1
Report Writer
Advanced Utility for Creating Customized Reports and Extracting Data
Part #280
User Manual
Version 7.3
Information in this document is subject to change without notice and does not represent a commitment on
the part of Data Pro Accounting Software, Inc. The software described in this document is furnished under
a license agreement or nondisclosure agreement. The software may be used or copied only in accordance
with the terms of those agreements. The purchaser may make one copy of this software for backup
purposes. No part of this manual or other materials included with the package, may be reproduced or
transmitted in any form or by any means electronic or mechanical, including photocopying and recording
for any purpose, other than the purchaser’s personal use, without the written permission of Data Pro
Accounting Software, Inc.
© 1985-2008 Data Pro Accounting Software, Inc.
Data Pro Accounting Software is a trademark of Data Pro Accounting Software, Inc.
No investigation was made into the common-law trademark rights of any word. Every effort was made to
capitalize or highlight, in some manner, any word with current registrations.
All companies, products, addresses, and persons contained herein are intended to be completely fictitious
and are designed solely to document and exemplify the use of Data Pro Accounting Software, Inc.’s
products.
Page i
This page intentionally left blank.
Page ii
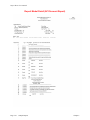
TABLE OF CONTENTS
Description
Page
CHAPTER 1 INTRODUCTION ............................................................................................... 1-1
GENERAL CONCEPTS .....................................................................................................................1-2
SYSTEM INTEGRATION..................................................................................................................1-3
DATA FILE DESCRIPTIONS ...........................................................................................................1-4
REPORT WRITER DATA FILE, FIELD, AND INDEX DESCRIPTIONS .................................1-5
File List.............................................................................................................................................................. 1-5
CHAPTER 2 CREATE OR MODIFY REPORTS.................................................................... 2-1
GENERAL OVERVIEW.....................................................................................................................2-1
BASIC REPORT DESIGN..................................................................................................................2-1
SET UP CUSTOM FILE DEFINITIONS..........................................................................................2-2
CUSTOM FILES..................................................................................................................................2-2
Add Mode (RW0410) ........................................................................................................................................ 2-2
CUSTOM FILE OVERHEAD ............................................................................................................2-3
CUSTOM FILE DETAIL LINES.......................................................................................................2-3
Change Mode (RW0411)................................................................................................................................... 2-4
Delete Mode (RW0412) .................................................................................................................................... 2-5
Copy Mode (RW0413) ...................................................................................................................................... 2-5
SET UP REPORT MODELS ..............................................................................................................2-6
Add Mode (RW0401) ........................................................................................................................................ 2-6
Report Overhead........................................................................................................................................ 2-6
Report Detail Lines.................................................................................................................................... 2-7
Single Match or Beg/End Range ............................................................................................................... 2-9
Heading Lines.......................................................................................................................................... 2-16
Change Mode (RW0402)................................................................................................................................. 2-18
Delete Mode (RW0403) .................................................................................................................................. 2-18
Copy Mode (RW0404) .................................................................................................................................... 2-18
PRINT MAINTENANCE REPORTS ..............................................................................................2-19
Report Model Listing (RW0201)..................................................................................................................... 2-19
Report Model Detail (RW0202) ...................................................................................................................... 2-19
EXPORT/IMPORT REPORTS ........................................................................................................2-20
Export a Report Model (RW0405) .................................................................................................................. 2-20
Import a Report Model (RW0406) .................................................................................................................. 2-21
SET UP MASTER INFORMATION ...............................................................................................2-22
Change Master Configuration (RW0490)........................................................................................................ 2-22
MAINTAIN DATA FILES (RW0491) .............................................................................................2-24
MAKE COMPLETE DATA BACKUPS .........................................................................................2-25
CHAPTER 3 PRINT CUSTOM REPORTS ............................................................................. 3-1
PRINT CUSTOM REPORTS (RW0101)...........................................................................................3-1
Enter Statistics......................................................................................................................................3-2
CHAPTER 4 DESIGNING CUSTOM REPORTS................................................................... 4-1
BASIC REPORT DESIGN..................................................................................................................4-1
SAMPLE "LISTING" REPORT........................................................................................................4-2
SAMPLE “TRANSACTION” REPORT ...........................................................................................4-3
SAMPLE “MULTI-LEVEL” REPORT ............................................................................................4-7
CHAPTER 5 SAMPLE REPORTS........................................................................................... 5-1
INDEX............................................................................................................................................ 1
Page iii
Report Writer User Manual
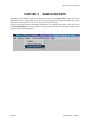
CHAPTER 1
INTRODUCTION
This chapter covers several of the general concepts of how to use the Infinity POWER Report Writer module.
This software program provides a very powerful tool, which not only allows the ability of creating and calculating
customized reports, but also provides a tool designed to extract data out of the Infinity POWER data files to be imported into other software applications.
This may include other accounting systems, spreadsheets, databases, word processors and other customized utilities.
The key is that this module provides specific control over how information within the Infinity POWER modules
may be reported or exported to other applications. This same feature, however, would also allow you to conveniently re-import any data back into any number of Infinity POWER accounting modules, all of which contain File
Import capabilities. This section also discusses some special features of this program.
Simply stated, a Report Writer is a program, which allows the user to create customized reports from a pre-existing
data base (collection of data files). This program allows for much of the technical design capabilities necessary for
sophisticated reporting in a format that is easy to use by non-programmers.
Infinity POWER has successfully integrated these design considerations into an extremely powerful, yet easy to
use package, called the Infinity POWER Report Writer module.
The Report Writer module allows user definition of all report characteristics including page size, page width, headings, default output device (printer, screen, disk file, etc.), as well as the actual report contents.
All reports may be completely file relational using as many Infinity POWER files at any one time as your system's
memory and operating system configuration will allow. This means that you can combine information from any Infinity POWER accounting programs into a single report.
This could include information from General Ledger, Accounts Payable, Payroll, Job Cost, Manufacturing Inventory, etc., all on the same report! You also have the flexibility of combining multiple reports to create extremely
complex reporting capabilities.
All reports allow you to display information stored in most Infinity POWER data files. Advanced features such as
user definable custom file definitions, variables, statistics, and formulas allow for even greater flexibility in the generation of custom reports.
Complex arithmetic formulas may include variables, file information or other formulas. Additionally, complete subtotaling and grand totaling is available in all numeric fields - including formulas!
Flexible report definitions allow you to specify file search, selection (Boolean comparisons), and masks (field wildcards) on most fields within the data files used. These definitions may be hard coded in the report or instructed to
prompt the user each time prior to the report being printed.
In addition, you can optionally use the automatic report spacing feature to let the system design your report columns' spacing, and the auto-calculation of heading lines to retrieve Infinity POWER field default descriptions.
However, you can override these defaults at any time and define your own.
This module utilizes the same consistent Infinity POWER interface for ease of use and simple operation. As an additional convenience, a new Word Processor style interface is included for the editing of report headings.
Virtually every existing Infinity POWER report can be generated by the Report Writer module, plus an infinite
number of new reports!
As you can see, the Infinity POWER Report Writer gives you the power of a systems level programmer in a simple to use non-programmer's package.
Chapter 1
Introduction
Page 1-1
Report Writer User Manual
GENERAL CONCEPTS
Although the Infinity POWER Report Writer is extremely easy to use, it is important to understand the general
concepts behind the structure of a report. Once you understand these concepts, the design and creation of a report
will proceed very rapidly.
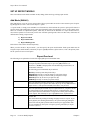
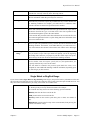
Most Infinity POWER reports contain the following elements:
Report Width
The maximum number of characters on a single line of the report. Normally,
printers are designed to print 10 and/or 16.5 characters per horizontal inch. On
an 8 1/2 by 11 printed page this allows 80 (or 132) character report width, respectively.
Lines per Page
The maximum number of lines on a page. Most printers are designed to print 6
and/or 8 lines per vertical inch. On an 8 1/2 by 11 printed page this allows 66
(or 88) lines per page, respectively. Laser printers normally allow for 60 lines
per page.
Printed Lines per
Page
The maximum number of actual printed lines on a page. Most reports are designed to print a one inch header and one inch footer. Normally, on a printed
page with 66 (or 88) lines per page, the printed lines per page would be 54 (or
72), respectively. This number cannot be greater than the total number of lines
per page.
Report Title and
Heading
The maximum title is two lines of 40 characters and will be centered. The
maximum heading is four lines of 132 characters.
Report Body Control
This is the method in which information is retrieved from the data files for presentation on the report. This is the most difficult report writing concept for the
non-programmer to comprehend.
Report Body Detail
This is the actual printed body of the report based on the information retrieved
by the Report Body Control. The printed body may consist of the following
items:
a. DP Fields: These are the values or pieces of information retrieved from the
Infinity POWER data files. These could be in the form of text, numeric or alpha/numeric information. In order to print this information, it must be retrieved
during the Report Body Control step.
b. Text: This is fixed text (or constant) that should print at a specific location
within the body of the report.
c. Statistics: These are numeric values, which may be entered periodically.
These values may be used in formulas or printed directly on the report.
d. Formulas: These are numeric values, which can be calculated based on
mathematical equations. Each formula may include DP fields, statistics or other
formulas.
e. Totals: These are accumulations of numeric values that are summarized and
printed on the report.
Often, when using a software package, it appears as though information magically appears on your screen. In actuality, the program was specifically designed to retrieve this information based on some objective criteria.
Information is stored on your disk in data files. Normally, these data files contain a number of similarly structured
pieces of information called records. Each record is subdivided into fields.
The magic of retrieving this information is performed by the program. Normally, programs use a technique called
indexing to allow quick access to the information. Using an index is like alphabetizing certain fields within the file,
independent of one another.
Page 1-2
Introduction
Chapter 1
Report Writer User Manual
For instance, you may have a data file which contains all of your customer address information. Each record within
the file contains a single customer's address information. Each customer's record may be subdivided into these
fields; customer number, customer name, customer phone number, customer address, customer credit limit, etc.
This customer file could be indexed on the customer number and customer name. Therefore, when you input the
customer number or name, the program can automatically retrieve the entire customer address record. This index is
also called a search field, since the records within the file are searched by this index for retrieval purposes.
In the customer file described above there are two search fields. Therefore, if you wanted to create a report called
Customer Listing, you would have to tell the program to search by either the customer number or name.
In order to retrieve data from a file you must tell the report how to retrieve it. This concept is called the search
method. Every time a file is used on a report, you must specify its search method as well as a Data Source. There
are three different data sources available in the Infinity POWER Report Writer. This allows you to use a specific
default data file or other data file which may be from a different company or year. You may also custom configure
a data file to be sorted in a unique way.
Another important concept in the Report Body Control is that of selection criteria. Selection criteria tells the program whether to include a particular record on a report based on Boolean comparisons (such as >, <, =, >=, <=, < >,
etc.).
For example, on the Customer Listing described above, you could instruct the program to only include those customer records that have a customer credit limit greater than or equal to $1000. The report would still be sorted in
customer number or name order; however, all customers with credit limits less than $1000 would be omitted.
SYSTEM INTEGRATION
The Report Writer module integrates with all other Infinity POWER modules. All Reports may retrieve information from as many Infinity POWER files at any one time as your system's memory and operating system configuration will allow. Each file could be from a different module, if desired. There is no set up required.
These products data file structure are completely different than that of Infinity POWER products, thus making direct access to their data files impossible.
Infinity POWER Report Writer allows for the ability to create new custom files that can be added as accessible
data files through Report Writer. This integration will allow you to create your own combinations of non-standard
data (e.g., merge customer files from three different companies, sort an existing file on a specific field or fields) and
then create reports that will access this custom data.
These custom files will allow you to define up to five (5) sort keys that may have up to five (5) sub-keys. This function will allow you to create reports that provide easy sorting capabilities beyond the normal indexed keys found
within each module.
For instance, you may easily create a report for AR customers that is sorted in Zip Code order instead of one of the
normal three key fields (customer number, name, special field).
This custom capability also means that you can create reports that combine data not only across companies, but fiscal years as well. Therefore, reports could be generated showing a five year historical trend for a specific range of
customers, vendors, employees, etc.
After reports are created, the Report Writer has the capability of exporting/importing these reports. If Custom File
Definitions were used in the report, these are also exported and imported. It also performs a verification check to see
if the Custom File Definition already exists, and renames it to another name so that no data is lost.
All in all, the levels of integration that can be found with the Report Writer module are very powerful. Take advantage of the power and see how much you can do with all of the data to be found throughout the Infinity POWER
line of products!
Chapter 1
Introduction
Page 1-3
Report Writer User Manual
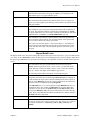
DATA FILE DESCRIPTIONS
The report Writer module utilizes the following data files:
1) Master Configuration
2) Report Model File
3) Report Model Detail File
4) Search Criteria File
5) Custom File Definitions
6) Custom Detail File Definitions
File Name
Description
Master Configuration File
(filename: SYSRW0.dbf)
This file contains certain configuration information, such as auto-spacing
offset, password configuration, etc.
Report Model File
(filenames: SYSRW1.dbf
and SYSRW1.mdx)
Report Detail File
(filenames: SYSRW2.dbf
and SYSRW2.mdx)
These files contain all overhead information pertinent to each report,
such as titles, headings, report width, lines per page, report password, etc.
Search Criteria File
(filenames: SYSRW3.dbf
and SYSRW3.mdx)
Custom File Definition
File
(filenames: SYSRW4.dbf
and SYSRW4.mdx)
Custom File Key File
(filenames: SYSRW5.dbf
and SYSRW5.mdx)
These files contain all of the BEGIN FILE line types for the SINGLE
MATCH and BEG/END RANGE search types used in the reports.
These files contain all of the information concerning each reports' actual
printed detail, such as specified data files, fields, text, formulas, totals,
statistics, print formats, etc.
These files contain all of the information concerning each Custom File
Definition overhead information, such as file name, file type, number of
records, last update date and time, etc.
These files contain all of the information concerning the detail customization within the Custom Files. This information includes the key types,
key numbers, key descriptions, sub-key information, etc.
NOTE
All of these files reside in the default program path (i.e. POWER) since they
are considered program control files, instead of the data path. Therefore, during your normal backup procedures you should take specific steps to make
certain that you also backup the Report Writer files.
Page 1-4
Introduction
Chapter 1
Report Writer User Manual
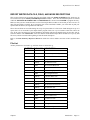
REPORT WRITER DATA FILE, FIELD, AND INDEX DESCRIPTIONS
This section references the accounting data files and fields within each Infinity POWER data file which may be
accessed and used by the Infinity POWER Report Writer module. These file and field descriptions are located
within the FILEINFO.dbf FLDINFO.dbf and NDXINFO.dbf files located in the POWER or program directory.
Make sure that you have loaded the latest version of the Report Writer module to insure that you have access to as
many files and fields as possible. By reviewing the lists of files and fields available, you will be able to plan your
report models in advance, saving much time and effort.
These files and fields are accessible during the set up of report models. If a field is not found during the set up of a
report, then it is not accessible by the Report Writer program. There are very few instances where this will be the
case. At the top of each page for each file definition, the heading will state the module name, the next line will describe the data file. The “token name” is the four character name that the Report Writer module uses to specify data
file access, which is located at the beginning of each file name description.
Refer to the Data Dictionary Reference Manual to outline the various modules and each of their available data
files.
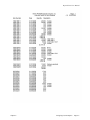
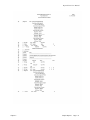
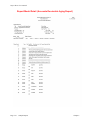
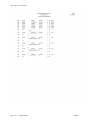
File List
All array field choices enclosed in [ ]. All field values are enclosed in { }.
Chapter 1
FILETYPE FILE NAME
DESCRIPTION
AP00
coAP0
Accounts Payable Configuration
AP01
coAP1dy
AP Vendor File
AP02
coAP2
AP Open Item File
AP03
coAP3dy
AP Transaction File
AP06
coAP6
AP Overhead Batch File
AP07
coAP7
AP Detail Batch File
AP10
coAPA
AP Recurring Expense File
AR00
coAR0
AR Configuration File
AR01
coAR1dy
Customer Master File
AR02
coAR2
AR Open Item File
AR03
coAR3dy
AR Transaction File
AR04
coAR4dy
AR Transaction Detail File
AR05
coAR5dy
AR Salesman File
AR06
coAR6dy
AR Tax Rate File
AR07
coAR7dy
AR Sales Code File
AR08
coAR8
Ship to Address File
AR10
coARA
Cycle Invoice File
AR15
coARF
AR Price Plan File
AR20
coARK
PS Register Balance File
AR21
coARL
PS EDC Configuration File
Introduction
Page 1-5
Report Writer User Manual
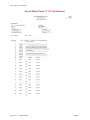
Page 1-6
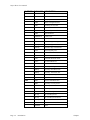
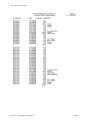
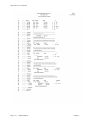
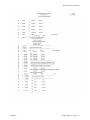
FILETYPE FILE NAME
DESCRIPTION
AR22
coARM
PS EDC Audit File
CPY
coCPY
Company
CR00
coCR0
Master Configuration File
CR01
coCR1
Checking Account File
CR02
coCR2
Account Detail File
CR03
coCR3
EFT Configuration File
CR04
coCR4
EFT Detail File
CRNC
CURRENCY
Country File
CTRY
COUNTRY
Country File
GL00
coGL0
General Ledger Configuration
GL01
coGL1dy
General Ledger Accounts
GL02
coGL2dy
General Ledger Transactions
GL04
coGL4
Recurring Entry File
GL05
SYSGL5
Consolidation Entities
GL06
coGL6
Financial Statement File
GL07
coGL7
Financial Statement Detail
GL10
coGLA
Overhead Batch File
GL11
coGLB
Detail Batch File
IM00
coIM0
Inventory Configuration File
IM01
coIM1dy
Inventory Item Master File
IM02
coIM2dy
Inventory Transaction File
IM03
coIM3
Inventory Assembly File
IM04
coIM4
IM Price Plan Master File
IM05
coIM5
IM Price Plan Detail File
IM06
coIM6
Inventory Cost Layer File
IM07
SYSIM7
Inventory Location File
IM08
coIM8
Inventory U/M File
JC00
coJC0
Job Cost Configuration
JC01
coJC1dy
Job Cost Project File
JC02
coJC2dy
Job Cost Project Detail File
JC03
coJC3dy
Job Cost Transaction File
JC04
coJC4
Job Cost Cost Code File
NOTE
coNOTES
Notes
Introduction
Chapter 1
Report Writer User Manual
Chapter 1
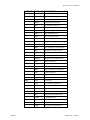
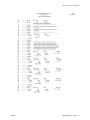
FILETYPE FILE NAME
DESCRIPTION
PO00
coPO0
Purchase Order Configuration
PO01
coPO1dy
Purchase Order File
PO02
coPO2dy
Purchase Order Detail File
PO03
coPO3
PO Temporary Work File
PO04
coPO4
PO Batch File
PR00
coPR0
Payroll Configuration
PR01
coPR1cy
Payroll Employee File
PR02
coPR2cy
Payroll Transaction File
PR03
coPR3cy
Payroll Department File
PR04
coPR4
PR Special Pay Types File
PR05
coPR5
Payroll Tax Table File
PR06
coPR6
Payroll Employee Comments File
PR07
coPR7
PR Workers' Comp Class File
PR11
coPRB
Current Pay Data Work File
PR12
coPRCcy
PR Detailed Transaction File
PR22
CoPRMcy
PR Historical Accumulator File
PT01
coPT1
Address Book File
PT02
coPT2
Calendar File
PTR
PRINTERS
Printer File
SD00
coSD0
Support Database Configuration
SD01
coSD1
Serial Number File
SD02
coSD2dy
Support Ticket File
SD03
coSD3
Contract File
SD04
coSD4
Tickler File
SO00
coSO0
Sales Order Configuration
SO01
coSO1dy
Sales Order File
SO02
coSO2dy
Sales Order Detail File
SO03
coSO3
Sales Order Work File
SO04
coSO4
Picking Ticket Rpt Work File
SS00
SYSSS0
Configuration File
SS01
SYSSS1
User File
SS02
SYSSS2
Group File
SS03
SYSSS3
User/Group Assignment File
Introduction
Page 1-7
Report Writer User Manual
Page 1-8
FILETYPE FILE NAME
DESCRIPTION
SS04
coSS4
Permissions File
SS05
SYSSS5
Authority File
SS06
SYSSS6
Company Directory File
SS08
SYSSS8
Activity Log File
SS09
SYSSS9
Custom Object File
TE00
coTE0
Timesheet Entry Configuration
TE01
coTE1
Timesheet Entry File
TE02
SYSTE2
Timesheet Form
Introduction
Chapter 1
Report Writer User Manual
CHAPTER 2
CREATE OR MODIFY REPORTS
This chapter provides you with a step-by-step procedure for the initial set up of your custom report models. It also
discusses some of the steps necessary for routine maintenance within this system. The contents of this chapter follow the sequence in which the options appear on the “Set Up Report Models” menu.
GENERAL OVERVIEW
The Report Writer module is a special program which may be executed by the “Infinity POWER Systems Menu.”
Once you have installed this module, reviewed the System Overview chapter, and set up Master Information, you
will be ready to set up your custom report models.
For your convenience, a number of sample reports have already been predefined within the Report Writer. It is recommended that you review these reports before creating your own report models, so that you can learn from these
examples. If you intend to create similar reports, you can modify or copy existing reports to simplify the process.
You may also delete any sample reports at your discretion.
NOTE
Refer to Chapter 5 Sample Reports to import the report models.
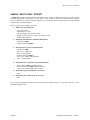
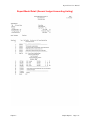
BASIC REPORT DESIGN
One of the most important steps in accomplishing any goal is to clearly define what that goal is. The reason for creating any report is to provide you with information that is useful towards specific company goals. These goals may
range from basic auditing needs, to financial accounting needs, to strategic management requirements, and so on.
After you have defined your reporting needs, then it is important to understand where the information is stored
within your accounting data files, and how to retrieve this information for presentation on your report.
The following general steps are recommended to design your report:
1.
Define your reporting needs. Determine the purpose of the report and what information you need. It may
be customer address information, inventory cost information, employees' year-to-date federal withholding,
etc.
2.
Identify what data files contain this information. Since your accounting systems contain a number of
data files, (each containing different information) you must determine where the information is located
For instance, customer address information is stored in the Customer File (AR01), inventory cost is in Inventory Item File (IM01), employees' year-to-date federal withholding is located in the Employee File
(PR01), etc.
3.
Determine how to retrieve this information. Determine the method of retrieving the data and getting the
information in the sorted order to accomplish your report. For instance, suppose you want to print all customer addresses for each customer. Determine if you want the customers listed in numeric order by customer number, or if you want the customers listed alphabetically by customer name.
This criteria is established when a file is opened and you are asked for a “Key Number.” This key number
tells the system how to “sort” the file. Each data file has one or more keys which you can individually
choose to sort the file. If there is a need to sort the file in some other manner other than the normal sort
keys, the “Custom File” is your answer. By creating a custom file, you can design how the data will be
sorted. You may use just about any data field in the data to sort the data.
4.
Determine if special selection criteria is needed. Selection criteria allow you to either include or exclude
certain data file records based on some value within the data file.
Chapter 2
Create or Modify Reports
Page 2-1
Report Writer User Manual
For instance, you could specify to print only those customers on a customer list, which have a credit limit
over $1000, and are located in Florida. This can be accomplished either upon opening the data file and
choosing the search types; Single Match, Begin/End Ranges or by using a “criteria” statement in the
body of the report before printing any of the data.
5.
Determine where to print the requested information. Decide exactly which data fields to print and determine how you want this information aligned on the report. For, instance, you could specify your customer list to print a single customer per sheet of paper, print on a mailing label, print in a columnar format
or print to a text file to create a file which can be used to import information into another program.
6.
Decide if special calculations are necessary. If the information you need is not in a data file in “final
form,” you may need to perform mathematical calculations, which are know as “formulas.” For example,
if you wanted to print the average employee year-to-date federal withholding, you would take the year-todate withholding figure from the Employee File, then divide it by 12 months.
7.
Identify if any column totals are necessary. Decide if you want any of the numeric fields totaled and
printed at the end of a file section as a subtotal and/or printed at the end of the report as a grand total. This
function may be accomplished using “Prt Totals,” on numeric data fields. If you are using a ”formula” to
produce a given result that will need to be totaled, you will also need another formula to accumulate the results of the first formula.
After you have completed these steps, the actual set up of the report should be a relatively easy procedure. Please
refer to Chapter 4 for examples of the primary types of reports you may want to print. Prior to setting up report
models, you must select the option, “Change Master Configuration” found in this chapter.
SET UP CUSTOM FILE DEFINITIONS
After selecting the Report Writer Module, proceed to select, “Set Up Report Models.”
If your custom report will require a “Custom File,” you will need to select “Set Up Custom Files.” This option is
used to create a file in a different sort other than what is normally available. It may also include information from
other systems that would not normally be accessible through the Infinity POWER data files.
CUSTOM FILES
This option allows you to inquire, add, change or delete “Custom File Definitions.”
A Custom File Definition creates a method of uniquely sorting a data file using the original Infinity POWER accounting data file. This new data file can then be accessed in the report model and used to sort the information as
established in the custom file definition.
The Infinity POWER data files are capable of being sorted by their predefined sort keys. Custom File Definitions
allow the user to create new data files with the sort required to accomplish their reporting need.
After creating a custom file definition, you must “merge” the data from the original data file by issuing certain
commands from within the Report Detail Lines section of the report model. This “merge” command will actually
create and randomly name an additional set of data files (.dbf & .mdx) and place them in the data directory.
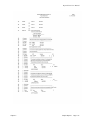
Add Mode (RW0410)
There are two areas, which must be defined when creating a custom file:
1) Custom File Overhead
2) Custom File Detail Lines (sort keys)
When you select to add a “Custom File” you must specify the custom file number. Each custom file must be assigned a Custom ID number, which may be up to ten (10) characters (alpha/numeric). This is the primary number
the system will use to track custom files.
Page 2-2
Create or Modify Reports
Chapter 2
Report Writer User Manual
CUSTOM FILE OVERHEAD
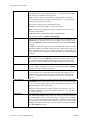
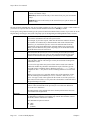
The following is an explanation of the two (2) data items present, when adding a Custom File Definition.
Description
File Type
This is the custom file definition description. Use this description to briefly define the custom file you will be creating. An example may be, “AP Trans.
sorted by GL acct.” This description may be up to thirty (30) characters (alpha/numeric).
This field is used to define which of the Infinity POWER data files will be
used as a pattern to create the new custom file.
Typically, you will choose an account master file or transaction file, however,
all files are available except the Master Configuration files for each accounting
program. This is due to the fact that these files do not have index (.mdx) files.
Delete File?
These are the only fields that are required for the overhead section of the custom
file. However, when this custom file is used in a report model and the new data
files are created, the following information is added to the overhead and can be
viewed under the change or inquiry mode of “Custom Files.”
This button is only available once the custom file has been created. It allows
you to delete the actual data files which were created by running a report using
this Custom File Definition.
Usually, this should only be performed if you have decided to make a change to
the Custom File Definition. This will ensure that the next time the report model
is run; a new set of data files will be created with the sort change.
File Name
This is the file name that is randomly issued to the newly created custom file. It
creates a data file (.dbf) and an index file (.cdx or .mdx) and places them in the
data directory.
# Records
This field is updated with the number of records the custom file contains every
time the custom file has been changed or updated. Normally, this will occur
when a “Merge” line type is used in the Report Detail Line section of the report
model.
Updated
This field is updated with the date and time every time the custom file has been
changed or updated. Normally, this will occur when a “Merge” line type is
used in the Report Detail Line section of the report model.
CUSTOM FILE DETAIL LINES
The Custom File Detail Lines control the actual sort method that will be used when the custom file is created.
Once you have completed entering the Custom File Overhead information, a new scrolling data entry screen will
appear which allows the input of thirty (30) detail lines.
Each Infinity POWER data file can be sorted in up to five (5) different major key sorts. Within these major key
sorts, you can have five (5) different sub-key sorts.
For example, you want to sort the Accounts Payable transaction file by general ledger account number. You would
also like this data sorted by vendor number and then by date.
The Key Sort would be the general ledger account number and the sub-key sorts would be the vendor number and
date. This example only shows one (1) Key Sort with three (3) sub-key sorts.
Chapter 2
Create or Modify Reports
Page 2-3
Report Writer User Manual
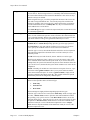
The following is an explanation of each of the data fields on this detailed portion of the screen:
Item #
This field is numeric field (1-5) used to enter the sequence number of the Key
fields.
Description
This is a thirty (30) character (alpha/numeric) field, which is the description for
the Key you are defining. This description will appear in a “pop-up” box on the
“Key Number” field when you select a ”Begin File” line type in the Report Detail Line section of the report model.
Unique
This data defines whether or not this Key is unique. For example, chart of account numbers are unique. You cannot have two charts of accounts with the
same account number. <Click> on the check box to define this Key as unique.
Item #
This field is numeric field (1-5) used to enter the sequence number of the Subkey fields.
Field Name
This is the field in which the sub-sort will be based on. This is a valid field
name within the file you have chosen.
Array 1
This field is used to define the first array of the field, if one is assigned.
Array 2
This field is used to define the second array of the field, if one is assigned.`
Sub Key Description
This is a thirty (30) character (alpha/numeric) field, which is the description for
the Sub-key you are defining. The description of the Key associated with this
sub-key will appear in a “pop-up” box on the “Key Number” field when you
select a “Begin File” line type in the Report Detail Line section of the report
model.
Custom File Definitions that are accessed within a report model will be automatically exported with the report
model when you select the option to “Export Report Models.”
When you import a report that contains a Custom File Definition the system will verify if there is a definition that
already exists with the same name.
If there is an existing Custom File Definition, the system will automatically rename the file and add a (-1) to the end
of the Custom File Definition number.
Results:
SYSRW4.dbf - Custom File Definition File
- Custom File Definition is added
SYSRW5.dbf - Custom File Key File
- Custom File Key detail lines added
Change Mode (RW0411)
This mode allows you to change information on an existing Custom File Definition.
If any mistakes were made during the set up process, you may return to the “Custom Files” option. This option will
allow changes to any information already entered as long as the custom data file has not been created through a report model.
Having created the custom data file, this file contains the data in the format in which the key sorts were defined in
the original Custom File Definition. If you are planning to change the sort keys or the sub-sort keys, you will need to
delete the custom data file.
Page 2-4
Create or Modify Reports
Chapter 2
Report Writer User Manual
First, you must navigate to the record you wish to change. You may find a record using the navigation tool bar or
<click> on the “Navigation” option on the Menu Bar and then the appropriate navigation option. If you are changing
a record, <click> on the “Modify the Current Record” button or choose the “Operation” option from the Menu Bar
and then “Change.” Make the changes required and <click> on the “Save” button to save your changes or <click>
on the “Cancel” button to cancel the changes made.
The “Delete” button will allow you to delete the custom data file created with the current key sorts. Once the file is
deleted, you will then be able to change any of the key sorts and/or sub-key sorts.
Results:
SYSRW4.dbf - Custom File Definition File
- Custom File Definition is modified
SYSRW5.dbf - Custom File Key File
- Custom Key File is modified
Delete Mode (RW0412)
This mode allows you to delete custom file definitions that you may have entered by mistake, or that you no longer
need. If a Custom File Definition has already been utilized in a report model and has created a Custom File, you will
need to delete that custom file through the “Change Mode” before deleting it through this option.
First, you must navigate to the record you wish to delete. You may find a record using the navigation tool bar or
<click> on the “Navigation” option on the Menu Bar and then the appropriate navigation option. This option allows
you to delete accounts that you may have entered by mistake, or you no longer want. <Click> on the “Delete the
Current Record” button or choose the “Operation” option from the Menu Bar and then “Delete.” This will place
you into the “Delete” mode, then <click> on “Save” to validate your deletion of this record.
Make sure this is what you want to do, because once a custom file definition is deleted, there is no way to retrieve it
again.
Results:
SYSRW4.dbf - Custom File Definition File
- custom file definition is marked for deletion
SYSRW5.dbf - Custom File Key File
- custom file keys are marked for deletion
Copy Mode (RW0413)
This mode allows you to create a new custom file definition by copying the information from an existing one. Using
this option, the system provides a quick method of setting up custom file definitions that are very similar. This may
apply in a situation where you want several variations of sort keys on the same file. First, you must navigate to the
record you wish to copy from. You may find a record using the navigation tool bar or <click> on the “Navigation”
option on the Menu Bar and then the appropriate navigation option. <Click> on the “Create a Record Based on the
Current Record” button or choose the “Operation” option from the Menu Bar and then “Copy.”
You will notice all the information, except for the Custom ID number, will be copied to a new record. Enter the new
account number for this record. At this point, you may choose to edit any of the information or <click> on the
“Save” button to validate, which will then add it to the file.
Results:
SYSRW4.dbf - Custom File Definition File
- Custom File Definition is added to file
SYSRW5.dbf - Custom File Key File
- Custom File Keys are added to file
Chapter 2
Create or Modify Reports
Page 2-5
Report Writer User Manual
SET UP REPORT MODELS
This section discusses the modes available to add, change, delete and copy existing report models.
Add Mode (RW0401)
This mode allows you to set up new report models. These report models are used to create custom reports for printing through the use of the “Print Custom Reports” option.
A “report model” is simply a user definable set of instructions, which informs the system to print specific data in a
specific format. This model must specify where the information comes from and how to use it on the custom report.
There are a number of sophisticated options, which may be utilized in the definition of a report model. However,
most of these options are not necessary for the more common reporting needs. There are three areas, which must be
defined when creating a report model:
1) Report Overhead
2) Report Detail Lines
3) Report Heading Lines
Each of these areas will be discussed separately.
When you select to add a “Report Model,” you must specify the report model number. Each report model must be
assigned a report model number, which may be up to eight (8) characters (alpha/numeric). This is the primary number the system will use to track reports.
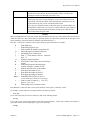
Report Overhead
The following is an explanation of each of the eight (7) Report Overhead data items.
Title
This is the primary report title. It is centered on the printed page when the custom report is printed. This name may be up to forty (40) characters (alpha/numeric). NOTE: Company name will automatically print; therefore, do
not include it in the title.
The following special commands may be utilized:
{DATE,#} Current system date plus # of days
{BEGMON,#} First day of current month (period) plus # of days
{ENDMON,#} Last day of current month (period) plus # of days
{BEGYR,#} First day of current year plus # of days
{ENDYR,#} Last day of current year plus # of days
Sub-Title
This is the optional secondary report title. It is centered underneath the Title
when the custom report is printed. This name may be up to forty (40) characters
(alpha/ numeric). The special commands, listed above, may be used.
Password
This is the optional password that may be required whenever you print or access
this report model. To turn password protection on, you must have the “password” option turned on in the Master Configuration to allow password protection on reports. This field may be up to eight (8) characters (alpha/numeric).
Headings
Default: On
This field controls the printing of headings and page breaks on a report. If you
specify (N)o by not checking the checkbox, the system will begin printing the
report at the current printer position and will not skip over page breaks when
they are encountered. (This option is helpful if printing ASCII files for import
into other software.)
Page 2-6
Create or Modify Reports
Chapter 2
Report Writer User Manual
If you specify (Y)es by <clicking> on the checkbox, the system will always
start and end a report at the top of a page. In addition, a new heading will be
printed at the top of every page within the report.
Page Numbers
Default: On
This field controls the printing of page numbers at the top of every page of a
report. If you specify (N)o by not checking on the checkbox, the system will not
print page numbers.
Page Width
Default: 80
This field allows you to specify the maximum horizontal width in characters of
the report. The maximum width for a printed report is 132 characters. NOTE:
the report width can be set to zero to allow exporting records that are wider than
132 characters to a “text file” or “comma-delimited file” type file.
Chained Report #
This field allows you to specify a report model that will always print after the
current report has printed. Simply enter the name/number of the report model
that you wish to attach to the current report model.
Then, when you select the option to “Print Custom Reports,” the attached report will always print immediately after the current report model. Form feeds
will be sent after each report. The next chained report will start at the top of a
new page.
Report Detail Lines
The Report Detail Lines control the actual printed body of the report. These lines may be set up or modified when
you <click> on the “Detail Lines” button. At this point, a new scrolling data entry screen will appear which allows
the input of up to 400 detail lines per report. The following is an explanation of each of the data fields on this new
screen:
Line Type
This field indicates the type of instruction that the current line represents.
NOTE: This line type will act as the “master control” for what other fields
will be asked for on each line. When you press <click> on the arrow button, a
“pop-up” window will display sixteen (16) line type choices.
The following cells describe a description of each of the line types.
DP Field
This option allows you to retrieve the field value from a specified DP File for
recognition of the field value for upcoming Criteria line types or to display as
a printed field on the report. This is the basic building block of most reports. In
order to use the DP Field, you must first specify which DP file the field will be
used from. This is accomplished by using a Begin File.
Some DP Fields have arrays. This means that a single DP Field may have several different values. For example, the DP Field for an Accounts Receivable
Customer's City has an array of (1) Bill To City and (2) Ship To City. When
you select the DP Field, “City,” the system will prompt you to enter either (1)
or (2). Refer to the Data Dictionary Reference Manual for a complete listing of
DP Fields with arrays and values.
Text
This allows you to place fixed text at a predefined place on the report.
Command
This allows you to place special printer control codes within the report body
(such as forced line feeds, character control codes, font changes, etc.). Some of
the popular commands are: {ASCII: ##}, {CR: #}, {NP}, {COUNT} and
{JPEG}.
Chapter 2
Create or Modify Reports
Page 2-7
Report Writer User Manual
ASCII:## is used for sending an ASCII code to the printer. This requires a two
(2) character ASCII code to be placed after the “:” to tell the system what character control code should be sent to the printer.
CR:# is used for sending a certain number of carriage returns to the printer.
This command requires and a number be placed after the “:” to tell the system
how many carriage returns to perform.
NP is used to send a new page command to the printer.
COUNT is used to count a number of records in a routine.
JPEG is used to send a graphic jpeg image to the printer as part of the form.
The entire command line is
{JPEG:linenumber,columnnumber,stretchpct,imagefilename}
or an example would be: {JPEG:10,30,15,dpa.jpg}
Begin File
This line type creates the beginning of a file section, which is terminated by the
End File line type. This file section serves two purposes. First, it allows you to
specify what DP File to retrieve information from and print using the DP Field
line types.
In addition, it defines the report control, which instructs the system how much
information should be read from the data file and in what order to retrieve it.
When you select this line type, the system will display a special data entry
screen, which allows you to specify the file information. The screen prompts are
as follows:
File ID
This prompt allows you to specify what DP File type is selected for this Begin
File. If you are not sure of the DP File you want to use, simply <click> on the
arrow button and scroll through the data file list to make your selection. The
type of file you choose will affect the way additional report criteria is utilized.
DATA SOURCE
This data field will define which data file will be used for this operation. A
”pop-up” window will appear when you press the space bar and press ENTER.
You may select any of the following choices:
Default Data File
This instructs the system to use the normal Infinity POWER data file (for the
current company in use) for the DP File type selected. For example, if you selected the DP File type of AR01, the system would use the coAR1dy.dbf file
(where “co” represents the current company in use and “dy” represents the
data year).
This instructs the system to use a different data file other than the normal Infinity POWER data file. This selection allows you to define a specific company's
file to use. This convention could be used to open and merge data from several
different companies in one report model.
Other Data File
Custom File
Page 2-8
Another use of this selection is to define a specific year's data file to use. You
are capable of defining a specific year or define a variable of + or - years from
the current year in use.
This instructs the system to use a Custom File that was created through the use
of a Custom File Definition. The system will prompt you for the Custom File
Custom ID number or allow you to create one, by <clicking> on the “Create”
button. Keep in mind, that this Custom Data File is referencing a physical data
file, which will only contain data by running a report writer model, which
“merges” data into this custom file. See the sections describing the “Merge”
and “Clear Merge” line types.
Create or Modify Reports
Chapter 2
Report Writer User Manual
SEARCH TYPE
This selection allows you to specify how the information should be retrieved
from this file. You may select any of the following choices:
None
This instructs the system not to attempt any new data retrieval; instead use the
data file information which has previously been retrieved.
Single Match
This tells the system to search for a matching item in the data file. Depending
on the DP File you choose to open, the predefined sort keys will be the basis for
the matching condition. For example, you could retrieve a customer's name
from the customer file based on a specified customer number.
Entire File
This instructs the system to sequentially retrieve each record from the DP file
chosen and continue through each of the line types defined in the report until it
reaches the End File line type. It will then retrieve the next sequential record
and continue through the report in the same fashion.
It will continue this procedure until it has reached the last record in the file. The
most common application for this is a quick listing that shows information from
each record within the file.
Beg/End Range
This allows you to retrieve all records in a specified range for the DP File you
choose to open. The predefined sort keys for this file will be the basis for the
matching condition. For instance, in the AR01 DP File, you could create a report, which includes all customers whose names start with the letters M through
Q.
Ask Beg/End
Range
This selection allows you to retrieve all records in a specified range for the DP
File you choose to open. The report model will prompt you for the beginning
and ending items each time you prepare to print the custom report. The predefined sort keys for this file will be the basis for the matching condition.
Keys
Since most of the data files contain several different ways to search for a record
(such as number, name, description, special field, etc.), this option allows you
to specify which sort key to use for the search.
You will either be returned to the previous report detail line screen, or be
prompted for some additional matching condition information, depending upon
the Search Type you have entered.
Single Match or Beg/End Range
If you selected either Single Match or Beg/End Range search types, the specified sort key information will be displayed on the lower half of the screen. You will be required to specify what criteria the report should search on. You
may select either a DP field from a previously retrieved file or a constant value.
Constant
The constant value is thirty (30) characters of text or numeric values, such as
the M and Q in the previously mentioned customer file example.
The constant value may also be one of the following special commands:
{BEGIN} Search on the first record in the file.
{END} Search on the last record in the file.
{DATE,#} Search on the current system date, plus or minus “#” number of
days.
{BEGMON,#} Search on the first day of the current month (fiscal period), plus
or minus “#” number of days.
Chapter 2
Create or Modify Reports
Page 2-9
Report Writer User Manual
{ENDMON,#} Search on the last day of the current month (fiscal period), plus
or minus “#” number of days.
{BEGYR,#} Search on the first day of the current fiscal year, plus “#” number
of days.
{ENDYR,#} Search on the last day of the current fiscal year, plus or minus “#”
number of days.
The date oriented commands may only be used when searching on a file with a sort key, which is a date variable. If
you wish to use a specific date as a constant, the date should be entered in a “mmddyy” format.
If you specify a Single Match search type, the system will ask for the Match Field (constant). If you select one of the
Beg/End Range search types, the system will prompt you for the Beginning and Ending Match Fields (constants).
Field
The Field selection tells the system to perform the retrieval from the current file
based on the information retrieved from a previous file.
For example, if you create a report, which lists all customers and their salesmen,
the customer file contains only a salesman number and not the salesman name.
Therefore, you could tell the system to retrieve the salesman name from the
salesman file, based on the DP Field for salesman number in the customer file.
When you select DP Field, the system will prompt you for the DP File and the
DP Field Name to base the retrieval on.
End File
This line defines the end of a file section. It can only be used with a previously
specified Begin File line type. Once you have specified an End File, the report
control will switch back to the previously specified file section, if applicable.
Criteria
This line type allows you to specify special selection criteria based on DP Fields
retrieved from a data file. This line type can only be used inside of a Begin File
and End File section.
A Criteria line type allows the system to filter certain records from a data file
and decide whether they should be included on the report. This line type compares DP fields to predefined values in Boolean (a term for >, <, >=, <= and <>)
comparisons. The “~” may also be used as a masking character in a Criteria line
type.
When a Criteria line type is specified, and the value of the comparison is false,
then all remaining lines within the file section, or until an “End Criteria” or
“Else” line type is used, will be ignored for the current record. The system will
then continue each record to see if it passes the criteria until it reached the end of
the specified range of records.
Prt. Total
This line type tells the system to automatically print totals for all DP fields with
numeric values and formulas in the previous file section that were defined as
“Print & Total” detail lines.
All totals printed, will be printed at the same column position and use the same
print format as the original field.
Formula
This line type allows you to calculate and/or print values that require some kind
of mathematical evaluation. The formulas may contain other formulas, numeric
DP Fields, statistics and numeric constants.
The mathematical operators include:
& (add)
+ (add)
- (subtract)
Page 2-10
Create or Modify Reports
Chapter 2
Report Writer User Manual
*
/
\
:
(multiply)
( normal division)
( divide with no remainder)
(round to nearest decimal place)
Each formula must have a Formula ID associated with it so that may be used in
other formulas or ID Criteria line types. It is the user's responsibility to name
these formulas and keep track of them. Formulas may be printed and totaled as
well.
Formulas can also be used to store numeric character information so that ID Criteria may be performed. This includes a numeric chart of account number, a date,
etc.
Statistic
This line type is used to create numeric variables which may be periodically
modified using the “Enter Statistics” menu option. These variables may be
printed or used in formula calculations.
ID Criteria
This line type is very similar to the Criteria line. However, its special selection
criteria are based on Formula or Statistic line types instead of DP Fields.
An ID Criteria line type can be used to tell the system whether a certain record
retrieved from a data file should be included on the report. This line type compares Formula or Statistic values to predefined values in Boolean comparisons.
When an ID Criteria line is specified, and the value of the comparison is false,
then all remaining lines within the file section, or until an “End Criteria” or
“Else” line type is used, will be ignored for the current record. The system will
then continue each record to see if it passes the criteria until it reached the end of
the specified range of records.
Else
This line type is used with a previously specified Criteria or ID Criteria line
type. If the Criteria or ID Criteria comparison is false, the system checks for an
Else statement. If an Else statement is found, the remainder of the detail lines
will be executed until an End Criteria, End File or Break statement is found. If
the Criteria or ID Criteria comparison is true, the statements following the Else
statement will not be executed. The Else statement is optional, but only one Else
statement per corresponding Criteria or ID Criteria can be used.
End Criteria
This line type defines the end of a criteria block. It is used with a previously
specified Criteria or ID Criteria line type.
Once you have specified an End Criteria, the report will execute the next statement. The system will automatically assume an End Criteria for each Criteria or
ID Criteria used in the report model when an End File line type is encountered.
It is recommended that End Criteria be specified for each Criteria and ID Criteria.
Comment
This line type is used to add comments to a report model. If a Comment statement is specified, the system will do nothing.
Comments are used to define what the report does and to add special instructions
that will be useful in determining what the report will be used for. Adding extra
comments for debugging at a later date is highly recommended.
Break
Chapter 2
This line type is used to escape from a file section. If a Break statement is found,
the remainder of the detail lines for this file section will be skipped. The report
will execute the detail lines after the next End File. For example, if a Criteria or
ID Criteria comparison is true and the remainder of the detail lines in that file
section don't need to be executed, a Break statement would ”escape” directly to
the End File line type and execute the next statement after the End File.
Create or Modify Reports
Page 2-11
Report Writer User Manual
Merge
This line type is used to add records from the file currently opened to an existing
Custom ID File. The file being written to is a randomly named file determined by
the Custom File Definition. This Custom File Definition is also where sort keys
and sub-sort keys are defined.
When using this line type, you will be prompted for the name of the Custom ID
you want to merge information into. You can only merge files with the same
format. For example, if the Custom ID File is in the format of the Accounts Receivable Transaction File, the ”coAR3dy.dbf” file, only records from that file
can be added to the Custom ID File.
If no Clear Merge line type is used in the report model, this Custom ID File will
be continually appended to.
Clear Merge
This instruction is used to clear a Custom ID File, before writing new information to it. This will allow the system to create a fresh new file each time this line
type is selected. Normally, this line type would be used prior to a Begin File line
type which will have a Merge line type defined within its file section.
Field Name/ID
This is a ten (10) character dual-purpose field to be utilized as a Field Name,
Formula ID, or a Custom ID depending upon the type of line type specified.
The Field Name is only used with DP Field and Criteria line types. It allows
you to specify the actual DP field to be used on the current detail line.
If the line type is Criteria, then the DP field selected will be used in conjunction
with a Boolean comparison to determine if the rest of the current file section
should be printed.
The ID field is only used with Formula, Statistic and ID Criteria line types.
With Formula and Statistic lines, it allows you to use the numeric value of this
line in formulas that are utilized in the report model. If you use the same ID on
multiple lines, the system will remember only the last value calculated. If the line
type is an ID Criteria, the ID tells the system which variable to use in the criteria
comparison.
NOTE: Normally, all variables are zeroed out between reports. However, a special feature called “global variables” allows you to pass Formula or Statistic
values between chained reports. To create a “global variable,” simply start an
Formula or Statistical ID with the letter “G.” This variable will then be passed
automatically between all contiguously chained reports.
Action
This field is only used on DP Field, Criteria, Formula and ID Criteria line types.
There are three possible choices for this line type:
•
Print Only
•
Print & Total
•
Don't Print
Their meanings are slightly different depending upon the line types.
If the line type is DP Field or Formula, then “Print Only” means to simply print
the value, “Print & Total” means to print the value and accumulate a total for
later printing, (only if field is numeric) and “Don’t Print” means to access the
field, but do not print it. If the line type is Criteria or ID Criteria, then you have
the options to “Execute if True” which means to execute the remainder of the
detail lines in this file section if the Boolean comparison is true or “Skip if
True” means to skip the remainder of the detail lines in this file section, if the
Boolean comparison is true.
Page 2-12
Create or Modify Reports
Chapter 2
Report Writer User Manual
Line
This field is only used on DP Field and Formula line types. This numeric field
instructs the report to advance the specified number of lines vertically before
printing the current field. Normally, this value is zero.
Col
This field is only used on DP Field, Text and Formula line types. This numeric
field instructs the report to begin printing the current value at the specified column number. This column number will be automatically calculated for you during the initial set up, but you can override this default value.
If you specify a column beyond the width of the report, the column number will
default back to Column One. If you specify a column within the report width, but
the length of the field being printed extends beyond the report width, the field
will be truncated at the report width.
Format
This twenty (20) character field is only used on DP Field and Formula line types. This field describes the manner in
which the current line value will be printed. It primarily defines the width of the printed field, decimal places and
special formatting. All special characters should be surrounded by braces { }.
If the line is a Formula or a numeric DP Field, the following special characters are available:
$
,
()
*
y
=
=
=
=
=
=
<> =
d =
b
=
a
z
p
n
m#,#
=
=
=
=
=
r
=
0
Print dollar sign
Print trailing negative sign
Print commas on numbers greater than 999
Surround negative numbers with braces
Pad leading zeros with asterisk
Print ”Y” if the numeric value is 1, otherwise
print ”N”
Alternate negative brackets
If DP field is a date field, prints in mm/dd/yy
format
Print blanks instead of decimal points
(number of blanks = number of ”Bs”
Print the absolute value of the number
Don't print the number if zero
Don't print the number if positive
Don't print the number if negative
Print MIDSTR of STR (only print a
certain amount of characters in a string)
Print reversed if comma (e.g., ”last, first”
prints as ”first, last”)
Print leading zeros on numeric values
If the DP field is a date field, then d is the special character used to print in a mm/dd/yy format.
For example, a fifteen character text field should have the following format:
15 or 15{}
If you want to print only the first five characters, then use the following format:
5 or 5{}
If you want to print a sixteen digit numeric field with two decimal places, a dollar sign, commas if the number is
greater that 999.999 and a trailing negative sign, use the following:
16.2{$-}
Chapter 2
Create or Modify Reports
Page 2-13
Report Writer User Manual
When using a DP field, the default format will automatically be supplied by the system. You may change this format
if you prefer.
Criteria
This twenty (20) character field is only used on Criteria and ID Criteria line types. This field allows you to define
the Boolean comparison that you want to perform on the DP field specified on this line.
The following comparisons are available:
>
<
>=
<=
=
<>
~
Greater than
Less than
Greater than or equal to
Less than or equal to
Equal to
Not equal to
Perform a mask (wildcard) comparison
All of the above comparisons may be used with text values. The mask comparison is especially useful since it allows
positional comparison within text values.
Therefore, the mask “??111??” would evaluate as true with “1211177,” “4411156” and “1111111,” but would be
false with “1121111.”
This field may specify a constant value, such as:
>=1000
which will be evaluated as “the current DP Field, Formula or Statistic value is greater than or equal to 1000.”
In addition, you may specify a prompt value, which will ask you for the criteria value each time before you print the
custom report. For example, the criteria statement:
<{ASK, What Quantity?}
will prompt you each time you print the custom report with:
What Quantity?
The value you enter will be evaluated in the criteria statement as “the current DP Field, Formula or Statistic is less
than your input value.”
Multiple criteria statements may be used on subsequent detail lines to check for values within a range, such as:
>=100
<=200
The net evaluation would be “the current DP Field, Formula or Statistic is between the range of 100 to 200, inclusive.”
This criteria value may also be used in date comparisons. If the value entered is a constant, it must be in the
“mmddyy” format. The following special date commands are also available:
{DATE,#}
Compare on the current system date, plus or minus “#” number of days.
{BEGMON,#}
Compare on the first day of the current month (period), plus or minus “#” number of days.
{ENDMON,#}
Compare on the last day of the current month (period), plus or minus “#” number of days.
{BEGYR,#}
Compare on the first day of the current accounting year, plus “#” number of
days.
{ENDYR,#}
Compare on the last day of the current accounting year, plus or minus “#” number of days.
Page 2-14
Create or Modify Reports
Chapter 2
Report Writer User Manual
.
For instance, the criteria statement:
>={DATE,30}
will evaluate “the current DP Field's date value is greater than or equal to thirty days from the current system
date.”
The criteria value may also include a DP Field, Formula or Statistic value for its comparison.
For instance, the criteria statement:
={GL01:account}
will evaluate “the current DP Field is equal to the DP Field `account' in the `GL01' data file.”
An example Formula criteria statement is:
<>{A1}
which, evaluates as “the current DP Field, Formula or Statistic is not equal to the ‘A1’ Formula value.”
NOTE
All comparisons using DP Fields, Formulas and Statistics as part of the comparison criteria statement must have the same variable type as the DP Field
being compared to (e.g., DATE compared with DATE, TEXT compared with
TEXT, NUMERIC compared with NUMERIC).
Ask Stat Description
This twenty (20) character field is only used on Statistic line types. This field
allows you to define the screen prompt which will be used when you select
the option to “Enter Statistics.”
Text
This seventy (70) character field is only used on Text line types. This field
allows you to specify all text that is to be printed on the current detail line.
Formula
This seventy (70) character field is only used on Formula line types. This
field allows you to create a mathematical equation, which will be associated
with the current detail line and the ID used by the current line.
The equation specified may include complex multi-leveled steps which include other values represented by ID's (Formulas and Statistics line types), as
well as DP Fields. The following formula uses many of these elements:
(12 * {A}) / (10 & ({IM01:QTY} * .5))
This formula displays an ID value, surrounded by {} and identified as variable A. The DP field value QTY from the file IM01 is also represented. Note
that both variable and DP field are surrounded by {}.
These must be supplied in order to designate them as special values.
In addition, all variables or DP Fields used in a formula must be previously
defined in the report model, whether they are printed or not.
If A equals 10 and IM01:QTY equals 20, then this formula would be evaluated as:
(12 * 10) / (10 & (20 * .5))
(12 * 10) / (10 & 10)
(12 * 10) / 20
120 / 20
6
Chapter 2
Create or Modify Reports
Page 2-15
Report Writer User Manual
Command
This seventy (70) character field is only used on Command line types. This
field allows you to define special printer control codes within the report body
(such as forced line feeds, character control codes, font changes, etc.).
The following commands are available:
{NP} This command forces the report to perform a new page.
{CR:#} This command tells the program to print a number of carriage returns.
The “#” in the command represents a numeric value (e.g., 1-66), or a formula
name which contains the number of carriage returns to perform. For example, {CR:4} or {CR:{number}} where “number” is a formula name.
The most common use of this feature is when you are creating report writer
models to emulate the printing of forms such as invoices, statements, purchase orders, or checks.
{COUNT} This command tells the system to increment the “* Number of
items printed:” counter. This will count the number of items printed within
the current file section and include this number at the end of the report.
{ASCII:#,#...,#} This command forces the #'s specified to be printed as ASCII values to the output device. This is useful in switching fonts, printing bar
code or any number of other special printer functions.
An example of the use for this command is the printing of the City, State, Zip
Code address line, where the State should be printed two spaces after the
City, and the Zip Code should be printed one space after the State.
The command {ASCII:32,32}, where 32 is the decimal value for a space
would give two spaces if used after the City is printed. The State should then
be printed at column position minus one (-1), then another {ASCII:32} would
give another space before the Zip Code is printed.
Heading Lines
The Report Heading Lines are the fixed column headings that are included at the top of every page. Normally, these
headings correspond to the detail lines defined in the body of the report.
The heading lines may be set up or modified if you <click> on the “Headings” button on the report overhead screen.
The following is an explanation of each of the data items on this new screen:
Generate
By <clicking> this button the system will automatically create the column descriptions in the heading lines based on
the report detail lines. These descriptions are based on the DP Field default descriptions.
A special “word processor” type data entry format is utilized to allow set up of all four heading lines. The width of
this field may be up to 132 characters wide, but will never be greater than the actual report width.
NOTE
To properly align column headings, a ~ or ` character must be placed at the
last position of the column. The ~ (tilde) will left justify the text and the
` (acute) will right justify the text.
Page 2-16
Create or Modify Reports
Chapter 2
Report Writer User Manual
Once you have completed the report model set up, you may <click> on the “Save” button to validate or <click> on
the “Cancel” button to cancel all changes.
Results:
SYSRW1.dbf - Report Model File
- Report Model is added
SYSRW2.dbf - Report Detail File
- Report Model Detail Lines are added
SYSRW3.dbf - Search Criteria File
- Search Criteria Lines are added
Chapter 2
Create or Modify Reports
Page 2-17
Report Writer User Manual
Change Mode (RW0402)
This mode allows you to change information on an existing report model. If any mistakes were made during the set
up process, you may return to the “Change Mode” option to change any information already entered.
First, you must navigate to the record you wish to change. You may find a record using the navigation tool bar or
<click> on the “Navigation” option on the Menu Bar and then the appropriate navigation option. If you are changing
a record, <click> on the “Modify the Current Record” button or choose the “Operation” option from the Menu Bar
and then “Change.” Make the changes required and <click> on the “Save” button to save your changes or <click>
on the “Cancel” button to cancel the changes made.
Results:
SYSRW1.dbf - Report Model File
- Report Model is modified
SYSRW2.dbf - Report Detail File
- Report Model Detail Lines are modified
SYSRW3.dbf - Search Criteria File
- Search Criteria Lines are modified
Delete Mode (RW0403)
This mode allows you to delete report models that you may have entered by mistake, or you no longer need.
First, you must navigate to the record you wish to delete. You may find a record using the navigation tool bar or
<click> on the “Navigation” option on the Menu Bar and then the appropriate navigation option. This option allows
you to delete accounts that you may have entered by mistake, or you no longer want. <Click> on the “Delete the
Current Record” button or choose the “Operation” option from the Menu Bar and then “Delete.” This will place
you into the “Delete” mode, then <click> on “Save” to validate your deletion of this record. If you have specified
that you want password protection for reports (in the “Master Configuration”), you will be prompted for the password. To proceed, you must either enter the report password or the system master password.
Make sure this is what you want to do, because once a custom file definition is deleted, there is no way to retrieve it
again.
Results:
SYSRW1.dbf - Report Model File
- Report Model is marked for deletion
SYSRW2.dbf - Report Detail File
- Report Model detail lines are marked for deletion
SYSRW3.dbf - Search Criteria File
- Search Criteria lines are marked for deletion
Copy Mode (RW0404)
This option allows you to create a new report model by copying the information from an existing one.
Using this option, the system provides a quick method of setting up report models that are very similar. This may
apply in a situation where you want several variations of the same report.
First, you must navigate to the record you wish to copy from. You may find a record using the navigation tool bar or
<click> on the “Navigation” option on the Menu Bar and then the appropriate navigation option. <Click> on the
“Create a Record Based on the Current Record” button or choose the “Operation” option from the Menu Bar and
then “Copy.”
Page 2-18
Create or Modify Reports
Chapter 2
Report Writer User Manual
You will notice all the information, except for the Report Model number, will be copied to a new record. Enter the
new number for this record. At this point, you may choose to edit any of the information or <click> on the “Save”
button to validate, which will then add it to the file.
If you have specified that you want password protection for reports (in the “Master Configuration”), you will then
be prompted for the source report model's password. To proceed, you must either enter the report password or the
system master password.
Results:
SYSRW1.dbf - Report Model File
- Report Model is added to file
SYSRW2.dbf - Report Detail File
- Report Model Detail Lines are added to file
SYSRW3.dbf - Search Criteria File
- Search Criteria Lines added to the file
PRINT MAINTENANCE REPORTS
This section discussed all of the Report Writer maintenance reports options. These are used for listings of report
models that currently exist within the system and the detail report, which should be used during the creation, and
modification of reports to illustrate all of the lines of code for each specific report model.
Report Model Listing (RW0201)
This report provides a listing of all report models you have set up. This report is designed to provide you with a simple listing of all of your report models for quick reference purposes. It also contains the number of detail lines in the
RW02 file and search criteria lines in the RW03 file. If there were any run-time errors, they will be listed at the end
of this report.
Remember that this report may be sorted in different sequences so that you may get an alphabetical listing as well a
listing based on report model numbers.
You may also print these listings to the screen if specific information is needed temporarily.
Field Names:
- Report Model Number
- Report Title
- Report Sub-Title
- RW02 records
- RW03 records
Report Model Detail (RW0202)
This report allows you to print a maintenance report containing all of the detail of a report model. This report is designed to provide you with a complete listing of all information that is set up for a specific report model.
When you select this option you will be asked to select the report model number that you wish to print this report
for. If you have specified that you want password protection for reports (in the “Master Configuration”), you will
prompted for the password. To proceed, you must either enter the report password or system master password. Press
ESC to select another report if you do not know the password.
Chapter 2
Create or Modify Reports
Page 2-19
Report Writer User Manual
Field Names:
- Report Model Number
- Report Title
- Report Subtitle
- Report Password
- Page Width
- Lines per Page
- Printed Lines per Page
- Chained Report Model
- Default Output Device
- Heading Lines
- Files used in Report
- Report Detail Lines
EXPORT/IMPORT REPORTS
This section discusses two special options, which allow you to share your custom report models with other users of
the Report Writer module.
These options, called “export” and “import,” allow you to send reports out of your system for others to use (export), or bring reports from other Report Writer files into your system (import).
NOTE
If you are importing report models that were created in Infinity Series Report
Writer, Versions 1.5 and higher, there are some adjustments that are necessary
on these report models. All information regarding print devices is not converted due to a new enhanced file structure change. This information, which
consists of the Printer Name, Text File Name, Lines/Page and Printed/Page,
will need to be re-keyed manually.
Also due to file structure changes in the Purchase Order Entry and Sales Order
Entry modules in the Infinity POWER products, any report models accessing
those files may need to change Begin File logic. Also, each line in the report
model should be validated to ensure that none of the DP Field names have
changed.
Export a Report Model (RW0405)
This option allows you to export a report model to a single file which may be imported into another system. If
there is a Custom File ID contained in the report model, it will also export as part of this single file. This option allows you to export your reports to another directory or another medium for safe individual backup of each report
model.
This option is used to share report models with other users. It allows you to create an operational report model and
then either sell or give this report to another user.
NOTE
You only have the legal right to transfer the report model data files and not the
Report Writer programs. Any user that you provide with a report model must
have purchased a copy of the Report Writer or Report Writer Run-Time module. If you sell, lend, lease, give or otherwise transfer Report Writer programs
to another user, you are in violation of federal copyright legislation.
Page 2-20
Create or Modify Reports
Chapter 2
Report Writer User Manual
This option creates an ASCII file which contains all of the specified report model information, including any Custom File IDs. This file is in a format, which is recognizable to the “Import a Report Model” option, described later
in this chapter. When you select this option, you will be asked to enter the report model number that you wish to export.
If you have specified that you want password protection for reports (in the “Master Configuration,”) you will then
be prompted for the source report model's password. To proceed, you must either enter the report password or the
system master password. Once you have selected the report model, the system will ask you for the name of the export data file to be created. You may specify any valid data path (drive assignment and subdirectory) and file name.
Example:
C:\REPORT\EXPORT.RPT (DOS/LAN)
/usr/report/export.rpt (UNIX)
If you specify either an improper file name or an invalid data path, the system will display a Warning 13, “Improper File Name” message. If you specify a file that already exists, the system will ask you if you want to overwrite this file. When the new file is created, the old file is deleted. To be on the safe side, don't overwrite a file if
you don't know what it is.
Once you have specified a valid file name, the system will perform the export. Now, you may do whatever you like
with this self-contained report model.
Results:
Export File created with the specified Report Model and any Custom File Definitions.
Import a Report Model (RW0406)
This option allows you to import a report model from a single file, which was generated by another system or stored
on another medium as a backup.
This option is primarily used to share report models with other users. It allows you to use operational report models
that were created by other users or created on another system.
This option imports a data file which contains all of the specified report model information, including all Custom
File Definitions that are contained within the report model. This file must be in a format which was created by the
“Export a Report Model” option, described earlier in this chapter.
When you select this option, the system will ask you for the name of the data file to be imported. You must specify
the valid data path (drive assignment and subdirectory) and file name as it was originally named during the export
procedure.
During the import, the system will verify if there is not already an existing report model with the same name. If there
is, the system will ask if you wish to replace the existing model. Additionally, if the report contains a Custom File
Definition that already exists, it will automatically rename it by adding a (-1) to the end of the number.
Example:
C:\REPORT\EXPORT.RPT (DOS/LAN)
/usr/report/export.rpt (UNIX)
If you specify either an improper file name or an invalid data path, the system will display a Warning 13, “Improper
File Name” message.
Chapter 2
Create or Modify Reports
Page 2-21
Report Writer User Manual
Results:
SYSRW1.dbf - Report Model File
- Report Model is added to file
SYSRW2.dbf - Report Detail File
- Report Model Detail Lines are added to file
SYSRW3.dbf - Search Criteria File
- Search Criteria Lines are added to file
SYSRW4.dbf - Custom File Definition File
- Custom File Definitions are added to file
SYSRW5.dbf - Custom File Key File
- Custom File Keys are added to file
SET UP MASTER INFORMATION
This section discusses the options necessary to input your master file information. The options utilized in this menu
allow you to custom configure your Report Writer master information.
An additional option is also available to pack your data files in case of hardware or media failure.
Change Master Configuration (RW0490)
This option allows you to change the standard Report Writer configuration. This includes changing the password
configuration status and the auto-spacing characteristics.
Page 2-22
Create or Modify Reports
Chapter 2
Report Writer User Manual
Password Protection
Default: Off
The Report Writer Module allows you to optionally assign a specific password
to each report. Each report's password must be set up under the “Set Up Report
Model” option. If you <click> on the checkbox, every time you select the option to “Print Custom Reports” the system will prompt you for each report's
password before allowing it to be printed.
The system will also require the entry of each report's password before you can
access the report under the “Set Up Report Models” option. If you forget the
password for any report, the system master password (see the System Administrator manual) will also allow access to the report.
A default configuration is already built into your Report Writer module. However, you may prefer to change this
configuration to meet your company's specific requirements. If you decide to assume the default values, please review them carefully before you begin processing.
The Master Configuration screen will display the two data items necessary for configuring your Report Writer system. The following is a list of each of these data items and the default values and descriptions of each.
You have now completed the Master Information Configuration.
Chapter 2
Create or Modify Reports
Page 2-23
Report Writer User Manual
MAINTAIN DATA FILES (RW0491)
This option includes both “Pack” and “Re-Index” utilities to manage your Report Writer files after a hardware or
media failure or to remove any items marked for deletion from your data files. You should NOT rely on the “Pack”
option to replace backups. Your backup procedures should include daily backups and weekly off-site backups.
There are several situations in which the Pack option need be accessed.
•
Power (hardware) failure.
•
Media Error (bad disk)
•
Remove records marked for deletion
You are then given the options to “Pack” or “Re-Index” that data file. Pack is a utility that physically removes any
deleted records from that data file. These procedures display a “Percentage of Completion” graph on the screen
while the files are being processed. Re-Index is a utility to rebuild the index file. It is also run automatically at the
end of a Pack procedure.
Before you execute the Pack option, check the file size of your Report Writer files at the operating system level. The
system will sort the current “out of index” file into a new “indexed” file before deleting the old file.
If you do not have enough disk space available to perform this function, an error will be generated at the time the
system runs out of disk space. This, however, could be some time later, depending on the size of your data files. If
your data files are 2MB in combined size, you will need at least 2.2MB in additional free space before proceeding
with this option.
NOTE
This option will only reorganize undamaged data within your files. Therefore,
you should carefully audit all information after you execute this option and
make any necessary adjustments to your data.
The following files are available for maintenance:
•
** ALL FILES **
•
Report Model File
•
Report Model Detail File
•
Criteria Search File
•
Custom File Definition File
•
Custom File Key File
You may select individual files or all files for either of these procedures. There are buttons on the right hand side of
the screen that allow you to “Select All” files, “Unselect All” files, and “Invert Selection,” which selects those
files that were not selected in a previous pack or re-index condition.
There is also a button, “Details,” that provides pertinent information about that particular data file. This information
includes the directory path and file name, the type of file, the pattern of the filename structure and the total records
including those records marked for deletion in that data file.
To begin the procedure of a pack or re-index, simply <click> on the “Start” button, after selecting the files you
wish to manage.
Results:
All Records in all or specified Report Writer Files will be packed.
Page 2-24
Create or Modify Reports
Chapter 2
Report Writer User Manual
MAKE COMPLETE DATA BACKUPS
Make sure that you make complete data backups as you add more and more information to your system. The file
naming structure and location of the Report Writer files is different than that of your normal data files. Report
Writer files are located in the program directory. By default, this is the \POWER directory. A listing of the Report
Writer files is located in Chapter 1.
We strongly recommend that the following backup procedures be followed to adequately protect your data files
against any possible problems. Experience has shown that “careless disregard” of making adequate backups can
literally cost you months of hard work and expense.
Any of the following problems could destroy all or part of your accounting information.
•
Hardware Failure of any kind (such as a hard disk failure)
•
Power Failure or Fluctuations
•
Improper Execution of certain operating system commands
•
Careless Handling of Data Disks or Tapes (such as copying files the wrong direction)
It is recommended that you make a backup of your data files on a daily basis. This does not mean for you to continue copying over the same backup that you may have made the previous day. Instead you should consider the following structure. Create five to seven daily backup sets of disks or tape cartridges, depending on your system. The
number will vary based on the number of days you “normally” work on your files. Mark each set with the name of
the day of the week that it is to be used for backup purposes. For instance, disk set or tape #1 may read Monday,
disk set or tape #2 may read Tuesday, etc. Only use these specific sets of disks or tapes on the days that are designated. This would mean that they would not be used more than once a week. Therefore, if problems were to occur
and you did not realize it immediately, you could at least go back as far as a week to find your last set of valid data
files.
Of course the entries made during the last week may be lost, but that is better than many months or years worth of
input. To go a step further, we recommend that you next make four additional sets of disks or tapes. These would be
your weekly master backups. Mark them accordingly with the week number (Week #1) and at the end of every
week, make a full backup of your data files.
Though you may have a complete daily backup for each day of the week, sometimes problems are not found within
the week's time frame and all of those backups could be invalid. This way, you could go back several weeks at a
time to find your last set of valid files. Next, you will want to go further and create a monthly master set of disks or
tapes. You would mark them accordingly with the name of the month of the year. At the end of every month, you
would then make a complete backup of your data files again.
This allows you to then go back several months at a time, if necessary, to review information or to print historically
dated information. Of course, the last set of files created should be the yearly set of files done at the end of each fiscal year for archiving purposes. It is also highly recommended that all report model detail be run at this time for hard
copy backup. As an additional protection for those users with tape backup systems, it is still highly recommended
that if you have a floppy disk drive on your computer that a floppy disk backup be made occasionally (at least
monthly) in case a problem were to develop on the tape drive that you are using. Normally, you would not find out
there is a problem until you needed to restore information, and that may be too late.
This all may sound like a considerable amount of work and inconvenience, but consider the investment involved.
The largest true cost of a hardware failure or loss of information is not the loss of programs, disks or even computers. The largest cost is that of labor and management's time designing and creating your Report Writer models.
This can literally represent thousands of man hours over time. This is a large investment that should be safeguarded
at all times. This program is designed for creating and generating reports. Unfortunately, there is limited ability to
protect the information created. That is entirely up to you, the user and manager, to protect your investment. For further information on Backup Procedures and commands, refer to either the System Administrator manual or the documentation for your operating system.
Chapter 2
Create or Modify Reports
Page 2-25
Report Writer User Manual
CHAPTER 3
PRINT CUSTOM REPORTS
This section discusses the method in which you can print custom reports from the Report Writer module. These custom reports are based on the report models that you created in the “Create or Modify Reports” option, described in
Chapter 2.
PRINT CUSTOM REPORTS (RW0101)
This option allows you to print custom reports based on specified report models. These report models should first be
created under the “Set Up Report Model” option. You may modify and reprint these reports as often as you desire.
This option is used to print the actual reports that you defined in your report models. This is the end result of your
report model creation. After selecting this option, you will be asked for the report model number. Select the report
model that you would like to print. If you have specified that you want password protection for reports (in the “Master Configuration”), you will then be prompted for the password. To proceed, you must either enter the report password or the system master password. Press ESC to select another report. At this point the system will respond differently, depending on how the report model is defined.
If you have included any files in your report that have a search type of #5 - Ask Beg/End (e.g., ask for a beginning
and ending range), the system will prompt you for the beginning and ending items from the file before printing the
report. The format of this prompt will be very similar to the way in which the standard accounting program would
ask for a beginning and ending range. For instance, if you specified Ask Beg/End on the AR01 File (Customer File),
and selected the customer number as the index, the system would first ask:
Enter the Beginning Customer #
After you made your selection the system would ask:
Enter the Ending Customer #
After you made this selection, the report would only include those customers on the report that were between the
range of the two selected customers. The screen prompts for the above selections would respond almost identically
to the Accounts Receivable system's screen prompts for a beginning and ending customer when printing the Customer Listing.
If your report model has specified more than one file with a search type of Ask Beg/End, then the system would
prompt you for each file's beginning and ending items. Next, if you have configured your report model to include
any criteria detail lines with an ASK value specified, then the system will prompt you for each of these values. After
all the criteria values have been asked, the system will begin the actual printing process. If the report model has been
set to the “Normal” print device, the system will print the report to the current device that you are using.
If you have defined the report model to always use a specific printer name, then the system will automatically switch
to that device to print the report. After the report is completed, the system will automatically switch back to the previously defined print device. Please note that if you terminate a report prematurely, the system may not return to the
previous print device automatically. It is wise to confirm that the previous print device has been restored after you
exit a report mid-stream.
The actual printing should now begin. To stop the printing process you may press any key. To continue printing you
should press ENTER, or you may press ESC to exit the report. If the specified report has heading printing turned
on, then the system will do a top of form at its completion.
Finally, if the report model has a “chained report” specified, it will load the corresponding report model and begin
its preliminary procedures (e.g., ask password, Ask Beg/End file range and file Criteria). This report will now be
printed, and its “chained report” will be processed, if applicable. After these reports have been printed, you will be
asked for the next report model to print. At this point you may select another report or press ESC to return to the
menu.
Chapter 3
Print Custom Reports
Page 3-1
Report Writer User Manual
Results:
No DP Files affected
ENTER STATISTICS
This option allows you to periodically enter statistical information needed for special calculations in your report
models.
This option allows you to periodically input numeric values which may be used by your report models for special
calculations or printing. You may define the descriptions and use of these statistics when you set up your report
models. In general these statistics are used for special report calculations.
For instance, if you want to calculate new credit limits for your customers, you could use a statistic named “% increase” to be used in the calculation of these new credit limits. Then, every time you print this report, you could use
this option to enter a new percentage. An example of this is shown in the sample report mode “1-SAMPLE.”
When you select this option, you will be asked for the report model number. Select the report model that you would
like to enter statistics for.
If you have specified that you want password protection for reports, (in the “Master Configuration”) you will be
prompted for the password. To proceed, you must either enter the report password or the system master password.
Press ESC to select another report. If the report model that you select does not have any statistic detail lines defined,
you will not be prompted for any information. Otherwise, the screen will display all statistic descriptions and current
values. You may change any values that you wish or simply validate the existing values.
Each statistical value may have up to five decimal places. The numeric range is between plus and minus
9,999,999,999.00000. When you validate this data entry screen, all statistical values will be updated to the report
model file. These values will be fixed within the report model until you change them using this option. Once you
have validated the statistic data entry screen, you may select a new report model or press ESC to return to the menu.
Results:
SYSRW2.dbf - Report Detail File
- Statistics are stored for the report model
Page 3-2
Print Custom Reports
Chapter 3
Report Writer User Manual
CHAPTER 4
DESIGNING CUSTOM REPORTS
This chapter provides you with general guidelines for designing custom reports. Of course, the starting point for
every custom report is its design - that is, what information you want on a report and how that information should be
presented. This chapter provides you with some insight into how to create a report that accomplishes your goals. In
addition, several examples of the concepts discussed are provided.
BASIC REPORT DESIGN
One of the most important steps in accomplishing any goal is to clearly define what that goal is. The reason for creating any report is to provide you with information that is useful towards specific company goals. These goals may
range from basic auditing needs to financial accounting needs, to strategic management requirements and so on.
After you have defined your reporting needs, then it is important to understand where the information is stored
within your Infinity POWER data files, and how to retrieve this information for presentation on your report. Chapter 1 of each program user manual provides a detailed listing of all accounting data files and their contents.
The following general steps are recommended to design your report:
1.
Define your reporting needs. Determine what information you need from the report. It may be customer
address information, inventory cost information, employees' year-to-date federal withholding, etc.
2.
Determine what data files contain this information. Since your accounting systems contain a number of
different data files (each containing unique information) you must determine where the information is located.
For instance, customer address information is stored in the Customer File (AR01), inventory cost is in Inventory Item File (IM01), employees' year-to-date federal withholding is located in the Employee File
(PR01), etc.
3.
Determine how to retrieve this information. Determine the method of retrieving the data, getting the information in the sorted order to accomplish your report.
For instance, suppose you want to print all customer addresses for each customer. Determine if you want
the customers listed in numeric order by customer number, or if you want the customers listed alphabetically by customer
This criteria is established when a file is opened and you are asked for a “Key Number.” This key number
tells the system how to “sort” the file. Each data file has one or more keys which you can individually
choose to sort the file.
If there is a need to sort the file in some other manner other than the normal sort keys, the “Custom File” is
your answer. By creating a custom file, you can design how the data will be sorted. You may use just about
any data field in the data to sort the data.
4.
Determine if special selection criteria is needed. Selection criteria allow you to either include or exclude
certain data file records based on some value within the data file. For instance, you could specify to print
only those customers on a customer list, which have a credit limit over $1000, and are located in Florida.
This can be accomplished either upon opening the data file and choosing the search types; Single Match,
Begin/End Ranges or by using a “criteria” statement in the body of the report before printing any of the
data.
5.
Determine where to print the requested information. Decide exactly which data fields to print and determine how you want this information aligned on the report. For, instance, you could specify your customer list to print a single customer per sheet of paper, print on a mailing label, print in a columnar format
or print to a text file to create a file which can be used to import information into another program.
Chapter 4
Designing Custom Reports
Page 4-1
Report Writer User Manual
6.
Decide if special calculations are necessary. If the information you need is not in a data file in “final
form,” you may need to perform mathematical calculations, which are known as “formulas.” For example, if you wanted to print the average employee year-to-date federal withholding, you would take the yearto-date withholding figure from the Employee File, and then divide it by 12 months.
7.
Identify if any column totals are necessary. Decide if you want any of the numeric fields totaled and
printed at the end of a file section as a subtotal and/or printed at the end of the report as a grand total. This
function may be accomplished using “Prt Totals”, on numeric data fields. If you are using a “formula” to
produce a given result that will need to total, you will also need another formula to accumulate the results
of the first formula.
After you have completed these steps, the actual set up of the report should be a relatively easy procedure. The remainder of this chapter provides you with several examples of the primary types of reports that you may want to
print.
SAMPLE "LISTING" REPORT
Perhaps the most simplistic of all reports is a “listing.” A listing normally provides a quick summary of basic information for a single data file. For example, you may want to create a report, which lists all Florida customers, alphabetically by name, which have a credit limit over $1000. In addition, you want to know how much total credit
would be extended if you increased the credit limit 10% for each customer.
Follow the steps below to design your report:
1.
Define your reporting needs.
- List of all customers.
- Alphabetically by name.
- Located in the State of Florida.
- With a credit limit greater than $1000.
- Calculate a new credit limit 10% higher.
2.
Determine what data files contain this information.
- Customer File (AR01).
3.
Determine how to retrieve this information.
- Customer File) AR01).
Search Type: Entire File.
Index: Customer Name.
4.
Determine if special selection criteria is required.
- Include if state equals Florida.
- Include if credit limit is greater than $1000.
5.
Determine where to print the requested information.
- Print is columnar format.
- Let the system automatically space columns.
6.
Determine if special calculations are necessary.
- New credit limit equals limit plus 10%.
7.
Determine if any column totals are necessary.
- Print a column total for existing credit limit.
- Print a column total for new limit.
Once you have completed these steps, the creation of the report model (using the “Set Up Report Models” option)
should be straightforward.
Page 4-2
Designing Custom Reports
Chapter 4
Report Writer User Manual
The following pages illustrate a sample Report Model Detail and a Sample Custom Report.
SAMPLE “TRANSACTION” REPORT
A “transaction” report generally provides a detailed look at information stored in one data file as transactions,
which correspond to master items defined in another file. For example, you may want to create a report which lists
all inventory items in numeric order which have a current quantity on-hand. In addition, you want to list all receipts
for each item.
Follow the steps below to design your report:
1.
Define your reporting needs.
- List of all inventory items.
- Numerically by number.
- With quantity on hand.
- List all receipts and subtotal.
2.
Determine what data files contain this information.
- Inventory Item File (IM01).
- Inventory Transaction File (IM02).
3.
Determine how to retrieve this information.
- Inventory Item File (IM01).
- Search Type: Entire File.
- Index: Item Number.
- Inventory Transaction File (IM02).
- Search Type: Beg/End Range (all records for
- current IM01 item number)
- Index: Item Number.
4.
Determine if special selection criteria is required.
- Include Items (IM01) if quantity on hand is greater than zero.
- Include Transactions (IM02) if transaction type equals Receipts.
5.
Determine where to print the requested information.
- Print Items (IM01) is columnar format.
- Print Transactions (IM02) indented beneath.
- Let the system automatically space columns.
6.
Determine if special calculations are necessary.
- None.
7.
Determine if any column totals are necessary.
- Print a column subtotal for each Item’s receipts.
- Print a column total for quantity on-hand.
Once you have completed these steps, the creation of the report model (using the “Set Up Report Models” option)
should be straight forward. The following pages illustrate a sample Report Model Detail and a Sample Custom Report.
Chapter 4
Designing Custom Reports
Page 4-3
Report Writer User Manual
Page 4-4
Designing Custom Reports
Chapter 4
Report Writer User Manual
Chapter 4
Designing Custom Reports
Page 4-5
Report Writer User Manual
Page 4-6
Designing Custom Reports
Chapter 4
Report Writer User Manual
SAMPLE “MULTI-LEVEL” REPORT
A “multi-level” report normally combines information from a number of different data files to provide a heavily
integrated report model. For example, you may want to create a report which lists all vendors and the inventory
items for which they are primary vendors. In addition, you want to print each inventory item's asset account and the
General Ledger account description.
Follow the steps below to design your report:
1.
Define your reporting needs.
- List of all vendors.
- Numerically by vendor.
- List all inventory items for each vendor.
- Display each inventory item’s GL Cost of Sales account
- number and description.
2.
Determine what data files contain this information.
- Vendor File (AP01).
- Inventory Item File (IM01).
3.
Determine how to retrieve this information.
- Vendor File (AP01).
- Search Type: Entire File.
- Index: Vendor Number.
- Inventory Item File (IM01).
- Search Type: Match on Beg/End File.
- Index: Vendor Number.
4.
Determine where to print the requested information.
- Print Vendors (AP01) is columnar format.
- Print inventory items (IM01) indented beneath.
- Let the system automatically space columns.
5.
Determine if special calculations are necessary.
- None.
6.
Determine if any column totals are necessary.
- None.
Once you have completed these steps, the creation of the report model (using the “Set Up Report Models” option)
should be straight forward.
Chapter 4
Designing Custom Reports
Page 4-7
Report Writer User Manual
The following pages illustrate a sample Report Model Detail and a Sample Custom Report.
Page 4-8
Designing Custom Reports
Chapter 4
Report Writer User Manual
Chapter 4
Designing Custom Reports
Page 4-9
Report Writer User Manual
Page 4-10
Designing Custom Reports
Chapter 4
Report Writer User Manual
CHAPTER 5
SAMPLE REPORTS
This chapter shows examples of many of the sample reports available in the Report Writer module. These report
model samples may be copied, edited, or used for your internal reporting needs. These are examples only and can
lend guidance in the proper way to create or lay out a specific report model type.
The first report provides a listing of the examples included here. The remainder of this chapter will provide you with
the Report Model Detail or the actual coding and set up of each report and then an actual sample of how the report
model prints out using sample data files.
Chapter 5
Sample Reports
Page 5-1
Report Writer User Manual
Report Model Listing (RW0401)
Page 5-2
Sample Reports
Chapter 5
Report Writer User Manual
Report Model Detail (AP Vendor Listing)
Chapter 5
Sample Reports
Page 5-3
Report Writer User Manual
Report Model Detail (AP Past Due Aging)
Page 5-4
Sample Reports
Chapter 5
Report Writer User Manual
Chapter 5
Sample Reports
Page 5-5
Report Writer User Manual
Page 5-6
Sample Reports
Chapter 5
Report Writer User Manual
Chapter 5
Sample Reports
Page 5-7
Report Writer User Manual
Page 5-8
Sample Reports
Chapter 5
Report Writer User Manual
Chapter 5
Sample Reports
Page 5-9
Report Writer User Manual
Report Model Detail (AP Discount Report)
Page 5-10
Sample Reports
Chapter 5
Report Writer User Manual
Chapter 5
Sample Reports
Page 5-11
Report Writer User Manual
Page 5-12
Sample Reports
Chapter 5
Report Writer User Manual
Chapter 5
Sample Reports
Page 5-13
Report Writer User Manual
Report Model Detail (Address Book Export/Import File)
Page 5-14
Sample Reports
Chapter 5
Report Writer User Manual
Chapter 5
Sample Reports
Page 5-15
Report Writer User Manual
Report Model Detail (Accounts Receivable Aging Report)
Page 5-16
Sample Reports
Chapter 5
Report Writer User Manual
Chapter 5
Sample Reports
Page 5-17
Report Writer User Manual
Page 5-18
Sample Reports
Chapter 5
Report Writer User Manual
Chapter 5
Sample Reports
Page 5-19
Report Writer User Manual
Page 5-20
Sample Reports
Chapter 5
Report Writer User Manual
Chapter 5
Sample Reports
Page 5-21
Report Writer User Manual
Page 5-22
Sample Reports
Chapter 5
Report Writer User Manual
Report Model Detail (General Ledger Accounting Listing)
Chapter 5
Sample Reports
Page 5-23
Report Writer User Manual
Report Model Detail (Y-T-D Trial Balance)
Page 5-24
Sample Reports
Chapter 5
Report Writer User Manual
Chapter 5
Sample Reports
Page 5-25
Report Writer User Manual
Page 5-26
Sample Reports
Chapter 5
Report Writer User Manual
Chapter 5
Sample Reports
Page 5-27
Report Writer User Manual
Report Model Detail (Y-T-D Summary by Account Type)
Page 5-28
Sample Reports
Chapter 5
Report Writer User Manual
Chapter 5
Sample Reports
Page 5-29
Report Writer User Manual
Page 5-30
Sample Reports
Chapter 5
Report Writer User Manual
Chapter 5
Sample Reports
Page 5-31
Report Writer User Manual
Report Model Detail (Current Receipts Price Labels)
Page 5-32
Sample Reports
Chapter 5
Report Writer User Manual
Report Model Detail (Budget Comparison Report)
Chapter 5
Sample Reports
Page 5-33
Report Writer User Manual
Page 5-34
Sample Reports
Chapter 5
Report Writer User Manual
Chapter 5
Sample Reports
Page 5-35
Report Writer User Manual
Report Model Detail (Purchase Order Backorder Report)
Page 5-36
Sample Reports
Chapter 5
Report Writer User Manual
Chapter 5
Sample Reports
Page 5-37
Report Writer User Manual
Page 5-38
Sample Reports
Chapter 5
Report Writer User Manual
Report Model Detail (Employee Accumulators)
Chapter 5
Sample Reports
Page 5-39
Report Writer User Manual
Page 5-40
Sample Reports
Chapter 5
Report Writer User Manual
Report Model Detail (Sales Order Backorder Report)
Chapter 5
Sample Reports
Page 5-41
Report Writer User Manual
Page 5-42
Sample Reports
Chapter 5
Report Writer User Manual
Chapter 5
Sample Reports
Page 5-43
Report Writer User Manual
This page intentionally left blank.
Page 5-44
Sample Reports
Chapter 5
Report Writer User Manual
INDEX
B
BASIC REPORT DESIGN............................................................................................................................................................2-1
C
Change Custom File Definition .....................................................................................................................................................2-4
Copy Custom File Definitions .......................................................................................................................................................2-5
Create or Modify Reports ..............................................................................................................................................................2-1
Custom File....................................................................................................................................................................................2-1
CUSTOM FILE DETAIL LINES..................................................................................................................................................2-3
CUSTOM FILE OVERHEAD ......................................................................................................................................................2-3
Custom File Unique Keys..............................................................................................................................................................2-4
CUSTOM FILES ...........................................................................................................................................................................2-2
D
DATA FILE DESCRIPTIONS......................................................................................................................................................1-4
Designing Custom Reports ............................................................................................................................................ 4-1
Determine Column Totals..............................................................................................................................................................2-2
Determine Criteria .........................................................................................................................................................................2-1
Determine How to Retrieve Information .......................................................................................................................................2-1
Determine Special Calculations .....................................................................................................................................................2-2
Determine Where to Print ..............................................................................................................................................................2-2
G
GENERAL CONCEPTS ...............................................................................................................................................................1-2
GENERAL OVERVIEW ..............................................................................................................................................................2-1
I
Introduction ...................................................................................................................................................................................1-1
K
Key Number ..................................................................................................................................................................................2-1
P
Print Custom Reports...................................................................................................................................................... 3-1
PRINT CUSTOM REPORTS (RW0101) ......................................................................................................................................3-1
R
Report Detail Lines........................................................................................................................................................................2-7
Report Overhead............................................................................................................................................................................2-6
S
Sample Reports.................................................................................................................................................................... 5-1
SET UP REPORT MODELS.........................................................................................................................................................2-6
Single Match or Beg/End Range....................................................................................................................................................2-9
SYSTEM INTEGRATION............................................................................................................................................................1-3
Index
Page I-1