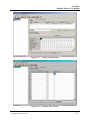
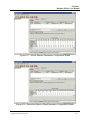
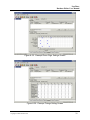
1
NextPhase Intersection Management Software Database Editor User Manual Version 3.7 Copyright © 2002 Revision - May 2002 Siemens Energy & Automation, Inc. Gardner Transportation Systems Business Unit NextPhase Intersection Management Software Database Editor User Manual Version 3.7 All information contained herein is the exclusive proprietary property of Siemens Energy & Automation, Inc., Gardner Transportation Systems Business Unit (Siemens GTS). This publication is protected by Federal Copyright Law, with all rights reserved. No part of this publication may be reproduced, stored in a retrieval system, transcribed, or transmitted in any form, by any means, without express written permission from Siemens GTS. Siemens GTS reserves the right to make changes to this manual without further notification. The information presented herein is thought to be fully consistent with the product it describes. However, Siemens GTS does not assume liability for the contents of this publication and shall not be responsible for any damages, direct or consequential, caused by reliance on the materials presented. If you have comments concerning this manual, or for technical support, please contact Siemens GTS. To Contact Siemens GTS: Siemens Energy & Automation, Inc. Gardner Transportation Systems Business Unit 1355 Willow Way, Suite 110 Concord, California 94520 Phone: Fax: E-mail: Web Site: (925) 691-9524 (925) 691-9604 [email protected] www.gts.sea.siemens.com Copyright © 2002 Siemens Energy & Automation, Inc. Gardner Transportation Systems Business Unit All Rights Reserved NextPhase Database Editor User Manual TABLE OF CONTENTS 1 Introduction ...................................................................................... 1 1.1 Overview..................................................................................................... 1 2 Getting Started.................................................................................. 2 2.1 System Requirements ............................................................................... 2 2.1.1 Hardware .................................................................................................................. 2 2.1.2 Software.................................................................................................................... 2 2.2 Installing DBEditor..................................................................................... 2 2.3 Uninstalling Database Editor .................................................................... 3 2.4 Configuration ............................................................................................. 3 2.4.1 Database UDL Configuration.................................................................................... 3 2.4.2 Database Editor Initialization (dbeditor.ini) ............................................................... 3 2.4.3 Local INI File ............................................................................................................. 4 3 DBEditor Operation .......................................................................... 6 3.1 System Startup .......................................................................................... 6 3.2 The Database Editor Workspace .............................................................. 6 3.2.1 3.2.2 3.2.3 3.2.4 3.2.5 Menu Bar .................................................................................................................. 7 The Button Bar........................................................................................................ 15 The Footer Bar........................................................................................................ 15 The Controller Display ............................................................................................ 15 The Parameter Display ........................................................................................... 15 APPENDIX............................................................................................ 16 NextPhase Database Editor User Manual Copyright 2002 Siemens GTS i NextPhase Database Editor User Manual 1 INTRODUCTION The NextPhase Database Editor is a Microsoft Windows-based tool for managing the configuration and operating parameters for Advanced Transportation Controllers (ATCs) running Siemens GTS’ NextPhase Intersection Management Software. This software allows controller data to be edited with a simple point-and-click graphical interface. Controller data can be uploaded from and downloaded to controllers via a communications channel. This User Manual contains all the information necessary to configure and operate the Database Editor in standalone mode (i.e., without a full central system setup). It is assumed that the operator has moderate computer knowledge and familiarity with the Microsoft Windows NT/2000 operating system. If you have questions about using Windows, refer to the operations manual for that product. In some cases, additional references have been provided that may prove useful for basic setup, configuration, and operation of Windows NT/2000 and related services. Reference the NextPhase Intersection Management Software Operation Manual for a complete description of controller parameters. 1.1 Overview The editor provides an effective and efficient platform for traffic signal professionals to manage traffic controller databases. The user interface uses state-of-the-art windowing features to simplify all editing and data management functions. This greatly improves operator efficiency over entering and manipulating data directly through the controller front panel. Formatted data entry screens with automated parameter range checking reduce operator error. The editor provides the capability to centrally define and store all controller parameters, download parameters to a controller, upload parameters from a controller, compare controller and central database parameters, and print individual controller timing sheets. The editor employs both object-oriented and relational DBMS database technologies and includes industry standard SQL interfaces. As a result, the editor easily scales to support a large number of controllers. National and international standards and protocols are used to the fullest extent practical such that the system can adapt to changes in technology and increased functionality over time with a minimum impact on individual system components. The editor supports the National Transportation Communications for Internet Protocol (NTCIP) standard for traffic signal controllers allowing users to easily migrate to the new standard. It also supports the California standard AB3418 protocol. NextPhase Database Editor User Manual Copyright 2002 Siemens GTS 1 NextPhase Database Editor User Manual 2 GETTING STARTED This section provides planning, installation, and configuration information needed prior to operating the database editor. It is recommended that this section be reviewed prior to proceeding with the installation and configuration of the system. 2.1 System Requirements To use the Database Editor application you must have the following: 2.1.1 Hardware • IBM PC or compatible with at least one serial communications port. PC hardware must be on the Windows Hardware Compatibility listing for the operating system used. This list can be found on the World Wide Web with the following URL: http://www.microsoft.com/hwtest/hcl. This listing serves as our basic minimum recommendations. Please contact your Siemens GTS technical support group for more information. The following should serve as minimum requirements: Pentium 150MHz computer with 32MB RAM, 50 MB available hard disk space, and a color display with at least 800x600 resolution and 256 colors. • RS232 serial communications cable to connect computer with controller. For a Model 2070 controller, this may be either a standard null-modem serial cable for ports 1-4 on the back panel, or a special cable if connecting to the C-50 port on the front panel. See the NextPhase Installation Guide for a cable pinout for the C-50 cable. 2.1.2 Software Basic required system components include: • Microsoft Windows NT 4.0 or Windows 2000 Professional Workstation operating system. Windows NT requires Service Pack 5 or later. It is suggested that non-standard drivers and configurations be verified with Siemens GTS as to their reliability and compatibility • Microsoft SQL Server or Microsoft Database Engine (MSDE). MSDE is provided with the installation software. 2.2 Installing DBEditor See the file README.TXT provided with the installation software for detailed installation instructions. Caution! It is very important to follow the correct installation procedures. If you are installing Database Editor as an upgrade to a previous version, it may be necessary to contact Siemens GTS for assistance in order to prevent loss or corruption of existing controller data stored in the database. NextPhase Database Editor User Manual Copyright 2002 Siemens GTS 2 NextPhase Database Editor User Manual 2.3 Uninstalling Database Editor You can uninstall the editor by using the tools provided with the Windows operating system. Open the control panel and double-click on Add/Remove Programs, Database Editor, and click Remove. You may also wish to uninstall MSDE if you installed it along with Database Editor. Note, however, that if you uninstall MSDE you will permanently destroy any controller data stored in the local database. 2.4 Configuration 2.4.1 Database UDL Configuration The UDL (Microsoft Data Link) files are used to support the connection to the databases for storing/retrieving controller timing parameters needed by the editor. This section describes the UDL configuration process. The UDL files are located in the <path>\Gardner Systems\Database Editor directory. The databases are located under the directory C:\MSSQL7\. 1. The UDL files are used to configure and test database connections. Setup the UDL files as indicated in the README.TXT installation instructions. You will not usually need to change these settings after the initial installation. 2.4.2 Database Editor Initialization (dbeditor.ini) The DBEditor INI parameters have been carefully selected to operate the editor in most standard configurations and do not require editing. Configuring the database editor is done through an initialization file found in the same directory as the database editor executable. These parameters may be modified using a text editor such as notepad. [Comm] Section: CommDLL = [DBEdComm.dll] Specifies application support file to use with the database editor. Do not modify this parameter. Comm Type = [ITMSComm | CommMgr, default=CommMgr] Should be set to ITMSComm. Comm Server Name = [Computer Name] Should be set to the local computer name or “.”. Local Mode = [true | false] Indicates if the database editor is to operate in local ‘standalone’ mode or in remote mode. Local standalone mode is typically used for controller database upload/download using the local computer communication port (i.e., in the field or on the bench). The local.ini file must also be configured to use the local mode. The remote mode is used to perform database editor operations within the icons iGUI environment. Turn Off Polling =[true | false] Not used for local mode. Retry Count = [0-10] Number of retries to upload/download data segments in the event of bad communication response. Typically set at 3 or 5. NextPhase Database Editor User Manual Copyright 2002 Siemens GTS 3 NextPhase Database Editor User Manual ReadTotalTimeOutConstant = [Integer milliseconds, default: 10000] Specifies the constant, in milliseconds, used to calculate the total time-out period for read operations during upload/download. This parameter overrides the same parameter defined in itmscomm.ini or local.ini supporting the target controller. [Users] Section: User Names = [Unique Name] Unique logon name(s) available through the logon dialog box when starting the database editor in standalone mode. Names are comma separated. User names will automatically be added to this list as they are used in the Database Editor program. [Editors] Section: This section contains entries for every controller type that is supported by the editor. A comma (;) at the beginning of a line marks that line as a comment. If an entry is marked as a comment, then that controller type is disabled. For the standalone editor, only the NextPhase controller types are supported. You may wish to comment/uncomment the lines to customize the editor to the version(s) of NextPhase that you use. For example, if you use only NextPhase 1.4, you may comment out line 1 (NextPhase 1.3) and line 10 (NextPhase 1.5) by placing a semicolon at the beginning of each of those lines. 1 = [NPEditor13DLL.dll] – NextPhase v1.3 controllers. 2 = [xxx.dll] – Not supported in the standalone editor. 3 = [blank] – Not currently supported. 4 = [blank] – Not currently supported. 5 = [xxx.dll] – Not supported in the standalone editor. 6 = [ASC2NTCIP.dll] – Not supported in the standalone editor. 7 = [NPEditorDLL.dll] – NextPhase v1.4 controllers. 8 = [xxx.dll] – Not supported in the standalone editor. 9 = [xxx.dll] – Not supported in the standalone editor. 10 = [NPEditor15DLL.dll] – NextPhase v1.5 controllers. Database Editor (local mode) INI (local.ini): Configuring the database editor for local operation requires the local.ini initialization file also found in the same directory as the Database Editor executable. This initialization file is used to configure communication parameters for the database editor to function from a local communication port. 2.4.3 Local INI File The local INI file defines the computer serial port settings for communicating with the locally attached controller. The local.ini initialization file found in the same directory as the Database Editor executable. The following are the only parameters that may need to be changed: NextPhase Database Editor User Manual Copyright 2002 Siemens GTS 4 NextPhase Database Editor User Manual [Channel] Section PortName – [COMX, X=1-4] Serial communications port used. For example, if you are using serial port COM1 to communicate with the controller, then set this value to 1. Note: The following communication parameters need to match those configured in the controller. LineSpeed – [1200 | 4800 | 9600 | 19200 | 38400 bps] Serial communications data rate. LineBits – [7 | 8 bits] NOT including parity. LineParity – [NOPARITY | EVENPARITY | ODDPARITY | MARKPARITY | SPACEPARITY | NOPARITY] LineStopBits – [ONESTOPBIT | ONE5STOPBITS | TWOSTOPBITS] [Controller] Section Address – [1-255] Controller communications address. NextPhase Database Editor User Manual Copyright 2002 Siemens GTS 5 NextPhase Database Editor User Manual 3 DBEDITOR OPERATION This section describes the operation of Controller Database Editor. 3.1 System Startup In the stand-alone configuration, when the application is launched the operator is presented with a log on screen that allows the user to select between two different communication modes. The Remote mode allows the editor to connect to an existing central system for communication to field traffic controllers. The Local mode allows the editor to connect directly from the local computer serial port to the traffic controller. Select the Local mode for stand-alone operation where controller is directly connected to the computer serial port. Figure 3-1: Standalone Database Editor Log-On Screen Enter a User Name or select from a pull down list of valid users to log on. After successful sign on the user is presented with the Database Editor workspace as shown in Figure 3-2. 3.2 The Database Editor Workspace When the Database Editor is started the user is presented with the screen shown in Figure 3-2. The screen is divided into the following regions: • • • • • Menu Bar – permits the operator to access various menu options Button Bar – provides “one-click” shortcuts to commonly performed editor tasks Footer Bar – displays the highlight menu item and the communication connection mode Controller Display – a list selection in the left panel that displays all controllers currently loaded into the editor Parameter Display – a tabular selection of parameter pages in the right panel that displays all configuration and operating parameters for a selected controller. This is the region where parameters may be edited. NextPhase Database Editor User Manual Copyright 2002 Siemens GTS 6 NextPhase Database Editor User Manual When the editor is initially started the left panel controller display and right panel parameter display areas are empty indicating that no controllers are currently loaded. Figure 3-2: Database Editor Workspace 3.2.1 Menu Bar The Database Editor Menu Bar contains the following menu items: • File • Utilities • Communication • Help A drop down menu for any of these menu items can be selected by left clicking its menu title. A detailed discussion of the contents of each of these menu items is contained in the following section. 3.2.1.1 The File Menu The file menu contains the following choices: • • • Load Controller from Database (Ctrl+L) Store Controller in Database (Ctrl+S) Close Controller NextPhase Database Editor User Manual Copyright 2002 Siemens GTS 7 NextPhase Database Editor User Manual • • • • • New Controller (Ctrl +N) Delete Controller Print Preview Print (Ctrl+P) Exit Menu items are selected by left clicking the menu title or alternatively using the keyboard shortcut keys. Upon initial startup of the editor or when no controllers are currently loaded only the Load Controller from Database, New Controller, and Exit menu items are selectable. A controller must first be loaded into the editor before any of the other operations can be performed. The Load Controller from Database command is used to load the parameters for a controller already defined in the database. Defining a new controller can be performed using the New Controller menu item. Selecting this menu item displays the Select Controller screen shown in Figure 3-3. This screen lists all the controllers currently defined in the database. The two buttons along the top bar allows the user to select between a List and Details view. Figure 3-3: Controller Selection Screen The controller list may be alphabetically or numerically sorted by any column simply by left clicking the column header. Alternatively, a context menu with sort and list commands may be displayed by right clicking on the row of any controller. A controller is loaded into the editor by double clicking the left mouse button anywhere on the row of the desired controller, or alternatively by clicking once and then selecting the Load button. The Cancel cancels the operation and returns the user back to the editor main workspace. NextPhase Database Editor User Manual Copyright 2002 Siemens GTS 8 NextPhase Database Editor User Manual The Load Controller from Database loads the data into the editor workspace for viewing and editing, and loads a copy into a temporary “restore” repository in the editor. The restore area is used during other editor operations. The operation is illustrated below: Restore (Copy) DB Editor Workspace DB The Store Controller in Database command is used to store the parameters for a selected controller back to the database. All changes made in the editor for the selected controller will be stored, overwriting any existing database parameters. A confirmation dialog box is used to confirm the action. The Store Controller to Database saves the data back to the database while also storing a local copy back to the restore area in the editor. This keeps the restore copy current with the database. The restore area is used during other editor operations. The operation is illustrated below: Restore (Copy) DB Editor Workspace DB The Close Controller command will close the selected controller from the list of available controllers in the editor. If any changes have been made a dialog box will be displayed that allows the user to save or discard any changes prior to closing the controller. The New Controller command allows the user to define a new controller within the editor. Selecting this menu item displays the Create Controller screen shown in Figure 3-4. NextPhase Database Editor User Manual Copyright 2002 Siemens GTS 9 NextPhase Database Editor User Manual Figure 3-4: Controller Creation Screen The screen includes a Controller Type pull down list to select the type of controller to be defined. Select the controller type corresponding to the NextPhase version that you are using. (If your version of NextPhase is not listed, please see Section 2.4.2 describing dbeditor.ini.) The Number is the intersection number, or the SIG object number that will be used to define this controller in the system. This must be a unique number. The Primary Address, Secondary Address, and Version are all descriptive fields used to uniquely identify this controller. Selecting the OK button will create the new controller in the database and also load the controller and a default parameter template into the editor. If a controller with the same number is already defined in the database a dialog box will be displayed asking the operator to confirm the operation. The Delete Controller command allows the user to permanently remove a controller from the editor database. The Print Preview command allows the operator to preview all database parameter forms for the selected controller prior to printing. Selecting this menu item displays the Print Preview screen shown in Figure 3-5. The screen has a top button bar and a footer bar. The button bar includes icons buttons for performing all the functions in the preview screen. Each button includes “flyover” title as to its function. The first three buttons allows the operator to adjust the size of the displayed report forms. The Zoom to Fit button reduces the report form to the size of a printable page. The 100% zoom button expands the report form to occupy the entire print preview display area. The Zoom to Width button expands the report form to full width. The next four buttons allow the operator to advance through the report form. The First Page arrow button moves the report back to the first page. The Previous Page arrow button moves the report back to the page previous from the current. The Next Page arrow button moves the report forward to the next page. The Last Page arrow button moves to the report on the last page. The Printer Setup button allows the user to setup various printing parameters. The Print button prints the current report. Note: A printer needs to be defined through Windows before these buttons will function. The Save Report button allows the operator to save this report to file for later retrieval. The Load Report button allows the operator to retrieve a previously saved report. The footer bar indicates the current page being previewed and also shows the printing progress. NextPhase Database Editor User Manual Copyright 2002 Siemens GTS 10 NextPhase Database Editor User Manual Figure 3-5: Print Preview Screen The Print command allows the operator to directly print the report. The Exit command is used to shut down Database Editor. 3.2.1.2 The Utilities Menu The Utilities menu contains the following choices: • • • Compare Controller Restore Database Data (Ctrl+Z) Quick Compare Menu items are selected by left clicking the menu title or alternatively using the keyboard shortcut keys. Upon initial startup of the editor or when no controllers are currently loaded none NextPhase Database Editor User Manual Copyright 2002 Siemens GTS 11 NextPhase Database Editor User Manual of these items are selectable. A controller must first be loaded into the editor before any of these operations can be performed. The Compare Controller command toggles on/off the compare feature in the editor. The Compare feature highlights parameter differences in yellow between the controller data and the restore copy of the database data. An upload from controller operation must precede the compare operation to check differences for the selected controller. The controller data must be loaded and visible in the editor workspace for this operation to be able to highlight the differences. For example, if an upload from a controller operation is performed and then a load from database is performed, the database version of the data is what is loaded in the editor workspace. Since the restore copy and database are identical, the comparison operation will not indicate any differences. Restore (Copy) DB Editor Workspace The Restore Database Data command restores a copy of the controller data from the central database. The editor maintains a copy of the controller database in a temporary repository anytime the controller is loaded or stored from/to the database. A restore operation will replace the active data in the editor workspace with the copy from the restore repository. This will discard any changes that have been made to the data and restore it to the last version saved in the database. Restore (Copy) DB Editor Workspace The Quick Compare command is NOT supported for NextPhase controllers. Use the Upload from Controller command (described below) to perform a comparison between the data stored in a field controller and the copy in the editor database. 3.2.1.3 The Communications Menu The Communications menu contains the following choices: • • Upload From Controller (Ctrl+U) Download To Controller (Ctrl+D) NextPhase Database Editor User Manual Copyright 2002 Siemens GTS 12 NextPhase Database Editor User Manual Menu items are selected by left clicking the menu title or alternatively using the keyboard shortcut keys. Upon initial startup of the editor or when no controllers are currently loaded, only the Upload From Controller menu item is selectable. A controller must first be loaded into the editor before the Download To Controller operation can be performed. The Upload From Controller command uploads the data from the selected controller into the editor. During the upload process a dialog box is displayed showing the progress of the operation. The operator may cancel the operation at any time. The editor will only accept data if the entire operation is successful. Once the upload operation is complete the data is displayed in the editor workspace. This operation will load the controller from the database first if the controller is not currently loaded in the editor. The upload is a two-step process for NextPhase controllers whereby a comparison between controller data and database data is performed first to determine data table differences. A dialog box is presented as shown in Figure 3-6 that indicates the table differences. Figure 3-6: NextPhase Upload Table Selection Screen NextPhase Database Editor User Manual Copyright 2002 Siemens GTS 13 NextPhase Database Editor User Manual The operator can then select the tables of interest to upload. Where only a few parameters may have changed this two-step process limits the amount of data transfer and speeds up the upload operation. The Download To Controller command downloads the data for the selected controller in the editor to the field. During the download process a dialog box is displayed showing the progress of the operation. The operator may cancel the operation at any time. All changes made in the editor for the selected controller will be stored in the controller, overwriting any existing parameters. Once the download operation is complete the operator may continue working within the editor workspace. The download is a two-step process for NextPhase controllers whereby a comparison between controller data and database data is performed first to determine data table differences. A dialog box is presented as shown in Figure 3-7 that indicates the table differences. The operator can then select the tables of interest to download. Where only a few parameters may have changed, this two-step process limits the amount of data transfer and speeds up the download operation. Note: The NextPhase controller must be in standby mode to download configuration data. Figure 3-7: NextPhase Download Table Selection Screen NextPhase Database Editor User Manual Copyright 2002 Siemens GTS 14 NextPhase Database Editor User Manual 3.2.1.4 The Help Menu The Help menu contains a single About selection. The About selection contains version information about the Database Editor. 3.2.2 The Button Bar The button bar located directly below the menu bar is used to provide one-click access to commonly used system functions that are also available through the main menu. Each button contains a “flyover” description of the supported operation. Resting the mouse pointer over the button displays the “flyover” title, which also displays the title in the footer bar. 3.2.3 The Footer Bar The footer bar is used to display informational messages to the operator. The left side of the bar displays the title of the buttons and menu items when selected by the mouse pointer. The right side of the bar displays the Communication Mode used by the editor. 3.2.4 The Controller Display The Controller Display area is shown on the left side of the editor workspace. It provides a list of controllers currently loaded into the editor. The operator needs to select a controller to display and edit the parameters in the Parameter Display area. If only one controller is loaded, by default that controller will be automatically selected. When more than one controller is listed, then the operator can drag and drop one controller to another to copy data parameters from one to the other. Only controllers of the same type can be copied between each other. This can be useful for creating “template” controllers that can later be copied and used as the initial database for new controllers. 3.2.5 The Parameter Display The Parameter Display area is shown on the right side of the editor workspace. It shows the various parameter displays organized as tabbed pages of data for the selected controller. For NextPhase controllers, there are tabs along the top that select between the three classes of NextPhase data tables: Control, Parameters, and Configuration. Tabs along the bottom allow specific table types to be selected. If multiple tables of a given type are supported, then a table selection region is shown in the parameter display to allow the desired table to be selected. In some cases, a third layer of tabs or buttons is presented in the middle of the window to select different portions of a table to be displayed if the data can not all be shown at once. The layout of the parameter screens varies depending on the specific controller type. Example parameter screens are provided in Appendix A. See the NextPhase Operation Manual for detailed information about the NextPhase database tables and parameters. Only one controller database may be viewed at a time in the Parameter Display area. However, the editor does remember the most recently displayed screen for each controller. This feature allows the user to easily compare parameters between multiple controllers of the same type by switching back and forth between the controllers in the Controller Display. NextPhase Database Editor User Manual Copyright 2002 Siemens GTS 15 NextPhase Database Editor User Manual APPENDIX Example Parameter Screens Note: These screen shots are for NextPhase 1.5. Some screen parameters are version specific. Check the NextPhase Operation Manual for a complete description of controller parameters for a specific NextPhase version. NextPhase Database Editor User Manual Copyright 2002 Siemens GTS 16 NextPhase Database Editor User Manual Figure A-1: Active Control Parameters Screen Figure A-2: Schedule Settings Screen NextPhase Database Editor User Manual Copyright 2002 Siemens GTS 17 NextPhase Database Editor User Manual Figure A-3: Fixed Holidays Screen Figure A-4: Floating Holidays Screen NextPhase Database Editor User Manual Copyright 2002 Siemens GTS 18 NextPhase Database Editor User Manual Figure A-5: Plan Mode/Cycle Settings Screen Figure A-6: Plan Splits/Offsets Settings Screen NextPhase Database Editor User Manual Copyright 2002 Siemens GTS 19 NextPhase Database Editor User Manual Figure A-7: Phase Sequence Settings Screen Figure A-8: Overlap Flags Settings Screen NextPhase Database Editor User Manual Copyright 2002 Siemens GTS 20 NextPhase Database Editor User Manual Figure A-9: Overlap Parameters Settings Screen Figure A-10: Phase Flags Screen NextPhase Database Editor User Manual Copyright 2002 Siemens GTS 21 NextPhase Database Editor User Manual Figure A-11: Phase Timing Screen Figure A-12: External Plan Screen NextPhase Database Editor User Manual Copyright 2002 Siemens GTS 22 NextPhase Database Editor User Manual Figure A-13: Controller Configuration Screen Figure A-14: Offsets, Rings, and Miscellaneous Phase Configuration Screen NextPhase Database Editor User Manual Copyright 2002 Siemens GTS 23 NextPhase Database Editor User Manual Figure A-15: Phase Mode/ID Configuration Screen Figure A-16: Vehicle Detector Flags Configuration Screen NextPhase Database Editor User Manual Copyright 2002 Siemens GTS 24 NextPhase Database Editor User Manual Figure A-17: Vehicle Detector Parameters Configuration Screen Figure A-18: Pedestrian Detector Flags/Parameters Configuration Screen NextPhase Database Editor User Manual Copyright 2002 Siemens GTS 25 NextPhase Database Editor User Manual Figure A-19: System Detector Flags/Parameters Configuration Screen Figure A-20: Cabinet Input Function Assignment (Function Type) Screen NextPhase Database Editor User Manual Copyright 2002 Siemens GTS 26 NextPhase Database Editor User Manual Figure A-21: Cabinet Input Function Assignment (Connector /BIU) Screen Figure A-22: Cabinet Output Function Assignment Screen NextPhase Database Editor User Manual Copyright 2002 Siemens GTS 27 NextPhase Database Editor User Manual Figure A-23: Cabinet Type Configuration Screen Figure A-24: Preempt Timings/Flags Settings Screen NextPhase Database Editor User Manual Copyright 2002 Siemens GTS 28 NextPhase Database Editor User Manual Figure A-25: Preempt Phase Flags Settings Screen Figure A-26: Preempt Timings Setting Screen NextPhase Database Editor User Manual Copyright 2002 Siemens GTS 29 NextPhase Database Editor User Manual Figure A-27: Overlap Primary Parent Phase Flags Screen Figure A-28: Overlap Secondary Parent Phase Flags Screen NextPhase Database Editor User Manual Copyright 2002 Siemens GTS 30 NextPhase Database Editor User Manual Figure A-29: Overlap Modifier Phase Flags Screen Figure A-30: Overlap Parameters/Flags Settings Screen NextPhase Database Editor User Manual Copyright 2002 Siemens GTS 31 NextPhase Database Editor User Manual Figure A-31: Overlap Outputs Screen Figure A-32: Coordination Configuration Settings Screen NextPhase Database Editor User Manual Copyright 2002 Siemens GTS 32