1
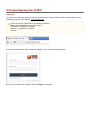
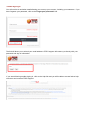
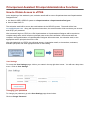
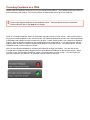
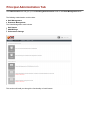
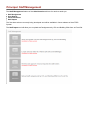
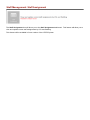
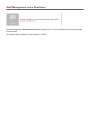
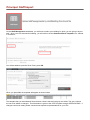
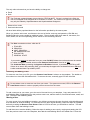
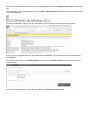
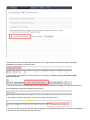
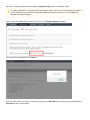
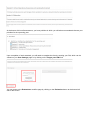
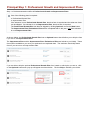
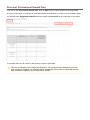
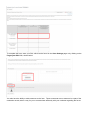
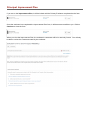
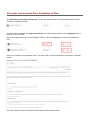
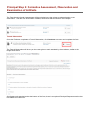
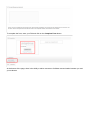
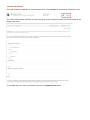
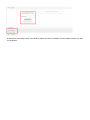
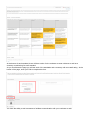
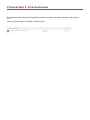
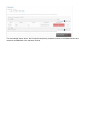
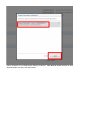
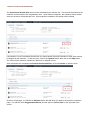
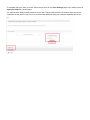
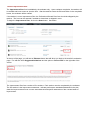
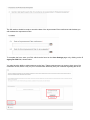
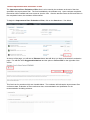
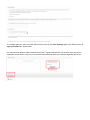
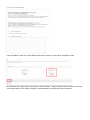
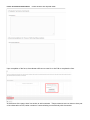
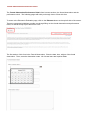
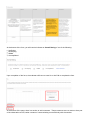
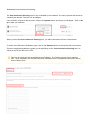
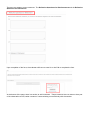
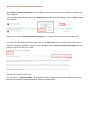
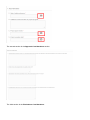
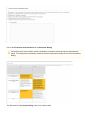
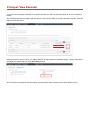
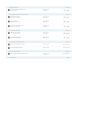
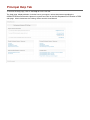
Ohio eTPES Principal User Guide
Ohio Electronic Teacher and Principal Evaluation System
Version 6.3
Principal Table of Contents
1. Principal Introduction to eTPES
a. Principal Signing Into eTPES
b. Principal and Assistant Principal Administrative Functions
c. Providing Feedback on eTPES
2. Principal Administration Tab
a. Principal: Staff Management
i. Staff Management: Staff Assignment
ii. Staff Management: User Search
iii. Staff Management: Issue Resolution
iv. Staff Management: Staff Import
b. Principal: Evaluator Management
c. Principal: Staff Import
d. Principal: SGM Ratings
e. Principal: Performance Ratings
3. Principal Evaluations Tab
a. Principal Optional Self-Assessments
b. Principal Step 1: Professional Growth and Improvement Plans
i. Principal Professional Growth Plan
ii. Principal Improvement Plan
iii. Principal Improvement Plan: Evaluation of Plan
c. Principal Step 2: Formative Assessment, Observation and Examination of Artifacts
d. Principal Step 3: Performance Rating Rubric
e. Principal Step 4: Student Growth Measures (SGM)
f. Principal Step 5: Final Summative
4. Principal Educators Tab
a. Principal: Edit Educator
i. Evaluator View of Teacher Self-Assessment
ii. Evaluator View of Teacher's Step 1: Professional Growth and Improvement Plans
1. Teacher Professional Growth Plan
2. Teacher Improvement Plan
3. Teacher Improvement Plan: Evaluation of Plan
iii. Evaluator View of Teacher's Step 2: Formative Assessment
1. Evaluation Pre-Conference Form
2. Informal Observation
3. Formal Observation/Performance Rubric
4. Evaluation Post-Conference Planning
iv. Evaluator View of Teacher Professional Project
v. Evaluator View of Teacher's Step 3: Student Growth Measures
vi. Evaluator View of Teacher's Step 4: Summative Evaluation
b. Principal View Educator
5. Principal Reports Tab
6. Principal Help Tab
Principal Introduction to eTPES
In May 2009, the Ohio Principal Evaluation System framework was approved by the State Board of
Education, and in November 2011, the framework for the Ohio Teacher Evaluation System was approved.
Ohio’s electronic Teacher and Principal Evaluation System (eTPES) was named as a project in Ohio’s Race
to the Top Grant (2010), and made possible through RttT funds. Work began on the design and development
of the project with the vendor, RANDA Solutions, in November 2011.
The goal of the eTPES project is to automate the teacher and principal evaluation frameworks using
Web-based technology. Ohio eTPES will follow the adopted framework components of 50% educator
performance and 50% student growth measures. The electronic system will allow evaluators and educators
secure access to document, store evidence and complete the evaluation process in a standard Web
browser. Steps will lead evaluators through the process and determine educator performance based on
performance rubrics. A final summative rating (based on the components) for principals and teachers will be
generated through the system.
This eTPES product is undergoing consistent upgrades and not yet complete. We are
planning improvements based on your input from the feedback forms located at the bottom of
many eTPES screens.
Principal Signing Into eTPES
Signing In
To sign in to the electronic Teacher and Principal Electronic System (eTPES), click on the browser on your
desktop and go to the eTPES site, www.ohiotpes.com.
eTPES is currently supported on the following browsers:
IE8+ (Internet Explorer version 8 or later)
Firefox 3.6+ (version 3.6 or later)
Safari 5.1+ (version 5.1 or later)
Chrome
You will be directed to the sign in page and asked for your username and password.
Enter your username and password and click Sign In to proceed.
Trouble Signing In
You will receive an activation email allowing you to set up your account, including your username. If you
have forgotten your password, click on the Forgot your password? link.
The link will direct you to submit your email address. eTPES support will contact you directly with your
password and sign in information.
If you are still having trouble signing in, click on the Help link and you will be able to access further help
resources and contact eTPES Support.
Logging Off
To log off of eTPES, click on your name in the top right hand corner of any screen.
You will see a drop down menu. Click on Log Off.
Principal and Assistant Principal Administrative Functions
How to Obtain Access to eTPES
At the beginning of the academic year, activation emails will be sent to Superintendents and Superintendent
Designees who:
Are listed in ODE’s OEDS-R system as a Superintendent or Superintendent Designee
Have a State Staff I.D.
The activation email will be sent to the email address in the OEDS-R system. The email will be from
[email protected]. Along with important instructions, the email contains a link to activate your account
and set up your password.
After successful login to eTPES, the LEA Superintendent or Superintendent Designee will be required to
complete setup tasks, which includes a principal roster review and verification. When these tasks are
complete, the Superintendent or Superintendent Designee will send access, via activation email, to the
appropriate staff in principal roles for the LEA.
After principals login to eTPES, they will send access, via activation email, to the teachers, evaluators,
assistant principals, and other appropriate staff for the building.
User Settings
To access the User Settings page, click on your name in the top right hand corner. You will see a drop down
menu. Click on User Settings.
Changing your password
To change your password, go to the User Settings page shown below.
Click on Change Password.
When you click on the Change Password link, the pop-up shown below will appear.
Enter your old password. Enter your new password twice. Click on Submit Changes.
The screen will indicate your password has been changed.
Viewing your PIN
A PIN will be used to signify completion of a form.
To view your PIN, stay on the User Settings screen.
Click on Show PIN link, as shown below.
The pop-up below will appear.
Enter your password and click View PIN.
The PIN will appear as shown below.
Providing Feedback on eTPES
Please utilize the feedback screen to give us your thoughts and opinions. Your feedback will help to improve
future releases of the product. This is your product, so please take time to give your feedback.
Do not enter support questions on the feedback screen. These questions will not be answered.
Please utilize the link on the Help tab for support.
There is a “Provide Feedback” button in the bottom right hand corner of each screen. Click on this button at
any time to provide feedback on the current screen. All feedback entered will be sent to the Ohio Department
of Education and RANDA in order to improve the product. Please note that this is not a method of obtaining
support. Support questions entered in the feedback will not be responded to. If you need support, call the
support phone number or email the support email address on the Help screen. An example of the “Provide
Feedback” button is shown below on the left.
After you have entered feedback on a screen, the button will change (see below). You can click on the
“Provide More Feedback” button multiple times to enter additional feedback for that specific screen. When
you click on the “Provide More Feedback” button, you will be taken to a new screen – you will not see the
previous information you entered. An example is shown below on the right.
Below is the Feedback screen. Click on the appropriate radio button and/or enter your comments. Click on
the Save button at the bottom of the screen to save and submit your feedback.
This the only screen you will need to press a Save button to save your selections.
Principal Administration Tab
The Administration tab will give you both Building Administration tools as well Data Management tools.
The Building Administration tools include:
Staff Management
Evaluator Management
The Data Management tools include:
Staff Import
SGM Ratings
Performance Ratings
This section will walk you through the functionality of each feature.
Principal: Staff Management
The Staff Management feature of the Administration tab has four tools to assist you:
Staff Assignment
User Search
Issue Resolution
Staff Import
The first three tools are currently being developed and will be available in future releases of the eTPES
System.
The Staff Import tool will allow you to upload staff assignments by LEA and Building IRNs from an Excel file.
Staff Management: Staff Assignment
The Staff Assignment icon will direct you to the Staff Assignment dashboard. This feature will allow you to
view and update current staff assignments by LEA and Building.
This feature will be available in future version of the eTPES System.
Staff Management: User Search
The User Search icon, will allow you to locate users by State ID or Name.
This feature will be available in future versions of eTPES.
Staff Management: Issue Resolution
The Staff Management Issue Resolution feature will allow you to review and approve the removal requests
for staff rosters.
This feature will be available in future releases of eTPES.
Staff Management: Staff Import
There are two different ways to access the Staff Import feature in eTPES. The first way is through the Staff
Import icon on the Administration tab. The other, shown here, is through the Staff Import icon that is
accessible through Staff Management icon. Each will bring you to the same page.
For complete instructions on how to use the Staff Import feature, see the Principal: Staff Import page under
the Administration tab.
Principal: Evaluator Management
The Evaluator Management dashboard will have three features:
LEA Approved Evaluators
Evaluator Assignments
Issue Resolution
This section will explain the functionality of each feature.
For immediate instructions on how to edit a Primary Evaluator, see the Principal: Edit Educator section of this
guide.
These features will be available in a future version of eTPES and the user guide will be updated
accordingly
Principal: Staff Import
On the Staff Management dashboard, you will have to select your building for which you are going to import
staff. Once you have selected the building, you will click on the the Download Excel Template icon, outlined
in red below.
You will be asked to open the file in Excel, press OK.
When you press OK, the template will appear as shown below.
The template that you download will have thirteen columns that are both gray and white. The gray columns
are not to be edited or changed. This information is given to the eTPES system through OEDS and EMIS. If
changes need to be made, please contact those respective representatives for your LEA.
The only white columns that you have the ability to change are:
Email
Role
The Evaluator credential dates are provided to eTPES by NIET. If there is no date in the field, the
user is not eligible to be assigned as an evaluator in eTPES. The columns for approving evaluators
may only be edited by Superintendents and Superintendent Designees.
Remove from roster
Send activation email
All other fields will be populated based on the information provided by the state system.
When you need to add a user, scroll down to the end of the list, and copy and paste the LEA IRN and
Building IRN to the rows needed for additional users. Then manually enter their state ID, last name, first
name, email, role and corresponding yes/no entries for the remaining columns.
The Role recorded must be a valid role ID:
TEACHER
PRINCIPAL
ASST. PRINCIPAL
HR ADMINISTRATOR
EVALUATOR
GENERAL STAFF
If you need to remove an educator from your roster DO NOT delete the row that educator is entered
on, rather change the Yes/No answer under Remove from Roster? from No to Yes.
The Credential Date, preceding the Approve to Evaluate? column, is provided to eTPES by NIET.
If there is no date in the preceding field, you must keep the approved to evaluate field set to NO until
a valid credential date is provided by NIET.
Removing and Adding a User
To remove a user from your LEA, go to the Remove from Roster? column on the template. The default to
this column is to have the field marked NO. To remove the user, manually type YES into this field.
Do not delete a row to remove a user from your roster. The system must read, YES in the Remove
from Roster column in order to properly remove a user from the roster.
To add a new user to your roster, go to the end of the user list on your template. Copy and paste the LEA
and Building IRNs (if applicable) from the previous user's row, add the state ID, first and last name, email, and
role. Then fill in the remaining fields.
Moving a User
To move a user from one building to another, you will have to remove the user from their original building and
then add them to another building. To remove them from their original building, follow the steps as explained
before by marking the Remove from Roster? field as YES for the user you would like to remove. This will
remove them from that building's roster.
To add that user to another building, follow the steps for adding a new user by copying and pasting the LEA
from the previous user's row in the template, then add the new Building IRN for the added user. Fill out the
state ID, first and last name, email, role, and remaining fields. Ensure the Remove from Roster? field reads
NO.
For more help on using the template, click on the Help - Staff Selection tab found at the bottom right corner
of the Excel template.
This tab, shown below, will give you any information you may need to continue importing your staff.
Once you have completed the form, go to File and then Save As. We recommend saving this template to
your Desktop.
You will then scroll down on the Staff Import page and click the Select a File button to find the document
you just saved.
Once you have selected the correct file, you will then click Submit for Processing.
The eTPES system will process the changes and additions you have made to the template.
Before you apply those changes, click on Download File Upload Report.
This report will be in an Excel sheet and will give you an opportunity to review the records that will be
uploaded to the system, as shown below.
If you go down to the bottom of the Excel sheet, you will see an additional tab labeled Errors - Staff
Selection Record.
If you click on this tab, it will show any errors or discrepancies that are in the data you input into the system.
The image below shows the record that has the error.
If you scroll to the end of the report, you can see exactly what the error is.
In this case, in the second row and the original template, Jane Superintendent has an incorrect role assigned
to her that can only be assigned at the LEA level.
Be sure to check this report before clicking the Apply Changes button to finalize the data.
You will not be able to correct the errors from the error report. Once you have reviewed your errors it
is very important to go back into the original template and correct the errors. Then re-submit the
template and apply changed.
Upon review of the data and correction of the errors, click Apply Changes to finalize.
You will receive a notification of completion.
Now you will be able to access your roster by clicking on the Educators tab on the tool bar and clicking the
Educators button, shown below.
Users with a role of General Staff will not be evaluated in eTPES and do not display in the Educators
lists.
Any user data that is uploaded to the eTPES system through this feature will be considered accurate
and real data. Therefore, any upload for an LEA or building based import, MUST be comprehensive to
avoid automated removal of staff that is not intended.
Principal: SGM Ratings
The SGM Ratings icon will allow you to upload SGM ratings for Vendor Assessment, SLO/Other, and Shared
Attribution from an Excel file.
This feature will be available in a future version of the eTPES system and the user guide will be updated
accordingly.
Principal: Performance Ratings
The Performance Ratings icon will allow you to upload performance ratings from an Excel file.
This feature will be available in a future version of eTPES, and the user guide will be updated accordingly.
Principal Evaluations Tab
The Evaluations tab will contain your personal OPES evaluation forms for the current academic year.
The top section of the page will have your LEA and building information, your information, evaluation model,
evaluator information, and your access level. It is important to review this information to ensure its accuracy.
The workflow shown in this section is for demonstration purposes and is based on the selection of all
electronic forms. There are other options that may be selected by your Superintendent.
At the bottom of this page, you will be able to upload evidence and artifacts that you would like to have on
record regarding your evaluations.
The following sections will walk you through the steps in the all electronic form workflow.
Principal: Optional Self-Assessments
The first part of this workflow is the Optional Self-Assessment section.
You have the option to fill out one, both, or none of the listed self-assessment forms.
To begin completion of either of the self assessment forms, click Start next to the applicable form item.
If you choose to skip a self-assessment, click on the Optional button, next to the Start button, and a pop-up
will appear as shown below.
Click Skip to confirm. If you choose not to fill out either of the forms, you will need to complete this step for
both forms.
If you accidentally skip a form, you may reverse the action by clicking the Restore button and
confirming that you want to restart the process for the form.
Self-Assessment A
If you chose to fill out Self-Assessment A, click start and that form will appear.
The top part of the page will allow you to return to the evaluation workflow page when you click on the
Evaluation button at the top left of the screen.
On the right side of the page, you will have access to Suggested Guidelines as well as the option to Print
to PDF.
This form is private and only accessible by the Principal. The Evaluator cannot view or edit this
form. Upon completion, the Evaluator will be notified the form is complete, but will not be able to
view or edit the form.
Below is a view of Standard 1: Continuous Improvement. You will see the description of the standard as well
as an essential question that complements the standard.
You will then see a series of questions related to the standard.
You will mark each question as:
Never
Rarely
Sometimes
Frequently
Always
You also have the ability to clear the selection completely by clicking on the clear selection link next to the
choices.
The next four standards will follow the same format as Standard 1.
Upon completion of the standards, complete the form by entering your PIN, which can be viewed on your
User Settings page or by clicking on the Forgot your PIN? link.
When completing the self- assessment forms, not all standards are required for the form to be
completed.
You can return to the Evaluations workflow page by clicking on the Evaluation button at the bottom left side
of the screen.
Self-Assessment B
If you chose to skip Self-Assessment A, you have a second option, Self-Assessment B. To begin, click
start and that form will appear.
The top part of the page will allow you to return to the evaluation workflow page when you click on the
Evaluation button at the top left of the screen.
On the right side of the page, you will have access to Suggested Guidelines as well as the option to Print
to PDF.
This form has five standards for the self-assessment which request that you indicate whether each
sub-standard is an Area of Strength or an Area of Growth. To clear the selection, click on the clear
selection link next to each choice.
Each subsequent standard will be assessed in the same format.
At the bottom of this self-assessment, you have priorities in which you will select two standards that are your
priorities for the upcoming year.
Upon completion of each standard, you will need to complete the form by entering your PIN, which can be
viewed on your User Settings page or by clicking on the Forgot your PIN? link.
You can return to the Evaluations workflow page by clicking on the Evaluation button at the bottom left
side of the screen.
Principal Step 1: Professional Growth and Improvement Plans
Step 1 of the demonstrated workflow is Professional Growth and Improvement Plans.
One of the following plans is required:
Professional Growth Plan
Improvement Plan
If the educator is on a Professional Growth Plan, then that form is required and the other two forms
can be skipped. If a educator is on an Improvement Plan, then that form is required.
The Professional Growth Plan can then be skipped by clicking Optional, next to the Start button.
The Improvement Plan: Evaluation of Plan will be completed later in the year, only if the educator
is on the Improvement Plan.
As shown below, the Professional Growth Plan has an Optional button that will allow you to skip the form
if you are on the Improvement Plan.
The Improvement Plan and the Improvement Plan: Evaluation of Plan are locked to you initially. These
forms will be available to you once your evaluator has completed them. The evaluator should skip these
forms if you are not on an Improvement Plan.
If you are able to skip the optional Professional Growth Plan form, based on which plan you are on, click
on the Optional button and a pop-up will appear as shown below. Click on Skip to indicate your choice.
Principal: Professional Growth Plan
If you are on the Professional Growth Plan, click on Start and you will be directed to the page below.
At the top of the page, you will see an Evaluations button that will direct you back to your evaluation page.
You will also have Suggested Guidelines and the option to Print to PDF on the right side of the screen.
To complete the form, fill in each of the sections under the goal listed.
This form is editable by the Principal and Evaluator. The Principal must complete the form first.
Upon Principal completion, the Evaluator will be notified and have access to review/edit the form.
Upon Evaluator completion, the Principal will be notified.
To complete the form, enter your PIN, which can be found on the User Settings page or by clicking on the
Forgot your PIN? link, shown below.
You also have the ability to add comments to the form. These comments are not meant to be a part of the
evaluation record, rather a way for you to communicate efficiently with your evaluator regarding the forms.
Principal: Improvement Plan
If you are on the Improvement Plan, it will be locked until the Primary Evaluator completes the the form.
Once the evaluator has completed the Improvement Plan form, it will become accessible to you. Click on
Continue to view the form.
When you view the Improvement Plan, the evaluator's comments will be in read only format. You will only
be able to review the comments made by the evaluator.
At the bottom of the form, you will have the opportunity to complete the form by entering your PIN.
You will also be able to add any of your own comments in the comments section at the very bottom of the
page.
Principal: Improvement Plan- Evaluation of Plan
The Evaluation of the Improvement Plan is a form that will be locked to the Principal until their Primary
Evaluator completes the form.
Once you have completed your Improvement Plan you will see that its status is now completed and you
are able to view the form.
Below the Improvement Plan, is the Evaluation of Plan. Click on Continue to access and complete the
form.
When you continue to the Evaluation Form, you will be able to view the evaluator's comments in read only
format.
The form will also record the conference dates that the form was discussed.
When you have reviewed the evaluation and discussed it with your evaluator, you will enter your PIN to
complete the form.
You have the ability to add any comments to facilitate communication with your evaluator as well as see any
comments your evaluator made on the form.
Principal Step 2: Formative Assessment, Observation and
Examination of Artifacts
The Formal and Informal Assessments will be unlocked once the primary evaluator begins a new
observation. Until the new observation is added, these items will be locked to the Principal
Formal Observation
Once the Evaluator completes a Formal Observation, click Continue to access and complete the form.
The Formal Observation will show you the notes given to each standard by the evaluator, similar to the
image show below.
Scroll past each standard and at the bottom of the form, there is an optional Principal Response section that
is available to be filled out.
To complete the form, enter your PIN and click on the Complete Form button.
At the bottom of the page, there is the ability to add a comment to facilitate communication between you and
your evaluator.
Informal Observation
Once the Evaluator completes an Informal Observation, click Continue to access and complete the form.
The Informal Observation will show you the notes given by the evaluator in read only format, similar to the
image show below.
To complete the form, enter your PIN and click on the Complete Form button.
At the bottom of the page, there is the ability to add a comment to facilitate communication between you and
your evaluator.
Principal Step 3: Performance Rating Rubric
As each step in the evaluation process is completed, the system will indicate completion by collapsing each
step and showing a green check mark as shown below.
The Performance Rating Rubric will be locked to the Principal until their Primary Evaluator completes the
form.
Once the evaluator fills out the Performance Rubric Rating Rubric and completes it, the system will mark
it as In Progress and you will have the ability to continue the completion process. Click Continue to
complete the form.
The Performance Rating Rubric will show you each standard and what the rating is for each indicator within
that standard. Not all standards have to be rated, those that are rated will turn orange to indicate that.
At the bottom of each standard, there will be a section for the evaluator to enter evidence as well as a
summary overall rating for each standard.
As you scroll down the page you will see each of the standards and a summary with an overall rating. At the
bottom of the page, enter your PIN to complete the form.
You have the ability to add comments to facilitate communication with your evaluator as well.
Principal Step 4: Student Growth Measures (SGM)
The Student Growth Measures are features that will be avaialble in the Spring of 2014.
Training for these features will begin in February 2014.
Principal Step 5: Final Summative
The Final Summative Rating of Principal Effectiveness is a feature that will be avaialble in the Spring of
2014.
Training for these features will begin in February 2014.
Principal Educators Tab
After you have completed your Staff Import, you will be able to view your educators from the
Educators tab.
On the Educators tab, you can either search for a specific educator, or click on the Educators icon, shown
below, and view a list of your educators and building assignments.
At the top of the page, you will see the academic year, LEA and Building information.
For each educator listed, you will see their:
State ID
Last Name
First Name
Evaluation Type
Percent Completion (for the evaluation)
To the right of each listed name there will either be an Edit link or a View link. If you are the Primary
Evaluator, you will be able to edit the the teacher's record and conduct evaluations on the teacher. If you
are not listed as the Primary Evaluator, you will only have to ability to view the teacher's evaluation forms
when they are completed.
For the example shown above, the Principal is the primary evaluator for both of the listed teachers and
therefore can Edit both of the teachers' records.
Principal: Edit Educator
If you are the selected Primary evaluator for an educator, you will have the option to edit their evaluation
forms. When you click the Edit link, you will be directed to that educator's Evaluation page.
The top section of the page will have LEA and building information, evaluation model, evaluator information
and your access level. It is important to review this information to ensure its accuracy.
The workflow shown in this section is for demonstration purposes and is based on the selection of all
electronic forms. There are other options that may be selected by the Superintendent.
At the bottom of this page, you can upload evidence and artifacts to have on record regarding the
evaluations.
The following sections will address the steps that are related the Option 1 workflow which includes all
electronic forms and is the OTES model only.
Changing the Evaluators
The following roles have the ability to modify the Primary and Secondary Evaluators assigned to an
educator in their LEA/Building:
Superintendent
Superintendent Designee
HR Administrator
Principal
The Principal will only have access to the building for which they have the Principal permission for
updating evaluators. They will not be able to update the evaluator(s) assigned to their own OPES
evaluation.
At the top of the Evaluation page, you will see the evaluation information for that educator, including their
Primary and Secondary Evaluators listed. In the screenshots below, Jane Superintendent is listed as the
current Primary Evaluator, while the Secondary Evalutator is unassigned. To change the Primary Evaluator
to another evaluator, click on the change link, outlined in red below. To change or add a Secondary
Evaluator, click on the change link next to the assigned Secondary Evaluators.
You must select at least one Primary Evaluator per educator.
A pop-up will appear listing the LEA-approved evaluators. To make the changes, click the checkbox next to
the new evaluator and then click Apply.
The list will only include LEA-approved evaluators for the building that the teacher or educator is
located.
Now, listed as the Primary Evaluator, is Donna Evaluator. Your Access Level shows that Jane
Superintendent can only view the record.
In selecting the Secondary Evaluator, perform the same actions in selecting the Primary Evaluator. To save
the changes to your selection, click Apply.
You are able to select more than one Secondary Evaluator per educator using the checkboxes next
to the names listed. You may remove a currently assigned secondary evaluator by removing the
check next to the evaluator's name.
Donna Evaluator is now listed as the Primary Evaluator. Your Access Level shows that Jane
Superintendent can only view this record.
When you return to the list of educators, the record for Joe Principal has changed to view. To change the
record for another educator, click on View as shown below.
For Karen Teacher, the Primary Evaluator is Unassigned. Click on the change link and a pop-up would
appear with a list of approved evaluators.
Select the evaluator you would like to assign as the Primary Evaluator and then click Apply.
The list will only include the LEA-approved evaluators for the building that the teacher or educator is
located.
Now the record will reflect the changes made.
Evaluator View of Teacher Self-Assessment
This form is private and only accessible by the Principal. The Evaluator cannot view or edit this
form. Upon completion, the Evaluator will be notified the form is complete, but will not be able to
view or edit the form.
Evaluator View of Teacher's Step 1: Professional Growth and
Improvement Plans
Step 1 of the demonstrated workflow is Professional Growth and Improvement Plans.
One of the following plans are required:
Professional Growth Plan
Improvement Plan
If the teacher is on a Professional Growth Plan, then that form is required and the Improvement
Plan forms can be skipped by the evaluator. If the teacher is on the Improvement Plan, then those
forms are required. The teacher can skip the Professional Growth Plan by clicking Optional, next
to the Start button.
The Improvement Plan: Evaluation of Plan will be filled out later in the year only if the teacher is
on the Improvement Plan.
As shown below, the Professional Growth Plan has an Optional button that can be skipped if the educator
is on on the Improvement Plan.
The Improvement Plan and the Improvement Plan: Evaluation of Plan is locked initially to the teacher.
These forms will be available to the teacher, once the evaluator, has completed them.
The following sections will explain each form in depth.
Teacher Professional Growth Plan
The Professional Growth Plan form must be completed by the teacher first. The form will be locked for the
evaluator until the teacher has completed the form. Upon teacher completion, the evaluator will be notified
and have access to review/edit the form. Upon evaluator completion, the teacher will be notified.
If the teacher is on a Professional Growth Plan, the Improvement Plan and Evaluation of Plan forms should
be skipped by the evaluator. To skip the form, click on the Optional button then click on the Skip button.
The forms can be restored if needed at a later time or skipped in error.
After the teacher has completed the Professional Growth Plan, click on Continue to open the form.
At the top of the page, you will see an Educator button that will direct you back to the teacher’s evaluation
page. You will also have Suggested Guidelines and the option to Print to PDF on the right side of the
screen.
When the form opens you will see the information entered by the teacher regarding their two goals and
evidence. Enter comments regarding professional growth to support these goals in sections 2.3 and 2.6. In
addition, enter the dates discussed in section 3.1.
To complete the form, enter your PIN, which can be found on the User Settings page or by clicking on the F
orgot your PIN? link, shown below.
You also have the ability to add comments to the form. These comments are not meant to be a part of the
evaluation record, rather a way for you to communicate efficiently with your evaluator regarding the forms.
Teacher Improvement Plan
The Improvement Plan form is editable by the evaluator only. Upon evaluator completion, the teacher will
be notified and have access to view the form. After the teacher enters the PIN and clicks on the completion
button, the evaluator will be notified.
If the teacher is on an Improvement Plan, the Professional Growth Plan form should be skipped by the
teacher. The form can be restored if needed at a later time or skipped in error.
To begin the Improvement Plan, click on the Start button. See below.
At the top of the page, you will see an Educator button that will direct you back to the teacher’s evaluation
page. You will also have Suggested Guidelines and the option to Print to PDF on the right side of the
screen.
The Improvement Plan form consists of five sections. Each section must be completed by the evaluator.
The first section is the improvement statement. Indicate performance standards addressed in the plan,
dates the improvement area or concern was observed and specific statements of the concern/areas of
improvement.
The second section addresses the desired level of performance.
The third section addresses the plan of action in detail.
The fourth section addresses assistance and professional development.
The fifth section should be used to record the date of the Improvement Plan conference and the date you
will evaluate the Improvement Plan.
To complete the form, enter your PIN, which can be found on the User Settings page or by clicking on the F
orgot your PIN? link, shown below.
You also have the ability to add comments to the form. These comments are not meant to be a part of the
evaluation record, rather a way for you to communicate efficiently with your evaluator regarding the forms.
Teacher Improvement Plan: Evaluation of Plan
The Improvement Plan: Evaluation of Plan form is to be used by the evaluator at the end of the time
specified in the Improvement Plan. The form is editable by the evaluator only. Upon evaluator completion,
the teacher will be notified and have access to view the form. After the teacher enters the PIN and clicks on
the completion button, the evaluator will be notified.
To begin the Improvement Plan: Evaluation of Plan, click on the Start button. See below.
At the top of the page, you will see an Educator button that will direct you back to the teacher’s evaluation
page. You will also have Suggested Guidelines and the option to Print to PDF on the right side of the
screen.
This form has four sections which are viewable below. The evaluator will indicate the Improvement Plan
conference date, Evaluation of Plan conference date, recommendation and justification for the
recommendation including evidence.
To complete the form, enter your PIN, which can be found on the User Settings page or by clicking on the F
orgot your PIN? link, shown below.
You also have the ability to add comments to the form. These comments are not meant to be a part of the
evaluation record, rather a way for you to communicate efficiently with your evaluator regarding the forms.
Evaluator View of Teacher's Step 2: Formative Assessment
Step 2: Formative Assessment will have the Observation Template, which is viewable by the evaluator
only. It also has the Teacher Professional Project, which is optional.
Prior to starting a new observation, Step 2 will look similar to the image below.
Once the Primary Evaluator selects the Add New button, a series of forms will appear that will open up the
observation process to be completed.
The following sections will explain each part of the process in detail.
Evaluation Pre-Conference Form
The Pre-Conference form must be completed by the teacher first and then the evaluator will close it.
If you need to skip the form, click on the Optional button and a pop-up will appear. Click on Skip to make
your selection.
If you choose to complete the pre-conference form, you will be directed to the form's page similar to the one
show below.
This form is editable by the Teacher and Evaluator. The teacher will review/complete the form first.
Upon completion, the Evaluator will be notified and have access to review/respond to the form.
Upon Evaluator completion, the Teacher will be notified.
There are Suggested Guidelines to guide you through the completion process as well as the ability to print
the form in PDF.
There are three sections to this form:
1. Instructional Planning
2. Instruction and Assessment
3. Professional Responsibilities
In each of the sections, the Teacher will have the ability to response to the content and their comments will
be available in read only format.
At the bottom of each section, the evaluator will have the ability to make comments.
Upon completion of the form, the evaluator will have to enter his or her PIN to complete the form.
At the bottom of the page, there is a section to add comments. These comments are not meant to be a part
of the observation record, rather a means of communicating more efficiently with the teacher.
Informal Observation
When you start an Informal Observation, you will be directed to the observation form. The following pages
will walk you through how to fill out the informal observation form.
To return to the Educator's Evaluation page, click on the Educator button at the top left side of the screen.
There are suggested guidelines to guide you through filling out the informal observation, as well as a way to
print this form to PDF.
This form is editable by the Evaluator only. Upon Evaluator completion, the Teacher will be notified
and have access to view the form. After the Teacher enters the PIN and clicks the completion
button, the Evaluator will be notified.
The first section of this form is the observation information including the date, time, and subject.
The second section is the Evaluator's observations. You will need to check all the items that apply or enter
observation notes in the space provided.
The third and fourth part of the form is the Evaluator Summary Comments, and the Recommendation for
Focus of Informal Observation. These sections are required fields.
Upon completion of the form, the evaluator will have to enter his or her PIN to complete the form.
At the bottom of the page, there is a section to add comments. These comments are not meant to be a part
of the observation record, rather a means of communicating more efficiently with the teacher.
Formal Observation/Performance Rubric
The Formal Observation/Performance Rubric form has two sections: the formal observation and the
performance rubric. The following pages will walk you through how to fill out this form.
To return to the Educator's Evaluation page, click on the Educator button at the top left side of the screen.
There are suggested guidelines to guide you through filling out the formal observation and performance
rubric, as well as a way to print this form to PDF.
The first section of this form is the Formal Observation. Enter the date, time, subject of the formal
observation. Then, enter the observation notes. All of these items are required fields.
The Performance Rubric has three sections:
1. Instructional Planning
2. Instruction and Assessment
3. Professionalism
Each section has standards to be rated. Click on the rating you feel applies and below you can enter
evidence.
Follow this same format for each of the sections.
At the bottom of the form, you will need to indicate an Overall Rating of one of the following:
Ineffective
Developing
Skilled
Accomplished
Upon completion of the form, the evaluator will have to enter his or her PIN to complete the form.
At the bottom of the page, there is a section to add comments. These comments are not meant to be a part
of the observation record, rather a means of communicating more efficiently with the teacher.
Evaluation Post-Conference Planning
The Post-Conference Planning form is only accessible by the evaluator. The form is private and cannot be
viewed by the teacher. The form can be skipped.
If the evaluator chooses to skip the form, click on the Optional button and a pop-up will appear. Click on Sk
ip to make your selection.
When you start the Post-Conference Planning form, you will be directed to the form, shown below.
To return to the Educator's Evaluation page, click on the Educator button at the top left side of the screen.
There are suggested guidelines to guide you through filling out the Post-Conference Planning form, as
well as a way to print this form to PDF.
This form is private and only accessible by the Evaluator. The Teacher cannot view or edit this
form. Upon completion, the Teacher will not be notified the form is complete and will not be able to
view or edit the form.
There are two areas to enter comments. The Reflective Questions for Reinforcement and the Reflective
Questions for Refinement.
Upon completion of the form, the evaluator will have to enter his or her PIN to complete the form.
At the bottom of the page, there is a section to add comments. These comments are not meant to be a part
of the observation record, rather a means of communicating more efficiently with the teacher.
Evaluator View of Teacher Professional Project
The Teacher Professional Project form is available for both the teacher and the evaluator to complete and
can be skipped.
If you choose to skip the form, click on the Optional button and a pop-up will appear. Click on Skip to make
your selection.
When you start the Teacher Professional Project form, you will be directed to the form, shown below.
To return to the Educator's Evaluation page, click on the Educator button at the top left side of the screen.
There are suggested guidelines to guide you through filling out the Teacher Professional Project form, as
well as a way to print this form to PDF.
There are four sections to this form.
The first section is Important Dates. Fill in the date for each event by clicking on the calendar icon next to
the field and selecting the appropriate date. These are required fields.
The second section is the Approval Considerations section.
The third section is the Evaluations Considerations.
Part of the Evaluation Considerations is the Evaluator Rating.
The project rating, shown below, and the evaluator's comments should be used to determine the
rating. This rating will be holistically combined with the Observation Rating for the Final Summative
Rating.
The last section is the Project Rating, which is a required field.
Upon completion of the form, the evaluator will have to enter his or her PIN to complete the form.
At the bottom of the page, there is a section to add comments. These comments are not meant to be a part
of the observation record, rather a means of communicating more efficiently with the teacher.
Evaluator View of Teacher's Step 3: Student Growth Measures
Step 3: Student Growth Measures is a feature that will be available in the Spring of 2014.
Training for this feature will begin in February of 2014 and the User Guide will be updated accordingly.
Evaluator View of Teacher's Step 4: Summative Evaluation
Step 4: Summative Evaluation is a feature that will be available in the Spring of 2014.
Training for this feature will begin in February of 2014 and the User Guide will be updated accordingly.
Principal: View Educator
If you are not the primary evaluator for a specific teacher you will only have the ability to view an educator's
record.
The example below shows what it will look like to only have the ability to view an educator's record. Click Vi
ew to access the record.
When you click to view a record, you will be directed to that educator's evaluation page. Notice at the top of
the page you will see that you have View Only access.
All of the forms and steps in the observation process will be seen, however they will be locked to you.
Principal Reports Tab
Currently there are not reports available to see. As reports are added to the Principal permission,
the User Guide will be udpated accordingly.
Principal Help Tab
To access the Help page, click on the Help tab on the tool bar.
The Help page, displayed below, includes how to get support, various documents regarding the
OPES/OTES framework and the electronic system and a link to the Ohio Department of Education eTPES
web page. Also included are the Training Videos and this User Manual.
Support Contact Information
There are three different support contacts to select from. To ensure you receive the quickest response to
your support questions, it is important that you contact the correct support team.
For policy related questions, you will need to contact [email protected].
For technical questions regarding the eTPES website, you will need to click on the Online Support
Request link, email [email protected], or call 1877.314.1412. For the fastest most efficient response,
fill out the Online Request form by clicking the link provided.
For questions regarding evaluator credentialing, you will need to email [email protected].
Resources and Training Videos
There are a number of help documents, user guides and other resources, including training videos available
for you to review.
Click on any link to access the related resource.