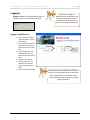
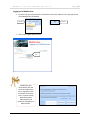
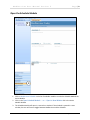
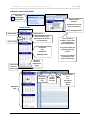
1
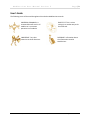
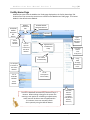
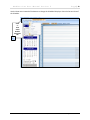
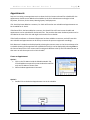
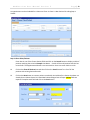
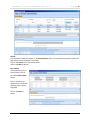
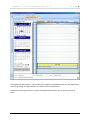
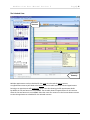
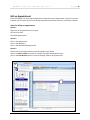
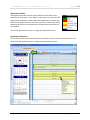
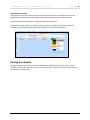
254 Broad Street SW ● Cleveland, TN 37311 ● 423-479-6729
MedServices
S c he dul e
User Manual
Version 5
MedServices User Manual Version 5
P age |2
Table of Contents
Table of Contents .................................................................................................................................... 2
User’s Guide ............................................................................................................................................ 3
Logging In ................................................................................................................................................ 4
Logging into MedServices: ................................................................................................................... 4
Logging out of MedServices ................................................................................................................. 5
Facility Home Page .................................................................................................................................. 6
Schedule Module Description .................................................................................................................. 7
Open the Schedule Module ..................................................................................................................... 8
Adjust the View of the Schedule .......................................................................................................... 9
Appointments ....................................................................................................................................... 11
Create an Appointment ..................................................................................................................... 11
Appointment Wizard ......................................................................................................................... 12
The Schedule View ............................................................................................................................ 17
Edit an Appointment ............................................................................................................................. 18
Appointment Status........................................................................................................................... 19
Appointment Resource ...................................................................................................................... 19
Appointment Location ....................................................................................................................... 20
Printing the Schedule ............................................................................................................................ 20
Contact Information .............................................................................................................................. 21
©DataNet Solutions, Inc. 2009 ● 254 Broad Street SW ● Cleveland, TN 37311 ● www.DataNetSolutions.org ● 423-479-6729
MedServices User Manual Version 5
P age |3
User’s Guide
The following Icons will be used throughout this and other MedServices manuals.
UNIVERSAL COMMAND: A
command that will work in all
modules or is a common
operation in all modules.
SHORT CUT: This is a time
saving tip or another way to do
the same task.
IMPORTANT: Pay close
attention to these directions.
DATABASE: Information about
the information stored in
MedServices.
©DataNet Solutions, Inc. 2009 ● 254 Broad Street SW ● Cleveland, TN 37311 ● www.DataNetSolutions.org ● 423-479-6729
MedServices User Manual Version 5
Logging In
P age |4
Before you can login to
MedServices, you must have a User
Name and Password. Only users
with Administrative rights can set
up new users and reset passwords.
Updates: MedServices automatically checks for
updates each time the software is opened.
Logging into MedServices:
1. Click on the drop down
arrow to display a list of
clinic names.
2. Click on the desired clinic
name to enter the clinic
name into the Clinic text
box.
3. Hit the TAB key on the
keyboard to move the
cursor to the User Name
Field
4. Type in a User Name
5. Hit the TAB key on the
keyboard to move the
cursor to the Password
Field
6. Click on the Log In button
Drop Down
Arrow
Log In
Button
User Names and Passwords are case sensitive.
Each user is assigned permission to Add, View,
Edit, or Delete data in each module. Only
users with Administrative rights can change
these permissions.
©DataNet Solutions, Inc. 2009 ● 254 Broad Street SW ● Cleveland, TN 37311 ● www.DataNetSolutions.org ● 423-479-6729
MedServices User Manual Version 5
P age |5
Logging out of MedServices:
1. From the File menu select the Exit command or click on the X button in the top right corner
of the MedServices V5 Window.
File Menu
X Button
2. Click on the Log Out button to Exit
Log Out
Button
MedServices will
automatically lock the
screen and require the
user to log back in after
10 minutes of inactivity.
This is a system setting
dictated by HIPAA
requirements and
cannot be changed by an
Administrator.
©DataNet Solutions, Inc. 2009 ● 254 Broad Street SW ● Cleveland, TN 37311 ● www.DataNetSolutions.org ● 423-479-6729
MedServices User Manual Version 5
P age |6
Facility Home Page
MedServices opens with the MedServices Today page displayed on the Facility Home Page Tab.
Statistics from the current days activities are tracked on the MedServices Today page. The Patient
Module is the default Active Module.
Show/Hide
Module
Navigation
Bar
Button
Active
Module
Window
MODULE
NAVIGATION
BAR
Available Module
Navigation Buttons
Menu Bar
Links to
open an
Instance of
the Active
Module
Open
Instance
Navigation
Buttons
Appointments
scheduled for
today
Using Costs
added in
Code
Configuration
List of Visits
recorded today
Using
AWP
“Average
Wholesale
Price”
List of Open
Instances of
the Active
Module
List of
Available
Modules
List of
Prescriptions
written today
Active
Module
The Clinic’s Database automatically refreshes every 3-5
minutes. When making a change to the system like
entering a new patient or scheduling an appointment,
other users will be able to see the update within
3-5 minutes. Users can manually refresh
their system by using the Refresh Button.
Manually
Refresh
Database
to update
Daily Clinical
Activity
Summary
©DataNet Solutions, Inc. 2009 ● 254 Broad Street SW ● Cleveland, TN 37311 ● www.DataNetSolutions.org ● 423-479-6729
MedServices User Manual Version 5
P age |7
Schedule Module Description
The Schedule Module is like a note board. Appointments can easily be created, moved, resized, and
reassigned around the board. When the appointment is scheduled, the Appointment Wizard will allow
the user to select an existing patient or create a new patient record with limited data. All of the patient
appointments are assigned a unique Appointment ID and are linked to the Patient’s Record. A list of past
and future appointments scheduled for the patient can be found on the Appointment tab of the
Patient’s Record. A list of future appointments can be found on the Summary tab of the Patient’s
Record.
The Schedule Module can be used to reserve meeting space and clinic resources. Appointments can also
be scheduled for clients or “Non-Patients” like drug reps or vendors.
An appointment is just a note on the schedule until a Visit Record is created for the patient’s encounter
with a provider. The Physician’s Daysheet is linked to the Schedule Module so that the most updated
information about the appointment will be available to the clinic’s staff.
©DataNet Solutions, Inc. 2009 ● 254 Broad Street SW ● Cleveland, TN 37311 ● www.DataNetSolutions.org ● 423-479-6729
MedServices User Manual Version 5
P age |8
Open the Schedule Module
2
1
1. Click on MedServices Schedule in the list of available modules to make the Schedule Module the
Active Module
2. Click on the Open Schedule Module – or – Open in New Window link in the Active
Module window
3. The Schedule Module will open in a new tab or window. If the schedule is opened in a new
window, the user will have to toggle between MedServices and the Schedule.
©DataNet Solutions, Inc. 2009 ● 254 Broad Street SW ● Cleveland, TN 37311 ● www.DataNetSolutions.org ● 423-479-6729
MedServices User Manual Version 5
P age |9
Adjust the View of the Schedule
Show/Hide
Active Module
Navigation Bar
Select a Current
Resource
Appointments show for
the Current Resource
Navigation Pane
Clinic = All Appointments
Ahead 1 Month
Back 1 Month
Today
Jump to Today
Adjust the
Day View
Zoom Level
Click on a date to view
appointments schedule for
the selected date
Resources can be
Providers, Service Areas,
Facilities/Meeting
Spaces, Equipment etc.
Last Month
And
Next Month
A separate schedule can
be displayed for each
resource.
REFERENCE ONLY
Resources are added to
the Schedule by the
Clinic’s Administrator.
Adjust the
Minimum
Appointment
Length
Show/Hide
Navigation
Pane
Display
Schedule
for Today
Display Schedule
for a
Day
Work Week
Full Week
Month
Navigation
Pane
©DataNet Solutions, Inc. 2009 ● 254 Broad Street SW ● Cleveland, TN 37311 ● www.DataNetSolutions.org ● 423-479-6729
MedServices User Manual Version 5
P a g e | 10
Use the View menu instead of the buttons to change the Schedule’s display or Print the Current View of
the Schedule.
Show
or
Hide
Active
Module
Navigation
Bar
©DataNet Solutions, Inc. 2009 ● 254 Broad Street SW ● Cleveland, TN 37311 ● www.DataNetSolutions.org ● 423-479-6729
MedServices User Manual Version 5
P a g e | 11
Appointments
Step one in creating a new appointment is to select the clinical resource that will be scheduled for the
appointment. Resources are added to the schedule by the Clinic Administrator and might include
Physicians, Clinicians, Service Areas, Meeting Spaces, and Equipment.
If Dr. Smith has been added as a resource, Dr. Smith will have her own schedule and appointments can
be scheduled for Dr. Smith.
If the Dental Clinic has been added as a resource, the Dental Clinic will have its own schedule and
appointments can be scheduled for the Dental Clinic. The provider that treats the dental patient can be
recorded at the time of the visit and might not have their own schedule.
If the Conference Room or Ultrasound Equipment has been added as a resource, each will have their
own schedule and appointments can be set up to reserve the space or equipment accordingly.
Each Resource’s schedule can be displayed by selecting the resource name on the Current Resource list.
A schedule showing all the appointments scheduled at the clinic can be displayed by selecting Clinic on
the Current Resource list. Each resource will be assigned a different color by the Clinic Administrator so
that users can tell them apart on the clinic schedule.
Create an Appointment
Option 1
1. Click on the File Menu inside the Schedule Module Tab.
If the Schedule was opened in a new window there will be
only one File Menu to choose from.
2. Select the New Appointment Command
Option 2
1. Double Click on the desired appointment time in the schedule.
Double
Click
©DataNet Solutions, Inc. 2009 ● 254 Broad Street SW ● Cleveland, TN 37311 ● www.DataNetSolutions.org ● 423-479-6729
MedServices User Manual Version 5
P a g e | 12
Appointment Wizard
If the Current Resource is set to Clinic, the Appointment Wizard will open at Step 1 where the user will
be prompted to choose a Resource. If a resource is selected in the Current Resource field; the
appointment will be scheduled for that resource and the Appointment Wizard will open at Step 2.
Use the << Back button in the Appointment Wizard to go back to Step 1 if necessary.
Step 1: Chose a Resource:
Click on the Select box to schedule the appointment with a specific resource.
Click on the Next >> button
©DataNet Solutions, Inc. 2009 ● 254 Broad Street SW ● Cleveland, TN 37311 ● www.DataNetSolutions.org ● 423-479-6729
MedServices User Manual Version 5
P a g e | 13
An appointment can be scheduled for a Patient or Client. A client is a Non-Patient like a Drug Rep or
Vendor.
Step 2: Chose Client/Patient:
Enter data in one of the Choose Patient fields and click on the Search button to display a table of
patients matching that criteria. Example: Last Name = Smith will show all patients with the last
name Smith. The Appointment Wizard is not case sensitive. Users can enter Smith or smith.
Or
Click on the Show All Patients box and then Click on the Search button for a list of all the
patients with existing Patient Records.
Or
Click on the New button to create a patient record with minimal data for a Patient that does not
already have a Patient Record. A Create New Patient dialogue box will open. Yellow fields are
required. Complete each field and click on the Save button.
©DataNet Solutions, Inc. 2009 ● 254 Broad Street SW ● Cleveland, TN 37311 ● www.DataNetSolutions.org ● 423-479-6729
MedServices User Manual Version 5
P a g e | 14
Patient
A list of patient records will appear in the Choose Patient table. If a new patient record was created, the
new patient record will appear in the table.
Click on the Select box for the correct patient
Click on the Next >> button
Non- Patient
If the appointment is for
a Non-Patient, click on
the Choose Non-Patient
button
Enter a name for this
appointment into the box
(Example: Hillary Green;
Drug Rep)
Click on the Next >>
button
©DataNet Solutions, Inc. 2009 ● 254 Broad Street SW ● Cleveland, TN 37311 ● www.DataNetSolutions.org ● 423-479-6729
MedServices User Manual Version 5
P a g e | 15
Step 3: Appointment Details:
Set the Appointment Date, Start Time, and End Time
Select an Appointment Type from the list
Appointment Status and Patient Location are traditionally used to track the appointment process after
the patient has arrived on the day of the actual appointment.
Enter Appointment Notes in the box. This might include a chief complaint, reason for appointment, or
special instructions to the provider or clinic staff.
Click on the Save & New button to create another appointment
Or
Click on the Save & Close button to close the Appointment Wizard and return to the schedule
©DataNet Solutions, Inc. 2009 ● 254 Broad Street SW ● Cleveland, TN 37311 ● www.DataNetSolutions.org ● 423-479-6729
MedServices User Manual Version 5
P a g e | 16
The appointment will appear on the schedule color coded to the scheduled resource. If the appointment
time is long enough, the appointment notes will be visible on the schedule.
Double click on the appointment to re-open the Appointment Wizard if any corrections need to be
made.
©DataNet Solutions, Inc. 2009 ● 254 Broad Street SW ● Cleveland, TN 37311 ● www.DataNetSolutions.org ● 423-479-6729
MedServices User Manual Version 5
P a g e | 17
The Schedule View
Current
Resource
Appointment
Summary
Multiple appointments can be scheduled for the same time slot and the same resource.
An appointment summary will show at the bottom of the Schedule tab for the selected appointment.
Pointing to an appointment will temporarily open a note box showing the full appointment details.
By default the Current Resource is set to Clinic. The schedule shows all appointments for all resources
when the Current Resource is set to Clinic. Select the name of a resource on the Current Resource menu
to view the appointments scheduled for the selected resource.
©DataNet Solutions, Inc. 2009 ● 254 Broad Street SW ● Cleveland, TN 37311 ● www.DataNetSolutions.org ● 423-479-6729
MedServices User Manual Version 5
P a g e | 18
Edit an Appointment
There are 3 options for accessing the Appointment Wizard to edit an appointment. The short cut menu
in Option 1 also contains short cuts to change the Appointment Status, Resource, and Patient Location.
Steps for editing an appointment.
Option 1
Right click on the appointment to bring up
the short cut menu
Select Edit Appointment
Option 2
Click on the Appointment
Click on the Edit Menu
Click on the Edit Selected Appointment
Option 3
Double click on the appointment to open the Appointment Wizard
Use the << Back and Next >> buttons to navigate the Appointment Wizard steps.
Click on the Save & Close button to save the changes made to the appointment.
2
1
©DataNet Solutions, Inc. 2009 ● 254 Broad Street SW ● Cleveland, TN 37311 ● www.DataNetSolutions.org ● 423-479-6729
MedServices User Manual Version 5
P a g e | 19
Appointment Status
The Appointment Status shows the clinic staff the current status of the
appointment. Each status is color coded. A status color bar to the left of the
appointment will always be visible. When the appointment is selected, the
border of the appointment will reflect the status color and the status of the
appointment will show in the appointment summary box at the bottom of
the schedule.
Use the Edit Appointment options to change the appointment status.
Appointment Resource
To view the schedule of each individual resource, select the resource from the Current Resource list.
Use the Edit Appointment options to change the appointment resource.
©DataNet Solutions, Inc. 2009 ● 254 Broad Street SW ● Cleveland, TN 37311 ● www.DataNetSolutions.org ● 423-479-6729
MedServices User Manual Version 5
P a g e | 20
Appointment Location
The appointment Location tracks the patient from the time they enter the reception area until the
appointment is completed. The Clinic Administrator will set up the locations used by the clinic.
Use the Edit Appointment options to change the appointment location.
If the patient is being seen by a provider that uses the Physician Daysheet to record the visit, the
Provider can view and change the appointment location on the Physicians Daysheet.
Printing the Schedule
The Administration manual for the Schedule Module gives detailed instructions on how to use the
schedule’s report writer. Users can print the current view of the schedule using the Print Current View
command on the View Menu.
©DataNet Solutions, Inc. 2009 ● 254 Broad Street SW ● Cleveland, TN 37311 ● www.DataNetSolutions.org ● 423-479-6729
MedServices User Manual Version 5
P a g e | 21
Contact Information
MedServices Technical Support
[email protected]
423-479-6729 Ext. 1
Register for Check with a Tech “CWAT”
[email protected]
General Question
[email protected]
423-479-6729 Ext. 1
DataNet Solutions Sales and Marketing
[email protected]
423-479-6729 Ext. 2
DataNet Solutions Accounting
423-479-6729 Ext. 3
©DataNet Solutions, Inc. 2009 ● 254 Broad Street SW ● Cleveland, TN 37311 ● www.DataNetSolutions.org ● 423-479-6729