1
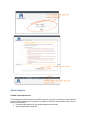
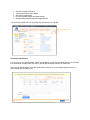
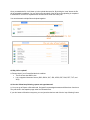
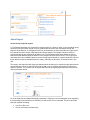
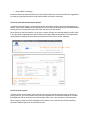
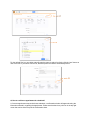
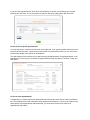
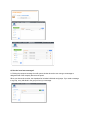
Provider Portal User Manual
Please find and then click the subject you are interested on the left. Questions and answers about using
this system will show with illustrations. If you still have problems, contact your IT staff or call support for
more information please.
Make sure javaScript is enabled in your browser.
General Questions
Q: What is the Provider Portal? What are the main features?
A: The Provider Portal is designed for referring providers to access information regarding the patients
they have referred to the practice owning the portal.
•
•
•
Referring Providers can access reports, appointment history, and basic demographic related to
patients.
Appointment requests can be created and sent to the practice owning the portal. Once scheduled,
a confirmation message comes back to the requesting user showing that their requested
appointment has been scheduled. Scheduled appointments will also show on a calendar
An interactive messaging tool is available so that referring providers can communicate with staff
of the practice owning the portal.
Q: How to login the system?
A: An Admin user of the portal should be able to provide two things before logging into the portal: a
username, password and a web address to access the portal. After you enter in your username and
password, you will be prompted to accept a HIPAA Security Agreement. This will display at every login,
and you will have to click the “I Accept” option.
Once logged in, you will be led to a screen with a setup similar to the one shown below. We have four
main tabs to work in that are all independent from each other: Reports, Appointments, Scheduler, and
Message Center.
About Snapshot
Q: What is this Snapshot for?
A: The Snapshot as the first screen to see after every time you login, it provides you a brief view and
control of thing happening here. It is also the only place to access our upload wizard. Here is a list of
things you can do here:
• Check and view details of all your pending appointment requests
• Upload patient files to image box
•
•
•
•
•
Get new message notification
View reports that are newly added
See today’s appointment
Check all followed reports and appointments
Stop following selected reports and appointments
You can always update the view by clicking the refresh button on top right.
Q: How do I upload files?
A: If you click on the “Upload Wizard” button from snapshot, you will see the upload screen. You will need
to fill information like patient last, first name; referral and office phone before you attach files.
There are two button named “auto” after each section, which is a new convenient feature allow you to
select patient and referral from list.
Once you attached a file, it will show up in the upload document list. By clicking the “start” button the file
will be uploaded immediately. You can click on the thumbnail of the file when the uploading is completed
to download or view the file. Uploaded files will also shows under the history tab.
You can also attach multiple files and upload together.
Q: Why I fail to upload?
A: Please check if your file satisfied the both condition:
• The file is less than 2MB in size.
• It is a supported document format ( DOC, DOCX, GIF, JPG, JPRG, PDF, PNG, RTF, TXT, and
XPS)
Q: How do I follow/stop following reports and appointments?
A: You must go to Report or Scheduler tab, find specific reports/appointments and follow them from there.
They will show in the snapshot page under the Followed Items.
If you don’t want to follow them anymore, you can just select the item and click the “stop following” button.
About Report
Q: How to find a specific report?
A: The Reports tab allows user to search for specific reports in a variety of ways. In the colored bar going
across the top of the search results, there is a radio button where the user can search through My
Reports, Group Reports, or All Reports. Each user will be linked to a referring provider and a group and
this restricts the user’s access to My Reports and Group Reports. The linkage of both the referring
provider and groups are managed by an Admin user. The All Reports radio button allows the user to
search across all data and pays no attention to the settings tied to the user account. To the right of the
radio buttons are four available options to search through reports based on a specific timeframe. Each of
these options will pull all available reports for today, yesterday, the last week, or the last month in one
click.
The arrow in the search box will trigger a dropdown which will allow you to search through reports across
several different criteria. At least one field must be field out (or a complete date range) in order for the
search to perform. You can also use as regular search box by just typing keywords in the field follow by
clicking the search button.
For a few fields, we have added formatting parameters in a light grey color that appears upon expanding.
If the formatting for these fields is not followed, you will receive an error message. These are the fields
with their required formatting:
•
•
Last Four SSN: xxxx
Phone: xxxxxxxxxx (numbers only)
•
Date of Birth: mm/dd/yyyy
Important: Please be aware that performing very broad searches are not recommended. We suggest that
you start your searches with narrow criteria and broaden the criteria if necessary.
Q: How to view and sort the search results?
A: Search results will display in a list showing specific information regarding the report and appointment
reason. Each column heading can be clicked on to sort the results in an ascending or descending manner.
Clicking the icon with two green boxes will launch the report in a new window.
When clicking on the plus symbol (+) on an item, a section will open up three tabs where you will be able
to see all reports, all appointments, and insurance information related to that patient. The patient’s basic
demographic will display just above the three tabs (Name, DOB, Phone number, Address).
Q: How to view reports?
A: When viewing search results, there will be an icon in the last column that looks like a document. By
clicking this icon, you can launch the report tied to the appointment. Documents will appear in a window
that displays in front of the portal. Users will be able to print, save, zoom, minimize or close the report.
When a report is minimized, a bar will appear at the bottom of your view that will hold that minimized
document. Multiple reports can be minimized at once.
About Appointment
Q: How to schedule an appointment?
A: The Scheduler tab is used as a way for referring physicians to request appointments and check the
status on their appointment requests. Referring practices can use this tab simply to request and
appointment for their patient to be seen at the practice who hosts the portal.
First, you will need to type the patient’s full name. You then have the option to click the auto button, which
will display a list of relevant patients and their demographic information. Once you have selected a patient,
his/her demographic information will be automatically filled into the form.
When you click the “auto” button at the end of Study field, you will be able to select study from a list after
you choose the facility and department. This also supports choosing multiple reasons and you can easily
remove any by click the close button of each item. If you didn’t find any reason you want, you can directly
type in the filed too.
For the referral filed, you can either manually type the name or select from list by click the “auto” button at
next to the field. If you select from the list, the office phone filed will be automatically filled in.
Q: How to confirm an appointment is scheduled?
A: Once an appointment request has been submitted, a confirmation window will appear showing the
information entered in regarding the appointment. Please note that there is a print icon in the top right
corner that can be clicked to print the confirmation sheet.
If you go to the appointment list, which is the second button on top left, you should see your request
shows under “this week”. Or you can perform a search at the top by typing patient last, first name.
Q: How to find a specific appointment?
A: On the top there is a search box with arrow on the right side. If you type the patient name into the box
and click the search button, a basic search is performed. For an advanced search, you can click on the
small arrow to display more options in the dropdown.
The radio buttons on the top allow you to search through My Appointments, Group Appointments, or All
Appointments. To the left, you can search for appointments through This Week, Tomorrow, Today, and
Last Week.
Q: How to view appointments?
A: Expanding on a search result in the Appointment tab will open the same view as it did in the Reports
tab. The only difference is that it defaults to show appointment information. If you were to expand on the
same patient in the Appointments and Reports tab, you would have access to the same list of
appointments and reports.
You can also click on the third button near the top of the screen (with a calendar and magnifying glass
icon) to switch to calendar view. When you hover your mouse over any individual appointment, details will
show up in a box with the appointment information and status. Pending requests and confirmed
appointments will appear in different colors. Remember that the calendar will only refresh and load new
data when you perform a new search. Changing the date range will not refresh the calendar.
About Message Center
Q: What does this message center do?
A: The Message Center is a way for users and the staff of the practice owning the portal to communicate
with each other. Referring providers can communicate with the portal-owning practice’s staff by sending
and receiving messages using the Message Center. MedInformatix users will see these messages
available as they normally do through the Messages area of the application; they will not have to log into
the provider portal to send or receive messages.
Q: How do I receive and view messages?
A: In the view below, referring practices can receive messages in their inbox confirming that an
appointment has been booked. This message directly relates to an appointment request made by the
portal user. If the process for handling appointment requests, as outlined in the section for the Scheduler
Tab, is followed as suggested then confirmation messages will be sent back to the portal user showing
that appointment requests have been scheduled.
Q: How do I send new messages?
A: Clicking the compose message icon will open a window where the user can type a message to
designate staff of the company that owns the portal.
When you choose the receiver, the dropdown list includes individuals and groups. If you send a message
to a group, every individual in the group will see your message.