1
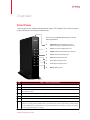
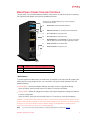
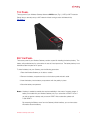
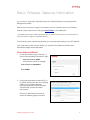
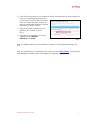
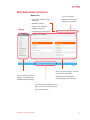
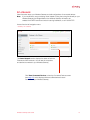
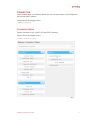
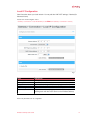
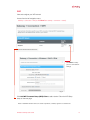
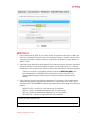
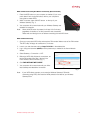
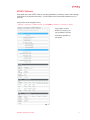
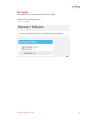
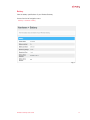
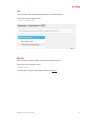
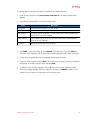
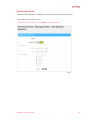
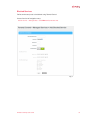
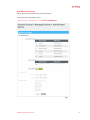
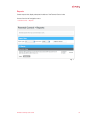
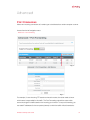
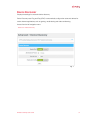
XFINITY Voice and Internet
Wireless Gateway
User Guide
i
Version 1.0 6/22/10
Table of Contents
About Your Wireless Gateway
1
Overview
2
Front Panel ..........................................................................................................................2
Rear Panel Connectors and Controls ..................................................................................3
Top Panel ............................................................................................................................4
Bottom Panel .......................................................................................................................4
Bottom Label .......................................................................................................................5
Basic Wireless Gateway Information
6
Home Network Wizard.........................................................................................................6
Web Management Interface Menus.....................................................................................8
Web Management Interface ................................................................................................9
At a Glance ..........................................................................................................................10
Connection ..........................................................................................................................11
Connection Status ...............................................................................................................11
Local IP Configuration .........................................................................................................12
WiFi 13
WiFi Setup ...........................................................................................................................14
Connecting a Computer or Other Device to your WiFi Network ..........................................15
For Non-WiFi Protected Setup (WPS) Computers ..............................................................15
For WiFi Protected Setup (WPS) Computers ......................................................................15
WPS Method for WiFi Connection 15
WPS via PBC Connectivity/One Button Connectivity (Recommended)
16
WPS via PIN Connectivity 16
XFINITY Network .................................................................................................................17
Firewall ................................................................................................................................18
Software ..............................................................................................................................19
Hardware .............................................................................................................................20
System Hardware ................................................................................................................20
Battery .................................................................................................................................21
Wireless Gateway User Guide
i
LAN Ethernet .......................................................................................................................22
WiFi 23
Wizard .................................................................................................................................23
Connected Devices
24
Computers ...........................................................................................................................24
Parental Control
26
Managed Sites.....................................................................................................................26
Blocked Sites .......................................................................................................................27
Blocked Keywords ...............................................................................................................28
Managed Services ...............................................................................................................29
Blocked Services .................................................................................................................30
Managed Devices ................................................................................................................31
Reports ................................................................................................................................33
Advanced
34
Port Forwarding ...................................................................................................................34
Port Triggering .....................................................................................................................35
DMZ .....................................................................................................................................36
Device Discovery .................................................................................................................37
Troubleshooting
Logs
38
38
Diagnostic Tools...................................................................................................................39
Restore/Reset Gateway ......................................................................................................40
Change Password ...............................................................................................................41
Wireless Gateway User Guide
ii
About Your Wireless Gateway
Your Wireless Gateway is the next generation cable modem and Voice-Over-IP (VoIP) adapter,
integrated with home gateway features. It combines a two-line Embedded Media Terminal Adapter
with an integrated router, wireless transmitter and four Gigabit Ethernet RJ45 ports. The XFINITY
Wireless Gateway has been designed to meet PacketCable™ 1.5 and 2.0 and DOCSIS® 3.0
specifications.
Here’s what you get
...when you subscribe to both XFINITY Digital Voice and High-Speed Internet services:
•
WiFi Technology — WiFi is a way of connecting your computers and other devices to the
network without wires. WiFi technology uses radio frequency to connect to the Internet
wirelessly and gives you the freedom to connect from computers in your home network. Your
Wireless Gateway can connect to b, g and N clients simultaneously.
•
Fast Download Speed — Your Wireless Gateway is DOCSIS 3.0 compliant with speeds up to
eight times faster than DOCSIS 2.0 cable modems.
•
Easy Connectivity — Connect any WPS-compatible computer or device with just one button.
•
Security — Because WiFi networks send information over radio waves, signals from your wireless network can be intercepted by unauthorized users. Use the simple Home Network Wizard
to securely set up your WiFi broadband connection for WiFi enabled devices.
•
Convenience — Simultaneously use four Ethernet ports for wired devices and 802.11b/g/n
connectivity for wireless devices. Choice between wireless LAN (WLAN) or wired Ethernet LAN
connections.
•
Flexibility — the ability to support two lines of telephone service, as well as high speed data;
the ability to use your own router with your Wireless Gateway
•
Telephony Services — Complies with PacketCableTM 1.5 or 1.0
•
Protection — Lithium Ion backup battery back-up (included with XFINITY Voice subscription)
If you haven’t already done so, please activate both XFINITY Voice and Internet services if you
subscribe to both, or just XFINITY Internet services if you subscribe only to high-speed data
services. Refer to the user guide you received with each of these services for activation
instructions and information about XFINITY Voice and Internet features.
Wireless Gateway User Guide
1
Overview
FRONT PANEL
The front panel of your Wireless Gateway features a set of LED indicators which shows the status
of your Gateway and can simplify troubleshooting.
The front of your Wireless Gateway (Fig. 1) has the
following indicators:
A
WPS button: WiFi Protected Setup is active
(Button with light ring is located on top of unit)
B
Power: AC power is available to the unit
C
US/DS: Upstream and downstream connectivity
D
Online: Internet connectivity status
E
WiFi: Status of the wireless LAN
F
Tel 1: Status of telephone line 1
G
Tel 2: Status of telephone line 2
H
Battery: Battery status
Fig. 1
LED
Table 1. Front Panel LED Indicators
Power
Blinking=power failure and during battery backup. ON=power being supplied. OFF=power is not being supplied.
US/DS
Blinking=ranging is in progress. ON=ranging is complete on 1 channel only. OFF=scanning for DS channel.
Online
Blinking=cable interface acquiring IP, Time of Day, Cable Modem configuration. ON=Gateway is operational.
OFF=Gateway is offline.
WiFi
Blinking=data is transmitting over the Gateway’s WiFi interface. ON=WiFi is enabled. OFF=WiFi is disabled.
Tel1
Blinking=Tel line 1 is in use. ON=Gateway’s Tel 1 port is online. OFF=Gateway’s Tel 1 port is not online.
Tel2
Blinking=Tel line 2 is in use. ON=Gateway’s Tel 2 port is online. OFF=Gateway’s Tel 2 port is not online.
Battery
Blinking=battery power is low. Use AC power as soon as possible. ON=Gateway is operating on AC power,
battery is not charging. OFF=(a) If Battery LED is off and Power LED is blinking, then device is in battery backup
mode. (b) If Battery LED is off and Power LED is solid, this indicates there is no battery or battery is not properly
functioning. Solid Glow=battery is charging.
Wireless Gateway User Guide
2
REAR PANEL CONNECTORS AND CONTROLS
The rear panel of your Wireless Gateway features a reset button, as well as the ports for attaching
the supplied power adapter and connecting additional devices.
The back of your Wireless Gateway (Fig. 1) has the following
connectors and controls:
A
Reset button: resets the Wireless Gateway*
B
USB host connector for connecting external USB device
C
Tel 1 connector for analog phone line
D
Tel 2 connector for analog phone line
E
Gigabit Ethernet (1 - 4) connectors for use with a computer
LAN port (Each port has two LED lights. See Table 1 below)
F
Cable connector for the coaxial cable
G
Power connector for the power cord
Fig. 1
LED
Table 1. Gigabit Ethernet Connectors LED Indicators
Green
Indicates Gigabit Ethernet in use
Orange
Indicates Fast Ethernet in use
* Reset Button
To protect against accidental reset, the reset button is recessed on the rear panel. By pressing the
reset button for varying lengths of time, you can perform two types of reset operations with the
Wireless Gateway.
• Normal Reset – reboots the Wireless Gateway but retains current configuration settings.
Use a thin object, press the reset button for at least 2-5 seconds and release.
• Factory Reset – deletes all changes ever made to the original configuration settings and restores
to factory configuration.
Use a thin object, press and hold the reset button for 15 seconds or more before releasing.
CAUTION: If you select Restore Factory Settings, be certain you want to reset ALL settings (passwords, parental controls
and firewall settings) before proceeding! You will lose all customized settings you may have made to your Wireless Gateway.
Please also note that a Factory Reboot will take your Wireless Gateway out of Bridge Mode if it had been previously
enabled. Call 1-800-XFINITY if you would like to re-enable Bridge Mode.
Note:
You can also reset your Wireless Gateway using the Web Management Interface (see page 35).
Wireless Gateway User Guide
3
TOP PANEL
The top panel of your Wireless Gateway features a WPS button (Fig. 1). WPS (or WiFi Protection
Setup) lets you securely set up a WiFi network without having to enter the Network Key.
See page 11.
Fig. 1
BOTTOM PANEL
The bottom panel of your Wireless Gateway contains a panel for installing the backup battery. The
battery will provide backup for voice service in case of a local power loss. The battery backup is not
intended to take the place of AC power.
To install a battery into your Gateway, use the following procedure.
1.Place the Wireless Gateway on its side on a table.
2.Remove the battery compartment door on the bottom panel and set it aside.
3.Insert the battery into the battery compartment with the polarity in place.
4.Close the battery compartment.
Notes: A battery is needed to enable voice service availability in the event of a power outage. A
battery is included with your Wireless Gateway only if you subscribe to XFINITY Voice. If
you did not receive a battery and you are an XFINITY Voice subscriber, please call
1-800-XFINITY.
By accessing the Battery menu from the Gateway’s Web interface, you can view status
information about the battery.
Wireless Gateway User Guide
4
BOTTOM LABEL
The bottom label of your Wireless Gateway will display the following information:
WiFi Network Name HOME - XXXX (where XXXX is the last 4 digits of the Cable Modem MAC)
Encryption
WPA-TKIP
Network Password
Printed on the label
WPS PIN
Printed on the label
DEFAULT CONFIGURATIONS OF THE WIRELESS GATEWAY
Following are the factory default configurations:
WPS
Enabled
Gateway IP
http://10.0.0.1
Firewall Configuration
Low (No ports are blocked)
UPnP
Enabled
All other features are disabled by default. In order to enable other features, please access the
Web Management Interface.
Wireless Gateway User Guide
5
Basic Wireless Gateway Information
You can view or modify basic information about your Wireless Gateway by accessing the Web
Management Interface.
Make sure your computer or laptop is connected to one of the ethernet ports on your Wireless
Gateway. Open a web browser* and typing http://10.0.0.1 in the address line.
* Compatible web browsers include Internet Explorer 6.0+, Firefox 3.0+ and Safari. Your computer does not
have to be online to configure your Wireless Gateway.
Find out the encryption methods supported by your computer before setting up your WiFi Network.
Upon initial setup (or after a Factory Reset), you will see the Home Network Wizard’s three
administrative pages as described below.
Home Network Wizard
1. On the Administrative Login screen (Fig. 1),
type the following default information to login:
Default Username: admin
(The username cannot be changed.)
Default Password: password
Click LOGIN.
Fig. 1
2. Change the administrative password (Fig. 2)
to prevent unauthorized users from changing
settings on your Wireless Gateway.
Use a strong password with at least eight
characters that contains both letters
and numbers.
Record your New Password in order to
access the Gateway pages in the future.
Fig. 2
Wireless Gateway User Guide
6
3. Enter a WiFi network name of your preference. Remote computers use this name to identify the
router. It is case-sensitive and can be up to
32 characters in length. A valid WiFi network
name can contain only letters, numbers, hyphens or underscores. No spaces or periods
are allowed. i.e. XFINITY-12456.
4. Select an encryption method that is supported by your computer or device
(Fig. 3).
5. Depending on your selection, you may be
required to enter a Network
Password. Click FINISH.
Fig. 3
Note: The Wireless Gateway can be connected to wireless B, G and N devices operating at 2.4
GHz.
After your initial setup and on subsequent logins, when you access http://10.0.0.1, you will see the
Web Management Interface screen as described on the following page.
Wireless Gateway User Guide
7
Web Management Interface Menus
Access Menus (and Submenus)
Description
Gateway > At a Glance
Displays information about your home network, connected
devices and recent network updates
Gateway > Connection
Displays the following 3 submenus to:
Gateway > Connection > Local IP
View and reset your local IPv4 settings
Gateway > Connection > WiFi
View and edit basic and advanced wireless settings
Gateway > Connection > XFINITY
View XFINITY network settings and initialization procedures,
including cable modem, downstream and upstream information
Gateway > Firewall
Configure the security level of the Wireless Gateway’s internal
firewall
Gateway > Software
View system software information
Gateway > Hardware > System Hardware
View information about the Wireless Gateway’s system
hardware
Gateway > Hardware > Battery
View information about the Wireless Gateway’s internal battery
(for XFINITY Voice only)
Gateway > Hardware > LAN
View the link status and Media Access Control (MAC) address
for each of the 4 Ethernet ports
Gateway > Hardware > WiFi
View the status and MAC address of the Gateway’s WiFi port
Gateway > Wizard
Access a wizard to set up your home network
Connected Devices
Displays the Computer submenu for adding online computers
and viewing computers that are offline
Parental Control
Displays the 4 following submenus for:
Parental Control > Managed Sites
Blocked sites, blocked keywords and trusted computers
Parental Control > Managed Services
Blocked services and trusted computers
Parental Control > Managed Devices
Managed and blocked devices
Parental Control > Reports
Generating reports containing selected Log Messages
Advanced
Displays submenus to:
Advanced > Port Forwarding
Enable/disable the port forwarding feature
Advanced > Port Triggering
Enable/disable the port triggering feature
Advanced > Port Blocking
Enable/disable the port blocking feature
Advanced > Device Discovery
Enable/disable the Universal Plug and Play (uPnP) feature for
dynamic connectivity to network devices
Troubleshooting
Displays submenus to:
Troubleshooting > Logs
Configure log filters and download/print system logs
Troubleshooting > Diagnostic Tools
Test connectivity to a URL or IP address
Troubleshooting > Restore/Reboot
Reset the Wireless Gateway or restore factory settings
Gateway
Wireless Gateway User Guide
8
WEB MANAGEMENT INTERFACE
Status Icons
Log out of the Web
Management Interface or
‣ Percentage of battery power
remaining
change your password.
‣ Gateway’s Internet
‣ Status of the Gateway’s
wireless connection
‣ Firewall security level access
Fig. 1
When you click a category from the
left menu bar, associated
From the menu bar, select a
category to configure your
information and configuration
settings appear in the main area.
Wireless Gateway settings.
From the links at the bottom of the
page, you can access XFINITY.com
and customerCentral.
Wireless Gateway User Guide
9
AT A GLANCE
View information about your Wireless Gateway and edit configurations of connected devices
Note: If you would like to use your existing router instead of using the routing functionality on your
Wireless Gateway, the Bridge Mode on the Wireless Gateway will need to be
enabled. An XFINITY technician can do this during installation, or call 1-800-XFIITY.
Access from the left navigation menu:
Gateway > At a Glance
The Home Network section displays the states of both the
Fig. 1
Ethernet and WiFi networks. You can see the computers
and devices connected to your Wireless Gateway.
Click View Connected Devices to view the Connected Devices screen
(see page 24), which displays online and offline devices that are
connected to your Wireless Gateway.
Wireless Gateway User Guide
10
CONNECTION
View information about your Wireless Gateway, such as Connection Status, Local Configuration,
WiFi and the XFINITY Network
Access from the left navigation menu:
Gateway > Connection
Connection Status
Displays a summary of your Local IP, WiFi and XFINITY networks
Access from the left navigation menu:
Gateway > Connection > Status
Fig. 1
Wireless Gateway User Guide
11
Local IP Configuration
View information about your local network. You may edit the LAN DHCP settings, if desired (for
Advanced Users).
Access from the left navigation menu:
Gateway > Connection > Local IP Network (or click VIEW from Gateway > Connection > Status)
Fig. 1
Field
IPv4
Gateway Address
Subnet Mask
DHCP Beginning Address
DHCP Ending Address
DHCP Lease Time
Description
Local IP address of the router
Subnet address for the LAN (3 subnets to choose from)
First available Local IP Address in the DHCP pool
Last available Local IP Address in the DHCP pool
Length of time a local device retains an IP Address before
checking back with the DHCP Server on the Wireless Gateway
Note: IPv6 parameters are not configurable.
Wireless Gateway User Guide
12
WiFi
View and configure your WiFi network
Access from the left navigation menu:
Gateway > Connection > WiFi (or click VIEW from Gateway > Connection > Status)
Click EDIT to modify
your 2.4 GHz Network
settings.
Fig. 2
Click Add WiFi Protected Setup (WPS) Client to add a device. Follow the WiFi Setup
steps on the next page.
Note: A valid WiFi network name can contain only letters, numbers, hyphens or underscores.
Wireless Gateway User Guide
13
Fig. 1
WIFI SETUP
1. Enter a Network Name (SSID) of your choice. Remote computers use this name to identify the
router. It is case-sensitive and can be up to 32 characters in length. A valid WiFi network name
can contain only letters, numbers, hyphens or underscores. No spaces or periods allowed. i.e.
XFINITY-12456.
2. Select the Security Mode (Encryption Method). Each mode in the option provides a certain level
of network security. The Encryption Method you select must be supported by your computer.
Please refer to your computer’s user manual to verify which method(s) your computer supports.
Unless your computer is incompatible, the Security Mode of WPA2-PSK (AES) is the
recommended option. WPA/WPA2 offers a higher level of security than WEP. Your
Wireless Gateway supports AES encryption to protect the data transmitted over the
network.
3. Enter a Network Password (see following requirements). Every device in the wireless network
will require this password. No password is required if you choose Open (risky) mode. Use of
this option is NOT RECOMMENDED because any external device within range can access your
network.
WPA2-PSK-AES = minimum of 8 and maximum of 64 characters
WEP-64 = exactly 10 hexadecimal characters (0-9, A-F) are required
WEP-128 = exactly 26 hexadecimal characters (0-9, A-F) are required
WPA-PSK-TKIP = minimum of 8 and maximum of 64 characters
Record your new password here:
Wireless Gateway User Guide
14
4. Verify that the Broadcast Network Name (SSID) box is checked. The default state is to enable
broadcasting of SSID to allow other users to see and join the network. Click SAVE SETTINGS.
Connecting a Computer or Other Device to your WiFi Network
After you’ve changed your network password, personalized your network name and selected an
encryption method, you are ready to connect a computer or laptop using either of the following two
methods.
• Manual setup using the Network Key
• WiFi Protected Setup (WPS lets you simply and securely set up a WiFi network without entering a
Network Key)
For Non-WiFi Protected Setup (WPS) Computers
• You need to manually connect to your WiFi network. Follow the steps based on your computer’s
operating system. Visit the appropriate manufacturer’s website listed below for specific steps.
• Windows XP
http://www.microsoft.com/windowsxp/using/networking/setup/wireless.mspx
• Windows Vista
http://windows.microsoft.com/en-us/windows-vista/Setting-up-a-wireless-network
• Windows 7
http://windows.microsoft.com/en-US/windows7/Add-a-device-or-computer-to-a-network
• Mac OS X 10.0 or greater
http://support.apple.com/kb/HT2497
• Use the same Network Name and Password you created during the Home Network Wizard.
For WiFi Protected Setup (WPS) Computers
WPS Method for WiFi Connection
• You can easily connect to your WiFi Network using either the default Push Button Configuration
(PBC) or the Personal Identification Network (PIN) method.
• If you don’t know if your computer supports WPS, refer to your computer’s documentation. Any
WPS-compatible device will work with your Wireless Gateway.
Wireless Gateway User Guide
15
WPS via PBC Connectivity/One Button Connectivity (Recommended)
1. Press the WPS button on your computer or wireless. (If your computer doesn’t have a physical button, refer to your computer’s
user guide to enable WPS.)
2. Within 2 minutes, press the WPS button on the top of your
Wireless Gateway. (Fig. 1)
3. Your computer will communicate with your Wireless Gateway and
establish a connection.
Note:
When the WPS button is pressed, it will stay lit for 5 minutes
(regardless of whether or not the connection was successful).
Please wait until the light turns off before connecting the next WPS client.
Fig. 1
WPS via PIN Connectivity
1. Open your computer’s WPS utility and acquire a PIN number. Make a note of the PIN number.
The WPS utility will begin its countdown to 2 minutes.
2. Launch your web browser and type http://10.10.0.1 in the address line.
3. Log in using the username (admin) and the password you created in the Home Network
Wizard.
4. Select Gateway > Connection > WiFi.
5. Before the WPS Utility finishes its countdown, enter the PIN number from Step 1 above in the
Enter Wireless Client’s PIN field. (Fig. 1)
6. Click PAIR WITH MY WIFI CLIENT.
7. Your computer will communicate with your Wireless Gateway and establish a connection.
Fig. 1
Note:
If your WPS clients prompts you to enter the Wireless Gateway’s PIN while
connecting using WPS, then enter the WPN printed on the label of your Wireless
Gateway’s box.
Wireless Gateway User Guide
16
XFINITY Network
View details about the XFINITY Network, including initialization procedures, cable modem settings,
downstream and upstream information. The information show automatically refreshes every 10
seconds.
Access from the left navigation menu:
Gateway > Connection > XFINITY Network (or click VIEW from Gateway > Connection > Status)
If you need to contact
XFINITY for support, you
may be asked to provide
information displayed on
this screen.
Fig. 1
Wireless Gateway User Guide
17
FIREWALL
View and modify Firewall settings to block unauthorized/unsafe traffic from accessing your network
Access from the left navigation menu: Gateway > Firewall
Most of your applications will be
blocked except for browsing, email,
iTunes and VPN.
Fig. 2
All of your Peer-to-peer apps are
blocked.
Fig. 3
Fig. 1
Fig. 4
Minimum Security is the
default setting. All secure is
enabled.
For blocking a specific TCP/UDP port, please use Managed Services under
Fig. 5
Parental Control.
Wireless Gateway User Guide
18
SOFTWARE
View details about your Wireless Gateway’s current software
Access from the left navigation menu:
Gateway > Software
Fig. 1
Wireless Gateway User Guide
19
HARDWARE
View your Wireless Gateway’s hardware details: System Hardware, Battery, LAN Ethernet, WiFi
System Hardware
Access from the left navigation menu:
Gateway > Hardware > System Hardware
Fig. 1
Wireless Gateway User Guide
20
Battery
View the battery specifications of your Wireless Gateway
Access from the left navigation menu:
Gateway > Hardware > Battery
Fig. 1
Wireless Gateway User Guide
21
LAN Ethernet
View information about the wired devices connected to your Wireless Gateway
Access from the left navigation menu:
Gateway > Hardware > LAN
Fig. 1
Wireless Gateway User Guide
22
WiFi
View information about the devices connected to your Wireless Gateway
Access from the left navigation menu:
Gateway > Hardware > WiFi
Fig. 1
WIZARD
Set up wireless connections quickly using the Home Network Wizard
Access from the left navigation menu:
Gateway > Wizard
For details about using the Home Network Wizard, see page 5.
Wireless Gateway User Guide
23
Connected Devices
View and edit information about online or offline computers connected to your Wireless Gateway
COMPUTERS
Access from the left navigation menu:
Connected Devices > Computers
Fig. 1
Click Edit to modify the
connection setting for
the corresponding
device.
Click X to block that
device from accessing
the internet.
Wireless Gateway User Guide
24
To manually add a computer with a static IP address to your wireless network:
1. Under Online Computers, click Add Computer with Static IP. The Add Computer menu
appears.
2. Complete the following fields in the Add Computer menu:
Option
Description
Host Name
Host name of the computer you want to add
Connection
Read-only field that displays the network connection of Ethernet
MAC Address
MAC address of the computer you want to add. (Use a colon between each
2-character ID in the MAC address)
Static Address
Static IP address of the computer you want to add (Use a period between
each octet in the IP address
Comments
Optional comments about the computer
3. Click SAVE to save your settings (or click CANCEL to discard them). If you click SAVE, the
Computer menu reappears, with the computer you added displayed under Offline Computers.
4. To add more computers with static IP addresses, repeat steps1 through 3.
5. To edit an online computer, click the EDIT button next to the computer you want to modify,edit
the settings on the Edit Computer menu and click SAVE.
6. To delete an online or offline computer, click the X next to the computer. When the Delete
Computer message appears, click OK to delete the computer or CANCEL to retain it. If you
clicked OK, the computer is removed from the Computers menu.
Wireless Gateway User Guide
25
Parental Control
Using the Parental Controls menu, you can configure websites, keywords and computers by
blocking content or restricting access
MANAGED SITES
Using the Managed Sites menu, you can block access to certain Web sites from local computers
Access from the left navigation menu:
Parental Controls > Managed Sites
Fig. 1
If the Blocked Sites, Blocked Keywords and Trusted Computers are grayed out, click
Enable next to Enable Managed Sites. You can then add blocked sites or keywords.
Trusted Computers
Specify the computers you do not want affected. If a computer is selected as a Trusted
Computer, it bypasses the configured parental control settings. Under Trusted select Yes
to make a device a Trusted Computer and No if a device is not a Trusted Computer.
Wireless Gateway User Guide
26
Blocked Sites
Enter the URLs of the website(s) to be blocked and set up a time schedule
Access from the left navigation menu:
Parental Control > Managed Sites > Click ADD next to Blocked Sites
Fig. 1
Please enter the URL in www.xfinity.com format. The blocked website may be accessible
using its IP address.
Wireless Gateway User Guide
27
Blocked Keywords
Enter keyword(s) that appear on websites you want blocked and set up a time schedule
Access from the left navigation menu:
Parental Control > Managed Sites > Click ADD next to Blocked Keywords
Fig. 1
Wireless Gateway User Guide
28
MANAGED SERVICES
Prevent access to applications and services
Access from the left navigation menu:
Parental Control > Managed Services
Fig. 1
Wireless Gateway User Guide
29
Blocked Services
Define services and ports to be blocked using Parental Control
Access from the left navigation menu:
Parental Control > Managed Sites > Click ADD next to Blocked Sites
Fig. 1
Wireless Gateway User Guide
30
MANAGED DEVICES
Displays information about devices that can be managed by rules
Access from the left navigation menu:
Parental Control > Managed Devices
Fig. 1
• When Block All is selected, an +Add Allowed Devices button will be displayed.
• When Allow All is selected, an +Add Blocked Devices button will be displayed.
Wireless Gateway User Guide
31
Add Allowed Devices
Define devices that are exempt from Parental Controls
Access from the left navigation menu:
Parental Control > Managed Sites > Click ADD ALLOWED DEVICE
Fig. 1
Wireless Gateway User Guide
32
Reports
Create reports that display attempted violations of the Parental Control rules
Access from the left navigation menu:
Parental Control > Reports
Fig. 1
Wireless Gateway User Guide
33
Advanced
PORT FORWARDING
Allows new incoming connections of a certain type to be directed to a certain computer or server
Access from the left navigation menu:
Advanced > Port Forwarding
Fig. 1
Fig. 2
For example, if a new incoming FTP session arrives at the router, the router needs to know
which server is responsible for this traffic. The Port Forwarding rules tell the router which
server should get this traffic based on the incoming port number. To use port forwarding, you
use static IP addresses for the computers (servers) to which the traffic will be forwarded to.
Wireless Gateway User Guide
34
PORT TRIGGERING
Temporarily opens an incoming port to a particular computer or server when that computer initiates
a particular outgoing connection (the trigger).
Access from the left navigation menu: Advanced > Port Triggering
Fig. 1
The Add Port Trigger button can be clicked
only when Enable Port Triggering is Enabled.
Fig. 2
Note: You may not need to configure the interval for port triggering.
Wireless Gateway User Guide
35
DMZ
Configure a single computer on your LAN to open all of its ports
Access from the left navigation menu:
Advanced > DMZ
Fig. 1
Wireless Gateway User Guide
36
DEVICE DISCOVERY
Displays the settings for automatic device discovery
Device Discovery uses Plug and Play (UPnP) to automatically configure the router and devices for
various Internet applications, such as gaming, media sharing and video conferencing.
Access from the left navigation menu:
Advanced > Device Discovery
Fig. 1
Wireless Gateway User Guide
37
Troubleshooting
LOGS
View the System, Event and Firewall Logs (same as seen under Parental Control > Reports). Use
these logs to troubleshoot issues and to identify potential security risks
Access from the left navigation menu:
Troubleshooting > Logs
Fig. 1
Wireless Gateway User Guide
38
DIAGNOSTIC TOOLS
You can run a Connectivity or IP Check test to troubleshoot connectivity issues to a website URL or
IP address.
Access from the left navigation menu:
Troubleshooting > Diagnostic Tools
Fig. 1
• Test Connectivity Results tests your Internet connection. Input any valid URL, such as
www.xfinity.com, in the Destination Address field. If there is no connectivity or the URL is
invalid, then the test will fail.
• Check for IP Address Results determines if an IP address is accessible.
Wireless Gateway User Guide
39
RESTORE/RESET GATEWAY
Enables the resetting of your Wireless Gateway and restoring of factory defaults
CAUTION: If you select Restore Factory Settings, be certain you want to reset ALL settings
(passwords, parental controls and firewall settings) before proceeding! You will lose all customized
settings you may have made to your Wireless Gateway.
Please also note that a Factory Restore will take your Wireless Gateway out of Bridge Mode if it had
been previously enabled. Call 1-800-XFINITY if you would like to enable Bridge Mode again.
Access from the left navigation menu:
Troubleshooting > Restore/Reset Gateway
Fig. 1
• If you click Reset when someone is using the phone, you’ll see a warning message that a Voice
Call is in Progress and will be disconnected if the Wireless Gateway is rebooted.
• The Wireless Gateway will take a few seconds to reset the Wireless Gateway. Internet
connectivity through the Ethernet may be lost momentarily.
Wireless Gateway User Guide
40
CHANGE PASSWORD
Change the password for your Wireless Gateway
Access from the left navigation menu:
Troubleshooting > Change Password
Fig. 1
• Enter your current password and a new password.
Wireless Gateway User Guide
41