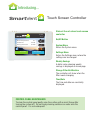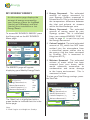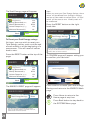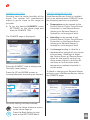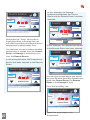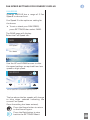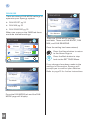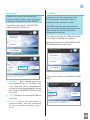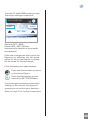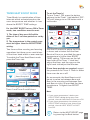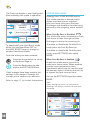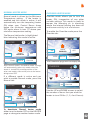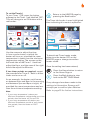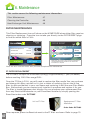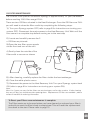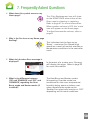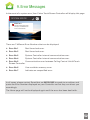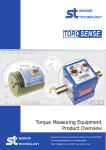
1
SmartVent N Z ’s H o m e Ve n t i l a t i o n S p e c i a l i s t s 15 MAR 13:15 SmartVent Room Temperature 19˚C Air Source Outside Saving this week $14.50 SYSTEM SETTINGS Synergy 405PLUS User Guide Manual www.sma r tve nt.co.nz Introducing... SmartVent 15 MAR 13:15 SmartVent Room Temperature 19˚C Air Source Outside Saving this week $14.50 SYSTEM Touch Screen Controller SETTINGS State-of-the-art colour touch screen controller On/Off Button System Menu Enters the System menu Settings Menu Enters the Settings menu where the settings can be changed Weekly Savings A dollar value showing weekly savings is displayed on home page Change Filter Notification The controller will show when the filter needs changing Time/Date The time and date are constantly displayed. CONTROL PANEL MAINTENANCE To clean the control panel gently wipe the surface with a moist tissue after turning the system off. Do not spray cleaning solutions or water onto the control panel. It is not waterproof. Contents 1. Information in your system ........................................ 2. Getting Started ...................................................... 3. Home Page........................................................... Boost Fan ...................................................................... 3 Child Lock ..................................................................... 4 Control Volume / Contrast / Brightness / Power ................ 6 Reset ............................................................................. 10 1 1 2 4. System .................................................................. 12 Climate Temperature / Humidity .......................................13 Filters ............................................................................. 15 Mode Heat Boost / Core By-Pass .......................................18 Heater Normal / Timer / Override...................................... 18 Energy Kilowatt hours / Cost / Kg CO2 / I.............................20 Contact ......................................................................... 22 5. Settings ................................................................. 23 Climate Temperature ....................................................... 24 Fans Fan Speed / Fan Mode .............................................. 28 Mode Heat Boost / Core By-Pass .................................. 35 Heater Normal / Timer / Override ...................................... 41 Energy Kw / Cost ............................................................ 45 Clock Time / Day / Year .................................................... 46 6. Maintenance ........................................................... 47 Filter Maintenance .......................................................... 47 Cleaning the Controller ................................................... 49 Heat Exchanger Unit Maintenance .................................. 49 7. Frequently Asked Questions .................................... 8. Glossary of Terms ................................................. 9. Error Functions .................................................... 10. Warranty ............................................................ 50 51 52 41 1. Information on your system Synergy consists of supply airflow, extract airflow and a Heat Exchanger. A balanced system is created by extracting stale moist air from the home and at the same time, introducing fresh filtered dry air into the home. The two air paths flow through a Heat Exchanger which is situated in the roof cavity. As the airflows pass by each other, up to 90% of the heat from the extracted air is transferred to the incoming air which is delivered into the home. Synergy offers a 24 hour, 7 day a week ventilation system that truly recovers heat, ultimately saves you money in heating and cooling your home, when compared to a positive pressure ventilation system. The ColourTouch Screen Controller offers you complete control of your system including: • Selectable Fan Speeds • Heat Boost and Core By-Pass Modes • Heater Settings (if installed) The controller also gives you up-to-date readings on: • Room Temperature • Humidity • Air Source • Fan Speed • Date and Time 2. Getting started To get started you must set up your Synergy system by completing the following steps: 1) Enter your ‘Minimum Temperature’ Go to page 25 to set this up 2) Enter your ‘Comfort Level’ Go to page 25 to set this up 3) Set up the ‘Clock’ Go to page 46 to set this up Once these 3 settings are entered you can continue to learn more about your system using this User Manual. 1 3. Home page The Home Page (pictured below) is where you enter all other pages from and provides you with a snap shot of the following readings: ff Room Temperature: Your current Room Temperature measured at your Colour Touch Screen Controller. ff Air Source: The source of the air provided to the heat exchanger to be supplied to inlet diffusers ff Savings This Week: How much money you have saved this week through running your Synergy System over a Positive Pressure System. 15 MAR 13:15 SmartVent Snap shot of Readings Room Temperature BOOST FAN, pg. 3 19˚C Air Source Outside Saving this week $14.50 Date & Time CHILD LOCK, pg. 4 CONTROL, pg. 6 RESET, pg.10 SYSTEM SYSTEM Menu, pg.12 SETTINGS SETTINGS Menu, pg. 23 To enter any of these pages just press on the tab or icon. Note: ‘Date & Time’ and ‘Snap shot of Readings’ are for your information only and can not be entered into. 2 Boost Fan The Boost Fan function is used to increase Synergy’s fans to their maximum speed for a 15 minute interval. Useful when the home environment is experiencing a build up of toxins (e.g. cigarette smoke, cooking smells) or high levels of humidity in specific areas of the house. To enter the Boost Fan mode, press the ‘fan’ icon on the Home page: 15 MAR 13:15 SmartVent Room Temperature 19˚C Air Source Outside Saving this week $14.50 CONFIRM Confirm turn Boost Fan ON? Cancel Confirm Once confirmed, the Home page will display with the ‘fan’ icon flashing on/off every half second. This icon will continue to flash for 15 minutes while the fan is in Boost mode. After 15 minutes the fan icon will stop flashing and the fans will return to their last fan speed setting. 15 MAR 13:15 SmartVent SYSTEM SETTINGS The BOOST FAN page will show the status of the Boost Fan. It is OFF when the OFF tab is highlighted with a blue border. To activate the Boost Fan Press the ON tab: BOOST FAN When ON the fan will switch to high for 15 mins and the Home page icon will flash. ON OFF 3 A CONFIRM page will prompt you to confirm your decision. Press Confirm to turn Boost Fan ON: Room Temperature 19˚C Air Source Outside Saving this week $14.50 SYSTEM SETTINGS To deactivate the Boost Fan when ON The Boost Fan can be deactivated before the 15 minutes have expired. Press the flashing ‘fan’ icon, this will take you to the BOOST FAN page. This page will show the ON tab highlighted with a blue border. Child Lock Press the OFF tab: BOOST FAN When ON the fan will switch to high for 15 mins and the Home page icon will flash. ON OFF A CONFIRM page will prompt you to confirm your decision. Press Confirm to turn Boost Fan OFF: CONFIRM Confirm turn Boost Fan OFF? Cancel Confirm The Child Lock feature prevents those ‘little fingers’ from changing details on your controller. When in Child Lock mode, the Touch Screen will not respond to anything other than a direct touch of the Child Lock ‘key’ icon. To activate Child Lock Press the ‘key’ icon (coloured white) on the Home page: Room Temperature Once confirmed, you will return to the Home page where the fan icon will no longer be flashing. 19˚C Air Source Outside Saving this week $14.50 SYSTEM 15 MAR 13:15 SmartVent SETTINGS The CHILD LOCK page will be displayed. Press the Lock button for 5 seconds to place Synergy in Child Lock mode, as you press and hold ‘Lock’ you will hear a beeping sound for the 5 seconds. CHILD LOCK Press the LOCK button for 5 seconds to lock the keypad. When locked, the key on the Home page will be yellow. Lock After a 5 second time period a CONFIRM page will prompt you to confirm your decision. Press Confirm to Lock the controller screen: 4 Press the Unlock button for 5 seconds to disable the Child Lock mode. After a 5 second time period, a CONFIRM page will prompt you to confirm your decision. Press Confirm to Unlock the Controller screen: CONFIRM Confirm Child Lock ON? CONFIRM Cancel Confirm Confirm Child Lock OFF? Once confirmed, the Home page will resume. Note: The ‘key’ icon on the Home page has now turned yellow to indicate Synergy is locked. If the screen is pressed in Child Lock mode, a display appears saying the system is locked and how to restore it to normal operation: MON 13:15 MAR 1515MAR 13:15 13:15 SmartVent Once confirmed, the Home page will display and Synergy will be returned to normal with the Child Lock ‘key’ icon white, not yellow: Room Temperature 15 MAR 13:15 19˚C Air Source Outside Saving this week $14.50 SETTINGS MY SETTINGS SETTINGS To unlock the Controller Press the yellow ‘key’ icon and the CHILD LOCK page will appear: CHILD LOCK Press the UNLOCK button for 5 seconds to unlock the keypad. When unlocked, the key on the Home page will be white. 5 Confirm 16˚COutside - 23˚C To turn Child Lock OFF press the Saving this $14.50 Savings this week $4.26 yellow keyweek icon on the right. SYSTEM MY SYSTEM SYNERGY Cancel SmartVent Temperature 19˚C Room Temperature Child Lock is ON19˚C Air Source Comfort Range Unlock SYSTEM SETTINGS Control The CONTROL page allows you to: VOLUME f Adjust the controller speaker volume level To adjust the speaker volume, press the Volume button: f Adjust screen contrast & brightness CONTROL f Turn Synergy ON and OFF Volume Brightness To access these settings, press the Control ‘cogs’ icon on the Home page: 15 MAR 13:15 SmartVent Contrast Screen/Sound Power 19˚C Room Temperature Air Source Outside Saving this week $14.50 SYSTEM SETTINGS A new CONTROL page will appear with an up and down arrow and a sliding scale of 0 to 8: CONTROL Volume The CONTROL page will appear: CONTROL 012 3 4 5 6 78 Volume Screen/Sound Power Brightness Contrast Screen/Sound Power Press the black arrows to adjust the speaker level. At every press of the button, the speaker will sound at the new volume level. 0 setting turns the speaker volume OFF and 8 is the loudest. The Screen/Sound tab is highlighted, indicating the CONTROL Page which displays the Volume, Contrast and Brightness is active. Press the Back page button to return to the Screen/Sound CONTROL page, or the Home button to return to the Home Page at any time. Note: When speaker volume is OFF, a ‘mute’ icon will appear on the Home page. 6 BRIGHTNESS CONTRAST To adjust the screen Brightness, press the Brightness button: To adjust the screen Contrast, press the Contrast button: CONTROL CONTROL Volume Volume Brightness Brightness Contrast Contrast Screen/Sound Power A new CONTROL page will appear with an up and down arrow and a sliding scale of 1 to 9: CONTROL Power A new CONTROL page will appear with an up and down arrow and a sliding scale of 1 to 9: CONTROL Brightness Contrast 123 4 5 6 7 89 123 4 5 6 7 89 Screen/Sound Power Screen/Sound Power Press the black arrows to adjust the screen’s Brightness level. Level 1 is the darkest and level 9 is the brightest. Press the arrows to adjust the screen’s contrast level. Level 1 gives the least contrast and level 9 the highest. Note: The best screen display is a subjective mixture of both Brightness and Contrast controls. Note: The best screen display is a subjective mixture of both Brightness and Contrast controls. Press the Back page button to return to the Screen/Sound CONTROL page, or the Home button to return to the Home Page at any time. Note: Reset (see page10) returns the brightness, contrast and sound to mid level. 7 Screen/Sound Press the Back page button to return to the Screen/Sound CONTROL page, or the Home button to return to the Home Page at any time. Note: Reset (see page 10) returns the brightness, contrast and sound to mid level. Press the OFF button: POWER Turning Synergy OFF CONTROL When Synergy is turned OFF, all heat recovery, ventilation and Heat Boost will stop. All your customised settings will be remembered for the next time you turn the system ON. This excludes the Heater Override mode; if this mode is currently ON with time remaining, the system will turn the heater OFF and revert back to Heater Timer or Normal mode and not the Override mode. To turn your Synergy system OFF, press the Power button: ON OFF Smart-Vent Synergy Power Synergy will automatically prompt you to confirm your decision: CONFIRM CONTROL Confirm turn Synergy OFF? Volume Brightness Contrast Screen/Sound Power A new CONTROL page will appear: Cancel Confirm Note: Press Cancel if you wish to return to the Home page without turning Synergy OFF. Once confirmed the display will revert to a modified Home page: CONTROL MON 13:15 MAR 1515MAR 13:15 13:15 SmartVent Temperature Room Temperature Synergy is OFF Air Source Comfort Range ON Smart-Vent Synergy Screen/Sound OFF 19˚C 19˚C 16˚COutside - 23˚C To turn Synergy ON press the Cogs Saving this week Savings this week tab on the right. $14.50 $4.26 Power SYSTEM MY SYSTEM SYNERGY The ON button will be highlighted blue and the Synergy logo will be coloured green and red, indicating Synergy is currently ON. SETTINGS SETTINGS The screen will not respond to anything other than a direct touch to the Control ‘Cogs’ icon: 8 Turning Synergy back ON Press the Control ‘Cogs’ icon to access the CONTROL page: 15 MAR 13:15 SmartVent Air Source Outside Saving this week $14.50 SYSTEM Room Temperature CONTROL Smart-Vent Synergy OFF Power Press the ON button and Synergy will automatically prompt you to confirm your decision: CONFIRM Confirm turn Synergy ON? 9 Cancel 19˚C Air Source Outside Saving this week $14.50 SETTINGS The CONTROL pages will appear showing the status of Synergy as OFF. The OFF button will be highlighted blue, the Synergy logo will be white and the Screen/Sound tab will be absent:. ON 15 MAR 13:15 SmartVent 19˚C Room Temperature Once confirmed, the Home page will display and Synergy will be switched back ON, restoring all your previous SETTINGS. (Except Heater Override mode). Confirm SYSTEM SETTINGS Reset When Synergy is first installed, the operating system defaults to set conditions. Most importantly, the in-line tempering heater (if installed) is disabled. The following is the status of Synergy when Reset or when first installed: Room Temperature 19˚C Air Source Outside Saving this week $14.50 SYSTEM ff Minimum temperature: 18ºC ff Comfort Level: Mid Range (indicated by green bar): 15 MAR 13:15 SmartVent SETTINGS The SYSTEM RESET page will appear: ff Clock*: 00:00 (Hr:Min) ff Fan Speed: 5 SYSTEM RESET ff Heater: Disabled (if installed) ff Speaker Volume: Level 3 (medium) Press the Reset button for 5 seconds to restore your Synergy system to factory settings. ff Contrast: Level 5 (medium) RESET ff Brightness: Level 5 (medium) ff Automatic Boost Fan:Enabled ff Fan Min: Enabled-Low ff Fan Seasons: Disabled * A system RESET will not reset the Clock to zero. Synergy can be RESET at any time. This procedure enables you to restore the system to the known values above BUT all customised settings will be lost as a result of this action. Press the ‘RESET’ button for 5 seconds to RESET Synergy. As you press RESET you will hear a beeping sound every second. After 5 seconds a CONFIRM page will automatically appear. Press Confirm to RESET your Synergy system: CONFIRM Note: The filter usage total is not affected by a system RESET and will revert back to the readings prior to the system being reset. To RESET Synergy, press the ‘RESET’ icon on the Home page: Confirm Reset to Factory defaults? Cancel Confirm 10 15 MAR 13:15 SmartVent 19˚C Room Temperature Air Source Outside Saving this week $14.50 SYSTEM SETTINGS To check that the RESET was successful, check that the Comfort page shows the Comfort level as being MID RANGE indicated by the green bar of the Comfort Level Screen. COMFORT LEVEL Cooler Warmer For further information on COMFORT LEVEL please refer to your Synergy User Manual under the Climate section. 11 4. System Pages within the SYSTEM menu are designed to present you with a summary ‘snap-shot’ of your Synergy system. The information contained within these pages can not be altered, they contain decisions you have made using the SETTINGS pages SYSTEM MENU provides five different information pages: Climate 13 Heater 18 Filters 15 Energy 20 Mode 17 Contact 22 To enter into one of these pages simply press the SYSTEM tab on the Home page and then again on the related tab: 15 MAR 13:15 SmartVent Room Temperature 19˚C Air Source Outside Saving this week $14.50 SYSTEM SETTINGS SYSTEM Climate Heater Filters Energy Mode Contact Note: All SYSTEM pages have a Green colour scheme. There is a green strip at the top left each page and a green outline distinguishing between pages within a section. 12 Climate SYSTEM CLIMATE TEMPERATURE An information page providing you with up-to-date readings on Temperature, Air Source and Fan Speed. To access SYSTEM CLIMATE press the Climate tab on the SYSTEM Menu page: SYSTEM Climate Heater Filters Energy Mode Contact The CLIMATE page will appear showing your current readings: CLIMATE Outside Roof Cavity Control Room Temperature 13 17°C 25°C 18°C Humidity f Air Source: temperature of the incoming air, either from outside or from the Roof Cavity (depending on your Heat Boost mode setting). f Roof Cavity: air temperature measured at the Heat Exchanger in your roof space. f Control Room: air temperature measured at the Colour Touch Screen controller. f Remote Room: If you have installed the Remote Sensor which is an optional component (Order Code FAN2047) then the temperature in the room where the Remote Sensor Panel is installed will be displayed. f Average: If you have installed the Remote Sensor which is an optional component (Order Code FAN2047) then this temperature reading is the average of the Control Room and Remote Room. Temperatures are measured in degrees Celsius. Note: The Remote Room and Average temperatures will only show if the optional Remote Sensor is installed: Order Code: FAN2047) Press Home to return to the Home page at any time Press Back button to step back to the SYSTEM Menu page HUMIDITY To view the Relative Humidity page, press the Humidity tab: CLIMATE Air Source Roof Cavity Control Room 17ºC 25ºC 18ºC Relative Humidity is measured in percentages, please refer to the Glossary of Terms (page 50) for a more detailed explanation on Relative Humidity. Note: The Remote Room and Average temperatures will only show if the optional Remote Sensor is installed: Order Code: FAN2047 Press Home to return to the Home page at any time Temperature Humidity Press Back button to step back to the MY SYNERGY Menu page The Humidity tab is now highlighted with a green border to indicate that this is the active page. CLIMATE Control Room Temperature 65% Humidity ff Control Room: relative humidity measured at the Colour Touch Screen controller. ff Remote Room: If you have installed the Remote Sensor which is an optional component (Order Code FAN2047) then the relative humidity in the room where the Remote Sensor Panel is installed will be displayed. ff Average: If you have installed the Remote Sensor which is an optional component (Order Code FAN2047) then this humidity reading is the average of the Control Room and the Remote Room. 14 Filters SYSTEM FILTERS To Reset your Filters An information page displaying the usage of your 2 x G3 and 1 x F7 filters in terms of weeks remaining before they require either cleaning or replacing. To access SYSTEM FILTERS press the Filters tab on the SYSTEM Menu page: SYSTEM Climate Heater Filters Energy Mode Contact The FILTERS page will appear: FILTERS The Filter Resets are to be used when you have cleaned or replaced your filters and wish to reset the filters back to empty/ new. This will reset the replacement time back to the start. Refer to page 46 for further information on replacing and cleaning your filters. Note: DO NOT reset the filter before the filters have been cleaned or replaced as this will void your warranty. Press the RESET button at the top of the page: FILTERS Time Remaining F7 Filter 51 weeks G3 Filters 18 weeks The readings above show how long your filters have before they require maintenance. To reset either filter, press the Reset button at the top of the screen. Time Remaining F7 Filter 51 weeks G3 Filters 18 weeks Press the ‘Reset’ tab adjacent to the Filter(s) you wish to Reset: FILTER RESET The readings above show how long your filters have before they require maintenance. To reset either filter, press the Reset button at the top of the screen. f F7 Filter: The F7 filter replacement time is 52 weeks (1 year). Refer to page 46 for replacement instructions. f G3 Filters: The G3 filters are both located in the Heat Exchanger which should be cleaned every 26 weeks (6 months) and replaced approximately every 2 to 3 years. Refer to page 46 for maintenance instructions. 15 F7 Filter FULL G3 Filters 18 weeks Reset Reset When FULL, please refer to your Synergy User Manual for cleaning/replacement instructions. Press ‘Reset’ after maintenance is complete. A CONFIRM page will appear asking you to confirm your decision: CONFIRM Confirm if you would like to Reset your Filter? Cancel Confirm Press Confirm to Reset the filter(s) and return to the FILTERS page. Press Home to return to the Home page at any time Press Back button to step back to the SYSTEM Menu page Note: A Filter Replacement button will appear on the HOME PAGE when either filter requires cleaning or replacing. Press the button to take you directly to the FILTER RESET page and follow the maintenance instructions on Page 46 . MAR 1515MAR 13:15 13:15 SmartVent Temperature Room Temperature 19˚C 19˚C Source Air Source Outside Outside Saving this this week week Saving $14.50 $14.50 SYSTEM SYSTEM SETTINGS SETTINGS 16 Mode SYSTEM MODE An information page providing the status of the optional upgrades: Heat Boost and Core By-Pass modes. These will be displayed as either ‘Enabled’ or ‘Disabled’ as read from your set preferences in the SETTINGS MODE pages (refer to Page 35 to set these up). To access SYSTEM MODE press the Mode tab on the SYSTEM Menu page: SYSTEM Climate Heater Energy Mode Contact The MODE page will appear: MODE Current Mode Settings Enabled Disabled To change these settings press the Mode icon on the right or go back to the ‘Settings’ menu and press ‘Mode’. f Core By-Pass: When this mode is enabled and the right conditions exist, inlet air will by-pass the Heat Exchanger core, therefore no heat will be transferred to incoming air. 17 When this mode is enabled, excess heat will be transferred only from your heated area to the rest of your home, via the Heat Exchanger, whenever your Boost Temp setting is exceeded. By closing off an extract point in a cooler area of the home, the temperature of the air supply to the heat exchanger and therefore the temperature of the air delivered to the rest of the home is effectively “boosted”. Note: Please refer to the Glossary of Terms on page 51 for an explanation of the above modes. Filters Heat Boost Core By-Pass f Heat Boost: For the use with Synergy systems with two or more extract points within the home. The status of the modes can be altered by pressing the Mode icon in the bottom right hand corner of the MODE page. MODE Current Mode Settings Heat Boost Core By-Pass Enabled Disabled To change these settings press the Mode icon on the right or go back to the ‘Settings’ menu and press ‘Mode’. This takes you straight to the SETTINGS MODE page. The status of the Heat Boost and Core By-Pass can now be altered. Refer to the SETTINGS MODE section for details on how to change these modes (page 35). Press Home to return to the Home page at any time Press Back button to step back to the SYSTEM Menu page Heater SYSTEM HEATER An information page providing the status of your heater (if installed), showing whether the heater is ON or OFF and (if ON) which of the 3 modes (Normal, Override or Timer) is active. This information reads directly from your settings in the SETTINGS HEATER pages (refer to page 41 to set these up). To access SYSTEM HEATER, press the Heater tab on the SYSTEM Menu page: SYSTEM Climate Heater Filters Energy Mode Contact A HEATER page will appear: Shown below are samples of possible heater pages: HEATER Heater DISABLED HEATER Heater ENABLED Heater currently: ON Mode:Normal To change these settings press the Flame on the right or go back to the ‘Settings’ menu and press ‘Heater’. In this example, the heater option is enabled and active (ON) and operating in Normal mode, which means the heater turns ON when the Room temperature falls below your minimum temperature setting. HEATER Heater ENABLED Mode:Timer Timer 1 ON 06:15 - 09:00 Timer 2 ON 17:30 - 22:30 To change these settings press the Flame on the right or go back to the Settings menu and press ‘Heater’. In this example the heater is in Timer mode with it programmed to turn ON at 6:15hrs and OFF at 9:00hrs on Timer 1, and then ON again at 17:30hrs and OFF at 22:30hrs on Timer 2, provided the room temperature is below your minimum temperature setting. To change these settings press the Flame on the right or go back to the ‘Settings’ menu and press ‘Heater’. In this example the heater has been ‘disabled’ which means under no circumstances will the heater turn on. 18 HEATER Heater ENABLED Time remaining: 3hrs 15mins Mode:Override To change these settings press the Flame on the right or go back to the Settings menu and press ‘Heater’. In this example, the heater is in Override mode and there is currently 3 hours and 15 minutes remaining of the ON time, irrespective of room temperature. The status of the heater modes can be altered by pressing the Heater icon in the bottom right hand corner of the HEATER page. HEATER Heater ENABLED Mode:Timer Timer 1 OFF Timer 2 ON 17:30 - 22:30 To change these settings press the Flame on the right or go back to the ‘Settings’ menu and press ‘Heater’. This takes you straight to the SETTINGS HEATER page. The status of the Heater can now be altered. Refer to the SETTINGS HEATER section for how to change these settings (page 41). Press Home to return to the Home page at any time 19 Press Back button to step back to the SYSTEM Menu page Energy MY SYNERGY ENERGY An information page displays the amount of energy recovered by your Synergy system for the Week (starting as of Monday) and Total (starting from installation or last Energy Reset). To access MY SYNERGY ENERGY press the Energy tab on the MY SYNERGY Menu page: SYSTEM Climate Heater Filters Energy Mode Contact f Money Recovered: The estimated amount of money saved by your Synergy system. This is calculated from your entered ENERGY COST in (refer to page 45 to set this up) and the Energy Recovered. f Carbon Footprint: The total estimated amount of CO² which has NOT been emitted into the atmosphere from a mixed-fuel power station due to the energy that has been recovered by Synergy. This is measured in kilograms of CO². The ENERGY page will appear displaying your Weekly Energy Totals: ENERGY f Moisture Removed: The estimated volume of water which has been removed from your home, which would otherwise accumulate as condensation and cause damage to the home environment. This is measured in litres. To view your Total Energy savings, press the Total Tab: Energy Efficiency Week Energy Recovered (kWh) Money Recovered ($) Carbon Footprint (kg CO²) Moisture Removed (l) Week f Energy Recovered: The estimated amount of energy recovered by your Synergy System, measured in kilowatt hours. This is calculated from the temperature difference between the inlet and exhaust air streams within the Heat Exchanger core. 21 4.62 9.0 7 Total The ‘Week’ tab is highlighted with a green border to indicate that this is the active page. ENERGY Energy Efficiency Week Energy Recovered (kWh) Money Recovered ($) Carbon Footprint (kg CO²) Moisture Removed (l) Week 21 4.62 9.0 7 Total Note: A ‘Week’ begins at midnight on Sundays 20 The Total Energy page will appear: ENERGY Energy Efficiency Week Energy Recovered (kWh) Money Recovered ($) Carbon Footprint (kg CO²) Moisture Removed (l) Week 399 87.78 172 133 Note: When you reset your Total Energy Savings, these values will be deleted from Synergy’s memory and you will be unable to recover them. All Total values will be reset to zero. Weekly totals will be unaffected. Press the RESET button on the right hand side: ENERGY RESET Total Total Energy Savings To Reset your Total Energy savings At times, you may wish to reset your Total Energy values, such as at the end of each month or at the beginning of a new season. This will reset all values back to zero. Press the RESET button at the top of the page: If you wish to reset your cumulative Energy totals to zero, press the ‘Reset’ button for 5 seconds. Once reset, previous totals can not be recovered. A CONFIRM page will appear asking you to confirm your decision: CONFIRM ENERGY Energy Efficiency Week Energy Recovered (kWh) Money Recovered ($) Carbon Footprint (kg CO²) Moisture Removed (l) Week Reset Total The ENERGY RESET page will appear: ENERGY RESET Total Energy Savings Confirm Energy Reset? 399 87.78 172 133 Reset Cancel Confirm Press Confirm to Reset your Total Energy Savings and return to the ENERGY Week page. Press Home to return to the Home page at any time Press Back button to step back to the SYSTEM Menu page If you wish to reset your cumulative Energy totals to zero, press the ‘Reset’ button for 5 seconds. Once reset, previous totals can not be recovered. 21 Contact SYSTEM CONTACT An information page listing several contact modes for technical assistance and advice on your Synergy System. To access SYSTEM CONTACT press the Contact tab on the SYSTEM Menu page: SYSTEM Climate Heater Filters Energy Mode Contact The CONTACT page will appear: CONTACT Phone: (09) 259 1662 Email: [email protected] Website: www.smartvent.co.nz Model 405PLUS Software V 1.5 x.x For any questions on your system please first refer to your Synergy User Manual, otherwise use one of the above points of contact. To assist with any questions you may have regarding your Synergy Controller, please use one of the following points of contact (quoting your Model and Software Version number): Phone: (09) 259 1662 Email: [email protected] Website: www.smartvent.co.nz 22 5.Settings SETTINGS pages are the control pages where you set up your Synergy system to your desired settings. Every time you change settings within SETTINGS, the controller automatically changes your SYSTEM pages where applicable. SETTINGS MENU provides six different setting pages: Climate 24Heater 41 Fans 28 Mode 35Clock 46 Energy $ 45 To enter into one of these pages simply press the SETTINGS tab on the home page and then press on the related tab. 15 MAR 13:15 SmartVent Room Temperature SETTINGS 19˚C Air Source Outside Saving this week $14.50 Climate Fans SYSTEM SETTINGS Heater Mode Energy $ Clock Note: All SETTINGS pages all have a blue strip at the top left of each page. CONFIRMING A SETTING Once the setting has been entered on any of the functions, Press the Home button to return to the Home Page or Press the Back button to step back to the SETTINGS Menu. If any changes have been made to the settings in this section, Synergy will prompt you to confirm your decision: CONFIRM Press the Confirm button and the display will return to the SETTINGS Home page. 23 Confirm change of settings? Cancel Confirm Climate SETTINGS CLIMATE SETTINGS CLIMATE is the defining setting for the control over your home comfort. Some modes are dependent on these settings being setup such as tempering heater and Fan Min modes. CLIMATE Min Temp Remote Sensor Comfort Level Humidity The Climate default settings are: 1. Minimum Temperature = 18°C 2. Comfort Level = Mid Range (Green) 3. Humidity Level = 75% Synergy aims to keep your home environment within this comfort zone by using these settings in conjunction with your Heat Boost and Core By-Pass mode set-up. SETTINGS Once the setting has been entered, Press the Home button to return to the Home Page or Press the Back button to step back to the SETTINGS Menu. If any changes have been made to the settings in this section, Synergy will prompt you to confirm your decision. Refer to page 23 for further instructions Climate Fans Heater Mode Energy $ Clock When you press on the CLIMATE tab there are four available settings 1. Min Temp 2. Comfort Level 3. Humidity 4. Remote Sensor (will only appear if this optional extra has been installed) 24 MIN TEMP SETTING COMFORT LEVEL SETTING This setting is used to control the optional tempering heater and the operation of the system fans as set in the Fan Min Settings. Comfort Level sets the target warmth of the home. The system will automatically adjust to get as close to this target as possible. f To set the desired MINIMUM TEMPERATURE press SETTINGS on the Home page and then the CLIMATE TAB. f To set the desired COMFORT LEVEL press SETTINGS on the Home page and then the CLIMATE TAB. The CLIMATE page is displayed: The CLIMATE page is displayed: CLIMATE CLIMATE Min Temp Min Temp Comfort Level Comfort Level Humidity Humidity Press the MIN TEMP tab to change the minimum temperature setting. Press the UP and DOWN arrows to increase/decrease the setting as desired. MIN TEMP Press the COMFORT LEVEL tab to change the settings The mid-range Comfort Level is highlighted. To choose a Warmer or Cooler Comfort Level use the UP and DOWN arrows to increase/decrease the setting as desired. COMFORT LEVEL Min Temp: 15°C Cooler Warmer For further information on MIN TEMPERTURE please refer to your Synergy User Manual under the Climate section. For further information on COMFORT LEVEL please refer to your Synergy User Manual under the Climate section. Once the setting has been entered, Press the Home button to return to the Home Page or 25 Press the Back button to step back to the SETTINGS Menu. Once the setting has been entered, Press the Home button to return to the Home Page or Press the Back button to step back to the SETTINGS Menu. HUMIDITY SETTING REMOTE SENSOR SETTING Humidity sets the target humidity of the home. The system will automatically adjust to get as close to this target as possible. If the Remote Sensor Panel is installed (this is an optional extra: FAN2047) then the following options are available. f To set the desired HUMIDITY, press SETTINGS on the Home page and then the CLIMATE TAB. The CLIMATE page is displayed: f Temperature can be sensed at the Control Room (Colour Touch Screen Controller) or the Remote Room (where your Remote Sensor is located) or an Average of both. f Humidity can be sensed at the Control Room (Colour Touch Screen Controller) or the Remote Room (where your Remote Sensor is located) or an Average of both. f An Average reading is ideal for a representative sample of your home environment. Readings at either the Control Room or Remote Room allow for site specific control, e.g, damp areas subject to build up of moisture or heat transfer when temperature reaches threshold in certain areas. CLIMATE Min Temp Comfort Level Humidity Press the HUMIDIT Y tab to change the Humidity Level setting. Press the UP and DOWN arrows to increase/decrease the setting as desired. HUMIDITY CLIMATE OFF ON To check or change your Remote Sensor settings, press the Remote Sensor tab on the CLIMATE page: Min Temp Remote Sensor Humidity: 15% Comfort Level For further information on HUMIDITY please refer to your Synergy User Manual under the Climate section. Humidity Once the setting has been entered, Press the Home button to return to the Home Page or Press the Back button to step back to the SETTINGS Menu. 26 REMOTE SENSOR Temp. Humidity In this example, the Average temperature between the Control Room and the Remote Room has been selected: ? CLIMATE Average Temp. Humidity For further information on REMOTE SENSOR please refer to your Synergy User Manual under the Climate section. Average Notice that the ‘Temp.’ tab border is highlighted blue, indicating that you are selecting where you would like your temperature readings taken from. Use the black arrows to choose whether temperature is sensed from the Control Room, an Average of both sensors, or from the Remote Sensor: Comfort In this example, the Temperature Sensor in the Remote Room has been selected: CLIMATE Humidity Remote Room REMOTE SENSOR Comfort Humidity Remote Room For further information on REMOTE SENSOR please refer to your Synergy User Manual under the Climate section. ? Temp. In this example below, the Temperature Sensor has been selected at the Remote Room: Temp. Sensor Sensor You can also choose where you would like your Relative Humidity sensed from; either the Control Room, the Remote Room or the Average of both. Press the ‘Humidity’ tab: REMOTE SENSOR Temp. Humidity Control Room For further information on REMOTE SENSOR please refer to your Synergy User Manual under the Climate section. 27 Repeat the same steps as for Temperature. Fans FANS SETTINGS FANS The Fans determine how many air exchanges per hour take place (in how many hours the air inside your home is replaced with new incoming air). Healthy living and wellness is best provided in living areas at 0.35 air exchanges per hour (as per Australasian standard AS/NZS 4303; 1990). The Fans default settings are: ff Fan Speed = 5 ff Fan Boost = Normal ff Fan Min = Enabled, Low Speed ff Fan Seasons = Disabled, Oct - Mar ff House Size = 210-240m2 Synergy aims to keep your home environment within this comfort zone by using these settings Fan Speed Fan Mode House Size Once the setting has been entered, Press the Home button to return to the Home Page or Press the Back button to step back to the SETTINGS Menu. If any changes have been made to the settings in this section, Synergy will prompt you to confirm your decision. Refer to page 23 for further instructions SETTINGS Climate Fans Mode Heater Energy $ Clock When you press on the FANS tab there are three available settings ff Fan Speed ff Fan Mode (Fan Boost, Fan Min, Fan Seasons) ff House Size 28 FAN SPEED SETTINGS FOR SYNERGY 405PLUS FAN SPEED HOUSE SIZE Synergy 405PLUS has a range of 9 Fan Speeds to choose from. Synergy has a range of 4 house sizes. Once your house size has been selected, Synergy will automatically provide you with the sufficient ventilation rate. Fan Speed 5 is the optimum setting for the house. f To set or check your FAN SPEED, press SETTINGS then select FANS. The FANS page will display. Select the Fan Speed tab: The FANS page will display. Select the House Size tab: FANS FANS Fan Speed Fan Speed Fan Mode Fan Mode House Size House Size Use the UP and DOWN arrows to alter the speed settings as required from low speed to high speed. FAN SPEED 123 4 5 6 7 89 The 9 fan speeds offer a comfortable fan speed range based on your house size. For further information please refer to your User Manual. The bar above the fan speeds will change to blue when selected indicating the current Fan Speed. Once the setting has been entered, 29 f To set or check your HOUSE SIZE, press SETTINGS then select FANS. Use the UP and DOWN arrows to alter the house settings as required. HOUSE SIZE 210m² - 240m² Once you enter your house size, you can manually adjust the fan speed for your home. For further information please refer to your User Manual. The house above the House Size will change to blue when selected indicating the current House Size. Once the setting has been entered, Press the Home button to return to the Home Page or Press the Home button to return to the Home Page or Press the Back button to step back to the SETTINGS Menu. Press the Back button to step back to the SETTINGS Menu. FAN SPEED SETTINGS FOR SYNERGY 225PLUS FAN SPEED Synergy 225PLUS has a range of 3 Fan Speeds to choose from. Fan Speed 2 is the optimum setting for the house. f To set or check your FAN SPEED, press SETTINGS then select FANS. The FANS page will display. Select the Fan Speed tab: FANS Fan Speed Fan Mode Use the UP and DOWN arrows to alter the speed settings as required from low speed to high speed. FAN SPEED 1 2 3 The 3 fan speeds offer a comfortable fan speed range based on your house size. For further information please refer to your User Manual. The bar above the fan speeds will change to blue when selected indicating the current Fan Speed. Once the setting has been entered, Press the Home button to return to the Home Page or Press the Back button to step back to the SETTINGS Menu. 30 FAN MODE There are several FAN MODE settings to optomise your Synergy system. ff FAN BOOST pg 32 ff FAN MIN pg 32 FAN MODE Fan Boost Fan Min ff FAN SEASONS pg 33 When you press on the FANS tab there are three available settings. There are 3 FAN MODE settings available. These are FAN BOOST, FAN MIN, and FAN SEASONS. SETTINGS Climate Fans Mode Fan Seasons Heater Once the setting has been entered, Energy $ Press the Home button to return to the Home Page or Clock Press the Back button to step back to the SETTINGS Menu. FANS If any changes have been made to the settings in this section, Synergy will prompt you to confirm your decision. Refer to page 23 for further instructions Fan Speed Fan Mode House Size Press the FAN MODE tab and the FAN MODE page will display. 31 FAN BOOST FAN MIN Use this to control the automatic boost function for Synergy. There are 3 settings available for FAN BOOST. The default setting for FAN BOOST when installed is Normal. FAN MODE Use this to set the ventilation rate of the system, when Min Temp is reached in the controller room. FAN MIN controls the operation of the fans when the Room Temperature falls below the system Minimum Temperature setting. Fan Boost The default setting for FAN MIN when installed is Enabled; low speed. Fan Min When you press the FAN MIN tab the FAN MIN page will display FAN MODE Fan Seasons Fan Boost FAN BOOST Fan Min Night Normal OFF For further information on FAN BOOST please refer to your Synergy User Manual under the FAN section. f NORMAL - Will change the fan to Fan Speed 9 for 15 minutes, any time that the room temperature/ humidity rises (significantly) above the current COMFORT Setting (see page 25) Fan Seasons There are 2 settings available for FAN MIN FAN MIN Enable Disable f OFF - Disables the Automatic Boost function f NIGHT - Works as described in Normal mode, with the exception of being disabled between 9pm 7am. For further information on FAN MIN please refer to your Synergy User Manual under the FAN SPEED section. 32 FAN SEASONS f ENABLED - When the minimum temperature is reached, the fan switches off or goes to low speed (user adjustable). f DISABLED - When the minimum temperature is reached, the fan stays on its current speed. FAN MIN FAN OFF To set the Seasonal months. This determines where the primary air source is drawn from during the summer and winter seasons The FAN SEASONS setting is available for systems that source incoming air from either outside or the roof cavity. This setting allows the user to set the Summer and Winter seasons for the system based on their climate. Low Speed For further information on FAN MIN please refer to your Synergy User Manual under the FAN section. f FAN OFF - Fan switches off until the room temperature rises above the Minimum Temperature setting. f LOW SPEED - Changes fans to Low Speed until the room temperature rises above the Minimum Temperature setting. Once the setting has been entered, Press the Home button to return to the Home Page or Press the Back button to step back to the SETTINGS Menu. If any changes have been made to the settings in this section, Synergy will prompt you to confirm your decision. Setting the Summer and Winter seasons help the Synergy system to determine where to source the incoming air. During the summer months, air is primarily sourced from outside and during the winter months, primarily from the roof cavity. When you press the FAN SEASONS tab, the FAN SEASONS page will display. FAN MODE Fan Boost Fan Min Fan Seasons Refer to page 23 for further instructions The default FAN SEASONS setting is OCT - MAR for the summer months and APR - SEPT for winter months. 33 Use the UP and DOWN arrows to alter the month settings as required. FAN SEASONS Enable Disable SUMMER MONTHS OCT - MAR For further information on FAN SEASONS please refer to your Synergy User Manual under the FAN SPEED section. Summer OCT - MAR Winter APR - SEPT (Winter automatically defaults to the months not selected). If the user changes the start month for Summer by selecting the left arrow, adjust till the correct month is shown. Do the same for the end month. Once the setting has been entered, Press the Home button to return to the Home Page or Press the Back button to step back to the SETTINGS Menu. If any changes have been made to the settings in this section, Synergy will prompt you to confirm your decision. Refer to page 23 for further instructions 34 MODE SETTINGS MODE Synergy incorporates both a Heat Boost Mode and Core By-Pass modes. These provide complete control of your system for all year round ventilation. To enable or disable the Heat Boost mode, press SETTINGS then select MODE. SETTINGS Climate HEAT BOOST MODE Fans Heater Energy $ (For use with multiple extract points) This mode is perfect for when you have a heat source (fireplace, heat pump etc) in the Control Room, which creates too much heat for that one room. When Heat Boost is ON, the excess heat is extracted only from this room, passing it through the heat exchanger, taking maximum advantage of this excess heat which is used to warm the incoming air entering you home via your inlet diffusers. When Heat Boost is Enabled Once the room temperature reaches your set BOOST TEMP setting (see page 36) the system starts pulling this excess heated air from only the warmed room, transferring it through the heat recovery system to warm the incoming supply air. When the room temperature drops below the set BOOST TEMP the system reverts back to extracting from all outlets. When Heat Boost is Disabled The system will extract from all outlets installed and supply through the heat exchanger to all inlet diffusers. 35 Mode Clock When the MODE page is displayed, select HEAT BOOST: MODE Heat Boost Core By-Pass If there is no Heat Boost installed an information page will be displayed: This optional extra is not currently installed, please contact your installer for more information. Once installed the related screens will appear. Press the Home button to return to the Home Page at any time. To ENABLE to DISABLE the Heat Boost function, press either the ON/OFF tabs. Press the Back button to step back to the SETTINGS Menu. Next select the desired temperature which you would like to start the Heat Boost function. The HEAT BOOST page will appear. MODE Press the UP and DOWN arrows to increase/decrease the setting as desired. Next, select the desired mode which you would like Heat Boost to be activated. Heat Boost NORMAL HEAT BOOST MODE Core By-Pass The HEAT BOOST tab is used to enable or disable the Heat Boost function. Set the temperature level in the controller room at which you would like the system to extract excess heat only from the heat source room and select the desired Mode Press the Heat Boost tab and the HEAT BOOST page will display. Normal mode is driven by the BOOST TEMP setting. If the Heat Boost is enabled and this mode is active, then it will automatically turn the Heat Boost ON when your Control Room rises above the BOOST TEMP and off again when it drops 1oC below the BOOST TEMP. The Normal tab border is highlighted blue indicating this mode is active: HEAT BOOST ? Heat Boost ENABLE ON OFF Boost Temp: 26°C HEAT BOOST ? Timer Heat Boost DISABLED ON Boost Temp: 26°C Timer Normal Normal Override OFF Override Note: Normal mode is the default mode. Synergy will automatically select this mode when the Heat Boost is turned ON, providing neither of the other two modes were active prior to the Heat Boost being turned OFF. If a different mode is active and you wish to enable Normal mode, press the Normal tab: 36 ? HEAT BOOST OVERRIDE Heat Boost ENABLE ON OFF 1 Boost Temp: 26°C Timer Normal Override To deactivate Normal Heat Boost mode either turn the Heat Boost OFF on the HEAT BOOST page or change to another Heat Boost mode. OVERRIDE HEAT BOOST MODE Override mode allows you to turn the Heat Boost ON, irrespective of any temperature settings. To enable the Override mode, press the Override tab: HEAT BOOST ? Normal 4 6 Override Use the UP and DOWN arrows to select the number of hours that you wish the Heat Boost to turn ON for (1, 2, 4 or 6 hours). When you have chosen how long you wish to run the Heat Boost for, press the ON/OFF button to read ON so that border is highlighted red, indicating the Override mode is now active. ? OVERRIDE 2 Hours 4 6 OFF ON Boost Temp: 26°C Timer Hours ON 1 Heat Boost ENABLE ON 2 Override The OVERRIDE page will be displayed: Override Note: Once this setting is confirmed, the Heat Boost will instantly turn ON. After the time has elapsed, the Heat Boost will turn OFF and the system will revert back to the previous active mode (either Normal or Timer mode). If you have not used either mode before enabling the Heat Boost it will revert to Normal Mode as default. Return to the Heat Boost page by pressing the Back button 37 To deactivate Override Heat Boost mode either turn the Heat Boost OFF on the HEAT BOOST page or change to another Heat Boost mode. TIMER HEAT BOOST MODE Timer Mode is a combination of time intervals which activate based on the room temperature and whether it rises above the BOOST TEMP settings. For the HEAT BOOST to turn ON in Timer mode, two conditions must be met: 1) The time of day must fall within either of the 2 set time periods as set by you. To set the Timer(s) To turn Timer 1 ON, press the button adjacent to the Timer 1 tab labelled ‘OFF’. This will change to an ON button with a red border: Timer 1 2) The temperature in the control room must be higher than the BOOST TEMP setting. Two timers allow morning and evening operations but there are no restrictions of the timer band width or even overlap. To enable the Timer Heat Boost mode press the Timer tab: HEAT BOOST ? Heat Boost ENABLE ON OFF Boost Temp: 26°C Timer Normal Override The TIMER page is displayed showing Timer 1 and Timer 2 on/off times: ? TIMER ON OFF Timer 2 on on 06:30 16:45 off 10:45 off 16:45 Use the UP arrows to adjust the time in hours and minutes that the Heat Boost will turn on, provided the room temperature is higher than BOOST TEMP setting. The arrows on the left hand side of the Timer 1 ‘clock box’ adjust the Hour, and the ones on the right hand side adjust the Minutes. If two timer periods are required, repeat the procedure for Timer 2. Both or either timers can be on or off. As an example, the Heat Boost could be set to come on between 6am and 8am in the morning and between 5pm and 8pm at night, all provided the room temperature is higher than BOOST TEMP. Note: ? TIMER Timer 1 ON OFF Timer 2 on on 06:30 16:45 off 10:45 off 16:45 1. If your room temperature is below your BOOST TEMP setting during your timer periods, then the Heat Boost will not turn ON. 2. If your room temperature rises above your BOOST TEMP outside of your chosen time periods, then the HEAT BOOST will NOT turn ON. Return to the HEAT BOOST page by pressing the Back button 38 The Timer tab border is now highlighted blue indicating this mode is operative: HEAT BOOST ? Heat Boost ENABLE ON OFF Boost Temp: 26°C Timer Normal Override To deactivate Timer Heat Boost mode either turn the Heat Boost OFF on the HEAT BOOST page or change to another Heat Boost mode. Once the setting has been entered, Press the Home button to return to the Home Page or Press the Back button to step back to the SETTINGS Menu. If any changes have been made to the settings in this section, Synergy will prompt you to confirm your decision. Refer to page 23 for further instructions CORE BY-PASS MODE Synergy has a CORE BY-PASS option. This mode operates a damper which allows the fresh inlet air supplied into your home to by-pass the Heat Exchanger and therefore it avoids being warmed by the outgoing, warm exhaust air. When Core By-Pass is Disabled This allows the warm exhausted air from your home to flow through the Heat Exchanger to warm the incoming air. To enable or disable the Core By-Pass mode press the Core By-Pass tab: To enable or disable the Core By-pass mode, press SETTINGS then select MODE: When Core By-Pass is Enabled Enable this mode when you wish to make your home cooler. When enabled and the room temperature rises significantly above the set comfort level, the damper ‘opens’ allowing the inlet air to bypass the heat recovery core. Go into the SETTINGS page then select MODE. Note: When heating the house, we recommend disabling Core By-Pass to allow the heat to be recovered. SETTINGS Climate Fans Mode 39 Heater Energy $ Clock Note: As a safety feature, if the inlet air falls below -5°C, the Core By-Pass damper opens to prevent the condensation in the Heat Exchanger core icing up. Press the Core By-Pass tab. MODE Heat Boost Once the setting has been entered, Press the Home button to return to the Home Page or Core By-Pass Press the Back button to step back to the SETTINGS Menu. The CORE BY-PASS page will display the status of the Core By-pass mode. If this mode is ON, then the ON button border will be highlighted and the 3 arrows are coloured blue: If any changes have been made to the settings in this section, Synergy will prompt you to confirm your decision. Refer to page 23 for further instructions Core By-Pass ON Core By-Pass ENABLE OFF For further information on CORE BY-PASS please refer to your Synergy User Manual under the MODE section. To disable the Core By-Pass mode press the OFF button and the page changes so that the OFF button is highlighted blue and the arrows are coloured white. Core By-Pass ON Core By-Pass DISABLE OFF OFF For further information on CORE BY-PASS please refer to your Synergy User Manual under the MODE section. 40 Heater SETTINGS HEATER An in-line tempering heater is available as an optional extra to the Synergy system. The heater ‘tempers’ the inlet air in situations where the amount of heat recovery from your home air is insufficient to bring the incoming air temperature to your comfort setting. To enter the Heater page, press SETTINGS on the Home page and then press HEATER: If installed, the HEATER page will appear. When the heater is OFF, the OFF button will have a blue border and the flame will be white. To Enable the heater Press the ON button: HEATER ON ? Heater DISABLED OFF SETTINGS Climate Fans Heater Energy $ The page changes to show the 3 available Heater modes: Timer, Normal and Override: HEATER Mode If there is no heater installed, an information page will be displayed: ON Timer This optional extra is not currently installed, please contact your installer for more information. Once installed the related screens will appear. In this case: Press the Home button to return to the Home Page or 41 ? Clock Press the Back button to step back to the MY SETTINGS Menu. Heater ENABLED Normal OFF Override NORMAL HEATER MODE OVERRIDE HEATER MODE Normal mode is driven by the Minimum Temperature setting. If the heater is enabled and this mode is active, it will automatically turn the tempering heater ON when your Control Room drops below the minimum temperature and OFF again when it rises 1°C above your minimum temperature setting. Override mode allows you to turn the heater ON, irrespective of any other variable settings. This mode is useful to temper the incoming air in situations where the internal heating has been off and human activity is at a minimum. The Normal tab border is highlighted blue indicating this mode is active: HEATER To enable the Override mode press the Override tab: ? Heater ENABLED ON ON ? HEATER Heater ENABLED OFF Timer Timer Normal Override Note: Normal mode is the default mode. Synergy will automatically select this mode when the heater is turned ON, providing neither of the other two modes were active prior to the heater being turned OFF. If a different mode is active and you wish to enable Normal mode, press the Normal tab: HEATER ON Timer Normal Normal Override The OVERRIDE page will be displayed: OVERRIDE 1 2 Hours ON ? Heater ENABLED OFF 4 6 Override Use the UP and DOWN arrows to select the number of hours that you wish the heater to turn ON for (1, 2, 4 or 6 hours). OFF Override To deactivate Normal heater mode either turn the heater OFF on the HEATER page or change to another heater mode. 42 When you have chosen how long you wish to run the heater for, press the ON/ OFF button to read ON so that border is highlighted red, indicating the Override mode is now active. ? OVERRIDE 1 2 Hours ON 4 TIMER HEATER MODE Timer Mode is a combination of time intervals which activate based on the room temperature and whether it falls below the MIN TEMP settings. For the heater to turn ON in Timer mode, two conditions must be met: 1) The time of day must fall within either of the two set time periods as set by you. 6 Override Note: Once this setting is confirmed, the heater will instantly turn ON. After the time has lapsed, the heater will turn OFF and the system will revert back to the previous active mode (either Normal or Timer mode). If you have not used either before enabling the Heater, it will revert to Normal Mode (default). 2) The temperature in your Control Room must be less than the minimum temperature setting. Two timers allow morning and evening operations but there are no restrictions of the timer band width or even overlap. To enable the Timer heater mode press the Timer tab: ? HEATER Return to the Heater page by pressing the Back button The Override tab border is now highlighted blue indicating this mode is operative: HEATER ? Heater ENABLED ON Timer Normal Heater ENABLED ? OFF Timer 1 Timer 43 Normal Override The TIMER page is displayed showing Timer 1 and Timer 2 on/off times: TIMER ON OFF Override To deactivate Override heater mode either turn the heater OFF on the HEATER page or change to another heater mode. ON OFF Timer 2 on on 06:30 16:45 off 10:45 off 16:45 To set the Timer(s) To turn Timer 1 ON, press the button adjacent to the Timer 1 tab labelled ‘OFF’. This will change to an ON button with a red border: ? TIMER Timer 1 ON OFF Return to the HEATER page by pressing the Back button The Timer tab border is now highlighted blue indicating this mode is operative: HEATER ? Timer 2 on on 06:30 16:45 off 10:45 off 16:45 Use the arrows to adjust the time, in hours and minutes, at which the heater will turn on, provided the room temperature is lower than the minimum temperature setting. The arrows on the left hand side of the Timer 1 ‘clock box’ adjust the Hour, and the ones of the right hand side adjust the Minutes. If two timer periods are required, repeat the procedure for Timer 2. Both or either times can be on or off. As an example, the heater could come on between 6am and 8am in the morning and between 5pm and 8pm at night, all provided the room temperature was less than the minimum temperature setting. Note: Heater ENABLED ON Timer Normal OFF Override To deactivate Timer heater mode, either turn the heater OFF on the HEATER page or change to another heater mode. Once the setting has been entered, Press the Home button to return to the Home Page or Press the Back button to step back to the SETTINGS Menu. If any changes have been made to the settings in this section, Synergy will prompt you to confirm your decision. Refer to page 23 for further instructions 1. If your room temperature is above your Minimum Temperature setting during your timer periods, then the heater will not turn ON. 2. If your room temperature falls below your Minimum Temperature outside of your chosen time periods, then the Heater will NOT turn ON. 44 Energy cost MY SETTINGS ENERGY COST Synergy uses your entered Energy Cost to calculate your savings shown in the MY SYNERGY ENERGY section. Typical household energy units are expressed as kWh (kilowatt hours) and are metered and charged accordingly by your energy supplier. Refer to your energy bill for your current energy charge. To check or change the current Energy Cost, enter MY SETTINGS then press Energy $ to display the ENERGY COST page. Once the current amount has been entered, Press the Home button to return to the Home Page or Press the Back button to step back to the MY SETTINGS Menu. If any changes have been made to the settings in this section, Synergy will prompt you to confirm your decision: CONFIRM Confirm change of settings? SETTINGS Climate Fans Mode Heater Energy $ Clock Use the arrows to set your current charge for energy units: ENERGY COST Enter your energy cost as stated by your power provider. $0.22 / kWh Note: The default Reset value for the energy cost is $0.22 / kWh. 45 Cancel Confirm Press the Confirm button and the display will return to the MY SETTINGS Home page. Clock SETTINGS - CLOCK Once the setting has been entered, The CLOCK is used to operate the timers for the tempering heater or Heat Boost features (if installed). Note: When the Clock is set, the current date and time will be displayed in the top right hand corner of the HOME PAGE. To change the Clock, press SETTINGS on the Home page then press Clock: Press the Home button to return to the Home Page or Press the Back button to step back to the SETTINGS Menu. If any changes have been made to the settings in this section, Synergy will prompt you to confirm your decision. Refer to page 23 for further instructions Note: In the event of a power cut, an internal battery will maintain the proper CLOCK operation. SETTINGS Climate Heater Fans Energy $ Mode Clock The CLOCK page will display showing the current hour, minute and day settings. CLOCK Hour 13:45 Day 26 March Month Year 2010 Year Min f Use the red arrows to adjust the Hour and minutes f Use the blue arrows to adjust the Day and Month f Use the black arrows to adjust the Year 46 6. Maintenance This section covers the following maintenance information: Filter Maintenance 47 Cleaning the Controller 49 Heat Exchanger Unit Maintenance 49 FILTER MAINTENANCE This Filter Replacement icon will show on the HOME PAGE when either filter requires cleaning or replacing. Press the icon to take you directly to the FILTER RESET page to find out which filter is FULL: MAR 1515MAR 13:15 13:15 SmartVent Temperature Room Temperature 19˚C 19˚C Source Air Source Outside Outside Saving this this week week Saving $14.50 $14.50 FILTER RESET F7 Filter FULL G3 Filters 18 weeks SYSTEM SYSTEM SETTINGS SETTINGS Reset Reset When FULL, please refer to your Synergy User Manual for cleaning/replacement instructions. Press ‘Reset’ after maintenance is complete. Note: DO NOT reset the filters until you have completed the maintenance. F7 FILTER REPLACEMENT The F7 filter’s life span for SmartVent Synergy is approximately 1 year (52 weeks) before reaching 100% filter usage/FULL. Once the F7 filter is FULL, you will need to replace the filter media. You can purchase and change this filter yourself as it is just a matter of undoing clips on the in-line filter (as pictured below) in your roof space and replacing it with the new Filter Media Box. Alternatively you can contact your installer to purchase and replace it for you. The filter is located between duct lengths. You can purchase your replacement filter from any Electrical Wholesaler or your SmartVent Installer by simply quoting the SmartVent order code ‘DCT2093’. In-Line F7 Filter Replacement F7 Filter Media Box Order Code: DCT2093 47 Once replaced, press the Reset tab next to the F7 filter as shown. Refer to page 15. G3 FILTER MAINTENANCE The G3 filter’s life span for SmartVent Synergy is approximately 1/2 year (26 weeks) before reaching 100% filter usage/ FULL. There are two G3 filters situated in the Heat Exchanger. Once the G3 filters are FULL you will need to clean the filter media by completing the following steps: 1) Turn your Synergy system OFF (refer to page 8 for instructions on turning your system OFF). Disconnect the mains power to the Heat Recovery Unit. Wait until the fans come to a complete stop before moving on to the next step 2) Locate and carefully remove the 2 x G3 filters as pictured: 3) Open the two filter access panels on the front and rear of the unit 4) Gently clean the outside of the filters with a vacuum as shown 5) After cleaning, carefully replace the filters inside the heat exchanger. 6) Close the white plastic covers 7) Reconnect the power to the Heat Recovery Unit. Turn your Synergy system back ON (refer to page 9 for instructions on turning your system ON). Note: After 2 or 3 years you may find the filters are not cleaning as well as they used to. If after cleaning they are still dirty you should consider replacing them. Replacement G3 filters are available - please contact SmartVent for ordering information. To Reset your Filters once maintenance is complete The Filter resets are to be used when you have cleaned or replaced your filter/s and wish to reset the filter/s back to empty/new. This will reset the replacement time back to the start. Please refer to page 15. 48 CLEANING THE COLOUR TOUCH SCREEN CONTROLLER 1) Turn your Synergy system OFF (refer to page 8 for instructions on turning your system OFF). 2) Clean the control screen by gently wiping the surface with a slightly dampened tissue moistened with water only, cleaning solution is not recommended. DO NOT spray cleaning solutions or water onto the control screen as it is NOT WATERPROOF. 3) Turn your Synergy system back ON (refer to page 9 for instructions on turning your system ON) MAINTENANCE OF THE HEAT RECOVERY UNIT We recommend that the Heat Exchanger Core is cleaned once a year by completing the following steps: 1) Turn your Synergy system OFF (refer to page 8 for instructions on turning your system OFF). Disconnect the mains power to the Heat Recovery Unit. 2) Unscrew the eight screws on the front of the unit. Carefully remove the front panel of the unit and put to one side. 3) Carefully remove the heat exchanger core. 4) Create a mild detergent solution (1 x teaspoon of washing up liquid to a 9L bucket of warm water). Soak the heat exchanger core in this liquid for one minute. 5) Rinse thoroughly using clean water until the water runs clear and there is no solution residue left on the inner plates of the heat exchanger core. Allow to fully dry before proceeding. 6) Reassemble the unit, taking care not to damage the rubber seals. 7) Reconnect the power to the Heat Recovery Unit. Turn your Synergy system back ON (refer to page 9) 49 7. Frequently Asked Questions ff What does this symbol mean on my Home page? This Filter Replacement icon will show on the HOME PAGE when either of the filters require cleaning or replacing. Refer to page 47 for more information. When speaker volume is OFF, this ‘mute’ icon will appear on the Home page. To adjust/increase the volume, refer to page 6. ff Why is the Fan Icon on my Home page flashing? ff What do I do when Error message is displayed? SYSTEM ERROR ERROR No.1 For more information on this error press the ERROR icon for our contact details ff What is the difference between ‘ON’ and ‘ENABLED’, and ‘OFF’ and ‘DISABLED’, regarding the Heat Boost mode and Heater modes (if installed)? This indicates that the fans are on ‘Boost’ - maximum Fan Speed (high speed) as a result of manual override or temperature conditions in the controller room. In the event of a system error, Synergy will display this page. Refer to page 52 for more information. The Heat Boost and Heater modes (discounting Override mode) are conditional on the room temperature/ humidity being above or below a set value: therefore the mode can be ‘Enabled’ but physically inactive or ‘OFF’ depending on the room conditions. 50 8. Glossary of Terms Air Source The source of inlet air: either the roof cavity or outside. Heat Boost Mode When enabled, Synergy will extract warm air from just your heated room (where your controller is placed), first passing through the Heat Exchanger which significantly warms the incoming air before distributing it throughout the home. (Multiple extract Systems) 51 Roof Cavity The roof space where your Synergy system is installed can provide a source of heated source air at times. Core By-Pass Mode The Core By-pass feature opens a damper which allows the inlet air to by-pass the Heat Exchanger and therefore not be warmed by the hot exhaust air. Tempering Heater An in-line 1kW duct heater used to raise the temperature of the inlet air. 9. Error Messages In the event of a system error, Your Colour Touch Screen Controller will display this page. SYSTEM ERROR ERROR No.1 For more information on this error press the ERROR icon for our contact details There are 7 different Error Numbers that can be displayed. ff Error No.1 Real time clock error. ff Error No.2 Real time clock error. ff Error No.3 System Controller internal communication error. ff Error No.4 System Controller internal communication error. ff Error No.5 Communication error between Ceiling Control Unit & Touch Screen Controller. ff Error No.6 User variables memory error. ff Error No.7 Indicates an unspecified error. In all cases, please contact SmartVent on 09 259 1662 to speak to an advisor and quote the Error Number displayed on your Controller so that they can direct you accordingly. The Home page will not be displayed again until the error has been dealt with. 52 10. Warranty 5 YEAR WARRANTY Simx warrants to the purchaser that this product is free from defects in the material and workmanship for a period of five years from the date of the original retail purchase. The warranty only operates if proof of purchase in the form of a bill of sale, invoice or purchase receipt is presented at the time of request of service a nd if the attached warranty card is completed and returned to Simx. The customer shall ensure that the goods are fit and suitable for the purpose for which they are required and the company is under no liability if they are not. The Warranty is in addition to all other conditions, warranties, guarantees, rights and remedies which may be applied by relevant legislation in New Zealand. This warranty will not be applicable if the product has not been operated and maintained in accordance with the manufacturer’s instructions and recommendations contained in the operating & installation instructions provided with the product, or if the product has been used in a manner other than for which it was originally designed, or if the damage, malfunction or failure has resulted from incorrect voltages, alterations, accident, misuse, neglect, abuse, faulty or improper installation or main supply problems. We recommend that you keep all the original packaging as it provides the best protection should you have to store or transport this unit in the future. Filter Replacement is not included in this warranty. INSTALLER DETAILS Date Installed: ______________________________________________________________ Installer’s Name:____________________________________________________________ Company:__________________________________________________________________ Contact Phone Number:_____________________________________________________ 53 11. Notes 54 55 Contact Details For any questions regarding the SmartVent Synergy system please contact us at: Phone: (09) 259 1660 Email:[email protected] Website:www.smartvent.co.nz SmartVent SYNERGY Distributed by Simx Limited Simx reserves the right to alter specifications without notice. User Manual [email protected] | www.smartvent.co.nz Pub0382 Iss04 10/12