1
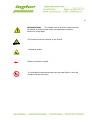
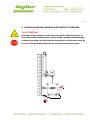
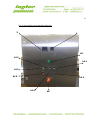
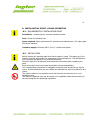
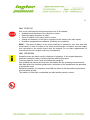
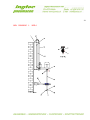
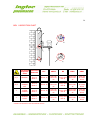
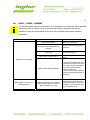
USER MANUAL ® AKO WALL VARIABLE SPEED WALL MOUNTED MIXER 1 TABLE OF CONTENTS Page No 1. MACHINE DATA 4 2. SPECIFICATIONS 6 2.1. MIXING SHAFT DRIVE 6 2.1.1. Main Motor 6 2.1.2. Speed Control Unit / Frequency Converter 6 2.2. REDUCER ELECTRIC MOTOR…………………………………………………………………………………..6 2.2.1. Motor / Reducer 6 2.3. NOISE INFORMATION 7 2.4. CONTROL PANEL 7 2.5. CONNECTOR BOX 7 2.6. MIXING EQUIPMENT 7 2.7. WEIGHT 7 2.8. STROKE 7 2.9. EXTEND OF DELIVERY 8 3. SAFETY 9 3.1. EXPLANATION OF SYMBOLS AND NOTICES 9 3.2. SAFETY DURING OPERATING AND MAINTENANCE 11 4. EXPLOSION HAZARD THROUGH ELECTROSTATIC CHARGING 12 2 5. RECEIPT OF THE MACHINE, TRANSPORT AND STORAGE 13 5.1. PACKAGING AND TRANSPORTATION 13 5.2. STORAGE 13 6. BASIC INFORMATIONS 14 6.1. PURPOSE OF THE MANUAL 14 6.2. PROPER APLICATION 14 7. DESCRIPTION OF THE MACHINE 15 7.1. MACHINE MAIN FRAME 15 7.2. MIXING SHAFT 15 7.3. MIXING PROPELLER 15 7.4. CONTROL PANEL 15 7.5. SAFETY SWITCHES……………………………………………………………………………………..18 8. INSTALLATION, START-UP AND OPERATION 19 8.1. REQUIREMENTS AT INSTALLATION POINT 19 8.2. INSTALLATION 19 8.3. INSTALLATION DESCRIBE 20 8.4. START-UP 21 8.5. OPERATION 21 8.5.1 Starting The Operation 22 3 9. INSPECTION AND MAINTENANCE 24 9.1. MAINTENANCE TABLE 24 9.1.1. Checking The Mixing Propeller 9.2. DRAWING 1. KDE-4 25 26 9.2.1. List Of Numbers : Drawing 1. KDE-4 27 9.3. LUBRICATION CHART 28 10. FAULT / CAUSE / REMEDY 29 11. CLAUSES OF GUARANTEE 30 12. USER MANUAL DELIVERY PROTOCOL 32 13. USER MANUAL TRAINING PROTOCOL 33 ATTACHMENTS 4 1. MACHINE DATA MACHINE NAME : AKO-WALL VARIABLE SPEED WALL MOUNTED MIXER MACHINE TYPE : KDE-4/W SERIAL NO. : 1011299 DATE OF MANUFACTURE : 2010 Seller’s Name : INGTEC-PNEUMACON AG Address : Unterforststrasse 4313 Möhlin SCHWEIZ Telephone : +41 - 61 816 11 05 Fax : +41 - 61 816 11 12 e-mail : [email protected] Web : www.ipswiss.ch Customer’s Name : GEA Pharma Systems AG Address : Hauptstrasse 145, 4416 Bubendorf, SCHWEIZ Telephone : +41 – 61 936 36 36 Fax : +41 – 61 936 36 00 e-mail : [email protected] Web : www.geapharmasystems.com 5 COUNTRY OF ORIGIN : Made in Turkey When ordering spare Parts please quote : MACHINE TYPE / SERIAL NO. DESCRIPTION / REQUIRED QUANTITY IDENTIFICATION PLATE : The machine is delivered neutral without identification plate. ATTENTION ! Only original IPSWISS parts must be used. IPSWISS does not accept any liability for damages resulting from the use of non original spare parts,wearing parts or accessories. 6 2. SPECIFICATIONS 2.1. MIXING SHAFT DRIVE 2.2.1. Main Motor • • • • • • • • • Manufacturer Serial No Type Nominal Power Operating Voltage Nominal Current Speed Degree of Protection Explosion Protection : : : : : : : : : SEW EURODRIVE 01.1337521101.0001.10 DFV100L4/C/3D 3 kW 230/400 V 11.00/6,30 Amper 1400 rpm IP 54 Ex II3D ExtD 2.1.2. Speed Control Unit / Frequency Converter • • • Manufacturer Type Nominal Power : INVT : CHF100A-004G-5R5P-4 : 4 kW / 5.5 kW 2.2. REDUCER ELECTRIC MOTOR 2.2.1. MOTOR / REDUCER • Manufacturer • Serial No • Type • Nominal Power • Operating Voltage • Nominal Current • Speed • Reducer Output • Degree of Protection • Explosion Protection : : : : : : : : : : SEW EURODRIVE 01.1337521102.0002.10 SAF47/II2GD DT90 S4/BMG/TF/II3D 1,1 kW 230/400 V 4.85/2.80 Amper 1400 rpm 192 /rpm. IP 54 Ex II3D ExtD 7 2.3. NOISE INFORMATION • Working Operation : 77-79 dB (A) 2.4. CONTROL PANEL • • • • Manufacturer Serial No Type Explosion Protection : : : : PROTAŞ 10.1049-2 MU3-C Ex d IIAB T6 : : : : PROTAŞ 109387-2 MU-1 Ex d IIAB T 2.5. CONNECTOR BOX • • • • Manufacturer Serial No Type Explosion Protection 2.6. MIXING EQUIPMENT • 3-Winged Propeller : ø 120 mm 2.7. WEIGHT • Weight Complete Machine : 550 kg 2.8. STROKE • Lifting of propeller : 1170 mm 8 2.9. EXTEND OF DELIVERY • • • 1 Unit AKO-WALL Model KDE-4 1 Unit 3-winged propeller ø 120 mm 1 Unit control panel Manual in duplicate Drawings and electrical documents are composed in the annexes of this manual. 9 3. SAFETY 3.1. EXPLANATION OF SYMBOLS AND NOTICES The following symbols are used to indicate dangers during the handling of this machine. Failure to comply with the instructions for the related symbols may lead to damages to health and property. Warning : This symbol next to all safety notices concerns the danger to life and property. Follow the instructions and act with caution. Dangerous Electricity : This symbol next to safety notices for electric usage concerns the danger to life and property. Follow the instructions and act with caution, stricktly. Important : This warning Marks places where special care should be taken, so that instructions and accurate procedures are followed and damage to the machine avoided. NOTE : Note Marks places which record application advice or correct working procedures. Ex-equipment ,important instructions on the Explosion Protection. 10 Mechanical Risk : This symbol next to all safety notices concerns the danger to acute personal injury and inadvertent accidents because of sharp edges. This symbol shows the necessity to use Forklift . Lubrication symbol Follow turn direction symbol. It is prohibited to smoke and draw near with open flame in close the machine and the near area ! 11 3.2. SAFETY DURING OPERATING AND MAINTENANCE This machine can be dangerous if used improperly by untrained personnal. It may only be setup, operated and maintained by authorized, qualified employees familiar with the machine. The machine’s operating instructions as well as it’s safety notes should be road and carefully observed before unpacking, installing and starting-up the machine. All local safety and accident prevention regulations must be observed during the handling of the machine. Any of the safety devices must not be changed, dismantled, circumvented or bridged. The defected safety devices should be exchanged immediately. Close–fitting clothes must be weared while working with the machine. For maintenance, reparations and inspections the main power has to be switched off and main switch has to be secured against an inadvertent start. If flammable fluids are used, sufficient ventilation and earthing connections should be provided. The machine should not be used for improper applications. Any part of the machine must not be changed without permission of the manufacturer. The machine should not be used with high speeds while the impeller is out of the product. Only authorised staff may operate the AKO-WALL. 12 4. EXPLOSION HAZARD THROUGH ELECTROSTATIC CHARGING PAY ATTENTION ! Grounding of the container is vital necessary while using this machine, in connection with flammable fluids, during mixing, charging and discharging. Common grounding clips with earth wire connection are warrant for use, be sure that both grounding clips ends are connect to uncoloured metal . 13 5. RECEIPT OF MACHINE, TRANSPORTATION AND STORAGE 5.1. PACKAGING AND TRANSPORTATION Case dimension : 1537mm x 3950mm x 1345mm For easy transportation and for easy mounting the mixer is crated in one-piece. The mixer is packed in wooden cage. It should be opened by starting from the upper side, and avoid any actions or hits which can harm the machine during this operation. On receipt of good, the consignment must be checked for possible defects on transport damages. If any damages are noticed, a statement of damage must be made immediately. 5.2. STORAGE In case of a short-time storage of the machine, the place of storage should be dry, well aired and functionally safe. The machine must not be stored outdoors and exposed to humidity and direct sunlight. If the machine is to be lifted by means of o crane or fork-lift, the attachment of the transport safety devices are absolutely essentially. Furthermore special attention must be given to the correct positions of the carrying points. 14 6. BASIC INFORMATIONS 6.1. PURPOSE OF THE MANUAL This manual contains the required safety instructions to prevent possible danger. This manual is a guide for the proper applications of the mixer which as a machine might expose the operator, other persons and/or property for a product line, Therefore technical differences are possible. The users of this machine must have read and understood the content of this manual before starting the machine. It is the responsibility of the owner to ensure and control this activity. This manual is issued specially for the described AKO-WALL KDE-4. 6.2. PROPER APPLICATION The mixer may only be used for the task specified. This mixer is suitable to manufacture products of medium and high viscosity products. This is a mixing process of pigments and other powder components in liquids. The range of application of the mixer is manly characterized by the dispersion of paints and varnishes. The initial product has to be a liquid component with VBF A I. (*) approved appropriate materials. The machine may only be operated and maintained by qualified employees who are familiar with the machine and have informed about potential dangers. All other uses will be considered improper. The manufacturer does not accept liability for any damages resulting from improper use. (*) VBF A I. (The A I. Coded category contains Liquids, which mix with 15°C with water in any relationship and a flash point under 21°C have, are assigned to the warning category B. 15 7. DESCRIPTION OF THE MACHINE This mixer is a variable high speed wall- mounted mixer designed to be used for mixing of pigments. This machine operates mounted on wall with mobile mixing vessels. The machine consists of the following main parts: 7.1. MACHINE MAIN FRAME Machine is equipped with a support platform and mounted on wall is crated in one-piece. It should be opened by starting from the upper side, and avoid any actions or hits which can harm the machine during this operation 7.2. MIXING SHAFT The mixing shaft made of precision machined stainless steel runs between two bearings mounted in a robust bearing house. The shaft is delivered with an propeller. Surface measuring CUTOFF 0.8 /Ra=0.87μm – 1.15 μm / 1.03 μm – 1.38 μm with Mitutoyo Surftest 301 7.3. MIXING PROPELLER The 3-winged mixing propeller with 120 mm diameter is made of stainless steel. The propeller is polished. Easy screw system, the propeller directly can screwed on the shaft end. 7.4. CONTROL PANEL The control panel of this mixer is delivered separately and it should mounted on the wall near the mixer. All the operating elements are integrated in this control panel, with related marks indicating functions in clear. 16 List of the indicating and operating elements. 2. 1. H1. b1.2 b2.1 b1.1 b1.0 b2.2 b1.3 b0 17 (1.) TIMER The TIMER allows to adjust the pre-mixing time. At the end of the setted mixing period The machine stops. The time adjustment can be made even during the operation. For example 20 ’33 is set up to work. In the meantime, stop button is pressed, the machine stops. When starting the machine again the timer period continue. If the EMERGENCY STOP is pressed the timer reset. (2.) Speed Indicator / Tachometer It shows the speed of the main motor in rpm. (b1.1) Main Motor ” START” Push Button It stimulates commissioning of main motor mixing shaft. (b1.0) Main Motor “STOP” Push Button It stops the mixing shaft of the main motor. (b1.2 Speed Control “ Fast “ Push Button Increases (button with arrow shows upwards) Increases mixing shaft revolution. (b1.3) Speed Control Button “ Slow “ Push Button Decreases (button with arrow shows downwards) mixing shaft revolution. (H1) Light Main Motor is “ ON - OFF ” Green Lamp for Main motor is ON (b2.1) Lift Mixing Shaft “Raise” It raise the mixing shaft. (b2.2) Lower Mixing Shaft”Lower” It lower the mixing shaft (b0) EMERGENCY STOP BUTTON It stops the main motor by switching off the main power. NOTE : Upon operating emergency-stop button the main motor is immediately Stopped also at a higher speed. Before starting the machine, speed Control button has to be set to “ON”. 18 7.5. SAFETY SWITCHES ( L S1 ) SAFETY SWITCH ON CLAMPING ARM The main motor can only be started when a vessel (or similar) is fixed in the clamping arms and fastened tight. ( LS2 ) SAFETY SWITCH FOR THE MIXING PROPELLER The main motor can only be started when the mixing propeller is lowered into the vessel for the correct mixing. That means in case the propeller comes to the upper vessel rim the Control currentcircuit will be interrupted. Consequently it will be impossible to start the main motor before the machine top will not have been lowered in to correct level. ( L S3 ) SAFETY SWITCH SHAFT (MINIMUM LIMIT) This limit switch allows the lowering of the mixing shaft only until min. limited. ( L S4 ) SAFETY SWITCH SHAFT (MAXIMUM LIMIT) This limit switch allows the raising of the mixing shaft only until max. limited height. 19 8. INSTALLATION, START- UP AND OPERATION 8.1. REQUIREMENTS AT INSTALLATION POINT Foundation: Leveled and raw concrete industrial column. Area: Shock and vibration free. Space required: Space requirement for operation and maintenance 1,5 m clear space around the machine. Customer supply: Electricity 380 V, 50 Hz, 3–phase total power. 8.2. INSTALLATION Before erecting the machine make sure that the place is ready. The setting up of the machine must be made under the supervision of the manufacturer. The manufacturer will not accept any liability if it is executed differently. Check the tight fit of all electrical and mechanical connections after unpacking the parts. Some connections may have loosed by vibration during transportation. The corresponding precautions for ventilation measures must be carried out. By the owner. If these precautions are not fulfilled the manufacturer will not be liable for any claims. The electric cabinet is not explosion-proof and therefore must be set up in o nothazardous area. The electric installation may only be carried out by qualified electricians according to the wiring diagram and pertaining regulations. 20 8.3. INSTALLATION DESCRIBE It should be opened by starting from the upper side, and avoid any actions or hits which can harm the machine during this operation. After lifting up the main frame with the help of the eyebolt on the upper side up to the connecting rod nuts secured on the wall before by hooking it safely, if possible, with a rope and/or similar heaving element, bolt and fix it to those connecting rod. One important point to consider during mounting of the machine to the wall is requirement of strong materials and surface of the wall. Mounting should preferably be on raw (pure) concrete made surfaces (concrete wall/column). As described in (see. Figure 2), it should be connected by steel wall plug. For the steel wall plug, the 6 connection hole coordinates described in.must be marked to the wall beforehand carefully/ the wall needs drilling in a depth slightly more than length of the wall plug to the extent that body of the wall plug can clip to the wall. A drill bit that is capable of drilling hard concrete must be used. Later steel wall plugs should be mounted to wall strictly and carefully and then machine should be mounted on wall. Another method of connection is the method used for walls built with cavity such as with bricks (applicable for obligatory conditions). Also in this method, the 6 connection hole coordinates described in (Figure1.) must be marked to the wall carefully and the wall must be drilled in depth of as much as length of M16 grub screw packaged with the machine. The two grub screws must be moved through one blade at the back side of wall mounting surface, and connect bolt pins to grub screw points in couple so that consequently they are turned (locked) to each other (Figure 3) After this connection is made with 3 blades in couple for total 6 holes, the machine is lifted to the wall and put over to the grub screws, and then it must be connected using bolt pins strictly and carefully. 21 8.4. START-UP Prior to the initial start-up the following items have to be checked. • Installation and alignment of the machine is correct. • Electricity supply connection is made. • Sense of rotation of the mixing shaft is correct. • Voltage and frequency of the motor correspond to the values of the main supply. • Protective arrangements are effected .(Earthling and ventilation) NOTE : The sense of rotation of the mixing shaft has to checked for very short time with lowest speed. In case of a failure in the mixing shaft’s direction of rotation, two main supply lines connected to the electric board must be replaced. Do not make replacements on connection lines of the engine under any circumstances. 8.5. OPERATION Generally mixers are mainly used for dispersion of pigments. In this respect dispersion means the complete coating of primary particles with binding agent. The main dispersion zone is near the toothed-disc periphery. Only qualified and trained personnel who are familiar with the operating instructions and have been given the necessary guidance by a technician of the manufacturer are permitted to operate the mixer. During the operation, the operators must fulfill the claims of the local safety requirements and instructions strickly. This machine is fitted with a compatible and safe handling machine control. 22 8.5.1 Starting The Operation The machine is equipped with a support platform and mounted on wall. Electrical motor with reducer lift the mixing shaft through the (b2.1)control button. Place the mixing container (or boiler, drum, etc.) under the mixing shaft by pushing or transferring (forklift trans. - pallet). Lower the mixing shaft into the mixing container (or boiler, drum, vessel, etc.) by means of the b2.2 “Lower” control button. Switch off emergency-stop button (b0) which is Suited on the control panel. Push the speed control button (b1.3 “Slow”)make sure that the speed is in min. value. Push (b1.1) “ON” button of main motor on the control panel. Mixing shaft and wheel start to rotate at 150 / 200 / rev/min. This protects the engine. You can not ensure rotation at lower turnover. Never operate the machine and the mixing shaft while the impeller is out of the product in the vessel Set speed velocity at demanded level by using (b1.2 “Fast”) or (b1.3 “Slow”) speed control buttons on the operator board. Perform mixing requirements (process). Push (b1.0)“OFF” button of main motor on the control panel. Emergency stop button (b0) should be held down when the machine is not used. Lift the mixing shaft by means of the (b2.1 “Lift” ) control button. Take the mixing container (vessel etc.) from bottom of the mixing shaft. Lower the mixing shaft down to the lowest level by means of the (b2.2) control button. In case of any dangerous position press the emergency-stop button(b0). The main motor is immediately stopped even while the mixing shaft is running with high speed. When the machine is not in operation, the engine and the mixing shaft should stand on the bottom level. (for security reasons) 23 Good earth (Grounding) and sufficient ventilation are vital necessities while using the mixer is connection with flammable fluids during mixing, charging, and discharging. Otherwise it may result in explosion hazards through electrostatic discharge and damages to health because of the emission of deleterious vapours. Never operate the machine while the impeller is out of the product in the vessel with high speeds. During the operation the mixing shaft, as a rotating element, may under any circumstance not be touched. Only for cleaning period it can be touched while it is running without the product with lowest speed. Be act and take precautions accordingly. Run the motor for a very short period only in order to control direction of rotation! In case of a failure in the mixing shaft’s direction of rotation, two main supply lines connected to the electric board must be replaced. Do not make replacements on connection lines of the engine under any circumstances. 24 9. INSPECTION AND MAINTENANCE In order to keep the machine in good working conditions and to ensure the proper function it has to be inspected and maintained regularly and repaired if necessary. The following details have to be taken into consideration. • Maintenance and repair tasks may only be effected by skilled and trained persons with a corresponding formation and qualification. • Inappropriately effected maintenance and repair may lead to a breakdown of the machine, personnel injury and damages to property. • Use only original spare parts supplied by the manufacturer. • Gökkaya does not accept any liability for damages resulting of using foreing spare parts and improper maintenance. • Before starting any maintenance, inspection and upkeep tasks the mixer has to be switched dead and the main switch to be secured against in adverted start. • Avoid the risks of injury from worn, sharp edges. • The electric equipment has to be cheeked regularly. The cables, in particular those laid flexible, should regularly be checked for loose connections and damages. If required, they must be exchanged immediately by qualified electricians. 9.1. MAINTENANCE TABLE The intervals and points of the maintenance tasks are listed in the table. Designation Task Interval MIXING DISC Inspection Every 3 months 25 9.1.1. Checking The Mixing Disc Check the wear and balance quarterly. If there is no problem with the performance and balance of the mixing disc, maintenance is not required. However, it must be replaced in the event of failures. Be careful and avoid any Risk of injury from worn, sharp edges. 26 9.2. DRAWING 1 . KDE-4 27 9.2.1. List Of Item Numbers : Drawing 1.KDE-4 PART NO PART NAME UNIT PART NO PART NAME MIXING DISC CONNECTING PLATE, UPPER MIXING DISC CONNECTING PLATE, BOTTOM UNIT 1 MACHINE COLUMN 1 10 1 2 MAIN MOTOR ANCHOR PLACE 1 11 3 SHAFT 2 12 MIXING DISC FIXATION NUT 1 4 MIXING SHAFT 1 13 MIXING DISC 2 5 NUT WASHER 1 14 CLAMPINARMS 2 6 MOTOR SHAFT CONNECTION PART 1 15 LIFTING SHAFT 1 7 EXTERNAL RING 1 16 LIFTING MOTOR WITH REDUCER 1 8 METAL RING 1 --- ----------------------------- --- 9 SCREW NUT 4 --- ----------------------------- --- 4 28 9.3. LUBRICATION CHART Lubrication Lubrication Required Intervals Parts ELF SHELL BP ESSO ARAL (A) 1 BEARING Once a Week * Elfolna 46 Tellus 46 Tellus DO 46 Energo HLPHM 46 Nuto H-46 HLPD-OEL 46 Vitam DE 46- Vitam GF 46 (B) 2 SCREW SPINDLE NUT Once a Week * Elfolna 46 Tellus 46 Tellus DO 46 Energo HLPHM 46 Nuto H-46 HLPD-OEL 46 Vitam DE 46- Vitam GF 46 3 SCREW SPINDLE Once a Week * Elfolna 46 Tellus 46 Tellus DO 46 Energo HLPHM 46 Nuto H-46 HLPD-OEL 46 Vitam DE 46- Vitam GF 46 4 BEARING GUIDE Once a Week * Elfolna 46 Tellus 46 Tellus DO 46 Energo HLPHM 46 Nuto H-46 HLPD-OEL 46 Vitam DE 46- Vitam GF 46 * DEPENDS ON WORKING TYPES AND WORKING HOURS ! 29 10. FAULT / CAUSE / REMEDY The following faults lead to an interruption of the operating of the machine. Below specified instructions must be carried out by experienced electrician or by authorized machine operators. Follow the items related to the fault. Do not handle except below specified instructions. FAULT CAUSE Start button defect. Emergency-stop button defect or pressed. Power off Main motor Thermic failure REMEDY Check by an electrician. Release if locked check by an electrician. Check power supply Reset main motor button and restart Main motor not running Mixing shaft not running or rotating properly Speed control device defective. Write down the malfunction code of speed control device. Find out error reason from the handbook of the device and follow the required instructions. If the error can not be remedied, contact the authorized service of the device. Shaft is not placed on its coupling appropriately, shaft is curved or tilted. Propeller worn out. Check fixing of the shaft into its coupling and locate it properly. If the shaft is curved, order a new one or straighten it up. 30 11. CLAUSES OF GUARANTEE The period of guarantee begins on the day of delivery and it ends after Twelve months. The guarantee lapses for personal injury and/or property damage due to one or several of the following reasons. • Improper mounting, starting, operating and maintaining of the machine. • Improper application of the machine. • Fitting spare parts which are not supplied by the manufacturer. • Use of the machine with defective safety devices. • Unauthorized constructional modifications. • Improper reparations by unauthorized and unqualified persons. • Natural disasters, fire, improper environment. The guarantee is given to the purchaser for faultlessness in material and workmanship according to the respective state of the machine. ATTENTION ! Use only original Parts of A K O – W A L L . NOTE IPSWISS does not accept any liability for damage resulting from the use of non A K O – W A L L spare parts, wearing Parts or accessories. 31 GUARANTEE MACHINE MACHINE NO. : 1011299 TYPE / MODEL : AKO - WALL VARIABLE SPEED WALL MOUNTED MIXER KDE-4/W DATE OF MANUFACTURE : 2010 DATE OF DELIVERY : DEZEMBER / 2010 PLACE OF DELIVERY : CH-4313 MÖHLIN SELLER INGTEC-PNEUMACON AG Adress : Unterforststrasse, CH-4313 Möhlin Tel : +41 61 816 11 11 Fax : +41 61 816 11 12 e-mail : [email protected] web : www.ipswiss.ch BUYER GEA Pharma Systems AG Adress : Hauptstrasse 145, CH-4416 Bubendorf Tel : +41 61 936 36 36 Fax : +41 61 936 36 00 e-mail : [email protected] web : www.geapharmasystems.com 33 12. USER MANUAL DELIVERY PROTOCOL IMPORTANT NOTE : The delivery protocol hereby is prepared to certify that the user manual of the machine-the type, model and serial number of which is specified below-was delivered. NAME OF THE : AKO-WALL VARIABLE SPEED WALL MOUNTED MIXER MACHINE MODEL : KDE-4/W SERIAL NO : DATE OF MANUFACTURE 1011299 2010 USER MANUAL FORM NO : 10/11 DELIVERY APPROVAL OF THE USER MANUAL (*) *Personnel authorized to take delivery of the user Manual. DELIVERED BY: User manual has been completely delivered. Note: Issues such as safety warnings, commissioning conditions, use principles, circuit diagrams, maintenance instructions, authorized service information and warranty terms are shown on the user manual. NAME SURNAME: DATE OF DELIVERY: LOCATION : SIGNATURE : RECEIVED BY User manual has been completely delivered. Note: Issues such as safety warnings, commissioning conditions, use principles, circuit diagrams, maintenance instructions, authorized service information and warranty terms are shown on the user manual. AUTHORIZED PERSONNEL: DATE OF DELIVERY: FIRM STAMP: SIGNATURE Note: If the user manual sent with the machine, user must fill in the form and fax it to manufacturer. 34 13. USER MANUAL TRAINING PROTOCOL IMPORTANT NOT : The delivery protocol hereby is prepared to certify that the training for the related machine -the type, model and serial number of which is specified below- was given. NAME OF THE : AKO-WALL VARIABLE SPEED WALL MOUNTED MIXER MACHINE MODEL : KDE-4/W SERIAL NO : 1011299 SERIAL NO : 1011299 DATE OF MANUFACTURE : 2010 USER MANUAL FORM NO : 10/11 TRAINING APPROVAL (*) * This part will be filled by the firm owner that the authorized personnel have received the training. TRAINER Theoretical and mechanical training to the operators has been completely given Note: Basic issues such as safety warnings, commissioning conditions, use principles, current diagrams, maintenance instructions, spare parts and authorized service information and fault-causeremedy were explained. NAME SURNAME LOCATION : : DATE OF TRAINING SIGNATURE : : TRAINEE Theoretical and machine training aimed at the operators has been received. Not: Basic issues such as safety warnings, commissioning conditions, use principles, current diagrams, maintenance instructions, spare parts and authorized service information and failurereason-remedy are explained. OPERATOR(S) : AUTHORIZED PERSONNEL FIRM STAMP : : DATE OF TRAINING : SIGNATURE: Note: In case the Training Protocol is sent together with the machine, please fill in the delivery protocol and send via fax to our party. ATTACHMENTS • MANUFACTURER STATEMENT • FAT INSPECTION REPORT • ELECTRICAL DIAGRAMS • DRAWINGS 1948-02-100.1/1948-02-101.0/1948-02-102.0/1948-02103.0 • STAINLESS STEEL MATERIAL WILL BE CERTIFICATED • SAFETY SWITCHES CE CONFORM • SEW MOTORS WILL BE EX-PROOF CERTIFICATED • FREQUENCY CONTROL AND PARAMETERS • DIGITAL TIMER AND INDICATOR