1
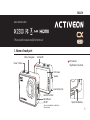
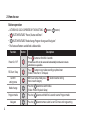
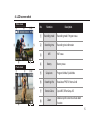
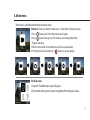
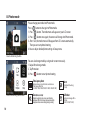
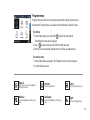
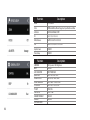
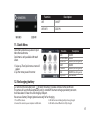
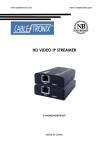
USER MANUAL
www.activeon.com
Table Of Contents
1. Name of each part
2. How to use
3. Start the camera
4. LCD screen shot
5. Graphical icon description
6. Mode menu
7. Video mode
8. Photo mode
9. Playback mode
10. Setup mode
11. Quick menu
12. Recharging Battery
13. Smart phone control
14. Connect ACTIVEON CX GOLD to smartphone(using ACTIVEON App)
15. Transferring data to computer
16. Firmware update
17. Features and specification
18. Inside the Package
※ CAUTION
※ FCC RADIO FREQUENCY INTERFERENCE STATEMENT
※ RF Exposure Information (SAR)
※ Warranty
1
2
4
5
6
7
8
10
12
14
17
17
18
18
20
21
22
23
25
25
26
28
ENGLISH
www.activeon.com
* Please read this manual carefully before the use!
1. Name of each part
Mode / Navigation
Internal MIC
LED Indicator
(Top, Bottom, Front, Back)
Power / Shutter
LCD Screen
Speaker
Li-ion battery slot
microSD Card Slot
Mini USB port
HD OUT
* Please use “Micro HDMI" cable on HD OUT port.
* Cable not included.
Tripod hole (Bottom)
1
2. How to use
Button operation
●
●
●
●
ACTIVEON CX GOLD IS OPERATED BY TWO BUTTONS. (
button ,
button )
(
)BUTTON FEATURES “ Power, Shutter and Enter”.
(
)BUTTON FEATURES ”Mode change, Program change and Navigator”.
The feature of buttons are defined as below table.
Function
Power On / Off
Description
Press (
) button and hold for 2 seconds
* If Auto Power off is set, the camera will automatically shut down in 3 minutes
when there is no operation.
Mode change
Press (
) button to start video recording or photo shoot
(Video / Photo / Burst / Timelapse)
Within user setup mode, press (
) button to enter setting
menu in each category
) button to switch modes
Press the (
(Video> Photo>Playback>Setup)
Program mode
Press the (
) button and hold for 2 seconds to enter Program mode
Navigator
Press the (
) button to move select bar on OSD menu or change setting
REC Start / Stop
Confirm
setting menu
2
Button
Touch operation
●
If you want to use the CX Gold display
responds to touch-based gestures like
tapping and swiping.
Tap
●
Double-Tap
Tap & Hold
You can easily access the menu
Swipe Right
Swipe left
<Mode menu>
<Program menu>
Double-Tap
<Zoom>
Swipe up, down,
left, right
Swipe Up
<Quick menu>
3
3. Start the camera
1. Open the battery cover and insert ACTIVEON CX GOLD Li-ion battery.
2. Insert microSD Card on the microSD Card slot. (The camera will not record when microSD Card is not inserted.)
3. Press the (
) button and hold for two seconds. (The camera will turn on and LCD screen will display live screen .)
How to unlock the Touch operation
●
If you want to use touch operation, tap
the screen first.
And then it will show " Lock image".
Tap and hold the "Lock image" until the
live screen is ready.
Power saving features
●
CX Gold includes special power saving features.
1. Auto Backlight Dimming : When you set [Auto LCD Off ] , auto backlight dimming will start at midpoint of your setting time.
2. Quick LCD OFF : Tap and hold the screen for 2-3 seconds. LCD will go off automatically.
* For turning on the LCD again, please press the (
) button once.
* If lock image appears, please refer to How-to-Unlock-the-Touch-Operation guide.
4
4. LCD screen shot
Video screen
①
②
③④
⑧
⑤
⑥
⑤
⑦
Photo screen
①
②
⑤
③④
⑧
⑥
⑤
⑦
No.
Function
①
Recording mode
Recording mode / Program status
Description
②
Recording time
Recording time information
③
WiFi
④
Battery
⑤
Swipe icon
⑥
Recording Info
Resolution/FPS/FOV/Interval info
⑦
Function Zone
Quick REC/ Effect Setup /AE
⑧
Zoom
WiFi status
Battery status
Program/ Mode/ Quick Mode
Double-tap the screen to activate zoom
function
5
5. Graphical icon description
Video mode
Time lapse
Photo mode
Burst
Looping
Video Program
Playback
Self-timer
Time lapse
Video Setup
Water sports
Diving
Manual
Outdoor
Indoor
Winter Sports
Riding
Outdoor
Portrait
Landscape
Night
Quick menu
Zoom
6
Photo Setup
Effect Setup
General Setup
Connection
Photo Program
Manual
Indoor
Setup
Night
WiFi
Quick REC
Beep
Upside Down
1x
2x
3x
4x
1x
2x
3x
4x
Speaker
MIC
Brightness
6. Mode menu
Mode menu is available with both button and touch screen.
For Button : There are 4 modes in “Mode menu” - Video, Photo, Playback and Setup.
1. Press (
) button once. Then Video mode icon will appear
2. Press (
) button once again to shift mode you want among Video, Photo,
Playback and Setup.
3. Wait for a one second, the selected menu will show up automatically.
4. For Playback and Setup mode, Press (
) button to see more options.
For Touch screen
1. Swipe left. Then Mode menu screen will appear.
2. Tap the mode which you wish to enter among Video, Photo, Playback or Setup.
7
7. Video mode
1. After the camera is turned on, Press(
) button to start video recording.
2. When the camera starts to record, LED light blinks* and shows recording
time on the screen.
3. Press(
) button to stop recording.
4. You can adjust video settings in “Video Setup”.
* If LED OFF option is selected in General setup, LED light will not blink.
Screen shot of using button
Time Lapse-video
Captures images in set intervals and creates a Time lapse video file.
(0.5 SEC/1 SEC/3 SEC/5 SEC/10 SEC/30 SEC/60 SEC)
Looping
Continuously records a video until you stop.
** Maximum video file capacity is 4GB. If the file size is over the looping space, the camera will
overwrite current recording file.
Zoom
Screen shot of using touch screen
8
Double-tap shortly on live screen, zoom function will appear.
After 3sec the zoom menu automatically disappear and save value
during recording. (x1/x2/x3/x4)
Double-Tap
Program menu
Program menu provides fast and simple camera effect settings based on your
environment. Program menu is available with both button and touch screen.
For button
1. At the Video mode, press and hold (
) button for two seconds.
Then Program menu icon will appear.
) button once again to shift the mode you want.
2. Press (
3. Wait for a one second, the selected menu will show up automatically.
For touch screen
1. At the Video mode, swipe right. Then Program menu screen will appear.
2. Tap the mode you want.
Manual
Winter sports
Indoor
Water sports
Riding
Night
Diving
Outdoor
Rollback to previous setting before
the Program mode
For Recording on the water or beach
For Recording under the Water
For recording on the Snow
For Recording Speedy Activity
For Recording Indoor place
For Recording Night time
For Recording Outdoor with strong
shine
9
8. Photo mode
Please change your mode into Photo mode.
Press (
) button to change into Photo mode.
1. Press (
) button. The mode menu will appear on your LCD screen.
2. Press (
) button once again, the camera will change into Photo mode.
3. After 1 sec, the mode menu will disappear from LCD screen automatically.
Then you can start photo shooting.
4. You can adjust detailed photo settings in Setup menu.
Screen shot of using button
You can also change mode by using touch screen more easily.
1.Swipe left to change mode.
2. Tap Photo icon.
3. Press (
) button to start photo shooting.
Time Lapse-photo
Captures images in set intervals and creates a
Time lapse photo file.
(0.5 SEC/1 SEC/3 SEC/5 SEC/10 SEC/30 SEC/60 SEC)
Screen shot of using touch screen
10
Zoom(x1/x2/x3/x4)
Double-tap shortly on live screen, zoom function
will appear. After 3sec the zoom menu automatically
disappear and save zoom setting during recording.
Burst
Photo burst shooting.
(6/1sec)
Self-timer
Captures an image after a
set time.
(5 SEC/10 SEC/15 SEC)
Program menu
Program menu provides fast and simple camera effect settings based on your
environment. Program menu is available with both button and touch screen.
For button
1. At the Video mode, press and hold (
) button for two seconds.
Then Program menu icon will appear.
) button once again to shift the mode you want.
2. Press (
3. Wait for a one second, the selected menu will show up automatically.
For touch screen
1. At the Video mode, swipe right. Then Program menu screen will appear.
2. Tap the mode you want.
Manual
Rollback to previous setting before
the Program mode
Outdoor
For Shooting Outdoor with strong
shine
Portrait
Indoor
Landscape
Night
For Shooting Portrait
For Shooting Outdoor with strong
shine
For Shooting Indoor place
For Recording Night time
11
9. Playback mode
Please change the mode into Playback mode.
User can view recorded video or photo on the screen.
Press (
) button to select control panel on top menu.
While the file is playing, you can call the play control panel by pressing (
Icon
) button.
Description
Sorting function provides 3 options :
All (both video & photo), Video and Photo
Select to delete a file. Multiple files can be deleted at once.
1/34
File IDX number or Selected file quantity / Total file quantity
Back button
Thumbnail image
File type
00:16
1
12
Recording Time(For video file) or Picture quantity(For photo file)
Swipe left or right to go into next page.
PLAYBACK (Video)
No.
Icon
Description
File type
Playback Time / Total time
①
Battery remaining
With one tap, you can hide the control bar.
When you tap the screen once again,
the control bar will appear.
Prev. file / Pause / Next file
②
Delete / Back
Scroll bar
③
PLAYBACK (Photo)
No.
Icon
Description
File type
①
Playback Time / Total time
Battery remaining
You can see all photo files with slide
show function.
*Time lapse & burst photo will only show
the first picture.
②
Prev. file / Pause / Next file
Delete / Back
13
10. Setup mode
Screen shots of using button & Touch screen
Please change the mode into Setup mode.
●
●
●
●
●
●
14
Able to choose more options with Setup mode.
Video Setup : Provides detailed video recording
options
Photo Setup : Provides photo shooting options.
Effect Setup : Provides effect setup options for
shooting.
General Setup : Provides general camera setup
options.
Connection : Provides WiFi function.
Setup
Video Setup
Photo Setup
Option
Mode/Resolution/FPS/FOV/Video Quality/Interval
Mega Pixel/FOV/Picture Quality/Interval
Filter/AE Meter/Zoom/EV/White Balance
/ISO/Upside Down/ Time Stamp
Control/Beep/LED indicator/Quick REC
General Setup /Auto LCD OFF/Auto Power OFF
/Screen Lock/ TV Out/Time Setup
/Memory Format/Default/Software Info
WiFi/WiFi Info
Connection
Effect Setup
10-1. Setup options
Function
Description
MODE
Manual/ Looping/ Time Lapse
RESOLUTION
1080P/ 720P/ 480P
FPS
240/120/60/30
FOV
Super wide/ Wide/ Medium/ Narrow
VIDEO QUALITY
S-Fine/ Fine/ Normal
T/LAPSE INTERVAL
0.5/ 1 / 3 / 5 / 10 /30 / 60 (sec)
Function
Description
MODE
Manual/Time Lapse/Burst/Self Timer
MEGA PIXEL
16MP / 12MP / 8.5MP/ 7MP
FOV
Super wide/ Wide/ Medium/ Narrow
Picture Quality
S-Fine/Fine/Normal
T/LAPSE INTERVAL
0.5/ 1 / 3 / 5 / 10 /30 / 60 (sec)
Self Timer INTERVAL
5/ 10 / 15 (sec)
15
Function
x1/ x2/x3/x4
Filter
Off/Black&White/Warm/Negative/Sepia/Red/Green/Blue
AE Meter
CENTER/AVERAGE/SPOT
EV
-2.0/-1.0/0/+1.0/+2.0
White Balance
AUTO/3000K/5500K/6500K
ISO
AUTO/100/200/400/1600/3200
Upside Down
ON/OFF
Time Stamp
ON/OFF
Function
CONTROL
BEEP
LED INDICATOR
QUICK REC
AUTO LCD OFF
AUTO POWER OFF
Screen lock
TV OUT
TIME SETUP
MEMORY FORMAT
DEFAULT
SOFTWARE INFO
16
Description
Zoom
Description
Mic/Speaker/ LCD Brightness
ON/OFF
OFF/TWO/FOUR
OFF/ 0sec/ 3sec/ 5sec
OFF/30sec/ 1min/ 5min
OFF/ 5min/ 10min/ 30min
OFF/ 5sec/ 10sec/ 30sec
NTSC/PAL
DATE - TIME
YES/NO
YES/NO
Function
Description
WiFi
ON/OFF
WiFi INFO
SSID-PW
11. Quick Menu
Quick menu provides easy access to your
most often used menu.
Quick menu is only available with touch
screen.
1. Swipe up. Then Quick menu screen will
appear.
2. Tap the menu you wish to enter.
Function
Description
WIFI
UPSIDE DOWN
QUICK REC
BEEP
SPEAKER
MIC
Brightness
ON/OFF
ON/OFF
ON/OFF(last setting value)
ON/OFF
ON/OFF(last setting value)
ON/OFF(last setting value)
CONTROL BAR
12. Recharging battery
LCD will show the low battery icon(
) when the battery is too low and close to the cut off level.
The camera will save the file automatically until it is turned off. You must recharge your battery to restart.
It will take about 3.5 hours for a full charge by USB port.
You can use a Battery Charger (optional accessory) for fast charging.
1. Turn off the camera.
2. Connect the camera to your computer via USB cable.
3. LED will turn on indicating battery is being charged.
4. LED will be turned off when it is fully charged.
17
13. Smartphone control
●
●
●
●
Utilizing WiFi APP function of ACTIVEON, user can control the camera through smartphone.
Compatible with iOS and Android OS.
Before connecting the camera, download ‘ACTIVEON’ application from smartphone app store.
Search for ‘ACTIVEON’ in Apple App Store or Google Play Store.
* While smartphone is connected to the camera, camera button operation will be disabled.
* You can take a video and photo, and adjust camera setting on ‘ACTIVEON’.
* ‘ACTIVEON’ features will be upgraded through application updates on your smartphone.
14. Connect ACTIVEON CX GOLD to smartphone(using ACTIVEON App)
On your camera
18
●
Turn on ‘WiFi APP’ function in ACTIVEON CX Gold.
●
The camera screen will display “Waiting for connection”
Waiting for connection
14. Connect ACTIVEON CX GOLD to smartphone(using ACTIVEON App)
On your Smartphone
On your smartphone or tablet, turn the WiFi on and select the network CXG-xxxxxx under WiFi setting.
Default password is ‘1234567890’.
Run 'ACTIVEON' app on your smartphone or tablet.
Press ’Connect ACTIVEON’ on the app. You can now control your ACTIVEON camera.
●
●
●
●
19
15. Transferring data to computer (compatible with both Windows OS and Mac OS)
●
If the camera is connected to a computer or battery charger while it is powered off,
the camera starts to recharge the battery.
●
●
If the camera is connected to a computer while it is powered on, the camera changes to file–transfer mode.
While the camera is connected to a battery charger or car charger for recharge,
the camera can record while it is recharging.
1. Power on ACTIVEON CX GOLD.
2. Connect the camera to a computer via USB cable.
3. The camera LCD will display as 'USB Ready'.
4. Go to ‘My Computer’ in PC.
5. Search ‘Removable Disk’.
6. Double click ‘Removable Disk’.
7. Double click ‘DCIM’ folder.
8. Open the folders to find video or photo file.
9. Copy and paste files to the computer.
20
16. Firmware update (Find the latest firmware at www.activeon.com)
●
You can always find the latest firmware updates of ACTIVEON products on the website. (www.activeon.com)
●
Firmware upgrade may fail if battery is too low.
●
Recharge up to two cells of battery gauge for proper upgrade.
1. Format the memory card, and copy firmware file to the root directory of microSD Card.
2. Insert the microSD to ACTIVEON CX GOLD and turn on the power.
3. Firmware upgrade will automatically start as showing the updating status on the screen.
4. When upgrade is completed, the camera will show ’F/W Updating’ and will automatically turn off.
* Do Not turn off the camera or take out the battery during firmware upgrade.
21
17. Features and specifications
●
●
●
●
●
●
●
●
●
●
●
●
●
“ACTIVEON CX GOLD” 1080p 60fps Action Camera.
FULL HD(1920 x 1080) resolution, 60fps recording.
196ft(60m) waterproof housing.
16M SONY IMX CMOS sensor.
Easily control camera Effect setting by Program mode.
Super wide angle field of view(FOV).
Built in 2.0” LCD(320x240) with touch panel.
Built in WiFi.
Versatile recording resolution(1080p/720p/480p).
Burst photo-shooting(*6 shots in 1 second).
H.264 codec, saved as MP4 format.
Rechargeable Li-ion Battery.
Battery running time : Approximately 120minutes of continuous recording(1080p 30 fps)
* recording time may vary depending on the condition
●
●
●
22
Recharging time : 3.5 hours by USB port/ 2.5 hours by AC adapter(Optional Accessory)
Easy graphical user interface
Full line of accessories
18. Inside the Package
ACTIVEON CX GOLD
Action camera
Connecting Screw
Short Connector
Waterproof
Housing
Opened Backdoor
Rechargeable Li-ion Battery
USB Cable
Curved Adhesive
Mount
microSD Card
23
19
CAUTION
It could be exploded if the battery is inappropriate type. Please insert proper type of battery according to instructions.
The symbol means that according to local laws and regulations your product should be disposed of separatly from household waste. When this product reaches its end of life, take it to
a collection point designated by local authorities. Some collection points accept products for free. The separate collection and recycling of your product at the time of disposal will help conserve
natural resources and ensure that it is recycled in a manner that protects human health and the environment.
FCC RADIO FREQUENCY INTERFERENCE STATEMENT
FCC ID : XOMGCX01
This device complies with Part 15 of the FCC Rules. Operation is subject to the following two conditions:
(1) This device may not cause harmful interference, and
(2) This device must accept any interference received, including interference that may cause undesired operation.
Warning: Changes or modifications to this unit not expressly approved by the party responsible for compliance could void the user’s authority to operate the equipment.
Note: This equipment has been tested and found to comply with the limits for a Class B digital device, pursuant to Part 15 of the FCC Rules.
These limits are designed to provide reasonable protection against harmful interference in a residential installation. This equipment generates, uses and can radiate radio frequency energy and, if
not installed and used in accordance with the instructions, may cause harmful interference to radio communications. However, there is no guarantee that interference will not occur in a particular
installation. If this equipment does cause harmful interference to radio or television reception, which can be determined by turning the equipment off and on, the user is encouraged to try to
correct the interference by one or more of the following measures:
●
●
●
●
Reorient or relocate the receiving antenna.
Increase the separation between the equipment and receiver.
Connect the equipment into an outlet on a circuit different from that to which the receiver is connected.
Consult the dealer or an experienced radio/TV technician for help.
The device has been evaluated to meet general RF exposure requirement.
The device can be used in portable exposure condition without restriction.00
25
RF Exposure Information (SAR)
NOTE : This appliance and its antenna must not be co-located of operation in conjuction with any other antenna or transmitter. A minimum separation distance of 20cm must be maintained between
the antenna and the person for this appliance to satisfy the RF exposure requirements.
This device meets the U.S. government’s requirements for exposure to radio waves.
This device is designed and manufactured not to exceed the emission limits for exposure to radio frequency (RF) energy set by the Federal Communications Commission of the U.S. Goverment.
The exposure standard employs a unit of measurement known as the Specific Absorption. Rate(SAR). The SAR limit set by the FCC is 1.6W/kg. Tests for SAR are conducted using standard operating
positions accepted by the FCC, with the device transmitting at the certified power level in all tested different channels.
The FCC have granted an Equipment authorization for this device with all reported SAR levels evaluated as in compliance with the FCC RF exposure guidelines. SAR information on this device is on file
with the FCC, and can be found under the Display Grant section of www.fcc.gov/oet/ea/fddid after searching on
This device is compliance with SAR for general population / uncontrolled exposure limits in ANS/IEEE C95.1-1999 and had been tested in accordance with the measurement methods and procedures
specified in OET bulletin 65 Supplement C.
FCC ID : XOMGCX01
HDMI, the HDMI logo, and High-Definition
Multimedia Interface are trademarks or registered
trademarks of HDMI Licensing LLC
26
USA Warranty
www.activeon.com
23
ACTIVEON LIMITED WARRANTY
This limited warranty is provided by ACTIVEON to the original end‐user purchaser (“Purchaser”), when delivered in new condition in its original container.
The Product is warranted to be free from manufacturing defects under normal use and service for a period of 12 months from the date of original purchase (“Warranty Period”). Where there
is no evidence of the date of original purchase, ACTIVEON shall consider the date of manufacture as the date of original purchase.
If the Product is returned to an ACTIVEON and ACTIVEON concludes in its discretion that the product is defective in manufacture, ACTIVEON may, at its sole discretion and without charge (a)
exchange the Product for a new Product, or (b) exchange the Product for a refurbished Product.
Exchange or replacement of the Product does not extend the original warranty period of the Product.
TNo warranty shall be provided if the Product is damaged through the negligence or fault of others, abuse, mishandling, improper packaging by you, alteration, accident, electrical current fluctuations,
failure to follow ACTIVEON’s operating and maintenance instructions, or if services are performed to the Product by someone other than ACTIVEON or its authorized service provider.
Water, environmental, sand, and corrosion damage; battery leakage, scratches, or damage to the Product will be presumed to have resulted from misuse, abuse or failure to operate the
Product as set forth in the operating and maintenance instructions. No warranty shall be provided if the Product has had its serial number or dating altered or removed.
ACTIVEON SPECIFICALLY DISCLAIMS ANY IMPLIED WARRANTY OF MERCHANTABILITY OR FITNESS FOR A PARTICULAR PURPOSE DURING OR AFTER THE EXPRESS WARRANTY PERIOD STATED ABOVE,
AND NO OTHER EXPERT WARRANTY OR GUARANTY, EXCEPT AS MENTIONED ABOVE, SHALL BE BINDING ON ACTIVEON. (SOME STATES AND PROVINCES DO NOT ALLOW LIMITATIONS ON HOW
LONG AN IMPLIED WARRANTY LASTS, SO THE ABOVE LIMITATION MAY NOT APPLY TO YOU) ACTIVEON SHALL NOT BE LIABLE FOR AND SPECIFICALLY DISCLAIMS LIABILITY FOR INCIDENTAL OR CONSE
QUENTIAL DAMAGES, ANY ACCIDENT, INJURY, DEATH, LOSS OR OTHER CLAIM RELATED TO OR RESULTING FROM THE USE OF THIS PRODUCT, INCLUDING BUT NOT LIMITED TO LOSS OF REVENUES
OR PROFITS, INCONVENIENCE, EXPENSE FOR SUBSTITUTE EQUIPMENT OR SERVICE, STORAGE CHARGES, LOSS OR CORRUPTION OF DATA, OR ANY OTHER SPECIAL, INCIDENTAL OR CONSEQUENTIAL
DAMAGES CAUSED BY THE USE OR MISUSE OF, OR INABILITY TO USE, THE PRODUCT, REGARDLESS OF THE LEGAL THEORY ON WHICH THE CLAIM IS BASED. ACTIVEON SHALL NOT BE LIABLE FOR
WATER HOUSING LEAKAGE OR ANY RESULTING DAMAGES CAUSED BY USER'S RESEALING ERROR. IN NO EVENT SHALL RECOVERY OF ANY KIND AGAINST ACTIVEON BE GREATER IN AMOUNT THAN
THE PURCHASE PRICE OF THE PRODUCT. WITHOUT LIMITING THE FOREGOING, THE PURCHASER ASSUMES ALL RISK AND LIABILITY FOR LOSS, DAMAGE OR INJURY TO YOU AND YOUR PROPERTY
AND TO OTHERS AND THEIR PROPERTY ARISING OUT OF USE OR MISUSE OF, OR INABILITY TO USE, THE PRODUCT NOT CAUSED DIRECTLY BY THE NEGLIGENCE OF ACTIVEON. (SOME STATES AND
PROVINCES DO NOT ALLOW THE EXCLUSION OR LIMITATION OF INCIDENTAL OR CONSEQUENTIAL DAMAGES, SO THE ABOVE EXCLUSION OR LIMITATION MAY NOT APPLY TO YOU). THIS LIMITED
WARRANTY SHALL NOT EXTEND TO ANYONE OTHER THAN THE ORIGINAL PURCHASER OF THE PRODUCT, AND IS THE PURCHASER’S SOLE AND EXCLUSIVE REMEDY.
For assistance (USA) – If you purchased ACTIVEON product in USA and have questions regarding the product or this Limited Warranty, please call 1-858-798-3300. Or visit www.activeon.com.
It is the Purchaser’s responsibility to properly package and send the Product, together with a copy of the original proof of purchase, an explanation of the problem, and a return address to ACTIVEON
at the Purchaser’s expense. If the Product covered by this limited warranty and proven to be defective upon inspection, it will be serviced and returned to the Purchaser at no charge. Any received
Product that is not covered by this limited warranty or is beyond the Warranty Period will be returned as it is.
28
EU Warranty
www.activeon.com
19
ACTIVEON LIMITED WARRANTY (EU)
The following limited warranty is provided by ACTIVEON with respect to the ACTIVEON product (“Product”) purchased by the original end user purchaser (“Purchaser”), when delivered in new condition
in its original container. Consumers have legal rights under applicable national legislation governing the sale of consumer goods. Such rights are not affected by the warranties in this limited warranty.
The Product is warranted to be free from manufacturing defects under normal use and service for a period of 24 months as from the date of original purchase (“Warranty Period”). Where there is no
evidence of the date of original purchase, ACTIVEON shall consider the date of manufacture as the date of original purchase.
If the Product is returned to ACTIVEON and ACTIVEON concludes in its discretion that the product is defective in manufacture, ACTIVEON may, at its sole discretion and without charge (a) exchange
the Product for a new Product, or (b) exchange the Product for a refurbished Product.
Exchange or replacement of the Product does not extend the original Warranty Period of the Product.
No warranty shall be provided if the Product is damaged through the negligence or fault of others, abuse, mishandling, improper packaging by you, alteration, accident, electrical current fluctuations,
failure to follow ACTIVEON’s operating and maintenance instructions, or if services are performed to the Product by someone other than ACTIVEON or its authorized service provider. Water,
environmental, sand, and corrosion damage; battery leakage, scratches, or damage to the Product will be presumed to have resulted from misuse, abuse or failure to operate the Product as set forth
in the operating and maintenance instructions. No warranty shall be provided if the Product has had its serial number or dating altered or removed. Damages deriving from an accident or caused by
the natural wear and tear (including but not limited to accessories and batteries) do not fall within this guarantee or other guarantees.
ACTIVEON SPECIFICALLY DISCLAIMS ANY IMPLIED WARRANTY OF MERCHANTABILITY OR FITNESS FOR A PARTICULAR PURPOSE DURING OR AFTER THE EXPRESS WARRANTY PERIOD STATED ABOVE,
AND NO OTHER EXPERT WARRANTY OR GUARANTEE, EXCEPT AS MENTIONED ABOVE, SHALL BE BINDING ON ACTIVEON. (SOME TERRITORIES DO NOT ALLOW LIMITATIONS ON HOW LONG AN IMPLIED
WARRANTY LASTS, SO THE ABOVE LIMITATION MAY NOT APPLY TO YOU) ACTIVEON SHALL NOT BE LIABLE FOR AND SPECIFICALLY DISCLAIMS LIABILITY FOR INCIDENTAL OR CONSEQUENTIAL DAMAGES,
ANY ACCIDENT, INJURY, DEATH, LOSS OR OTHER CLAIM RELATED TO OR RESULTING FROM THE USE OF THIS PRODUCT, INCLUDING BUT NOT LIMITED TO LOSS OF REVENUES OR PROFITS, INCONVENIENCE,
EXPENSE FOR SUBSTITUTE EQUIPMENT OR SERVICE, STORAGE CHARGES, LOSS OR CORRUPTION OF DATA, OR ANY OTHER SPECIAL, INCIDENTAL OR CONSEQUENTIAL DAMAGES CAUSED BY THE USE OR
MISUSE OF, OR INABILITY TO USE, THE PRODUCT, REGARDLESS OF THE LEGAL THEORY ON WHICH THE CLAIM IS BASED. ACTIVEON SHALL NOT BE LIABLE FOR WATER HOUSING LEAKAGE OR ANY
RESULTING DAMAGES CAUSED BY USER'S RESEALING ERROR. IN NO EVENT SHALL RECOVERY OF ANY KIND AGAINST ACTIVEON BE GREATER IN AMOUNT THAN THE PURCHASE PRICE OF THE PRODUCT.
WITHOUT LIMITING THE FOREGOING, THE PURCHASER ASSUMES ALL RISK AND LIABILITY FOR LOSS, DAMAGE OR INJURY TO YOU AND YOUR PROPERTY AND TO OTHERS AND THEIR PROPERTY ARISING
OUT OF USE OR MISUSE OF, OR INABILITY TO USE, THE PRODUCT NOT CAUSED DIRECTLY BY THE NEGLIGENCE OF ACTIVEON (SOME STATES AND PROVINCES DO NOT ALLOW THE EXCLUSION OR
LIMITATION OF INCIDENTAL OR CONSEQUENTIAL DAMAGES, SO THE ABOVE EXCLUSION OR LIMITATION MAY NOT APPLY TO YOU). EXCEPT WHERE PROHIBITED BY APPLICABLE LAW, (I) THIS LIMITED
WARRANTY SHALL NOT EXTEND TO ANYONE OTHER THAN THE ORIGINAL PURCHASER OF THE PRODUCT, AND IS THE PURCHASER’S SOLE AND EXCLUSIVE REMEDY AND (II) THIS LIMITED WARRANTY
IS LIMITED TO THE COUNTRY OF PURCHASE OF THE PRODUCT.
For assistance (EU) – If you purchased an ACTIVEON product in the EU and if you have questions regarding the Product or this Limited Warranty, please visit www.activeon.com.
It is the Purchaser’s responsibility to properly package and send the Product, together with a copy of the original proof of purchase, an explanation of the problem, and a return address to ACTIVEON.
If the Product is covered by this Limited Warranty and proven to be defective upon inspection, it will be serviced and returned to the Purchaser at no charge. Any received Product that is not covered
by this Limited Warranty will be returned to the Purchaser as it is.
30
ACTIVEON EU B.V. HULLENBERGWEG 278 1101 BV AMSTERDAM THE NETHERLANDS (Not a visiting address)