1
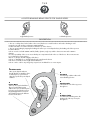
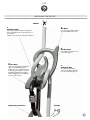
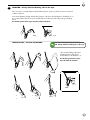
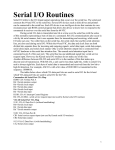
The Assisted Braking Belay Device for Single Ropes Instruction Manual All users should read this booklet and follow the instructions. The Assisted Braking Belay Device for Single Ropes Right-handed position Left-handed position description • The “9” is a belay device for the leader or the second, this device is made for indoor and outdoor climbing on well equipped routes with anchors conforming to UIAA standards. • In this manual the “9” will be referred to as either the “9” or the “device”. • The “9” assists braking by trapping the braking side of the rope in a V-Shaped Slot (3); the braking side of the rope must be held at all times. •The “9” must be used with a UIAA certified, flexible, dynamic, single rope which is between 9.1mm and 11.0mm in diameter. •It is the responsibility of the user to ensure that they are competent and safe in the use of this device. These instructions are not a substitute for proper training. •Before use, always check the integrity of the device. •The “9” is adaptable for use by left-handed people; simply turn the device! •This device is suitable for low weight and low fall factors. •The “9” can be used for canyoning in dry canyons but is Prohibited for use in wet canyons. 1 Carabiner Hole •Use a pear-shaped carabiner through this hole to attach the device to the belay loop of your harness •Clip the rope into the pear-shaped carabiner 2 Lower Horn •The rope must pass behind this to allow a smooth braking action •Allows the rope to be held in place be being squeezed by the non-braking hand against the Lower Horn when shifting between the different functions of the device 5 Top Horn •For lowering a climber without the assisted braking function 4 Circular Hole •The climber’s side of the rope passes through here 3 V-Shaped Slot •For the assisted braking action; the braking side of the rope must pass through here The Installing the device Climber 5 Top Horn •For lowering a climber without the assisted braking function 1 Carabiner Hole •Use a pear-shaped carabiner through this hole to attach the device to the belay loop of your harness •Clip the rope into the pear-shaped carabiner 4 Circular Hole •The climber’s side of the rope passes through here 2 Lower Horn •The rope should pass behind this to allow a smooth braking action •Allows the rope to be held in place be being squeezed by the non-braking hand against the Lower Horn when shifting between the different functions of the device Belay loop of harness 3 V-Shaped Slot •For the assisted braking action; the braking side of the rope must pass through here Belayer 2 T HE User guide : 1 General Information : • This instruction manual must be read and understood before the device can be used effectively. •Before using this device, the user should consider all the necessary handling techniques in case difficulties occur. •Climbing is a potentially dangerous activity with the risk of injury or death. Participants in this activity should be aware of and accept these risks and be responsible for their own actions. It is the responsibility of the user to ensure that they are competent in the use of this device. •The “9” assists braking by trapping the braking side of the rope in a V-Shaped Slot (3); the braking side of the rope must be held at all times. •The “9” must be used with a UIAA certified, flexible, dynamic, single rope which is between 9.1mm and 11.0mm in diameter. •All activities marked as “Prohibited” must not be done as they may result in the malfunction of the device, injury or death. • Every other use of the device, not mentioned in this instruction manual, is Prohibited. •The images engraved on the device only show the Traditional Position for installing the rope (for right-handed use). 2 Installing the “9” on the Harness : • Install the device using a locking pear-shaped HMS carabiner •D-shaped carabiners are Prohibited as the rope may get trapped causing the device to malfunction. •A belay carabiner which prevents cross-loading can be used. Pear-shaped locking HMS carabiner D-shaped carabiner: Prohibited 3 T HE 2 Installing the “9” on the Harness 2.1 Harness with a vertical belay loop The gate of the carabiner should be on the same side as your brake hand 2 1 Clip the carabiner onto the harness orientated horizontally braking side of the rope Clip the “9” onto the carabiner with the Top Horn (5) on the lower side of the device. braking side of the rope stop 3 4 Install the rope. 2.2 braking side of the rope Check tug the climber’s side of the rope upwards with your nonbraking hand whilst leaving your braking hand below the device, relaxed, without gripping the rope to check the function of the system. Harness with horizontal belay loop The gate of the carabiner should be facing upwards 2 1 Clip the carabiner onto the harness orientated vertically braking side of the rope Clip the “9” with the Top Horn (5) on the right for right-handed people or on the left for lefthanded people. braking side of the rope stop braking side of the rope 3 Install the rope. 4 Check tug the climber’s side of the rope upwards with your nonbraking hand whilst leaving your braking hand below the device, relaxed, without gripping the rope to check the function of the system. Attention : Ropes must be flexible; stiff ropes may cause the device to malfunction 4 T HE 2 Installing the “9” on the harness / continued • Installing and removing the rope from the “9” can be done without removing the device from the carabiner which can remain attached to the harness. directional anchor •It is Prohibited to attach the “9” directly to the belay. The “9” must be attached to the belay loop of the belayer’s harness and the rope must pass through a directional anchor above the belayer when bringing up a second or when the leader leaves the belay on a multi-pitch climb. unlocking • When installed on a harness with a vertical belay loop and the 901D “9” is in a vertical position, you must ensure that the Top Horn (5) unlocking is on the lower side of the device to ensure better braking function in case the rope is accidentally released from the braking hand. 3 unlocking INSATALLING THE ROPE: The Traditional Position 902D descent descent 908D 901D descent 902D 909D 903D descent • Place the rope on the same side of your body as your braking hand (i.e. on the right-hand side for right-handed people). 901D 902D 908D 903D 904D 909D 910D 915D descent 916D • Install the rope by passing a loop of rope into the “9” then clipping the loop into the pear-shaped carabiner. • Place the loop of rope behind the Lower Horn (2), this will 908D provide good braking friction. 909D 915D 910D 911D 916D 923D 917D • The climber’s side of the rope must pass through the Circular Hole (4) and the braking side of the rope must pass through the V-Shaped Slot (3) to be in position. 922D 923D 915D 916D 917D 924D 918D N.B. for stiffer ropes we recommend the Rapid Position, with all the advice and reservations of its use (see chapter 10 Rapid Position) 922D 923D 925D 924D 5 T HE 3 INSTALLING THE ROPE / continued descent descent g descent 902D 902D 903D 903D 904D 904D • It is Prohibited to thread the rope around the “9” like a traditional “8” belay device. The rope must be clipped into the pearshaped carabiner. t 901D 902D 905D 905D 903D 906D 906D 907D 907D • It is Prohibited to pass the braking side of the rope through the Circular Hole (4) of the device; always ensure the braking side of the rope passes through the V-Shaped Slot (3). 904D 905D 906D Always descentcheck that the device has been correctly installed 909D 909D 910D 910D 911D 911D • Tug the climber’s side of the rope upwards with 912D 912D 913D 913D 914D 914D your non-braking hand whilst leaving your braking hand below the device, relaxed, without gripping the rope to check the function of the system. 908D 909D 4 916D 916D 910D 911D 912D 917D 4 GETTING STARTED 918D :918D techniques to learn919D919D 917D 913D 920D 920D 921D 921D 2 915D 916D 917D 918D 919D 920D Unlock • The Squeeze Technique: To use the different applications of the “9” described 924D in this 924D user manual it is necessary to know the Squeeze Technique which allows you to change the rope position whilst holding the rope in place by squeezing it against the Lower Horn923D(2) of the device . 924D 923D 923D 925D 925D 922D 926D 926D 1 The Squeeze Technique Squeezing the rope against the Lower Horn (2) of the device929D to hold it in place. 930D 928D 928D • The Guide Hand Technique : 925D 926D 929D The hand on the climber’s side of the rope pulls the rope 928D through the device In order to be able to give out lots of rope you must prevent the “9” from locking whilst pulling the rope through the device. This can be done by keeping your braking hand above the device to act as a guide for the braking side of the rope (keeping it out the V-Shaped Slot (3)) whilst pulling the climber’s side of the rope out of the device with your non-braking hand. 930D 929D The hand acting as the guide does not move 2 1 The Guide Hand Technique The hand on the braking side of the rope is held above the device. 6 T HE 5 BELAYING : always hold914Dthe braking side of the rope. 913D •The “9” must be used with a UIAA certified, flexible, dynamic, single rope which is between 9.1mm and 11.0mm in diameter. • The assisted braking, locking and unlocking functions of the device should always be checked before use. It is recommended to place the loop of rope behind the Lower Horn (2) as this will provide good braking friction. The braking side of the rope must be held at all times. D 920D 921D descent Lock Belay 1 901D 902D 2 903D descent 904D 905D 1 929D N.B. Always hold the braking side of the rope. 930D 1 908D 909D 907D 2 Taking in rope / the five step method D 906D 910D 911D 2 912D 913D 914D • The assisted braking, locking and unlocking functions of the device should always be checked before use. The braking side of the rope must be held at all times. 915D 916D 917D 918D 3 1 919D 920D 921D 929D 930D 4 11 unlocking 3 2 923D 22 924D 922D 3 2 descent 925D 3 926D 901D 902D 4 4 928D 903D Lock 904D 905D descent 4 3 3 4 908D 5 5 4 4 909D 5 910D 5 1 911D 5 912D 7 915D 916D 917D 918D 919D T HE Taking in rope / simplified method N.B. Always hold the braking side of the rope unlocking 2 Slide the hand on the climber’s side unlocking back up the rope Pull the braking side of the rope out of the “9”, push the climber’s side of the rope into the “9” 901D Slide the hand on the braking side of the rope back up towards the “9” Go back to the start position 902D 903D 904D 908D 909D descent unlocking Lock : descent 1 lower the braking hand to lock the rope in the V-Shaped Slot (3) 901D 6 902D descent descent •For a good locking action you should pull the rope to the bottom of the V-Shaped Slot (3). 908D 909D 910D 911D 915D 901D 902D • The reserve of rope on the braking side of the rope must be kept below the belay device. 916D 903D 904D descent 923D 915D •The rope must pass through a directional anchor when 908D 916D 909D bringing up a second or when the leader leaves the belay on a multi-pitch climb. 917D 918D 910D 911D 922D 923D 924D unlocking descent •The belayer must be standing near to the cliff / climbing wall. unlocking ` WARNING: 915D 922D 901D descent The device should be able to operate freely at all times, this may not be the case if it is touching the cliff / climbing wall. The function of the device must not be hindered by obstaclesdescent (e.g. branches caught in the V-Shaped Slot, etc…) 916D 902D 903D 923D 902D 903D 908D 909D 910D 904D 908D 909D 905D 910D 911D 915D 916D 904D 905D 924D 911D 906D Too far 925D 922D 915D 918D 926D descent 901D The reserve of rope on the braking side of the rope must be kept below the belay device. 917D 925D 912D 916D 907D 912D 926D 913D 917D 918D 914D 919D WARNING: The belayer must be attached to the belay point to avoid the risk of falling if belaying from a ledge. 923D 917D 918D 924D 919D 920D 921D 8 922D 923D 924D 925D 926D 928D 909D 910D 911D 912D 913D T HE 7 Unlock : • Use your non-braking hand to perform the squeeze technique (see chapter 4 GETTING STARTED: techniques to learn) then pull the braking side of the rope up and out of the V-Shaped Slot (3) using your braking hand. 917D • Unlocking can also be achieved918D by initiating a “climbing the rope” 919D movement (see chapter 916D CLIMBING THE ROPE) 11 Pull upwards 923D 920D Pull upwards 924D ou NB : It may sometimes be necessary to use two hands to unlock the rope before the Squeeze Technique can be used (for example after a925D significant fall). 8 Squeeze 926D Unlock using a “climbing the rope” movement 928D 929D Giving out rope: always hold the braking side of the rope • To give out rope the hand on the braking strand of the rope must stay above the device in order to prevent the assisted braking action from locking the rope (see the Guide Hand Technique, chapter 4 GETTING STARTED: techniques to learn) Unlock the rope if necessary then use the hand on the braking side of the rope as a guide to keep the rope out of the V-Shaped Slot (3). Give out rope by pulling the climber’s side of the rope out of the device using your non-braking hand. The hand keeping the braking side of the rope can either move with the rope or stay in a fixed position and allow the rope to slide through the fingers (see the Guide Hand Technique). Hands should return to their start positions between two sequences of giving out rope. The hand on the climber’s side of the rope pulls the rope through the device The hand acting as the guide does not move Giving out rope 9 908D 909D 910D 911D 912D T HE 911D 912D 9 913D Stopper system The abseil is done on a single rope Preparing a single rope abseil • The unlocking action leads naturally into lowering the climber / abseiling.Control the rate of decent using your hands on the braking side of the rope.This position retains the assisted braking function should the rope be dropped. 916D 917D 915D 918D 919D 904D 918D 921D 920D Pull upwards to unlock 919D Hand fixed as a guide Hand fixed as a guide 905D 906D 923D Hand regulating the rate of decent 907D 924D ou Unlock using a “climbing the rope” movement Squeeze 911D 912D 926D 922D 914D Lowering a climber on a top rope / Abseiling With assisted braking function 928D 913D Unlock 929D 914D Abseil method 1930D 925D Lowering a climber on a top rope / Abseiling unlocking 9.1 Without assisted braking function descent Abseil method 2 926D 928D •Using the Top Horn (5). 918D 919D Horn (5) allows the climber to be lowered 920D Using the Top whilst keeping the hand on the braking side of the rope below the belay device. 921D unlocking WARNING: the assisted braking function does not work in this position. Changing into this position must either be done in a dynamic way or by releasing the rope from the V-Shaped Slot (3) whilst holding the rope in place around the Lower Horn (2) of the device using the 901D 902D Squeeze Technique (see chapter 4 GETTING STARTED: techniques to learn). descent 903D descent The assisted braking function 904D position. does not work in this Always keep a hand on the braking side of the rope. Pull upwards 901D 926D 929D 928D 908D 902D 930D 909D 903D descent 910D 911D wrap the rope 908D 909D Lower the climber behind the Top / abseil Horn (5), release the squeeze • At all times, be careful to keep a good grip on the braking side of the N.B. Always keep a hand rope. 915D 916D 917D 918D Squeeze • Whilst lowering, do not let the rope “jump” off the Top Horn (5). • Always keep the palm of your belay hand facing into the body. 910D on the braking side of the rope. 10 915D 916D 917D T HE 10 Rapid Position It is Prohibited to use the Rapid Position if the belayer risks being lifted off the ground (e.g. at the start of an overhanging climb). • To change from the Traditional Position to the Rapid Position, simply move the loop of rope out from behind the Lower Horn (2). • When using the “9” in the Rapid Position there is less friction between the device and the rope making it easier to give out rope, however this reduction in friction can mean less control of the rope when unlocking. • It is necessary to use the Squeeze Technique when unlocking the rope Belay before using the Top Horn (5) to lower a climber on a top rope (see chapter 4 GETTING STARTED: techniques to learn). • When belaying on slabby cliffs it is possible for an experienced belayer to use the Rapid Position. • The Rapid Position is not advised when belaying at the beginning of a pitch or on steep or overhanging cliffs as unlocking the rope can be difficult or dangerous. •Using two hands when unlocking the rope can improve your grip on the rope. Pull upwards Unlock with two hands Squeeze NB : Unlocking can also be achieved by initiating a “climbing the rope” movement (see chapter 11 (CLIMBING THE ROPE), the climber can then be lowered. wrap the rope behind the top horn, release the squeeze Unlock using a “climbing the rope” movement Lower the climber Lower the climber OK Before changing to the Rapid Position at least 5 quickdraws need to have been clipped (3 on a slabby cliff). NB: The Rapid Position can be an advantage when using a stiff rope Whether using the Rapid or Traditional Position, always check the function of the system. 11 T HE 11 Climbing the Rope •It is also possible to climb a rope using the “9” •It is necessary to have a second stopping device above the “9” with a step, and to lock the brake side of the 920D 921D 919D rope into the V-Shaped Slot (3) between sequences. descent 902D 903D 904D 905D 906D 907D descent 929D 928D 930D 12 Checking, maintenance, storage and replacement : 909D • This device must be checked before and after each use. • Any kind of deformation, visible abrasion, cracks or corrosion requires an immediate and permanent repla910D 911D 912D 913D 914D 920D 921D cement. The same applies in the case of an exceptional impact, or after a severe fall. • Do no put the device into contact with chemical substances. • At best, the device should not be used for longer than 10 years. • The “9” is recyclable. 916D 917D 918D 919D •All techniques that are crossed out or have a warning sign are Prohibited. 923D 924D Please refer to our website regularly for the most up-to-date version of these instructions. 925D 926D 928D 929D 930D 12