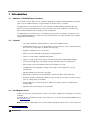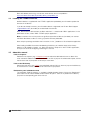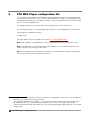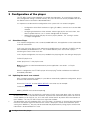
1
FTP MP3 Player
Store-and-play audio player for Barix audio decoding hardware.
Application User Manual
Firmware
Released
Supported on:
V1.00
28th Sep. 2012
Exstreamer family
Annuncicom family
IP Audio Modules
REVISION TABLE
Date
Version
Who
Change
21/01/10
1.0
ASI
First draft for FTPMP3 v0.71
19/11/10
1.1
ASI
Adapted for FTPMP3 v0.74:
- corrected the time format for the playlists from HH:MM to HHMM or
HH:MM:SS;
- added more information about QUICK_PLAY configuration flag;
- added information about switching between % and dB for the
volume;
14/02/11
1.2
ASI
Added:
- information about the RELAY_ON_PLAY config option;
- IR Remote control
23/02/11
1.3
ASI
Adapted for FTPMP3 v0.75
- maximum number of playlists increased to 100
28/03/11
1.4
ASI
Adapted for FTPMP3 v0.76:
- added information about the BARIMON_TIMEOUT config option
20/04/11
1.5
ASI
Changed the version of FTPMP3 to v0.77
13/05/11
1.6
ASI
Updated for FTPMP3 v0.78
- changed the FTPMP3 version
- added remarks for playlist name length and playlist time wrap in
section Using more playlists
02.06.12
1.7
ASI
Updated for FTPMP3 v0.79
- changed the FTPMP3 version
- added remarks for using the webUI security settings
26/10/12
1.8
ASI
Updated for FTPMP3 v1.00
- changed the FTPMP3 version
2
Table of Contents
1
Introduction................................................................................7
1.1 About the “FTP MP3 Player” firmware...........................................7
1.2 Features........................................................................................7
1.3 Installing the device.......................................................................8
1.4 Loading the FTPMP3 Firmware.....................................................8
1.5 About this manual.........................................................................9
Links to chapters...........................................................................9
Links to the Dictionary...................................................................9
Bookmarks pane in Adobe Acrobat............................................10
2
FTP MP3 Player configuration file..........................................11
3
Configuration of the player.....................................................12
3.1 Standalone Player ......................................................................12
3.2 Updating the music over network................................................13
3.3 Setting the time...........................................................................15
3.4 Playlist configuration....................................................................15
3.5 Using more playlists....................................................................17
3.6 Solving network transmission problems......................................18
Length checking..........................................................................18
Repeating download...................................................................19
Timeouts.....................................................................................19
3.7 Updating configuration over network...........................................20
4
Web Interface...........................................................................22
4.1 Settings page..............................................................................22
Network settings.........................................................................22
Use SonicIP.................................................................................22
IP Address...................................................................................23
Netmask......................................................................................23
Gateway IP Address....................................................................24
Primary DNS ..............................................................................24
Alternative DNS...........................................................................25
DHCP Host Name.......................................................................25
Web Server Port..........................................................................25
Other Settings.............................................................................25
Player Directory Location.............................................................26
Player Directory Name.................................................................26
Refresh Control Page..................................................................26
Refresh Interval............................................................................26
Volume Units...............................................................................27
Debug Mode...............................................................................27
3
Enable IR Control........................................................................27
IR Source....................................................................................27
4.2 Control Page...............................................................................28
4.3 Status Page................................................................................29
4.4 Playlists Page..............................................................................31
4.5 Directory Listing Page.................................................................32
4.6 Factory Defaults Page.................................................................33
4.7 Update Page...............................................................................34
5
List of available settings..........................................................36
6
Details........................................................................................40
6.1 Startup behaviour........................................................................40
6.2 Scheduling..................................................................................40
6.3 Cleanup phase tuning.................................................................41
6.4 Using a relay output during music playback................................41
6.5 Using the IR remote control.........................................................42
6.6 WebUI Security Settings..............................................................43
7
Updating the Firmware in a new device................................44
8
Dictionary..................................................................................45
9
Legal Information.....................................................................47
Illustration Index
Illustration 1: FTP MP3 Status Page...................................................31
Illustration 2: FTP MP3 Playlists page.................................................32
Illustration 3: FTP MP3 Directory Listing Page....................................33
Illustration 4: FTP MP3 factory defaults page......................................33
Illustration 5: FTP MP3 update page...................................................34
Illustration 6: FTP MP3 FW upload page.............................................34
Illustration 7: Enabling the IR remote control.......................................42
Illustration 8: FTP_MP3 Security Settings page..................................43
4
1 Introduction
1.1
About the “FTP MP3 Player” firmware
The “FTP MP3 Player” firmware was especially designed to support audio distribution by network,
when a fast or reliable network is not guaranteed, or network access is limited.
The application can use either the FTP or HTTP protocol to download configuration data and
playlists with their corresponding music files, and stores them onto a USB stick. FTPMP3 then
plays the downloaded music according to the configuration.
The application can also be used as a standalone player, without any network connection: in this
case a preloaded USB stick can be sent to the player location and simply inserted into the device
for playback to commence.
1.2
Features
• Plays MP3, WMA files and M3U playlists from external USB memory;
• Configuration and/or music can be updated in set time intervals using standard protocols,
HTTP and FTP, or fetched at a specific time every day;
• Supports handling of up to 100 playlists;
• Playlists can be scheduled to be played at configured times;
• Playlists can be valid for a defined date period ;
• Playlists can be set for certain days of the week (even within a defined date period);
• Control and configuration is possible using any text editor and any web browser;
• Relay output may be activated while the music playback is active;
• Preloaded rescue configuration settings to be used in case of broken or missing
configuration;
• Remote update of the firmware is possible;
• Monitoring can be done using the BariMon1 service from Barix and/or SYSLOG;
• Automatic network configuration (BOOTP, DHCP, AutoIP and IPzator) as well as manual
static IP configuration are available
• Features SonicIP ® announcing the IP address on power up over the audio outputs
(configurable);
• Supports Barix serial and built-in IR controllers.
1.3
Installing the device
Follow the instructions contained in the “Quick Install Guide” supplied with the device to install your
hardware.
A printed version is included in the box, if you have lost it, a new one can be downloaded from our
site www.barix.com.
Note: Barix do not supply USB sticks, you will need to provide one of your own. Please check the
1See http://www.barimon.net/
5
Introduction
Barix Wiki before purchasing, as there are some devices that cause problems.
http://wiki.barix.com/index.php5/USB_device_compatibility_list
1.4
Loading the FTPMP3 Firmware
No Barix device is supplied with the FTPMP3 application preloaded; you will need to update the
firmware in the device.
If you do not already have one, you will need to obtain a registered user ID from Barix Support
([email protected]) to enable you to download the software.
Next, download the software from the Barix website: it's stored under 'ABCL applications' in the
downloads section, select 'ABCL FTPMP3 player application'.
Note: customers who wish to purchase significant quantities of devices (hundreds) can contact
their Barix distributor, to discuss having a specific firmware preloaded.
Now unzip the package and follow the instructions in the '_Readme1st' file to load the application.
After loading the ABCL firmware and rebooting the device, you need to revert to the factory
defaults as described in Chapter 4.6. Now your device is ready to run the FTP MP3 application,
and you can continue configuring it following this manual.
1.5
About this manual
Links to chapters
References to chapters (e.g. X Chapter name) are red and underlined and serve as direct links
when viewed in Adobe Acrobat Viewer. Click on the link to jump to the referenced chapter, click on
the left arrow icon to jump back to where you came from.
Links to the Dictionary
Some technical terms (e.g. DHCP) are underlined and red. Click on them to jump to the dictionary
at the end of this manual, click on the left arrow icon to jump back.
Bookmarks pane in Adobe Acrobat
The complete “Table of Contents” is available in Adobe Acrobat Viewer. Click on the “Bookmarks”
pane tab on the left side of Adobe Acrobat Viewer to open it. Click on any bookmark to directly
jump to the corresponding part of the manual.
6
Introduction
2
FTP MP3 Player configuration file
The FTP MP3 Player requires that a USB Mass Storage disk be attached to the device, formatted
with the FAT16 or FAT32 file system. There should be a directory2 “player” in the root directory and
configuration file “player.cfg” in the directory “player”. All of the configuration of the FTP MP3 Player
itself is set in this configuration file.
The configuration file is a plain ASCII file3 consisting of comment and command lines.
Any lines beginning with '#' are considered to be comments, and are ignored by FTP MP3 Player.
Command lines should be of the form
variable=value
For a description of all of the variables see chapter 5. List of available settings.
Note: when variable is assigned different values on different lines, the last assignment is used.
Note: If the USB stick is not formatted, or the player directory is not created, the application will
send a warning syslog message, and will quit.
Note: If the configuration player.cfg file is not found in the player directory at boot, the application
will contact the preset rescue server to try to fetch it.
2
3
7
Starting from v0.69, the location of the music directory is configurable. It can be set to use the USB root
directory, or any other name up to 8 characters.
Any text editor (Notepad, Vim, TextEdit, ...) can be used to create or edit this file. Lines are allowed to
be ended with CRLF (as usual on Microsoft Windows) or LF (as usual in the Unix world). Word
processors (Microsoft Word, OpenOffice.org,...) are not intended for editing plain ASCII files, and should
not be used.
FTP MP3 Player configuration file
3 Configuration of the player
The FTP MP3 Player can be tailored to suit number of environments. As a result of this, there are
many configuration settings, however normally, only a few of them are actually needed to be set to
non-default values to achieve the desired behaviour.
It is important to understand that configuration of the system falls in to several categories:
•
•
•
3.1
Configuration of the Barix hardware: assigning IP address, netmask etc in section Web
Interface
configuring the behaviour of the software: where to get playlists and music from, how
often to update the time, etc. in section Configuration of the player
defining how the player will play the music: playlist priorities, etc. starting in section
3.4 Playlist configuration
Standalone Player
In its simplest configuration, with a correctly loaded USB stick, the application can be used without
a network connection4.
In this case, the music files must be present on the USB memory in a directory /PLAYER, typically
these would be pre-loaded from a PC. The /PLAYER directory must also contain a playlist
containing the names of the music files.
In this simplest configuration, the only entry needed in the player.cfg file is the setting of the playlist:
PLAYLIST=playlist.m3u
where “playlist.m3u” is the playlist name.
Note: the playlist must be formatted correctly for the application: see section 3.4 Playlist
configuration.
With this configuration, the FTP MP3 player will start playing5 the files available on the USB stick
immediately after boot.
3.2
Updating the music over network
With a network connection available, it is possible to automatically update the configuration, playlist
and music files over the network.
At least the PLAYLIST and the MUSIC SERVER have to be set, for example:
PLAYLIST=playlist.m3u
MUSIC_SERVER=musicserver.example.org
4
5
8
With factory default settings the device tries to discover a DHCP server upon boot, which can take up
to two minutes if there is no network connection. To prevent the network discovery, either set the IP to
a static address or set the IP to “0.0.15.0” and switch off the SonicIP to prevent the announcement of
the IP address. This way FTP MP3 Player starts right after the boot.
The device does not have hardware clock, so in case there is no network, its time may be wrong due to
the lack of connection to get time from the NTP server. If the playlists contain time information (a line
starting with “#BARIX-4”), they may not be evaluated and played correctly. Using playlists without time
information is recommended in this case.
Configuration of the player
If set this way, the FTP MP3 Player tries to contact the MUSIC_SERVER with the following default
settings:
●
every6 10 minutes (default value for MUSIC UPDATE)
●
to connect using protocol FTP (default value for MUSIC PROTOCOL)
●
to server musicserver.example.org7 (this has been set using MUSIC SERVER)
●
on port 21 (default value for MUSIC PORT, when protocol FTP is used)
●
using username “anonymous” (default value for MUSIC USERNAME)
●
and password “a@a” (default value for MUSIC PASSWORD)
●
and download new version of playlist(s) (set using PLAYLIST) from root directory (default
value for MUSIC DIR).
After downloading the playlists, all playlists are scanned to determine whether there are any music
files missing. If some of the required music files are not found on the USB memory, FTP MP3
Player tries to download them using the same settings that were used for downloading the playlist.
Note: Playlists are always downloaded, even if they are already present on the USB stick.
Note: FTP MP3 Player does not detect whether the contents of the music files changed on the
server. Music files have to be renamed to force music update.
Note: FTPMP3 uses 8.3 format filenames: Only the first 8 characters of a music file's name and 3
characters of the filename extension are significant. If there are more music files with “same”
name, only the first one is downloaded and used for playing.
Note: The current implementation of the USB mass storage driver does not support evaluation of
the disk free space, so make sure you always have enough free space on the USB disk.
After downloading of the missing files is finished, FTP MP3 Player searches the USB Memory for
music files no longer used. All files in the “player” directory, which are
●
neither the “player.cfg” file
●
nor a playlist mentioned in “player.cfg”
●
nor a music file included in one of the playlists in the configuration file
8
are deleted
.
This cleanup phase can take some time and, upon certain conditions, interfere with the playing.
For details, see section 6.3 Cleanup phase tuning on page 39.
3.3
Setting the time
Having an accurate time is critical for playlist configuration and switching. FTP MP3 Player uses the
6
7
8
9
Updating may be postponed if the device is busy, see chapter 6.2 Scheduling on page 38
This can be also overridden using UPDATE DAILY TIME
DNS resolving is done only if some of the values of CONFIG SERVER, MUSIC SERVER, NTP SERVER,
BARIMON SERVER changes
Configuration of the player
standard NTP protocol to get the time.
To enable time update using the NTP protocol, set the NTP_SERVER variable in the FTP MP3
Player configuration file, so that it points to a reachable NTP server, for example:
NTP_SERVER = ntp.example.org
If set this way, the FTP MP3 Player tries:
3.4
●
every 1 hour (default value for NTP_UPDATE HOUR)
●
to connect to an NTP server running on the address ntp.example.org and to get time
information
Playlist configuration
The first line of every playlist must be a special configuration comment, in the form:
#BARIX-4,DATE1,DATE2,DOTW,TIME1,TIME2,REPEAT,VOLUME,INTERRUPT,SHUFFLE
(all of this should be on one line)
with the exception of #BARIX-4, all items on the line can be empty
Permissible values of the variables and their meanings are summarized in the following table:
Item
Meaning
#BARIX-4
This tells the FTP MP3 Player that this is a special configuration
comment and the version of the configuration syntax used. The syntax
of configuration comment can change in newer versions of the FTP
MP3 without retaining backward compatibility
DATE1
Either empty, or four digits, DDMM, or 8 characters in format DD-MMYY where DD is for day, MM is for month, YY is for the last 2 digits of
the year. e.g.
7th February is 0702, 7th January 2010 is 07-01-10
If non-empty, the playlist is not played before the day given by DATE1
DATE2
Either empty, or four digits, DDMM, or 8 characters in format DD-MMYY where DD is for day, MM is for month, YY is for the last 2 digits of
the year. e.g.
7th February is 0702, 7th January 2010 is 07-01-10
If non-empty, the playlist is not played after the day given by DATE2
DOTW
List of the days of the week (using two character abbreviations) when
the playlist should be played,. Permissible values are MO, TU, WE, TH,
FR, SA, SO
e.g. MOFRSA means the playlist should be played on Monday, Friday
and Saturday.
Ignored if empty.
9
10
TIME1
Either empty, or time in format HHMM or HH:MM:SS9, if defined, the
playlist is not played before this time of day i.e. START TIME
TIME2
Either empty, or time in format HHMM or HH:MM:SS, if not empty, the
This can be also overridden using UPDATE_DAILY_TIME
Configuration of the player
playlist is not played after this time of day i.e. STOP TIME
REPEAT
Playlist is played only REPEAT times in one day and between music
updates. Only "completed" playbacks are counted (where the playlist
playing has not been interrupted by higher priority playlist). The
counter is reset during playlist update and at midnight.
Default is -1, which means unlimited playing.
VOLUME
0..100%, in 5% steps e.g. 25, or:
-70 to 0 dB, in 1dB steps, eg -30, or 0
INTERRUPT
Used when switching playlist. If set to 0 (which is default), FTP MP3
Player waits until the current song in the current playlist is finished,
before switching to this playlist. If set to 1, switching is done
immediately, interrupting the current song during playback.
SHUFFLE
When empty or set to 0, playlist items are played in the given order.
When set to 1, songs are played in pseudo-random order.
Ignored if the playlist contains less than 3 songs.
3.5
Using more playlists
Up to 100 playlists can be defined using PLAYLIST. If more then one playlist is set, playlists are
assigned priority by their position in the configuration file, with the first playlist listed having the
highest priority, and the last the lowest.
The Playlist to be played is determined by playlists' configurations and priorities and current
date/time .
Playlist switching is considered every minute and can happen either immediately, or after the
current song ends. This can be configured using INTERRUPT (see previous section abover).
IMPORTANT NOTES:
NOTE 1: The name of the playlists must be up to 12 characters (i.e. they must be in 8.3 format)
NOTE 2: Playlist start and stop time cannot wrap up beyond 24h. In other words, a playlist cannot
be defined to start at 23:00h, and stop 02:00 on the next day. In this case two playlists should be
created, containing the same songs – the first one to start at 23:00 and stop at 23:59, and the
second one to start at 00:00h, and stop at 01:59.
3.6
Solving network transmission problems
Length checking
Poor network connections can result in partial file downloads, which are not easily detectable and
result in unpredictable playback. To solve this, on unreliable network connections, it is possible to
detect incomplete files using length checking:
As well as downloading the music file, a second file containing the length of the music file is
downloaded. A simple check reveals if the whole music file has been received.
In order for length checking to be employed, files with length information have to be created on the
server. For every file (including the configuration file) another file with (second) file extension “.len”
11
Configuration of the player
must be created on the server(s). This “.len” file should contain just 12 digits - size of file in bytes
padded with zeroes from the left.
It is easy to create the length files using the WriteFileSize tool, which is included in the firmware
update archives. See how to get newest version of the firmware update archive in the chapter 7
Updating the Firmware in a New device on page 42.
WriteFileSize is a command-line tool. When run without arguments, it displays its documentation.
Typical use is to give WriteFileSize just one argument:
WriteFileSize MyDir
which results in adding length files for all of the files in the subdirectory MyDir.
Then, length checking must be activated in the configuration using the variable CHECK_LENGTH::
CHECK_LENGTH=1
Repeating download
If download occasionally fails for unknown reasons, it may help to enable immediate repeating of
downloads in cases of failure, by increasing the value of REPEAT_DOWNLOADE.
Timeouts
On high latency networks, it may take too much time for the servers to respond to the requests. In
such cases, updating over network keeps failing. One solution to this problem is setting longer time
limits for communication with the servers. It's possible to increase the values of INTITAL_TIMEOUT
and OPERATIVE_TIMEOUT
.
Note: increasing these values increases the time spent reconnecting in vain if the problem is
elsewhere.
3.7
Updating configuration over network
Setting automatic network update of the configuration is similar to the setting of automatic network
update of the music.
At least the CONFIG has to be set, for example:
CONFIG_SERVER=configserver.example.org
If set this way, the FTP MP3 Player tries to contact the configuration server with the following
default settings:
12
●
every 60 minutes (default value for CONFIG_UPDATE)
●
to connect using protocol FTP (default value for CONFIG_PROTOCOL)
●
to server musicserver.example.org (this was set using CONFIG SERVER)
●
on port 21 (default value for CONFIG_PORT, when protocol FTP is used)
●
using username “anonymous” (default value for CONFIG_USERNAME)
●
and password “a@a” (default value for CONFIG_PASSWORD)
●
and download new version of the configuration file “player.cfg” from root directory (default
value for CONFG_DIR)
Configuration of the player
Music update is made immediately after every configuration update.
Note: Value of configuration variable QUICK_PLAY determines the behaviour of FTP MP3 Player
upon boot. If QUICK_PLAY is set to 0 (default if not explicitly set in the player.cfg file), FTP MP3
Player tries to refresh the configuration and the music before starting the actual playback. This can
be used to prevent playing obsolete messages/music. When set to 1, the player first evaluates the
current playlists, starts playing, and then tries to refresh the configuration as specified in the current
player.cfg file.
13
Configuration of the player
4 Web Interface
You can adjust network settings and monitoring settings of Barix devices via the device's Web
interface. To enter the configuration mode you will need:
• the IP address, as announced over the audio outputs (see the Quick Install Guide)
• a standard web browser
Open your web browser and type in the IP address of the Barix device in the URL field and hit the
“Enter” key.
• Example: “192.168.0.12”
The FTPMP3 Control page will show up. Click on the needed button to navigate to the
corresponding web UI page (ex. Click on the “Network Configuration” button to open the network
configuration page.
4.1
Settings page
Network settings
This chapter explains how to adjust the network settings of the Barix device.
We recommend that you set a Static IP address. With a static (permanent) IP address the device
does not have to get a new IP address at power on or reboot.
Use SonicIP
If “Use SonicIP” is set to yes, the device will announce its IP address over the audio output during
start up. This feature is useful during implementation, but may not be desirable in a 'live
environment'. Always make a note of any static IP address you assign.
IP Address
Enter the 4 values of the desired static IP address e.g.:
• “192.168.0.12” for an internal LAN
Attention: Make sure that you enter a free IP address. The device will check this and will not be
available until the device using the same IP is disconnected or switched off. The command Ping
can be used to ensure that a specific IP address is unused (i.e. No reply).
The Barix automatic discovery functions are not executed if a static IP address is set.
Enter 4 zeroes to enable automatic discovery:
• “0.0.0.0” for automatic discovery (Discovery order: BOOTP, DHCP, IPzator, AutoIP)
To enable automatic discovery but disable certain IP discovery functions, set all but the third value
to zero. For each function you want to disable add the value from the table below:
•
•
•
•
14
Web Interface
“0.0.1.0” to disable AutoIP
“0.0.2.0” to disable DHCP
“0.0.4.0” to disable BOOTP
“0.0.8.0” to disable IPzator
Examples:
• “0.0.3.0” disables AutoIP and DHCP
• “0.0.11.0” disables all but BOOTP
Attention: “0.0.15.0” disables all discovery functions which locks you out unless you reset the
device to factory defaults by pressing the reset button for about 10 seconds.
Netmask
Enter the 4 values of the desired Netmask e.g.:
• “0.0.0.0” for a default Netmask depending on the IP Address used
• “255.255.255.0” for a C class network
Note: Try first the Netmask your PC is set to or ask your Network Administrator.
Gateway IP Address
A correct setting of the Gateway IP address is needed to connect to streams from the Internet or
from outside your local network (LAN).
Enter the 4 values of the desired Gateway IP address e.g.:
• "0.0.0.0" for no Gateway or automatic discovery
• "192.168.0.1" for a Gateway in a LAN
•
Note: If you have set the devices IP address to automatic discovery and your server or router has
issued an IP address then most probably it also has supplied a valid Gateway address, “0.0.0.0”
will then work fine.
If you have set a Static IP address then you will need to configure a valid Gateway address
manually. Try first the same Gateway IP address your PC is set to. If it doesn’t work then ask your
Network Administrator for a correct Gateway IP address.
Primary DNS
A correct setting of the primary DNS IP address is needed to connect to URLs (e.g.
“www.radio.com”).
Enter the 4 IP address values for the primary DNS e.g.:
• “0.0.0.0” for no DNS
• “192.168.0.111” for a DNS
Note: If you have set the devices IP address to automatic discovery and your server or router has
issued an IP address then most probably it also has supplied a valid DNS address, “0.0.0.0” will
then work fine.
If you have set a static IP address then you will need to configure a valid DNS address manually.
Try first the same DNS IP address your PC is set to. If it doesn’t work then check your Network
Administrator or your Internet Service Provider for correct DNS addresses.
15
Web Interface
Alternative DNS
Enter the 4 IP address values of the desired alternative DNS e.g.:
• “0.0.0.0” for no alternative DNS
• “192.168.0.111” for a DNS
Note: An alternative DNS is needed only in case the primary DNS is not reachable.
See also the note in the Primary DNS section above.
DHCP Host Name
Name of the device sent in DHCP request. If not set, a name based on the device's MAC address
is automatically generated. Enter up to 15 Characters.
Note: it can help in the administration of multiple devices when a descriptive DHCP Host Name is
given.
Web Server Port
The port of the internal Web Server can be adjusted. If set to zero the default port 80 is used.
When changing configuration parameters remotely is desired but a web server using port 80 is
already installed in the LAN you can change the Web Server Port of the Barix device to a different
port (e.g. 8080).
Other Settings
Player Directory Name
Enter here the desired name of the directory, containing the configuration and music files. The
name should not be than 8 characters long, and should not contain a trailing "/". The starting "/" is
automatically added to the input string.
Default: "/PLAYER" or "/" depending on the previous selection of Player Directory Location
Player Directory Location
Defines the location of the directory, containing the configuration and music files. When set to
"Custom", then the "Player Directory Name" entry box becomes visible.
Default: "/PLAYER"
Player Directory Name
Enter here the desired name of the directory, containing the configuration and music files. The
name should not be than 8 characters long, and should not contain a trailing "/". The starting "/" is
automatically added to the input string.
Default: "Manual"
Refresh Control Page
Defines the way the control page is refreshed. When set to "Manual", the control page is refreshed
16
Web Interface
when clicking on any of the control buttons, or with the browser refresh button. When set to
"Automatic" the page is automatically refreshed at the refresh interval below.
Default: "/PLAYER" or "/" depending on the previous selection of Player Directory Location
Refresh Interval
Defines the refresh interval for the control page in seconds. If Refresh Control Page is set to
"Manual", then this configuration option is not visible.
Default: "5 seconds"
When you finish modifying your settings, click on the “Submit” button to store the changes, or
“Cancel” to ignore all modifications.
Volume Units
Allows to switch between using % and dB for the volume. Please take care to update all
your playlists accordingly to have the correct volume units in the #BARIX-4 config line.
Default: "%"
Debug Mode
Enables more verbose syslog messages output.
Default: "No"
Enable IR Control
Enables the IR control support. When set to "Yes", then the IR Source configuration option
also becomes visible.
Default: "No"
IR Source
Allows to switch between using the Barix serial port IR dongle, or the build-in IR for devices
that have one (for example Extreamer 110/120/200).
Default: "serial dongle"
4.2
Control Page
This is the default page when you open the device IP with your browser. To navigate to the Control
Page you can also click on the “Control” button from the navigation bar. If the “Refresh Control
Page” is set to Automatic, then the control page is refreshed regularly providing you with up-todate information about the device status.
There you can do one of the following:
17
●
Force refresh the page by clicking on the “Refresh” button on the top of the page
●
Change the current volume by clicking on the volume slider, or by dragging the slider
Web Interface
pointer. The volume can be updated also in 10% or 6dB steps by clicking on the arrows.
You should see the new updated value printed on the web page;
4.3
●
Navigate through the songs in the current playlist by clicking on the play, pause, stop, play
next and play previous buttons from the button bar. You should see the updated
information for the current song10, and for the next song11
●
Force configuration refresh using the settings in the player.cfg file by clicking on the Force
Config Update link
●
Force configuration refresh using the configuration settings built-in the FW of the device by
clicking on the Force config update using preset configuration link
Status Page
To navigate to the Control Page click on the “Status” button from the navigation bar. The status
page is never refreshed, so use browser refresh button to update the page contents. On the status
page you will see information about the status of the device, and the values of the configuration
settings in the player.cfg file. An example view of the status page is shown on Illustration 1
Illustration 1: FTP MP3 Status Page
10It may happen that the name of the song being played changes to the current one that was playing just
before the click on the button, because the browser refreshes immediately while changing the song may take 13 seconds. If the data does not seem correct, then use the browser refresh button to get the updated values. If
the generated from the browser refresh network traffic is not an issue for the network, using automatic refresh is
recommended.
11The next song to be played is printed only if the file cache is not empty.
18
Web Interface
4.4
Playlists Page
To navigate to the Playlists Page click on the “Playlists” button from the navigation bar. The status
page is never refreshed, so must click again on the button to update the page contents.
On the page all playlists with their corresponding time settings are displayed, marking also the
current one. An example view of the page is shown on Illustration 2.
If the application is not running for some reason, or the device hasn't completed the boot up
Illustration 2: FTP MP3 Playlists page
process, an “Error 405” may appear in your browser when you try to load the playlists page.
4.5
Directory Listing Page
To navigate to the Directory Listing Page click on the “Music Files” button from the navigation bar.
Click on the (A-Z) or “Filesize” to sort the contents of the player directory in ascending/descending
order by name, or file size. Select any file with the checkboxes, then click “Delete Selected Files” to
delete them.
Illustration 3: FTP MP3
Directory Listing Page
4.6
Factory Defaults Page
To navigate to the Factory Defaults Page click on the “Factory Defaults” button from the navigation
bar. The following will appear in your browser:
19
Web Interface
Illustration 4: FTP MP3 factory defaults page
Click on “Revert to defaults” to confirm. A confirmation page counting down while the defaults are
being loaded will appear. After that the device will reboot.
4.7
Update Page
To navigate to the Update Page click on the “Factory Defaults” button from the navigation bar. The
Illustration 5: FTP MP3 update page
following will appear in your browser:
If you want to continue with the update, click on the Please click here to continue link to open the
upload page (Illustration 6).
Illustration 6: FTP MP3 FW upload page
Click “Browse” and navigate to the directory containing the compound.bin file you would like to
upload. Select it, then click “Upload” to send the file to the device. After the confirmation for
successful upload go back to this page, and click on “Reboot” to restart the device.
Note: Please DO NOT use the “Advanced update” as it may screw up the device completely, and
serial port rescue (which would require physical access to the device) may be needed in that case.
Use it only if explicitly advised to do so by Barix support following their instructions.
20
Web Interface
5 List of available settings
Variable
Meaning
CONFIG_DIR
directory on the server where the configuration is stored
CONFIG_PASSWORD
password, used only for FTP, default a@a
CONFIG_PORT
configuration port (default 21 for FTP, 80 for HTTP)
CONFIG_PROTOCOL
either “ftp” (default) or “http”
CONFIG_SERVER
hostname/IP address for configuration update
CONFIG_UPDATE
configuration update interval in seconds (default 3600)
disabled if UPDATE_DAILY_TIME=1
CONFIG_USERNAME
username (default “anonymous”), used only for FTP
DEL_BEGIN,DEL_END
interval when deleting is allowed (in hours).
Examples:
DEL_BEGIN=5, DEL_END=9
=> deleting possible 05:00-8:59
DEL_BEGIN=20, DEL_END=9
=> deleting possible 00:00-8:59 and 20:00-23:59
DELETE_STOP
1 (default)
do not begin deleting until the current song is finished; do
not play the next song until all needed deletions are
finished
0
delete files during playing. This can result in music buffer
underruns and interruptions for larger files. Expected to be
safe for filesize less than 4MB, but critical file size depends
for example on the MP3 file bitrate, and on the speed of
the connected USB drive
CHECK_LENGTH
0 (default)
Length checking disabled
1
Length checking enabled
For details, see paragraph Length checking on page 11
INITIAL_TIMEOUT
timeout in milliseconds for establishing
HTTP/FTP connections, if
the connection attempt times out, the connection is considered lost and the
download fails; default value is 10000 (10 seconds)
LOCALTIME
positive or negative offset from UTC, e.g.
+1 for Central European Time,
+2 for Central European Summer Time
-5 for Eastern Standard Time
BARIMON_PORT
BariMon server port
BARIMON_SERVER
BariMon server hostname/IP address
BARIMON_INTERVAL
Sets BariMon messages to be sent every BARIMON_INTERVAL minutes
BARIMON_TIMEOUT
Sets the time (default 30 ms) for which the FTPMP3 should wait before checking
for a successfully established TCP connection to the BariMon server. Use this
option if the BariMon server response is too fast (eg. when the BariMon is residing
21
List of available settings
Variable
Meaning
on your local network). The maximum accepted value is 1000 ms.
MUSIC_DIR
directory on the server containing playlists and audio files
MUSIC_PASSWORD
password, used only for FTP
MUSIC_PORT
playlist port (default 21 for FTP, 80 for HTTP)
MUSIC_PROTOCOL
either “ftp” (default) or “http”
MUSIC_SERVER
hostname/IP address of the playlist/mp3 server
Examples:
192.168.2.130
music.example.org
MUSIC_UPDATE
playlist update interval in seconds (default 600)
disabled if UPDATE_DAILY_TIME=1
MUSIC_USERNAME
username (default “anonymous”), used only for FTP
NO_DELETE
if set to 1, all deleting is disabled
default is 0
NTP_SERVER
NTP server hostname/IP address
NTP_UPDATE_HOUR
NTP update interval in hours. Should be minimum 1 hour. Default: 1 hour
OPERATIVE_TIMEOUT
maximum timeout in milliseconds between
two replies on
HTTP/FTP; if this timeout is exceeded the connection is considered lost and the
download fails; default value is 1000 (1 second); increase this timeout if you have
problems with interrupted downloads or if your network latency is high (e.g.
wireless network)
PRIORITY_BUFFER
priority RTP buffer level, default 16000, maximum 32768. For smooth playing, RTP
stream is buffered in memory (up to 64kB). The RTP algorithm manages the
average buffer level between the PRIORITY_BUFFER and half of the value. This
way the maximum delay is limited and lost data are duplicated to avoid audio
dropouts. Depending on the bitrate used, the value defines the delay before the
playback starts (higher value=longer delay). Increase this value to prevent sound
interruptions caused by network problems. Decrease the value to shorten the
playback delay of priority streams.
QUICK_PLAY
1
upon startup: send NTP request, start
playing music, then update playlists
0
upon start: send NTP request, first
update playlists, then start playing
REPEAT_DOWNLOAD
if checking length, how many times should the player try to download one file
before giving up
UPDATE_DAILY_TIME
specific time (hh:mm) to start download
config/playlist/audio files and also update system time. Disables standard interval
updates set using CONFIG_UPDATE, MUSIC_UPDATE and NTP_UPDATE_HOUR.
BARIMON_INTERVAL is NOT disabled by this setting!
Update Time can be configured between 00:00-23:59 hour. Any value grater that
23:59 hour will disable this feature. Minute part will be ignored if that is greater than
59 minute.
22
List of available settings
Variable
Meaning
UPDATE_DAILY_DURATIO specific the maximum duration (in hh:mm format) after which the download shall
N
stop. This option is used only together with DAILY_UPDATE_OPTION.
If UPDATE_DAILY_DURATION=0 then it is not defined, and ignored.
NOTE1: Take care to set it long enoug to be able to download all music files
NOTE2: Download of the file that is currently being downloaded CANNOT be
interrupted. Therefore, it may happen the download to continue a little bit beyond
the specified duration. In fact, it will stop before starting the download of the next
file.
RELAY_ON_PLAY
When set to 1, the devices that have relay output, will switch on the relay when the
music playback starts, and switch it of when there is nothing to play. For more
information using this feature check chapter 6.4
PLAYLIST
Adds a playlist
23
List of available settings
6 Details
6.1
Startup behaviour
Value of configuration variable QUICK_PLAY determines the behavior of FTP MP3 Player upon
boot. If QUICK_PLAY is set to 0, FTP MP3 Player tries to refresh the configuration and the music
before starting the actual playing. This can be used to prevent playing obsolete messages/music.
6.2
Scheduling
The most important task of the FTP MP3 Player is to play music. In order to ensure smooth
playback, only one of the other resource-demanding activities is allowed at a time.
These activities are:
●
●
updating the configuration
updating the music (including the clean-up phase)
In the case where one task is already being executed and the time comes to start a new task, the
new task execution is postponed until the entire current task is finished (e.g. all the music is
downloaded).
The most observable instance of this postponing is when updating music takes a long time. During
music update, it is not possible to force update of the configuration or restart music update, until all
of the music is downloaded.
6.3
Cleanup phase tuning
Because cleanup phase is resource intensive, and under certain conditions could interfere with
playback, it is possible to disable it:
• during some parts of the day,
• allow deleting only during song switching or
• disable deleting entirely.
•
The following settings are available:
DEL_BEGIN, DEL_END, DELETE_STOP, NO_DELETE
If deleting is disabled using NO_DELETE, values of DEL_BEGIN and DEL_END are ignored.
6.4
Using a relay output during music playback
In some cases, a relay output may be needed to control external equipment (for example power
amplifier, lights, etc.). In this case the relay may be controlled by adding in the player.cfg file the
following option:
RELAY_ON_PLAY=1
In this case the relay will switch on when the music playback starts (found active playlist), and
switch off when there is no playlist to play.
Note: Please have in mind that you need a BARIX device with a relay output (for example
24
Details
Exstreamer 110, 120, 200 or Annuncicom) to use this feature, otherwise this setting will be
ignored.
Note: In case of using playlists containing few short music files 2-3 seconds), the relay may toggle
more often.
6.5
Using the IR remote control
To use this feature, you need either the Barix IR Remote Control Kit to connect to COM1 of your
Exstreamer 100, or Extreamer 110/120/200 that have IR receiver built in.
To enable the IR remote control, open the SETTINGS PAGE, go to OTHER SETTINGS section
and click Yes to enable the IR receiver. The IR Source option will then appear.
Select serial dongle if you are using Exstreamer 100 with a serial dongle, or built-in if you are using
Illustration 7: Enabling the IR remote control
Exstreamer 110/120/200.
The following commands from the IR remote control are supported:
•
•
•
•
•
•
•
•
25
Details
Vol+
- increases the volume in 5% or 3dB steps. Repeated if kept pressed
Vol- decreases the volume in 5% or 3dB steps. Repeated if kept pressed
Song+, Plist+ - plays next music file from the playlist
Song-, Plist- plays the previous sonf file from the playlist
Pause
- pauses the playpack
Play
- Starts playback
Stop
- Stops the playback
Mute
Toggles the sound off/on. When muted, it keeps the current volume,
and gradually decreases the audio to the minimum (0%, or -70dB). If Vol+ is pressed
while muted, the volume starts increasing from minimum, and the stored volume before
the Mute is cleared
6.6
WebUI Security Settings
The FTP_MP3 application has standard BARIX web UI settings also integrated. However, there is
no direct link to the security configuration page. To configure it, you have to type the following URL
in your browser:
http://your.device.ip/uisettings.html
For example:
Illustration 8: FTP_MP3 Security
Settings page
Scroll down to the bottom of the page to see the security settings.
26
7 Updating the Firmware in a new device
Barix preloads Exstreamer family devices with either the 'Streaming Client' firmware (USA), or the
“Exstreamer standard firmware” (ROTW).
In both cases, the firmware will need updating to the ABCL FTPMP3 Player application.
If you do not already have one, you will need to obtain a registered user ID from Barix Support
([email protected]) to enable you to download the software.
Once you have the ID, download the software from the Barix website: it's stored under 'ABCL
applications' in the downloads section, select 'ABCL FTPMP3 player application'.
Now unzip the package and follow the instructions in the '_Readme1st' file to load the application.
After loading the ABCL firmware into the device, the FTPMP3 application must be selected, in
order for the FTP MP3 Player to start. Once FTPMP3 has been selected, it remains as the default
startup application for the unit.
27
Updating the Firmware in a new device
8 Dictionary
DHCP
Short for Dynamic Host Configuration Protocol, a protocol used to assign an IP address to a
device connected to a Network.
IP
Short for Internet Protocol, the IP is an address of a computer or other network device on a
network using IP or TCP/IP. Every device on an IP-based network requires an IP address to
identify its location or address on the network. Example: 192.168.2.10
IPzator
Barix IPzator™ technology is designed for the purpose that the Barix device can create its
own IP address according to the network structure in case it can’t receive one from your
network. If DHCP, AUTOIP or BOOTP fail, IPzator will create an IP address within the subnet
and test it. If the address works and is not being used by another device on the network, it
will give the address to the Barix device.
MAC address
Abbreviation for Medium Access Control, a MAC is a unique address number formatted in
hexadecimal format and given to each computer and/or network device on a computer
network. Because a MAC address is a unique address a computer network will not have the
same MAC address assigned to more than one computer or network device. Example:
A1:B2:C3:D4:E5:F6
Netmask
A number used to identify a sub network so that an IP address can be shared on a LAN
(Local Area Network).
A mask is used to determine what subnet an IP address belongs to. An IP address has two
components, the network address and the host address. For example, consider the IP
address 150.215.17.009. Assuming this is part of a Class B network, the first two numbers
(150.2) represent the Class B network address, and the second two numbers (.017.009)
identify a particular host on this network. The Netmask would then be 255.255.0.0 .
Ping
Ping is a basic Internet program that lets you verify that a particular IP address exists and
can accept requests. Example: ping 192.168.2.10
SonicIP
Barix SonicIP® technology is designed to vocally announce the Barix devices current IP
address. This makes it easier and faster to obtain the necessary network information. To
make use of SonicIP plug in the included earphone into RCA audio out, connect the
network and plug in the power supply. It will announce the address over the earphones right
after power up.
Static IP
A Static IP is a fixed IP address that you assign manually
to a device on the network. It remains valid until you disable it.
28
Dictionary
9 Legal Information
© 2006 Barix AG, Zurich, Switzerland.
All rights reserved.
All information is subject to change without notice.
All mentioned trademarks belong to their respective owners and are used for reference only.
Barix, Exstreamer, Instreamer, SonicIP and IPzator are trademarks of Barix AG, Switzerland and are
registered in certain countries. For information about our devices and the latest version of this
manual please visit www.barix.com.
Barix AG
Seefeldstrasse 303
8008 Zurich
SWITZERLAND
Phone: +41 43 433 22 11
Fax:
+41 44 274 28 49
Internet
web:
www.barix.com
email: [email protected]
support: [email protected]
29
Legal Information