1
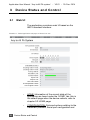
A N Y T O A L L PA S Y S T E M
Application User Manual
Application version V2.01
Released
19. Dec. 2014
Supports:
Annuncicom family (send/receive audio)
Exstreamer family (receive audio)
© 2014 Barix AG, all rights reserved. All information is
subject to change without notice. All mentioned trademarks
belong to their respective owners and are used for reference
only.
Table of Contents
1
Introduction...............................................................................5
1.1 About the “Any to all PA system”...............................................5
1.2 Installing the device....................................................................6
1.3 Additional documents.................................................................6
1.4 Preloaded Firmware....................................................................6
1.5 About this manual.......................................................................7
1.5.1 Links to chapters..............................................................7
1.5.2 Links to the Dictionary......................................................7
1.5.3 Bookmarks pane in Adobe Acrobat..................................7
2
Any to All PA system Description............................................8
2.1 IDLE mode..................................................................................8
2.2 RECEIVE mode...........................................................................8
2.3 TRANSMIT mode........................................................................9
2.4 Hardware:.................................................................................10
2.4.1 Encoder..........................................................................10
2.4.2 Decoder..........................................................................10
2.5 Audio format.............................................................................10
2.6 Latency.....................................................................................11
3
Device Status and Control.....................................................12
3.1 Web UI......................................................................................12
3.2 HOME page:.............................................................................13
3.3 CONFIGURATION Page...........................................................15
3.3.1 Basic Settings.................................................................16
3.3.2 Advanced Settings..........................................................17
3.3.3 Applying or Discarding Settings......................................22
4
X8 to Annuncicom Wiring.......................................................23
4.1 Introduction
.........................................................................23
4.2 Annuncicom DB9 pinout...........................................................23
4.3 Connection using COM1..........................................................24
4.4 Connection using COM 2.........................................................25
5
Updating the device................................................................26
6
Dictionary................................................................................27
6.1.1 DHCP .............................................................................27
6.1.2 IP ....................................................................................27
6.1.3 IPzator ............................................................................27
6.1.4 MAC address..................................................................27
6.1.5 Netmask..........................................................................28
6.1.6 Ping ................................................................................28
6.1.7 Static IP..........................................................................28
6.1.8 Telnet..............................................................................28
7
IP Address, Netmask etc........................................................29
7.1.1 IP Addressing..................................................................29
7.1.2 Class A network..............................................................29
7.1.3 Class B network..............................................................29
7.1.4 Class C network..............................................................30
7.1.5 Class D network..............................................................30
7.1.6 Class E network..............................................................30
7.1.7 Network Address............................................................30
7.1.8 Broadcast Address.........................................................30
7.1.9 IP Netmask.....................................................................31
7.1.10 Private IP Networks and the Internet............................32
7.1.11 Network RFC’s..............................................................32
8
Legal Information....................................................................33
Application User Manual “Any to All PA system“ - V2.01 - 19. Dec. 2014
1
1.1
Introduction
About the “Any to all PA system”
This is a BCL application to stream audio from any
one of a number of locations to all / selected
destinations.
Selection of destinations is achieved by input
switches. Audio is unidirectional, from the sender to
selected destinations i.e. a PA implementation.
Features:
• The system supports a maximum of 16 individual
locations, using Annuncicom Family hardware
with an optional X8 module attached.
• Barix Exstreamer devices can also be used as
'Receive only' endpoints in the system.
• One input can be defined to mean 'stream to all
destinations'.
• The application supports a web UI with
configuration and status information.
• Application is supplied with source code and can
be modified by users, if desired.
• Supports RTP streaming protocol
• Uses mp3, uLaw or aLaw audio format
• Supports unicast, multiple unicasts, multicast and
broadcast addressing
Introduction
5
Application User Manual “Any to All PA system“ - V2.01 - 19. Dec. 2014
1.2
Installing the device
For the physical installation of the Annuncicom
hardware, please refer to the corresponding “Quick
Install Guide”.
A printed version is included in the box and can also
be downloaded from our site www.barix.com.
The wiring of the X8 modules is detailed later in this
document.
1.3
Additional documents
Technical specifications can be found in the
corresponding product sheet which can be
downloaded from our site www.barix.com.
For detailed technical information about the BCL
programming language please download the “Barix
Control Language (BCL) Programmers Manual” from
our website. The Simple PA system application is
delivered with its source code: if you wish to modify
it, you can do so.
1.4
Preloaded Firmware
Barix preloads all Annuncicom and Exstreamer
devices with standard applications. In order to use
the 'Any to all PA Application', you will first need to
load it into all devices in the system, by following the
instructions in the “_readme1st” document included
in the application download.
NOTE: this is an ABCL application, developed on
Barix' open development platform, it uses the ABCL
standard web interface; status information is
reported in the main ‘HOME’ tab, configuration
options for this application, or options relating to the
device/network configuration are found by clicking
on the 'CONFIGURATION' tab.
6
Introduction
Application User Manual “Any to All PA system“ - V2.01 - 19. Dec. 2014
1.5
About this manual
1.5.1
Links to chapters
References to chapters (e.g. X Chapter name) are
red and underlined and serve as direct links when
viewed in Adobe Acrobat Viewer. Click on the link to
jump to the referenced chapter, click on the left
arrow icon to jump back to where you came from.
1.5.2
Links to the Dictionary
Some technical terms (e.g. DHCP) are underlined
and red. Click on them to jump to the dictionary at
the end of this manual, click on the left arrow icon to
jump back.
1.5.3
Bookmarks pane in Adobe Acrobat
The complete “Table of Contents” is available in
Adobe Acrobat Viewer. Click on the “Bookmarks”
pane tab on the left side of Adobe Acrobat Viewer to
open it. Click on any bookmark to directly jump to
the corresponding part of the manual.
Introduction
7
Application User Manual “Any to All PA system“ - V2.01 - 19. Dec. 2014
2
Any to All PA system Description
The Any to All PA system is an ABCL application, as
such its user interface is based upon the ABCL
standard; hardware/network general settings
configured in the 'CONFIGURATION' section,
application specific behaviour under main 'HOME'
tab (index page). See chapter 3.1 for more detail.
The system has 3 distinct modes in operation: IDLE,
RECEIVE and TRANSMIT, depending upon whether
the system is currently inactive, has an incoming
audio stream, or is sending audio to other
destinations.
2.1
IDLE mode
If none of the input switches are active, the system
is in IDLE mode. Idle is used to mean not actively
sending or receiving audio; the system is not doing
nothing.
In IDLE mode the device listens to a UI-configurable
UDP Send/Receive socket for an RTP stream.
On detecting an RTP stream on the specified port
whilst in IDLE mode, it will enter RECEIVE mode.
If an input switch becomes active when the device is
in IDLE mode, the device will enter TRANSMIT
mode.
2.2
RECEIVE mode
On entering RECEIVE mode, the device plays the
received stream, any input switch changes will be
ignored on this device: only one device in the
system can TRANSMIT at any time, all others (that
are addressed) must RECEIVE.
8
Any to All PA system Description
Application User Manual “Any to All PA system“ - V2.01 - 19. Dec. 2014
If so configured, the device will set its relay active
whilst receiving a stream. This relay signalisation is
intended to enable control of attached equipment,
such as an amplifier, at the remote end.
The status page will show a status of 'RECEIVING'
and the details of the source stream.
2.3
TRANSMIT mode
When the device is in Idle mode, activating one or
more of the attached inputs will cause the device to
look up the destination configured for the activated
input(s) and start sending audio to the configured
target(s), using the defined Send/Receive port.
The Audio input source can be from Line In, or the
microphone input, configurable via the web UI, as
are the targets for the input switches.
The first input to go active sets the destination and
starts the audio stream, if more inputs become
active whilst the device is streaming, then the
stream is also sent to the corresponding
destination(s).
If an input is deactivated during streaming (whilst
the device is in TRANSMIT mode), then the audio is
no longer streamed to the destination(s) associated
to that input.
The device stays in TRANSMIT mode sending audio
for as long as any of the inputs are active.
Any to All PA system Description
9
Application User Manual “Any to All PA system“ - V2.01 - 19. Dec. 2014
2.4
Hardware:
There are several possible Barix devices that can
run the application.
2.4.1
Encoder
In order to operate as an audio source, the Barix
device must be an encoder, with GPIs: it is intended
for use with the Annuncicom family, specifically the
Annuncicom 100, with an X8 extension module
attached to provide the necessary number of GPIs.
If used, the X8 must be operated in "standard"
(default) mode (Modbus/RTU).
X8 connection is available by both COM1(rs232)
and COM2 (rs485).
2.4.2
Decoder
The application may also be run on an Exstreamer
family device, where it will support Receiving of
audio only, not Sending.
For the Exstreamer family devices with LCD display,
the LCD displays the application name, version and
device IP in IDLE state, and “Stream From :
INCOMING_IP” when a stream is received, or
“Streaming” when in TRANSMIT mode.
2.5
Audio format
◦ The device encodes in MPEG or G.711(µ-Law, a-
Law) format.
◦ When using MP3, different Quality levels are
supported (0 -7) – this affects how much data is
transmitted over the network (0 is lower quality; so
requires less network bandwidth, 7 is highest
quality, and needs more).
10
Any to All PA system Description
Application User Manual “Any to All PA system“ - V2.01 - 19. Dec. 2014
◦ When using MPEG, sample rates of 16, 22.05, 24,
32, 44.1 and 48 kHz are supported, while using
G.711 format (µ-Law / a-Law), 8 and 24 kHz sample
rates are available.
The sample rate is how often the signal is
measured.
A lower sample rate has two obvious
consequences:
first, it means that the signal is examined less often,
so less data about the audio is collected, requiring
less network bandwidth to transmit it.
Second, because the signal is sampled less often,
the 'precision' of the audio is less than at higher
sample rate: it will sound less good. (Consider: the
standard for fixed line telephony was 8 kHz, mp3
music files typically use 48 kHz)
2.6
Latency
System latency – the delay in transmitting the audio
from Sender to playback at the receiver – has many
factors:
◦ The principal user-controllable factor affecting
system latency is the size of the receive buffer (in
milliseconds): decrease the size to reduce the delay,
but beware of reducing it too low as this will expose
the system to audio dropouts due to network jitter.
◦ the sample rate and encoding quality affect how
much data is sent: the more data being sent, the
quicker the receive buffer is filled, the faster the
receiver starts playing the audio.
◦ the physical topology of the network: is it local, or
remote, and the type/bandwidth of the connections
and so forth will determine the network jitter.
A system latency in the range 200-500ms is
considered acceptable for this application.
Any to All PA system Description
11
Application User Manual “Any to All PA system“ - V2.01 - 19. Dec. 2014
3
3.1
Device Status and Control
Web UI
The application provides a web UI based on the
ABCL standard interface:
Illustration 1: Default application web page on Annuncicom 100
12
•
HOME: Information of the current state of the
application are found under the 'HOME' tab; this is
the default page when the device restarts, refer to
chapter 3.2 HOME page:
•
CONFIGURATION: Data and options relating to the
Hardware (Network, Serial port configuration and
Device Status and Control
Application User Manual “Any to All PA system“ - V2.01 - 19. Dec. 2014
Security) and to the application are found under the
‘CONFIGURATION’ tab, refer to chapter 3.3
CONFIGURATION Page .
3.2
•
STATUS: Clicking on this tab, a page displays in a
report all the device, application status and
application configured parameters.
•
Defaults: Clicking on the 'Defaults' tab allows the
user to reset the application factory default settings,
with the exception of the Network settings (needed
for ongoing communication!). The device will reboot.
•
Reboot: allows the user to force a reboot of the
device.
•
Update: Enters the web update mechanism,
allowing the device firmware to be updated. Refer to
the “readme1st” file in the application package for
full details.
HOME page:
All aspects of the application are defined here. Note:
the displayed data is updated every second.
APPLICATION STATUS section
•
State: the current state of the device; Idle, Receive,
Transmit. When in Receive state, the sender IP is
displayed.
•
X8 Extension : whether an X8 extension module has
been detected, or not.
I/O STATES section
•
Device Inputs: the states of the GPIs are represented
here; Inactive states are shown grey, unavailable GPIs
are shown white, active GPIs are shown in yellow.
•
X8 Inputs : whether a X8 extension module has been
detected, states of the X8 GPIs are represented here;
Inactive states are shown grey, unavailable GPIs are
Device Status and Control
13
Application User Manual “Any to All PA system“ - V2.01 - 19. Dec. 2014
shown white, active GPIs are shown in yellow. If the X8
is not connected GPIs are shown white.
Note: whether a PS16 is used, these GPIs, from 1 to 8,
represents respectively PS16 keys 9 to 16.
•
Relay State: the relay 1 can be controlled by the
application, the current state at the time of the page
load is shown here. Either 'Open', as grey box, or
'Activated' as yellow box. On devices where Relay is
not available, a white box is shown.
STREAMING DETAILS section
14
•
Decoding Audio Format: the auto-detected incoming
stream audio format. The audio format is recognized
from the incoming RTP ‘payload type’ field.
•
Encoding Audio Format: the current configured
encoding audio format.
•
Average Bitrate: the bitrate in kbps of the INCOMING
stream.
•
RX Buffer Level: the amount of data in the INPUT
buffer, in bytes, from 0 to 32768.
•
Current Volume: Current volume level, from 0 to 100%,
as 5% steps.
•
Input Level: the audio input level on the configured
input source. Absolute linear value, from 0 – 32768.
•
Output Level: the audio output level. Absolute linear
value, from 0 – 32768.
•
RTP Lost Frames: number of lost frames during
decoding. The value is reset with every new RTP
sequence.
•
RTP Duplicated Frames: number of duplicated frames
during decoding due to the buffer management.
Frames are duplicated if encoder is slower than
decoder.
•
RTP Dropped Frames: number of dropped frames
Device Status and Control
Application User Manual “Any to All PA system“ - V2.01 - 19. Dec. 2014
during decoding due to the buffer management.
Frames are dropped if encoder is faster than decoder.
3.3
CONFIGURATION Page
Clicking on the UI 'CONFIGURATION' tab will cause
the browser to display the general configuration
page; this is where both application options and
device-specific settings can be configured.
This page is divided in several sections: the ‘Basic
Settings’ left menu link allows a quick setup-and-go
of the application, while the ‘Advanced Settings’
displays all the application and device-specific
settings, separating every functionality in a specific
dedicated section.
Device Status and Control
15
Application User Manual “Any to All PA system“ - V2.01 - 19. Dec. 2014
Illustration 2: Settings page for configuring application or device-specific parameters.
3.3.1
Basic Settings
Basic settings, for a fast configuration of the PA
system. Streaming sockets (IP and ports) can be
configured here.
Target Table
This table allows to use digital inputs to start and
stop streaming to a destination. For every available
input is possible to configure a destination socket
(IP:PORT). IP as 0.0.0.0, or a port value set to 0,
16
Device Status and Control
Application User Manual “Any to All PA system“ - V2.01 - 19. Dec. 2014
mean "no target". Unicast, or multicast IP addresses
can be used here.
By having a destination address of 255.255.255.255
configured against an input, the device will stream
to ALL destinations configured in the target table
when that input is activated. The streams will be
sent UNICAST to each destination.
Note: on Barix PS16 Paging Station the 16
destinations corresponds, from n. 1 to 16, to PS16
keys 1 to 16.
[default: 0.0.0.0 : 0]
Receiving Socket
Audio stream receiving socket (IP:PORT).
Use 0.0.0.0 (default) to listen to any IP or use a
multicast IP to join a multicast group.
[default: 0.0.0.0 : 3030]
3.3.2
Advanced Settings
Advanced settings, for detailed configuration of
every behavior of the PA system.
Network section
Network Settings
This section allows the configuration of the following
device settings:
•
•
•
•
•
•
•
•
IP address
Netmask
Gateway
DNS
Syslog message destination server: if unset
(default, set to 0.0.0.0) syslog messages are
broadcasted
DHCP hostname
WEB server listening port
Default Ethernet Port (Annuncicom 1000
only)
Device Status and Control
17
Application User Manual “Any to All PA system“ - V2.01 - 19. Dec. 2014
Streaming section
Target Table
This table allows to use digital inputs to start and
stop streaming to a destination. For every available
input is possible to configure a destination socket
(IP:PORT). IP as 0.0.0.0, or a port value set to 0,
mean "no target". Unicast, or multicast IP addresses
can be used here.
By having a destination address of 255.255.255.255
configured against an input, the device will stream
to ALL destinations configured in the target table
when that input is activated. The streams will be
sent UNICAST to each destination.
Note: on Barix PS16 Paging Station the 16
destinations corresponds, from n. 1 to 16, to PS16
keys 1 to 16.
[default: 0.0.0.0 : 0]
Receiving Socket
Audio stream receiving socket (IP:PORT). Use
0.0.0.0 (default) to listen to any IP or use a multicast
IP to join a multicast group.
[default: 0.0.0.0 : 3030]
RTP delay
The RTP decoder keeps constant decoding latency
within one frame accuracy. Set the required delay in
milliseconds. To synchronize multiple receivers to
the same stream, set all to the same value.
The delay value should be set large enough to cope
with network jitter (difference in packets delivery
time) and possible packet loss. Increase the value if
you are experiencing audio dropouts.
18
Device Status and Control
Application User Manual “Any to All PA system“ - V2.01 - 19. Dec. 2014
Audio format
µ/a-Law 8kHz
mono
µ/a-Law 24kHz
mono
MPEG Quality 0
16kHz
MPEG Quality 0
22,05kHz
MPEG Quality 0
24kHz
MPEG Quality 0
32kHz
MPEG Quality 0
44,1kHz
MPEG Quality 0
48kHz
Rec.
Max.
444
4076
188
1345
883
(*)
658
(*)
646
(*)
478
(*)
392
(*)
384
(*)
(*) For more details about the RTP settings please
visit the RTP Buffering on Barix Wiki.
[default: 500msecs]
Audio section
Output Volume
Selects the desired output volume, from 0% to
100%, in 5% steps.
[default: 50%]
Input Source
Selects the desired mono input source, as Line or
Microphone input.
[default: Mic]
Microphone Gain
If Mic input source has been selected, this field
selects the microphone input gain, in dB.
[default: 21db]
A/D Amplifier Gain
Selects the Analog to Digital circuit gain, in dB. If
Device Status and Control
19
Application User Manual “Any to All PA system“ - V2.01 - 19. Dec. 2014
Mic input source is selected this gain is added to
the microphone gain.
[default: 0dB]
Audio Format
Selects the desired PA system audio format.
[default: MPEG]
MPEG Encoding Quality
If MPEG audio format is selected, selects the
desired MPEG encoding quality. An higher value
mean a lower compression.
[default: 0]
Sample Rate
Selects the desired sample rate.
[default: 32Khz]
I/O section
X8 Connection Port
Selects the desired device serial port where to
connect the Barix X8 extension.
Each serial port is preconfigured to connect to the
X8 extension, when X8 is configured with the default
serial communication parameters.
COM1 allows to connect the X8 using a rs232 to
rs485 adapter
COM2 allows to connect the X8 using real rs485
protocol.
See next chapter 4 for further information on the X8
connection wiring.
[default: COM1]
Relay Action
Selects the desired relay behavior.
[default: Active on Listen]
20
Device Status and Control
Application User Manual “Any to All PA system“ - V2.01 - 19. Dec. 2014
Security section
Security Settings
This section allows to configure the device
password and other security settings.
Reset Function
Enable or disable the "Reset" function on the Reset
button and on the WEB UI. In order to restart the
device press the Reset button once.
Default: "enabled"
Factory Defaults
Enable or disable the "Factory Defaults" function on
the Reset button. In order to revert all settings to
factory defaults keep the Reset button pressed until
the red LED starts blinking (approx. 10 seconds).
Default: "enabled"
Update Function
Enable or disable the WEB Update function of the
device. If the Update function is disabled, the only
way to update the firmware is to use the serial
rescue.
Default: "enabled"
Set Password
This is visible as long as no password is set.
Enter a password (up to 25 characters) and hit the
"Apply" button. After the restart you should close
the browser window and open a new browser
window. You will be asked to supply user name and
password. The user name can be omitted but the
password has to be supplied in order to see the web
configuration.
Old Password / New Password
These fields are visible as long as a password is set.
To allow free access (clearing the password) enter
the old password and leave the field "New
Password" empty. Enter the old password in the
password field above the "Apply" button as well and
Device Status and Control
21
Application User Manual “Any to All PA system“ - V2.01 - 19. Dec. 2014
then hit the "Apply" button.
After the restart you will not be asked for user name
and password anymore.
To change the password enter the old password
and enter the new password in the field "New
Password". After the restart you will be asked for
user name and password. The user name can be
omitted but the new password has to be supplied in
order to see the web configuration.
3.3.3
22
Applying or Discarding Settings
After the parameters has been set, click on “Apply”
button in the left side of the page, the device will
reboot with new parameters set. Click on “Cancel”
to return back to the current set parameters.
Device Status and Control
Application User Manual “Any to All PA system“ - V2.01 - 19. Dec. 2014
4
4.1
X8 to Annuncicom Wiring
Introduction
The Annuncicom 100/200 devices have two COM
ports available, COM1 and COM2. Both COM ports
are physically connected to the DB9 connector on
the front panel of the device.
COM1 is RS232
COM2 is RS485
When connecting an X8 Input extension device,
either port can be used. The X8 uses RS485 to
communicate, hence if using COM1 on the
Annuncicom, a special adapter cable must be made.
NOTE: for details of how to wire the X8 with inputs,
refer to the X8 documentation, available from
www.barix.com
4.2
Annuncicom DB9 pinout
1. Not connected
2. RS232 receive data (RxD)
3. RS232 transmit data (TxD)
4. Vcc +14,6V 100mA max
5. GND
6. RS485 Wire A
7. Ready To Send (RTS)
8. Clear To Send (CTS)
9. RS485 Wire B
X8 to Annuncicom Wiring
23
Application User Manual “Any to All PA system“ - V2.01 - 19. Dec. 2014
4.3
Connection using COM1
In order to use COM1 on the Annuncicom with the
X8, construct the connector cable as shown below.
X8 J3
Front
DB9
1
2
2.7 kOhm
3
2
2.7 kOhm
3
4
4
5
5
24
X8 to Annuncicom Wiring
Application User Manual “Any to All PA system“ - V2.01 - 19. Dec. 2014
4.4
Connection using COM 2
Using COM2, a standard RS485 cable should be
wired as follows:
X8 J3
Front
DB9
2
6
3
9
4
4
5
5
X8 to Annuncicom Wiring
25
Application User Manual “Any to All PA system“ - V2.01 - 19. Dec. 2014
5
Updating the device
Barix preloads all Annuncicom and Exstreamer
devices with firmware which is current at the day of
production, however Barix constantly enhances the
capabilities and functions and recommends to keep
the firmware on the device up-to-date.
Barix recommends the use of the “Update over
network” method to update the firmware using
TFTP.
We strongly recommend use of the supplied batch
files which are included in the “Update Kit” to
perform a serial update, especially the first time that
the application is loaded onto each device.
If the network update is interrupted during the
process (power or network loss) the device might
become unreachable.
In that case the “Serial Rescue” procedure is the
only remedy. Please keep that in mind when
planning a remote “Update over network”.
26
Updating the device
Application User Manual “Any to All PA system“ - V2.01 - 19. Dec. 2014
6
6.1.1
Dictionary
DHCP
Short for Dynamic Host Configuration Protocol, a
protocol used to assign an IP address to a device
connected to a Network.
6.1.2
IP
Short for Internet Protocol, the IP is an address of a
computer or other network device on a network
using IP or TCP/IP. Every device on an IP-based
network requires an IP address to identify its
location or address on the network. Example:
192.168.2.10
See also chapter 7 IP Address, Netmask etc.
6.1.3
IPzator
Barix IPzator™ technology is designed for the
purpose that the Barix device can create its own IP
address according to the network structure in case
it can’t receive one from your network. If DHCP,
AUTOIP or BOOTP fail, IPzator will create an IP
address within the subnet and test it (starting with
x.x.x.168 and if occupied incrementing by one). If
the address works and is not being used by another
device on the network, it will give the address to the
Barix device.
6.1.4
MAC address
Abbreviation for Medium Access Control, a MAC is
a unique address number formatted in hexadecimal
format and given to each computer and/or network
device on a computer network. Because a MAC
address is a unique address a computer network
will not have the same MAC address assigned to
more than one computer or network device.
Example: A1:B2:C3:D4:E5:F6
Dictionary
27
Application User Manual “Any to All PA system“ - V2.01 - 19. Dec. 2014
6.1.5
Netmask
A number used to identify a sub network so that an
IP address can be shared on a LAN (Local Area
Network).
A mask is used to determine what subnet an IP
address belongs to. An IP address has two
components, the network address and the host
address. For example, consider the IP address
150.215.017.009. Assuming this is part of a Class B
network, the first two numbers (150.2.) represent the
Class B network address, and the second two
numbers (.017.009) identify a particular host on this
network.
The Netmask would then be 255.255.0.0 .
See also chapter 7 IP Address, Netmask etc.
6.1.6
Ping
Ping is a basic Internet program that lets you verify
that a particular IP address exists and can accept
requests. Example: ping 192.168.2.10
6.1.7
Static IP
A Static IP is a fixed IP address that you assign
manually to a device on the network. It remains valid
until you disable it.
6.1.8
Telnet
Telnet is an user command and an underlying
TCP/IP protocol for accessing remote computers.
On the Web, HTTP and FTP protocols allow you to
request specific files from remote computers, but
not to actually be logged on as a user of that
computer. With Telnet, you log on as a regular user
with whatever privileges you may have been granted
to the specific application and data on that
computer. Example: telnet 192.168.2.10
28
Dictionary
Application User Manual “Any to All PA system“ - V2.01 - 19. Dec. 2014
7
7.1.1
IP Address, Netmask etc.
IP Addressing
An IP address is a 32 bit value, divided into four
octets of eight bits each. The standard
representation is four decimal numbers (in the range
of 0..255), divided by dots.
• Example: 192.2.1.123
This is called decimal-dot notation. The IP address
is divided in two parts: a network and a host part. To
support different needs, five ”network classes” have
been defined. Depending on the network class, the
last one, two or last three bytes define the host,
while the remaining part defines the network. In the
following text, ‘x’ stands for the host part of the IP
address.
7.1.2
Class A network
• IP address 1.x.x.x to 127.x.x.x
Only 127 different networks of this class exist.
These have a very large number of potential
connected devices (up to 16'777'216)
• Example: 10.0.0.1 (network 10, host 0.0.1)
7.1.3
Class B network
• IP address 128.0.x.x to 191.255.x.x
These networks are used for large company
networks. Every network can consist of up to 65534
devices.
• Example: 172.1.3.2 (network 172.1, host 3.2)
IP Address, Netmask etc.
29
Application User Manual “Any to All PA system“ - V2.01 - 19. Dec. 2014
7.1.4
Class C network
• IP address 192.0.0.x to 223.255.255.x
Class C networks are most common and for smaller
companies. These networks can consist of a
maximum number of 254hosts.
• Example: 192.7.1.9 (network 192.7.1, host 9)
7.1.5
Class D network
The remaining addresses 224.x.x.x - 239.x.x.x are
defined as ”Class D” and are used as multicast
addresses.
7.1.6
Class E network
No addresses are allowed with the four highest
order bits set to “1” (240.x.x.x – 254.x.x.x).
These addresses, called "class E", are reserved.
7.1.7
Network Address
The host address with all host bits set to "0" is used
to address the network as a whole (for example in
routing entries).
• Example: 192.168.0.0
Network addresses can not be used as a host
address!
7.1.8
Broadcast Address
The address with the host part bits all set to ”1” is
the broadcast address, meaning ”for every host”.
• Example: 192.168.0.255
Broadcast addresses can not be used as a host
address!
30
IP Address, Netmask etc.
Application User Manual “Any to All PA system“ - V2.01 - 19. Dec. 2014
7.1.9
IP Netmask
The Netmask is used to divide the IP address
differently from the standard defined by the classes
A,B and C.
Entering a Netmask, it is possible to define how
many bits from the IP address are to be taken as the
network part and how many bits are to be taken as
the host part.
Standard IP network Netmask:
Class
A
B
C
Network bits
8
16
24
Host bits
24
16
8
Netmask
255.0.0.0
255.255.0.0
255.255.255.0
Netmask examples:
Netmask
255.255.255.252
255.255.255.248
255.255.255.240
255.255.255.224
255.255.255.192
255.255.255.128
255.255.255.0
255.255.254.0
255.255.252.0
255.255.248.0
.
.
255.128.0.0
255.0.0.0
2
3
4
5
6
7
8
9
10
11
.
.
23
24
Host bits
IP Address, Netmask etc.
31
Application User Manual “Any to All PA system“ - V2.01 - 19. Dec. 2014
7.1.10
Private IP Networks and the Internet
If your network is not connected to the Internet and
there are no plans to make such a connection you
may use any IP address you wish.
However if you are not connected to the Internet
and have plans to connect to the Internet or you are
connected to the Internet and want to operate your
Barix Barionet on an intranet you should use one of
the sub-networks below for your network. These
network numbers have been reserved for such
networks. If you have any questions about IP
assignment ask your Network Administrator.
Private IP networks by class:
Class
A
B
C
7.1.11
32
Network
10.x.x.x
172.16.x.x
192.168.0.x
Network RFC’s
For more information regarding IP addressing see
the following documents. They can be found on the
Internet:
IP Address, Netmask etc.
Application User Manual “Any to All PA system“ - V2.01 - 19. Dec. 2014
8
Legal Information
© 2014 Barix AG, Zurich, Switzerland.
All rights reserved.
All information is subject to change without notice.
All mentioned trademarks belong to their respective
owners and are used for reference only.
Barix, Exstreamer, X8 and Annuncicom are
trademarks of Barix AG, Switzerland and are
registered in certain countries.
For information about our devices and the latest
version of this manual please visit www.barix.com.
Barix AG
Seefeldstrasse 303
8008 Zürich
SWITZERLAND
T
F
+41 43 433 22 11
+41 44 274 28 49
www.barix.com
[email protected]
[email protected]
Legal Information
33