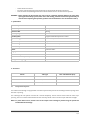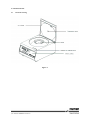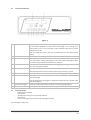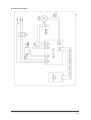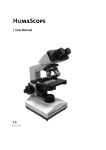
1
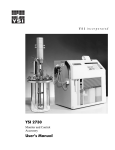
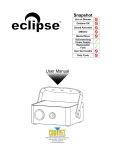
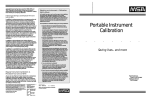
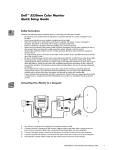
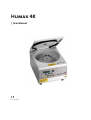
Gtl`w3J
| User Manual
|
Cat.-No. 15210/100
QduhrhnmKhrsnesgdL`mt`k
No.
1
i
DATE / Rev.
01/2007-01
REVISION DESCRIPTION
First edition
ii
1 INTRODUCTION
This manual is considered as a part of the instrument; it has to be at the operator’s hand as well as at the
maintenance operator’s availability. For accurate installation, use and maintenance, please read the following
instructions carefully. In order to avoid instrument or personal damages, carefully read the ”GENERAL SAFETY
WARNINGS”, describing the suitable operating procedures. In case of breakdowns or any troubles with the
instrument, apply to the local Technical Service.
2 USER WARRANTY
HUMAN warrants that instruments sold by one of its authorised representatives shall be free of any defect in
material or workmanship, provided that this warranty shall apply only to defects which become apparent within
one year from the date of delivery of the new instrument to the purchaser.
The HUMAN representative shall replace or repair any defective item at no charge, except for transportation
expenses to the point of repair.
This warranty excludes the HUMAN representative from liability to replace any item considered as expendable in
the course of normal usage, e.g.: lamps, valves, syringes, glassware, fuses, diskettes, tubing etc.
The HUMAN representative shall be relieved of any liability under this warranty if the product is not used in
accordance with the manufacturer's instructions, altered in any way not specified by HUMAN, not regularly
maintained, used with equipment not approved by HUMAN or used for purposes for which it was not designed.
HUMAN shall be relieved of any obligation under this warranty, unless a completed installation / warranty
registration form is received by HUMAN within 15 days of installation of this product.
This warranty does not apply to damages incurred in shipment of goods. Any damage so incurred shall be reported
to the freight carrier for settlement or claim.
3 INTENDED USE OF THE INSTRUMENT
The instrument has to be used for the expected purposes and in perfect technical conditions, by qualified
personnel, in working conditions and maintenance operations as described in this manual, according to the
GENERAL SAFETY WARNINGS. This manual contains instructions for professional qualified operators.
4
GENERAL SAFETY WARNINGS
Use only chemical reagents and accessories specified and supplied by HUMAN and/or mentioned in this manual.
Place the product so that it has proper ventilation.
The instrument should be installed on a stationary flat working surface, free from vibrations.
Do not operate in area with excessive dust.
Work at room temperature and humidity according to the specifications listed in this manual.
Do not operate this instrument with covers and panels removed.
Only use the power cord specified for this product, with the grounding conductor of the power cord connected to
earth ground.
Use only the fuse type and rating specified by the manufacturer for this instrument, use of fuses with improper
ratings may pose electrical and fire hazards.
To avoid fire or shock hazard, observe all ratings and markings on the instrument.
Do not power the instrument in potentially explosive environment or at risk of fire.
Prior to cleaning and/or maintaining the instrument, switch off the instrument and remove the power cord.
For cleaning use only materials specified in this manual, otherwise parts may become damaged.
It is recommended always to wear protective apparel and eye protection while using this instrument.
Respective warning symbols, if appearing in this manual, should be carefully considered.
I
5 DISPOSAL MANAGEMENT CONCEPT
The currently valid local regulations governing disposal must be observed. It is in the responsibility of the user to
arrange proper disposal of the individual components.
All parts which may comprise potentially infectious materials have to be disinfected by suitable validated
procedures (autoclaving, chemical treatment) prior to disposal. Applicable local regulations for disposal have to be
carefully observed.
The instruments and electronic accessories (without batteries, power packs etc.) must be disposed off according to
the regulations for the disposal of electronic components.
Batteries, power packs and similar power source have to be dismounted from electric/electronic parts and disposed
off in accordance with applicable local regulations.
6 INSTRUMENT DISINFECTION
Instruments or parts which may come in contact with biological samples (patient specimens, controls etc.) should
be considered at least potentially infectious.
Before doing any servicing on the instrument it is very important to thoroughly disinfect all possibly contaminated
parts. Before the instrument is removed from the laboratory for disposal or servicing, it must be
decontaminated/disinfected. Decontamination/disinfection should be performed by authorised welltrained
personnel, observing all necessary safety precautions. Instruments to be returned have to be accompanied by a
disinfection certificate completed by the responsible laboratory manager. If a disinfection certificate is not
supplied, the returning laboratory will be responsible for charges resulting from non-acceptance of the instrument
by the servicing centre, or from authority´s interventions.
7 NOTICE
Every effort has been made to avoid errors in text and diagrams, however, HUMAN GmbH assumes no
responsibility for any errors which may appear in this publication. It is the policy of HUMAN GmbH to improve
products as new techniques and components become available. HUMAN GmbH therefore has to reserve the right
to change specifications if necessary in the course of such improvements.
II
NOTICE
Analytical instruments for in vitro diagnostic application involve the handling of human samples and controls
which should be considered at least potentially infectious. Therefore every part and accessory of the respective
instrument which may have come into contact with such samples must equally be considered as potentially
infectious.
BIOHAZARD
The „BIOHAZARD“ warning label must be affixed to instrument prior to first use with biological material !
Servicing Note:
Before doing any servicing on the instrument it is very important to thoroughly disinfect all possibly contaminated
parts. Before the instrument is removed from the laboratory for disposal or servicing, it must be decontaminated.
Decontamination should be performed by authorised well-trained personnel only, observing all necessary safety
precautions. Instruments to be returned have to be accompanied by a decontamination certificate completed by
the responsible laboratory manager. If a decontamination certificate is not supplied, the returning laboratory will
be responsible for charges resulting from non-acceptance of the instrument by the servicing centre, or from
authority’s interventions.
HUMAN
Gesellschaft für Biochemica und Diagnostica mbH
| Max-Planck-Ring 21 · 65205 Wiesbaden · Germany
| Tel.: +49 61 22/99 88-0 · Fax: +49 61 22/99 88-100
| e-Mail: [email protected] · www.human.de
a
b
Bnmsdmsr
1
Description
2
2
Installation
3
2.1 Contents of Package
3
2.2 Mains Supply
3
2.3 Environmental Conditions
3
2.4 Positioning
3
2.5 Inspection
3
2.6 Loading
3
2.7 Rotor Installation
3
2.8 Manual Lid Opening
3
3
Specifications
4
4
Accessories
4
4.1 Safety Interlock System
4
Instructions for Use
5
5.1 Schematic Drawing
5
5.2 Controls and Indicators
6
5.3 Preparing The Run
6
5.4 Programming
7
5.5 Program Recall
7
5.6 Starting, Running and End Of Run
7
5.7 Error Codes
7
Hazards, Precautions And Limitations Of Use
7
6.1 Cautions
7
6.2 Cleaning
8
6.3 Contamination Hazards
8
6.4 Disinfection
8
6.5 Electrical
8
6.6 Improper Use
8
Cleaning And Preventive Maintenance
9
7.1 Daily
9
7.2 Weekly
9
5
6
7
8
Electrical Circuit Diagram
10
1 Description
The HuMax 4K bench-top centrifuge is especially designed for the separation of blood samples, urine particles
sedimentation and for carrying out the other routine applications in microbiology laboratories.
By means of the programmable microprocessor-controlled system, speed and time can be programmed. The ‘pulse’
function allows the operator to run programs of short duration.
The HuMax 4K ensures safe and easyoperation by means of a locking system, which does not allow the centrifuge
to operate or the rotor to spin if the lid is not closed.
The lid-locking system allows the lid to be opened when the program ends by pressing a single key There are
audible and visible alarms to inform the operator when the lid is open, when the program ends or when any error
occurs. In the case of a power failure, the lid can be opened manually by using the manual lid-opening tool
(included). There is also an observation hole in the lid enabling the user to check the speed of the centrifuge using a
tachometer.
The HuMax 4K bench-top centrifuge is manufactured in accordance with the following standards:
EN 61010-1, EN 50081-1, EN 61010-2-020
2/10
2 Installation
&RQWHQWVRI3DFNDJH
HuMax 4K
1 user manual
1 power cable
1 manual lid opening tool
0DLQV6XSSO\
The HuMax 4K requires 230 V, 50 Hz.
The centrifuge should be connected only to a grounded outlet.
(QYLURQPHQWDO&RQGLWLRQV
The instrument is designed to operate safely under the following conditions:
Indoor use only
Ambient temperature: 5 ° C to 25 ° C.
Maximum relative humidity of 80% for temperatures up to 22 °C.
Maximum performance is obtained between 15 °C / 25 °C.
3RVLWLRQLQJ
Place the centrifuge on a bench-top able to support its weight and vibrations, in clean, non-corrosive environment.
Leave a 30 cm space each side of the centrifuge.
,QVSHFWLRQ
Before installation, the rotor should be inspected for damage and cleanliness.
Dirt and particles inside the inserts can cause the breakage of tubes and lead to a major imbalance.
The central hole of the rotor and the motor shaft must also be kept clean and dry at all times.
/RDGLQJ
Each tube insert must be the same weight as the one diametrically opposite for balancing.
CAUTION:
Rotor imbalance may cause major damage to the rotor and centrifuge.
Never attempt to introduce liquids into the tube inserts.
If the number of tubes to be centrifuged is less than the capacity of the rotor, the tubes must be placed in opposite
inserts. If an odd number of tubes is be centrifuged, a water-filled tube of the same weight must be used for
balance.
5RWRU,QVWDOODWLRQ
Unscrew the nut on the the shaft with a 24 mm socket wrench. Make sure the shaft and the rotor are clean.
Carefully place the rotor onto the drive shaft positioning the pins of the shaft into the recesses underneath the
rotor. Replace the shaft nut that holds the rotor.
Make sure that the nut is screwed down tightly.
0DQXDO/LG2SHQLQJ
In the case of a power cut or any defect, the instrument can be opened manually to access the samples.
To open the lid manually:
3/10 +XPDQ+X0D[. User Manual
Power off the instrument
Insert the manual lid opening tool into the hole on the left hand side of the instrument.
Push the tool inward, holding it horizontal until the lid lock releases and the lid can be opened.
WARNING: Before opening the lid manually, the rotor must be completely stopped. (Observe the rotor while
opening the lid carefully by hand; if the rotor is still rotating, close the lid and wait approximately 10
minutes before repeating the operation.) (Und das Loch im Deckel? Kann man das nicht dort sehen?)
3 Specifications
Technical Specifications
HuMax 4K
Maximum speed
5000 rpm
Maximum RCF
2822xg
Tube capacity
12 x 15 ml
Control system
Programmable Microprocessor Control
Speed set range
1000- 5000 rpm
Speed set step
10 rpm
Timer set range
1- 99 minutes and hold position
Timer set step
1 minute
Motor
Induction Motor
Supply Values
230 V / 50 Hz
Power Consumption
350 W
External Dimensions (WxDxH) mm
274 x 355 x 238
Net / packed weight (kg)
11 / 12
4 Accessories
Cat. No.
Tube Type
Max. Tube Diameter (mm)
17155
1.5 / 2 ml microtubes
11
17156
5 ml vacuum / non-vacumm tubes
13
17157
7 ml vacuum / non-vacuum tubes
13
6DIHW\,QWHUORFN6\VWHP
The HuMax 4K Centrifuge is equipped with an interlock system that prevents the centrifuge lid from opening when
the rotor is spinning.
The centrifuge will not operate until the lid is closed completely. The lid remains closed until the rotor stops
spinning. The run can not be started before the lid is correctly closed. In this case the lid-open indicator will light.
NOTE: If a power failure occurs, manual access to the sample in the centrifuge is possible using the special tool
included with the centrifuge.
4/10
5 Instructions for Use
6FKHPDWLF'UDZLQJ
Figure – 1
5/10 +XPDQ+X0D[. User Manual
&RQWUROVDQG,QGLFDWRUV
Figure – 2
1
Speed Display
This display shows the speed values during programming.
It also indicates whether the instrument is accelerating (“Acc”), braking (“br”),
power failure (“E oFF ”), open lid (“oPEn”) and (“cLoSE Lid”) when start is pressed
while the lid is open.
The error codes that occur in the case of a malfunction are also shown on this
display.
2
Time Display
This display shows the programmed time and the time remaining in the run.
3
Lid Key and LED
This key opens the lid if the LED is on.
It is active before starting centrifugation and at the end of centrifugation when
the audible signal indicates that the rotor has stopped.
4
Set Key
This key is used to set the speed and time during programming and to check the
RCF value during the operation.
5
Pulse Key
Causes the motor to increase to the maximum speed.
The motor will continue to spin at that speed as long as the key is pressed.
6
Value Increasing Key
This key is used to increase the parameter values during programming.
7
Start Key and LED
This key starts the centrifugation operation.
The LED will light.
The LED will go out if the program is stopped manually or the lid is opened at the
end of the program.
8
Value Decreasing Key
This key is used to decrease the parameter values during programming.
9
Stop key
This key is used to stop the operation manually.
3UHSDULQJ7KH5XQ
Switch on the centrifuge.
Open the lid.
Load the rotor, making sure it is properly balanced.
Close the lid.
Create a new program or select the required program memory.
The centrifuge is ready to run.
6/10
3URJUDPPLQJ
In stand-by,
Push the Set key. The speed value on the speed display starts to flash.
Adjust the speed by pushing the Value Increase and Decrease keys.
Push the Set key again. The time value on the time display starts to flash.
Adjust the time by pushing the Value Increase and Decrease keys.
Push the Set key again to save the settings to memory.
3URJUDP5HFDOO
When the centrifuge is in stand- by press the value increase key to select a memory position. Press set to confirm.
The program in memory is displayed and the corresponding memory LED is illuminated.
6WDUWLQJ5XQQLQJDQG(QG2I5XQ
Create a new program or select the required program.
Check the values in the display.
Load the samples, ensuring that the load is statically and dynamically balanced.
Close the lid. The lid open LED (3) should be off.
Run the program by pressing the start key (7). The LED of the key should be on.
As soon as the start key (7) is pressed, the lid is locked and timer starts to count down. The remaining
time can be followed in the time display (2). If hold position is set, the letter “H” letter is displayed. In
hold position, the run can be stopped manually using the stop key (9).
When the programmed time is over, the rotor starts braking and the timer counts down the duration of
the braking phase until the rotor stops spinning.
When the program is completed, “END” is shown on the speed display (1) and the warning beep sounds
to indicate to the user that program has ended. The warning beep will continue to sound until the stop
key (9) is pressed or the lid is opened.
It is not possible to run the program again unless the lid is opened and closed again.
(UURU&RGHV
In the case of any of the problems described below, the corresponding error code will be displayed in the speed
display and the motor will start braking.
Err 01:
Err 02:
Err 03:
Err 04:
Lid Open:
Eoff:
May occur during accelerating or braking of the motor. Motor or main board is defective.
May occur during motor acceleration. Motor or main board is defective .
May occur during motor acceleration. The motor terminal connections may be loose or broken.
Motor overheating error. Please wait for the motor to cool down and start the centrifuge again.
This error occurs when lid is opened during centrifugation. Please close the lid properly and start
the centrifuge again.
It occurs in case of a power failure during the run. This message will disappear after several
minutes or after the lid is opened and closed again.
In the case of any persistent(?)error, please contact your local HUMAN representative.
6 Hazards, Precautions And Limitations Of Use
&DXWLRQV
The following precautions must be observed:
Never try to bypass the safety lid lock while the rotor is spinning.
Do not try to open the lid until display returns to stand-by mode.
Only use a correctly grounded mains supply.
7/10 +XPDQ+X0D[. User Manual
Special attention to the following is necessary:
Installation of the unit: Proper ventilation, levelling of the centrifuge, rigidity and stability of the bench.
Rotor installation: Check that the rotor nut is tightened firmly.
Cleaning of the accessories and the rotor chamber.
Load balancing
Samples: The cleaning of the accessories is particularly important when using potentially infectious
materials.
&OHDQLQJ
Ideally, the rotor should be washed after every use but at least weekly in warm water containing a few drops of
mild liquid soap (domestic washing liquid is ideal ) and any time after spillage has occurred.
Each rotor insert must be washed thoroughly using a small nylon brush. Do not use metal wire brushes.
Dry the rotor with a soft, absorbent, non- woven cloth or tissue. Drying may be finished off with a warm air jet
(e.g. a hair-dryer).
Make sure that no deposits remain in the bottom of the insert holes because the pressure of a flask or tube from
above during centrifugation will significantly increase the chances of breakage.
&RQWDPLQDWLRQ+D]DUGV
Our centrifuges are used in medical research, where hazardous substances, including radioactive chemicals, are
frequently found.
Always use the appropriate decontamination procedures where the rotor is exposed to these chemicals.
Examples of commonly used techniques are outlined below. The information is given as a guide only. It is the
responsibility of the owner to use the most suitable procedure.
The rotor should always be completely disassembled before being subjected to heat and after external chemical
cleaning.
'LVLQIHFWLRQ
Alcohol ( 70% ethanol or isopropanol ) applied for 10 minutes is ideal for destroying bacteria and viruses.
Alternatively, rotors can be autoclaved for 20 minutes at 120°C to destroy micro-organisms.
Any part which has been subjected to temperatures above 130°C must be discarded.
(OHFWULFDO
High voltage is present behind the panels of the centrifuge.
Caution: Do not open the instrument! There are no user-servicable parts inside.
In the case of a malfunction, please contact your local HUMAN representative.
,PSURSHU8VH
Use only rotors and accessories designed for use in the centrifuges.
Do not attempt to override the lid interlock assembly.
Load and lock the rotor only in the recommended way. As the centrifuge starts to spin, an improperly
loaded rotor could cause sufficient force to damage the drive shaft and the rotor chamber.
8/10
7 Cleaning And Preventive Maintenance
CAUTION: All cleaning should be performed with the centrifuge disconnected from the power outlet.
'DLO\
No daily cleaning is required, except in the case of accidental glass breakage or a large amount of spillage in the
bowl.
:HHNO\
Clean the bowl and the accessories with a cotton wool pad dipped in 70% alcohol solution.
NOTE: Never use metallic implements to clean the rotor or the inserts.
After cleaning the accessories, always rinse them with clean water and dry.
9/10 +XPDQ+X0D[. User Manual
8 Electrical Circuit Diagram
10/10
HUMAN
Gesellschaft für Biochemica und Diagnostica mbH
| Max-Planck-Ring 21 · 65205 Wiesbaden · Germany
| Tel.: +49 61 22/99 88-0 · Fax: +49 61 22/99 88-100
| e-Mail: [email protected] · www.human.de
01/2007-01