1
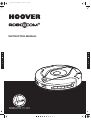
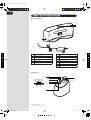
Robocom2 user manual EN.pdf 1 6/16/2012 11:10:33 PM
INSTRUCTION MANUAL
C
M
Y
CM
MY
CY
CMY
K
®
GB
IMPORTANT SAFETY REMINDERS
This Robo.com2 vacuum cleaner should only be used for domestic cleaning, as described in this User Manual.
Please ensure that this User Manual is fully understood before operating the appliance. Please keep this User
Manual for reference. Use only consumables or spares recommended or supplied by Hoover.
WARNING:
Electricity can be extremely dangerous. This appliance is powered by rechargable Ni-MH batteries and is
provided with a Charger Base Station. Please ensure the voltage marked on the mains power adapter is suitable
for connection to standard mains power outlet voltage.
REMINDERS:
t Always store the appliance indoors. Do not use outdoors or expose the appliance to the elements, humidity
or heating sources (oven, fireplace, wet floor).
t Do not expose the Robo.com2 or accessories to excessive heat / cold (Keep between 0-30°C).
t Do not drop the Robo.com2 or use any accessory if it has been dropped, damaged, left outdoors or dropped
in water.
t Never unplug or pull the mains power adaptor by the power cord.
t Never pick up matches, hot ash, cigarette ends, or sharp objects.
t Do not spray with, or pick up flammable liquids, cleaning fluids, aerosols, or their vapours, as this may cause
risk of fire/explosion.
t Do not continue to use your Robo.com2 if it appears to be faulty. If the mains power adaptor power cord is
damaged, stop using it IMMEDIATELY: to avoid a safety hazard, only an authorised Hoover Service engineer
must replace the Power Cord.
t This Robo.com2 is for use on wooden flooring, rubber, ceramic tile, linoleum and short pile carpet.
t Do not use to clean stairs.
After Use:
Return the Robo.com2 to the Charger Base Station. Always switch off and disconnect the mains power adaptor
before cleaning or attempting any maintenance task. If the Robo.com2 will not be used for a long time (several
weeks), unplug the Charger Base Station according to the instructions in this User Manual.
Safety with children, the elderly or infirm:
This cleaner is not a toy.
Do not let children play with the appliance or its controls. Please supervise the use of the appliance by older
children, the elderly or the infirm.
IMPORTANT NOTES BEFORE USE
Please read the following information carefully before using your Robo.com2 or its accessories.
Do not disassemble the Robo.com2 and do not attempt to repair it yourself. If a fault occurs, please contact the
Hoover After Sales Service for professional advice.
Stairs: The Robo.com2 uses sensors to avoid falling down steps, stairs or over an edge. In some
situations the sensors can become confused.
The Robo.com2 cannot detect steps that are less than 8cm in height. Steps less than 8cm may
cause the Robo.com2 to fall down. If available, use the Virtual Barrier* to protect your Robo.com2
from falling.
Highly reflective or very dark surfaces used on some steps or stairs, such as glass or polished ceramics
may cause the Robo.com2 to fall down. If available use the Virtual Barrier* or place a carpet on the
lower step to protect your Robo.com2 from falling.
Using your Robo.com2 on mezzanines, landings or raised areas without borders should be avoided. If
available use the Virtual Barrier* to prevent your Robo.com2 entering these areas.
Battery Use: Your Robo.com2 is powered by rechargeable, high capacity NiMh batteries. These rechargeable
batteries are guaranteed for a period of 6 months if they are maintained and operated according to this User
Manual.
In the event of a significant drop of the Robo.com2 performance, replacement batteries can be obtained from
your Hoover retailer.
Only use Hoover approved replacement parts for your Robo.com2. Use of parts that are not approved by
Hoover are dangerous and will invalidate your warranty.
Only use the supplied Charger Base Station and mains power adaptor to recharge your Robo.com2. Use of the
incorrect Charger Base Station or mains power adaptor is dangerous and will invalidate your warranty.
* Certain Models Only
** May vary according to model
Robocom2 user manual EN.pdf 1 6/16/2012 11:23:28 PM
GB
CONTENTS OF THE BOX
Charger Base Station
Filter**
DEM
O
C
M
Mains Power adaptor
Y
User Manual
Remote Control**
CM
MY
CY
CMY
K
Virtual Barrier*
Multi-purpose Cleaning Brush
Floor Polisher Pad Holder*
Floor Polisher Pad*
Edge Cleaning Brush (x2)
* Certain Models Only
** May vary according to model
RoboCom2Manual2011__GB.indd 2
14/07/2011 13.39.56
Robocom2 user manual EN.pdf 1 6/16/2012 11:48:33 PM
GB
7
6
1
2
5
3
4
1
Front Bumper
12
Right Drive Wheel
2
Infra Red Receiver
13
Power Switch
3
Auto Charge Contacts
14
Charging Connector
C
4
Soft Furniture Protector
15
Exhaust Grille
M
5
Sensor Window
16
Dust Container
Y
6
Display Screen
17
Floor Polisher Pad*
7
Dust Container Release Button
18
Floor Polisher Pad Holder*
8
Floor Sensor
19
Floor Brushes Release Latch
9
Front Wheel
20
Floor Brushes
10
Battery Cover
21
Left Drive Wheel
11
Right Edge Cleaning Brush
22
Left Edge Cleaning Brush
23
Dust Sensor
CM
MY
CY
CMY
K
22
8
8
9
21
8
20
10
19
11
23
20
18*
8
17*
12
16
15
13
14
23
*Certain Models Only
** May vary according to model
RoboCom2Manual2011__GB.indd 3
14/07/2011 13.39.58
Robocom2 user manual EN.pdf 1 6/17/2012 12:04:44 AM
GB
Charger Base Station
28
27
26
25
24
29
C
24
Power Supply Connector
30
Virtual Barrier* Set Switch
25
Charging Contacts
31
OFF
26
Infra Red Transmitter
32
Short Range Barrier- 2m
27
Charge Indicator
33
Medium Range Barrier - 4m
28
Power Indicator
34
Long Range Barrier - 6m
29
Mains Power Adaptor
35
Infra red Transmitter
CMY
36
Power Indicator
K
37
Near Infra red Transmitter
M
Y
CM
MY
CY
Virtual Barrier*
30
37
31
32
36
33
34
35
* Certain Models Only
** May vary according to model
RoboCom2Manual2011__GB.indd 4
14/07/2011 13.39.58
GB
Remote Control**
39
46
40
41
42
43
47*
49*
45
44
48
DEMO
38
38
Voice Button
39
40
Automatic Cleaning Mode Button
41
Spot Cleaning Mode Button
42
43
Arrow Buttons
44
Local Time Setting Button
45
Full & Go Button
46
Automatic Return to Charger Base Station
Button
47
Scheduling Function Button*
48
Demo mode Button
49
Turbo Speed Button*
50
Battery Charge Level Indicator
51
Clock
52
Day Indicator (Scheduling Function)*
53
Automatic Return to Charger Base Station
Indicator
54
Automatic Cleaning Mode Indicator
55
Spot Cleaning Mode Indicator
56
Maintenance Indicator
57
Turbo Speed Indicator*
58
Automatic Return to Charger Base Station
Sensitive Touch Control
59
Automatic Cleaning Mode Sensitive
Touch Control
60
Spot Cleaning Mode Sensitive Touch
Control
57*
50
51
56
52*
55
53
S
E
NS
I T I V E TO U
CO
* Certain Models Only
58
C
H
54
N T RO L S
59
60
** May vary according to model
RoboCom2Manual2011__GB.indd 5
14/07/2011 13.39.59
GB
Packaging
30°c as this may damage the Battery. The Mains power adaptor must only be connected to a standard mains
power outlet.
Batteries
preventing them from becoming overcharged.
Charger Base Station Setup
0.5m
0.5m
3m
t
t
t
t
t
t
Objects that can be easily knocked over.
Edges of carpets or rugs that it may get caught on.
Floor length curtains and tablecloths.
Heat sources or flammable items.
Power cords and cables.
Fragile objects.
1.
2.
3.
4.
the Charger Base Station.
There should not be any objects in the area around the Charger Base Station for 3m in front and 0.5m
to each side.
Plug in the Mains power adaptor and connect to the Charger Base Station. Make sure the power cord is
not caught underneath the Charger Base Station.
Make sure the Power Cord is not tangled or stretched. If there is an excess, use the power cord tie to store
it neatly.
5.
6.
approximately.
Automatic Charging
Once docked with the Charger Base Station a light on the Charger Base will illuminate indicating that charging
is in progress.
Charger Base Station. For best results ensure that the Charger Base Station is in a wide open space.
DEMO
Manual Charging
A.
By pressing the Automatic Return to Charger Base Station button on your Remote control** or the
B.
C.
Important:
whilst charging or whilst connected directly to the mains power adaptor.
* Certain Models Only
** May vary according to model
RoboCom2Manual2011__GB.indd 6
14/07/2011 13.40.00
GB
Remote Control** Set Up
To install batteries see Cleaner Maintenance - Replacing the batteries.
Note: The Remote Control** can be used through walls because it works on radio waves not infrared.
Virtual Barrier* Set Up
To install batteries see Cleaner Maintenance - Replacing the batteries.
DEMO
t
t
t
1.
2.
Remove any obstacles from the area that you want to block.
Ensure the Virtual Barrier* is more than 3m away from the Charger Base Station.
Position the Virtual Barrier* so that the infra red transmitter is pointing across the area you want to create
the barrier.
Slide the toggle switch to the desired length of the barrier.
ICON
BARRIER TYPE
BARRIER LENGTH
0m
2m
Short
2m
4m
Medium
4m
6m
Long
6m
R
3.
NOTE: The battery power usage relates directly to the infra red level. For longer battery life chose the correct
length of infra red beam.
Barrier*.
Changing the Voice Language
Robo.com² is able to communicate in English, French, Italian or Spanish. The default language is English. To
change this:
50cm
1.
2.
3.
Turn the Robo.com² on.
Press and hold the Voice Button for 5 seconds until you here the current language setting.
Press the Voice button again until you hear the next language. Repeat this until you hear the desired
language setting.
4.
Once selected the Robo.com² will change the settings. Do not press the remote control again.
NOTE: The language icon will appear for 5 seconds on the display.
DEMO
ENGLISH
ITALIAN
FRENCH
SPANISH
Adjusting Robo,com² Voice Volume
1.
Press the Voice button to select the desired volume. You can select Low, Medium or High or Off.
2.
The volume will appear on the display.
NOTE: The voicevolume will appear on the display. volume will appear for 5 seconds on the display.
DEMO
DEMO
LOW
MEDIUM
HIGH
OFF
* Certain Models Only
** May vary according to model
RoboCom2Manual2011__GB.indd 7
14/07/2011 13.40.01
GB
Power On
1.
2.
The LCD screen will illuminate.
NOTE: If your robot is already switched On, but in standby mode, it can be activated from the remote control**
or pressing one of the touch sensitive keys.
1.
2.
Use the up and down arrow on the Remote Control** until the line appears below the correct day. Press
3.
4.
5.
Day and time are now set.
DEMO
Cleaning Programs
With the dust sensor*, on dust detection the Robo.com² will automatically initiate a cleaning cycle and will
follow a square pattern.
Press the AUTO Sensitive touch control on the robot or press the AUTO button on the remote control to activate
S
EN
C
SIT
I V E TO U
C ON
H
T RO LS
DEMO
ZIG ZAG
EDGE
ELLIPTICAL
SQUARE
Press the SPOT Sensitive touch control on the robot or press the SPOT button on the remote control to activate
elliptical pattern, where the radius will continuously increase for approximately 3 minutes.
S
E
NS
I T I V E TO U
CO
C
H
DEMO
N T R O LS
With the Remote Control**, you can also activated all the other cleaning programs:
Manual Navigation:
The Robot can be controlled manually at any time during a cleaning program. The
navigation arrow keys in the remote control will move the Robot in the desired
be controlled up to a distance of 10m, even behind a wall.
Full & GO:
When the robot is charging, press the FULL & GO button on the remote control to
Station.
DEMO
TURBO*:
Press the TURBO* button on the remote control to activate the TURBO* speed. The
faster speed, covering quicker the area to clean.
Scheduled Cleaning*:
a cleaning schedule follow see ‘Setting Up The Cleaning Schedule’.
* Certain Models Only
** May vary according to model
RoboCom2Manual2011__GB.indd 8
14/07/2011 13.40.05
RoboCom2Manual2011__GBprint - Copy.pdf
1
7/14/2011
4:00:13 PM
GB
Setting up the Cleaning Schedule*
the following:
1.
(Monday).
2.
DEMO
3.
Once each day of the week have been selected, you can decided the hour of the cleaning schedule: the
4.
5.
C
The cleaning schedule for the days has been selected.
This bar below
the letter of the
day indicates the
‘Current day’
the letter of the
day indicates that
day has a cleaning
schedule set.
M
Y
NOTE: The cleaning hour will be the same each day scheduled for cleaning.
CM
S
E
NS
CH
I TI VE TO U
CO
NT R OL S
MY
CY
DEMO
Additional Features
CMY
K
Automatic Return to the
Charger Base Station:
Press the
Sensitive touch control on the robot or press the
button on
the remote control, this will activate the Automatic Return to the Charger Base
Station
Demo Mode:
:Press the DEMO button once to start the product demonstration. This will start
in Loop mode. To stop the demonstration press the DEMO button again.
Floor Polisher Pad*:
DEMO
Attached via the Floor Polisher Pad Holder * to the underside of the cleaner, the
Floor Polisher Pad* is used to polish marble, parquet, wooden and other delicate
NOTE: Do not use on a carpeted Surface.
* Certain Models Only
** May vary according to model
RoboCom2Manual2011__GB.indd 9
14/07/2011 13.40.07
GB
1.
2.
3.
Use a damp cloth with a little soap to clean all surfaces. DO NOT allow water into any part of the product
whilst cleaning.
Dry with a soft Cloth.
Emptying the dust container
Empty the dust container every cleaning cycle or when the dust container is full.
1.
2.
3.
4.
Hold the dust container over a bin to empty.
Use the Multi-purpose Cleaning Brush when necessary to remove any excess dust from the internal
surface of the dust container.
5.
invalidate your guarantee.
1.
2.
3.
4.
5.
cloth and leave to dry.
6.
cleaners performance.
CLEAN FILTER REGULARLY
PULL TO ACCESS THE FILTER
Cleaning the Dust Sensors
The dust sensors are located in the dust container of Robo.com². Clean the sensor window each time the dust
container is emptied. Frequent cleaning is recommended to ensure optimum performance of your Robo.com².
Use a dry soft cloth or cotton swab to wipe the sensor window.
Cleaning the Motor Assembly
Under normal conditions of use, the motor assembly will not require any maintenance unless the pre motor
1.
2.
3.
4.
5.
Press the motor release button, the motor will pop out.
Turn the motor over and unclip the exhaust cover.
Clean using the Multi-purpose Cleaning Brush provided.
IMPORTANT: Never use water to clean the motor.
* Certain Models Only
** May vary according to model
RoboCom2Manual2011__GB.indd 10
14/07/2011 13.40.10
GB
Cleaning the Floor Brushes
Clean the Floor Brushes regularly to maintain maximum cleaning performance.
1.
2.
3.
4.
Rotate the Floor Brush assembly carefully and using scissors cut and remove any tangled threads or hair
etc.
Use the Multi-purpose Cleaning Brush to remove any excess dust.
Replacing the Floor Brushes
1.
2.
3.
4.
5.
6.
7.
Pull the Floor Brush Release Latch.
Lift the Floor Brushes Retainer.
Remove both Floor Brushes.
Clean the recess that the Floor Brushes sit.
Close the retainer ensuring it locks.
Cleaning the Drive Wheels
1.
2.
3.
4.
Remove any dirt or hair trapped in the wheels.
Clean the wheels with a dry cloth.
Check that the wheels can rotate freely.
* Certain Models Only
** May vary according to model
RoboCom2Manual2011__GB.indd 11
14/07/2011 13.40.12
GB
Cleaning the Edge Cleaning Brush
The Edge Cleaning Brush can be easily worn from heavy use so you should check it regularly to monitor its
condition.
1.
2.
3.
Remove the retaining screw with a screwdriver.
Use a pair of scissors to remove any trapped hair or debris.
Correcting Edge Cleaning Brush Deformation
The Edge Cleaning Brush can sometimes be deformed during transportation or when the product is used
under particular conditions. If this happens it is possible to return to the original shape by putting the bristles
in hot water.
GOOD
1.
2.
3.
4.
5.
RECOVERABLE
REQUIRES REPLACEMENT
Remove the retaining screw with a screwdriver. Remove the Edge Cleaning Brush.
Gently lower the bristles in hot water.
Hold each set of bristles until they have recovered and straightened. Then remove and leave to dry.
Once completely dry reassemble and screw in place.
Replacing the Edge Cleaning Brush
If the Edge Cleaning Brush is damaged it will need to be replaced. Replacement Edge Cleaning Brushes can be
obtained from your Hoover retailer.
1.
2.
3.
4.
Remove the retaining screw with a screwdriver.
Remove the old Edge Cleaning Brush and push the new one in place.
Replace and tighten the screw.
Cleaning the Front Wheel
1.
2.
3.
4.
Remove any dirt or hair trapped in the wheel.
Clean the wheel with a dry cloth.
Check that the wheel can rotate freely.
Cleaning the Floor Sensors
container is emptied. Frequent cleaning is recommended to ensure optimum cleaning performance and safe
1.
2.
3.
Use a dry soft cloth or cotton swab to wipe the sensors.
* Certain Models Only
** May vary according to model
RoboCom2Manual2011__GB.indd 12
14/07/2011 13.40.14
GB
Cleaning the Sensor Window
container is emptied. Frequent cleaning is recommended to ensure optimum performance of your Robo.
Use a dry soft cloth or cotton swab to wipe the sensor window.
Cleaning the Floor Polisher Pad*
1.
2.
3.
4.
5.
Press the Floor Polisher Pad Holder* release button and unclip from the dust container.
Tear the Floor Polisher Pad* from the Floor Polisher Pad Holder* and wash using hand warm water.
Remove excess water and leave to dry before re-using.
Re-assemble when fully dry.
Replacing the batteries
and will invalidate your guarantee.
batteries and store in a dry location.
1.
2.
then remove the battery cover.
Remove the old battery pack and replace with the new battery pack ensuring the polarity is correct.
Replace the cover.
3.
Replacing the Remote Control** batteries
1.
2.
Remove the battery cover.
Remove the old batteries and replace with the new batteries ensuring the polarity is correct. Replace
the cover.
Replacing the Virtual Barrier* batteries
1.
2.
Turn the Virtual Barrier* over and rotate the retaining clip. Remove the battery cover.
Remove the old batteries and replace with the new batteries ensuring the polarity is correct. Replace
the cover.
* Certain Models Only
** May vary according to model
RoboCom2Manual2011__GB.indd 13
14/07/2011 13.40.17
GB
TROUBLESHOOTING
The following is a list of commonly encountered problems and solutions.
If any of these problems persist contact your local Hoover representative.
t
t
t
Check that the dust container lter and motor are clean.
t
t
t
t
t
Empty dust container.
Check and clean th lter and motor.
Check and clean the Floor Brushes
Check and clean the sensors.
Check and clean the drive wheels.
t
t
t
Check the batteries.
Cleaning power is weak
The Remote Control** does not work
t
the Charger Base.
charge
cleaning
t
t
Clean the dust container an lter.
Check the brushes and drive wheels for dirt and debris.
t
Check the cleaning times set.
t
Check and clean the sensors.
cleans intermittantly
t
t
Contact your local Hoover representative
there is no error code display
Error Codes
The following codes may appear during use or on start up.
Failure Code
Explanation
Er01
Debris in the Right Edge Cleaning Brush. See ‘Cleaning the Edge Cleaning Brushh
Er02
Debris trapped in the Floor Brushes. See ‘Cleaning the Floor Brushes’
Er04
Left Drive Wheel motor overloaded. See ‘Cleaning the Drive Wheels’
Er05
Right Drive Wheel motor overloaded. See ‘Cleaning the Drive Wheels’
Er06
Both Drive Wheel motors overloaded. See ‘Cleaning the Drive Wheels’
Er07
Left or Right Drive Wheel not making contact with the ground. See ‘Cleaning the
Drive Wheels’
Er08
Er09
Dust container is absent. Replace Dust Container.
Er10
Check the battery connection.
Er12
Debris in the Left Edge Cleaning Brush. See ‘Cleaning the Edge Cleaning Brushh
ATTENTION: If any of these failures persist. Contact your local Hoover representative. DO NOT try to
* Certain Models Only
** May vary according to model
RoboCom2Manual2011__GB.indd 14
14/07/2011 13.40.17
Robocom2 user manual EN.pdf
1
7/4/2012
9:10:38 AM
GB
IMPORTANT INFORMATION
Hoover Spares and Consumables
Always replace parts with genuine Hoover spares. These are available from your local Hoover dealer or direct
from Hoover. When ordering parts always quote your model number.
Consumables
t Pre-Motor Filter:
RB 208
35601261
Spares
t
t Floor Brushes:
t Virtual Barrier* Battery Pack:
t Remote Control**
t Charger Base Station and Mains Power Adaptor
t Edge Cleaning Brush:
t Floor Floor Polisher Holder (1 o ) and Pad (
)
t Dust Container, Filter and Motor
RB 201
RB 202
RB 203
RB 214
RB 215
RB 206
RB 207
RB 217
35601254
35601255
35601256
35601340
35601341
35601259
35601260
35601343
Quality
C
Hoover’s factories have been independently assessed for quality. Our products are made using a quality system
which meets the requirements of ISO 9001.
M
Y
The Environment
CM
MY
CY
CMY
This appliance is marked according to the European Directive 2002/96/EC on Waste Electrical and Electronic
Equipment (WEEE).
By ensuring this product is disposed of correctly you will help prevent potential negative consequences for
the environment and human health, which could otherwise be caused by inappropriate waste handling of this
product.
K
The symbol on the product indicates that this product may not be treated as houshold waste.
Instead it shall be handed over to the appliance collection point for recycling of electrical and
electronic equipment.
Disposal must be carried out in accordance with the local environmental regulations for
waste disposal. For more detailed information about treatment, recovery and recycling of this
shop where you purchased the product.
Your Guarantee
Details regarding these conditions can be obtained from the dealer from whom the appliance was purchased.
The bill of sale or receipt must be produced when making any claim under the terms of this guarantee.
Subject to change without notice.
* Certain Models Only
** May vary according to model
RoboCom2Manual2011__GB.indd 15
14/07/2011 13.40.17
®
PRINTED IN P.R.C.
4800- EN


![TSD Series -40C ULT User Manual [EN]](http://vs1.manualzilla.com/store/data/005634658_1-66c9db561a67486106446026c707a26c-150x150.png)