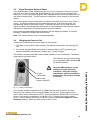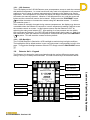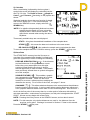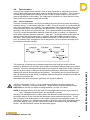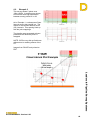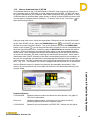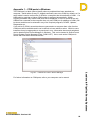
1
For Model 2010 SYSTEM MANUAL Dynalog Electronics Limited Bristol, England www.dynalog.co.uk Dynalog Software Please read Licence Agreement overleaf before installing Contents of Applications CD The programs listed below are available on the Applications CD provided with your C-SCAN Survey System. To install any of the applications or print a copy of this manual, place the CD in your drive and the installer should autorun index.html in your default web browser. If Autorun fails to start, open the CD content from My Computer and double click ‘index.html’. Each program can be installed from the suite menu. DCAPP GE This is the software needed to download data from a C-SCAN 2010. Folders created on root drive: \DCAPP2010 \DCAPP2010\archive\ \DCAPP2010\archive\original C-SCAN Manual Electronic copy of the manual in Adobe* PDF format. You must have Adobe Acrobat* installed to view the manual. C-SCAN Updater This program updates the C-SCAN firmware in the Detector head unit. If you are sent an upgrade file, this is the program to use to update your Detector. Should you be sent an update, all instructions for use will be included with the upgrade. C-SCAN Diagnostics This program will communicate with the C-SCAN Detector to provide status information on various sub-systems to assist in problem diagnosis. *Adobe and Acrobat are copyright Adobe Corporation **Windows and Excel are copyright Microsoft Corporation ***Google Earth is copyright Google Inc DYNALOG LICENCE AGREEMENT IMPORTANT: These products are supplied to you on the terms and conditions of the licence agreement indicated below. If you proceed to install these products you will be deemed to have accepted of these terms and conditions. If such terms and conditions are not accepted by you, do not install the product. The programs in the provided Suite are subject to this licence agreement – namely DCAPP GE, DCAPP 2010, DCAPP for Excel, C-SCAN Upgrader, C-SCAN Diagnostics and C-SCAN Manuals. In this licence: 'DYNALOG' means DYNALOG ELECTRONICS Ltd; and The 'Program' means the program or programs and online documentation that are about to be installed. The Purchaser does not hereby acquire any rights of ownership in the Program. The 'Product' means the device or devices that the program is designed to connect to. 1. COPYRIGHT The copyright and all other intellectual property rights in the Program shall be and remain vested in DYNALOG. DYNALOG grants to the Purchaser of this package a non-exclusive right to use the Program in accordance with these terms and conditions. Such Licence may be transferred only in accordance with Clause 3 below. Any other use or dealing not expressly authorised by these terms and conditions is strictly prohibited. 2. USE The Program may only be used on a single machine or terminal at any one time but may be copied in support of that use. Any such copying is subject to there being no modification of the Program and in particular to all the copyright notices being preserved in the copy. Save for copying as aforesaid, any other operations (including subdivision, modification, decompiling, reverse-engineering or translation from machine readable form) are expressly prohibited. Only a single copy of the Program is licensed for use at any one time. Where the Purchaser wishes to use multiple copies of the Program on different machines or terminals, application should be made in writing to DYNALOG which will be considered in its discretion. Where multiple copies of the Program are provided, this is for convenience of use only, it does not imply multiple licences. 3. TRANSFER The Program may be transferred to a third party provided the original and all copies are transferred or otherwise destroyed and provided further these terms and conditions are produced to that third party and prior to the transfer that party agrees and undertakes to observe and continue to observe the same. Without such transfer and undertaking any application of the Program or copies thereof by any other person will not be authorised by DYNALOG and will be in breach of DYNALOG's copyright and other proprietary rights. 4. DOCUMENTATION The copyright and all other intellectual property rights in the documentation accompanying the Program shall be and remain vested in DYNALOG. However, no right to reproduce that documentation in part or in whole is granted by DYNALOG. Should additional copies of the documentation be required for whatever reason, application must be made in writing to DYNALOG which will be considered in its discretion. 5. BREACH If the Purchaser acts in breach of any of these terms and conditions it shall indemnify DYNALOG against all loss suffered (including loss of profits) and the licence granted hereunder shall be deemed to be terminated forthwith. DYNALOG may also terminate the licence hereby granted without notice if the Purchaser declares itself bankrupt or, in the case of a business customer only, if it shall cease to carry on its business or shall have a liquidator, receiver or administrative receiver appointed to it or over any part of its undertaking or assets or shall pass a resolution for its winding up (otherwise than for the purpose of a bona fide scheme of solvent amalgamation or reconstruction where the resulting entity shall assume all of the liabilities of it) or a court of competent jurisdiction shall make an order, or shall enter into any voluntary arrangement with its creditors, or shall be unable to pay its debts as they fall due. On termination the Purchaser shall cease using the Program and deliver up to DYNALOG all infringing and lawful copies of the Program within seven days of termination of the licence hereby granted. 6. EXCLUSIONS Neither DYNALOG nor any person authorised by it gives warranties or makes representations that the Program is error free or will meet functions required by the Purchaser. It shall be the responsibility of the Purchaser to satisfy itself that the Program meets the Purchaser's requirements. The Program is supplied on an 'as is' basis and save as expressly provided in these conditions all warranties of any nature (and whether express or implied) are excluded. 7. LIABILITY 7.1 DYNALOG warrants that any physical media on which the Program is stored are free from material defect and through normal use will remain so for a period of 90 days after purchase. This warranty excludes defects arising out of accident, neglect, misuse, failure of electric power or causes other than ordinary use. In the event of any breach of this warranty (or statutory warranty or conditions incapable of exclusion by these conditions) the responsibilities of DYNALOG shall be limited to replacing the enclosed Program or to returning the price paid as DYNALOG may in its absolute discretion determine. In the event of a refund, Purchaser's right to use the Program shall automatically expire. 7.2 The aggregate liability of DYNALOG in respect of any loss or damage suffered by the Purchaser and arising out of or in connection with this Agreement, whether in contract, tort (including negligence) or for breach of statutory duty or in any other way shall not exceed the price paid for the Program. 7.3 DYNALOG shall not be liable, in contract, tort (including negligence) or for breach of statutory duty or in any other way for: 7.3.1 any economic losses (including, without limitation, loss of revenues, profits, contracts, business or anticipated savings); or 7.3.2 any loss of goodwill or reputation; or 7.3.3 any special or indirect or consequential losses in any case whether or not such losses were advised to DYNALOG or its dealer, suffered or incurred by the Purchaser arising out of or in connection with the use by the Purchaser of the Program, or any other matter under this Agreement. 8. MISCELLANEOUS 8.1 The Purchaser confirms that, in agreeing to enter into this Agreement, it has not relied on any representation save insofar as the same has expressly in this Agreement been made a representation and agrees that it shall have no remedy in respect of any misrepresentation which has not become a term of this Agreement save that the agreement of the Purchaser contained in this clause shall not apply in respect of any fraudulent or negligent misrepresentation whether or not such has become a term of this Agreement. 8.2 This Agreement shall be governed by and construed in accordance with the laws of England and Wales. The Purchaser hereby irrevocably submits to the nonexclusive jurisdiction of the English courts in respect of any dispute or matter arising out of or in connection with this Agreement. 8.3 The Purchaser agrees to supply vehicle statistics (excluding vehicle and personal specific data) via electronic transfer on subsequent calibration of the product. C-SCAN SURVEY MANUAL PREFACE This manual explains the operation of the C-SCAN System for surveying the condition of the wrap or coating on buried metal pipelines, and locating faults in the wrap. It is intended for the use of surveyors with some experience of the survey and maintenance of pipelines While the C-SCAN equipment is reasonably robust and weatherproof, it contains delicate electronic components and should be handled with appropriate care and it should be transported in its specially designed soft cases or otherwise protected from major shocks. The C-SCAN Detector Unit can also be damaged by exposure to some forms of radiation and to static electricity. Maintenance of this equipment should only be carried out by qualified personnel. The material contained in this Manual is copyrighted by Dynalog Electronics Ltd, and is not to be photocopied, duplicated, or reproduced in any form without the express written consent of Dynalog Electronics Ltd. Publication in this manual of information on the design and operation of the C-SCAN System does not confer any rights to use this information other than for the purpose of operating C-SCAN equipment supplied by Dynalog Electronics Ltd. Dynalog reserves the right to make improvements in its products without incurring any obligation to incorporate such improvements into products already sold. Specifications, instructions, and other information contained in this Manual are subject to change without notice. Before any setup work or survey work is undertaken, these instructions must be read and fully understood by the operators who will carry out the survey work using this equipment. United Kingdom Health & Safety at Work Act 1974 The user’s attention is therefore drawn to the following: 1. The appropriate sections of this manual must be read carefully before using the equipment. 2. Operation and maintenance must only be carried out by suitably trained personnel. 3. Normal safety precautions must be taken and appropriate procedures observed to avoid accidents Refer to the equipment suppliers — name and address below — for any technical advice or product information Any comments, queries or suggestions concerning this manual should be sent to : Dynalog Electronics Limited PO Box 1073 | Bristol | BS15 0DW | United Kingdom [email protected] web: www.dynalog.co.uk Issue 6-03 – 1510 E&OE For firmware versions 3.10 or higher CC--SSCCA ANN22001100 SYSTEM MANUAL Version 6.03 1 Leaders in Pipeline Survey Systems Section 6 (a) of this Act requires manufacturers to advise their customers on the safety and handling precautions to be observed when installing, operating, maintaining and servicing their products. OUTLINE OF THE C-SCAN SYSTEM....................................................................... 7 1. 1.1. Signal Generator ................................................................................................... 7 1.2. Detector Unit ......................................................................................................... 8 2. UNPACKING AND ACTIVATING THE C-SCAN 2010 SURVEY SYSTEM .............. 9 2.1. Unpacking.............................................................................................................. 9 2.2. Charging the Signal Generator ............................................................................ 9 2.3. Signal Generator External Power ...................................................................... 11 2.4. Charging the Detector Unit ................................................................................ 11 3. OVERVIEW .............................................................................................................. 15 3.1. Signal Generator – Keypad ................................................................................ 15 3.2. Signal Generator – Display ................................................................................ 15 3.3. Signal Generator – Side Panel ........................................................................... 16 3.4. Detector Unit – Front Panel................................................................................ 16 3.5. Detector Unit – Display....................................................................................... 17 3.5.1. LCD Contrast.................................................................................................... 18 3.5.2. LCD Backlight .................................................................................................. 18 3.6. 4. Detector Unit – Keypad....................................................................................... 18 SIGNAL GENERATOR - FIELD OPERATIONS ..................................................... 19 4.1. Operating Environments .................................................................................... 19 4.2. Survey Information ............................................................................................. 19 4.3. Connection to Pipeline ....................................................................................... 19 Location of Injection Point.............................................................................. 19 4.3.2. Check Pipeline ................................................................................................. 19 4.3.3. Signal Interference .......................................................................................... 20 4.4. Connection Methods........................................................................................... 20 4.5. Setting the Signal Current.................................................................................. 22 4.6. Pipeline Voltage message .................................................................................. 23 4.7. Automatic level adjustment ............................................................................... 23 4.8. Apparent Problems with Current Value ............................................................ 24 4.9. Key Sequence for AUTO Operation................................................................... 25 4.10. Key sequence for MANUAL operation .............................................................. 26 5. DETECTOR UNIT – PRINCIPAL DISPLAY SCREENS.......................................... 27 5.1. Start-up Screen ................................................................................................... 27 5.2. Pipeline Specification Screen ............................................................................ 27 5.3. Search Screen ..................................................................................................... 28 5.4. Menu Screen........................................................................................................ 29 5.5. Survey Screens ................................................................................................... 30 CC--SSCCA ANN22001100 SYSTEM MANUAL Version 6.03 2 Leaders in Pipeline Survey Systems 4.3.1. DETECTOR UNIT – FIELD OPERATIONS ............................................................. 31 6. 6.1. Operating Environment ...................................................................................... 31 6.2. Survey Principles ................................................................................................ 31 6.2.1. Survey Type ..................................................................................................... 31 6.2.2. Survey Procedure Overview ........................................................................... 32 6.3. Survey Planning .................................................................................................. 32 6.3.1. Preparation....................................................................................................... 32 6.3.2. Planning............................................................................................................ 33 6.3.3. Common Fault Areas....................................................................................... 33 6.3.4. Reference Readings ........................................................................................ 33 6.4. Survey Procedure ............................................................................................... 33 6.4.1. Signal Injection ................................................................................................ 33 6.4.2. Locate Pipeline ................................................................................................ 33 6.4.3. Locate Overhead.............................................................................................. 34 6.4.4. Record Sample................................................................................................. 34 6.4.5. Subsequent Samples ...................................................................................... 36 6.4.6. Entering Distance ............................................................................................ 37 6.4.7. Graphs .............................................................................................................. 38 6.4.8. Low Signal........................................................................................................ 39 6.4.9. Move Generator ............................................................................................... 39 6.5. Survey Numbering & Memory Storage ............................................................. 39 6.6. Notes on Entering Distances ............................................................................. 40 6.7. Chainage .............................................................................................................. 40 6.8. Fault Location ..................................................................................................... 42 Closer Inspection............................................................................................. 42 6.8.2. Close Interval Mode......................................................................................... 43 7. SURVEY PLANNING AND INTERPRETATION OF RESULTS.............................. 47 7.1. Distance Between Survey Points ...................................................................... 47 7.2. Attenuation Values.............................................................................................. 47 7.3. Conductance ....................................................................................................... 48 7.4. Signal Range ....................................................................................................... 50 7.5. Fault Size ............................................................................................................. 50 7.6. Minimum Distance Between Survey Points...................................................... 51 7.7. Reading Accuracy............................................................................................... 51 7.8. Close Interval Surveys........................................................................................ 51 7.9. Repeat Surveys ................................................................................................... 51 7.10. Long Term Program............................................................................................ 52 7.11. High Soil Resistivities ........................................................................................ 52 7.12. Changes in Soil Resistivity ................................................................................ 53 CC--SSCCA ANN22001100 SYSTEM MANUAL Version 6.03 3 Leaders in Pipeline Survey Systems 6.8.1. 7.13. 8. New Pipelines ...................................................................................................... 53 INTERFERENCE AND FIELD DISTORTION .......................................................... 54 8.1. The C-SCAN Signal ............................................................................................. 54 8.2. Ground Lead Interference .................................................................................. 54 8.3. Other Signals Carried by the Pipeline............................................................... 54 8.4. Buried Metal Structures...................................................................................... 54 8.5. Cross Bonds........................................................................................................ 55 8.6. Insulating Joints/Flanges ................................................................................... 55 8.7. Sacrificial Anodes ............................................................................................... 57 8.8. Pipeline Bends and ‘Tees’.................................................................................. 57 8.9. Sleeves................................................................................................................. 57 8.10. Effects of ‘Return Current’ ................................................................................. 57 8.11. Orientation of Detector to Pipe Axis ................................................................. 58 9. EXAMPLES.............................................................................................................. 59 9.1. Example 1 ............................................................................................................ 59 9.2. Example 2 ............................................................................................................ 60 10. DEMO MODE........................................................................................................... 61 11. DCAPP..................................................................................................................... 63 11.1. Additional windows ............................................................................................ 64 11.1.1. Pipeline layout .............................................................................................. 64 11.1.2. Table View ..................................................................................................... 64 11.1.3. Pipeline Details ............................................................................................. 66 11.2. How to download from C-SCAN ........................................................................ 67 11.3. Saving, Printing & Exporting ............................................................................. 68 Saving............................................................................................................ 68 11.3.2. Printing .......................................................................................................... 68 11.3.3. Exporting....................................................................................................... 68 11.4. Advanced Functions........................................................................................... 69 11.4.1. Tools Menu.................................................................................................... 69 11.4.2. GPS Functions.............................................................................................. 70 11.4.3. Auto Analyse................................................................................................. 71 11.4.4. Data Manipulation......................................................................................... 71 11.4.5. Show Close Interval Plots............................................................................ 71 11.5. 12. Clearing the Detector Memory ........................................................................... 72 GPS.......................................................................................................................... 72 12.1. GPS Setup ........................................................................................................... 74 12.2. External GPS Configuration............................................................................... 74 12.3. GPS Reset............................................................................................................ 74 CC--SSCCA ANN22001100 SYSTEM MANUAL Version 6.03 4 Leaders in Pipeline Survey Systems 11.3.1. 12.4. 13. Geo-fencing ......................................................................................................... 74 BATTERY INFORMATION ...................................................................................... 75 13.1. Battery Life .......................................................................................................... 75 13.2. Battery Indicator.................................................................................................. 76 13.3. Power Modes ....................................................................................................... 76 14. UPDATING............................................................................................................... 76 15. DIAGNOSTICS ........................................................................................................ 77 16. FAQ / NOTES .......................................................................................................... 79 16.1. TR Stations – The need to disconnect .............................................................. 79 16.2. Generator Connection Problems....................................................................... 79 16.2.1. Connecting to the Pipeline .......................................................................... 80 16.2.2. Establishing a good earth............................................................................ 80 16.2.3. Use alternative earth connection ................................................................ 80 16.3. Re-call Calibration Settings ............................................................................... 81 16.4. Display Messages ............................................................................................... 82 17. SPECIFICATION...................................................................................................... 83 18. MAINTENANCE....................................................................................................... 85 APPENDIX 1 – COM PORTS IN WINDOWS .................................................................... 86 GLOSSARY ....................................................................................................................... 87 Detector Firmware 3.10 DCAPP 2.77 Updater 5.2.1 Diagnostics 3.0 CC--SSCCA ANN22001100 SYSTEM MANUAL Version 6.03 5 Leaders in Pipeline Survey Systems Versions used in this manual: PRINCIPLES OF OPERATION An electrical current applied to a well coated buried metal pipeline will decrease gradually with increasing distance from the current injection point, as the current escapes to earth through the coating. If the coating has a uniform thickness and separates the pipeline from the surrounding soil at all points, the strength of the signal current on the pipeline will decline logarithmically, and the rate of decline will be dependant primarily on the electrical resistivity of the wrap or coating in use, and the area of coating in contact with the soil per unit length of pipe (i.e. for a given coating, the decline is proportional to the circumference of the pipe). [Note: because of the relative magnitude of the resistances involved, local changes in soil resistance can usually be ignored]. If there is a low resistance electrical path from the pipeline direct to the soil at any point, there will be a substantial local increase in the rate of loss of signal current. Such a low resistance path could arise from: incorrectly applied coating, mechanical damage to the coating before, during or after installation, decay of the coating due to soil conditions, disbonding of the coating from the pipeline (provided that ground water has penetrated into the gap to provide an electrical path to earth), or a leak in the pipeline itself causing the coating to fail at the leak point. Because the resistance of such a path is likely to be several orders of magnitude less than the resistance of the undamaged coating, the resultant loss of current, even from a single small fault of a few square millimetres, can usually be detected by a significant increase in the apparent rate of current decline over quite a long length of pipeline. In practice, the existence of one or two small faults on a section of pipeline several hundred metres in length can usually be tolerated because the Cathodic Protection System can be expected to prevent serious corrosion developing quickly. In this case it may not be necessary to locate the specific faults immediately but the rate of logarithmic decline of current between two specific points can be logged for future reference so that any deterioration of the condition of the pipeline can be monitored. [Note: the logarithmic rate of decline of the current (attenuation) measured in millibels per metre, is effectively independent of the applied current and is only marginally affected by seasonal changes in soil resistivity, so that it is virtually an absolute indication of the average condition of the coating between two given points at the date of the survey]. CC--SSCCA ANN22001100 SYSTEM MANUAL Version 6.03 6 Leaders in Pipeline Survey Systems If the attenuation level over a given section of pipeline is particularly high, serious anomalies (or a large number of small anomalies) in the protective coating are indicated. Intermediate readings of attenuation levels can be taken to identify the worst sections, and the precise location of these anomalies (generally to an accuracy of 1-2 metres) can be determined by recording and plotting the actual current levels at close intervals (3-5 metres) over the suspect section and noting those places where the rate of current decline is steepest. The most serious anomalies can then be excavated and repaired. 1. OUTLINE OF THE C-SCAN SYSTEM The main elements of the C-SCAN Pipeline Coating Evaluation System are the Signal Generator and the Detector Unit. The Signal Generator is connected to the pipeline and to an appropriate ground point, and generates a constant AC signal which passes along the pipeline, this in turn produces an electromagnetic field which radiates from the pipeline. The Detector Unit measures the strength of this electromagnetic field radiating from the pipeline and uses it to determine the location and depth of the pipe, along with the residual current remaining on the pipeline at the observation point. This data is stored in the memory of the Detector Unit’s computer and is used to compute and store attenuation rates between any two given observation points. The complete record of the survey (with time, date & GPS positioning) may be downloaded and printed out at the end of the survey to provide a permanent record. 1.1. Signal Generator The C-SCAN Signal Generator is a self-contained unit producing a computer controlled AC signal current with a frequency of 937.5 Hz. PIPE connector connects generator to pipeline Automatic pressure relief valve Auxiliary Power socket for charger or external 12 volt supply Battery ISOLATOR switch - used when storing or in transit Fig. 1.1 – Signal Generator The output from the Signal Generator is a sine wave signal at a frequency of 937.5Hz, with a nominal maximum voltage of 60V p-p (18V RMS). The maximum current obtainable is 1.5A (1500mA). The RMS value of the current being produced is displayed on the LCD on the control panel, expressed in mA. The actual level of current produced is set by the Surveyor using the instrument’s controls. Once set, this current level will be maintained at a constant level (despite any transient changes in soil resistivity) until the batteries are exhausted. In tests, the unit, when fully charged, has maintained a constant output of 600mA for up to 8 hours continuous operation when using the internal batteries. Use of an external 12-18 volt supply can extend this time indefinitely. CC--SSCCA ANN22001100 SYSTEM MANUAL Version 6.03 7 Leaders in Pipeline Survey Systems GROUND connector connects generator to suitable earth 1.2. Detector Unit The Detector Unit is housed in a weatherproof plastic case. The front tube contains the antenna system, and the keyboard and LCD display are mounted on the top of the tube with the main computer and GPS system. The base compartment contains the communications and charger computer, the batteries and connectors. Display and Keypad Carrying Handle Battery Compartment USB PC Connection Battery Charger port Fig. 1.2 – Detector Unit The antenna consists of a number of large diameter air cored coils. When the Detector is stationary in this ‘overhead’ position, a sample of 300 readings of the field strength values can be taken over a period of approximately six seconds. The computer will then calculate the depth of the pipeline (from the base of the Detector to the centre line of the pipeline) and the strength of the residual signal current on the pipe. The ‘DEPTH’ and ‘CURRENT’ values (in metres and mA) are shown on the LCD. Using the keyboard, and following the prompts appearing on the display, the operator can store the displayed data (which is automatically given a reference number), and request the computer to calculate the logarithmic attenuation of the signal from any previous location stored in its memory. This information is displayed on the LCD and is also stored. The total number of points or surveys that Detector can hold in its memory is 500 points spread over 100 surveys (whichever number is reached first), so although it is unlikely that a surveyor will run out of memory, it is advisable to download the data and clear the memory after each survey or survey series. Each survey data point contains the location CC--SSCCA ANN22001100 SYSTEM MANUAL Version 6.03 8 Leaders in Pipeline Survey Systems In operation, the computer calculates the vector sum of the field strengths measured by the coils over the length of the instrument. The Detector display (as shown on page 17) indicates to the operator the location of the pipeline and its approximate distance away, guiding the operator towards the pipeline. When the field measured by the vertical axis coil falls below a threshold value, the instrument display changes; the pipeline position indicator shows the pipeline in the centre of the display and the overhead location bars begin to close. When these bars are as close together as possible, the Detector is positioned in the vertical centreline of the pipeline. reference number, GPS location, depth of pipeline, strength of signal current, distance from a previous location reference, and logarithmic attenuation of the signal, in millibels per metre (mB/m), between the two points. At the beginning of each survey, the computer will also note automatically the time and date using the internal clock, and this information will also appear on the subsequent download/printout. At the end of a survey (or whenever required) the Detector Unit may be plugged into a standard computer via the USB connector (or RS232 serial interface) and the survey data can be downloaded and/or printed out in full, using Dynalog’s DCAPP software. The Detector Unit is powered by either NiMH rechargeable batteries which will normally provide enough power to run the instrument continuously for over 4 hours, or by Alkaline C cells, which will provide approximately 12 hours of continuous use. There is, in addition, a built-in lithium power source to maintain the data stored in the memory when the batteries have been exhausted. This has an estimated life of ten years. The surveyor must remember that the C-SCAN System is not immune to electromagnetic interference but it incorporates a number of features which are designed to keep such interference to an absolute minimum. Briefly, these features include: the generation of a pure sine wave so that no complex harmonics are produced, the use of a carefully selected frequency with virtually no harmonics in common with other frequencies in general use, the narrow bandwidth of the filters in the Detector Unit and the collection of 300 signal samples over a period of approximately 6 seconds to eliminate transient interference. The instrument can usually be used in the presence of mains AC and is not affected by any residual ‘ripple’ in operating DC (rectified) Cathodic Protection systems. 2. Unpacking and Activating the C-Scan 2010 Survey System 2.1. Unpacking For shipping safety the Detector and Signal Generator are shipped with their battery isolation switches in the OFF position. For future shipping and long storage periods ensure that the batteries are isolated. Unpack the entire system from the soft cases and make sure all the items are present in accordance with the packing list. NOTES: Do NOT try to activate damaged equipment. If everything appears to be present and undamaged proceed to 2.2 below to charge the Signal Generator and Detector Unit ready for use. 2.2. Charging the Signal Generator The generator has a built-in re-chargeable lead-acid battery, having a nominal capacity of 17 ampere-hours. Charging is initiated by attaching the charger power unit to the Charge socket on the side of the Signal Generator and plugging the charger unit into the mains power. Selection of mains voltage (110-240V, 50/60Hz) is automatic. When powered the charger unit will show a green light. This light is only a power indicator light and does not show charge status. The Signal Generator will automatically switch on and enter the charge cycle. Note that the battery isolator must be ON (not isolated) – if the isolator switch is in the OFF position, a warning will be shown on the screen and the back-light will flash. CC--SSCCA ANN22001100 SYSTEM MANUAL Version 6.03 9 Leaders in Pipeline Survey Systems A copy of the packing list can be found in the pocket of the Detector soft case. Report any obvious damage or any missing items immediately. The charging cycle is in four stages: Stage 1 charges to 80%. Stage 2 charges to 99%, Stage 3 charges to 100%+ and balances the battery and Stage 4 is the float charge which can remain active indefinitely. -- CHARGING -<04:22 Remaining 9.0% Capacity Stage 1 Stage 1. -- CHARGING -<01:52 Remaining 85.0% Capacity Stage 2 Stage 2. This stage can last up to 6 hours if the battery is very low. This message shows estimated time to charge is 4 hours 22 minutes, battery capacity is 9.0%. If the battery is well-used or old, this stage may last the longest Stage 3. Checking in 59s 107.2% Capacity Stage 3 Stage 3 is for top-off or charge balance. A timer will disconnect the charge such that after 2 minutes the battery is checked for its ability to hold a charge. If this passes then stage 4 will be active. Should the battery not hold a charge then a warning will be given. !--CHARGED--! Stage 4. Remove Charger (Float active) Charging is now complete and the charger can be removed. Float charge is now active which will continued to trickle charge the battery if the charger is left attached. The charge can be terminated at any time by removing the charger. Pressing the OFF key will prompt you to remove the charger. A full charge should last for two to three days of normal survey work (depending on level of signal current). The battery should not be allowed to discharge completely and if possible, the generator should be put on charge at the end of each day’s survey. This will extend the life of the battery. When storing for long periods (in excess of 1 month) isolate the battery using the isolator switch. Check and charge the battery every 6 months. There are two battery chargers supplied with the equipment. They are identical and can be used interchangeably to charge either the Signal Generator or the Detector Unit. The Signal Generator is powered by a completely sealed lead-acid battery. This battery is permanently installed and may be replaced only by a trained technician. IMPORTANT: Interrupting the initial charging cycle may seriously affect the ability of the batteries ever to reach full capacity. When shipping by air the battery must be isolated. CC--SSCCA ANN22001100 SYSTEM MANUAL Version 6.03 10 Leaders in Pipeline Survey Systems NOTE: The batteries are shipped in a low state of charge and it may take many hours of continuous charging to reach a fully charged state. The unit should be left on charge until it turns itself off. 2.3. Signal Generator External Power If the internal battery of the Signal Generator is too low to complete or carry out a survey and there is no time to charge the Signal Generator, an external 12-18 volt battery (car battery etc.) can be connected using the cable supplied (9-way socket terminated with red and black crocodile clips). This will extend the usable time to the capacity of the external battery. The external power can be connected to the Signal Generator at any time, even during a survey. The Signal Generator will recognise the presence of the external power and automatically switch to that power source. If the external power source fails then the Signal Generator will automatically switch back to internal batteries until either the internal batteries are exhausted or the external power source is replaced. During external power use the Signal Generator will not display the battery % and time indication, instead EXTERNAL ON will be shown. Note: The external battery must be charged separately. 2.4. Charging the Detector Unit There are two controls for the power supply to the Detector: 1. The Main Power isolator switch located in the battery compartment and normally left ON 2. For normal operational use the Detector is switched ON and OFF by pressing the button marked I/O on the Detector display panel / control keypad. The Detector is powered by NiMH (Nickel-Metal Hydride) C cells (4500mAh). The battery compartment is pictured below: The Detector can be powered either by re-chargeable NiMH batteries OR by alkaline batteries. Main Power Isolator (ON/OFF) Fig. 2.1 – Battery Compartment If not already installed, unpack the six (6) NiMH batteries and put them to one side. Remove the two battery covers using the battery removal tool. Ensure that the main power switch in this compartment is OFF! Insert the batteries, NEGATIVE (-ve) end first, three to each battery compartment, as shown in Fig. 2.2 below, and re-fit the battery covers. Use the battery removal tool to fit the covers but do not over tighten or cross thread the covers. Switch the Main Power Isolator to ON. CC--SSCCA ANN22001100 SYSTEM MANUAL Version 6.03 11 Leaders in Pipeline Survey Systems C Cells 4.5Ah NiMH Only the NiMH batteries can be charged using the following procedure. Using the charger with alkaline batteries installed in the Detector will result in damage to the unit. + - Fig. 2.2 – Inserting Batteries The LCD will now display either the clock and date setting panels (if these have not been factory set - Figs 2.3a & 2.3b below) or the Start-up screen. To set the time and date use the ◄&► arrows to select the hh:mm:ss or dd:mm:yyyy and the ▲▼ arrows to increase or decrease the selection. Once complete the Detector will perform some checks and the START-UP screen will be displayed. The Detector can now be charged. Fig. 2.3a – Time Display screen Fig. 2.3b – Date Display screen If the display does not activate, turn the Main Switch to OFF again, ensure the battery caps are fitted properly and wait for 5 seconds, then switch it back to ON. If the display then activates, proceed with charging. If the display fails to activate the batteries are exhausted – see Recovery charging procedure below. CC--SSCCA ANN22001100 SYSTEM MANUAL Version 6.03 12 Leaders in Pipeline Survey Systems NOTE: Up to this point no buttons have been pushed on the Detector display panel. The only switch that has been activated is the Main Power Isolator in the battery compartment. • Standard charging procedure − Locate the battery charger port on the right hand side of the Detector and unscrew the port cover − With the Detector in the OFF state, attach the battery charger and connect the charger power cord to a mains outlet socket – voltage selection is automatic. Make sure the mains outlet is ‘live’ − Switch on the Detector either by the main power isolator or the I/O key if isolator is already on. The charge cycle will automatically commence and the display will show the charge screen and countdown timer (Fig.2.4c below), or − If the Detector is already ON, then the charge cycle can be initiated manually by selecting MENU from the START-UP screen and selecting CHARGE as shown in figures 2.4a & 2.4b below Fig 2.4a –Start-up screen Fig. 2.4b –Menu screen Fig. 2.4c –charge screen When charging, the Detector will display a timer screen that counts backwards; the time displayed being the maximum time allowed to charge the batteries. If the batteries are charged before that time has expired charging will be terminated and the unit will revert to trickle-charge and the display will switch off automatically. If it is necessary to terminate the charging cycle before the batteries are fully charged, the charging cycle may be ended by pressing the ³ key. The display will shut off and the unit will enter trickle-charge. − Make sure the main power isolator in the battery compartment is ON position. − Connect the charger power cord to the mains supply outlet socket. Make sure the socket is ‘live’. − Leave the charger attached for 30 minutes. The charger will now attempt to recover the batteries but the screen will not display. When the batteries have been charged sufficiently the unit will automatically turn on and continue the charge cycle as described in the standard charging procedure. − If the unit fails to switch on, disconnect the charger, switch off at main power isolator for 5 seconds, then on again. The Detector should start and display the START-UP screen. The standard charging procedure above can then be followed. NOTE: Attaching charger without batteries will start the detector in charge mode. Since there are no batteries, they will not be charged. System will switch off in 4 hours or can be aborted by pressing the ³ key. If this has been done, disconnect the charger and ensure the switch is set to OFF before inserting rechargeable NiMH batteries. CC--SSCCA ANN22001100 SYSTEM MANUAL Version 6.03 13 Leaders in Pipeline Survey Systems • Recovery charging procedure If the NiMH batteries are completely exhausted (flat) the Detector display will either not activate after the I/O button on the display panel is pressed or display a BATTERY LOW warning (ensure batteries are installed and main power isolator battery switch is ON). In this instance it maybe necessary to attempt to recover the batteries by the following method: The Detector draws a small amount of current from the batteries when it is switched off at the Control/Display Panel I/O switch but with the main power isolator switch left ON. If left for a long period in this state the charge in the batteries will eventually be reduced to zero. If the unit is to be inactive for a period of time switch the main power isolator to OFF. If the unit is to be stored for longer periods of time (3 months +) or shipped without its shipping crate, the batteries must be removed. Leaving alkaline batteries in a stored Detector - even with the main power isolator Off may result in battery corruption and leakage, causing internal damage to the Detector. NOTE: Survey data storage is NOT affected by the removal of the batteries. WARNING • NEVER USE THE CHARGER WHEN ALKALINE BATTERIES ARE INSTALLED IN THE DETECTOR • NEVER use carbon/zinc or lithium-based batteries AT ANY TIME • NEVER use or charge a mix of different types of batteries Leaders in Pipeline Survey Systems CC--SSCCA ANN22001100 SYSTEM MANUAL Version 6.03 14 3. OVERVIEW This section gives an overview of the Signal Generator and Detector Unit, looking at the keypad interfaces, displays and icons and connections for each part of the C-SCAN 2010 system. 3.1. Signal Generator – Keypad ON/OFF: Pressing and holding this key switches the generator ON or OFF A quick press whilst active will disconnect the output. AUTO: Sets the output to 600mA or maximum attainable current up to 600mA. Pressing and holding key enters MANUAL mode where the current can be manually set to a chosen output using ▼&▲ buttons. STORE: Stores the present valued to memory ▼: Decreases current in MANUAL mode. 3.2. RECALL: Recalls previously stored value ▲: Increase current in MANUAL mode. Signal Generator – Display The Signal Generator has a backlit display, providing the surveyor with the current status of the Signal Generator while carrying out a survey. The details of the main screen are listed below. Z Y 1. Battery Capacity 2. Estimated survey time remaining 99% 06:49 i25° GENERATOR OUTPUT SET to 600mA 16w 10.7v 10Ω [ \ ] ^ for set current 3. Internal temperature 4. Battery state indicator - ³ shown if external power used 5. Power taken by the Generator 6. Peak output voltage 7. Loop Resistance between Signal Generator, Earth and Pipeline. This includes the contact resistance of the earthing system (Earth Spike, ground bed, etc.) – usually the main contributor CC--SSCCA ANN22001100 SYSTEM MANUAL Version 6.03 15 Leaders in Pipeline Survey Systems X 3.3. Signal Generator – Side Panel Connection to PIPELINE Connection to suitable EARTH BATTERY isolator switch. CHARGER or AUXILIARY power connector 3.4. USB Diagnostic / Update port Detector Unit – Front Panel The C-SCAN 2010 is the next generation design in the 2000 series Pipeline Survey System. The system increases the speed and accuracy and includes more statistical features for noise reduction, including: • Built in Global Positioning System (GPS) unit for precision position indication. • Attenuations can be calculated using GPS position information • Full graphic interface allows the displaying of data without the use of a laptop or PC. The onboard search facility displays: 1. 2. 3. 4. 5. 6. Leaders in Pipeline Survey Systems Pipeline position GPS coordinates Depth/Cover indicator Pipeline diameter Survey and location number Facility for recording pipeline diameter and wall thickness 7. Display of approximate coating conductance in μS/m2 8. Display of approximate coating resistance in Ω.m2 9. Symbol inclusion for landscape features 10. Graphs include: Attenuation – by chainage or increment • • Depth – cover or to centre line Current – including close interval plots GPS plot – show the plan of the pipeline Full compatibility with DCAPP for Excel included in C-SCAN 2000 Software upgradeable via PC CC--SSCCA ANN22001100 SYSTEM MANUAL Version 6.03 16 Where possible, all displays are language independent, with graphic icons representing features or functions: Depth to Centre Depth to top (cover) Current Attenuation Chainage Distance Symbols relating to landscape features such as trees, walls, fences, roads, rivers, pylons, etc. Symbols are available with the indicator on the left or right side Symbol for GPS 3.5. Detector Unit – Display Below is an example of the C-SCAN 2010 SEARCH screen showing the component parts of the graphical display during search mode. At this initial search stage, depth, current and distances are approximate. Pipeline Diameter Approx. Depth to centre or cover Leaders in Pipeline Survey Systems Approx Distance to Pipeline Overhead Locator Bars Pipeline Position indicator Approx. Current GPS coordinates Signal strength indicator CC--SSCCA ANN22001100 SYSTEM MANUAL Version 6.03 17 3.5.1. LCD Contrast The LCD display on the C-SCAN Detector uses a temperature sensor to track the contrast with ambient temperature. In normal use this will only need to be adjusted to suit personal preference, but in cases of extreme temperature the contrast on the display may require adjustment. If the temperature is hot then the display will begin to darken and the contrast will need to be manually reduced. Likewise, if the temperature is very cold the screen will lighten and the contrast will need to be increased. Simply select the CONTRAST button and either decrease or increase the contrast using the ◄ and ► buttons. To confirm your selection press . If the contrast is manually changed during extreme temperatures, the display may become unreadable when the Detector is returned to ‘normal’ temperatures making it difficult to see the contrast controls on screen. In this instance ensure that the Detector is OFF by switching the main power isolator OFF. After waiting for a few moments turn the switch ON to activate the Detector – the GPS LED will illuminate briefly during start up. Wait for a few moments to allow the Detector to complete its checks and then press the CONTRAST ( ) key twice. This will reset the contrast to factory default. 3.5.2. LCD Backlight The C-SCAN Detector is fitted with a LCD backlight to assist during low light conditions. The backlight is ON by default and as it uses very little power it can generally be left in this state. To toggle the backlight between ON and OFF simply select the BACKLIGHT button . 3.6. Detector Unit – Keypad The Detector Unit keypad is used to navigate through the various different screens used during a survey or to study the saved data. The main function keys are described below: Download key ON / OFF key GPS Indicator Leaders in Pipeline Survey Systems 14 Function keys Contrast key Backlight key NO key ( ) Help key YES key ( ) Back key Enter key CC--SSCCA ANN22001100 SYSTEM MANUAL Version 6.03 18 4. SIGNAL GENERATOR - FIELD OPERATIONS 4.1. Operating Environments The Signal Generator is housed in a strong weatherproof high impact structural copolymer case, but it is not designed for total immersion and is not certified for use in hazardous areas. The Signal Generator will operate between -20oC and +50oC. The efficiency of the battery however, is reduced under extremes of temperature. If internal temperatures reach 75ºC, the Signal Generator will automatically shut down and display a warning message that it is in ‘cooling mode’. Once temperatures have dropped the output will automatically restart at the previous current setting. Note: As the lid must be open during use, it is advisable to shade the Signal Generator from direct strong sunlight as this may cause overheating. 4.2. Survey Information Before a survey takes place it is recommended that as much detail as possible about the pipeline is gathered first. Information such as river or road crossings, bends, T-sections etc., will prove invaluable to the surveyor when in the field. See section 6.3 –planning a Survey. 4.3. Connection to Pipeline Before connecting to the pipeline, three important considerations have to be taken into account: 1) The location of a suitable injection point, 2) The potential for damaging AC currents and DC voltages existing on the line, and 3) The initial signal interference incurred when connecting to a pipeline. These are discussed in more detail below: 4.3.2. Check Pipeline Before connecting the Signal Generator to the pipeline it is very important to confirm if any AC currents or DC voltages exist on the pipeline being surveyed. Although the Signal Generator contains protection circuitry, this should only be relied upon as a last resort and all surveys should begin with the following procedure: • Disconnect all CP stations and cross-bonds to other pipelines within 1000m • Connect the Pipe and Ground leads to the pipeline and suitable earth, but do not connect to the Signal Generator yet. Using a multi-meter set to AC current, connect between the Pipe and Ground leads. If the meter indicates a value above 100mA RMS then there is a foreign AC signal on the line – DO NOT CONNECT SIGNAL GENERATOR CC--SSCCA ANN22001100 SYSTEM MANUAL Version 6.03 19 Leaders in Pipeline Survey Systems 4.3.1. Location of Injection Point To begin a survey the Signal Generator must first be connected to the pipeline being surveyed – the Signal Injection Point. Selecting a good injection point is a key part of the surveying process. When selecting the injection point it should be remembered that in most cases the applied signal will travel in both directions from the Injection Point, and that the Detector can operate moving towards the Injection Point (Signal Generator) as well as away from it. Surveying away from the Injection Point will see decreasing current values and hence positive attenuation values, while surveying towards the Injection Point will see increasing current values and therefore negative attenuation values. It is always recommended to survey away from the Injection Point so as to obtain positive attenuation values and never to survey across the Injection Point. Although these mistakes can be amended in DCAPP after downloading the survey, it is good practice to get into the habit of proper survey techniques from the start. Once the survey direction and area to be surveyed have been established a suitable injection point will need to be found, such as a Cathodic Protection (CP)Test Post, Transformer-Rectifier (TR) Station, valve or similar. • Set the multi-meter to DC volts and re-connect between the Pipe and Ground leads as before – and again, before they are connected to the Signal Generator. If the DC voltage is greater than +/-10v – DO NOT CONNECT SIGNAL GENERATOR The source of either foreign signal must be found and isolated before a survey can be started. Failure to check the above could result in permanent damage to the Signal Generator 4.3.3. Signal Interference Other points to consider when selecting the signal injection point is the availability of a good ground or earth connection, and the fact that a section of line 10-15 metres either side of the Injection Point cannot be surveyed because of mutual interference between the fields radiating from the Pipe lead connecting the Signal Generator to the pipeline. Thus, if it is intended to survey a road crossing or river etc, it is better not to use a signal Injection Point that is positioned at, or close to, the crossing to be checked. It must also be noted that when connecting to a pipeline via a remote connection such as a CP test post, TR station etc, the mutual interference experienced from the injected signal could be greater than 10-15 metres. The link between the CP test post/TR station and pipeline under survey may not be as direct as possible and may even cross the pipeline before it is bonded to the pipeline. In this instance the surveyor may experience initial rising current readings due to the anti-phase signal on the bonding cable. When current readings stop rising, the interference has subsided. 4.4. Connection Methods Methods of connecting to the pipeline can differ slightly but all require the same basic principle; a good, low-resistance connection to the pipeline and a good, low-resistance earth to complete the electrical circuit. Many surveys are compromised before they even start by a poor connection to a rusty valve. Once the signal injection point has been chosen, the Signal Generator should be placed close to it and connected to it using one of the Earth/Pipe leads plugged into the Pipe socket. The other Earth/Pipe lead should be plugged into the Ground socket and connected to a suitable earth. If connecting using CP test posts it is still imperative to disconnect active TR stations within 1000m while carrying out a survey. In all situations, the tests detailed in section 4.3.2 should always be carried out before connecting the Signal Generator. CC--SSCCA ANN22001100 SYSTEM MANUAL Version 6.03 20 Leaders in Pipeline Survey Systems Arguably, the best connection point to use is the TR station used for Cathodic Protection, as this has a direct connection to the pipeline and its own ground bed for a good earth connection. If the TR station is to be used as a connection then it must be switched off (de-energised) and the positive and negative leads disconnected from their relevant busses. The Signal Generator can then be connected to these positive and negative leads. Failure to shut down or disconnect the TR station before connecting the Signal Generator may permanently damage the Signal Generator. DISCONNECT TR station from Ground Bed and Pipeline Fig 4.1 – Disconnecting ground bed Although it is likely to be the best connection, it is incorrect to assume that the TR station has a perfect connection to the pipeline, as the cables connection the TR station to both the pipeline and ground bed may themselves be suffering corrosion or wear that is masked by high CP currents/voltages. The impedance indication given by the Signal Generator (see 3.2) may help to provide information about this, but if in doubt always perform resistance/impedance checks independently. If a TR station has been selected as the signal injection point, the ground bed lead (rectifier positive lead) and the lead connecting the rectifier to ‘pipeline under survey’ (rectifier negative) must be disconnected from the rectifier terminals. This completely isolates the pipeline under survey not only from the CP system but also other pipelines that may be protected by the same rectifier from a common buss. The Signal Generator Ground connection can now be safely connected to the rectifier’s ground bed, and the Signal Generator Pipe connection can be attached to the ‘pipeline under survey’ lead. Connecting the Signal Generator in this way not only provides the best connection to the pipeline, but it will also provide significant information as to the electrical integrity (loop impedance) of the rectifier’s ground bed and pipe connections. Fig 4.2 – Connection at CP test post CC--SSCCA ANN22001100 SYSTEM MANUAL Version 6.03 21 Leaders in Pipeline Survey Systems If a CP test post or valve is being used, the Signal Generator Ground lead should be clipped to one end of the Earth Extension Lead, and this in turn should be taken to a suitable grounding point as far away as possible from the pipeline – and at right angles to it. One or more of the Spikes should be driven into the ground at this earth point and the Earth Extension Lead should be attached to them (using the Earth Spike Jump cables provided, as necessary). Fig 4.3 – Fixing earth spikes perpendicular to pipeline Use of existing ground points (other than TR/CP ground beds), such as water pipes, lamp posts, steel fences, pylons, etc., may be necessary in some situations but must be chosen with care. If such structures are used as ground points it is essential to ensure that they do not approach or cross over the pipeline being surveyed at any point. When using a pylon, or similar, as an earth it must be noted that any system to ground failure of the mains electric being carried could damage the Signal Generator. Similarly the likelihood of any metal structure being struck by lighting has to be assessed 4.5. Setting the Signal Current Only when Pipe and Earth connections have safely been made, should the Signal Generator should be switched ON. The Signal Generator will carry out its own internal checks. When these checks are completed satisfactorily, the Operator can set the signal current. The flow diagrams in sections 4.9 and 4.10 below, outlines this process. The signal current is set using the AUTO, MANUAL or RECALL keys: AUTO: Pressing the AUTO key automatically sets the current to 600 mA. If the resistance of the ground/pipe circuit is such that 600mA cannot be attained then the Signal Generator will automatically set the current as close to 600mA as possible. If the signal is satisfactory, the survey can start. RECALL: Pressing the RECALL key will set the generator to the value that has been previously stored. CC--SSCCA ANN22001100 SYSTEM MANUAL Version 6.03 22 Leaders in Pipeline Survey Systems MANUAL: To manually set a current, hold the AUTO key to enter MANUAL mode and choose the current using the ▲▼ keys. When the chosen current is displayed press the AUTO key again to set the generator to this current. 4.6. Pipeline Voltage message The Signal Generator will check the existing AC voltage on the pipeline (the AC component of the pipe to soil potential) when it is first switched on and again when a current has been selected. If this is too high (greater than 10v peak voltage) then a warning will be shown. Pipeline Voltage too high!! Disconnect CP AUTO to restart If this warning is given, IT IS ESSENTIAL that the following procedure is carried out to avoid damage to the generator. • • • • • Disconnect all CP stations and cross-bonds to other pipelines within 1000m (if not already done) As detailed in 4.3.2, use a multi-meter set to AC current and connect between the Pipe and Ground leads – disconnect from Signal Generator first. If value is above 100mA RMS then there is a foreign AC signal on the line – DO NOT CONNECT SIGNAL GENERATOR Use a multi-meter set to DC volts and connect between the Pipe and Ground leads – disconnect from generator first. If the DC voltage is greater than +/-10v – DO NOT CONNECT SIGNAL GENERATOR Re-check Signal Generator (go through switch on procedure again) To proceed with the connection press AUTO. It is the responsibility of the surveyor to check the pipe-to-soil voltage (AC and DC) and current (AC) before proceeding. 4.7. Automatic level adjustment To carry out a Current Attenuation Survey it is essential to ensure a constant-current signal is applied to the pipeline. Once the signal current of the Signal Generator has been set, the Automatic Level Adjustment will become active after 1 minute. This mode is indicated by the message ‘OUTPUT LOCKED’ appearing on the display (see flow chart in 4.9 below). If conditions change dramatically such that the Signal Generator is unable to maintain the correct current, it will set the output to alternate between zero and the maximum attainable (up to the set value), every 6 seconds. The surveyor (the Detector operator) will notice the display on the Detector showing an alternating increasing and decreasing signal, indicating that the current is no longer stable and the Signal Generator and connections need to be checked. This usually occurs if the Earth Spike contact ‘dries out’ making a higher resistance circuit for which the Signal Generator is unable to compensate. CC--SSCCA ANN22001100 SYSTEM MANUAL Version 6.03 23 Leaders in Pipeline Survey Systems Once the signal current has been set, it will remain constant until the battery is exhausted. Any changes in operating conditions during the survey, e.g. changes in resistance at the Earth Spike due to rain or capillary action, will be automatically compensated for by the Signal Generator. 4.8. Apparent Problems with Current Value The maximum signal current achievable will be defined by the resistances in the Signal Generator–pipeline circuit. The circuit resistances consist of the following components: 1. Pipe to soil resistance ≈ 3Ω – usually small because of the large area in contact 2. Signal Generator to pipe connection ≈ 0Ω – should be zero for good connection 3. Signal Generator to earth connection – dependent on earthing system used see section 4.4. If the user is unable to apply any current at all, i.e. no output from the Signal Generator or the message ‘Output disconnected high resistance’ displayed, it can often be caused by a high value for item 3 above, but this must not be assumed and all components of the circuit need to be checked, including any cables being used. . Earth spike resistance Vs Current mA Resistance (ohms) 10000 1000 100 10 1 0 200 400 600 800 1000 1200 Current (mA) The graph above shows the earth contact resistance required for a given current to be achieved. Leaders in Pipeline Survey Systems CC--SSCCA ANN22001100 SYSTEM MANUAL Version 6.03 24 4.9. Key Sequence for AUTO Operation AUTO Operation On / Off 5 Seconds C-SCAN GENERATOR Pipeline 0v 99.8% C-SCAN GENERATOR CHECKING OK! V3.33 AUTO for 600mA or for MANUAL Hold AUTO ▲ for 1000mA AUTO MANUAL (HOLD) 100% 16:40 AUTO 937.5Hz 150mA >> 600mA Checking AUTO 937.5Hz TARGET 600mA 100% 08:40 AUTO 937.5Hz 408mA >> 600mA 99.7% 06:49 i25° 99.0% 06:12 o27° GENERATOR OUTPUT OUTPUT LOCKED SET to 600mA SET to 600mA 16w 10.7v 10Ω 15w 10.7v 10Ω 1 Minute Survey may start If no key press within10 Seconds 5 Seconds Recall OUTPUT IS LOCKED To UNLOCK ▲ SET to 600mA 15w 10.7v 10Ω From MANUAL Operation Recall S AUTO MANUAL (HOLD) Output OFF! AUTO/▲ Restart SET to: 0mA 15w 10.7v 10Ω Recall S OUTPUT UNLOCKED start NEW Survey if Output CHANGE 15w 10.7v 10Ω On / Off 5 Seconds To OFF Switching off! ISOLATE Battery When STORING for Long periods S OR AUTO MANUAL (HOLD) Leaders in Pipeline Survey Systems To MANUAL Operation 10 Seconds On / Off <1 Second 5 Seconds To OFF CC--SSCCA ANN22001100 SYSTEM MANUAL Version 6.03 25 4.10. Key sequence for MANUAL operation MANUAL Operation On / Off 5 Seconds C-SCAN GENERATOR CHECKING OK! V3.33 C-SCAN GENERATOR Pipeline 0v 99.8% Or from AUTO Operation AUTO for 600mA or for MANUAL Hold AUTO ▲ for 1000mA AUTO MANUAL (HOLD) HOLD AUTO to enter MANUAL set MANUAL use Keys ▼/▲ to change Set to: 600mA AUTO to SET Press and release ▲ increases current by 1mA Press and HOLD ▲ increases current by 10mA steps S Recall S Recall S MANUAL use Keys ▼/▲ to change Set to: 601mA AUTO to SET MANUAL use Keys ▼/▲ to change Set to: 610mA ▲ AUTO to SET MANUAL use Keys ▼/▲ to change ▲ Set to: 750mA ▲ AUTO to SET symbol shows increment by 10 ▲ ▲ ▲ symbol shows increment by 50 Leaders in Pipeline Survey Systems Continue to HOLD ▲ increases current by 50mA steps after next 50mA boundary Recall AUTO Store T Similarly use ▼ To decrease current MANUAL (HOLD) 100% 08:40 MANUAL 937.5Hz 408mA >> 750mA Continue as AUTO Operation CC--SSCCA ANN22001100 SYSTEM MANUAL Version 6.03 26 5. DETECTOR UNIT – Principal Display Screens 5.1. Start-up Screen When the Detector Unit is turned on it will complete a series of self checks and then the START-UP screen will be displayed, as shown in figure 5.1 (right). The information displayed here is: • Time and Date Set • Current Internal Temperature • Battery % = Off) • Antenna Status ( = ON, • Last Survey Location • GPS Status (default is OFF) • Function Keys: - Search Key - Pipeline Specification Menu - Menu Key Fig. 5.1 – the Start-up screen - GPS ON/OFF Note: The pipe symbol ( ) will only display if no pipeline details have been entered. Calculated conductance, resistance and cover data cannot be displayed unless the pipeline diameter and wall thickness are entered. Pressing the Search Key to enter the search screen will automatically turn on the GPS to ensure that GPS data is recorded during surveying. Pressing the GPS ON/OFF key will manually activate the GPS system and after a few seconds the screen will change to GPS ON to indicate that GPS is now searching. 5.2. Pipeline Specification Screen Using the keys OD UP or OD DOWN, scroll the list until the appropriate OD (outside diameter) is selected. Similarly, using the WALL UP or WALL DOWN keys, select the wall thickness required. When your selection is complete press Pressing ³ will exit without saving. to confirm. Fig. 5.2 – the Pipeline Specification Confirmation screen CC--SSCCA ANN22001100 SYSTEM MANUAL Version 6.03 27 Leaders in Pipeline Survey Systems In order for C-SCAN to calculate the conductance, resistance and depth of cover, the pipeline diameter needs to be entered. This can be done from the START-UP screen or during a survey. From the START-UP screen press the PIPE symbol ( ) (if the symbol is not displayed then details have been previously entered during a survey). The PIPELINE SPECIFICATION screen is now displayed, see figure 5.2. A final confirmation screen will confirm your selection (Fig. 5.3). If correct, select the key again to continue. If further editing of the specification is required, press the ³ key to return to the PIPELINE SPECIFICATION screen. Notes: Wall thickness may not be known, in which case select the “???” option. Calculation of conductance will then change slightly as an average will be taken. The resulting error will not be significant. Once the data has been downloaded to DCAPP, any size of Pipeline and Wall Thickness can be entered, so if the Pipeline Diameter or Wall Thickness required is not listed, choose the closest size and enter the correct data in DCAPP. Fig. 5.2 – the Pipeline Specification screen Fig. 5.3 – Pipeline Specification Confirmation screen Once the pipeline specification has been entered and accepted, the system returns to the START-UP Screen. As pipeline specification details have been entered, the SEARCH ) will be flashing, indicating that the instrument is ready to start a survey. To symbol ( start a survey, select SEARCH. 5.3. Search Screen When the SEARCH symbol ( ) is selected the Detector Unit enters SEARCH mode. The SEARCH screen allows the Surveyor to locate the pipeline so that readings can be taken. The main components of the SEARCH Screen can be seen in more detail in section 3.5 above. By studying that section and comparing to the example in Fig. 5.4 right, the following can be observed: Fig. 5.4 – Search screen Distance to Pipeline: In this example, the distance to the overhead position of the pipeline is approximately 1.2m, as shown at the top of the screen. Depth of Pipeline: The SEARCH screen indicates the depth to the centre of the pipeline ( ) is 1.3m. To change this to depth of cover, press the key adjacent to the cover symbol ( - bottom LH corner box). If the pipeline diameter has not been entered then this symbol will not be shown and only the depth to centre can be displayed. Pipeline diameter can be entered from the START-UP screen or after a reading has been taken. Fig. 5.5 – Position of the Detector relative to the pipeline CC--SSCCA ANN22001100 SYSTEM MANUAL Version 6.03 28 Leaders in Pipeline Survey Systems Pipeline Location: The central circle is indicating that the location of the pipeline is behind and to the right of the Detector Unit and the Surveyor – the Detector and Surveyor always being in the centre of the circle, and the pipeline indicated by the straight line crossing the circle. Fig. 5.5 below compares the SEARCH screen to the actual positions of the Detector and Pipeline. As the Surveyor rotates right to face the pipeline, the screen will show the pipeline move until it is in front of the Surveyor. NOTE: The circle equals to a 2 metre radius. If the pipeline is greater than 2 metres away then the line will stay at the periphery of the circle. The number above the circle indicates the horizontal distance in metres (1.2m in this example). If the pipeline is out of range no figure will be displayed. It is not possible to give accurate figures when the Detector is not directly over the pipeline, so all numbers shown are approximate (indicated by the ≈ symbol). GPS: The GPS status indication will show either: ACQUIRING: GPS data is blank, waiting for signal from satellites BAD: no satellites in view GOOD: satellites in view and acquired GPX: external GPS being used ANT FAIL: GPS antenna failure NOTE: More information about the GPS system can be found in section 12 below. 5.4. Menu Screen Menu: Pressing the MENU button from the START-UP screen accesses the Detector’s MENU screen. From here the following options are available: Option • Clear •³ • Info • Charge • Browse • Setup Section 11.5 2.4 6.4.7 Fig. 5.6 – Menu screen 5.4 Leaders in Pipeline Survey Systems Description Clear the survey data from C-SCAN’s memory Exit screen Info about C-SCAN such as serial number, location etc Enter Charge mode Browse the data stored in CSCAN Enter C-SCAN SETUP screen CC--SSCCA ANN22001100 SYSTEM MANUAL Version 6.03 29 Setup: Pressing SETUP opens the SETUP screen, allowing the following options to be set or updated: Option • Prog Description Update the Firmware inside the C-SCAN Turn On/Off Demo mode • Demo Exit screen •³ − Re-configure GPS system • GPS Setup − Turn on External GPS capability − Update Location Change the date stored in • Date C-SCAN Change the time stored in • Time C-SCAN • Calib − Recall the factory calibration details − Wipe all data and return CSCAN to factory default 5.5. Section 14 10 12 2.4 2.4 16.3 Fig. 5.7 – Setup screen Survey Screens The SURVEY screens seen during the process of carrying out a survey are described in section 6 DETECTOR UNIT – Field Operations Leaders in Pipeline Survey Systems CC--SSCCA ANN22001100 SYSTEM MANUAL Version 6.03 30 6. DETECTOR UNIT – Field Operations 6.1. Operating Environment The Detector is housed in a strong weather proof case, but is still a precision measuring instrument and should be treated as such. It is weatherproof to IP65 with total immersion up to a maximum of 500mm and is resistant to oils and alkalines. 6.2. Survey Principles The various types of survey and the general procedure for completing a survey are outlined below. These concentrate on coating evaluation surveys and will need to be adapted for unique surveys such as depth of cover surveys, although the principles remain the same. 6.2.1. Survey Type When using C-SCAN to survey a pipeline for the first time, Dynalog recommends the following as a survey method: Baseline Survey (Initial Survey) Periodic Survey (Subsequent Surveys) Closer Inspection CC--SSCCA ANN22001100 SYSTEM MANUAL Version 6.03 31 Leaders in Pipeline Survey Systems Fault Location (Close Interval Survey) The first survey carried out needs to build a baseline data profile of the pipeline. In this instance it is recommended to take survey readings approximately every 100m to build a complete picture of the pipeline, in both current (attenuation) and depth profiles. Any areas which produce high attenuation values can be analysed and repaired where necessary. (Attenuation values are discussed in section 7.2) For subsequent surveys, readings can be taken at much larger intervals as C-SCAN’s ability to produce absolute results means that these readings can be directly compared to the baseline survey or any previous C-SCAN survey data. This means that subsequent surveys can be carried out quickly to confirm that little or no change in attenuation levels has occurred, and only areas that show a marked increase in attenuation readings need further investigation. For areas that require closer inspection, the ‘halving’ method can be used to isolate the small section of pipeline that is producing high attenuation readings, or to confirm if a larger area has general coating degradation. This principle is explained in more detail in section 6.8. After the ‘halving’ method has been used to isolate the short section (30 – 45m typical) of pipeline in which the anomaly exists, the CLOSE INTERVAL mode in C-SCAN can be used to identify the anomaly (location and extent) for later action as necessary. 6.2.2. Survey Procedure Overview To carry out the above surveys, the following procedure is followed. These procedures are explained in more detail in the appropriate chapter listed: Survey Planning Signal Injection Locate Pipeline Locate Overhead Record Sample Repeat until low signal Move Generator Download Data Analyse & Report Clear C-SCAN 6.3 4.3 6.4.2 6.4.3 6.4.4 6.4.8 6.4.9 11.2 11.4.3 11.5 Survey Planning No two pipelines will produce identical survey results because of variations in size, coating, age, soil conditions, etc., but Dynalog has built up field experience over an extended series of trials which can provide initial guidance on survey planning and interpretation of the results obtained. As the Surveyor acquires his own field experience, particularly with repeat surveys on the same pipelines, he will refine and add to these techniques and develop additional skills in interpretation. 6.3.1. Preparation Before starting any survey, it is advisable to assemble as much information as possible about the pipeline. This should include a large scale map (1:5000 or better) showing the location of the pipeline and any other pipelines in the area, the approximate positions of all branches, valves, CP Test Posts, anodes, sleeves, and any other relevant information. The Surveyor should also review the available data on the pipeline’s history: date of installation, nature of wrap or coating, all recent survey reports, including ‘Pearson’ surveys and CIPS potential surveys, and when and where the line has been excavated and the coating repaired over the last five years or so, together with reports on defects found when excavating. CC--SSCCA ANN22001100 SYSTEM MANUAL Version 6.03 32 Leaders in Pipeline Survey Systems 6.3. It is always advisable to gather as much information as possible about the pipeline being surveyed before a survey starts. Connect the Signal Generator to the pipeline being surveyed using the methods described in this manual. Ensure that the signal cannot escape to, or enter from, another pipeline. Use the SEARCH screen to locate the position of the pipeline Use the OVERHEAD bars to accurately locate the position above the pipeline Take a reading from the OVERHEAD position and store the reading in the Detector’s memory. Continue taking readings at appropriate intervals until the signal on the pipeline becomes too low. To continue surveying the pipeline, the Signal Generator will need to be moved and a new survey started. The new injection point should allow for an overlap with the previous survey to ensure that no part of the pipeline is left un-surveyed. Once the area to be surveyed has been completed the data can be downloaded to computer using Dynalog’s DCAPP software. Once downloaded the data can be analysed using DCAPP and either printer or exported for use in other programs or documents/reports. Once the data has been successfully downloaded the detector memory can be cleared before the next survey. 6.3.2. Planning In planning a survey, particularly on a pipeline that has not been C-SCAN surveyed before, it is helpful to reference survey point locations and signal injection locations that can be marked on the map. Signal injection requires conductive electrical access to the pipeline and must therefore be at CP Test Posts, TR Stations, or possibly block valves, insulation joints, etc. When selecting these it should be remembered that the area in the immediate vicinity of the signal input cannot be surveyed (approx 10-15 metres), thus if a particular road or stream crossing is likely to be the site of faults, this requires that the Signal Generator is NOT positioned at the CP Post alongside the road/stream but at the next one. The surveyor should include some degree of overlap in the lengths of pipeline that are surveyed from each Signal Generator position to ensure that the ‘dead spots’ are adequately covered. DO NOT survey across the generator as the results obtained will be meaningless 6.3.3. Common Fault Areas The most common sites for wrap and coating defects are where the pipeline runs underneath roadways and rivers or streams, where the pipe trench has been cut through rock rather than soft sub-soil and where other excavations (for civil engineering work or laying additional pipelines) have taken place close to the line of the pipe after it was installed. Other areas to be checked include block valves, joints between sections installed by different teams at different times, steep slopes, and areas where the pipeline changes direction with a relatively small radius/bend. It is suggested that in these areas, the survey points should be relatively close together. 6.3.4. Reference Readings It may be desirable to compare absolute readings from one survey to the next – a reference reading. If reference readings are considered necessary then these should be taken at locations which must be identifiable and permanent, so that readings can be exactly repeated at a later date to check for changes in coating dielectric performance. This means that they should generally be at road crossings or field boundaries which can be identified on a map and on the ground. The sites for reference readings will frequently be dictated by the topography. Survey Procedure This section expands on the Survey Procedure Overview listed in 6.2.2 and guides the surveyor through the process of locating, sampling and saving data points in order to carry out a survey. 6.4.1. Signal Injection Before a survey can begin, the pipeline under inspection needs to be connected to the Signal Generator and the signal injected. Typical injection methods are given in section 4.3 with more advanced techniques discussed in section 8.6. 6.4.2. Locate Pipeline If surveying from the Signal Generator it must be remembered that the first survey point reading cannot be taken within 10-15 metres of the signal Injection Point due to ground interference effects discussed in section 4.3.3. Using the SEARCH screen as discussed in section 5.3 the surveyor should locate the pipeline under inspection and move the Detector closer until the straight line crosses the centre of the circle and the distance to the pipeline is zero (it is often easiest to approach the pipeline at right angles). Although the Detector is now over the pipeline the surveyor needs to ensure he is ‘overhead’ before taking any samples. CC--SSCCA ANN22001100 SYSTEM MANUAL Version 6.03 33 Leaders in Pipeline Survey Systems 6.4. 6.4.3. Locate Overhead In order to take a reading the Detector needs to be directly over the pipeline – overhead. Having located the pipeline as above, the surveyor will now move the Detector carefully until the two black ‘overhead’ bars at the top of the SEARCH screen begin to close, as shown below. The precise overhead position is achieved when they are as close together as possible. A sample can now be taken. Fig. 6.1 Locating the ‘overhead’ position Fig. 6.2 Overhead bars closing Fig. 6.3 Overhead bars meeting 6.4.4. Record Sample i) Take Reading Once the Detector has secured an overhead, two newly available function keys are displayed: the CALCULATION and CLOSE keys. CALCULATION (≈►=) The CALCULATION key takes a large sample of readings and converts these readings into accurate data. During this sampling it is important that the Detector is held stationary and perpendicular to the pipeline. Any movement will upset the readings resulting in data errors. CLOSE (CLOSE) The CLOSE key is for CLOSE INTERVAL CURRENT SURVEY mode. This is discussed in section 6.8.2 ) now and the Detector Keep the instrument still and press the CALCULATION key ( screen will temporarily change while the samples are being taken. Once the required number of samples has been gathered the CALCULATE screen will be displayed. Leaders in Pipeline Survey Systems Fig. 6.4 Preparing to take samples Fig. 6.5 Taking samples NOTE: If the Detector is in DEMO mode, the display will loop through the process of searching for the pipeline and obtaining an overhead signal. Press the ) appears. CALCULATION key when its symbol ( CC--SSCCA ANN22001100 SYSTEM MANUAL Version 6.03 34 ii) Calculate After a small delay (indicated by the hour-glass symbol) the screen will display the calculated results – see Fig. 6.6 right. The Depth of Cover , Depth to and Current remaining on the pipeline are Centre shown. Statistical analysis shows the error function for depth and current (shown as +/- 0.00 in this example). To return to the SEARCH screen, simply select the SEARCH key. NOTE: If no pipeline diameter/wall thickness has been entered then the Depth of Cover cannot be displayed and ? will be shown instead. This data can be entered when storing the data in iii) below Fig. 6.6 – the Calculate screen Three newly available keys are now displayed: STATS – this gives the statistical breakdown of the samples taken. STORE [ ] – this stores the data and continues to the next screen RE-CALCULATE [ ] – this retakes the sample and re-calculates the data. To store the sampled data into C-SCAN’s memory, press the STORE [ ] key now. iii) Store Data The STORE DATA screen gives the Surveyor an overview of the sampled data (depths & current) and gives the opportunity to enter or change the following: VISIBLE FEATURE [ ] – This enables a graphic icon representing a landscape feature to be noted Fig. 6.7 – Store Data screen and tagged to the data. These can aid future location or to act as a reference when studying the data after the survey. For a full list of the icons, see page 17 above. CHAINAGE [ ] – This allows absolute distance to be entered rather than distance from the previous survey point. It can be useful when entering distances referenced from a pipeline distance marker which aids in cross referencing later. See section 6.7 As this is the first point of the survey there is no other point of reference with which to calculate attenuation, conductance and resistance, so this point is designated the START POINT. All new surveys begin with a Start Point. NOTE: Pressing the ³ key returns to the SEARCH screen, and no data is stored. NOTE: For this example, only relative distances are used i.e. the distance from the previous survey point. Chainage is covered in Section 6.7 later in this manual. Press the STORE [ ] key now. CC--SSCCA ANN22001100 SYSTEM MANUAL Version 6.03 35 Leaders in Pipeline Survey Systems ) – If the diameter PIPELINE SPECIFICATION ( and wall thickness of the pipeline were not set before the survey was started, then this pipe symbol will flash and the Surveyor is given a second opportunity to enter the data. If the details were previously entered then no symbol will appear, as in this example. iv) Start Point Screen The START POINT screen in Fig. 6.8 is the final screen before data is stored in memory. As before, an overview of the data is given at the top of the screen, but this time with the addition of the following: │↔│ - Distance from previous location point. As this is the first point #000 = 000m is shown →│ - Chainage (0m) S#00 - Survey Number To store this data, press the key and C-SCAN will store the data and return to the START-UP screen. To revert to the previous screen, press the ³ key. Fig. 6.8 – Start Point screen Press the key now to store this Start Point. The first survey point has now been completed. 6.4.5. Subsequent Samples Now that a Start Point has been recorded, subsequent samples can be taken to assess the condition of the coating between these sections. The Detector should now be moved an appropriate distance ready for the next sample. The distance moved can depend on many factors, such as: The type of survey – Baseline surveys will have more regular survey points closer together. Repeat surveys may vary their survey points depending on the coating/area being surveyed • Attention to specific sections of pipeline – Road or river crossings or areas of high consequence such as built up areas may warrant closer inspection • Access to the pipeline – Survey points will often be dictated by the topography of the area, and will vary if the ideal position is in the middle of a river or road etc • Quality of coating – The further apart the samples are taken the less impact a single anomaly will have on the overall attenuation. So survey points taken 1500m apart will require a large single anomaly or area of general degradation before the Surveyor sees a significant rise in overall attenuation • Any previous survey data – All results from C-SCAN are absolute, so can be compared to previous surveys, but if a C-SCAN survey has been carried out before then taking repeat samples at the same points means that data can be directly compared to previous samples with ease Once a distance has been decided upon, the Detector should be moved to the new survey point and the same process of finding the pipeline and obtaining an overhead should be followed – steps 6.4.2 - 6.4.3. As before, once an overhead is obtained then a reading should be taken – 6.4.4 i) & ii). This time, instead of being a Start Point a distance will be entered. CC--SSCCA ANN22001100 SYSTEM MANUAL Version 6.03 36 Leaders in Pipeline Survey Systems • 6.4.6. Entering Distance Once a sample has been taken the Surveyor will store this data and will need to tell the system the distance between this and the previous survey point (or Start Point). When you reach the STORE DATA screen in 6.4.4 iii) it will differ slightly from when a Start Point was being entered. Comparing the screen of Fig. 6.9 to that of Fig. 6.7 above, several new keys are now available: Use – Instead of measuring and entering a distance manually, the distance as calculated by GPS GPS can automatically be used by pressing this button. The calculated GPS distance is always shown for information – 100m in Fig 6.9. See section 6.6 for more info on GPS distance. – Create a new Start Point if a new survey has begun or the Generator output has changed. +/- – If the surveyor has surveyed back towards the Generator then a negative distance must be entered using this button. This maybe used when a section of pipeline is being ‘halved’ to isolate any anomalies. Fig. 6.9 – Enter Distance screen Until a distance has been entered into the Detector, the STORE button will not be visible. Once a distance is entered or the GPS distance selected, the store button ( ) appears and the data can be stored. As the distance is entered it will appear at the bottom of the screen, in this example the distance from the start point #000 to the next point #001 is entered as 100m. Therefore #000#001 = becomes #000#001 =100 – see Fig 6.10 If the distance entered is incorrect, the delete key () can be used to delete each character. Fig. 6.10 – Entered distance NOTE: The +/- box key is used to change direction; POSITIVE (+ve) distances are away from the Signal Generator, while NEGATIVE (-ve) distances are towards the Signal Generator. Surveys should always be conducted away from the Generator (4.3.1), with negative distances being used during the halving technique as described in section 6.8. Data point numbers (#001 etc.) are incremented sequentially until memory is cleared. Press the STORE [ ] key now. CC--SSCCA ANN22001100 SYSTEM MANUAL Version 6.03 37 Leaders in Pipeline Survey Systems As discussed in section 4.3.1 and above, surveys should always be conducted away from the Injection Point. However, if the Surveyor surveys towards the Generator during the halving technique, the +/- key must be used to indicate this. This final screen provides a summary of the information before the data is permanently stored in memory. As with the Start Point, the Depth, Cover and Distance/Chainage information is shown, but as the Detector now has distance information from the previous survey point, values of Conductance and Resistance can now be displayed as in Fig 6.11. In this example, the following are shown: • Conductance: 195µS/m2 – micro-siemens per m2 • Resistance: 5.13kΩ.m2 – kilohms.m2 These figures relate to the coating condition allowing for pipeline diameter and wall thickness. Fig. 6.11 – Summary screen Finally, the START text denoting a Start Point has been replaced with the attenuation ( ) figure for that section of pipeline, in this instance 2.21 mB/m – millibels per metre. The attenuation value in mB/m, is the absolute rate of loss of signal current from the pipeline over any given section, in this example section #000 #001. It is independent of the value of the initial signal set on the Signal Generator and of the ground conditions. It is solely determined by the average condition of the coating between the two locations and by the area of pipeline coating in contact with the ground, per metre of pipeline – the pipeline diameter. For a pipeline of a given diameter, the attenuation value is an absolute indicator of dielectric performance of the coating; the lower the figure, the better. If comparing two pipelines of different diameters but with identical coating dielectric performance, the attenuation values will be proportional to the diameter. For more information about attenuation values, see section 7.2 Press the key now to store the data and continue. The graphs available are: ] – shows the CUMULATIVE ATTENUATION [ attenuation and distance between the current survey point and all previous survey points of the current survey. This is not available during BROWSE mode. Fig. 6.12 – Graphs screen GPS POSITION PLOT [ of the pipeline to scale. ] – this shows a plan view ATTENUATION PLOT [ ] – a bar graph of the attenuations recorded during this survey CURRENT PLOT [ DEPTH PLOT [ ] – shows the absolute current over the surveyed sections ] – shows the depth to: the centre-line [ depth of cover [ ] of the pipeline, or ]. CC--SSCCA ANN22001100 SYSTEM MANUAL Version 6.03 38 Leaders in Pipeline Survey Systems 6.4.7. Graphs If any survey data is stored in the Detector’s memory, the Operator has the option to view this data in graphical form to aid in identifying any anomalies in the coating without having to download the data or leave the field. These graphs can be accessed at any time via the BROWSE screen, but the operator is given the option to view them after each survey point stored. Within each graph the following options are available: ◄# - Move to previous survey point #► - Move to next survey point ). The Detector is now To return to the START-UP screen press the SEARCH icon ( ready to move to the next survey position and repeat the above process. 6.4.8. Low Signal The above process of taking and recording samples can be repeated until the signal from the Signal Generator is too weak to pick up. This is indicated on the search screen and (section 5.3) by the LOW indicator flashing between . When this occurs the Signal Generator needs to be moved to continue the survey. 6.4.9. Move Generator To continue a survey the Signal Generator can be moved and connected to the pipeline as before. When moving the Signal Generator two important points should be remembered: 1) Ensure there is some overlap with the previous survey so that no gaps appear in the data. Remember that the first 10-15m from the injection point cannot be surveyed. 2) When the Generator is moved, or the output current changed, a new survey must be started. 6.5. Survey Numbering & Memory Storage The first survey stored into an empty Detector memory will be allocated the ident S#00 and each new survey will be automatically incremented by 1. Similarly, starting with survey point #00, each survey point stored is incremented by 1. For example: Survey Number S#00 S#01 S#02 Survey Points #00 - #05 #06 - #13 #14 – #20 Number of points stored 6 8 7 CC--SSCCA ANN22001100 SYSTEM MANUAL Version 6.03 39 Leaders in Pipeline Survey Systems The total number of points or surveys that C-SCAN can hold in its memory is 500 points spread over 100 surveys (whichever number is reached first), so although it is unlikely that a surveyor will run out of memory, it is advisable to download the data and clear the memory after each survey, or survey series. 6.6. Notes on Entering Distances The distance that is entered is crucial to calculating the correct attenuation; hence it is very important that this value is correct. Remember that the distance entered relates to pipeline distance, not the direct distance between two points. If two successive points are taken around a bend in a pipeline and GPS is being used, it is important to enter the pipeline distance and NOT use the GPS distance, as this will cause an error. GPS will only calculate the straight line distance between two points. The table below shows the error for two readings taken 50m either side of a bend when comparing the direct line that would be calculated by GPS versus the actual pipeline distance. The increase in error can be seen with the increase in angle, as demonstrated below. Bend angle Pipeline Distance 0 10 20 30 40 50 60 70 80 90 Direct distance 100 100 100 101 102 103 104 105 106 107 % error 100 100 98 97 94 91 87 82 77 71 0 0 2 3 7 11 16 21 27 33 Fig. 6.13 – GPS distance 6.7. Chainage Chainage is the term given to incremental distance from the survey Start Point, i.e. the distance between a survey point and the Start Point of the survey, rather than the previous point. As an example, a survey has 4 points taken 100m apart. While the distance entered relates to the previous survey point, the chainage relates to the Start Point of the survey: Distance 0 100 100 100 Chainage 0 100 200 300 This can make it easier to reference if CP points have distance values already assigned to them. To use chainage rather than distance, use the chainage key as shown below. CC--SSCCA ANN22001100 SYSTEM MANUAL Version 6.03 40 Leaders in Pipeline Survey Systems Point #00 #01 #02 #03 Screen 1: Distance Screen 2: Chainage Start Point Chainage Start Point Select Distance button to enter distance screen (screen 1 – opposite) Select Chainage button to enter chainage screen (screen 2 – opposite) Fig. 6.14 – Entering Chainage NOTE: We may freely switch between CHAINAGE and DISTANCE. When a distance is entered, the chainage is automatically stored (it is displayed on the attenuation display). Point #00 #01 #02 #03 CP number 10 11 Line distance 3678 3978 distance 100 100 - chainage 3678 3778 3878 3978 Point #00 is entered as a chainage start point with a value of 3678m Points #01 and #02 are entered as distance from previous point as 100m Point #03 is entered as chainage 3978m. C-SCAN will calculate the Chainage of the two intermediate points, even though they were entered as Distances. NOTE: The maximum number that can be entered for chainage is 9,999m. CC--SSCCA ANN22001100 SYSTEM MANUAL Version 6.03 41 Leaders in Pipeline Survey Systems The CHAINAGE START POINT is used to start a new survey in the same way as a normal START POINT, except this Start Point does not have to be zero. As an example, consider a survey of four points. The first point is at CP marker 10 which has a distance marker of 3,678m (3.678km) and the last point is at CP marker 11 which has a distance marker of 3,978m (3.978km). The two intermediate points are 100m apart. 6.8. Fault Location There are two stages to fault location; firstly a closer inspection is required to locate the areas of high attenuation and reduce these to smaller sections of pipeline. This is needed to confirm if high attenuation readings are due to either a single anomaly or an area of general degradation in the coating. If a single fault is suspected, a Close Interval Current Only survey can be used to locate the anomaly. 6.8.1. Closer Inspection There are occasions when a survey is proceeding and every point surveyed is producing excellent results i.e. attenuations less than 1 mB/m. But then a section is encountered that has a high attenuation, say 10 mB/m. If the gap between each point has been 100m, then we do not know where in the last 100m the anomaly lies, so we need to use the ‘halving technique’ and go back to a point half way. This is demonstrated on the diagram below (Fig 6.15), where the attenuation between points #02 & #03 is 10mB/m, so a sample is taken at the mid-point between these two – point #04. The sample taken at this point will reveal in which half the anomaly lies i.e. between points #02#04 or between points #03#04. As the attenuation reading between points #03 and #04 is back to a normal level (0.73mB/m) when compared to rest of the pipeline, we know that the anomaly must lie between points #02 and #04. Fig. 6.15 – Halving Technique This technique of halving can be repeated again and again until the section with the anomaly is identified, or it is shown that a length of the pipeline has generally poor coating. Remember that going towards the generator is a negative distance. If GPS is being used, a minus (–ve) must still be used when surveying towards the Generator. GPS has no concept of direction. When asked to enter the distance press USE GPS then use the +/- button to change between +ve and –ve values. NOTE: If chainage is being used just enter the chainage distance; there is no need for a sign. Chainage inherently works out the position correctly. We have now identified that the coating defect lies between points #02#04, but from the information above, we do not know the attenuation value between these points. To see this we need to look at the graphs in more detail, in particular the attenuation graph. As described in section 6.4.7 (Graphs) the operator is given the option after each survey point to view the graphs or they can be viewed at any time for all surveys from the BROWSE screen. Via either method, choose the attenuation graph. CC--SSCCA ANN22001100 SYSTEM MANUAL Version 6.03 42 Leaders in Pipeline Survey Systems However, it must be remembered that when a survey point is taken closer to the Generator than the previous point a change of survey direction has taken place and a negative (-ve) distance will need to be entered into the Detector. The Detector will only know that point #04 lies between point #02 & #03 if a negative distance is entered, otherwise point #04 will continue on from point #03. The graph in Fig 6.16 shows attenuation values as the points were gathered i.e. ). The two low reading of points #00#01 & #01#02 are sequenced in time ( followed by the 10mB/m reading between points #02#03 as these were the order in which they were taken. Finally, the low attenuation of points #03#04 can be seen. If we re-sequence the graph by Chainage ( ), then the attenuations are now calculated in distance order. The attenuations for points #00#01, #01#02 remain unchanged, but now the attenuation for points #02#04 & #04#03 can be seen, as in Fig 6.17 The Graphs can be switched between order ( appropriate key. Fig. 6.16 Attenuations by order ) and Chainage ( ) by selecting the Fig. 6.17 Attenuations by distance Using the ◄# and #► arrow keys, you can choose a section of the survey and the details for section will be displayed above the graph. If the graph is being viewed in time mode (as the points were gathered – Fig 6.16) then the points will increment in order. If you switch to Chainage mode (Fig 6.17) then the using the ◄# and #► arrows will increment in distance order. So in the example above, we can switch to chainage mode and scroll through the points and see the attenuation between #02 and #04 is 19.25 mB/m. The method of conducting a Close Interval survey is similar to normal C-SCAN surveying but with a few difference. Firstly, in Close Interval mode the distance between survey points is chosen first, and is always the same spacing. Secondly, Close Interval surveying only calculates the current on the pipeline and does not calculate the attenuation. Normal attenuation readings have no meaning when the distance interval is less than (<) 15m. This is because small distances create large attenuations on small current changes – this effectively makes the attenuation values difficult to interpret. The Close Interval mode uses current only to map a section of pipeline. CC--SSCCA ANN22001100 SYSTEM MANUAL Version 6.03 43 Leaders in Pipeline Survey Systems 6.8.2. Close Interval Mode Once a Closer Inspection has been carried out on a section of pipeline with higher than average readings, a Close Interval Current Only survey can be used to pin-point an anomaly with greater accuracy (to within +/-1m or better depending on conditions). To start a close interval survey enter the search screen ( ) and locate the pipeline as normal, but rather than press the calculate key ( ), press the key marked ‘close’ instead. This will reveal the following screen: The Surveyor is then asked to choose the interval at which the Close Interval readings will be taken. It is very important that the readings are taken at the correct distance chosen, otherwise errors will occur. Fig. 6.18 – Choosing Spacing In this example, an interval of 5m between each reading is chosen. To confirm the selection, press a different interval. or press ³ to choose Fig. 6.19 – Spacing Selection Once a selection has been made, the Close Interval survey can begin and the CLOSE INTERVAL screen is shown – Fig 6.20. The CLOSE INTERVAL screen contains many of the elements of the SEARCH screen that are already familiar. The difference in the CLOSE INTERVAL screen is the graph displays the calculated current in real-time for each point. As the Detector reads the current, a dot is displayed on the graph representing the current on the pipeline. Check the unit is overhead by using the circle and overhead bars as before. Fig. 6.20 – Close Interval screen CC--SSCCA ANN22001100 SYSTEM MANUAL Version 6.03 44 Leaders in Pipeline Survey Systems As with the SEARCH screen, the Pipeline Position Indicator is shown as a circle and line, but this time it is located in the top right of the screen with the approximate distance shown above. The two Overhead Location Bars are also shown, as before, along with the Depth and Current. When a reading is ready to be taken, the calculate key ( ) is used as normal. The Detector will take a range of samples as before, but instead of changing to the STORE screen, the graph changes to a vertical bar showing the maximum, minimum and average current readings taken for this point. This can be seen in Fig 6.21, below, where several samples have already been taken. Move along the pipeline to the next interval point (in this case 5m) and use the Pipeline Position circle and Overhead bars at the top of the screen to ensure you are correctly located over the pipeline. When you are ready to take the next reading press the calculate ] as before and the survey continues – this is shown on the following screen after key [ several readings have been taken: The UP and DOWN keys allow you to zoom in on the graph. Press ³ to ignore the sample and retake the reading or press to accept the reading. After several readings, the current profile shown by the graph identifies where the current on the pipeline starts to drop before levelling out again. This drop in current is centred on a single anomaly in the coating. Fig. 6.21 – Close Interval Profile The survey may continue for as far as necessary. The graph will auto-scale to fit the points. When enough points have been taken and you wish to finish the Close Interval survey, press STOP. The following screen will be shown. Fig. 6.22 – Storing Close Interval survey After pressing the store key, the screen will revert to the search screen. CC--SSCCA ANN22001100 SYSTEM MANUAL Version 6.03 45 Leaders in Pipeline Survey Systems Press the store key [ ] to finish the Close Interval survey and save the data. Pressing ³ will not delete any data but will cancel the data saving and allow you to continue with the close interval survey. When conducting a Close Interval survey to locate a specific anomaly, one of two results will normally be seen. These are: As in the above example, this graph shows a single anomaly. The current on the pipeline is quite stable when measured at such a short distance, but then a sudden drop is seen before the current levels out again. The anomaly area is in the centre of the slope and it could consist of a single fault, a small group of faults or some other contact with the pipeline such as a cross bond etc. This type of profile can also be produced by foreign contact with the pipeline, taps, branches (or T’s) etc., as discussed in section 8. Fig. 6.23 – Analysing Survey It is often quite normal to see a small rise in current at the base of the slope. See section 8.10 It is possible to have several drops in current with the current levelling out in between, signifying several isolated faults within one area. This can be seen in the Examples in section 9. A current profile as shown here does not have the same defined defect area as that shown above. In this instance it is most likely that the entire area is suffering from general degradation of the coating. NOTE: During close interval surveying, the attenuation values and GPS positions are not displayed in C-SCAN but will be displayed in DCAPP CC--SSCCA ANN22001100 SYSTEM MANUAL Version 6.03 46 Leaders in Pipeline Survey Systems Fig. 6.24 – Area of degradation 7. SURVEY PLANNING AND INTERPRETATION OF RESULTS 7.1. Distance Between Survey Points When carrying out a survey, the distance between survey points is one of the decisions that the Surveyor will have to make. The optimum distance between readings will depend on two main factors: the general quality of the line and the minimum size of anomaly that is likely to require accurate location for excavation, investigation and repair. On a pipeline that has not been surveyed with a C-SCAN system before, it is important that the distance between readings is short, so that all anomalies can be captured – this is where the baseline survey is recommended. But for future surveys the distance between readings will be decided in part by the results of the baseline survey. If the results show an excellent coating with consistently low attenuation figures, then future surveys can be carried out with a greater spacing between points. If the results show a coating in poor condition with high attenuations, then it may be decided to either repair the damaged coating or continue to survey but instead concentrate on single ‘point’ faults where attenuations are significantly higher that the baseline reading. However, it must be remembered that while a single small fault may raise the attenuation levels by a noticeable amount when readings are taken at the baseline 100m intervals, this same fault may not raise attenuation levels enough to be noticed when readings are taken at greater intervals, e.g. 1000m. So the distance between survey points may need to be adjusted depending on the level of detail that is required. 7.2. Attenuation Values Attenuation figures measure the logarithmic rate of decline of the applied current, per metre length of the pipeline. The unit is millibels per metre, even when using imperial measurements. Typical attenuation values for well protected lines of various sizes are*: 0.4mB/m 1mB/m 5mB/m 5mB/m Excellent coating Good to fair coating Fair to bad coating Bad to no coating 12” Pipeline Less than 0.5mB/m to 1.5mB/m to Above 0.5mB/m 1.5mB/m 6mB/m 6mB/m Excellent coating Good to fair coating Fair to bad coating Bad to no coating 24” Pipeline Less than 0.6mB/m to 1.8mB/m to Above 0.6mB/m 1.8mB/m 8.0mB/m 8.0mB/m Excellent coating Good to fair coating Fair to bad coating Bad to no coating 36” Pipeline Less than 0.7mB/m to 2.0mB/m to Above 0.7mB/m 2.0mB/m 9.5mB/m 9.5mB/m Excellent coating Good to fair coating Fair to bad coating Bad to no coating *Figures based on Coal Tar/Bitumen coating. Coating type can be chosen in DCAPP There is a maximum attenuation that can be observed, and this occurs when all coating has been lost (bare pipe). In this situation, the maximum attenuation is limited by soil resistivity. The graph below shows these limits: CC--SSCCA ANN22001100 SYSTEM MANUAL Version 6.03 47 Leaders in Pipeline Survey Systems 6” Pipeline Less than 0.4mB/m to 1mB/m to Above Fig. 7.1 – Maximum attenuations with soil resistivities It is possible to reach or even exceed these maximum attenuation levels if the pipeline being surveyed is in contact with a foreign object, which itself is shorted to ground, as this can provide a lower resistance path than the surrounding soil. 7.3. Conductance Less than 100 μS/m2 100uS to 500 μS/m2 500uS to Above Excellent coating Good to fair coating 2 Fair to bad coating 2 Bad to no coating 2000 μS/ m 2000 μS/ m The unit μS/m2 is one-millionth (micro) of a Siemen per square metre. It should be noted that the NACE values are calculated from a DC perspective and scaled for a soil resistivity of 1,000 Ω.cm. The conductance as defined gives a value per square metre such that a pipeline of 10m length and 1m diameter will have the same area as a pipeline of 33m length and 30cm diameter. Therefore to calculate the conductance the diameter must be known. If the diameter is unknown the conductance will not be indicated, however, pipeline diameter can be entered in DCAPP, post-survey, to calculate conductance if these details were not know when the survey was carried out. CC--SSCCA ANN22001100 SYSTEM MANUAL Version 6.03 48 Leaders in Pipeline Survey Systems Within C-SCAN and DCAPP, figures are given for conductance as well as attenuation. Conductance measures the coating’s ability to conduct an electric current. For a coating, where its insulation property is paramount, this value is zero for a perfect (unattainable) coating and infinite for bare pipe. The unit for conductance is Siemens (S) and it is the reciprocal of resistance. The definition used in surveys has been defined by NACE in TM0102-2002 (page 6) and is defined for pipeline coatings of various qualities as follows: As C-SCAN uses an AC detection method, the conductance per square metre is dependent on an additional factor of coating type. The Detector uses an average value to give a general indication of conductance and also assumes 1,000 Ω.cm soil. If a more definitive value is required, the coating type and soil resistivity can be entered into DCAPP. If coating resistance is needed then the following values can be used: Translating into ohms.m2 Greater than 10,000 Ω. m2 Excellent coating 10,000 to 2,000 Ω. m2 Good to fair coating 2,000 to 500 Ω. m2 Fair to bad coating Below 2 500 Ω. m Bad to no coating C-SCAN can display either conductance or resistance. NOTE: It is advisable to use conductance rather than resistance when displaying the data graphically. This is because any section of excellent coating will have a very high resistance, meaning areas of poor coating will have a low resistance and these data points will be very close to the horizontal axis, which will be difficult to read. As conductance is the reciprocal of resistance the opposite becomes true; areas of good coating will be displayed close to the horizontal axis leaving the poor coating areas exposed for better identification. The relationship between attenuation and conductance is complex and the formulae are derived from extended simulations, manufacturer’s coating data and pipeline steel characteristics. This relationship is shown in the graph below for soil resistivities of 1,000, 10,000 and 20,000 Ω.cm Leaders in Pipeline Survey Systems Fig. 7.2 – Attenuation/Conductance for various soil resistivities CC--SSCCA ANN22001100 SYSTEM MANUAL Version 6.03 49 7.4. Signal Range When connected to a pipeline, the range of the signal applied by the Signal Generator is dependant on the following criteria: 1. 2. Wrap/Coating condition Amount of signal applied For a pipeline with poor coating, the attenuations will be high and therefore the range will be limited as more of the signal is ‘leaked’ from the pipeline through poor coating. If a low signal is applied the range is also reduced. It must be noted that a doubling of the injection current will not result in twice the distance achieved. The following graph shows the relationship between the maximum range versus attenuation for a given injection current. The graph assumes that the Signal Generator current is split into two at the injection point i.e. half the signal goes in one direction and half in the other as is normally the case. If a survey starts at an insulating joint/flange then the current is doubled as all the signal heads in the same direction. See section 8.6 for more information. Range Vs attenuation 100000 distance (m) 10000 1000 100 10 1 0 1 2 3 4 5 6 7 1000mA 600mA 150mA Fig 7.3 – Range v Attenuation 7.5. Fault Size There is no general linear relationship between local attenuation figures and size of fault/anomaly. These can be affected by local soil resistivity (in particular whether the pipeline is above or below the local water table) and by the build-up of corrosion deposits at a fault over time. It is also possible that an apparently small fault at the surface of the wrap is related to a large area of hidden wrap disbondment and therefore produces a large local attenuation. It is probable that for any given pipeline, the correlation between fault size and local attenuation will be closer, but confirmation of this requires more data collected over an extended period. CC--SSCCA ANN22001100 SYSTEM MANUAL Version 6.03 50 Leaders in Pipeline Survey Systems Attenuation mb/m 7.6. Minimum Distance Between Survey Points Unless a pipeline is in extremely poor condition, it is not generally advisable to take attenuation measurements at less than 15 metre intervals, because the possible signal errors are of a similar size to the signal loss on a well protected pipeline over such a short distance. The attenuation readings obtained would thus be virtually meaningless. This does not apply when the Surveyor is using the ‘halving’ technique to narrow down the section in which an anomaly lies, as here large local differences in attenuation are being sought, which will be greater than ambient signal loss on a well protected pipeline. 7.7. Reading Accuracy The accuracy of the readings obtained is generally in the range +/- 2% but this can be affected by a number of factors: depth of pipe, strength of signal, the presence of large faults, field distortion due to other pipes or buried structures close by, etc. In tests, using a signal level between 90 and 140 mA, and with minimum local distortion, at depths down to 3 metres, the depth reading was within 2% 65% of the time and within 5% 100% of the time. At depths between 3 metres and 5 metres, readings were within 2% 20% of the time, within 5% 50% of the time and within 10% 100% of the time. 7.8. Close Interval Surveys To locate specific faults, the suspect section should be narrowed down to 20-50 metres. This will either be done by using the halving technique or by taking attenuation readings at closer intervals in areas commonly associated with faults (see 6.3.3). The Operator should then take readings of current only at intervals of 3-5 metres over the suspect section using the Close Interval Mode described in section 6.8.2. These readings will be stored in a special format. The faults will be located where there is a steep fall in current level, and the precise position will usually be close to the mid-point on the steepest slope. If readings are taken at intervals smaller than 3-5 metres, the signal errors will produce a ‘saw-tooth’ plot which could make it more difficult to identify the anomaly site. For more information on how to complete a close interval survey, refer to section 6.8.2 7.9. Repeat Surveys CC--SSCCA ANN22001100 SYSTEM MANUAL Version 6.03 51 Leaders in Pipeline Survey Systems Much of the benefit of the signal attenuation survey system arises from the speed and low comparative cost with which a general survey can be carried out. These benefits become more marked in repeat surveys of lines that have already had a C-SCAN survey. Repeat surveys of selected sections can be carried out at more frequent intervals using the downloaded data or print-out to identify those sections where deterioration is most serious or is advancing most rapidly so that they can be dealt with in good time. The download or print-out itself provides a record of a survey having taken place at a particular date, in a form increasingly being demanded by the regulatory authorities. 7.10. Long Term Program A long term survey programme and good record keeping is essential if the full benefit is to be obtained from this equipment. After the baseline survey has been completed, the following approach is suggested: a) Carry out a general survey of whole pipeline at intervals of several hundred metres (shorter on high risk sections). Specific fault/anomaly location only on sections with very high attenuation. b) Study the results of (a) above and draw up a programme of specific fault/anomaly location for the highest risk sections (say 10-30% of the whole line) taking account of the extent to which the CP System can cope with minor faults. c) When a programme of fault location has been drawn up, survey the relevant section immediately before and after the repair work. d) Where any excavations, building work, pipe laying, road works, etc., are to take place near the pipeline, arrange for a check survey of the relevant section before and after the work to establish the responsibility for any resultant damage. e) Repeat (a) periodically (say every 1-2 years), if possible taking readings at exactly the same places each time to facilitate comparisons and the identification of rates of pipeline deterioration. f) Correlate data on local mB/m losses (or percentage current loss) with actual fault sizes for different coatings, sizes of pipe and soil conditions, and correlate CP current drain with local attenuation rates to improve the predictive value of the data collected. 7.11. High Soil Resistivities If the earth resistance is extremely high, it may not be possible to obtain a useful signal current, even with all the available Earth Spikes in use. This may occur in extremely dry terrain (desert or semi-desert) or where there is only a thin covering of soil over rock with a high electrical resistance (e.g. granite). In this situation it may be necessary to prepare a special ‘ground bed’ to minimise the resistance. This can be done by laying a Spike on a sheet of aluminium foil which is placed in a trench, covered with water, and buried. In extremely high resistivity soils, the resistivity is of the order of the pipeline coating. In this case only serve faults can be found unless the survey is carried out during the wet season when the soil resistivity drops significantly. This is demonstrated on the following graph: Leaders in Pipeline Survey Systems CC--SSCCA ANN22001100 SYSTEM MANUAL Version 6.03 52 Fig 7.4 – Attenuation v Conductance for various ground resistivities By studying the graph it can be seen that when soil resistivities are above 100k ohm.cm, the change in attenuation between fair and bad (500µS/m2 and 2000µS/m2) is very small. There is very little change in attenuation on the 1M Ω.cm & 10M Ω.cm lines between the two conductance values. For further information about earthing (grounding), see section 16.2 below. Resistivity changes during the course of a survey should not materially affect the results, as the current stabilising circuitry in the Signal Generator will ensure that the applied signal current remains constant despite such changes; until deliberately altered by the Surveyor. Seasonal changes in soil resistivity (from a wet spring to a hot dry summer) will affect the results, but experience to date suggests that changes in attenuation arising from this cause are unlikely to exceed 5%. This variation can be allowed for and is unlikely to affect the validity of the results. For regular ‘check’ surveys, it is suggested that any given pipeline is always surveyed at the same time of year to minimise possible interpretation errors from this source. If preferred, the resistivity of the soil can be measured with the appropriate equipment and the reading can be entered into DCAPP when the data is downloaded. 7.13. New Pipelines It is strongly urged that new pipelines should be checked, section by section, after laying but before backfill is complete. This will enable the surveyor to locate many of the wrap faults and damage caused during installation so that repairs can be effected with minimum disturbance and delay. Current values and attenuation rate (but not accurate depth readings) can be obtained from the side of the trench by tilting the Detector so that the antenna tube ‘points’ at the pipeline and the OVERHEAD signal is obtained on the display. CC--SSCCA ANN22001100 SYSTEM MANUAL Version 6.03 53 Leaders in Pipeline Survey Systems 7.12. Changes in Soil Resistivity 8. INTERFERENCE AND FIELD DISTORTION 8.1. The C-SCAN Signal The C-SCAN System operates with a ‘clean’ sine wave signal of 937.5Hz. The band width of the filters on the Detector is less than 20Hz. The frequency used and the small band width have been selected to minimise interference from commonly occurring frequencies while maximising the distance that the signal can travel and still provide useful data (5-10 kilometres on a reasonably well protected pipeline). 8.2. Ground Lead Interference When the signal is injected onto the pipeline, the Ground Lead coming from the Signal Generator will emit a signal similar to that of the pipeline at the signal injection point, and the signal will divide where it enters the pipeline, with roughly half of the signal going in each direction. There will therefore be considerable mutual interference of radiating fields around the signal input point. In order to minimise the length of pipe over which this interference is likely to prevent useful readings being taken, it is essential that the cables are laid out perpendicular (at 90º) to the pipeline axis, and the ground point is as far away as possible. In normal circumstances, a length of pipe 5-15 metres (depending on depth of pipeline) either side of the signal injection point cannot be surveyed and must be covered in the next ‘leg’ when the Signal Generator has been moved to its next location. 8.3. Other Signals Carried by the Pipeline The instrument is not affected by any residual ‘ripple’ in the rectified current used in standard cathodic protection systems, provided it is within certain limits (see 4.6, on page 23). The C-SCAN signal will be significantly distorted if a ‘Pearson’ type survey is carried out on any section of the same pipeline at the same time as a C-SCAN survey. Some forms of military signals using powerful transmitters which are located near to a pipeline, can result in the pipeline acting as an antenna and re-radiating a signal which may overlap with the C-SCAN signal. If the existence of such interference is suspected, the operator should turn off the Signal Generator and check whether a signal can still be detected on the pipeline. If the ‘external’ signal appears to be constant, the true C-SCAN signal will be arrived at by subtracting the value of the ‘external’ signal. 8.4. Buried Metal Structures Buried metal structures which are relatively large (e.g. other pipelines) and pass close to or lie in the same trench as the pipeline under survey, can sometimes pick up the applied signal and re-radiate it. This can occur through inductance or through signal current escaping from a fault in the wrap on one pipeline and transferring to the other. This is particularly likely to occur if the Signal Generator Earth Spike has been placed close to, say, an unwrapped iron water pipe which also crosses the pipe being surveyed at some point. The operator will usually recognise the anomalous readings produced in this situation and must repeat the survey with the Signal Generator at a different location. CC--SSCCA ANN22001100 SYSTEM MANUAL Version 6.03 54 Leaders in Pipeline Survey Systems Overhead power lines of normal height will not normally affect the readings. The instrument may pick up transient signals within its frequency range which arise in a random fashion from e.g. telephone lines laid close to the pipeline, but these will usually be eliminated by the signal averaging system. 8.5. Cross Bonds Pipelines which run near to each other are frequently bonded to reduce the possibility of corrosion being induced on one of them by a high CP potential on the other. These bonds can usually be disconnected at CP test posts. It is usually advisable to disconnect all cross-bonds for at least the next five to ten kilometres when carrying out a survey. If this cannot be done, the bonds will show up as ‘faults’ and some of the signal will be transferred to the other line where it may be picked up during the survey. It is usually possible to distinguish the ‘survey’ pipeline from the one carrying a signal returned via a cross-bond by the considerable difference in signal strength. 8.6. Insulating Joints/Flanges Where pipelines enter hazardous areas, or at the interface between a section protected by sacrificial anodes and a section protected by an applied CP potential (e.g. at the shore line), it is sometimes the practice to insert an insulating joint/ flange which electrically isolates one section of pipeline from the other. If the C-SCAN operator is surveying the CP protected section and approaches such a flange, the signal level will drop rapidly and there may be a very high apparent attenuation and depth over the last few hundred metres before the flange as the entire signal must leave the pipeline before the Insulating Joint. The attenuation and current plots, below, graphically show this phenomenon. There are several methods of not only overcoming this but using the IJ as an advantage to surveying and these are detailed below. CC--SSCCA ANN22001100 SYSTEM MANUAL Version 6.03 55 Leaders in Pipeline Survey Systems Fig 8.1 – Current and Attenuation plots at approach to IJ There are 4 recognised methods to survey near to, or across, an Insulation Joint: Use a link to bridge the IJ. Both sections of the pipeline either side of the joint can be surveyed as if the joint were not there Use the IJ as the injection point This has the additional benefit that the entire signal will be sent in one direction along the pipeline. Use the IJ to separate between the injection and earth points – there’s no need for a separate earth connection In this instance two separate surveys can be carried out. One in either direction. In this instance only, run the earth cable parallel to the pipeline CC--SSCCA ANN22001100 SYSTEM MANUAL Version 6.03 56 Leaders in Pipeline Survey Systems Use the Earth Spikes for the ground connection 8.7. Sacrificial Anodes These are generally used instead of an applied CP current as a means of protecting the pipeline. They will show up as ‘faults’ on a C-SCAN survey and should be disconnected if possible because they will severely reduce the available current and thus shorten the length of pipeline that can be surveyed from one Signal Generator location. 8.8. Pipeline Bends and ‘Tees’ Bends (of radius less than approximately 10 metres) and ‘T’ or ‘Y’ junctions in pipelines will often result in local distortion of the radiated field because of mutual interference between the signals from adjacent sections. Although discrete coating faults can usually be located in these areas with a short Close Interval survey, readings taken close to bends and Tees should not be used to compute attenuation levels over long sections of pipeline. It must be remembered that bends can be vertical as well as horizontal, especially near river and road crossings. Reference points should, where possible, be at least five metres from a bend or junction. If attenuation readings are made across a junction, a fault will be indicated because the injected signal will split and part of the signal will travel along the other ‘leg’ of the pipeline. A good plan of the pipeline will help to identify these anomalies before they are encountered during a survey. 8.9. Sleeves When pipelines are ‘sleeved’ under a roadway, the pipeline is encased in a section of metal pipe of larger diameter which provides protection from mechanical damage. However, it is still possible to detect wrap faults on the enclosed pipeline provided that: a) There is no electrical connection between the pipe and the sleeve b) The sleeve itself has some form of coating (inside and out) c) The annular space between the pipe and the sleeve is filled with some reasonably conductive medium (e.g. moist grout) d) There is a potential electrical path between the ‘filler’ and the surrounding soil Useful results may be obtained in the absence of some of these conditions, but they should not be relied upon. Reference readings should not be taken over sleeved sections of pipeline. When part of the applied signal current escapes through a wrap fault into the soil, it will travel in the general direction of the Signal Generator earth point. After a short distance, the return current will become dispersed and virtually undetectable, but close to the fault, this current may produce a field which will interfere with the field radiating from the pipeline. This may produce a ‘dip’ in the apparent pipeline current plotted during a close interval locating survey, i.e. after the sharp fall in signal current (indicating the presence of an anomaly or fault) the current may return part way to its original level when the effects of the ‘return current’ are no longer present. This effect is particularly marked when operating close to the earth point, when the fault is large, and when the pipe itself is large and with cover of less than 1x the diameter. CC--SSCCA ANN22001100 SYSTEM MANUAL Version 6.03 57 Leaders in Pipeline Survey Systems 8.10. Effects of ‘Return Current’ 8.11. Orientation of Detector to Pipe Axis The C-SCAN Detector uses the vector sum of the outputs from the antenna coils so that variations in the horizontal angle between the axis of the instrument and that of the pipeline are compensated for (although it is good practice always to approach the pipeline from the same side and approximately at right angles to its axis). Although the main source of potential operator error is eliminated, there is still the necessity to ensure that the axis of the Detector antenna is perpendicular to the pipeline in the vertical plane. This is not a problem in normal conditions where the pipeline is effectively horizontal, and the instrument vertical. But where a pipeline has been installed on a steep slope, and is parallel to the ground surface it is important that the Detector is held with its axis perpendicular to the ground (i.e. not vertical). If the Detector is used vertically in such a situation, the ‘effective length’ of the antenna is reduced (by the Cosine of the angle), leading to errors in the derived information. Leaders in Pipeline Survey Systems CC--SSCCA ANN22001100 SYSTEM MANUAL Version 6.03 58 9. EXAMPLES 9.1. Example 1 Survey shows 6 survey points taken over 1151m. These two anomaly areas were identified by the high attenuations seen between survey points #1 #2 and #4 #5 Images taken from DCAPP. CC--SSCCA ANN22001100 SYSTEM MANUAL Version 6.03 59 Leaders in Pipeline Survey Systems A C-SCAN Close Interval survey was then carried out from just before survey point #1. The resulting current-only survey identified the defect – located in mid-point of the steep drop in current. 9.2. Example 2 This survey shows 5 points over 180m (600ft). A problem was shown to exist here as a high attenuation between survey points #2 #3. As in Example 1, a subsequent Close Interval survey was carried out. The results of this showed defects at 9m (30’) intervals. This spacing lined up with the joint wrappings. The pipeline was excavated at these points and the defective joints rewrapped. NOTE: CIPS survey did not find these defects due to masking effects of the CP. Images from DCAPP and printed to PDF. Leaders in Pipeline Survey Systems CC--SSCCA ANN22001100 SYSTEM MANUAL Version 6.03 60 10. DEMO MODE Contained within the C-SCAN 2010 Detector is a pre-loaded set of survey data. This data is supplied to enable the user to practice the technique of surveying without the need to connect to a pipeline. The four surveys included are tabled below so that any self training can be verified against the correct data. To enable these surveys, the Detector will need to be put into DEMO mode. To do this, select MENU followed by SETUP then DEMO as described under the MENU screen in section 5.4. Once Demo mode has been initiated, the START-UP screen will display “Demo – no GPS” and the GPS function will be disabled. When the SEARCH function is enabled, instead of searching for a real pipeline, the Detector will default to the demo data below. The Pipeline Position Indicator circle will simulate the presence of a pipeline; the Surveyor should take a reading as normal. To further simulate the process, a mathematical calculation of the data is completed, meaning that the data produced will vary slightly from that shown below. This is to simulate taking a real reading at different stages of the process. If a reading isn’t taken in time, the demo program will loop through the process of locating the pipeline, and will continue to repeat the search until the Calculation ( ) button is selected. To ensure that no actual surveys are affected, the demo function is cancelled if the Detector is put into standby or powered off at the battery isolator switch. Although it must be remembered that all data saved whilst in demo mode will be saved to the Detector’s memory, so as to replicate faithfully the process of carrying out a proper survey. Each survey has different characteristics. Surveys 1 to 3 include GPS co-ordinates; Survey 4 does not have GPS co-ordinates and requires manual entry. Surveys with GPS data can still have their distances entered manually, either by ‘distance’ or ‘chainage’, and it is recommended to practice all these methods. NOTE: • • CC--SSCCA ANN22001100 SYSTEM MANUAL Version 6.03 61 Leaders in Pipeline Survey Systems • As with an actual survey, the survey data points will increment with each point saved to memory. To separate each individual survey, remember to include start points. The figures provided in the tables below are the ‘ideal’ result. To simulate a real survey, all data is calculated in the same way as it would be during an actual survey, so the results achieved will vary slightly depending on when the sample was taken, i.e. how ‘overhead’ the Detector is when a sample is taken. If no pipeline diameter is entered, depth of cover and conductance will be blank but attenuation will still be given. Remember that the pipeline characteristics (diameter, wall thickness, coating type etc) can be added in DCAPP after the survey has been downloaded. Survey 1 (S#00) Data Point #00 #01 #02 #03 #04 #05 #06 Current Depth 163.4 156.6 88.52 85.91 85.38 55.91 52.64 1.29 1.24 1.31 1.23 1.04 1.24 1.11 Latitude 44N29.534' 44N29.485' 44N29.467' 44N29.440' 44N29.430' 44N29.424' 44N29.424' Longitude 012W02.850' 012W03.050' 012W03.150' 012W03.300' 012W03.384' 012W03.539' 012W03.700' Distance 0 280 136 205 112 205 213 Chainage 0 280 416 621 733 938 1151 Attenuation 0.00 0.13 3.64 0.13 0.05 1.79 0.25 Survey 2 (S#01) Data Point #07 #08 #09 #10 #11 #12 Current Depth 415.5 21.44 13.64 10.44 9.97 5.79 1.91 1.60 1.77 1.57 1.96 1.71 Latitude 44N29.534' 44N29.485' 44N29.467' 44N29.440' 44N29.430' 44N29.424' Longitude 012W02.850' 012W03.050' 012W03.150' 012W03.300' 012W03.384' 012W03.539' Distance 0 280 136 205 112 205 Chainage 0 280 416 621 733 938 Attenuation 0.00 9.20 2.89 1.13 0.36 2.30 Survey 3 (S#02) Data Point #13 #14 #15 #16 #17 #18 Current Depth Latitude Longitude 30.00 21.44 13.64 10.44 9.97 5.79 0.91 1.60 1.77 1.57 1.96 1.71 44N29.534' 44N29.485' 44N29.467' 44N29.44' 44N29.43' 44N29.424' 012W02.850' 012W03.050' 012W03.150' 012W03.300' 012W03.384' 012W03.539' Current Depth Latitude Longitude 400 380 360 300 290 0.98 1.20 3.00 3.50 3.01 Distance 0 280 136 205 112 205 Chainage 0 280 416 621 733 938 Attenuation 0.00 1.04 2.89 1.13 0.36 2.30 Survey 4 (S#03) Distance Chainage Attenuation Choose Choose Choose Choose Choose Leaders in Pipeline Survey Systems Data Point #19 #20 #21 #22 #23 CC--SSCCA ANN22001100 SYSTEM MANUAL Version 6.03 62 11. DCAPP Data Capture, Archiving and Plotter Program DCAPP is Dynalog’s propriety software for downloading data from C-SCAN. Once data has been downloaded it can be investigate, errors amended and data printed or exported. DCAPP GE is a new program that incorporates all the features of DCAPP for Excel and DCAPP 2010, plus the additional features. • • • • • • • • • • • Graphic display of Conductance (µS) Ability to disable points Ability to re-sequence data points by GPS data Ability to interpolate GPS data Ability to split and reverse survey data Ability to filter data Auto Analyse function Printing and display of visual feature symbol Easy addition of comments for each point Pan and Zoom of all graphs Ability to re-format existing DCAPP files to new format To install DCAPP 2010, insert the Applications CD provided. The CD should autorun and the option to install DCAPP GE should be selected. If autorun fails to active, simply locate CD-Start.exe on the CD and double click on it. Select INSTALL DCAPP GE and follow the install instructions. After installation, DCAPP GE will appear on the Programs list under Dynalog. Click on DCAPP GE to start. The START-UP screen is show below: X Y \ Leaders in Pipeline Survey Systems Z [ ] Graphs: X Depth or Cover Y Attenuation or Conductance Z Current [ GPS Data: \ Data of selected point ] Comments added by user for selected point Fig 11.1 – DCAPP GE Start-up screen CC--SSCCA ANN22001100 SYSTEM MANUAL Version 6.03 63 Below is a close up of the toolbar buttons and their functions: Download from C-Scan Show Pipeline Details Open Existing File Show Conductance Graph Save File Show Attenuation Graph Print/Export Data and Graphs Plot Pipeline on Map (Google Earth/KML software required) Tools Menu Display Table Survey Navigation Bar Fig 11.2 – DCAPP toolbar 11.1. Additional windows 11.1.1. Pipeline layout This shows the pipeline layout scaled to a straight pipe with all the survey points marked on the line. You can click on individual survey points and the data for that point will be displayed in the Point data window (\) on the START-UP screen. Similarly, when a survey point is selected you can add information about it in the Comments window (]). The active point is highlighted in red. Fig 11.3 – Pipeline layout The TABLE VIEW ( ) shows the tabular data for a particular survey. If you wish to ignore a particular survey point/s, then these points can be disabled (suppressed) by clearing the tick box. DCAPP will re-calculate and the graphs will be re-drawn ignoring the disabled (suppressed) point/s. Alternatively, if there is a large amount of survey data the FILTER function can be used to filter the data at predefined intervals, e.g. 25m. No data is lost when survey points are disabled and they can be re-enabled at anytime. CC--SSCCA ANN22001100 SYSTEM MANUAL Version 6.03 64 Leaders in Pipeline Survey Systems 11.1.2. Table View Fig 11.4 – Table view Summary of options in Table View: - Hide Table View Enable All - Re-enable all suppressed points Convert to Feet - Convert to decimal feet or feet and inches Pipeline Details - Opens the Survey Details box Surveying TOWARDS Generator - If a survey has been taken towards the Generator the entire survey can be reversed to display a decreasing current (positive attenuations) Filter Parameters Filter - Once the filter parameters listed below have been chosen, select to apply the filter Filter Interval - If there is a large amount of data, this can be filtered at a predetermined interval e.g. 25m. Adjust the slide to increase or decrease the filter distance. This can be useful if data points were taken at narrow intervals for depth-of-cover surveys, but such close intervals are not good for attenuation surveys. By filtering the data at greater intervals means the data from a single survey can be analysed for both depth of cover and attenuation Use Interval Filter - Select to apply the Filter Interval distance chosen above Filter Negative Attenuations - Negative attenuations can appear during a survey for a number of reasons; starting too close to the Signal Generator, currents from a similar source entering the pipeline or simply an erroneous survey point. DCAPP allows the user to manually disable these points or use the Filter Function to automatically suppress these negative values. When the Filter Negative Attenuations CC--SSCCA ANN22001100 SYSTEM MANUAL Version 6.03 65 Leaders in Pipeline Survey Systems Hide function is used, DCAPP analyses the data in reverse form (from last point to first point) suppressing points that cause negative attenuations. These points can be reenabled at anytime. The following options are available when using this function: - Use disabled points - If the user has manually disabled (suppressed) any points in a survey, these points will still be used in any calculations as if they had not been disabled. - Don’t use disabled points - If the user has manually disabled (suppressed) any points in a survey, these points will not be used in any calculations, e.g. if the user knows that point is erroneous. - Remove from start - Negative attenuations are often seen at the start of surveys caused by surveying too close to the Signal Generator. When the Filter Negative Attenuation functions is used, DCAPP analyses the data in reverse form and will assume that the Start Point is always correct, which may not be the case. Selecting Remove From Start will analyse any negative attenuations at the start of a survey after the initial calculations have been completed. 11.1.3. Pipeline Details The PIPELINE DETAILS ( ) form allows the user to enter useful information about the pipeline and the survey conditions. This can be used as a reference when looking back over previous surveys or can be used to note the conditions prior to a repeat survey being carried out. To change any details, simply select the appropriate box and enter the new information. When changing Pipeline Diameter or Wall Thickness, the units used must be entered or you will be prompted for them. e.g. A 16 inch pipeline should be entered as 16” or 406mm. If a diameter or wall thickness is changed DCAPP will ask if this change should be applied to ALL surveys. Selecting YES will change all surveys in the downloaded file; selecting NO will change only the current survey. Note: Leaders in Pipeline Survey Systems The Original File Name field is not user definable – see How to download in section 11.2 for more details. Fig 11.5 – Survey details CC--SSCCA ANN22001100 SYSTEM MANUAL Version 6.03 66 11.2. How to download from C-SCAN To download data from the C-SCAN Detector to DCAPP, firstly connect the Detector to your computer using a USB cable (or serial cable) then open DCAPP. DCAPP will check for active COM ports on your computer, with COM1 (serial port) being the default. If using a USB interface to download data, either directly or though a serial-to-USB converter, then you will need to change the active COM port. To do this, click on the Tools menu ( ) to open the following window: Fig 11.6 – Tools menu Using the drop down menu, select the appropriate COM port from the list and click finish.* ) and DCAPP will wait for On the main DCAPP screen, select the DOWNLOAD button ( the data to be sent from the C-SCAN. Turn on the Detector and click the DOWNLOAD button on the keypad ( ); you will be presented with a request to choose compatibility and the three options shown below. Select the option C-SCAN 2010 and the data will start to transmit. During transmission, the data will briefly appear in the download data window shown below. Once completed this window will automatically close and the DCAPP startup screen will be shown, this time containing the downloaded survey data. When data is downloaded from DCAPP a backup of the data is automatically saved to the computer, so the user can manipulate the data safe in the knowledge that a backup of the original file has been made. This file is referenced in the Original File Name field of the Survey Details form – Fig. 11.5. The Detector can now be unplugged without the need for it to be ejected. Until the Detector memory is cleared, the data can be repeatedly downloaded. If the memory is not cleared then old survey data will continue to be downloaded with any new surveys added. Leaders in Pipeline Survey Systems Fig 11.7 – Download data window Download Options: C-SCAN 2000 Sends the data as a basic text format for serial printers. No graph or GPS info is transmitted Print cnvrt Sends the data as above, but line by line in a slower format for printers/computers that cannot respond quickly C-SCAN 2010 Sends full survey information to DCAPP GE. Always use this option CC--SSCCA ANN22001100 SYSTEM MANUAL Version 6.03 67 Note: Ensure that any regional settings on the download computer uses either a full stop (.) or comma (,) as a decimal separator. Any other character will report ‘no data’. *for more information on which COM ports are active on your computer, see Appendix 1 11.3. Saving, Printing & Exporting 11.3.1. Saving Once your data has been downloaded to DCAPP you can Save, Print or Export your data as required. To save your data, simply click the SAVE FILE icon ( ), if the Survey Details are blank, a warning will be displayed. If you wish to enter any survey details, click NO to cancel and enter the details before saving; otherwise click YES to continue saving. Choose the destination to save your data and click OK. NOTE: When saving data, DCAPP will save the entire data set containing all the surveys downloaded, not just the survey being viewed. 11.3.2. Printing To Print the data in DCAPP simply click on the PRINT icon ( window with the following options: • • • ); this brings up the Print Print Data – This will print the TABLE VIEW of the data only Print Graphs – This will print the Graphs of the data only Print Data and Graphs – Prints both Table View and Graphs The printed data will be sent to the default printer. NOTE: When printing a survey, only the active survey will be printed. e.g. if the downloaded data contains four surveys (#00 #03) and survey #02 is being viewed, then only the data and/or graphs for survey #02 will be printed, not the entire data set. Fig 11.8 – Print menu Leaders in Pipeline Survey Systems 11.3.3. Exporting Survey data from DCAPP can be exported as CSV (Comma Separated Values) or TXT (Text) data to be imported into other software programs, such as Excel or similar. To export data, follow the printing method described above, but instead select the option EXPORT DATA and the EXPORT FORMAT screen will be displayed. Fig 11.9 – Export data window CC--SSCCA ANN22001100 SYSTEM MANUAL Version 6.03 68 Simply select the fields that you wish to export then click on either EXPORT CSV or EXPORT TXT and the data will be exported. You will be prompted to enter a file name before the data is saved, with the file extension of either .CSV or .TXT automatically added. 11.4. Advanced Functions 11.4.1. Tools Menu Opening the TOOLS MENU ( ) will allow you access to the following options: Change DCAPP from displaying Conductance in μS/m2 ( ) to Resistance in KΩ.m2 ( ) Display Conductance or Resistance as above, but per m rather than per sqm Change COM port settings for downloading data Fig 11.10 – Tools menu When you select the MAP function ( ) from the Start-up screen toolbar, DCAPP will display the current survey data on any installed mapping software that uses KML files, such as Google Earth. The mapping software must be installed and KML file extensions must be associated with it. The survey must also contain GPS data. If you wish to include other surveys that have been previously downloaded and saved then CREATE MAP OVERVIEW can be used to add these surveys to view. When you select CREATE MAP OVERVIEW a new screen will open asking you to select which surveys to add. Select the survey from the file list and click either ADD or REMOVE. This can be repeated with many surveys. Once ready, press CREATE MAP OVERVIEW and the surveys will be shown on your mapping software. In Google Earth, each survey will appear in the Places menu. Leaders in Pipeline Survey Systems Fig 11.11 – Create map overview window CC--SSCCA ANN22001100 SYSTEM MANUAL Version 6.03 69 11.4.2. GPS Functions DCAPP has the ability to fix surveys with missing or incorrect GPS data, or adjust surveys based on the GPS data that was recorded. To correct any GPS data, click on CHECK GPS from the START-UP screen to access the following window: Fig 11.12 – GPS correction screen • • • Re-sequence Points from GPS - When saving points during a survey, the distance can be entered manually or GPS data can be used to calculate the distance. Even if the distance is entered manually, the GPS location is saved, if available. If any manually entered point is subsequently found to be erroneous, then it can be corrected using the GPS data. - When re-sequencing points from the GPS data, Force Chainage to GPS you can force the chainage of a survey to take its distances based on the GPS separation rather than manually entered distances. - GPS points can be added where no data exists: Interpolate/Extrapolate GPS Generate Missing GPS only − Re-Generate GPS from Suppressed Points ONLY − Generate ALL Points from Chainage - If a gap in the GPS data exists (GPS was off/view of satellites obstructed) then DCAPP can interpolate the data and add missing GPS points. - GPS data will be re-calculated but only for points that have been suppressed in the Table view (see 8.2-2, above). I.e. If GPS data exists but seems incorrect, the data can be re-calculated by suppressing the point or points in the table and using this function. All other points will remain unchanged. - Using this function will assume that the start point GPS data is correct and then calculate GPS points based on the chainage distances manually entered by the user during the survey. NOTE: GPS always assumes the distance between two points is based on a straight line, which may not always be the case. See Notes on Entering Distances section 6.6. CC--SSCCA ANN22001100 SYSTEM MANUAL Version 6.03 70 Leaders in Pipeline Survey Systems − 11.4.3. Auto Analyse The AUTO ANALYSE function in DCAPP can be used to produce a text report based on any Physical and Conditional results of a survey which fall outside of any set limits. For example, you can use the Auto Analyse function to process the data and indicate which survey points are under or over a certain depth of cover, quickly highlighting areas of the pipeline that are too close to the surface. When you have defined the Physical and Conditional limits click EXECUTE to produce the report, which will be displayed in the window and automatically saved to the same destination as the original survey. The path and filename of the report is displayed on the AUTO ANALYSE screen. Fig 11.13 – Auto analyse screen 11.4.4. Data Manipulation When viewing a graph in the Start-up screen, select a single point with left mouse button then right-click the point to open up the following options: Suppress Point Suppresses a survey point the same way as with Table view Correct GPS at Point Erroneous GPS data can be corrected This splits a single survey into two separate surveys, such as when a surveyor accidentally surveys across a generator injection point. Splitting a survey will keep the original survey and add the two split surveys to the end of the data set as new surveys - Reverse Whole Survey If a survey is taken in the wrong direction, i.e. towards a Signal Generator injection point, then the whole survey can be reversed Copy to Clipboard Each graph can be copied to the clipboard for pasting into other programs 11.4.5. Show Close Interval Plots In normal circumstances the Attenuation and GPS plots in DCAPP are disabled when viewing Close Interval surveys, as they can be misleading. Attenuation and GPS readings taken at close intervals can display erroneous data, but if you wish to view this data then select: Show plots in Close Interval CC--SSCCA ANN22001100 SYSTEM MANUAL Version 6.03 71 Leaders in Pipeline Survey Systems Survey Change: - Split Survey 11.5. Clearing the Detector Memory When all data from the Detector has been downloaded it is advisable to clear the memory. From the Detector’s MENU screen select CLEAR and press to confirm. 12. GPS GPS is an abbreviation for Global Positioning System which consists of 24 satellites in low-earth orbit. The GPS receiver in C-SCAN receives data from a number of these (maximum 12), depending on which satellites are ‘in-view’. When first turned on, the GPS unit attempts to acquire the satellites that are in-view. Acquisition times can be as quick as 2-30 seconds, but can be significantly longer. If the Detector has been moved a large distance or it is the first time the Detector has been used, acquisition time is likely to be longer. Although not essential, downloading the GPS Almanac will assist in faster acquisition times in the future. The Almanac will automatically download but needs around 15 minutes of continuous GPS data. To do this, leave the detector in search mode with the GPS switched ON for at least 15 minutes. The minimum number of satellites needed to calculate a position is 3. The more satellites that are acquired, the more accurate the displayed position will be. The SEARCH screen will display the co-ordinates of the last good signal, so if signal is lost for any reason the position displayed could be incorrect. To confirm if the co-ordinates displayed are current simply press the GPS SAT key which will display the status of the GPS signal and the number of satellites acquired. Fig 12.2 – GPS signal ‘GOOD’ with number of satellites shown In the example above, Fig 12.1 displays the GPS position. Pressing GPS SAT changes to GPS status, which in Fig 12.2 is GPS: GOOD SAT:#6. The GPS SAT key now changes to GPS POS (GPS Position) allowing you to switch between the number of satellites in view and the Latitude & Longitude position of the Detector. CC--SSCCA ANN22001100 SYSTEM MANUAL Version 6.03 72 Leaders in Pipeline Survey Systems Fig 12.1 – Latitude / Longitude position of the C-Scan Detector The GPS status indicator will show the following messages: GPS: ACQUIRING - System is searching for GPS satellites. This message will be displayed until 3 satellites are acquired, as a minimum of 3 are require for positional data. GPS: GOOD - 3 or more satellites have been acquired to give positional data. GPS: BAD - The current position is incorrect, or satellites have not been acquired or have lost acquisition. GPS: OLD - The data is more than 10 seconds out of date. As GPS data is normally updated every 1 second, this could mean that acquisition is about to be lost. GPX - The Detector is taking its GPS co-ordinates from an external GPS system attached through the USB (in serial protocol) or multi-pole connector. ANT FAIL - There has been an antenna failure or the antenna is not connected. If a survey point is stored with a BAD or OLD GPS position, the position displayed is likely to be that of the previous point. This would create a distance of zero. C-SCAN recognises this and will not allow the operator to use the GPS position when entering the distance; however it will be recorded. The operator must then enter the distance manually, or go back to the SEARCH screen and wait for GPS acquisition. Loss of GPS acquisition is usually caused by the GPS antenna being temporarily obscured; either by buildings or being inside a vehicle. Ensure that the top of the Detector has a clear view of the sky so that it can ‘see’ the satellites to receive the GPS signal. CC--SSCCA ANN22001100 SYSTEM MANUAL Version 6.03 73 Leaders in Pipeline Survey Systems When a survey is conducted in the open where the operator walks between survey points, it would make sense not to turn off the Detector; however, this reduces battery life. A power saving mode has been introduced that enables the GPS unit to remain on whilst all other devices are switched off. To enter this mode press the ON-Off key ( ) with GPS still on. A message will be shown enabling the unit to be switched to Power-Save mode with the GPS left running in the background. This occurs only if the GPS is on prior to switching off the Detector. A 30 second countdown will be shown, during which the display will be active and any key press will re-start the Detector. After 30 seconds the screen will shut down but the GPS will continue running; this is indicated by the flashing red LED. After a total of 10 minutes (600 seconds) the Detector will shut down completely. GPS Setup The GPS setup screen can be accessed by selecting the MENU button followed by SETUP. Now choose GPS SETUP Fig 12.3 – Menu screen The GPS setup screen offers the following options: GPX ON: Configure the Detector to receive GPS signals from a compatible external GPS source GPS SET: Reset the GPS system REGION: Only use when instructed by Dynalog Update Loc.: If the Detector senses it is outside of its region then you can use the UPDATE LOC. function to update your current location (see Geo-fencing below) Fig 12.4 – GPS Setup screen 12.1. External GPS Configuration When using an external GPS system plugged into either the USB or multi-pole plug, it must comply with the following requirements: Serial protocol, NMEA data stream, 9600 baud, no parity, 8-bit, 1 stop, no handshaking. GPS stream must include: GGA or GLL and RMC or ZDA. If no external signal is received within 5 minutes the system will default to internal GPS. If the GPS system requires re-setting at any time, this can be done by selecting GPS SET from the above menu, which will automatically detect and re-configure the GPS system. There are two types of GPS systems which are fitted to C-SCAN: Type 3 GPS: Instantly configured ready for use Type 2 GPS: Once re-set will configure next time GPS button is pressed on the start screen 12.3. Geo-fencing C-SCAN utilises geo-fencing technology within the Detector. Whilst normal operation is unaffected, users operating outside the boundaries of their encoded region will be given a time limit warning via the STARTUP screen. In normal operation the STARTUP screen will indicate the encoded region, but when surveying outside of this region the time limit warning will indicate the number of days remaining, after which time the Detector will not be able to carry out any further surveys until it is returned to its original territory. Normal operation will resume upon the next survey or by use of the UPDATE LOC. function. This information can be confirmed via the INFO screen accessed from the MENU button. CC--SSCCA ANN22001100 SYSTEM MANUAL Version 6.03 74 Leaders in Pipeline Survey Systems 12.2. GPS Reset 13. BATTERY INFORMATION 13.1. Battery Life The power consumption of the C-SCAN 2010 varies depending on use. This can be split into a number of categories as shown below, along with the associated power consumption. Switching the main isolator switch to OFF will disconnect the batteries. It is recommended that the main switch be set to OFF during storage or shipping. Supplied Nickel-Metal Hydride (NiMH) rechargeable batteries (fully charged 4500 mAh) Mode Survey (GPS) Survey (no GPS) Standby Non-survey Off System ON ON OFF ON OFF GPS ON OFF ON OFF OFF Antennae ON ON OFF OFF OFF Consumption 550mA 450mA 100mA 60mA <3mA Time System ON ON OFF ON OFF GPS ON OFF ON OFF OFF Antennae ON ON OFF OFF OFF Consumption 550mA 450mA 100mA 60mA <3mA Time 12 hours 17 hours 2 days 11 weeks 1 year 5 hours 8 hours 23 hours 4 days 4 months Alkaline type batteries. Mode Survey (GPS) Survey (no GPS) Standby Non-survey Off These times are continuous. In a real survey, the times will not be continuous as the Detector will be switched off and on between survey readings. Realistically the maximum survey time is 50 hours on one charge (more if using Alkaline batteries) for non-GPS surveys, and 30 hours for GPS survey. At a maximum of 6 hours per day survey this will give 8 days and 5 days respectively. NOTE: When replacing batteries, either alkaline or re-chargeable, be sure to purchase good quality batteries as this will have an effect on the operating time. Cheap, poor quality batteries (especially re-chargeable types) will not deliver the same power. Leaders in Pipeline Survey Systems CC--SSCCA ANN22001100 SYSTEM MANUAL Version 6.03 75 13.2. Battery Indicator The battery capacity is shown on the START-UP screen as a percentage: 61% Battery capacity can range from 0% to 110%. At low battery levels the battery indicator will start to flash to warn the user. If the batteries are too low to turn on the antennae at start-up, the user is given a warning to charge them. 13.3. Power Modes To conserve power, the Detector switches the antennae off and on depending on the circumstances. If the Detector is left showing the START-UP screen then the antennae will shut down after 3 minutes. After 5 minutes the entire system will enter standby mode, even if GPS is running. Leaving the Detector in Search mode or any Menu screen will prevent the auto shutdown. The antennae status is shown on the START-UP screen for reference: 14. – Antennae OFF – Antennae ON UPDATING Dynalog’s Updater software can be used to update the firmware within the Detector or confirm if the latest version is being used. To begin, install the Updater program from the Applications CD supplied with the C-SCAN system. Once installed, connect the Detector to the computer and then run the Updater program. If the Detector is connected first then the COM port will be detected when Updater is started. The user interface is shown below: Leaders in Pipeline Survey Systems Fig 14.1 – Updater program Firstly, it is important to ensure that Firmware within Updater is up to date. Simply click CHECK FOR WEB UPGRADE and Updater will check online for the latest updates. If a newer version is available it will be automatically downloaded. CC--SSCCA ANN22001100 SYSTEM MANUAL Version 6.03 76 To update the Detector, select the appropriate COM port (see Appendix 1) and turn on the Detector. As shown on the Updater program, select MENU > SETUP > PROG on the Detector. Once selected using the the user will be prompted for a security code. This is the code that is shown on the Updater screen (shown above as 12345678) and is simply used to ensure that an update is intended. Once entered press CONTINUE on Updater and the data will be uploaded to the Detector. Once complete, the Detector will re-boot and during this time is it important that you do not turn off the Detector as this could result in corrupted data which will require a factory reset by Dynalog. Therefore, it is recommended to ensure that the Detector’s batteries are charged before upgrading. NOTE: Updating can delete some or all of the surveys saved to the Detector’s internal memory. Always download any data before upgrading. 15. DIAGNOSTICS If it is suspected that there is a fault with the Detector, the Diagnostics program can be used to interrogate and confirm the correct functioning of the various sub-systems within the Detector. If an error is found, a report is produced which can be sent to Dynalog for assessment and further advice. The Diagnostics program can be installed from the Applications CD supplied with the CSCAN system, located under OTHER FILES / PROGRAMS. Once installed, connect the Detector to the computer and then start the Diagnostics Program. Ensure that the Detector is connected to the computer before running Diagnostics so that the correct COM port is made available (see Appendix 1). Once the correct COM port has been established, turn on the Detector and wait for it to complete its checks and reach the START screen. Do not press any keys on the Detector. Now press CONTINUE on the Diagnostics Program. Leaders in Pipeline Survey Systems Fig 15.1 – Diagnostics program The program will now communicate with the CSCAN and check various values. Fig 15.2 – Diagnostics check CC--SSCCA ANN22001100 SYSTEM MANUAL Version 6.03 77 If all checks are successful then ‘Idle, Checks done..’ is displayed and the program can now either be closed or the test can be re-started by selecting REDO. Fig 15.3 – Checks complete If any checks fail, then they are highlighted in red, as shown opposite. Fig 15.4 – Failures identified If any failures are detected, a diagnostics report is produced along with the option to send the report to Dynalog for further analysis. To do this click YES. Fig 15.5 – Diagnostics report The report is located in: Win XP • C:\Program Files\Dynalog\Diagnostics.txt Win 7 • C:\Program Files (x86)\Dynalog\Diagnostics.txt Leaders in Pipeline Survey Systems A print screen will appear to allow you to print the test report. Alternatively you can locate the test report on you computer and email this to Dynalog ([email protected]). Fig 15.6 – Print report CC--SSCCA ANN22001100 SYSTEM MANUAL Version 6.03 78 16. FAQ / NOTES 16.1. TR Stations – The need to disconnect Do I have to disconnect the TR station? There are several answers to this question: a) If you want to connect the generator across the TR station (i.e. use the TR station to apply the signal to the pipeline) then YES you MUST disconnect the TR station. Failure to do so can cause significant damage to the Generator. b) If you wish to apply the signal to the pipeline using a CP test post, then no, you may not have to, but it is wise not to connect the generator within 500-1000m of a TR station. If you use a CP test post to apply the signal to the pipeline and do not disconnect the TR station, then as you survey towards the TR station the signal on the pipeline may die away to zero; the current from the generator is being lost through the TR station to the ground bed. If this happens you have several choices: (i) Survey up to the TR station then move the generator to the other side of the TR station and connect to another CP test post and survey back to the TR station in the other direction, as shown below. In this instance it will not be possible to overlap surveys as the entire signal will leave the pipeline at the TR station. TR CP Survey 1 CP Survey 2 (ii) Turn off the TR station but do not disconnect it. Depending on the type of TR station, the signal from the generator may pass by without being lost to the ground bed, allowing you to survey across the TR station as if it were not there. (iii)If the TR station is turned off but the signal is still lost through it, then you will have Leaders in Pipeline Survey Systems to use either the method as stated in (i) or the TR station will have to be disconnected. 16.2. Generator Connection Problems Connecting the Signal Generator and injecting a good signal consists of two parts: 1) connecting to the Pipeline and, 2) connecting to a suitable earth. Each of these is as important as each other, as the level of the injected signal will depend on the loop impedance. Each part is discussed separately, below: CC--SSCCA ANN22001100 SYSTEM MANUAL Version 6.03 79 16.2.1. Connecting to the Pipeline When making a connection to the pipeline it is important to establish a low resistance connection and to ensure that the connection point is electrically connected to the pipeline. Many common mistakes are easily rectified: Connection to rusted component − Connection to isolated part, e.g. − isolated valve, isolated valve wheel, test post not connected to pipeline being surveyed Use a file or sand paper (abrasive) to prepare a clean area for a good electrical connection Try alternative connection Damaged Generator Cables − Connect the Ground and Pipe cables together to short circuit the Generator. Select AUTO and the current should reach 600mA with a low circuit impedance, unless cables are faulty. Connecting to a pipeline above the ground – often there is an insulating joint underground − Make alternative connection on the correct side of the IJ, or use IJ to increase survey distance (see 8.6) 16.2.2. Establishing a good earth Similarly, a low resistance connection is required when establishing a good earth, whether connecting to a physical part of the pipeline or using the Earth Spikes provided. Use all three Earth Spikes at 90° to the pipeline, positioned as far away as possible. Drive Earth Spikes deep into the ground. Ensure the spikes are not moved from side to side (both during and after installation) so that ground contact is maintained along the length of the spike. If the ground is dry, remove the Earth Spikes and fill the holes with water before replacing them. Ensure ground contact along the length of the spike. Brush away an area of topsoil and lay the Earth Spikes horizontally before replacing the topsoil. As for above but with a layer of tin foil (cooking foil) underneath the spikes. 16.2.3. Use alternative earth connection 1) Fences with metal posts can be used as an earth connection. It must be remembered however, that where a fence crosses the pipeline, readings cannot be taken in this area. 2) Use the ground bed of a TR (Transistor-Rectifier) station. Make sure the TR station has been turned off and disconnected to avoid damage to the Signal Generator. 3) Isolation Joints (IJ) can be used. Connect the Signal Generator Pipe connector to one side of the IJ and Ground connection to the other – it doesn’t matter which. You can now complete two surveys starting at the IJ, one in each direction going away from the IJ. When using a metal structure as an earth connection point, care must be taken during lighting (electrical) storms. Any lighting strike receive by the metal structure will be passed to the Signal Generator which could result in damage being caused. The surveyor must be aware that although the potential for a lighting strike could be some distance away, the type of metal structure being used could carry this high voltage signal for many kilometres, for example a long metallic fence. CC--SSCCA ANN22001100 SYSTEM MANUAL Version 6.03 80 Leaders in Pipeline Survey Systems As above but with soil wetted with water. 16.3. Re-call Calibration Settings The calibration data for the antenna is checked during the start-up sequence, if an error is found then the calibration details will be automatically restored from fixed memory. If an update to the Detector has been completed, then similarly the calibration details are checked and restored automatically. Manual checking can be done by the user at any time by the following procedure: 1) Press MENU 2) Press SETUP 3) Press CALIB 4) Press FACTOR Once the calibration data has been recalled, the Detector will return to the CALIB screen in 3), above. Simply press the ³ button to back out of the MENU pages. Leaders in Pipeline Survey Systems CC--SSCCA ANN22001100 SYSTEM MANUAL Version 6.03 81 GPS does not have clear view of sky Low batteries GPS antenna damaged / not responding GPS system down Detector memory is full Internal temperature too high Detector taken outside geo-fenced area Trying to charge Generator with battery isolated Loop impedance too high due to poor connection / high resistance soils Generator temperature too high Windows not configured correctly Incorrect separator in Windows Corrupted data Detector Detector Detector Detector Detector Generator Generator Generator DCAPP DCAPP GPS acquiring for too long Download – Store full Calibration Fail – Service required CC--SSCCA ANN22001100 SYSTEM MANUAL Version 6.03 82 Temperature too high Only x days remaining Isolator is off – please switch on Open circuit or high resistance – check connection Temperature xºC – Switching to 0mA too cool down No COM port in DCAPP Bad data in DCAPP Leaders in Pipeline Survey Systems Calibration information has been damaged or manually changed incorrectly Batteries low or depleted Antenna not responding (‘antenna fail’ message will also show) Detector Battery Low (on Startup) Cause System Message Ensure separator is either full stop (.) or comma (,) Contact Dynalog for recovery assistance See Appendix 1 Consult computer users manual Generator automatically shuts down until temperature drops, then returns to previous set current Check all connections Ensure good earth (see Generator Connection ...Problems) Check damage to cables Change survey time when ground resistance reduces Turn Generator isolator switch to On Return to area and update location Switch off Detector and store in shade/cool place Contact Dynalog Download Detector using DCAPP and clear memory Place Detector with unobstructed view of sky Charge / Replace batteries Re-boot GPS / use Diagnostics program to …investigate Re-boot GPS / use Diagnostics program Resume when GPS system re-enabled Replace / Recharge batteries Use diagnostics program to investigate / contact ..Dynalog Remedy 16.4. Display Messages Below is a list of display messages that may be encountered: 17. Specification Detector Unit specifications Weight 7.5 kgs (16lbs) Size 18 x 47 x 120cm (7 x 18 x 47”) Construction One-piece Polyethylene (PE) moulding Sealing (Protection Class) IP65 (total immersion for 500mm) Antenna array Symmetrical multi-axis Maximum detection depth 9+ metres (30+ feet) in good conditions Accuracy +/- 2.5% to 3 metres (10 feet) +/- 5.0% to 9 metres (30 feet) Features Internal Trimble 12 channel GPS system. Accuracy 2m (6.5 ft) 500 point survey memory with over 100 separate surveys stored Rechargeable batteries NiMH with 3 hour fast charger (charger input: 100-240vAC 50-60Hz) 13 hours continuous (4-5 days) Operating temperature range -20 to +40oC (-4 to +104oF) Note: battery capacity reduces at low temperatures Connectors • 1 x USB Computer Interface • 1 x multi-pole Charger / External Power • Membrane key pad • Graphic Backlit LCD display (160x160) • Multiple survey memory • Built-in intelligent charger • Protective Neoprene boot • Carrying strap • Soft Carry Case General Leaders in Pipeline Survey Systems Survey time on full charge CC--SSCCA ANN22001100 SYSTEM MANUAL Version 6.03 83 Signal Generator specifications Weight 9.5 kgs (21lbs) Size 27 x 25 x 18cm (11 x 10 x 7”) Construction Ultra High Impact Structural Copolymer MilSpec case with hinged lid (MIL-C4150J) Sealing (Protection Class) IP66 Rechargeable battery 1 x 12v – 17Ahr sealed lead/acid (charger input: 100-240vAC 50-60Hz) External power 11 to 18v DC Maximum output 1500mA (1.5A) (RMS) AC coupled at 937.5Hz Survey time - on internal batteries - on external power 8 hrs at 600mA Indefinite depending on capacity of power source -20 to +40oC (-4 to +104oF) NOTE: battery capacity reduces at low temperatures Connectors • 2 x shrouded 4mm output sockets • 1 x multi-pole charger and external power socket • 1 x USB Interface socket • Membrane key pad • Graphic Backlit LCD display • Battery Isolator Switch • Automatic power monitor and control • Automatic clip detection • Circuit Impedance Indication • Storage and recall of power settings • Built-in intelligent charger • Constant Current Output • Soft Carry Case General Leaders in Pipeline Survey Systems Operating temperature range CC--SSCCA ANN22001100 SYSTEM MANUAL Version 6.03 84 18. Maintenance General Care Whilst the C-SCAN system has been designed for daily use it must be remembered that it is a precision instrument and should be treated with a degree of care. When not in use the Detector and Signal Generator should be stored in their soft cases and particular care should be taken in the field with regard to the damage that can be caused by vehicles when equipment is placed on the ground. Battery Care Both the Detector and Signal Generator are fitted with rechargeable batteries. These should not be allowed to run completely flat as this can shorten the life of the battery. When storing either the Detector or Signal Generator for long periods the batteries should be isolated using the physical isolator switch on both systems. For prolonged periods of storage the batteries should given a charge every 6 months. When replacing either the rechargeable or alkaline batteries, only good quality batteries should be used. Cheap batteries have inferior performance and are prone to leakage which could damage the C-SCAN system. Routine Checks The C-SCAN system requires little-to-no routine maintenance. A general visual inspection of the system should be carried out routinely to inspect for any physical damage, which could indicate damage within the system that cannot be seen. Periodically check the fittings and bolts to ensure they have not worked loose, which could lead to water ingress. Signal Generator Battery Replacement As every battery has a life expectancy it is likely that at some point the Signal Generator battery will require replacement. Although Dynalog would recommend returning the Signal Generator for battery replacement, it has been designed so that users with the competency to carry out this task can do so with ease. NOTE: User replacement of battery while system is under warranty will invalidate any warranty. Using the strap fitted, lift the battery to an upright position so that it is possible to access the terminals. Remove the terminal bolts and extract the battery completely. Only replace the battery with a genuine Yuasa battery of the same type and specification. Any other battery fitted will invalidate any warranty that may be in place. Re-fitting is a reversal of removal. CC--SSCCA ANN22001100 SYSTEM MANUAL Version 6.03 85 Leaders in Pipeline Survey Systems To gain access to the internal battery, ensure the isolator switch is in the OFF position then remove the 8 bolts on the sides of the Signal Generator. Do not remove any of the bolts on the top of the Signal Generator. Once the bolts have been removed, carefully lift the entire top plate (heatsink) away from the casing, in an upward-left motion; be careful not to damage any cables during this process. Once the top plate is away from the casing, the cable assembly can be removed through the access panel 8 x side bolts on the underside by pressing the locking tab on the connector. The top plate can be then removed completely and stored safely. Appendix 1 – COM ports in Windows The COM port is a label used to identify where a peripheral has been attached to a computer. Serial cables (9-way ‘D’ shaped connectors) are set to COM1 by default, so if a serial cable is used to connect the C-SCAN to a computer then this defaults to COM1. If a USB cable is used then a higher COM number is assigned automatically. Within Dynalog’s software only active COM ports will be displayed, so if the C-SCAN is the only USB device connected to the computer then only one COM port (in addition to COM1) will be shown and this can be selected in any of the required programs; DCAPP, Updater, Diagnostics etc. If, as well as C-SCAN, several devices are connected to a computer then a list of active COM ports will be available and it can be difficult to know which to select. While in some instances it may be appropriate to try each one in turn, information about each peripheral can be obtained from Device Manager in Windows. This can be located in: Start>Control Panel>System>Device Manager>Ports (COM & LPT). Here, each active COM port is shown with information about the device. Leaders in Pipeline Survey Systems Fig 18.1 – COM & LPT Ports in Device Manager For further information on COM ports, refer to your computer user’s manual. CC--SSCCA ANN22001100 SYSTEM MANUAL Version 6.03 86 Glossary Anomaly – An area or section of pipeline that looses current resulting in high attenuation values. Until excavated and proved as a fault, these areas are defined as anomalies. Attenuation – The logarithmic loss of current along a length of pipeline in mB/m. Coating Conductance – The ability of a pipeline coating to conduct an electrical current. Measured in μS/m2. Coating Resistance – The ability of a pipeline coating to resist an electrical current. Measured in Ω.m2. Chainage – Distance reference from a survey Start Point, as opposed to the preceding data point. Close Interval Survey – Current only survey conducted at pre-determined distance intervals to pin point a coating anomaly with greater accuracy. CP Test Post – Test post with an electrical connection to the pipeline used to measure Cathodic Protection voltages. Data Point – A reading taken with the Detector produces a single data point. DCAPP – Data Capture, Archiving and Plotter Program. Dynalog’s proprietary software for downloading data from a C-SCAN Detector. Dielectric performance – The ability of the coating to act as an electrical insulator Earth Extension Lead – Used to extend the distance between the Signal Generator and the Earth Spikes. Fault/Defect – Damage to the coating of a pipeline resulting in an electrical path. Firmware – Core programme running inside the Detector Ground Lead – Used to connect the Signal Generator to the Earth Spikes. GPS Distance – The distance between two points in straight line. This can differ to the actual distance when measuring the route of the pipeline. Halving – The technique used to take readings half way between the previous two readings, thus isolating each half of the section to aid in finding anomalies. Injection Point – The location of the connecting point between the Signal Generator and the pipeline under survey. The location may be know precisely, e.g. when connecting using a valve/insulating joint, or not precisely e.g. when connecting via a CP test post whose own connecting point is not known exactly. Insulating Joint/Flange – Electrically isolating connector between two pipeline sections. Loop Impedance – The accumulative impedance of the Signal generator to pipeline circuit, which consist of the Signal Generator to pipeline, pipeline to ground, ground to earthing system and earthing system back to Signal Generator. Pipe Lead – Used to connect the Signal Generator to the Injection Point. Pipeline Position Indicator – Circular graphic displayed on the Detector showing the direction of the pipeline in order to guide the user. Soil Resistivity – The AC resistance component of the soil in contact with the pipeline. Measured in Ω.cm Start Point – The ident give to signify the beginning of a new survey. Survey – A series of stored data points TR Station – Transformer Rectifier station producing a negative cathodic voltage. CC--SSCCA ANN22001100 SYSTEM MANUAL Version 6.03 87 Leaders in Pipeline Survey Systems Hazardous Area – An area that requires intrinsically safe devices.