1
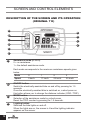
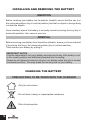
User
manual
EN
Original 7E
Tilt E
ref. 2849
Dear Customers,
Thank you for purchasing a B'TWIN electrically-assisted bike. It will introduce you
to the joys of travelling on 2 wheels for your leisure, it will be the most practical
and economical way for you to get around in town and will allow you to burn
calories to keep fit.
We invite you to read this instruction manual to get the best out of your B'TWIN
electrically-assisted bike.
Never forget that an electrically-assisted bike is not a moped. It needs your help
to go further and faster for longer.
We suggest that you learn how to use your electrically-assisted bike in an open
area in order to get used to the feel of the motor kicking in and thus ensure
optimum control of your bicycle.
Only use sport mode for your first kilometres if you are sure that you are able to
control your bike.
Here are the 10 commandments to get the best use of your B'TWIN electricallyassisted bicycle.
1. "pedal or you won't go far"
The bike's range is closely linked to the energy produced by the cyclist. The motor
on the electrically-assisted bike is only there to supplement the force produced
by the cyclist.
2. "inflate the tyres or you won't go far"
The bike's range is linked to the tyre pressure, like a car. If the tyre pressure is
insufficient, you will consume more than necessary and reduce your range.
3. "inflate the tyres or you will get a puncture"
Resistance to punctures is closely linked to the pressure in the tyres. An
electrically-assisted bike is heavier than a standard bike and is therefore even
more susceptible to punctures if the tyres are under-inflated.
4. "the colder it is, the shorter the distance you can travel"
The range of your battery is linked to the outside temperature. The range
displayed for an electrically-assisted bike is calculated based on an operating
temperature of between 20°C and 25°C. If the temperature is lower, the range
will be reduced.
5. " the more weight the bike is carrying, the shorter the
distance you can travel"
The battery range is linked to the weight of the cyclist and/or the load on the
bicycle. Just as for a car, the more weight the vehicle is carrying, the more it
consumes. Your range will be reduced if your bike is extremely overloaded. The
ranges displayed are given for an overall load of 80 kg.
2
6. " you don't get 100% of the range at the first push on the
pedals"
The range is only at its maximum after 5 full battery charges. All the batteries used
on our electrically-assisted bikes are memory-free (an average of 300 cycles at
100% charge) and recyclable, but they only acquire their full range after several
full charges. The first charge should give you approximately 70% of the range
indicated.
7. "the steeper the slope, the shorter the distance you can
travel"
The battery range is linked to the gradient of the terrain. Electrically-assisted
bikes consume the most when going up-hill. This can even lead to breakdown
linked to motor overvoltage. If your trip includes a very steep gradient, choose a
bike with gears allowing you to go up it easily.
8. " you shall check the battery charge even when you don't
use it"
The battery has a discharge limit threshold. If you leave your electrically-assisted
bike for more than three months without charging it (with an initial charge of
100%), the battery will be destroyed. If you have an electrically-assisted bike in
a holiday home, bring your battery home with you to check it and recharge it if
necessary.
9. "on the last LED, you shall ride in eco mode"
Electrically-assisted bikes have a battery gauge. The motor power on the last
LED will be weaker than on the first LED's.
The electrical power remaining in the battery can only be checked with the vehicle
at a complete standstill, as while you are moving, the counter shows fluctuating
LED's corresponding to the force the motor is drawing from the battery. When
you are on the last LED, the battery is down to its last dregs, the equivalent to
the reserve for a car. Switch to eco mode to avoid having to pedal home without
assistance.
10."if any technical operations are required on the bicycle,
you shall switch off the ignition and you shall remove the
battery"
Repairs on electrically-assisted bikes are more technical and require a minimum
number of precautions to be taken.
All operations (cleaning, chain problems, punctures, etc.) MUST be carried out
with the motor switched off. Indeed, turning the pedal to put the chain back on if
it has come off will drive the motor if it is not switched off.
For the same reasons, your battery must never be opened. No operations must
be performed without the intervention of a specialist.
3
Important, this instruction manual only applies to the electrical
characteristics of your bicycle. You must refer to the B'TWIN user guide
and warranty instructions and to the instructions for the 15 kg luggage
rack used on all our bikes which are provided with this document and
which can also be found on our website www.b’twin.com or by request
from our Decathlon stores.
TABLE OF CONTENTS
PRODUCT DESCRIPTION.............................................................. 6
Description of the equipment on your bike
and its technical characteristics.......................................................................... 6
Bicycle........................................................................................................... 6
Battery........................................................................................................... 7
Charger......................................................................................................... 7
Key................................................................................................................ 8
General operation of your bike............................................................................ 8
General operation of the electrical assistance.............................................. 8
General rules concerning range ................................................................ 10
SCREEN AND CONTROL ELEMENTS.......................................... 12
Description of the screen and its operation (original 7 E) ............................. 12
Push button description (tilt-E).......................................................................... 13
BATTERY AND CHARGER........................................................... 14
First use of the battery........................................................................................ 14
Precautions for use............................................................................................. 14
Precautions to be taken with the battery..................................................... 14
Storage conditions...................................................................................... 15
Information concerning the battery............................................................. 15
Installing and removing the battery................................................................... 16
Insertion...................................................................................................... 16
Removal...................................................................................................... 16
Charging the battery .......................................................................................... 16
Precautions to be taken with the charger................................................... 16
Recharging the battery............................................................................... 17
Maintenance and lifetime (warranty condition)................................................ 19
Self-diagnosis...................................................................................................... 19
Additional precautions for use.......................................................................... 20
Maintenance ........................................................................................................ 21
General recommendation........................................................................... 21
Specific maintenance for electrically-assisted bikes................................... 21
Contents of the commercial warranty for your electrically-assisted bike..... 22
5
PRODUCT DESCRIPTION
DESCRIPTION OF THE EQUIPMENT ON YOUR BIKE
AND ITS TECHNICAL CHARACTERISTICS
BICYCLE
Your electrically-assisted bike comprises various components which it is important
to recognise;
►► Cycle part
• Aluminium frame and suspended fork
• Sram Altus 21-speed transmission
• V brake
• 26" or 28" double-walled aluminium wheel with 36 reinforced spokes
• Adjustable stem
• Comfortable gel saddle
• Universal luggage carrier compatible with the B'Twin panniers. Maximum
acceptable load: 15 kg
• Mud guard
►► Electrical part
B
C
E
D
F
A
G
I
6
H
A
Rear LED light
B
Battery sheath and controller
C
Wiring harness: Control / Motor / Pedalling detector
D
Control screen
E
Braking detector
F
Front LED light
G
Motor wiring harness
H
Motor
I
Pedalling detector
• Motor: 24 C, 250 Watts, placed in the wheel for improved balance and
optimum consumption.
• Braking detector: Brake levers with built-in braking detector.
• Control screen: 3 digital display modes
BATTERY
Lithium ion 24V-10Ah i.e. 240Wh
CHARGER
• INPUT: 100~240 V – 1.8 A (Max.) 50~60 Hz
• OUTPUT: 29.4 V DC – 2 A – 50~60 Hz
7
KEY
Your bike is supplied with battery
security key and a spare. It is
essential to note down the number
of this key on the user guide supplied
with your bike on the day you buy it.
This number is also affixed inside the
battery sheath. You can use this if
you lose both the key and the spare
key in order to have another key cut
in your DECATHLON store.
IMPORTANT: If you ride
with the battery in the
sheath, it is essential to
set your key to "locked"
position.
GENERAL OPERATION OF YOUR BIKE
GENERAL OPERATION OF THE ELECTRICAL ASSISTANCE
You possess an electrically-assisted bike, which can be used with or without
assistance.
To start up your assistance, press the ON/OFF button.
The assistance on your electrically-assistance bike will only operate if you pedal.
When you brake, your assistance will instantly switch off and will remain off as
long as one or both brake levers are pulled. Your assistance will also switch
off if you exceed 25 km/h and will automatically restart when your speed falls
8
below 23 km/h. In order to preserve your range, the bike is fitted with a "power"
limiter which will limit your assistance on steep gradients. During intensive use
and in exceptional weather conditions, the assistance may switch off to avoid
overheating and safeguard the entire system.
Your bike's assistance therefore depends on 4 main parameters:
• pedalling (pedalling sensor)
• braking (braking sensor)
• speed (motor)
• power (motor)
And a parameter for exceptional circumstances:
• the temperature
IMPORTANT: During prolonged use in very hot weather, the
temperature of your controller may reach very high temperatures.
Ensure you do not touch the heat sink located under the front of
the battery sheath.
9
GENERAL RULES CONCERNING RANGE
►► Range and tyre inflation
You are advised to inflate the tyres to between 3.5 and 4.5 bars. A bike loses on
average 1 to 1.5 bars per week.
IMPORTANT: Insufficient tyre pressure reduces the battery range as the tyre
surface in contact with the ground is greater.
Distance in eco
mode (km)
Range
Max. pressure Original 7 E 4.5 bars
Pressure (bar)
Max. pressure Tilt E 3.5 bars
40
30
20
10
0
0
1
2
3
4
5
Pressure (bar)
Yield (%)
Punctures occur more quickly on the drive wheel.
Lack of pressure makes pedalling more difficult.
A puncture on a front motor is more dangerous than on the rear.
100
90
80
70
60
50
40
30
20
10
0
Efficiency
Puncture zone
0
1
2
3
Pressure (bar)
10
4
5
►► Range and temperature
The lithium battery draws its energy from an electrochemical reaction between
the components it contains. A temperature of between 20 and 30°C is the
optimum situation to obtain the maximum amount of energy.
Range vs. T°C
120
100
% range
80
60
40
20
0
-10
0
10
20
30
40
50
60
T°C
►► Range and driving mode
Like a motor vehicle, a responsible driving style will result in a larger range.
If you allow the bike to "carry" you all the time, your range will be reduced in
consequence.
Thus, by riding exclusively in sport mode at low speed, you will bring the range
down to 50%.
Mode
Eco
Normal
Sport
Range
100%
75%
50%
11
SCREEN AND CONTROL ELEMENTS
DESCRIPTION OF THE SCREEN AND ITS OPERATION
(ORIGINAL 7 E)
A
G
B
H
C
I
D
J
E
F
A
Assistance mode (0-1-2-3)
0 = no assistance.
1 = the default assistance mode.
Each mode corresponds to the maximum assistance speeds given
below:
B
C
D
12
Mode
0
1
2
3
Speed
0 km/h
17 km/h
22 km/h
25 km/h
ON/OFF button
Switch the electrically-assisted bike on and off by pressing for 1.5
seconds.
Once the electrically-assisted bike is switched on, a short press on
this button allows you to change the distance indicator (ODO / TRIP).
MODE button
Selection of the assistance mode by a short press.
Reset the TRIP counter by pressing for 1.5 seconds.
Lighting button
Switches the bike lights on and off.
When the lights are on, the screen is lit and the lighting indicator
appears on the screen.
E
F
G
H
I
J
ODO: Global distance counter (in km)
0-99999 km
By default, ODO mode appears on the screen.
TRIP: Partial distance counter (in km)
0-1000 km
Reset by pressing for 1.5 seconds on the MODE button.
Battery level
Five battery levels
When the battery level is too low, the indicator starts to flash.
Warning, when you make heavy use of the assistance, the charge
indicator is likely to vary temporarily to indicate the instantaneous
overconsumption.
You are advised to check the battery charge indication when halted.
Speed indicator
Indicates the speed in real time with an accuracy of +/- 2%
Lighting indicator
The lighting indicator appears on the screen when the lights are on.
Speed unit (km/h)
If a problem occurs, the display will indicate an error code. In this case, contact
your store for a diagnosis and repair.
PUSH BUTTON DESCRIPTION (TILT-E)
ON/OFF button
Switch the electrically-assisted bike on and off by pressing
for 1 second. When the system is on, the ON / OFF button is
lighted.
Lighting button
Switch the bike lights on and off by pressing for 1 second.
When the lights are on, the lighting button is lighted.
13
BATTERY AND CHARGER
FIRST USE OF THE BATTERY
Your battery is fitted with "intelligent" electronics.
It will be delivered in "sleep" mode in order to economise its consumption
(pressing the battery status button will serve no useful purpose as nothing will
be shown on the LED's).
In order to "wake up" your battery, you simply need to connect the charger: The
battery LED's will light up to indicate that it is now ready for use.
PRECAUTIONS FOR USE
PRECAUTIONS TO BE TAKEN WITH THE BATTERY
Do not expose it to temperatures exceeding 60°C
Never dismantle it
Do not throw it away in inappropriate containers
Risk of fire
Risk of electrocution
Handle with care / Shock sensitive product
14
STORAGE CONDITIONS
It is essential to store the battery in a dry, cool place (between -10°C and +25°C),
out of sunlight.
INFORMATION CONCERNING THE BATTERY
• Always use your battery between -10°C and 50°C.
• The battery is waterproof and can therefore withstand the rain. However,
high-pressure washing and submerging the battery and the bike in water are
strictly forbidden. Preferably wash using a damp sponge.
• Under ideal conditions, your battery can withstand approximately 300 cycles
(complete charging and discharging cycles). Over time and with use, the
performance of your battery will gradually diminish.
• Under normal usage conditions, your battery is given for a range of 35 km
(for a new battery with one user weighing 70 kg, at an average speed of 18
km/h on flat ground.
• The performance of your battery will diminish in low temperatures (*).
• Never short-circuit the battery by connecting the positive and negative
terminals.
• Never try to open, dismantle or insert objects into the battery. If a problem
should arise, please consult your DECATHLON store.
• The effects on the environment are low, as electricity is a clean form
of energy. At the end of its life, the battery must be taken back to your
DECATHLON store to be recycled. You will then be able to replace it.
• Failure to comply with the precautions for use will invalidate the warranty.
(*) All the specifications mentioned are valid for a temperature of 25°C. The
performance of your battery will fall with the temperature:
• Loss of approximately 15% at 0°C
• Loss of approximately 20% at -10°C
• Loss of approximately 35% at -20°C
15
INSTALLING AND REMOVING THE BATTERY
INSERTION
Before inserting your battery into its position (sheath), ensure that the key is in
the unlocked position (key in vertical position) and that no object or foreign body
is inside the sheath.
Once inserted, ensure the battery is correctly locked by turning the key (key in
horizontal position), then remove your key.
REMOVAL
Before removing your battery from its position (sheath), ensure you have unlocked
it by placing the key in the unlocked position (key in vertical position).
Then remove your battery by pulling it.
IMPORTANT NOTES
It will be impossible to lock your battery and remove the key if the battery is not
in the correct position and sufficiently inserted into its seating.
Please do not attempt to insert or remove your battery when the lock is locked
(horizontal position): This may break the security lock on your battery.
CHARGING THE BATTERY
PRECAUTIONS TO BE TAKEN WITH THE CHARGER
Only for use indoors
Do not throw it away in inappropriate containers
Risk of electrocution
16
The electrically-assisted bike has a lithium-ion battery which powers the motor.
Unlike other batteries, it is "memory free".
It can therefore be charged whatever its status may be.
When it is used for the first time, charge it up fully (100%)
RECHARGING THE BATTERY
1.Remove the protective cover on the charging connector located on the side
of the battery.
2.Insert the charger plug into a power socket. The charger LED will light up
green.
3.Then connect the charger to the battery by inserting the charger connector
into its socket on the battery.
4.At the start of charging, the charger LED will go to orange and the LED's on
the battery will light up (according to the status of your battery).
5.During charging, the charger LED will remain orange and the battery LED's
will light up as charging progresses (see the charging indication table
below).
6.Once charging is complete, it will stop automatically. The charger LED will
switch to green and the LED's on the battery will go out 10 minutes after the
battery is fully charged (charging lasts approximately 6 hours).
7.You can then disconnect the battery from its charger and use it.
17
►► Battery charge indication table
Charger only connected to the
mains power supply (battery
not connected to the charger)
Charger
LED
Battery
LED's
Charging
status
Permanent
green
-
0 to 20%
Permanent
orange
Charging
21 to 40%
41 to 60%
61 to 80%
81 to 99%
Fully charged
Problem during charging
= LED off,
= LED flashing,
Permanent
green
Flashing
orange
100%
After 10
minutes
-
= LED permanently on
►► Important notes
• Always ensure the charger is compatible with the local electricity network:
Voltage: 100 V, maximum 240 V,
- Frequency: minimum 50, maximum 60 Hz.
• Charge your battery in a dry environment at a temperature of between 0°C and
40°C.
• Never allow children to play with the battery or handle it.
• Never attempt to recharge the battery in the rain or in a damp place.
• Never attempt to charge the battery with a charger other than that designed for
the battery.
• Never attempt to charge any battery other than that designed for the charger.
• Never attempt to open, dismantle or insert objects into the charger. If a problem
should arise, please consult your DECATHLON store.
• Failure to comply with the precautions for use will invalidate the warranty.
18
MAINTENANCE AND LIFETIME
(WARRANTY CONDITION)
• Never store the battery discharged (1 flashing green LED) to avoid any deep
discharge which could lead it to malfunction.
• In case of extended storage, recharge the battery at least every 3 months.
• To guarantee an accurate indication of your battery status (when the status
indication button is pressed), we advise you to fully charge it every 6 months
and then completely discharge it (this operation "calibrates" the battery
status).
SELF-DIAGNOSIS
The battery has a self-diagnosis tool which allows you to know its status at all
times.
This operation is possible using the push button on the battery.
Battery status indication table
Charger
LED
Meaning
11 to 20%
21 to 40%
41 to 60%
61 to 80%
Press and
hold the
battery
status button
81 to 100%
(1)
Action
Indication of
the battery
charge status
(measurement of
the actual capacity)
Battery in safe mode
Low capacity < 10%
Undervoltage
protection
Recharge the
battery urgently
Temperature
protection
Please return the
battery to your afterShort-circuit protection
sales service
Other protection
= LED off,
= LED flashing,
= LED permanently on
(1) IMPORTANT NOTE: If no LED lights up on the battery when the battery status
button is pressed, you must immediately connect the battery to its charger.
Two cases are then possible:
19
• If charging starts, your battery was in safe mode. Terminate charging and ensure
you do not leave your battery in this status as this will lead to your battery being
out of service
• If charging does not start, your battery is out of service and you must return it
to your after-sales service
ADDITIONAL PRECAUTIONS FOR USE
• Always carry out maintenance operations in sufficient light.
• Warning, if you remove the wheel, you must ensure the direction of rotation
of your wheel is correct.
• Before each use, ensure your brakes are operating correctly.
• The nominal weight of your bike is:
- Tilt E = 23.3 kg
- Original 7 E = 26.3 kg.
• Always wear a helmet when riding your bike.
• These electric bikes are designed for persons aged 14 and over. In all cases
you must be able to control the bike in order to use it.
• If the bike is not used for an extended period, remove the battery from your
bike to prevent a third party from using it.
• Warning, in the event of an electrical fault, you may have to pedal without
assistance. The additional weight of an electrically-assisted bike may reduce
your ability to complete your trip.
• You should use your stand on flat, stable ground to ensure your bike is
stable.
• Caution, in rain, frost or snow, you may have less tyre adherence.
20
MAINTENANCE
GENERAL RECOMMENDATION
All cleaning, electrical or mechanical maintenance must be carried out with
the power switched off and the battery removed from the bike!
We advise you to bring your electrically-assisted bike back to your DECATHLON
store for its 6-month service.
Caution, with your electrically-assisted bike, you cover more kilometres at higher
speed. It is therefore very important to have the brakes services at regular
intervals.
For all bike maintenance operations, consult the instructions on our btwin.com
website. These instructions can also be obtained by request from the store.
If the bike or battery suffers a fall, check that your battery is intact. Caution, as
the watertightness of your battery is no longer guaranteed following a fall.
SPECIFIC MAINTENANCE FOR
ELECTRICALLY-ASSISTED BIKES
►► Cleaning
• Cleaning with a high-pressure jet washer is strictly forbidden even in
specialised car-washing facilities.
• Rinsing your bike is not recommended.
• You are advised to wash your bike with a damp sponge.
►► Tyres
To maintain a good range, your bike tyres must be kept inflated at between 3
and 4.5 bars. A bike loses a lot of pressure. It is therefore essential to pump up
the tyres every week.
►► Wheel
Your bike is fitted with a V-braking system, which comprises brake pads and
rims. The rims are therefore subject to wear which must be checked to ensure
they are intact.
The motorised wheel is also subject to higher stress than a standard bike wheel,
and although it is reinforced, it is possible that spokes may break. If a spoke
breaks, contact your DECATHLON store.
21
►► Brake
The brake pads must be adjusted according to the recommendations in the bike
instructions on b’twin.com.
It is important to remember that your electrically-assisted bike is subject to more
frequent and more intense stress. Its braking system will therefore be subject to
more rapid wear.
Altering the position of the brake adjustment screws is forbidden. ( A ). These
screws adjust the braking sensitivity. If this setting is modified, we can no longer
guarantee that your electric bike will operate correctly.
A
A
CONTENTS OF THE COMMERCIAL WARRANTY FOR
YOUR ELECTRICALLY-ASSISTED BIKE
• Please ensure that you keep your invoice as proof of purchase.
• The bike is guaranteed for 5 years for the frame and 2 years for normal wear
parts.
• The battery is guaranteed for 2 years with a maximum of 300 full charges
and a minimum of one charge every three months.
• The warranty does not cover damage resulting from misuse, from a failure to
respect the precautions for use, from accidents, from improper use or from
commercial use of the bike.
• This bike is for personal use only and not for professional use.
• The warranty does not cover damage resulting from repairs carried out by
persons not authorised by Decathlon.
• Each electronic component is permanently sealed. Opening one of these
components (battery, battery sheath, controller, screen, motor) may cause
physical injury to persons or damage to the system. Opening or modifying a
component in the system will invalidate the warranty for the bike.
• The warranty does not cover cracked or broken screens showing visible
signs of impacts.
22
23
OXYLANE
4 Boulevard de Mons – BP 299
59665 Villeneuve d’Ascq cedex – France