1
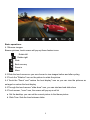
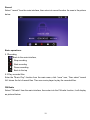
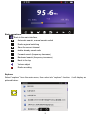
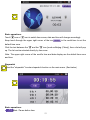
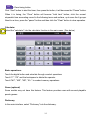
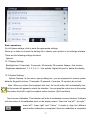
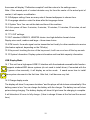
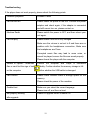
Foreword Thank you for purchasing an Ematic Digital Touch screen MP3 player, please read this manual carefully before using the product. Specifications and software updates are subject to change without notice. The player pictured in this manual may differ from yours, but the information in this manual will still apply Cautions: This manual contains important safety measures and information regarding proper use of the product. Read this manual carefully before using the product. Ɣ Do not put the unit in direct sunlight, humid or dusty places. Ɣ This product is not moisture or water resistant. Ɣ Do not open or disassemble the unit, as this will void the warranty. Ɣ Avoid dropping the unit. Do not let the TFT screen come under heavy vibration, or it may result in damage and/or the TFT screen display might not work. Ɣ Please select the appropriate volume, please lower the volume if using the headphones. If you feeling ringing in your ears, lower the volume. Ɣ If the player is connected to the computer do not suddenly disconnect, it may lead to a system error. Make sure to safely remove the player form your computer Ɣ Do not use alcohol, thinner, or benzene as cleaning agent when cleaning the unit. Ɣ Do not use this product in areas where electronic devices are prohibited (eg: on an airplane) Functions Overview Ɣ High precision touch screen with an easy and intuitive operation. Ɣ 4.3 inch touch screen. Ɣ full-screen touch, supports slip and drag operation Ɣ Music formats, supports MP3, WMA, WAV, FLAC, APE, ACC Ɣ Video formats, supports RM,RMVB, AVI, MP4, WMV, FLV, MPG, MPEG, MKV Ɣ Image formats, supports JPEG, BMP, GIF Ɣ Supports image zoom in, zoom out, and rotate Ɣ Supports calendar and world time function Ɣ Supports dictionary and calculator functions Ɣ Supports stopwatch function Ɣ Support game function, built-in multiple games Ɣ Multiple EQ modes Ɣ Support multiple languages 1 Ɣ High speed USB 2.0 Ɣ Support EBook function Ɣ Mobile hard disk function, support firmware upgrade Ɣ Support HDMI output Product Layout 1. Earphone jack 2. USB port 3. Pull switch: Power on/off 4. HDMI port 5. TF card slot 6. Remote receiver window: receive remote controller’s signals 2 Main Menu: Enter main menu after power on, see below picture: Slide left or right to find the desired options, select from Video, Music, eBook, Photo, Record, Radio, Explorer, Calendar, Time Zone, Stopwatch, Calculator, Dictionary, Settings, etc. functions. Video Select [Video] from main menu, then enter into video playlist, such as the bellow picture. 3 Basic operations: 1.1 Play video Touch the screen, then the screen will display the icons below Switch Display mode Previous track Play/Pause Next track More Back to the main interface Back to the top Volume adjust In the video playback interface, select “ the previous or the next track; touch “ Switch Display mode. After touching ”, then the current video playback will be on ”, you can select pause or play, touch “ the volume progress bar will pop up can adjust the volume. 4 ” for then you 1.2 More: touch “ ” and then a menu will pop up, click “select time play” in the menu, then press the up or down buttons to select time, press “Yes” to confirm. It will start playing from the selected time. In the pop up menu, it has “Caption” “Caption language” “Track” etc settings. Music: Back to main menu All music Genre Artist Play list Back to the top Click [More], a function selection list will pop up: a. Record files: Display record files playlist b. Dir list: c. Update Media library d. Hold On play e. Resume play 5 Album more Basic Operations: 2.1 Play music: Select previous or next song by click Play/Pause: Click or to pause the play, touch once for pause, touch again for play Vol adjustment: After click A progress bar will pop up, and then click it for Vol adjust. Lyrics display: Sometimes the lyrics will display automatically 2.2 A-B repeat In the music playback mode, touch to A-B repeat mode, 2.3 EQ mode In the music playback mode, touch , then you can set EQ mode. EQ mode: Nature, Pop, classic, jazz, rock, soft, dbb 2.4 More In the music playback mode, touch then a window will pop up as pictured below: Click “repeat mode “, Cycle mode can be switched, click “play mode”, you can switch the play order. EBook Select eBook from the main menu, and then enter into the eBook interface as pictured below: 6 Basic operations: 3.1 Download txt format files: Connect the unit to the computer, then select the files that need to be downloaded, save the files to .TXT format to the removable disk. 3.2 Reading files: Enter eBook interface from the main menu, click the list and select the content which you would like to read, enter into the current eBook file after confirmation. Icon function: Back to the main interface, Auto Scroll Page Jump Bookmark More 3.3 Bookmark Touch the function icon "bookmark" to pop up a list of bookmark options. Choose "store bookmarks," "extract bookmark", "delete bookmark" to bookmark action. 3.4 Page jump After entering the function, you can touch up and down buttons to set the page, then press OK to jump to the page selected. 3.5 Auto Scroll Touch the function icon "auto scroll" and the display will automatically scroll up, it will stop when you click the icon again. 3.6 More 7 Touch the function icon "Settings" to pop up the settings list 3.7 Background Color: Enter into the function of setting the current background color, three choices: green, blue, or black. Font color: Access to the function of selecting the current font color to display, three choices: white, purple, or gray. Font size: Access to the function of selecting the current font size to display, three choices: large font, font, or small font. Auto flip: Access to the function to set the automatically flip time, E-book will automatically flip according to the time. The upper right corner will show the total number of pages and the current page number when reading, according to the display; you can know how much the content is remaining. Bookmark operations on all the e-book files. By "extracting bookmarks" can jump directly to the appropriate location for reading e-book set Note: The machine only supports the "ANSI" encoding format of the TXT text; does not support other formats. Photo Select “Photo album” from the interface, and then into image list as the below picture shows: Click to enter the album browser interface, as shown below: 8 Basic operations: 4.1 Browser images: Browse pictures, touch screen will pop up these feature icons: Rotate left Rotate right Slide Best recovery Zoom in More 4.2 Slide the touch screen so you can choose to view images before and after cycling 4.3 Touch the "Rotation" icon on the picture to rotate the picture. 4.4 Touch the "Zoom" and "restore the best display" icon so you can view the pictures as enlarged or restore the best display 4.5 Through the touch-screen "slide show" icon, you can start and end slide show 4.6 Touch screen, "more" icon, the screen will pop up a set list a. Set the desktop: you can set the current picture to the theme picture b. Slide Time: Sets the time between slides 9 Record Select record” from the main interface, then enter into record function. As seen in the picture below: Basic operations: 5.1Recording Back to the main interface, Stop recording Start recording Pause recording Back to the top 5.2 Play recorded files Enter the "Music Play" function from the main menu, click “more” icon, Then select "record file" shows the list of record files. Then use music player to play the recorded files. FM Radio Select ”FM radio” from the main interface, then enter into the FM radio function, it will display as pictured below: 10 Basic operations: Back to the main interface, Automatic search, manual search switch Radio regional switching Save the current channel delete already saved radio Forward search (frequency decrease) Backward search (frequency increases) Back to the top Volume adjust Radio recording Explorer Select “explorer” from the main menu, then enter into “explorer” function pictured below: 11 it will display as 7.1 The list in Explorer interface, touch the screen and then slide down or up, the list will move down or up, and then the necessary documents can be found. 7.2 Delete files In Explorer, you can choose your own favorite music, videos, pictures and e-book files, Tap into the player or browser interface. Tap the folder into the folder will be displayed in the list of files, Encountered in the selection process if you do not need the documents, you can long press an option, and then will pop up a “delete “window. You can then delete files. Calendar Select the "Calendar" into the calendar function in the main menu. Such as below: Basic operations: Touch " Touch the " " icon, or " " icon to switch years day. " button, and return to the current date calendar display. Point on a certain date, and it will be highlighted. World Time Select the "world time" on the main menu, then access to the world time function. (See below) 12 Basic operations: Touch " " icon or " " icon to switch time zones; date and time will change accordingly. Keep touch through the upper right corner of the icon in the world time to set the default time zone. Click the text between the " " and the " " icon [such as Beijing (China)], then a list will pop up. The list can be selected directly by time zone. Note: The upper right corner of the world's time and date display are the default time zone and time. Stopwatch Select the "stopwatch" to enter stopwatch function on the main menu. (See below) Basic operations: Start / Pause button time 13 Clear timing button Click "Start" button to start the timer; then press the button, it will becomes the "Pause" button. When it is timing, the "Clear" button will become "total time" button; click the current stopwatch time accounting record to the following terms sub-surface, up to save the 4 groups. Need to re-time, press the "pause" button and then click the "Clear" button to clear operation. Calculator Select the "calculator" into the calculator function in the main menu. (See below) Basic operations: Touch the digital button and calculate through conduct operations Touch "C", "CE" and the backspace to delete the operator. Touch "MC", "MR", "MS", "M +" to conduct memory operations. Game (optional) Some models may not have this feature. This feature provides users with several playable puzzle games. Dictionary In the main interface, select "Dictionary" into the dictionary. 14 There are English-Chinese dictionary, English-English dictionary, Chinese-English dictionary, Chinese dictionary, idiom dictionary, etc. 5 dictionaries available in the dictionary function,. Basic operations: Touch the dictionary you like then you will enter the dictionary's input interface. Point icon on the upper right corner, then it will hide and display the keyboard English-Chinese Dictionary Selected "English-Chinese” Dictionary" into the English-Chinese dictionary. Basic operations: In the input interface, click characters on the keyboard to enter the word, while inputting the list it will display the word edge. After you enter the word, click on the word list, then enter the word interpretation (see below). 15 Explanation of last word Explanation of next word Into the input interface a word to explain a word to explain to return the next input interface 12.2 English-English Dictionary "English-English dictionary" into English-English dictionary. The operation of English-English Dictionary ---Please reference specific operation of English-Chinese dictionary. 12.3 Chinese-English dictionary Select "Chinese-English Dictionary" into the Chinese-English dictionary. The operation of Chinese-English dictionary ---Please reference specific operation of English-Chinese dictionary. 12.4 Chinese Dictionary Select "Chinese Dictionary" into the Chinese dictionary. The operation of Chinese dictionary --- Please reference specific operation of English-Chinese dictionary. 12.5 Idiom dictionary Select "Idiom Dictionary" entry idiom dictionary. The operation of idiom dictionary --- Please reference specific operation of English-Chinese dictionary. System settings Select the "Settings" enter the system settings functions on the main menu. (See below) 16 Basic operations: Go to System settings, click to enter the appropriate settings. Move up or down to choose the setting list to choose your options in the settings interface. There are the following settings functions Options: 13.1 Display Settings Backlight time: 10 seconds, 15 seconds, 20 seconds, 30 seconds, Always---five choices. Brightness adjustment: 1, 2, 3, 4, 5, 5 five options. Higher the level is, darker the display. 13.2 System Settings System Restore: In this menu: pop-up dialog box, you are prompted to restore system defaults. Keypad lock time: 10 seconds: 30 seconds, 5 minutes, 10 minutes, do not lock. Note: When you select the keyboard lock time, the touch button will automatically lock, point the screen will appear to unlock the interface. You can drag the unlock icon in the center of the screen from left to right to complete unlock function. (Such as below) Touch screen calibration: This selection will enter the calibration screen interface. Calibrate with the center of the calibration point on the display screen. There are “top left”,” top right”,” lower left”,” lower right” and “Center”. It needs to align five different points before calibration is completed. Once the calibration is completed 17 the screen will display "Calibration complete" and then return to the settings menu. Note: if the sensed point of contact deviates very far from the center of the actual point of contact, it will require re-calibration. 13.3 Wallpaper setting: there are many sets of themed wallpapers to choose from. 13.4 Language selection: enter the show after the language choice. 13.5 System Time: You can set the date and time of the machine. 13.6 Auto power off time: 3 minutes, 5 minutes, 10 minutes, 15 minutes, 20 minutes, do not shut down. 13.7 TV OUT settings: TV OUT standard: HDMI576, HDMI720 choice--two high-definition format choice. Display size: small, medium and large--- three sizes choice. 13.8 FM launch: the audio signal can be transmitted out locally for other machines to receive (this feature optional, depending on the FM chip.) 13.9 Key sound: touching the icon of the key sound, it will turn on or turn off the key sounds. 13.10 System Information: Display system information and local disk capacity information. USB Display Mode 14.1 This unit has a high-speed USB 2.0 interface with the standard removable disk function. It supports windows2000 above systems (do not need to install driver). Connected with the PC (pause a few seconds), it will display as on-line mode. It needs some time to install some system document in the first time. After that, it will become very fast. 14.2 Charge display mode The display will show “Low power shutdown” and the player will shut down automatically if the battery power is low. You can charge the battery with the charger. The battery icon will show pulses during charging. The battery display will show full grid once the charging is complete. It will take about 4 hours to fully charge. (It has to charge 8 times at the first and the second time.) 18 Troubleshooting If the player does not work properly, please check the following points Problem symptoms Can not turn on Possible Cause Please check the power of the unit. Connect the power adapter and check again, if the adapter is connected and still cannot turn on, please contact us. Machine Death Please switch the power to OFF, and then reboot your Can not play Please check if the unit is fully charged unit again. Make sure the volume is not set to 0 and there are no problem with the headphones connection, Make sure the headphones are Clean. Corrupted music files may lead to some noise, or cannot be played, ensure the files are saved properly. Please format the player with the computer Unable to upload / download Confirm the computer and Player is connected files or cant find the sign of risk probably. Confirm whether the memory storage is full. on the computer Confirm whether the USB cable is damaged Can’t record Please check whether there is enough space for the memory. Please check the power of the machine Garbled text Make sure you select the correct language Please turn-off, and then re-boot. Not properly working Please re-upgrade under Windows XP. after upgrade 19 Specification Item Specifications Screen 4.3inch TFT Language Support 17 languages Data rate High speed USB 2.0 Supported file formats music MP3 WMA WAV FLAC APE ACC record WAV/MP3 image JPEG/GIF/BMP Supported video formats RM RMVB AVI MP4 WMV FLV MPG MPEG SNR 85dB Max output power (L) 5mW + (R) 5mW (32Ohm) Battery Type 3.7V Li-Polymer Operation temperature 5 System Support Windows 2000/XP/VIsta Accessories User manual -40 earphone adaptor USB cable Note Please be sure to have a backup copy of your data before using, our company is not responsible for files lost due to software errors, hardware, misused, repair, battery replacement or other unforeseen circumstances arising from the loss of personal data and other indirect losses resulting liability, At the same time, we are not responsible for the damage if the user misunderstood the user manual. Therefore, our company will not be responsible for accidental damage that may occur outside of this manual and are not responsible for third-party claims of using the machine 20