1
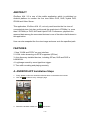
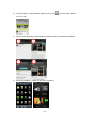
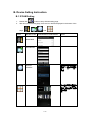
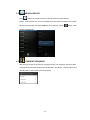
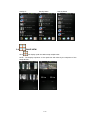
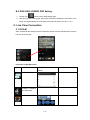
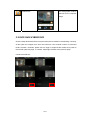
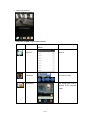
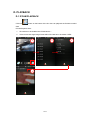
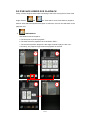
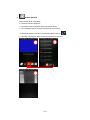
ANDROID APP
OPERATION INSTRUCTION
1/14
INDEX
ABSTRACT..................................................................................................................3
FEATURES ..................................................................................................................3
A. ANDROID APP Installation Steps.....................................................................3
B. Device Setting Instruction .................................................................................5
B.1 IPCAM Setting.................................................................................................5
B.2 DVR/ NVR/ HYBRID DVR Setting ...............................................................9
C. Live View Connection .........................................................................................9
C.1 IPCAM ...............................................................................................................9
C.2 DVR/ NVR/ HYBRID DVR............................................................................10
D. PLAYBACK...........................................................................................................12
D.1 IPCAM PLAYBACK ......................................................................................12
D.2 DVR/ NVR/ HYBRID DVR PLAYBACK .....................................................13
2/14
ABSTRACT
IProSecu A.M. V2 is one of the mobile application which is published on
Android platform to monitor the live view within DVR, NVR, Hybrid DVR,
IPCAM and Video Server.
This application, iProSecu A.M. V2, not only could monitor the live view of
connected devices, but also could reveal the quad view in IPCAMs (i.e. more
than 2 IPCAMs) or DVR, NVR and Hybrid DVR. Furthermore, playback the
reserved data among the connected devices is one of the other vital features in
this application.
User can also snapshot the live view image and save as to the specified path.
FEATURES
1. New "LOOK and FEEL" on user interface.
2. H.264 video streaming via RTSP supported.(IPCam)
3. Auto discovery installed devices, including IPCam, NVR and DVR in
LAN/WLAN.
4. Log/Image search by event type/time trigger.
5. Time shift recording and playing remotely
A. ANDROID APP Installation Steps
1. Firstly, please confirm the Android mobile has been connected to the Internet.
2. Click the
button to entry “All apps” page.
3. Search the android market icon
and click it.
3/14
4. In the first page of “Android Market”, please click the icon
and then insert “iprosecu
a.m. V2” to surf.
5. After found the application, please following the bellow steps to complete the installation
1
2
3
4
6. After finish installation, please click the app to activate it.
4/14
B. Device Setting Instruction
B.1 IPCAM Setting
1.
Please click
2.
After entry IPCAM setting page, there are four buttons displayed in the bottom of the
page,
ICON
button to entry IPCAM setting page.
、
INSTRUCTION
、
and
RESPONSE ACTION/ IMAGE
NOTE
PRESENT
SEQUENCE
ADD DEVICE
SEARCH
此功能手機的網路連線
DEVICES
需在 LAN 底下方可產生
動作。
QUAD VIEW
四分割所顯示的畫面依
序為清單中所建立的裝
置之順序。
5/14
2.1
ADD NEW IPCAM Site
Entry to the IPCAM setting page, click
button to add the new IPCAM site
【name】:Please insert the name of the site
【ip】
:Please setup the ip address of the device
【port】:Please setup the port of the device. The default value is 80
【account】
:Please setup the username of the device.
【password】
:Please setup the password of the device.
After finish the related setting, please click
button to create the
connection.
NOTE:If the connection device is not IPCAM, the warning dialog box will pop-up to
remind the user.
6/14
2.2
SEARCH DEVICE
Click
button can research all the IP devices within the same subnet.
NOTE:This function only can be activated when the network setting of the mobile
device is setup under the same LAN with the IP devices. Press
button could
refresh the searching
2.3
PRESENT SEQUENCE
After setup multi-site of the devices, press this button can sequence the setup sites.
Currently, there are three varieties can be switched, “Sort By IP”, “Sort By Name” and
“Sort By Status” (Connected or Dis-Connected).
7/14
Sort By IP
2.4
Sort By Name
Sort By Status
QUAD VIEW
Click
can display quad view after setup multiple sites
NOTE:The display sequence of the quad view will follow by the sequence of the
setup devices
8/14
B.2 DVR/ NVR/ HYBRID DVR Setting
1.
Please click
button to entry DVR setting page
2.
After entry to DVR setting page, there are three buttons displayed in the bottom of the
page, the related settings and controlling instruction will refer to the B.1 2.1~2.3.
C. Live View Connection
C.1 IPCAM
After complete all the settings of the IPCAM sites, please click the specified site to see the
live view of the IPCAM.
Instruction of IPCAM control:
ICON
INSTRUCTION
RESPONSE
ACTION/
NOTE
IMAGE
SITE SWITCH
ENABLE/ DISABLE
IPCAM AUDIO
PTZ IPCAM is connected.
PTZ CONTROL
9/14
SNAPSHOT。
The storage path could be
selected for the snapshot
image.
C.2 DVR/ NVR/ HYBRID DVR
Click the setup DVR site and then the quad view will be revealed in the following. Currently,
all the quad view images come from one DVR site. If the channel number of connected
DVR is exceed 4 channels, please use one finger to swipe left the mobile touch panel to
the second quad view page. In contrast, swipe right will back to the previous page.
8 Channels DVR site:
10/14
Click single channel:
Instruction of DVR single channel control:
ICON
INSTRUCTION
RESPONSE
ACTION/
NOTE
IMAGE
CHANNEL
Switch to the different
SWITCH
channel
PTZ
PTZ analog camera is
CONTROL
connected to DVR
SNAPSHOT
The storage path could be
selected for the snapshot
image.
11/14
D. PLAYBACK
D.1 IPCAM PLAYBACK
Click the
button on the bottom of the live view can playback the IPCAM recorded
data.
IPCAM Playback Note:
1.
SD card has to be installed into IPCAM device;
2.
Video format and single image format within SD Card has to be Motion-JPEG.
2
1
4
12/14
3
D.2 DVR/ NVR/ HYBRID DVR PLAYBACK
Firstly, click the single channel while connecting to the DVR. Among the live view of the
single channel,
and
are “Time Search” and “Event Search” playback
buttons. After select the specified time point or event item, the live view will switch to the
playback view.
1.
TIME SEARCH
Time Search Note in Playback:
a. The time point to perform playback;
b. The video format to playback has to be Motion-JPEG;
c. The channel to perform playback is the single channel to play the live view.;
d. Currently, only support single channel to playback at one time.
1
2
3
4
13/14
2.
EVENT SEARCH
Event Search Note in Playback:
a. The event items to playback;
b. The video format to playback has to be Motion-JPEG;
c. The revealed event list contains the latest fifty event items;
d. Refresh the latest event items in event list page by clicking
e. Currently, only support single channel to playback at one time.
2
1
3
14/14
;