1
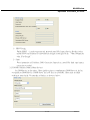
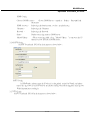
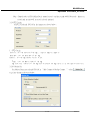
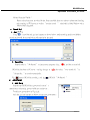
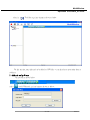
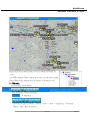
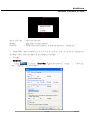
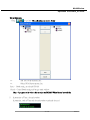
MultiWindow
Operation Document_V3.00.04
MultiWindow
Operation Document_V3.00.04
REVISION HISTORY
Version
Author
3.00.04
brian
Description
Date
19 Jan 2010
2 of 36
2010-1-19
MultiWindow
Operation Document_V3.00.04
Contents
1、SYSTEM REQUIREMENTS ..............................................................................................5
a.
b.
IP CAM Requirements .....................................................................................5
System Requirement ........................................................................................5
2、 PC SERVER ..............................................................................................................6
a.
Interface instruction ..........................................................................................6
1、 Login Interface ......................................................................................6
2、 Main Window..........................................................................................6
b. Tool Bar ..............................................................................................................8
1、System Set.................................................................................................8
2、User Set.....................................................................................................9
3、IP Cameras List .........................................................................................9
3.1 Add Camera & Modify Camera..........................................................9
3.2 Camera Setting............................................................................10
3.2.1 Status .................................................................................10
3.2.2 AV Setting ......................................................................11
3.2.3 NetWork Setting ................................................................13
3.2.4 PPPoE Setting.......................................................................13
3.2.5 DDNS ( Dynamic Domain Name Service )............................14
3.2.6 SMTP Config........................................................................15
3.2.7 FTP Config ...........................................................................15
3.2.8 Record By Schedule..............................................................16
3.2.9 PTZ Config...........................................................................17
c. Record Path ...................................................................................................18
1、Record Path .............................................................................................18
2、Record Set...............................................................................................18
d. All IPCAMS...................................................................................................18
1、Add Group ..............................................................................................18
2、IP Camera List.........................................................................................19
1、Add and modify E-map............................................................................21
Right click upon the Selected map in Tree to modify and delete the map ................22
2、EMap Set.................................................................................................22
3、Monitor Spot Set .....................................................................................23
f.
g.
Log system ....................................................................................................23
About Multi Window 3.0 ...............................................................................24
3 of 36
2010-1-19
MultiWindow
Operation Document_V3.00.04
3、 CLIENT SERVER ......................................................................................................25
a.
b.
c.
Login MultiWindow.......................................................................................25
Live monitor ..................................................................................................26
PlayBack........................................................................................................34
4 of 36
2010-1-19
MultiWindow
Operation Document_V3.00.04
1、System Requirements
a. IP CAM Requirements
Imagia Module Firmware Version:Module 2.0.5
Stardot
LEX-8200-8/16
HA-8160/4125
b. System Requirement
1:Terminal Server:
OS:Windows system : Windows 2000 and Windows XP above
Memory:
DDR 2048 MB above
Hard disk: Refer to the chart below ( by parameters of number of channel and recording time )
ID
Nunber of channel
Hard Disk Capacity (GB)
1
1
1*2 = 2
2
4
4*2 = 8
3
9
9*2 = 18
4
16
16*2 = 32
5
64
64*2 = 128
Calculation
Hard Disk Capacity : number of channel * 2(GB)
Hard Disk overwrite : When destination Hard disk is full capacity, the first five recording data
will be deleted and to overwrite recording into Hard disk
2:client terminal :
OS:Windows system : Windows 2000 and Windows XP、Windows VISTA、Windows 7
Memory:
DDR 2048 MB above
Hard disk:
Display resolution:1024 x 768 above
5 of 36
2010-1-19
MultiWindow
Operation Document_V3.00.04
2、 PC Server
a.
Interface instruction
1、
Login Interface
Double click the CMS-Server Program to execute it and then get into Login interface shown as below:
User Name:self-assigned name to login
Password:self-assigned password to login
Remember Password:Recording User's last Login-information
Auto Login:Directly auto login to Main Window with correct Username and password for next execution of
the CMS-Server Program when this item is selected .
Note:As first time execution, the default value for User Name : admin
/
Password : None
2、 Main Window
6 of 36
2010-1-19
MultiWindow
Operation Document_V3.00.04
To login to Main Window with correct Username and password as shown above
(1) Tool Bar
There are seven control option in Tool Bar:
1:Start/ Stop Record 2:User Set
6:EMap
3:Recording path 4:System set 5:Camera List
7:Log system
(2) Group list
ALL IPCAM connected to PC Server will be listed by group in Tree, and setting, adding and
modifying group, could be made in this list.
(3) Camera List
ALL IPCAM added to PC Server's Multi Window database (MultiWindow.mdb) will be listed b,
and setting of every details of each camera could be made in this list.
(4) Search Camera
ALL IPCAM available in LAN will be listed , and setting, adding and modifying group, could be
made in this list, furthermore, be added into data base with correct user name and password.
(5) Status Information
Display transmitting status of IPCAM, as well as its information: channel number, IP Address, frame
7 of 36
2010-1-19
MultiWindow
Operation Document_V3.00.04
rate , Streaming and present time
b. Tool Bar
1、System Set
select
in Tool Bar to get into interface shown as below
1:Add new camera when connect successful:
Auto connecting to new searched IPCAM with default username and password when enable this
function, and its IP address would be added into database, that simplifying the operation.
4:Max Window:Select the maximum amount of IPCAM (1,4,9,16,25,36,49,64,81,100)
5:Language:Select the language
6:Port:Set the port of the server terminal for internet connection,default value : 10001。
7:Auto record all:All the IPCAMin data base will auto-recording when enable this function.
8:Auto Login:Auto-login when enable this function with correct user name and password
9:Auto to run when the windows OS starting :
8 of 36
2010-1-19
MultiWindow
Operation Document_V3.00.04
auto execute after windows OS starting when enable this function
2、User Set
select
in Tool Bar to get into interface shown as below
1、Add:type new username and password and then “ add" to create a new account
2、Modify:Select one account and then “ modify “ to fix all parameters under its permission
3、Operate Group:permission of users could be modified in this column by group.
3、IP Cameras List
In this list, double click upon selected IPCAM to get into its setting interface.
3.1 Add Camera & Modify Camera
Click Add Camera & Modify Camera both are led to one interface as shown below
9 of 36
2010-1-19
MultiWindow
Operation Document_V3.00.04
1:Address
:Type IP Address of new IPCAM to add it to list
2:Port
:IP CAM's port
3:Camera Type :Select the Camera's type accordingly, such as HA-64X、StarDotand etc..
4:Channel
:Self-assign the name of each IP CAM
5:User name
:Set User name of IPCAM
6::Password
:Set Password of IPCAM
7:Group
:Self-assign the group for each IP CAM
8:MAC Address :MAC Address
9:Connect Test
:With correct username and password, Live display will show on the right after
click “connect test “ , and then “ OK “ to add it into database when the connection succeeded.
10:Camera Set
:Set IPCAM, refer to next index for details
11:Motion Set
:Set motion detect
3.2 Camera Setting
3.2.1 Status
You can see the camera, OCX and other basic information from the camera setting
as shown below:
10 of 36
2010-1-19
MultiWindow
Operation Document_V3.00.04
1、All IPcams
When “ Yes “ , all set will be to all camera in database, instead of setting individually , to save
time from setting.
2、Camera Type
Television system of cameras shown as PAL-Camera or NTSC-Camera
3、Firmware version
The current firmware version. Please check this information to make sure whether the system should
be updated or not.In general, update to latest firmware can fix the system bug and provide more
functions if available.
4、OCX version
The current ActiveX version : OCX goes along with the Multi Window installation, so up-date is
unnecessary as usual.
5、OCX path
The installation path of the ActiveX.
3.2.2 AV Setting
In this interface, you may set the Audio / Video of each IPCAM, such as Resolution, CBR, Limited frame
11 of 36
2010-1-19
MultiWindow
Operation Document_V3.00.04
rate and etc.., as shown below:
2、Video Config:
2.1 Resolution
Options as D1、CIF、VGA、QVGA.
2.2 CBR
CBR file fixed the amount of output data per time segment, to keep away from internet jammed with
limited band; transmitting image quality go down as CBR value is set lower
2.3 Limited Frame Rate (fps)
Frame rate transmitting per second is defined by the internet connection speed. Higher value
brings smoother picture performance..
2.4 Compression
Image compression rate-the less value brings the higher image quality and the larger data
transmission.
2.5 P/I Ratio (P frame:I frame)
As P/I value gets less, that image quality be higher, yet transmitting load rising.
3、Audio Config
12 of 36
2010-1-19
MultiWindow
Operation Document_V3.00.04
Enable IP Camera Audio to record its audio; enable PC Audio to play audio from IP Camera.
3.2.3 NetWork Setting
In this interface, you may set the network condition of each IPCAM, such as IP Address and etc..,
as shown below:
Obtain IP Address via DHCP:Obtain IP Address via DHCP
Use the following IP Address:Self-assign the IP Address of each device and related setting
HTTP Port:HTTP Port of selected IPCAM, default value : 80
3.2.4 PPPoE Setting
In this interface, you may set the PPPoE of each IPCAM , as shown below:
13 of 36
2010-1-19
MultiWindow
Operation Document_V3.00.04
1:PPPoE Config
Enable PPPoE :it needs user-name and password from ISP ( Internet Service Provider ) when
enable PPPoE, and dynamic IP is provided and changed accordingly by the “ Email Notification
when IP is Changed" .
2:Status
Every information of IP Address, DNS, Connection State and etc. from ISP is listed after internet
connection succeeded.
3.2.5 DDNS ( Dynamic Domain Name Service )
Set DDN Service in this option . Please kindly register to complimentary DDNS Server in the list
we offered for DDNS Service ; DDNS Server not in our list is not available . Please refer to related
website for more details. For example, as Dyndns, as shown as below :
14 of 36
2010-1-19
MultiWindow
Operation Document_V3.00.04
DDNS Config
Choose ( DDNS ) server:
Choose DDNS Server,offered as : Dyndns、PeanutHull and
Perfecteyes
DDNS Account:
Self-assign the domain name , such as : test.dyndns.org
Username:
Self-assign the Username
Password:
Self-assign the Password
Status:
Display connecting status to DDNS server
Manual Update
:When connecting failed, click “Manual Update “ to announce the IP
Address of your IPCAM to DDNS Server.
3.2.6 SMTP Config
Set SMTP of selected IPCAM in the interface as shown below :
SMTP Config
In PPPoE mode, please renew the IP when it is changedand noticed by E-mail; and please
refer to the fig. above to set SMTP server for picture sending when alarm triggered, entering your
E-Mail information accordingly.
3.2.7 FTP Config
Set FTP of selected IPCAM in the interface as shown below :
15 of 36
2010-1-19
MultiWindow
Operation Document_V3.00.04
FTP Path
Please ensure the correction of FTP Config for the function of recording to FTP when alarm
triggered.
3.2.8 Record By Schedule
Set Scheduled Recording of selected IPCAM in the interface as shown below :
Record By Schedule :
Record Type
:set as No Record、manual Record、record by Scheduls
Schedule
:Scheduled by self-assignment in this option
Duration
:Set recording time when alarm triggered
16 of 36
2010-1-19
MultiWindow
Operation Document_V3.00.04
Note:Default value of IPCAM,StarDot is manual record,and that of HA-640X No record,please set
record path for HA-64X to record in locale terminal.
3.2.9 PTZ Config
Set PTZ of selected IPCAM in the interface as shown below :
1、PTZ Config
Protocol : Set the Protocolof the PTZ ; supports PELCO-P, PELCO-D
Baud Rate : Set the Baud Rate of the PTZ.
Address : Set the PTZ address from 0 to 255.
Type :Set the Model Number of the PTZ
PTZ Direction::Please set the PTZ direction while the PTZ camera is in the opposite direction.
3.2.10 Motion Set
Set Motion Detect for selected IPCAM ,in “Add Camera & Modify Camera “,select
to get into interface shown as below :
17 of 36
2010-1-19
MultiWindow
Operation Document_V3.00.04
Motion Detection Enable:
Please select detect area for when Motion Detect enabled; there are options of alarm mail sending
and recording in FTP server, as well as “ motion record “
scheduled in Multi Window when
Motion Detect triggered.
c. Record Path
1、Record Path
Click
in tool bar and get into interface as shown below; multi-recording path is available as
second path would be executed when full capacity by first path
2、Record Set
Default value is “ No Record" as first execute program, click
IPCAM in data base of PC server,and fig. changes to
in tool bar to record all
; also select “ auto record all “ in
“ System Set “ to record automatically .
Fig.
means IPCAM in recording ; and fig.
d. All IPCAMS
IPCAM “ No Record “
1、Add Group
Self-classify all IPCAM into groups and set user's
permission to self-assign groups visible for certain user .
To add new group shows in Fig. right
And then get into interface as below to enter new group name :
18 of 36
2010-1-19
MultiWindow
Operation Document_V3.00.04
Right click upon certain group name to add, delete, and modify
selected group as shown below
Groups will be automatically added in the list of data base when finish of adding; and could be
self-classified.
P.S.:group named “ New “ is default value and means failed in connection; group named
“Added" also default value yet means succeeded in connection
2、IP Camera List
To set and manage each IPcam in data base, but the set of each IPcam itself will be remained; all set-up
be saved in data base of Multi Window only . Whenever every modification of each IPCAM finished, click
to make it valid
19 of 36
2010-1-19
MultiWindow
Operation Document_V3.00.04
Click
to search all IPCAM in LAN
Searched IPCAM will be added into the database automatically with correct user name and password when
“Add new camera when connect successful" selected.
e.
EMap
20 of 36
2010-1-19
MultiWindow
Operation Document_V3.00.04
select in
Tool Bar to get into interface shown as below
For this function, map file needs to be added as JPEG file,up to three layers from main-layer to
sub-layer
1、Add and modify E-map
The tool bar as shown below
select
to add EMap and get into interface shown as below :
21 of 36
2010-1-19
MultiWindow
Operation Document_V3.00.04
Right click upon the Selected map in Tree to modify and delete the
map
Live EMap, Modify EMap : modify the resource and file name of map;
Delete EMap: delete map file, and the camera in this map as well
2、EMap Set
The tool bar as shown below
Icon instruction ( from left to right ):
E-Map Ratio
( from left to right ) Zoom out、zoom in、move、Cursor、Original Size、Fit Screen、
Modify、Add、Back to last layer
22 of 36
2010-1-19
MultiWindow
Operation Document_V3.00.04
Names of E-Maps by layer
Note:the ratio is the selected area by cursor to the main frame
3、Monitor Spot Set
Put IPCAM upon Maps to matched position when maps-adding finished
Select IPCAM in Tree and draw it to the certain area of selected map;
also you may draw Group as well to selected map, yet the changement needs to be made in groupas
shown below:
Left:" added" means Group; and its sub-tree means
IPCAM
Right:numbers show the layer of maps
f.
Log system
record every operation information: user name,operated camera,motion detect triggered and etc. as shown
below
Save as.:to back up log
clean:
clear all in log away
23 of 36
2010-1-19
MultiWindow
Operation Document_V3.00.04
g.
About Multi Window 3.0
Related information of program Multi Window
Click
Exit:Right Click
in the top on right in Main Window
and “Exit" shown as
And the click “ Exit “
to close after confirmation of username and password as shown below
24 of 36
2010-1-19
MultiWindow
Operation Document_V3.00.04
3、 Client Server
a.
Login MultiWindow
Execute Client Server Program “ CMS-Client.exe" to get into interface as shown below :
Server Address : IP Address of PC server ( Default value : 127.0.0.1)
Server Port
:Server Port of PC server,Default value 10001。
User Name
:enter valid User Name; its addition and modification be set in PC Server
Pass Word
:enter correct Pass Word
Remember Password:no need of Pass Word entering for next login
Auto Login
OK
:OK
Cancel
:Cancel
:Auto Login
Note:Instruction of Multi-Server Connection will be later
25 of 36
2010-1-19
MultiWindow
Operation Document_V3.00.04
b.
Live monitor
After succeeded in connection, then comes the interface shown as below :
(1) Exit program
(6)Information of IP Address,Frame rate and etc.
(2) Live monitor
(7) PTZ Control
(3) Disply Mode
(8) IPCam list
(4) Tool Bar
(9) Log、Move log
(5) Information of Time , channel number
1.
Exit program, minimize, full screen and exit ( window )
Exit program
Full Screen ( of selected channel )
Minimize window
2.
Live monitor, drawing Cursor to change the position of each channel; with right click, it will be shown
as below:
26 of 36
2010-1-19
MultiWindow
Operation Document_V3.00.04
Start to Live View :Start / stop Live view
Snapshot
:make picture of certain channel
Auto Flip
:Enable auto switch of channel , to adjust the interval in “ System Set “
3.
Disply Mode : there are options of 1 ch, 4 ch, 9 ch, 16 ch, 25 ch , 36 ch , 49 ch , 64 ch(It depends on
the ability of PC to select the options for the smoothness of display )
4.
Tool Bar
System Set
Click
to get into “System Set “ , there are options of "Setting “ ,
“ Move log
“ and “ Language “ as shown below :
27 of 36
2010-1-19
MultiWindow
Operation Document_V3.00.04
1、Option
(1)Auto Flip
Its interval is adjust-able,and function be disable when interval set to “ 0"
Start economization mode:
When displayed in Auto Flip Mode, decoding will be made only for present channel to save system
resource.
(2)Return to original state's window style:
When Stay idle too long, system will be back to default display to save its resource from decoding; and
function be disable when interval set to “ 0"
(3)Return to original state's window style after motion happened
after motion happened, it will Return to original state's window style as reminder; and its duration is
adjust-able, and function be disable when duration set to “ 0"
(4)Snapshot Path: path to save pictures
(5)EMap Alarm
after motion happened, Icon of triggered IPCAM will remain flash; and its duration is adjust-able,
and function be disable when duration set to “ 0"
2、Move Log
Move-log that self-assigned will be shown on the right top
Max Windows Show : number of channel to display
Save current liveview status
28 of 36
2010-1-19
MultiWindow
Operation Document_V3.00.04
Click
to save current live view status and the split of connecting IPCAM
self-assigned and it as shown as below:
enter a file name and save, then options of live view be added
Multi-server connection
click to get into
list of Server
Enter Server ( IP ) Address and server ( port ) and then “ Add “ to Connect to Several Server
simultaneously, and see all of belonging IPCAM
29 of 36
2010-1-19
MultiWindow
Operation Document_V3.00.04
Playback
Please press this button
to enter the playback system as shown below. ,refer to its
operation later
Emap
Click
to get into Emap from PC Server
Note:
Except “Add and modify E-map", all operation is the same as that of PC Server, such as Zoom in / out
and etc..
30 of 36
2010-1-19
MultiWindow
Operation Document_V3.00.04
Group Broadcast
Click
to get into Group Broadcast as shown below:
>>
Add IPCAM from present list
<<
Delete IPCAM from present list
Start: Broadcasting to selected IPCAM
Cancel:Cancel Broadcasting and back to main window
Note:it supports only when audio function of IPCAM / Video Server be available
5.
Information of Time , channel number
Information, such as Time and channel number of selected channel
31 of 36
2010-1-19
MultiWindow
Operation Document_V3.00.04
6.
CH
Number of selected channel
CT
Present time
Information of IP Address,Frame rate and etc.
Information, such as IP Address,Frame rate and etc. of selected channel
IP Address:IP Address of selected channel
FrameRate、BitRate : Current FrameRate、BitRate of selected channel
7.
PTZ control
Icon Instruction:
-:
Zoom OUT
+:
Zoom IN
-: Focus +: Focus +
↑ :
Tilt
32 of 36
2010-1-19
MultiWindow
Operation Document_V3.00.04
↓ :
Down
← :
Left
→ : Right
■ :
Stop PTZ Control
Save present camera position
Clean present saved position
Enable / disable tour function
Select from saved position
8.
IP Cam List
After succeeded in connecting to server, all IPCAM will be listed
Surveillance could be displayed by IPCAM in list , as well as by group with right click upon group name
and then “ Play Group “
33 of 36
2010-1-19
MultiWindow
Operation Document_V3.00.04
9.
Logo、Move Log
Move Log set in “ System Set “ will be shown as below :
c.
PlayBack
in the tool bar of Main Window, click
to playback interface as shown below:
(1) Logo Info.
(4) Tool Bar
(2) IP CAM List
(5) time to playback
(3)date of recording data
(6) Playback Display
34 of 36
2010-1-19
MultiWindow
Operation Document_V3.00.04
1.
Logo Info.
2.
IP CAM List
all IPCAM of PC server is listed , selecting IPCAM or drawing selected IPCAM to play window on
left to playback directly
※ For HA-64X Series,it plays back data from DVR , by selecting data list with right click
and“
3、5
Play Server File" to playback data from Server
date of recording data
&
time to playback
date of recording data of selected IPCAM is shown in red as below,
Different data type will be shown by colors in time table
Above is 24 hrs Table and TIME list is by minutes, playback by select certain hour and then minute
Instruction:
Red : recording time
Green : interval between recordings
White : no recording data
4.
Tool Bar
Items in first raw from left : 1、replay
2、Pause
35 of 36
3、Stop
2010-1-19
MultiWindow
Operation Document_V3.00.04
Items in second raw from left :
1、Snapshot
2、Back Up
3、Synchronous /Not Synchronous Play back
Items in third raw from left :
1、Renew loading to server
2、Play Speed
3、Exit Play Back Window
4.1 Back u p
Channel
:Channel to Back-up
Type
:File type to Back-up :
1、 AV/AVS File
(Normally be AV file,and AVS file is reserved file for StarDot )
2、 avi File
Start Time
:Start Timeo Back-up
End Time
:End Timeo Back-up
Path
:Path o Back-up
4.2 Synchronous /Not Synchronous Play back
Synchronous Play back: After playback for a while, difference between 4 ch will be shown, and then
system will slow down the faster channel Synchronous Play back
Not Synchronous Play back: Each 4 ch be self-playback
4.3 Renew loading to server
Renew loading to server
6.
Playback Display
UP TO 4 Channel playback simultaneous.
36 of 36
2010-1-19