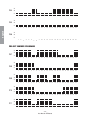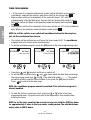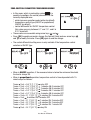
1
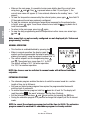
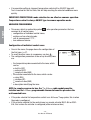
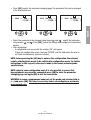
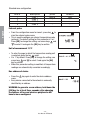
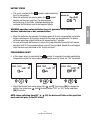
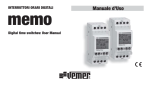
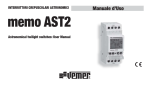
Cronotermostrato
Digitale
Athena
Manuale d’uso
User Manual
PROGRAMMABLE DIGITAL THERMOSTAT
Safety Instructions
Page
24
Technical Specifications
Page
24
Display And Programminsg
Page
25
Switch-on Reset
Page
26
Setting The Time
Page
26
Operating Modes
Page
27
Programming Menu
Page
29
Telephone Control
Page
40
Network Configuration
Page
40
Error Messages
Page
40
Reference Standards
Page
41
Dimensions
Page
42
Wiring Diagram
Page
42
Installation And Battery Placing
Page
43
- 23 User Manual Athena
English
Index
Athena is a multizone programmable thermostat for room temperature control.
SAFETY INSTRUCTIONS
English
1)
2)
3)
4)
When installing and operating the product it is absolutely necessary to
observe the following instructions:
The device must be installed by a qualified person.
Disconnect power supply while installing the device.
Do not power or connect the product if any part of it is damaged.
Connect the product considering the diagrams described in the following
manual and those on the device itself.
Code
VN940300
VE080800
Model
Athena
Athena Silver
Description
Programmable digital thermostat multizone/wireless
Programmable digital thermostat multizone/wireless
Color
White
Silver
TECHNICAL SPECIFICATIONS
•
•
•
•
•
•
•
•
•
•
•
•
•
•
•
•
•
•
•
•
•
•
•
Power supply voltage: 2x1,5V (AAA) alkaline batteries
Battery autonomy: 12 months approx.
Standby battery: approx. 2 minutes for battery replacement
Battery level control, with “dead battery” indicator
Bistable switchover relay output: maximum capacity 8A / 250V AC (resistive load)
“summer” and “winter” operation modes
Simultaneous control of 4 independent zones
Temperature adjustment type: proportional or ON/OFF, with differential adjustable
from 0,1 to 1°C
4 control setpoints that can be selected for every time segment
Clock with time and date reading
Automatic winter/summer switchover
Weekly programming with 7 daily programs
Programming resolution: 30 min
Measured temperature resolution: 0,1°C
Accuracy: ±0,5°C
Temperature measurement updated every 30s
Temperature measured by the built-in probe: 0°C ÷ 40°C
Temperature measured by the external probe: -40°C ÷ 60°C
Temperature control range: 2°C ÷ 35°C
Operating Temperature: 0°C ÷ 50°C
Storage Temperature: -10°C ÷ 65°C
LCD display reading the temperature, time, date and daily program
Protection degree: IP40
- 24 User Manual Athena
DISPLAY AND PROGRAMMING
LCD DISPLAY, KEYPAD
6
7
9 10 11 12 13
8
5
14
15
16
17
4
3
2
1
1
2
3
4
21
5
6
7
8
9
10 11 12 13 14 15 16 17 18 19 20 21 22 23
20
19
18
Figure 1
The LCD display reads the following information (Figure 1):
1 Graph of selected temperatures
2 Actuator ON in winter operation mode
3 Actuator ON in summer operation mode
4 Clock
5 Reading of day-month-year info, temperature control zone
6 Time/date configuration menu
7 Daily programming menu
8 Temperature programming menu
9 Timer programming menu
10 Zone-control parameter programming menu
11 Advanced programming menu
12 Battery status menu
13 Temperature control ON-OFF menu
14 Zone name, external temperature, or manual temperature reading
- 25 User Manual Athena
English
ADV
15 Measured temperature
16 Temperature measurement or acquisition in process
17 Unit of measurement °C/F
18 Manual operation
19 Wireless card IN
20 Extension program enabled
21 Telephone dialler status
English
Keypad (Figure 2):
• 1: ESC button
• 2: joystick; press the centre for [OK]
press the sides for , ,
• 3: manual operation key
,
,
Figure 2
SWITCH ON RESET
• Place batteries and then press the [R] reset key (see the “battery placement" diagram
on page 45). This does not erase previous programming but only date and time.
• All the segments on the display will flash and the relay will be actuated for approx. 3s.
• The display goes off and then back on with the time reading flashing.
• The clock keeps working regularly, whereas temperature control is inhibited until the
time is set.
Note: to restore the device's default conditions, press the [R] key and then the
[OK] key.
SETTING THE TIME
• Press the joystick centre [OK], and access the first menu, i.e. the time and date
. The page
setting menu, which is marked by symbol
opposite will be displayed.
• To change the fields displayed press the [OK] key again.
• The field to be modified will start to flash. Increase or
and
respectively,
decrease the value by keys
then confirm and move on to the next field by keys
and .
• The fields that can be modified are:
to set them to zero
° seconds: press
to set them to 0
and increase minutes, press
° hh:mm
° GG.MM.AAAA
ESC
- 26 User Manual Athena
ESC
ESC
• To end and save the changes press the [OK] key.
to exit the time setting page.
• Press
• The programmable thermostat will then start to control the temperature automatically
according to program P00 for weekdays, from Monday to Friday, and program P01 for
Saturdays and Sundays.
OPERATING MODES
The device features the following operation modes:
•
•
•
•
Automatic operation
Manual operation
Extension program
Countdown program
AUTOMATIC OPERATION
• After the reset phase, as soon as the date and time are set up, the device switches to
automatic operation.
• When in automatic operation, the device periodically measures the temperature in
the temperature zones it was programmed to control and performs zone temperature
control following the set up programs.
• The display reads the following information:
date and time
measured temperature (zone 1…4)
daily hourly graph (zone 1…4)
temperature measured by the external probe
temperature measurement unit
actuator status (zone 1…4)
presence of a wireless card
"dead battery" sign
temperature zone (Z1…Z4)
min. and max. measured temperature
1
2
3
4
5
6
ESC
- 27 User Manual Athena
7
8
9
10 11 12 13 14 15 16 17 18 19 20 21 22 23
English
ESC
English
• When on the main page, it is possible to view more details about the current zone
and . If key
is pressed when on field 14 (see Figure 1), the
using keys
current zone name will appear (if it was entered; otherwise the reading “zona…” will
appear).
from field 14
• To view the temperature measured by the external probe, press again
(If the probe exists and was previously configured).
• To view the minimum and maximum temperature measured by the external probe
again. To set these values to zero, hold the
key down for at
in field 5, press
least three seconds.
• To return to the main page, press key
again.
• To view the daily programming and the temperature in other zones, use arrow keys
and .
Note: zones that are not correctly configured are not displayed (cfr. “Advanced
programming” section).
MANUAL OPERATION
• This function is enabled/disabled by pressing key
• When in manual operation, the display reads the
symbol and the programmable thermostat works as an
ordinary thermostat, using the setpoint read on field 14.
• The control setpoint can be changed using keys
and . The setpoint may range from 2,0° to 35,0°.
The default setting is 18,0° for winter operation;
it is 23,0° for summer operation.
ESC
NOTE: the 4 zones can be switched to manual mode with different individual
setpoints.
EXTENSION PROGRAM
• The extension program enables the device to switch to manual mode for a certain
length of time (up to 96 hours).
• AAs soon as the extension program time expires the programmable thermostat
switches back to automatic.
• To enable the extension program, hold key down for at least 3s. The display will
, the word “extension” and the time (flashing).
read the symbol
and
and confirm by pressing the [OK] key.
• Set the time using arrow keys
• During the extension program it is possible to change the setpoint just like in manual
mode.
NOTE: to cancel the extension program just set the time to 00:00. The extension
program cannot be enabled if a countdown program is already enabled.
- 28 User Manual Athena
COUNTDOWN PROGRAM
• By the countdown program it is possible to schedule system switch-on and switch-off
on a certain date.
• As for details on configuring the countdown program, refer to the "Timer
programming" section on page 36.
NOTE: the countdown program cannot be enabled if the extension program is
already enabled.
English
PROGRAMMING MENU
• All the device's operating parameters can be selected by 8 programming menus.
• To access the programming menu, press the [OK] key from normal operation mode.
and
to scroll the menu.
Use arrow keys
• The menus are as follows, in the order in which they are listed:
Date and time setting, Winter/Summer time switching
Daily programming
Temperature programming
Timer programming
Programming of zone control parameters
Advanced programming
Battery status
Programming ON/OFF
• Every menu may contain various selectable parameters: use arrow keys
scroll all parameters, press the [OK] to change them.
and
to
DATE AND TIME SETTING, WINTER/SUMMER TIME SWITCHING
• To set the date and time, cfr. "Setting the time" section on page 28.
when in the date and time
or
• To set a summer/winter time switch, press
setting page.
• You will thus enter the automatic winter/summer time-change enable/disable menu.
This reads the current time status (winter or summer) and the operation status (ON for
automatic switching from daylight-saving time to solar time; OFF when this is disabled).
- 29 User Manual Athena
• To change parameter status, press [OK], make your selection using keys
and confirm by the [OK] key.
• The time changing date and hour cannot be altered:
summer change: last Sunday in March, at 02:00
° winter
winter change
last Sunday in October, at 03:00
° summer
and
English
DAILY PROGRAMMING
• ABy the daily programming menu it is possible to assign a temperature profile to every
day of the week, i.e. a daily program (per control zone). This menu is marked by
symbol
.
• Daily programs are organised by half-hour steps and
are only enabled during automatic operation.
• The user can configure 14 daily programs, which will be
identified as P00…P13: winter programs from P00 to
P06, summer programs from P07 to P13.
• The temperature zone that the programming will affect
is the one appearing before entering the menu. The
readings / stand for winter and summer programming respectively.
and
• The reading of daily programming starts from the current day. Use arrow keys
to scroll the days of the week and view the daily programs as configured.
1
1
2
3
4
5
6
ESC
7
8
9
10 11 12 13 14 15 16 17 18 19 20 21 22 23
1
2
3
4
5
6
7
8
9
10 11 12 13 14 15 16 17 18 19 20 21 22 23
ESC
2
1
4
3
2
3
6
5
4
5
7
6
8
7
10 11 12 13 14 15 16 17 18 19 20 21 22 23
9
8
9
10 11 12 13 14 15 16 17 18 19 20 21 22 23
ESC
• To change the current program press [OK]. The number identifying program number
(i.e. P00) will start to flash.
and
and choosing
• Change the current program selection using the arrow keys
among the pre-set programs. To change the current program instead, press the
[OK] key.
- 30 User Manual Athena
Changing daily program
1
2
3
4
5
6
7
8
9
10 11 12 13 14 15 16 17 18 19 20 21 22 23
1
2
3
ESC
4
5
6
7
8
9
10 11 12 13 14 15 16 17 18 19 20 21 22 23
ESC
1
2
3
4
5
6
7
8
9
10 11 12 13 14 15 16 17 18 19 20 21 22 23
ESC
• Use keys
and
to make the new temperature selection, or either keys
to move on to a different time segment.
• To end temperature profile programming press [OK].
• The charts below show the pre-set programs.
and
PRE-SET WINTER PROGRAMS
T3
P00
T2
T1
1
2
3
4
5
6
7
8
9
10 11 12 13 14 15 16 17 18 19 20 21 22 23
1
2
3
4
5
6
7
8
9
10 11 12 13 14 15 16 17 18 19 20 21 22 23
1
2
3
4
5
6
7
8
9
10 11 12 13 14 15 16 17 18 19 20 21 22 23
1
2
3
4
5
6
7
8
9
10 11 12 13 14 15 16 17 18 19 20 21 22 23
T3
P01
T2
T1
T3
P02
T2
T1
T3
P03
T2
T1
- 31 User Manual Athena
English
• After pressing the [OK] key, the temperature bar corresponding to the current time will
start to flash. The display reads the programming time and the current temperature
selection (T0, T1, T2 or T3).
T3
P04
T2
T1
1
2
3
4
5
6
7
8
9
10 11 12 13 14 15 16 17 18 19 20 21 22 23
1
2
3
4
5
6
7
8
9
10 11 12 13 14 15 16 17 18 19 20 21 22 23
1
2
3
4
5
6
7
8
9
10 11 12 13 14 15 16 17 18 19 20 21 22 23
T3
P05
T2
English
T1
T3
P06
T2
T1
PRE-SET SUMMER PROGRAMS
T3
P07
T2
T1
1
2
3
4
5
6
7
8
9
10 11 12 13 14 15 16 17 18 19 20 21 22 23
1
2
3
4
5
6
7
8
9
10 11 12 13 14 15 16 17 18 19 20 21 22 23
1
2
3
4
5
6
7
8
9
10 11 12 13 14 15 16 17 18 19 20 21 22 23
1
2
3
4
5
6
7
8
9
10 11 12 13 14 15 16 17 18 19 20 21 22 23
1
2
3
4
5
6
7
8
9
10 11 12 13 14 15 16 17 18 19 20 21 22 23
T3
P08
T2
T1
T3
P09
T2
T1
T3
P10
T2
T1
T3
P11
T2
T1
- 32 User Manual Athena
T3
P12
T2
T1
1
2
3
4
5
6
7
8
9
10 11 12 13 14 15 16 17 18 19 20 21 22 23
1
2
3
4
5
6
7
8
9
10 11 12 13 14 15 16 17 18 19 20 21 22 23
T3
P13
T2
English
T1
TEMPERATURE PROGRAMMING
• Temperature control uses 4 independent setpoint levels for each control zone and for
summer and winter operation modes. Setpoint levels can be selected in this menu.
, , use arrow keys
and
• When in this menu, which is marked by symbol
to select the temperature setpoint (T0, T1, T2 or T3) for the current zone and mode
(summer or winter) to be modified.
• Press [OK] to enter the temperature change (which will flash) and use arrow keys
and
to change the value.
• Press [OK] to apply the change.
NOTE: when in summer operation mode temperature setpoint T0 cannot be
used, as it means air-conditioner OFF.
• The admitted temperature intervals are as follows:
Winter operation
Temperature
T0
T1
T2
T3
minimum [°C]
2.0
T0
T1
T2
maximum [°C]
T1
T2
T3
35.0
default
5.0
15.0
18.0
20.0
Summer operation
Setpoint
T0
T1
T2
T3
minimum setting
[°C]
10
T1
T2
maximum setting
[°C]
T1
T2
35.0
- 33 User Manual Athena
default
OFF
23.0
24.0
25.0
TIMER PROGRAMMING
English
• • In this menu it is possible to determine system switch off/switch on parameters
.
(countdown), and view the system's work hour-count for the current zone
• When system switch-on is scheduled, all the zones will be put "off" until the
scheduled date; after that date every zone will take on the operation mode it was in
before the switch-off. When in this operation mode the display shows symbols
.
and
• When system switch-off is scheduled, all the zones will be put "off" on the scheduled
.
date. When in this operation mode the display reads symbol
NOTE: to exit the switch-on or switch-off countdown before the time expires,
just set the countdown time to zero.
• The system will be switched on or off when the timer reads 00:00. The countdown
program affects all control zones simultaneously.
• To set the countdown program, press the [OK] when in the timer programming menu.
ESC
ESC
ESC
and
to select switch-on or switch-off.
• Press keys
and
to move inside the data field and change
• To set the date, use arrow keys
and . If the date field reads [--.--.----] the switchthe values using arrow keys
on/switch-off date is not set. When the date is set, press the [OK] key to confirm.
to return to the main page.
Press
NOTE: the countdown program cannot be enabled if the extension program is
already enabled.
or
when in the timer
• To view the system's work hour-count, press key
programming menu. The work hours refer to the temperature zone shown before
entering the menu.
NOTE: to set the hour count for the current zone to zero, hold the [OK] key down
for approximately 3 when in the hour-meter reading menu. The maximum hourmeter value is 65535 hours.
- 34 User Manual Athena
• In this menu, which is marked by symbol
, it is
possible to configure the control parameters for the
currently displayed zone:
° winter/summer operation mode (winter by default);
° temperature-control type (ON/OFF or proportional)
(ON/OFF by default);
° control differential for ON/OFF temperature control
(this value may vary between 0,1° and 1,0°, and it is
0.3°C by default.
and .
• These menus are accessible using arrow keys
• Press [OK] to enable parameter change (the field will flash) and use arrow keys
to modify the value. Press [OK] again to end the change.
and
• The control differential setting menu is only available if the temperature-control
selection is ON/OFF type.
ESC
ESC
ESC
• When in ON/OFF operation, if the measured value is below the minimum threshold,
the load is always ON.
• When in proportional operation, temperature control is time-dependant with 10minute steps as follows:
Tmeas Tset + 0.6 °C [1.1 °F] relay OFF
Tmeas = Tset + 0.5 °C [0.9 °F] 1 minutes ON; 9 minutes OFF
Tmeas = Tset + 0.4 °C [0.7 °F] 2 minutes ON; 8 minutes OFF
Tmeas = Tset + 0.3 °C [0.5 °F] 3 minutes ON; 7 minutes OFF
Tmeas = Tset + 0.2 °C [0.4 °F] 4 minutes ON; 6 minutes OFF
Tmeas = Tset+ 0.1 °C [0.2 °F] 5 minutes ON; 5 minutes OFF
Tmeas = Tset 6 minutes ON; 4 minutes OFF
Tmeas = Tset - 0.1 °C [0.2 °F] 7 minutes ON; 3 minutes OFF
Tmeas = Tset - 0.2 °C [0.4 °F] 8 minutes ON; 2 minutes OFF
Tmeas = Tset - 0.3 °C [0.5 °F] 9 minutes ON; 1 minute OFF
Tmeas Tset - 0.4 °C [0.7 °F] relay ON
- 35 User Manual Athena
English
ZONE-CONTROL PARAMETER PROGRAMMING MENU
• If an operation setting is changed, temperature control will be ON-OFF type until
Tset is reached for the first time; this will help reaching the selected conditions more
quickly.
IMPORTANT: PROPORTIONAL mode selection has no effect on summer operation.
Temperature control is always ON/OFF type in summer operation mode.
English
ADVANCED PROGRAMMING
, sets operation parameters that are
• This menu, which is marked by symbol
common to all control zones:
° configuration of individual control zones;
° existence of an external probe;
° unit of measurement °C/°F ;
° bus address of device.
Configuration of individual control zones
• Once in the menu, the page shows the configuration of
the first zone, i.e. Z1.
.
• To scroll the other zones in a sequence, use key
• The configuration parameters to be set up for every zone
are:
ADV
° the temperature probe associated to the zone, which
can be:
built-in (INT)
external (EXT)
remote via bus (BUS)
° the actuator associated to the zone, which can be:
relay (REL)
wireless (RF)
remote via bus (BUS)
° a description identifying the zone.
NOTE: to remote-program via bus, the Tx.Athena radio module must be
installed and the Athena programmable thermostat must be placed on the
wall-mounted base.
• If the probe selected for temperature control is an Athena.Temp probe, this is when
the probe is configured.
• If the actuator selected for the control zone is a remote actuator RX4-8A or RX18A, this is when the actuator is configured (either wireless or bus).
- 36 User Manual Athena
• Press [OK] to enter the parameter changing page. The parameter that can be changed
is the intermittent one.
ESC
ADV
ESC
ADV
ESC
and
; modify the parameter
• Select the parameter to be changed using arrows
and . Press [OK] ] to end the change and configure the associated
using arrows
devices.
• After configuring:
° if configuration was successful the reading “OK” will appear
° if there are configuration errors, the word “ERROR” and the field where the error is
will flash simultaneously (probe or actuator).
NOTE: before pressing the [OK] key to enforce the configuration, the relevant
remote actuator/probe needs to be switched to configuration mode. For further
instructions to this respect, reference is made to the remote actuator/probe
specifications.
NOTE: when in zone configuration mode it is also possible to ensure that
bus peripherals are correctly connected: press [OK] to enter the parameter
changing page and again [OK] to test the connection.
WARNING: to erase a programmed zone just set the probe and actuator field to
[---] and press [OK]. This step is necessary before re-configuring a previously
programmed zone.
- 37 User Manual Athena
English
ADV
Standard zone configuration:
zone n°
1
2
3
4
description
ZONE
ZONE
ZONE
ZONE
1
2
3
4
probe
actuator
built-in
-
relay
-
English
External probe
• From the configuration menu for zone 4, press key
to
view the external probe menu.
• This is used to configure an external temperature probe
(optional). The default setting for this parameter is “no”.
and
Press [OK] to change the setting, use arrow keys
to select it and again the [OK] key to confirm.
ADV
Unit of measurement °C/°F
• To enter the page in which the temperature reading unit
again.
is selected, press the key
• It is °C by default. Press [OK] to change the setting, use
and
to select it and again the [OK]
arrow keys
key to confirm.
• When this parameter setting is modified, all temperature
readings are automatically converted accordingly.
ADV
Bus address of device
key again to enter the device address
• Press the
menu.
• Every device connected to the network is univocally
identified by an address.
WARNING: to generate a new address, hold down the
[OK] key for at least three seconds; after changing
the address all bus and wireless peripherals will
have to be re-configured.
- 38 User Manual Athena
ADV
BATTERY STATUS
WARNING: operation on low batteries does not guarantee relay switching,
wireless transmission or bus communication.
• When the batteries are removed, the display goes off to curb consumption and enable
battery replacement. All functions except for the clock are discontinued. The device
will keep operating without batteries for approximately 2 minutes.
• As soon as the new batteries are in place, the programmable thermostat will resume
operation with all the previous settings, current time included. Should this not happen,
reset the device as described in the "switch-on reset".
PROGRAMMING ON/OFF
symbol, it is possible to enable and disable
• In this menu, which is marked by the
temperature control for every separate configured zone. All zones are “ON” by default.
ESC
ESC
ESC
and , then press [OK] to change the
• Select the desired zone using arrow keys
and
to select either “OFF” or “ON” status and press
setting. Use arrow keys
[OK] to confirm.
NOTE: when switching from OFF to
ON, the device will take on the operation
mode selected prior to the OFF status.
- 39 User Manual Athena
English
symbol, reads the battery
• This menu, marked by the
level (in percentage).
symbol
• When the batteries are running down, the
appears on the main page too. The device keeps
on performing all functions, although displaying the
reminder that batteries need to be replaced shortly.
TELEPHONE CONTROL
English
• The programmable thermostat can be controlled by a disenergised contact in a
telephone dialler (resistance value <100 ).
• Two operating modes are possible:
° contact open normal operation;
° contact closed zones are switched “OFF” until the contact is opened again. When
the contact opens again they take on the status they were in before contact closing.
appears on the main page, this means that the telephone
• When the symbol
contact is closed (“OFF”).
NETWORK CONFIGURATION
• Athena programmable thermostats have only zone 1 configured by default, with the
built-in probe as temperature sensor and the device relay selected as actuator.
• To use wireless or bus remote actuators it is necessary to configure the network.
• To this purpose, select the remote probe and/or remote actuator for the desired zone
in the "configuration of individual control zones" menu. Then, before applying the
configuration procedure by pressing the [OK] key, switch the probe and/or remote
actuator to configuration mode (cfr. specific instructions) .
• After the [OK] key was pressed, if configuration is correct the device will read "OK".
ERROR MESSAGES
• During normal operation problems may prevent correct device functioning.
• For instance, if a probe (built-in, external or remote) is broken, the temperature field
for the zone in which the sensor belongs will read [--.-]. Temperature control in this
zone will then be inhibited and the corresponding actuator will be force-switched
“OFF”.
• When communication errors with bus peripherals occur, the display reads: “ERRORI
PERIFERICHE BUS Z…”
• To identify the problem it will be necessary to zone-test the device (cfr. note to the
paragraph "configuration of individual control zones").
- 40 User Manual Athena
REFERENCE STANDARDS
English
Conformity to the EU directives:
73/23/EEC modified by 93/68/EEC (Low Voltage)
89/336/EEC modified by 92/31/EEC and 93/68/EEC (EMC)
is declared with reference to the following harmonised standards:
Safety: EN 60730-2-7 and EN 60730-2-9
Electromagnetic compatibility: EN 61000-6-1 and EN 61000-6-3
- 41 User Manual Athena
DIMENSIONS
30
141
English
140
WIRING DIAGRAM
Bus
communication
External
probe
Telephone
dialler
- 42 User Manual Athena
English
INSTALLATION AND BATTERY PLACING
- 43 User Manual Athena
- 44 Manuale d’Uso Athena
.
.
- 45 Manuale d’Uso Athena
V3IS00368-011
Vemer S.p.A.
I - 32032 Feltre (BL) • Via Camp Lonc, 16
Tel +39 0439 80638 • Fax +39 0439 80619
e-mail: [email protected] - web site: www.vemer.it