1
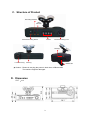
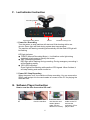
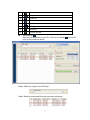
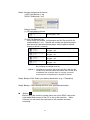
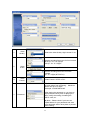
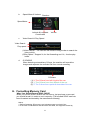
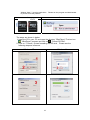
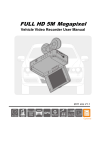
ALL IN ONE Vehicle Video Recorder User Manual 2010 NOV. V1.0 Table of Contents A. Features ............................................................................................................. 1 B. Specification....................................................................................................... 1 C. Structure of Product .......................................................................................... 3 D. Dimension .......................................................................................................... 3 E. Installation Guide .............................................................................................. 4 F. Led Indicator Instruction ................................................................................... 5 G. Software Player Instruction ............................................................................. 5 H. Formatting Memory Card ............................................................................... 11 I. Restoring Memory Card ................................................................................. 13 i A. Features 1. Ideal for taxi, trucks and buses. 2. Easy to install. Small in size to prevent blocking the driver's view. 3. Plug-n-Play. Both front & back cameras can record synchronously. 4. G-sensor, GPS and Image data will be recorded and playable by software player. 5. G-sensor sensitivity can be adjusted according to vehicles and road situations. When detect a strong shock, system will start emergency recording and keep the files without being overwritten. 6. Front view angle approx. 120 degrees. Back view angle approx. 170 degrees. 7. Google map is available for viewing the recorded file and let user to view the routes. 8. SDHC memory card Class 6 or above recommend. B. Specification Item Sensor Device View Angle Voltage Operating Temp. Storage Device Recording Frame Specification Forward facing lens: VGA CMOS Sensor. Backward facing lens: VGA CMOS Sensor. Outside vehicle approx. : 120 degree Inside vehicle approx. : 170 degree Machine Start: 5V±5%, 600mA. Operating: 500mA (IR on) / 350 mA (IR off). Remark: Please use 5V±5% 1A, Cigarette lighter adapter. The machine needs 4.8V to start. -15℃~+65℃ (Inside Vehicle). Silicon Power or Transcend Micro SDHC card. Class 6 or above recommend (up to 32GB). Forward facing lens: 640x480 (highest resolution) NTSC : 30 fps PAL : 25 fps Backward facing lens: 640x480 (highest resolution) NTSC & PAL : 15 fps Auto record when power up system Recording content Date, time, image, sound, G-sensor data, GPS data. Recording Format Specific format for software player. 1 Microphone High Sensitivity Microphone. Time Setup Auto-calibrating by GPS signals. If GPS is not available, the built-in clock will be used. G-Sensor Internal 3D G-Sensor. Input Device (a) Emergency Button : For emergency recording. Gleams in nighttime. (b) Red light: Recording indicator. In emergency recording, it flashes more frequently. (c) Green light: Flashing: Searching GPS signals. Light on : GPS positioning ready Remark: When IR turns on, the LED light will be dimmer. Description (a) Please do not plug the power in both micro-USB terminals. The machine might be damaged. (b) SD card must be formatted by special player first to be used properly. Important Notice Accessories (a) GPS positioning speed will be affected by weather, window films, etc. (b) Window film may contain metal substances and have impact on GPS positioning. (c) IR starts according the environment lux situation (weather, windows film, etc.) (d) When machine starts, it will be in the nighttime mode first for around 30 seconds then switch to daytime mode if the environment lux is enough (e) After formatting, the remaining capacity will show 80MB. 1. 2. 3. 4. 5V USB converter with 3.5m cable CD-R (Contains software player & manual) USB card reader 8G class 6 Micro SDHD card (OPTIONAL) 2 C. Structure of Product Recording Indicator GPS Indicator Manual Recording Button IR LED Backward Facing Lens DC5V(2) Forward Facing DC5V(1) MICRO SD ★ Caution:Please do not plug the power in both micro-USB terminals. The machine might be damaged. D. Dimension UNIT:mm 3 E. Installation Guide Make the bracket facing upward. Adjust the viewing angle. Assemble the sucking disc. Set up the machine in proper position. Connect the power cable (plug either 5 or 6 socket, please do not plug in both sockets at the same time) Plug in the cigarette adapter. Connect the power cable. Emergency button: Light on when power is connected successfully. Green: flashing while GPS is positioning, Light on when GPS is ready. Emergency Button: When press down, the red light will flashing rapidly. In the night its LED will light on as indicator. Installation Complete! 4 When the power is successfully connected, the IR LED will light on for 10 sec. Red: flashing during recoding, Fast flashing in emergency mode. God Speed! F. Led Indicator Instruction Recording Indicator GPS Indicator IR LED Manual Recording Button Backward Facing Lens 1. Power On / Recording Turn the power on and machine will start and finish booting within one minute. Green light will flash during system boot up procedure. The machine will starting recording automatically and the Red LED light will be flashing. LED light indicator: ● FORCE (Manual Recording Button) : It will deliver a dim light during nighttime to help users to identify the button. ● REC (Recording Indicator) : RED light will be flashing during recording. During emergency recording it will be flashing rapidly. ● GPS (GPS Indicator) : Green light will be flashing while position GPS signals. When finished, it will stop flashing and remain turned on. 2. Power Off / Stop Recording When the power is off, the machine will stop recording. You can remove the SDHC card and put it to the card reader to connect to the PC for playing the recorded files. G. Software Player Instruction How to read the files from micro SD card? Open the plastic lid. Remove the card from the machine. 5 Insert the SDHC card into the card reader (please make sure the direction is correct). Connect the card reader to the PC and use the software in CD to play the files. 1. Play Video Start the program “IBoxPlayer2.exe” (you can locate it in the CD-R), The main screen will be like the picture below. Press button, and choose where you insert memory card to play the files, or click on button to manually select the memory card or recorded file in the hard disk. During playback, the button would change to button and you can click on it to pause playback. 2. Main Screen Viewer Interface Viewing Window Inside Vehicle Viewing Window Outside Vehicle Google Map Speed Meter Play & Settings Volume Play Speed Latitude & Longitude Video Search Coordinates G-Sensor a. Play & Settings Icon Instruction: 1 play previous file 2 play previous frame 3 play backward 4 Pause 5 Stop 6 Play 6 7 Play next frame 8 Play next file 9 Open file 10 Disk back up 11 Google map 12 Setting 13 Snapshot 14 Format SD Disk Disk Backup Save the recorded files to your PC. Click on the button pop up the screen as below. Step1: Select the origin for the SD card Setp2: Select the recorded file which you want to backup 7 and it will Step3: Choose the backup file format (1)SD Card Backup (*.sd) (2)AVI File Backup (*.avi) Backup format: (1) SD card backup format SD File type (*.sd) (2) AVI File Backup(*.avi) When using AVI format, it will produce an AVI file and a file for subtitle display (*.srt). Subtitle will include the speed and date data but must use the software player which supports subtitle display to show it correctly. chn01 for front view camera image file, file type: *.avi chn01 for front view camera subtitle file file type: *.srt chn02 for back view camera image file file type: *.avi chn02 for back view camera subtitle file file type: *.srt ★Note 1:The subtitle file must have the same file name as the image file to display the subtitle correctly. ★Note 2:The difference between SD file and AVI file is that AVI file contains only date and speed information but lose the GPS coordinates and G-sensor data. As a result, we would recommend to do the backup by original SD format. Step4: Backup Path: Select your backup destination (e.g.: C:\blackbox) Step5: Backup : Start backup the file to your specified destination Setting Before using the machine, please insert the micro SDHC card to the card reader and connect to the PC to set up the machine. When finished, you can insert the card back to the machine and start recording. 8 1 Video Quality Select the video Quality: High/ Normal / Low Set the recording frame rate for front camera NTSC(5 / 10 / 15 / 30) fps PAL(5 / 10 / 15 / 25)fps 2 Video Frame Turn the recording off for inside camera Set the recording frame rate for inside camera (5 / 10 / 15)fps (NTSC/PAL) 3 Video Format Video Format : NTSC or PAL This function can encrypt the data and prevent others from accessing. Maximum letters are up to 15 digits. Example: 123456789012345 4 Password After setting the password up, you have to input password every time for playing the files, modify the setting, formatting the SDHC card, etc. ★ Note:Please check if you have set capital letters for your password and save your password well in other place to prevent from missing. 9 You can set up the speed unit here. Km/h: kilometer per hour Mile/h: mile per hour Knot:knot per hour ★ Note:1 KM=0.6214 mile, 1 mile=1.6093KM, 1 Knot =1.853KM 5 Unit Of Speed 6 Time zone Time Zone: GMT (GPS auto time correction) 7 Audio Recording Audio recording ON/ OFF Set the sensitivity for G-sensor. Six mode can be chosen. 8 G-sensor Sensitivity OFF, Light, Low, Normal, High, Heavy Note: In some uneven road, you might want to decrease the sensitivity to prevent repeated emergency recording. 9 Car Information You can input the driver’s name or license number here to identify people’s identity. Suitable for company or group using. Snapshot While playing the recorded file, you can use this function snapshot the picture and save it into your PC. Default saving path for snapshot picture will be in x:\IBoxPlayer/Snapshot folder. File type: BMP 10 to b. Speed Meter & Volume Direction Speed Meter Latitude & Longitude Coordinates c. Volume Video Search & Play Speed Video Search Play speed (1)Video Search:You can use the mouse to drag the bar to search the video quickly. (2)Play Speed:Support 2x, 4x fast forwarding and -2x, -4x slow play mode. d. G SENSOR When detecting extraordinary G-force, the machine will record the images and separate the recorded file from normal recording. G-Sensor (1) X: The G-force from left & right of the car. (2) Y: The G-force from front & back of the car. (3) Z: The G-force from upside & downside of the car. H. Formatting Memory Card When You Should Format SDHC CARD? When you use the SDHC card for the first time or just purchase a new card, you should format it in order to use it correctly. (The bundled SDHC card has been formatted and tested by the manufacturer already.) Notice: 1. Before formatting SD memory card, please ensure to unlock it first. 2. If the card is unlocked but still cannot be formatted, this might be caused by 11 Window Vista / 7 security restrictions. Please run the program as Administrator to prevent from this problem. 1 2 LOCK The steps are shown in below: 1. Insert the CD in your PC and open the directory ”IBoxPlayer” Find and run ”IBoxPlayer” program and click on “Format SD Disk”. 2. Click on『Format』to start formatting the SD card. Please see the following steps as reference. Windows XP Windows 7 12 3. When formatting is completed, please insert the card into the machine for recording. Open the plastic lid . I. Insert the SDHC card in correct direction. Press the SDHC card in until it is set. Close the plastic lid. Restoring Memory Card When you have backup the recorded files into PC and want to use the SDHC card for other purposes, you have to restore it first so it can be used correctly. Notice: 1. Before formatting SD memory card, please ensure to unlock it first. 2. If the card is unlocked but still cannot be formatted, this might be caused by Window Vista / 7 security restrictions. Please run the program as Administrator to prevent from this problem. 1 2 LOCK 13 How to restore it? Steps: Insert the SDHC card into the card reader (Please make sure the direction is correct) Connect the card reader with the PC 3. Insert the CD in your PC and open the directory ”IBoxPlayer” Find and run ”IBoxPlayer” program and click on “Format SD Disk”. 4. Click on『Restore』to restore the SD card. Please see the following steps as reference. After finished, you can use the memory card for other purposes. Windows XP Windows 7 14 15