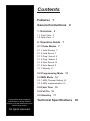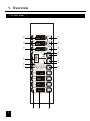
1
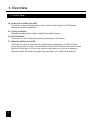
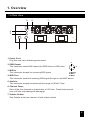
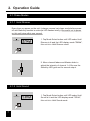
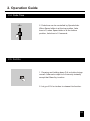
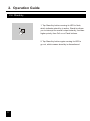
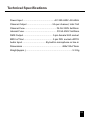
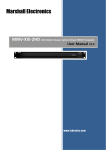
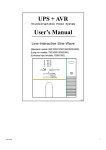
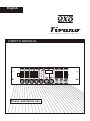
English
4 C H P o w e r C o n t r o l l e r
USER'S MANUAL
2
1
Power
3
4
10
10
10
8
8
8
6
6
6
4
4
4
Hold Dimmer
SPEED
Midi
Hold Sound
Prog Sound
MASTER
AUDIO
10
10
8
8
6
6
4
4
Prog Speed
Flash
2
2
2
0
0
0
Flash
Flash
Auto/Sound
Auto/Speed
UP
DOWN
Memory
Flash
Please read before use
Mode
Prog Select
Fade time
Tap sync
2
2
0
0
Full on
Mic
Stand-by
Contents
Features 1
General Instructions 2
1. Overview 3
1.1 Front View 3
1.2 Rear View 6
2. Operation Guide 7
2.1 Chase Modes 7
2.1.1 Hold Dimmer 7
2.1.2 Hold Sound 7
2.1.3 Prog. Sound 8
2.1.4 Prog. Speed 9
2.1.5 Auto Sound 10
2.1.6 Auto Speed 11
2.1.7 Memory 11
2.2 Programming Mode 12
2.3 MIDI Mode 14
2.3.1 MIDI Channel Setting 14
2.3.2 MIDI Implementation 15
2.4 Fade Time 15
2.4 Full On 16
2.5 Stand-by 17
Improvement and changes to
specifications, design and this
manual, may be made at any time
without prior notice.
All rights reserved.
Technical Specifications 18
Features
Thank you for your purchase. This product features
include:
4 channels DMX /MIDI pack
4 individual faders and 1 master fader
4 Flash buttons, Full On & Standby(priority)
43 preset chases with adjustable chase rate
7 programmable chases, each holds up to 16 steps
Fade Time(from instant to 10 seconds) enable/disable
MIDI channel setting allows MIDI control capable
Auto/Audio/Speed/Tap Sync/Memory chase can be selectable
Audio mode activated by either of built-in microphone and line in
4-digit LED shows chase status or programming options
Power failure memory with the use of EEPROM
NOTE:
A knowledge of MIDI and DMX is required to fully utilize this unit.
1
General Instructions
Read the instruction in this manual carefully and thoroughly, as they give important
information regarding safety during use and maintenance. Keep this manual with
the unit, in order to consult it in the future. If the unit is sold or given to another
operator, make certain that it always has its manual, to enable the new owner to
read about its operation and re lative instructions.
Warnings
DO NOT make any inflammable liquids, water or metal objects enter the unit.
Should any liquid be spilled on the unit, DISCONNECT the power supply to the unit
immediately.
STOP using the unit immediately In the event of serious operation problems and
either contact your local dealer for a check or contact us directly.
DO NOT open the unit--there are no user serviceable parts inside.
NEVER try to repair the unit yourself. Repairs by unqualified people could cause
damage or faulty operation. Contact your nearest dealer.
Cautions
This unit is NOT intended for home use.
After having removed the packaging check that the unit is NOT damaged in any way.
If in doubt, DON'T use it and contact an authorized dealer.
Packaging material (plastic bags, polystyrene foam, nails, etc.) MUST NOT be left
within children's reach, as it can be dangerous.
This unit must only be operated by adults. DO NOT allow children to tamper or play
with it.
NEVER use the unit under the following conditions:
In places subject to excessive humidity.
In places subject to vibrations or bumps.
In places with a temperature of over 45 C/113 F or less than 2 C/35.6 F.
Protect the unit from excessive dryness or humidity (ideal conditions are between
35% and 80%).
DO NOT dismantle or modify the unit.
2
3
2
1
3
Flash
1
2
0
2
0
Flash
6
8
4
6
8
4
10
2
10
Flash
3
0
2
4
6
8
10
Flash
4
5
Mode
Memory
Auto/Sound
Auto/Speed
Prog Speed
Prog Sound
Hold Sound
Hold Dimmer
Midi
10
Prog Select
UP
7 9
Fade time
DOWN
8888
8 6
4 11
15
Tap sync
SPEED
12
0
2
4
6
8
10
16
Full on
MASTER
13
0
2
4
6
8
10
17
Stand-by
AUDIO
14
Mic
1. Overview
1.1 Front View
1. Overview
1.1 Front View
1. Channel Faders(1-4)
These faders are used to control the intensity of channel 1-4.
2. Flash Buttons(1-4)
These faders are used to control the intensity of channel 1-4.
3. Channel LEDs(1-4)
These LEDs indicate the intensity of channel 1-4.
4. Mode LEDs
These LEDs are lit or flash to indicate the current operating mode.
5. Mode Button
This button sequences through the seven operating modes: Hold Dimmer/ Hold
Sound/ Program Sound/ Program Speed/ Auto Sound/ Auto Speed/ Memory.
The current mode is indicated by the Mode LEDs(4) and the LED display(10).
6. Prog. Select Button
Pressing this button 3 seconds can access to Programming mode. This unit allows
you to program up to 7 chases, each chase holds up to 16 steps.
7. Fade Time Button
This button is used for activating fade in or fade out of chase. Pressing this button 3
seconds can access to MIDI channel setting, either tap of Mode(5) or Prog. Select
button(6) can exit from this mode.
8. Up Button
This button is used to raise the display value.
9. Down Button
This button is used to lower the display value.
10. LED Display
Shows the current chase status or programming options.
11. MIDI LED
This LED flashes when MIDI signal is present.
12. Speed Slider & its LED
This slider controls the speed at which the programs will chase, its LED flashes
indicating the chase speed.
13. Master Slider & its LED
This slider controls the intensity of the overall channels except those from the
Flash buttons or Full On button, its LED indicates the intensity.
4
1. Overview
1.1 Front View
14. Audio Level Slider & its LED
This slider controls the sensitivity of the audio for best effect, its LED flashes
indicating the beat it detected.
15. Tap Sync Button
Repeatedly tapping this button establish the chase speed.
16. Full On Button
This button is used to bring the overall channels to full intensity.
17. Stand-by Button & its LED
This button is used to interrupt the overall output temporarily, its LED will flash
when this function is active. A second tap of this button will deactivate this function
and its LED will go out. Every time you turn the power on, this unit is always in
Stand-by mode. Stand-by has higher priority than Full on and Flash buttons.
5
1. Overview
1.2 Rear View
5
6
7
F US
SH
E
PU
F US
E
SH
F US
SH
E
PU
4
3
PU
SH
E
PU
F US
Line input
0.1V-1Vp-p
Midi Thru
Midi In
AC Input
1
DMX out
2
1. Power Cord
Plug this cord into a matching power outlet.
2. DMX Output
This connector sends DMX data to the DMX fixture or DMX pack.
3. MIDI In
This connector accepts the incoming MIDI signal.
1
3
2
1>Ground
2>Data3>Data+
4. MIDI Thru
This connector sends the incoming MIDI signal through to next MIDI device.
5. Audio In
This connector accepts the audio with the range of 100mV-1Vpp.
6. Channel Fuses
Each of the four channels is protected by a 6.3A fuse. These fuses prevent
your unit from overloading and damaging.
7. Schuko Outlets
One Schuko socket per channel, 4 total output sockets.
6
2. Operation Guide
2.1 Chase Modes
2.1.1 Hold Dimmer
Every time you power up the unit, it always resume last chase mode before power
off and Stand-by function is active(its LED flashes briefly). Be careful not to power
on this unit twice within one second.
Hold Dimmer
1. Tap Mode Select button until LED under Hold
Dimmer is lit and the LED display reads "DMHd",
this unit is in Hold Dimmer mode.
Mode Select
2. Move channel faders and Master slider to
adjust the intensity of channel 1-4. Be sure the
Stand-by LED goes out for normal output.
2.1.2 Hold Sound
Hold Sound
Mode Select
7
1. Tap Mode Select button until LED under Hold
Sound is lit and the LED display reads "SDHd",
this unit is in Hold Sound mode.
2. Operation Guide
2.1.2 Hold Sound
2. The overall four channels will be controlled by
the audio beat detected by the built-in microphone
or line in audio signal. The audio sensitivity can be
controlled by the Audio level slider.
2.1.3 Prog. Sound
01
Prog. Sound
1. Tap Mode Select button until LED under Prog.
Sound is lit and the LED display reads "SC01",
this unit is in Prog. Sound mode.
Mode Select
01
Up
2. The current program will be activated by the
audio beat. You may select desired program from
43 preset programs using Up/Down button.
Down
8
2. Operation Guide
2.1.3 Prog. Sound
3. Adjust channel faders and Master slider for
desired dimming effect.
2.1.4 Prog. Speed
1. Tap Mode Select button until LED under Prog.
Speed is lit and the LED display reads "RP01",
this unit is in Program Speed mode.
Prog. Speed
Mode Select
2. The current program will chase uninterruptedly
and you may select desired program from 43
preset programs using Up/Down button.
Up
9
Down
2. Operation Guide
2.1.4 Prog. Speed
3. Adjust Speed slider(or Tap Sync) for desired
chase effect. Adjust channel faders and Master
slider for desired dimming effect.
2.1.5 Auto Sound
Auto Sound/
Auto Speed
1. Tap Mode Select button until LED under Auto
Sound/ Auto Speed is lit and the LED display reads
"AS01", this unit is in Auto Sound mode.
Mode Select
2. All 43 programs will sequence uninterruptedly
depending on the audio beat, adjust Audio level
slider for best effect with audio.
3. Adjust channel faders and Master slider for
desired dimming effect.
10
2. Operation Guide
2.1.6 Auto Speed
Auto Sound/
Auto Speed
1. Tap Mode Select button until LED under Auto
Sound/ Auto Speed flashes and the LED display reads
"AP01", this unit is in Auto Speed mode.
Mode Select
2. All 43 programs will sequence uninterruptedly.
Adjust Speed slider(or Tap Sync) for desired chase
effect. Adjust channel faders and Master slider for
desired dimming effect.
2.1.7 Memory
Memory
Mode Select
11
1. Tap Mode Select button until LED under
Memory is lit, this unit is in Memory mode,
the programs you made before will be activated
in this mode.
2. Operation Guide
2.1.7 Memory
2. Tap Up button to change between MP, MS and
MA.
MP--: Uninterrupted chase of any of 7 programs
MS--: Sequential chase of all 7 programs subject
to audio beat
MA--: Uninterruptedly sequential chase of all 7
programs
Up
3. Tap Down button to select the desired program,
the third character shows the program.
Down
2.2 Programming Mode
Prog. Select
1. Pressing Prog. Select button three seconds
activates Programming mode, the LED display
shows "P" followed by three numbers. The second
character indicates the program(1-7), and the
last two characters indicate the step(01-16).
12
2. Operation Guide
2.2 Programming Mode
2. Adjust channel faders and Master slider to
desired position.
3. Tap Prog. Select button, you can store the
current setting this program and the step will
be increased by one.
Prog. Select
4. Continue steps 2-3 until you have finished
your programming of up to 16 steps. Tap Mode
Select button to exit from this mode.
Mode Select
13
2. Operation Guide
2.3 MIDI Mode
2.3.1 MIDI Channel Setting
1. Pressing Fade Time button three seconds
activates MIDI channel setting, the LED display
shows "MI" followed by two numbers.
Fade Time
2. Use Up/Down buttons to select desired
MIDI channel from 01-16. Be sure your MIDI
channel matches with that of MIDI sequencer.
Up
Down
3. Tap Mode Select or Prog. Select button to
exit from this mode, the MIDI channel you set
will be stored into memory.
Mode Select
14
2. Operation Guide
2.3.2 MIDI Implementation
When MIDI LED flashes, this unit will receives Note Number according to
the following table:
Note Number
Function
22-25
Flash buttons(1-4)
26-29
Faders(1-4)
30
Mode button
31
Up button
32
Down button
33
Fade time button
34
Full on button
35
Stand-by button
2.4 Fade Time
Fade Time
15
1. Tap Fade time button causing its LED to
be lit, which indicates fade time is active.
Fade time allows you to adjust the rate of
fade in/out of the intensity or chase from
instant to 10 seconds.
2. Operation Guide
2.4 Fade Time
Speed
2. Fade time can be controlled by Speed slider.
When Speed slider is at the top position, fade
time is 0, when Speed slider is at the bottom
position, fade time is 10 seconds.
2.5 Full On
1. Pressing and holding down Full on button brings
overall 4 channels output to full intensity instantly
except that Stand by is active.
Full on
2. Let go of Full on button to release this function.
16
2. Operation Guide
2.6 Stand-by
Stand-by
1. Tap Stand-by button causing its LED to flash,
which indicates stand-by is active. Stand-by allows
you to interrupt the overall output instantly, and has
higher priority than Full on or Flash buttons.
2. Tap Stand-by button again causing its LED to
go out, which means stand-by is discontinued.
17
Technical Specifications
Power Input ............................................... AC 220-240V~50-60Hz
Channel Output ...................................... 5A per channel, total 16A
Channel Fuse ............................................... F6.3A 250V 5x20mm
Internal Fuse ................................................. F0.5A 250V 5x20mm
DMX Output ............................................ 3-pin female XLR socket
MIDI In/Thrul ........................................... 5 pin DIN socket x2PCS
Audio Input ................................... By built-in microphone or line in
Dimensions ........................................................... 482x133x73mm
Weight(appro.) ...................................................................... 5.3 Kg
18
Printed in PR China
Rev 1.0 February 2005
All Rights Reserved
24-004-1654