1
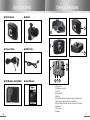
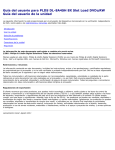
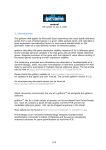
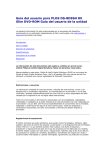
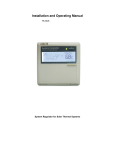
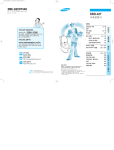
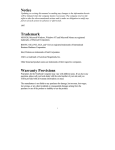
Vehicle Blackbox HMBS-200
USER MANUAL
Table of Contents
Caution : Any changes or modifications in construction of this device which are not expressly approved
by the party responsible for compliance could void the user's authority to operate the equipment.
This device complies with part 15 of the FCC Rules. Operation is subject to the following two conditions:
(1) This device may not cause harmful interference, and (2) This device must accept any interference
received, including interference that may cause undesired operation.
NOTE : This equipment has been tested and found to comply with the limits for a Class B digital device,
pursuant to Part 15 of the FCC Rules. These limits are designed to provide reasonable protection against
harmful interference in a residential installation. This equipment generates, uses and can radiate radio
frequency energy and, if not installed and used in accordance with the instructions, any cause harmful
interference to radio communications. However, there is no guarantee that interference will not occur in a
particular installation. If this equipment does cause harmful interference to radio or television reception,
which can be determined by turning the equipment off and on, the user is encouraged to try to correct the
interference by one or more of the following measures:
-- Reorient or relocate the receiving antenna.
-- Increase the separation between the equipment and receiver.
-- Connect the equipment into an outlet on a circuit different
from that to which the receiver is connected.
-- Consult the dealer or an experienced radio/TV technician for help.
Disclaimer
4
Safety Guidelines
5
Box Contents
6
Device Features
7
Technical Details
8
Device installation
10
Connecting accessories to the device
13
User manual
14
Firmware Upgrading Procedures
16
true-i PC Viewer
17
Specification
20
3
Disclaimer
Safety Guidelines
For your safety and to protect the device from mishandling and through
unintended incident, please read and follow instructions as outlined below.
Please read the following“TERMS OF USE”before you use the device.
TERMS OF USE
1. Device operation
Hanman Technology is not liable for any compensation or legal responsibility of
unexpected device malfunction or loss of important data at any instance. Please
read through whole user manual including safety guidelines and operation.
HMBS-200 blackbox is designed to record video before and after events at
normal operation condition; however, the blackbox does not guarantee video
record for all events at any conditions.
2. Product abuse
Hanman Technology is not liable for any compensation or legal responsibility of
individual, privacy, copyright infringement that arise through user abuse by
taking inappropriate video or audio. In addition, Hanman Technology is not
liable for any compensation or legal responsibility of product damage or
personal injury that arise through use of the device in an environment not
defined by the product use guidelines and spec.
3. For safe driving
Please park your vehicle at a safe place before operate the device. Hanman
Technology is not liable for any compensation or legal responsibility of vehicle
accidents that caused by operating the device when vehicle was in motion.
4. Device specification change
Product spec, software, user manual and/or others related to the product are
subject to change without prior notice.
By opening the plastic wrap of the device, user has agreed to the all terms as
outlined above. For any reason user does not agree the above mentioned,
please do not open the device wrap and return the device to where the product
was purchased from.
Do not open, repair and/or make any change to the device
It can lead to system malfunction or defects which Hanman Technology will not be
liable for.
Do not use water or flammable substance when cleaning the device.
It can cause system defect as well as potential fire or electronic short circuit.
Do not apply intentional shocks or insert substance into the device.
It can cause ststem defect or fire and/or electronic short circuit.
Please keep the camera lens clean and free of any obstacles within the
lens’viewing angle, to obtain clean and precise video during the
recording.
It is suggested not to place objects near the blackbox and windshield as they can be
seen in the video through reflection from the windshield.
Please check and reposition the device when it is exposed to extreme
shocks or vibration for a period of time.
Device will not record appropriate videos if the orientation of blackbox is out from user’
s intention or holder is loose due to the extreme shocks or vibration. In this case, user
shall park the vehicle at safe place for correction.
Recording of video quality may be affected for vehicle having heavily
tinted windshield.
Please check the windshield condition before installing the device.
Please use the power cable supplied for device power from vehicle and
power supply shall not exceed indicated voltage range in the
specification.
Using other cable aside from cable supplied, or attaching the device to a wrong power
supply can lead to system defect/malfunction and can cause fire.
Please do not place any other device or object in front or top of the
device after installation.
GPS signal may be hindered or affected when obstacles are placed along the signal
path or sun protection film is installed on windshield.
Please take note that a video may not be recorded correctly when
driving through tunnel, under high-beam from other side of the road,
against the direct sunlight and during the night.
Do not operate or look at the device when driving.
It can lead to unwanted vehicle accident.
Please take note that under extreme shock, the device may not record
video by device breakdown.
4
5
Box Contents
■ Main Device
Device Features
■ Holder
2
1
5
3
■ Power Cable
■ USB Cable
4
10
9
■ SD Memory Card(2GB)
■ User Manual
11
6
①
②
③
④
⑤
⑥
⑦
⑧
⑨
⑩
⑪
6
7
8
Power Input
SD memory card slot
AV-OUT
Power button
USB slot
Mode button (blackbox mode/ playback list backward)
Play button (play/stop blackbox event video)
Movie button (continuous record/ playback list forward)
Status LED
Microphone
Speaker
7
Technical Details
Technical Details
1. Camera Module
VGA (640x480) CMOS sensor and F/# 1.8 hi-end lens with 160.5 viewing
angle (121 horizontal, 88 vertical)
● 15fps video record speed at daylight/night/parking mode
●
9. Compact and Light weight
● Compact : 77mm (H) x54mm (V) x18mm (T) and 33mm (incl. lens and
holder).
Lightweight : less than 100g (incl. holder)
2. G-Sensor
Max 8G measuring capability at forward/backward, up/down and left/right
direction.
● Max 100 point of measurement data per second for more accurate record
during accident/event.
●
10. Event record mode
● Record total 40sec of video/audio/acceleration/GPS information
before/after event at 15fps
11. Continuous record mode
3. GPS
SirfStar III supported. Provide Longitude/Latitude/speed/direction/altitude
information.
● Capable of tracking actual location of event/accident by connecting to local
road/street map information.
●
4. Internal and external memory
1GB internal NAND flash memory. Able to support SD/SDHC memory card.
Records all event/accident into built-in internal memory for more reliable data
record.
● All event/accident information can also automatically be saved into external
memory card.
●
●
5. Video/Audio output
Can link to external video/audio devices with A/V IN, e.g. car navigator
(Not included) using built-in AV output socket.
●
● Max 25 fps video and 192kbps mono audio record capability using MPEG4
codec
● User configurable record time length
12. Parking monitoring mode (Surveillance mode)
● Can monitor events during parking mode when continuous power is available
(vehicle power)
● Low power consumption (less than 1W) by build-in Special power saving
feature
● Can record total 40sec video/audio/acceleration information before and
after event or when motion is detected on the camera viewing span/angle.
● Built-in power monitoring feature and auto power cut-off to prevent full vehicle
battery discharge.
● Can interchange automatically between event record mode and parking
monitoring mode.
13. Emergency event recording control button
6. Built-in Emergency back-up battery
With Lithium-polymer battery built-in, Can record event/accident even without
power supply from external power source.
● Maximum 10min battery life (after fully charged)
● Battery protection through built-in thermal sensing capability.
●
Link available for external emergency control button (not provided, optional)
Can record total 40sec video/audio/acceleration/GPS information through
internal record button or external emergency button (required optional
emergency recording button).
●
●
14. Built-in video/audio player
7. Built-in internal speaker
●
0.4W speaker for event alarming/sound
8. USB Mass storage device
Can play video/audio using its built-in player through AV output socket.
Can link directly to display device or GPS navigator through AV input socket.
● Can be readily displayed on display device or GPS navigator’
s monitor
screen without PC.
●
●
For file transfer to PC from built-in 1GB internal memory through PC USB slot.
Can be used as external memory device.
●
8
9
Device installation
1. How to attach device holder
Device installation
3. How to detach device from holder
Attach device holder on the windshield facing user. Make sure that the holder
does not block or obstruct the camera lens viewing angle. Once proper
location is found, user can easily attach the holder onto the front windshield
after removing the protection layer from 3M’s tape.
When detaching the device from the holder, user should tilt the device slightly.
After the holder is tilted, user should use his/her thumb to hold on to the front of
the device and use your index finger to push the device down from the holder
as shown as in the picture below:.
2. How to mount device to the holder
When attaching holder to the main device, please tilt and push in the holder to
the device as shown in the picture below. The device has a locking mechanism
to keep the holder in place. Please be warned that the holder or device can be
damaged when used with excessive force.
Step 1
Step 1
Step 2
Place your index finger on top and user
use your thumb to support the holder as
shown in the picture.
Align the device to the device holder.
Step 3
Tilt the device before insert
Step 3
10
Push with your index finger downward
and thumb to support.
Step 4
Step 4
After it passes through the first locking
mechanism tilt the device as shown.
Slide in the device. User will be able to
feel the device is locked onto the locking
mechanism.
Step 2
You can now successfully remove the
device.
Slide in the device to fully lock the device
in.
11
Device installation
4. Adjustment of camera angle
Using provided 2 directional holder, the device lens viewing angle can be
adjusted. User can find the desirable viewing angle and rotate the knob clockwise to fix the viewing angle. If viewing angle requires new adjustment, rotate
the knob counter clockwise to release the angle.
5. Plug-in of power cable
Use only the cigarette power cable provided. User must use cigarette power
cable for power supply from vehicle’s cigarette lighter socket. For continuous
power supply, user will need to detach cigarette converting plug and attach the
cable to appropriate power supply source in the vehicle.
※ Caution: User must take responsibility for any device defect or malfunction
from connecting power cable with wrong polarity. For appropriate power
cable installation, please consult with an experience automobile mechanics or
professionals as the power supply can vary from vehicle to vehicle.
Connecting accessories to the device
1. How to insert/removing SD memory card
Device must be turned off before inserting or removing SD card from the device.
When inserting SD card : Push the SD memory card into SD memory slot on the
side of the device until a click is heard or felt through hand.
When removing SD card : Push the SD memory card further into SD memory
slot. SD memory card will automatically be pushed out enough for user to hold
and pull the card out from the slot completely.
※ Caution: Do not apply too much force when pushing the card into slot or
inserting the card. User will take responsibility for device malfunction or defect
due to user mishandling.
2. Connecting or removing USB cable
User must connect USB cable into the device before attaching the device to PC.
When attempting to detach the USB cable, user has to detach the USB cable
from PC first before removing the cable from the device.
3. Connecting AV out cable.
The AV out socket is located at the side of the device. The cable is known as
4pole 3.5 Stereo to 3RCA cable. Yellow plug is for video, red for audio and
white for external emergency recording button. User can use AV cable when
external trigger is needed.
※ Caution: Use only standard AV cable as specified in the above. Use of
non-complied AV cable will cause damage to the device. User has to take
responsibility for device damage or malfunction by use of inappropriate AV
cable.
12
13
User manual
1. Power ON/OFF
① Power on
Device activates itself when the power is connected. In addition, device
activates with its internal battery by pressing device power button, even when it
is not connected to external power supply (e.g. vehicle battery power supply). In
this case, no other feature other than video/audio player will be enabled.
② power off
When power is disconnected, device will automatically be deactivated after few
seconds. The device can also be deactivated by pressing device’s power button
for 2 seconds or longer. During continuous power supply mode from
corresponding vehicle, device will monitor vehicle’s battery level and
deactivates itself when the battery drops below specified voltage level.
Similarly, devices will also deactivate itself when it detects low battery on built-in
battery power supply mode. The green and red LED will blink in turns fast
before it turns off completely.
※ How to turn off the power manually: User can deactivate device
manually by pushing power button and hold for more than 5 seconds.
Recommended not to deactivate device manually when the device is recording
the event.
2. Blackbox Mode
① Event record Mode
Red lighted LED signals that the blackbox is in event record mode. When event
such as specified acceleration or impact is detected on its corresponding
vehicle, 20sec video/audio/accel/GPS info is recorded each before and after
the event. During event recording interval, red LED will be flickered and it will
go back to stable RED LED again when the record is completed.
② Parking monitoring mode (Surveillance mode)
Parking monitoring mode activates with GREEN LED lighted when pressing
“MODE”button continuously until beep sound. In this parking monitoring
mode, 20 secs video/audio/accel/GPS info will be saved when shock is
detected or visual motion is detected on the camera viewing span/angle.
During this record interval, the LED light will be flickered and will activate again
when record is completed.
③ Mode interchangeability
Can interchange event (shock) record mode and parking monitoring mode by
pressing“MODE”button continuously until a beep sound is heard. User can
recognize each mode by LED lighted color. Depending on car’s condition,
device will automatically set its record mode.
※ Caution: Please check the device mode LED before you are driving or
14
User manual
parking the vehicle. Device may not interchange modes automatically in certain
circumstance. You may set appropriate mode by pressing the“MODE”button.
④ Manual record
In any mode, user can record 20 sec of video/audio/accel/GPS info by
pressing any one of three buttons or using external control button(optional).
3. Continuous record mode
Continuous record mode will be activated with orange LED flashing when
pressing“MOVIE”button continuously until beep. Depending on user
configuration, MPEG4 quality video/audio can be recorded for user configured
period of time until it’s completed and repeat record again. Event record mode
can be reverted back by pressing“MODE”button continuously again and
deactivates the continuous record mode.
※ Caution: SD(External) memory card must be inserted before activating
continuous record mode as it can only record into external memory card.
4. Blackbox File viewing/playing Mode
① Connect AV cable into device’s AV-OUT and external video/audio device at
its appropriate AV socket. Please use only standard AV cable as defined in this
manual.
② Blackbox events will be played through its built-in video/audio player by
pressing““▶”player button on the blackbox with small button beep along with
red and green LED flashing back and forth continuously.
③ Prior or next blackbox file can be played by pressing“<<”or““>>”button
during file viewing/playing mode.
④ Event recode mode can be reverted back by pressing “▶”button
continuously until beep and deactivate file viewing/playing mode.
5. MPEG4 file player
MPEG4 file codec is not included. Please check our website http://www.truei.com for more information.
6. USB memory mode
① Device can be turned into USB memory device by connecting USB cable
(provided) onto device’and PC’s USB port. At this event, orange LED will be
turned on.
② Device will be recognized as USB memory device by PC.
③ When in USB memory mode, 1GB of internal memory can all be used.
④ USB memory mode can be deactivated automatically by disconnecting USB
cable from its device.
15
Firmware Upgrading Procedures
1. Download and save the latest firmware available from“Download Center”in
www.true-i.com to user defined folder or an SD card.
2. Unzip the downloaded file to uncompress. User will see the files named
“hmbs200.bin”and“setup.hms”as successful unzip of the downloaded file.
3. Copy and paste the files into SD card if user saved the files in a PC or other
storage device.
4. Remove the power supply cable from device and make sure that the device
power is completely turned off.
5. Insert the SD card with the downloaded files
6. Connect back the power supply cable to device
7. ORANGE LED will be turned on and System will strat upgrading the firmware
automatically.
8. Updating the firmware may take up to 1 minutes and wait until system
reboots the device and RED LED will be turned on.
9. If firmware is updated successfully to the device, the“hmbs200.bin”file will
be automatically deleted from SD card and device will create“BLACKBOX”and
“MOVIE”folders.
true-i PC Viewer
1. Installation
Save and unzip“true-i.zip”file from SD card provided to a user defined folder.
From the uncompressed files, double click to run“true-i.exe”to start true-i
viewer.
※ Note: For the latest software update, please check the website at www.truei.com.
2. How to use true-i Viewer
Once the program is executed, true-i viewer is displayed on the PC screen as
below:
※ Caution: DO NOT TURN OFF THE POWER SUPPLY AND DO NOT PRESS
ANY BUTTONS WHILE UPGRADING THE FIRMWARE.
Click“OPEN”button on screen and select and the“BLACKBOX”folder from SD
card or True-I device attached to the PC using USB cable.
Clicking a file in“BLACKBOX”folder as shown on the screen shot below, the
true-I Viewer will open and play the file recorded.
16
17
true-i PC Viewer
On the bottom of video screen panel, time, speed and shock values will be
displayed.
Directly below the video screen panel, amplitude acceleration/shock will be
displayed before and after the event recorded.
And the left bottom of true-i Viewer screen, a simulated cockpit is displayed with
vehicle’
s speed, direction and acceleration information.
Actual footage of event will be displayed on the Google map when the PC is
connected to the internet.
※ Caution: The map will not be displayed when PC is not connected to the
internet or valid GPS data is not recorded during the event.
3. Viewer Configuration
User can configure true-i blackbox by pressing“SETUP”button located on the
upper right side of the viewer.
① Select blackbox recording mode. Select“Event”and configure record event
mode to user defined shock level, whereas,“MPEG4”configure continuous
record mode.
② Select“MPEG4”mode and configure recording time interval. For example,
choosing“10min”on the pull down menu will allow device to save every
10mins during continuous record mode.
18
true-i PC Viewer
1
2
3
6
4
7
5
8
9
10
11
③ Shock level can be adjusted. If the accelerator value is selected too high,
device would not be able to detect shock needed for appropriate event record.
Likewise, selecting very low shock level will allow device to record even a small
shock event. Therefore, user is suggested to find an appropriate level to user’s
need.
④ Acceleration level can be adjusted. Define the level of acceleration or
deceleration that device will detect.
⑤ Motion detection level can be adjusted. Setting level maximum will focus
object close to the device lens, whereas setting the level minimum can detect
objects farthest away from the device viewing angle. The motion detection level
should be set appropriately to user’s environment.
⑥ Configure audio record of the device.
⑦ Turns on and off sound.
⑧ Set the time zone of your country.
⑨ Load blackbox configuration file.
⑩ Save blackbox configuration file.
※ Caution: The configuration file name must be“setup.hms”and saved to
root directory of a SD memory card. Otherwise, configuration changes cannot
be reflected in your blackbox.
⑪ End configuration window.
19
Specification
Camera
Image Sensor
CMOS VGA
제 품 명
true-i Vehicle Blackbox
모 델 명
Field of View, F/#
D:160.5。
, H:121。
, V:88。
, F/#:1.8
구 입 일
20
제조번호
192 kbps Mono
구입대리점
Voice (Mic)
G Sensor
Sensor
3 Axis up to 8G
Sampling period
100 Hz
Resolution
VGA(640×480) fixed 15 fps
Recording time
Max. 40sec per event
Resolution
MPEG4 VGA(640×480) Max. 25fps
Recording time
Set by User
Parking
Resolution
VGA(640×480) fixed 15 fps
Surveillance
Detection by
Motion & Impact
Recording time
Max. 40sec per event
Event Record
User Record
년
월
일
보증기간
HMBS-200
구입일로부터 1년
제품 보증에 대하여
●한맨테크놀로지 제품을 구입해 주셔서 감사합니다. 당사는 소비자 피해보상 규정(재정경제
부 고지 제2000-21호)에 따라 다음과 같이 제품에 대한 품질 보증을 실시합니다.
●제품보증서에 구입 일이 표기되어 있지 않은 경우 제품 내 기록된 제조번호에 의한 제조일
자에 1개월을 합하여 제품보증기간으로 산정합니다.
●고장 발생 시 한맨테크놀로지 또는 가까운 서비스센터를 방문하여 보증서를 제시해 주시고
수리 의뢰하여 주십시오.
※ 이 보증서는 대한민국에서만 유효하며 재발행하지 않으므로 잘 보관하여 주십시오.
소비자 피해 유형
정상적인
사용상태에서
GPS
SirfStar III
자연 발생한
On-Board Internal NAND Flash Memory
1 GB
기능상의
External Memory Card Support
SD / SDHC
USB Interface
USB 2.0
Speaker
0.4 W Mono
On-Board Backup Battery
Lithium-Polymer 90mAh
Video/Audio Output
NTSC/PAL, Mono
External Switch for Recording
2 pin connector
Power Supply
12 ~ 24 V
Power Consumption
< 1W @Surveillance mode
Operating Temperature
-20 ~ 70℃
※ The specification is subject to change without prior notice.
20
제품보증서
성능,
고장 발생 시
보증내역
보증기간 이내
구입 후 10일 이내에 중요한 수리를 요하는 경우
제품교환 또는 구입가 환불
구입 후 1개월 이내에 중요 부품에 수리를 요하는 경우
제품교환 또는 무상수리
교환된 제품이 1개월 이내에 중요한 수리를 요하는 경우
교환 불가능 시
보증기간 이후
해당없음
구입가 환불
동일하자에 대하여 수리했으나 고장 재발(4회째) 시
여러 부위의 고장으로 총 4회 수리 받았으나 고장재발(5회째) 시 제품교환 또는 구입가 환불
수리 불가능 시
소비자가 수리 의뢰한 제품을 사업자가 분실한 경우
유상수리
해당없음
정액감가상각한금액에
제품교환 또는 구입가 환불
수리용 부품을 보유하고 있지 않아 수리가 불가능한 경우
10%를가산하여환불
소비자의 고의, 수리가 가능한 경우
유상수리
유상수리
과실에 의한 성능, 수리용 부품을 보유하고 있지 않아 수리가 불가능한 유상수리에 해당하는 금
해당없음
기능상의 고장 경우
액 징수 후 제품교환
•천재지변(화재/염해/가스/지진/풍수해/낙뢰 등)에 의한 고장이 발생하였을 경우
•사용전원의 이상 및 접속기기의 불량으로 인하여 고장이 발생하였을 경우
•기타 제품 자체의 하자가 아닌 외부 원인으로 인한 경우
유상수리
유상수리
•지정 서비스센터의 수리기사가 아닌 사람이 수리 또는 개조하여 고장이
발생하였을 경우
반품 및 환불 규정
* 제품 수령 후 7일 이내 반품 및 교환이 가능합니다.
* 반품을 원하실 경우, 제품 포장을 개봉하지 않은 상태에서 반송하여 주십시오. 제품 포장을
개봉한 제품은 반품이 불가합니다(단, 제품 불량으로 인한 반품의 경우는 제외).
* 제품 반송 시 반송 비용은 고객님께서 부담하셔야 합니다(단, 제품 불량으로 인한 반품의
경우는 제외).