1
SERVER EDITION PLUG-INS
FOR MS WINDOWS
User Manual – Version 5
May 2008
Version 1.2
User Manual
Server Edition Plug-ins for MS Windows
Table of contents
1
PLUG-IN INSTALLER ................................................................................................................. 3
1.1
2
PLUG-INS .................................................................................................................................... 4
2.1
2.2
2.3
2.4
2.5
2.6
2.7
2.8
2.9
2.10
2.11
2.12
3
INSTALLATION AND CONFIGURATION ........................................................................................ 3
MS EXCHANGE 2000, 2003 AND 2007 .................................................................................... 5
INSTALLATION AND CONFIGURATION ........................................................................................ 5
MS SQL SERVER / MS SQL 7................................................................................................ 8
MS SHAREPOINT 2003 ........................................................................................................ 10
MS VSS DATABASE PLUG-IN ................................................................................................ 11
SYBASE ASE 12.5 ............................................................................................................... 13
LOTUS DOMINO 5................................................................................................................. 15
ORACLE .............................................................................................................................. 19
EMAIL NOTIFICATION............................................................................................................. 26
SCRIPT PLUG-IN .................................................................................................................. 27
SYSTEM STATE BACKUP PLUG-IN .......................................................................................... 28
SINGLE MAILBOX RECOVERY FOR EXCHANGE 2000 / 2003 ..................................................... 29
SWISSVAULT SUPPORT ......................................................................................................... 37
© 2008 by SWISSVAULT AG
Version 5
Page 2 of 37
User Manual
Server Edition Plug-ins for MS Windows
1 Plug-in Installer
The Plug-in Installer allows you to upgrade existing Server Edition (SE) Backup Clients with added
functionality by installing application specific plug-ins and other monitoring tools. You can also
upgrade existing plug-ins with this installer. As from SWISSVAULT v5.0, plug-ins can also be autoupdated during the backup process, if enabled on the StorageCenter. The Plug-in Installer is only
available for Windows systems.
The SWISSVAULT Server Edition Client must be installed on the computer before you can install any
plug-ins. SE Plug-ins requires working space for the cache and disk space for creating a data dump
and patches.
Note: Ensure that the drive where the Backup Client is installed has enough free hard drive
space to store an extra copy of all the selected files. If not, move the toBackup, Cache and
dump folder to another drive.
1.1 Installation and Configuration
The application does not have to be installed before updating the Backup Client. Simply run the Plugin Installer executable and supply the necessary information. The installer will prompt you to close the
SE Backup Client interface, if it is open, when running the Plug-in installer.
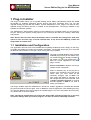
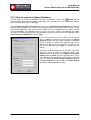
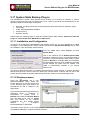
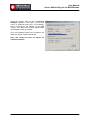
The Plug-in Installer displays a list of all the
available plug-ins that you can install. Plugins marked with
are already installed on
the system. Any plug-ins marked with a
blue icon will be upgraded to the latest
plug-in version.
Version Information displays the Plug-in
Installer version information
Select or deselect any of the plug-ins by
clicking in the checkbox next to the plug-in
name. After you have made all the
necessary changes, click on Next. The
next screen will display a summary of all
the changes that you have requested. Click
on Apply requested changes to continue
with the upgrade or Back if you want to
modify your selection.
The Plug-in Installer stops the SWISSVAULT SE service, installs, upgrades or uninstalls the selected
plug-ins and starts the service again. Click on Finish to close the application. After installing the plugins, open the Backup Client and configure the installed plug-ins. For more information about the plugins, please refer to the next chapter.
Note: The Plug-in Installer does not remove the dump folder used by the plug-ins or any plugin specific settings when you remove plug-ins. You have to remove it manually if needed.
© 2008 by SWISSVAULT AG
Version 5
Page 3 of 37
User Manual
Server Edition Plug-ins for MS Windows
2 Plug-ins
Adding to its features and functionality, SWISSVAULT Server Edition also provides a solution for
numerous databases and applications. These solutions are provided as plug-ins to the SWISSVAULT
Server Edition software.
Plug-ins currently available:
• MS Exchange 2000, 2003 and 2007
• MS SQL Server 2000 and 2005
• MS SQL 7
• MS SharePoint 2003
• VSS Database plug-in for supported databases and applications
• Sybase ASE12.5
• Lotus Domino 5
• Lotus Domino 6.5 and 7
• Oracle 8i, 9i and 10g
• Email Notification
• Script Plug-in
• System State Plug-in
• Single Mailbox Recovery for Exchange 2000 and 2003
© 2008 by SWISSVAULT AG
Version 5
Page 4 of 37
User Manual
Server Edition Plug-ins for MS Windows
2.1 MS Exchange 2000, 2003 and 2007
The MS Exchange 200x plug-in, combined with the Backup Client Server Edition, provides an
automated backup solution for any Exchange 2000, 2003 and 2007 storage group that you would like
to backup. It enables a fast and flexible way to protect vital Exchange data while the Exchange Server
is in use.
2.2 Installation and Configuration
Note: SWISSVAULT SE with the MS Exchange Plug-in is normally installed on an existing
Exchange Server since it automatically detects and configures the communications between
the two applications. The Exchange Server services must be running in order for the Plug-in to
access the files selected for backup. If you wish to install the Backup Client on a different
machine then you must first install Exchange on that second machine as to provide the
libraries required by the Exchange plug-in.
If you are installing the Single Mailbox Recovery (SMR) plug-in as well, please do so before
installing the Exchange plug-in to ensure that the SMR mail profile is configured correctly.
SWISSVAULT Server Edition can be upgraded with the Exchange Plug-in by running the Plug-in
Installer and selecting the MS Exchange 2000/2003/2007 plug-in. After the upgrade, open the
SWISSVAULT Backup Client to configure the plug-in. Select Plug-ins from the Tools menu and click
on Exchange 2000/2003 Backup settings.
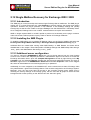
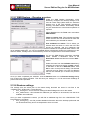
Select where you would like the Backup Client
to create a Storage dump folder. This folder is
used to dump a copy of the selected storage
groups from the Exchange server. From here,
the files will be encrypted and backed up. The
default
dump
folder
is
C:\Program
Files\SWISSVAULT SE\MSExchBackup.
Note: Make sure that your computer has
enough free hard drive space to store a
dump of all the selected storage groups.
The SWISSVAULT Backup Client requires
working space for the cache (which is
compressed), a temporary copy of each
exchange storage group (the dump folder) and
temporary disk space for creating patches to
be sent to the StorageCenter.
The next step is to select the storage group(s)
that you would like to backup. You have the
option to select individual storage groups by expanding Servers and selecting the Storage Groups
one by one. If you tick the Servers box, you will automatically backup all the storage groups within the
Server.
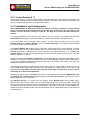
You have the option to choose between Full or Incremental backups. Right-click on a Storage Group
and select Properties to specify your preferences. The following window will be displayed:
© 2008 by SWISSVAULT AG
Version 5
Page 5 of 37
User Manual
Server Edition Plug-ins for MS Windows
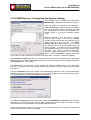
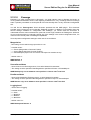
From here you can modify the Daily
Backup Type for the selected storage
group. The Backup Client will, by default,
do full backups during each backup.
To enable incremental backups (only the
Exchange log files), remove the check next
to Only do full backups and specify the
days that you want to do incremental
backups. Note: At least one full backup per week will still be enforced if you enable incremental
backups.
Enable the checkbox Apply this selection to all storage groups if you would like to use the same
configuration for all selected storage groups. Click OK to save the changes, or Cancel to go back to
the Exchange backup settings window.
Click OK to save the settings. Your Exchange Server Backup is now configured.
The Backup Process: To create your first backup, select Backup Now from the File menu.
SWISSVAULT will create an exact copy of the selected storage groups in the dump folder. These files
will be compressed and transferred to the StorageCenter. Subsequent backups will compare the
selected storage groups with the selection from the previous backup, which is stored in a cache.
SWISSVAULT will create a patch file for each storage group with all the changes made to the storage
group since the last backup. Only the patch files and any new selections will be backed up.
2.2.1 Full Backups vs incremental backups
SWISSVAULT SE provides you with two options when backing up Exchange 2000 / 2003 / 2007; Full
and Incremental Backups.
SWISSVAULT recommends making a Full Backup. The Full Backup process is straightforward. All
databases are backed up, and the log files for the particular storage group are removed after the data
has been incorporated in to the databases using a process called truncation. Using the efficient
patching techniques available in SWISSVAULT SE, only a small percentage of the full backup is
transferred to the StorageCenter on a daily basis.
During Incremental Backups, only the storage group changes since the most recent full backup is
protected. These changes are stored in the Exchange log files and truncated into the storage group
during the next full backup. Note that when restoring you need the most recent full backup as well as
all the incremental backups between the last full and the required recovery point (RPO).
SWISSVAULT SE will automatically restore all the required files during the restore process.
© 2008 by SWISSVAULT AG
Version 5
Page 6 of 37
User Manual
Server Edition Plug-ins for MS Windows
2.2.2 How to restore a MS Exchange Storage Group
It is very important to follow the following steps:
• Exchange must have the same service pack level as when the data was backed up.
• Set the database to be overwritten by a restore. Right-click on the different stores in
Exchange, click on Database and enable the option “This database can be overwritten by a
restore”.
• Delete or move all the .log files in the MDBDATA folder in the Exchange installation directory.
If these files are locked, stop the Exchange Information Store service and try again. Start the
service and if there are any log files created (after starting the service) delete or move them as
well.
• A restore can now be done as usual.
Open the Backup Client, select Plug-ins from the Tools menu and click on Exchange 2000/2003
Restore wizard.
The Exchange Restore Wizard enables you to restore any Exchange Storage group without having
to restore the backup from the StorageCenter first, as the Exchange Wizard will automatically restore
the files from the StorageCenter, should you choose to restore from a previous backup.
Restore Wizard Step 1
In the first step, select either Restore from locally available backup or Restore from previous
backups. Click Next to continue.
Restore Wizard Step 2
If you select the first option, the Backup Client will use the last backup that is stored locally on the
server. If you select the Restore from previous backups option, the Backup Client will connect to the
StorageCenter and display a list of available Exchange backups.
The Storage Groups available in the backup that you selected, are displayed in the second step.
Select whether you want to Dismount the stores before recovering the groups. Note: Deselect this
option if you are restoring to a Recovery Storage Group. You must specify whether you want to
Restore all Storage Groups or Specify restore options for each Storage Group. Click Next to
continue.
Restore Wizard Step 3
In the third step, you must specify the Exchange Server and Storage Group to where you want to
restore the data. The original Exchange Server and Storage Group information is displayed by default.
Also specify the following by enabling/disabling the checkboxes:
• Mount databases after restore - If you deselect this option, you will have to manually mount
the store after restoring it.
• Wait for Exchange to complete restore - the Backup Client will wait for confirmation from
MS Exchange before it will notify you that the Restore was successful.
• Only restore log files – Use this option to only restore the log files.
Click Next to continue.
The last step displays a summary of what you have configured. You can change the temporary path
that the Backup Client will use for the log and patch files by clicking on the Browse button. Click Start
restore to start the restore process. You have to select a backup set that you would like to Restore
from. Click on Browse and select the storage group that you want to restore. The client will list all the
details from the backup – displaying the Backup date, to which server the backup should be restored
to and the selected Storage group.
If Exchange cannot mount the store, run the Exchange eseutil application and try again.
© 2008 by SWISSVAULT AG
Version 5
Page 7 of 37
User Manual
Server Edition Plug-ins for MS Windows
2.3 MS SQL Server / MS SQL 7
The MS SQL Server and MS SQL 7 plug-ins, combined with the Backup Client, provides an
automated backup solution for any SQL database that you would like to protect, including MS SQL
Server 2005 Express. The plug-in will ensure that your business-critical data is protected in case of
corruption or loss. The SWISSVAULT SQL Server plug-in enables you to protect multiple SQL
instances on one server.
Note that there are two plug-in versions available, MS SQL Server that supports any database
from SQL 2000, and a plug-in for the older MS SQL 7. Usability is the same, so both plug-ins
are described in this section.
2.3.1 Installation and Configuration
Note: SWISSVAULT SE with the MS SQL Server plug-in needs to be installed on the actual SQL
Server and the SQL service must be running.
Run the Plug-in Installer and select the MS SQL Server (or MS SQL 7) plug-in to upgrade the Server
Edition Backup Client with the MS SQL Server plug-in. After the upgrade, open the SWISSVAULT SE
Client. You will notice a new entry in the Backup Selection tab, in the left-hand pane, called
MS
SQL Server. To add and configure a SQL instance click on this entry.
In the right-hand pane, specify the global
database dump folder for the SQL instances
in the MS SQL Server plug-in section. You
can use the Browse button to browse to a
specific folder.
Note: ensure that the server has enough
free hard drive space to store a data
dump of all the selected databases.
Click on the Add New
Server Instance button to
add the first SQL Server
instance. A sub-node will
be created in the MSSQL
Server section in the lefthand pane, as displayed in
the image below. Use the
MSSQL Server Instance
section pane to configure
this SQL instance.
MSSQL Server Instance:
Last
status
provides
information about the last
connection to the SQL
Server. Enter the Server
address, SQL username,
password and port that the
Backup Client must use to
connect to the SQL Server (note that you must manually enable TCP/IP ports in the SQL 2005
Management tools). Click on Test Connection.
© 2008 by SWISSVAULT AG
Version 5
Page 8 of 37
User Manual
Server Edition Plug-ins for MS Windows
The list of the available SQL databases is populated in the left-hand pane as sub-notes of the selected
instance, from where you can select the database that you want to backup. If you select the entire
section, all databases will be included, as well as any new databases created.
Select the database(s) that you want to backup. Backup and Restore operations are not allowed
on the tempdb database (SQL-DMO ODBC SQLState: 42000).
To add another instance, click on the MSSQL Server entry in the left-hand pane, and then on the Add
new server button in the right-hand MSSQL Server Plugin section. A new node will be added.
Configure the SQL Server settings and select the necessary databases. Note: ensure that you have
sufficient rights if protecting a remote server.
Verify that you have included all the required SQL databases in the left-hand pane before you initiate
the first backup. To create your first backup, select Backup Now from the File menu. Backup
Professional will create an exact copy of the selected databases in the dump folder. These files will
be compressed and transferred to the StorageCenter. The next backup will compare the selected
storage groups with the selection from the previous backup, which is stored in the cache.
SWISSVAULT will create a patch file for each database. This file consists of all the changes made to
the database since the last backup. Only the patch files and any new selections will be backed up.
2.3.2 How to restore a SQL Database from a backup device
The first step is to restore the database from the StorageCenter. Click on the
Restore tab and
select the dump folder from the specific backup date. From the File menu, click on Restore. Select a
restore location and restore the database.
Open the SQL Enterprise Manager. From the Console root, expand Microsoft SQL Servers and
browse to the Server where you would like to restore the database. Expand the databases section and
select the database that you would like to restore. If the database does not exist anymore, you have to
create and configure the database first. Right-click on the database, select All Tasks and click
Restore Database.
In the Restore as database window,
select the database you want to restore.
Select From device and then click on
Select Devices. From the Restore from
option, select disk and then click on Add.
Browse to the folder where you have
restored the database and select the file.
Click on OK accept the filename selected
and OK again to accept the device. Using
SQL functionality, you can select how
you would like to restore the backup set.
You can choose between a complete or
differential database, the transaction log
or file group. If you are restoring to a new
database you have to enable SQL to
overwrite the database.
Click on OK to start restoring the
database.
SQL
Server
Enterprise
Manager will confirm that you have
successfully restored the selected
database.
© 2008 by SWISSVAULT AG
Version 5
Page 9 of 37
User Manual
Server Edition Plug-ins for MS Windows
2.4 MS SharePoint 2003
The MS SharePoint 2003 plug-in provides protection for all sites configured on the SharePoint server,
down to individual document/item level.
2.4.1 Installation and Configuration
Note: SWISSVAULT SE and the MS SharePoint plug-in must be installed on the physical
SharePoint server.
Run the Plug-in Installer and select the SharePoint plug-in to add the plug-in to the existing Server
Edition backup client. After the upgrade, open the client.
After the installation, a new node will be available in the left-hand pane, called Sharepoint. The plugin will automatically communicate with the SharePoint portal using the native SharePoint APIs and
then retrieve and display the list of available sites and all sub nodes in the tree. As displayed in the
image above, individual files are displayed in the right-hand side.
Browse through the available trees and select the items that you want to backup as you would select
files and folders in the default Backup Selection tab. Once you have made your selection you can
click on the Backup toolbar button to initiate the first backup.
2.4.2 Restoring SharePoint data
Restoring SharePoint data is as simple as selecting the applicable SharePoint site and the required
nodes in the left-hand pane and then any individual files, if needed. The plug-in does the rest.
Open the
Restore tab, select the required databases and files in the SharePoint section and then
click on the Restore button in the toolbar. Specify the restore location and click Ok.
The Backup Client will restore the files
to the specified location and the
SharePoint plug-in will thereafter pick
up the files and restore it to the
SharePoint server.
Confirmation will be supplied in the
Restore dialog window and the log
file, once the restore is completed.
© 2008 by SWISSVAULT AG
Version 5
Page 10 of 37
User Manual
Server Edition Plug-ins for MS Windows
2.5 MS VSS Database Plug-in
SWISSVAULT SE makes use of the MS Volume Shadow Copy Service (VSS) to backup open files
like your Outlook PST file, which is just a fraction of what VSS can do. The MS VSS Database plug-in
utilizes VSS on a much more advanced level by allowing you to protect any VSS enabled database
and application available on your server with one single plug-in; without the need for a database
dump.
2.5.1 VSS explained
Please note that this explanation will only focus on functionality related to databases, even though
VSS is not limited to databases only. VSS (Volume Shadow Copy Service) consists of a number of
three basic components:
Writers (e.g. MSSQL)
It is the responsibility of each database vendor (MS SQL, Oracle, Exchange etc) to develop a VSS
writer which will allow a requestor (see below) to backup the data without having to understand the
exact inner workings of the database engine. The writer ensures data consistency and provides a safe
way to backup the data even while the application or database is still running. It provides a common
backup interface that is similar across all databases, regardless of the vendor. Using writers is a way
to ensure that the database vendor controls the data access, not an outside party.
Requestors (e.g. SWISSVAULT SE)
A requestor initiates the VSS process. The requestor uses a generic set of instructions to initiate the
VSS process and read data from the database. The instructions are the same regardless of the
database being backed up.
Providers (e.g. Microsoft Windows)
The provider is the interface to the point-in-time imaging capabilities. An in depth discussion of
providers is not needed for the purpose of this document. It is more important to understand the Writer
and Requestor.
2.5.2 The SWISSVAULT VSS Database Plug-in
The VSS database plug-in is a Requestor that (in theory) can backup any database or service that has
a VSS writer. These would include MS Exchange, MS SQL, System state, Registry and Active
Directory to name a few. In short it works like this:
1. During the first backup, the VSS plug-in connects to the database, reads all the data and
compresses it to the ToBackup folder from where it is transmitted to the Storage Platform - no
database dump is done.
2. After the backup, the data has been sent to the StorageCenter is moved from the ToBackup
folder to the cache.
3. For subsequent backups, the data in the cache is compared to the database data as it is being
read by the VSS plug-in, to work out patches which is again stored in the ToBackup folder.
4. The patches are transmitted to the StorageCenter.
5. After transmission to the StorageCenter the cache is updated by applying the patches to the
files in the cache.
6. Repeat from step 3.
So it can be seen that with the VSS plug-in, databases are treated as large files with no need to dump
them separately. If delta blocking is used the disk space requirements are further reduced (at the
expense of larger backups).
© 2008 by SWISSVAULT AG
Version 5
Page 11 of 37
User Manual
Server Edition Plug-ins for MS Windows
Advantages
•
•
•
Makes use of a generic set of instructions. So as new Writers are developed for databases,
SWISSVAULT SE should be able to back it up via the VSS Database plug-in.
NO DUMP SPACE needed. The VSS Database plug-in reads the data directly from the
database, without the need to make a database dump.
The backup should be much quicker since data is not first dumped and then patched and
compressed.
Disadvantages
•
Not all the features that are provided in the existing SWISSVAULT SE plug-ins are available in
the VSS plug-in (for example to use an Exchange recovery group).
2.5.3 Installation and configuration
Note: The VSS Database plug-in can only support VSS
enabled databases, applications and files on the local
machine where it is installed.
Run the SWISSVAULT Plug-in Installer and select the VSS
Database plug-in to upgrade the Server Edition backup client
with the plug-in. After the upgrade, open the Backup Client.
You will note a new entry in the left-hand pane, called VSS
Writers. The VSS Database plug-in will automatically display all
the writers available on the server. If you do not see the +
expand option next to the VSS Writers entry, right-click on it and
select Refresh.
Browse through the available writers and select the items as you
would select folders in the left-hand pane. Once you have made
your selection you can click on the Backup toolbar button to
initiate the first VSS Database plug-in backup, as described
earlier in this document.
2.5.4 Restoring databases using the VSS Database Plug-in
Open the
Restore tab, select the required databases and
files in the VSS Writers section and then click on the Restore
button in the toolbar. You will note that you cannot restore to
the original location when selecting any items from the VSS
Database section as VSS will do that once the data is
restored. Select a temporary restore location and click OK.
The Backup Client will restore the files to the specified
location and VSS will thereafter pick up the files and restore it
to the applicable database. Confirmation will be supplied in
the Restore dialog and the log file once the restore is
completed.
© 2008 by SWISSVAULT AG
Version 5
Page 12 of 37
User Manual
Server Edition Plug-ins for MS Windows
2.6 Sybase ASE 12.5
The Sybase plug-in, combined with the Backup Client, provides an automated backup solution for any
Sybase ASE 12.5 database that you would like to backup. The plug-in provides protection down to the
individual table or file group.
2.6.1 Installation and Configuration
Note: SWISSVAULT SE with the Sybase Plug-in needs to be installed on a server running
Sybase and the Sybase services must be running.
To upgrade Server Edition with the Sybase plug-in, run the Plug-in Installer and select the Sybase
plug-in. After the installation, open the SWISSVAULT Backup Client.
To configure the Sybase settings,
open the Tools menu, select Plugins and click on Sybase.
SQL Server settings: Enter the
username and password that the
Backup Client will use to connect to
the local Sybase Server. Make sure
that you change the port to the
correct port that Sybase is
configured to use. Click on Retrieve
database names. You will see a list
of all the available Sybase
databases.
Database
backup
selection:
Select where you would like the
Client to create the Database dump
folder. This folder is used by the
Client to dump a copy of the
selected databases from where they
will be backed up. The default folder is C:\Program Files\SWISSVAULT SE\SybaseSQLBackup.
Note: Make sure that your computer has enough free hard drive space to store a data dump of
all the selected databases.
After you have selected the databases, click on OK to close the window. Your Sybase Backup is now
configured. To create your first backup, select Backup Now from the File menu. SWISSVAULT will
create an exact copy of the selected databases in the dump folder. These files will be compressed and
transferred to the StorageCenter. The next backup will compare the selected storage groups with the
selection from the previous backup, which is stored in the cache. SWISSVAULT will create a patch file
for each database. This file consists of all the changes made to the database since the last backup.
Only the patch files and any new selections will be backed up.
© 2008 by SWISSVAULT AG
Version 5
Page 13 of 37
User Manual
Server Edition Plug-ins for MS Windows
2.6.2 How to restore a Sybase Database
The first step is to restore the database from the StorageCenter. Click on the
Restore tab and
select the dump folder from the specific backup date. From the File menu, click on Restore. Select a
restore location and restore the database.
Open the Sybase Central Java Edition and connect to the Adaptive Server Enterprise by selecting
Connect from the Tools menu. Expand the Sybase server tree in the left-hand pane until you can see
the available databases in the right-hand pane. Right-clink on the database that you want to restore
and select Restore. If the database does not exist, you have to create a new database first. Make
sure that you allocate enough space in the database to restore the data into the new database. Select
Restore the entire database and click on Next.
In the next window you have to select a dump device.
Click on Add and change the Dump Device to Explicit
Dump Device and type in the path (including the database
name) to where you restored the database and click on
OK. You will see that the dump device is included in the
list. Click on Next and then Finish, to continue with the
restore.
A window will be displayed with all the SQL commands.
The next step is to bring the database online. Open
Utilities in the left-hand pane in the Sybase Central Java
Edition and open JISQL from the right-hand pane. Type in
your username and password to connect and click on OK.
Type the command online database database_name in
the Input window and click on Go. The Status window
will confirm that the database is online.
© 2008 by SWISSVAULT AG
Version 5
Page 14 of 37
User Manual
Server Edition Plug-ins for MS Windows
2.7 Lotus Domino 5
The Lotus Domino 5 plug-in integrates the critical data protection of Lotus Notes messaging and
collaboration databases within the daily backup activities. Using the native Domino backup API, this
plug-in provides protection down to the individual mailbox.
2.7.1 Installation and Configuration
Note: SWISSVAULT SE with the Lotus Domino Plug-in should be installed on a Lotus Domino
Server as it automatically configures the communications between the two applications. The
Domino services must be running in order for the Plug-in to access the files selected for
backup.
To upgrade Server Edition with the Lotus Domino plug-in, run the Plug-in Installer and select the
Lotus Domino 5 plug-in. After the installation, open the SWISSVAULT SE Backup Client.
If you are familiar with the Backup Client interface, you will notice that there are two new tabs,
Domino Backup and Domino Restore.
Open the Domino Backup tab and click on Retrieve database names. The Backup Client will
connect to the Domino server and display a list of all the available databases.
The next step is to select where you would like the Backup Client to create a Database dump folder.
The default dump folder is C:\Program Files\SWISSVAULT SE\Domino. A copy of the selected
databases from the Domino server is created in this folder. From here, the files will be encrypted and
backed up.
The Backup Client requires working space for the cache (which is compressed), a temporary copy of
each database (the dump folder) and temporary disk space for creating patches to be sent to the
StorageCenter. Note: Make sure that your computer has enough free hard drive space to store a
data dump of all the selected databases.
Select the database(s) that you would like to backup. You have the option to select individual files or
mailboxes by expanding the Domino Server or any of its subfolders and selecting the entries one by
one. If you tick the box next to Domino Server, you will automatically backup the entire Domino
Server as well as any new files added to the server.
Click on Save selection. SWISSVAULT will not backup the selected databases if you do not
save the selection. Your Domino Server Backup is now configured.
The Backup Process: To create your first backup, select Backup Now from the File menu.
SWISSVAULT will create an exact copy of the selected databases in the dump folder. These files will
be compressed and transferred to the StorageCenter. Subsequent backups will compare the selected
databases with the selection from the previous backup, which is stored in a cache. SWISSVAULT will
create a patch file for each database or mailbox with all the changes made since the last backup. Only
the patch files and any new selections will be backed up.
© 2008 by SWISSVAULT AG
Version 5
Page 15 of 37
User Manual
Server Edition Plug-ins for MS Windows
2.7.2 How to restore a Domino Server
Open the Backup Client and click on the Domino Restore tab.
If you want to restore from previous backup, you have to retrieve the dump folder from the
Restore tab, select the dump folder from the specific backup date
StorageCenter first. Click on the
and restore the file. Remember to restore it to the original location.
From the Domino Restore tab use the Browse button to select the Recovery folder that you restored
from the StorageCenter and click on Retrieve databases. The default path is C:\Program
Files\SWISSVAULT SE\Domino. The Backup Client will display all the files from the specific backup.
You can browse through the available folders to select the specific mailboxes and files, or you can
select the top node to restore all available files.
If you want to do a full media restore, enable the tick next to Full Media Restore. This option will
select the entire backup set including the necessary configuration files (ini file, cert ID and server ID)
to do a full media restore. Note that you have to click on Retrieve databases before you will be able
to restore the data.
You have to stop the Domino Server before restoring any files. This is not necessary if you only
restore mailboxes. Select the files that you want to restore and click on Restore. SWISSVAULT will
restore the selected files to the Domino Server and the Backup Client will notify you when the restore
has been completed. After the restore restart the Domino Server.
© 2008 by SWISSVAULT AG
Version 5
Page 16 of 37
User Manual
Server Edition Plug-ins for MS Windows
2.7.3 Lotus Domino 6 / 7
The Lotus Domino 6 / 7 plug-in integrates the critical data protection of Lotus Notes messaging and
collaboration databases within the daily backup activities. Using the native Domino backup API, this
plug-in provides protection down to the individual mailbox.
2.7.4 Installation and Configuration
Note: SWISSVAULT SE with the Lotus Domino Plug-in should be installed on a Lotus Domino
Server as it automatically configures the communications between the two applications. The
Domino services must be running in order for the Plug-in to access the files selected for
backup.
To upgrade SWISSVAULT SE with the Lotus Domino plug-in, run the Plug-in Installer and select the
Lotus Domino 6.5/7 plug-in. After the installation, open the SWISSVAULT SE Backup Client.
If you are familiar with the Backup Client interface, you will notice that there are two new tabs,
Domino Backup and Domino Restore. Open the Domino Backup tab. The Backup Client displays
the Domino Server in the left-hand pane.
The Domino Backup tab enables you to select the components that you want to backup. To select
the Domino Server or any of its subfolders, right-click on the folder name in the left-hand pane and
Include the selection. Individual files can be selected in the right-hand pane. If you Include the
Domino Server, you will automatically backup the entire Domino Server as well as any new files
added to the server in future.
Select the location the Database dump folder. The default path is C:\Program Files\SWISSVAULT
SE\Domino. Should you want to change this location, use the Browse button to select another folder.
A copy of the selected components from the Domino server is created in this folder. From here, the
files will be encrypted and backed up.
The Backup Client requires working space for the cache (which is compressed), a temporary copy of
each database (the dump folder) and temporary disk space for creating patches to be sent to the
StorageCenter. Note: Make sure that your computer has enough free hard drive space to store a
data dump of all the selected databases.
Note that you have to click on the Save button after you have made your selection. SWISSVAULT will
not backup the selected components if you do not save the selection. Your Domino Server
Backup selection is now configured.
The Backup Process: To create your first backup, select Backup Now from the File menu.
SWISSVAULT will create an exact copy of the selected components in the dump folder. These files
will be compressed and transferred to the StorageCenter. Subsequent backups will be compared with
the selection from the previous backup. SWISSVAULT will create a patch file for each database or
mailbox with all the changes made since the last backup. Only the patch files and any new selections
will be backed up.
© 2008 by SWISSVAULT AG
Version 5
Page 17 of 37
User Manual
Server Edition Plug-ins for MS Windows
2.7.5 How to restore a Domino Server
Open the Backup Client and click on the Domino Restore tab.
You first have to retrieve the dump folder from the StorageCenter before you can restore the Domino
Restore tab, select the dump folder from the specific backup date and restore
Server. Click on the
the folder to its original location.
From the Domino Restore tab use the Browse button to select the Recovery folder that you restored
from the StorageCenter. The default path is C:\Program Files\SWISSVAULT SE\Domino. The Domino
Restore tab displays all files available from the specific backup. Note that you have to browse and
select the Recovery folder before you will be able to view the data. You can browse through the
available folders to select the specific mailboxes and files, or you can select the top node to restore all
available files.
A Full Media Restore is initiated by enabling the tick next to Full Media Recovery. This option selects
the entire backup set, including the necessary configuration files (ini file, cert ID and server ID) to do a
full media restore. The procedure when you have to do a Full Media Recovery:
1. Install the Domino Server
2. Run the Domino setup, but DO NOT START THE SERVER
3. Restore the recovery folder
4. Do a Full Media Recovery
5. Start the Domino Server
After you have selected the files that you want to restore and click on Restore. Note that the
selected databases or mailboxes should be closed during the restore process. SWISSVAULT
will restore the selected files to the Domino Server and the Backup Client will notify you when the
restore has been completed. You are advised to initiate a full backup after recovering a large amount
of data.
© 2008 by SWISSVAULT AG
Version 5
Page 18 of 37
User Manual
Server Edition Plug-ins for MS Windows
2.8 Oracle
The Oracle plug-in, combined with the SWISSVAULT SE Backup Client, provides an automated
backup solution for your Oracle Database at tablespace level. The plug-in will ensure that your
business-critical data is protected in case of corruption or loss.
2.8.1 Installation and Configuration
Note: SWISSVAULT SE with the Oracle plug-in needs to be installed on an Oracle Server and
the Oracle services must be running.
To upgrade Server Edition with one of the Oracle plug-ins, run the Plug-in Installer and select either
the Oracle 8i or Oracle 9i/10g plug-ins. After the installation open the SWISSVAULT Backup Client.
Note that the Oracle Recover tab is only available in the Oracle 9i/10g plug-in.
It is very important to ensure that the database is in Archive Log mode. Open the Oracle
Enterprise Manager Console, right-click on the database and select View/Edit Details. Click on the
Recovery tab and enable Archive Log mode and Automatic archival if it is not enabled. The
database will have to be restarted. Open the SWISSVAULT SE Backup Client and click on the Oracle
Backup tab to configure the necessary settings.
Oracle Server settings: Enter the database name, user name and password that the Backup Client
will use to connect to the Oracle database. Leave the port at its default setting of 1521. Click on
Retrieve tablespace names. A list of all the available tablespaces will be displayed.
Database backup selection: Select where you would like the Backup Client to create the Database
dump folder. This folder is used by the Backup Client to dump a copy of the selected datafiles from
where they will be backed up. The default folder is C:\Program Files\SWISSVAULT SE\OracleBackup.
Note: Make sure that your computer has enough free hard drive space to store a data dump of
the selected datafiles.
© 2008 by SWISSVAULT AG
Version 5
Page 19 of 37
User Manual
Server Edition Plug-ins for MS Windows
Select the tablespaces that you want to backup. Selecting the root (127.0.0.1) will backup all the
tablespaces and any new tablespaces added. The Backup Client will perform a full backup of the
selected files during each backup if you enable the checkbox next to Always perform Full Backup. If
you do not enable full backups it will only backup the archive logs. Please note that the Backup Client
will perform a full backup on Sundays and the first time that a backup is initiated. Click on Save
selection. SWISSVAULT will not backup the selected datafiles if you do not save the selection.
Your Oracle Server Backup is now configured. To create your first backup, select Backup Now from
the File menu. SWISSVAULT will create a hot backup of the selected datafiles in the dump folder.
These files will be compressed and transferred to the StorageCenter. The next backup will compare
the selected storage groups with the selection from the previous backup, which is stored in the cache.
SWISSVAULT will create a patch file for each datafile. This file consists of all the changes made to the
datafile since the last backup. Only the patch files and any new selections will be backed up.
© 2008 by SWISSVAULT AG
Version 5
Page 20 of 37
User Manual
Server Edition Plug-ins for MS Windows
2.8.2 How to Recover a Tablespace or Datafile (Oracle 9i/10g only)
You have the option to either recover or restore Oracle tablespaces or datafiles. If you recover the
datafiles, SWISSVAULT SE will ensure that the tablespace or datafile is offline, restore the data to its
original place, recover the data and place the datafiles online again. This cannot be done with the
System tablespace since it has to be online when you restore it.
The first step is to retrieve the files that you want to restore from the StorageCenter. Click on the
Restore tab and select the dump folder from the specific backup date. From the File menu, click on
Restore. Select a restore location (do not restore to the original location) and ensure that you
enable the checkbox to Recreate directory structure. Restore the files. After you have restored the
dump folder open the Oracle Recover tab.
Oracle Server Settings: Supply the Oracle database name and your user name and password that
you use to connect to the Oracle database.
Server Restore selection: Use the Browse button and select the folder where you restored the data
from the Restore tab.
Click on Retrieve Tablespaces. A list of the available tablespaces and datafiles will be displayed.
Select the datafiles that you wish to recover and click on Recover.
The files will be taken offline, the data will be restored to their original locations and the files will be
recovered. SWISSVAULT will place them online after they have been recovered.
Advanced Note: If the restore dialog window displays any warnings or errors in red, it is probably
requiring a log file that is not located in the default location. Please follow these steps to do a manual
recovery using SQL Plus:
Manual Recovery using SQL Plus (as sysadmin)
Follow these steps if the Recovery Tab restore process failed.
•
•
•
•
•
•
•
Open SQL Plus and log in as sysadmin
Run the command Alter database recover cancel;
And then Recover datafile ‘path to table space’;
Follow the on screen prompts. You may be asked to supply the path to specific log files.
These log files form part of the backup selection and would have been restored to the
specified dump folder during the restore process. If you cannot find it, search for the missing
log files in the backup history. You can either supply the path (remember to use inverted
commas) or copy the files to the Oracle folder listed in the error message.
Next you must set the database to online again with Alter database datafile ‘path to table
space.dbf” online;
The last step is to open the database with Alter database open;
The Oracle database will be opened and ready.
© 2008 by SWISSVAULT AG
Version 5
Page 21 of 37
User Manual
Server Edition Plug-ins for MS Windows
Manual Recovery Example
If you see the following error, or something similar as the log names will not be the same, you must
follow the abovementioned steps to recover the database.
•
•
Run the command Alter database recover cancel;
And then Recover datafile ‘O:\oracle\product\10.2.0\oradata\svora10g\users01.dbf’;
SQL> recover datafile 'O:\oracle\product\10.2.0\oradata\svora10g\users01.dbf';
ORA-00279: change 738710 generated at 05/14/2008 17:13:57 needed for thread 1
ORA-00289: suggestion :
O:\ORACLE\PRODUCT\10.2.0\FLASH_RECOVERY_AREA\SVORA10G\ARCHIVELOG\2008_05_15\O1_MF_1_12_%U_.ARC
ORA-00280: change 738710 for thread 1 is in sequence #12
Specify log: {<RET>=suggested | filename | AUTO | CANCEL}
•
If you hit RETURN, it will automatically try to use the suggested file, as specified in the
example. If the file is not available in the folder, a message will be displayed:
ORA-00308: cannot open archived log
'O:\ORACLE\PRODUCT\10.2.0\FLASH_RECOVERY_AREA\SVORA10G\ARCHIVELOG\2008_05_14\O1_
MF_1_12_42P0FVQD_.ARC'
ORA-27041: unable to open file
OSD-04002: unable to open file
O/S-Error: (OS 2) The system cannot find the file specified.
•
•
•
•
If the file cannot be found you have two options. Either point SQL Plus to the Recovery folder
with the filename command, or you can copy the file into the required Oracle folder,
O:\ORACLE\PRODUCT\10.2.0\FLASH_RECOVERY_AREA\SVORA10G\ARCHIVELOG\2008_05_14 in the
example above.
Files are copied back to the Oracle folder in this example. Once the file has been copied,
press RETURN to continue.
And then Recover datafile ‘O:\oracle\product\10.2.0\oradata\svora10g\users01.dbf’;
Continue with the Recover datafile
‘O:\oracle\product\10.2.0\oradata\svora10g\users01.dbf’; command and supplying the log
files until you see the following message:
Log applied.
Media recovery complete.
•
Alter database datafile 'C:\oraclexe\oradata\XE\users.dbf' online;
Database altered.
•
alter database open;
Database altered.
© 2008 by SWISSVAULT AG
Version 5
Page 22 of 37
User Manual
Server Edition Plug-ins for MS Windows
2.8.3 How to Restore a Tablespace or Datafile
The first step is to retrieve the files that you want to restore from the StorageCenter. Click on the
Restore tab and select the dump folder from the specific backup date. From the File menu, click on
Restore. Select a restore location (do not restore to the original location) and ensure that you
enable the checkbox to Recreate directory structure. Restore the files
There are a few different scenarios when restoring an Oracle database, tablespace or datafile. After
you have selected the recovery folder (the folder to where you restored the data) click on Retrieve
Tablespaces. A list of the available tablespaces will be displayed. Restore control files must be
enabled when you do a full restore. When you click on Restore, the Backup Client will remind you to
make sure that the database is offline. If you are only restoring a few datafiles, make sure that they
are offline before continuing. Use the SQL Plus commands in the next section to bring the database or
datafile offline. Change the necessary settings and click on Restore. The Backup Client will restore
the selected files to their original location but they will not be recovered. After the client has restored
the files, you have to manually recover the files and start the database.
The examples in the next section provide some help to restore the data and to manually recover the
files and start the database using SQL Plus.
© 2008 by SWISSVAULT AG
Version 5
Page 23 of 37
User Manual
Server Edition Plug-ins for MS Windows
2.8.4 Oracle Tablespace or Datafile recovery
Recovering a Closed Database
Media or hardware failure
• Determine which datafile or datafiles need to be recovered.
• Shutdown immediately
• Open the Backup Client and restore the dump directory from the StorageCenter. Open the
Oracle Restore tab and select the files that you want to restore. Click on Restore.
• Open SQL Plus with the following command: sqlplus /nolog
• Connect / as sysdba
• Mount the database with the startup mount; command
• Recover datafile 'c:\data\datafile1.dbf'; or recover tablespace ‘tablespacename’; or
recover database;
• Alter database open;
Recovering an Opened Database
Media or hardware failure (Not the System Tablespace)
• Determine the datafile or datafiles that need to be recovered.
• Open sqlplus /nolog and connect /as sysdba
• Take the datafile offline alter database datafile 'filename' offline;
• Open the Backup Client and restore the dump directory. Select the datafile that you want to
restore.
• Recover datafile 'c:\data\datafile1.dbf'; or recover tablespace ‘tablespacename’;
• Alter database datafile 'filename' online;
Recovering a Database
Media or hardware failure (System Tablespace)
• Unlike other tablespaces, the SYSTEM tablespace must be available in order to open the
database. Therefore, if any members of the system tablespace are damaged, they must be
restored now. Before doing this, make sure that the database is not open. It may be mounted.
To make sure, run the following command on the mounted, closed database.
• C:\Oracle\Ora92\bin> sqlplus / nolog
• connect / as sysdba
• select status from v$instance; The following will be displayed:
STATUS
------MOUNTED
1 row selected.
•
•
•
•
If the database is not open, restore the damaged files from the most recent backup available
restore dump directory and select the datafiles. Once all damaged files in the system
tablespace are restored, run the following command on the mounted, closed database:
recover tablespace system;
alter database open;
quit
© 2008 by SWISSVAULT AG
Version 5
Page 24 of 37
User Manual
Server Edition Plug-ins for MS Windows
Full Media Recovery
Recovery to the same location
•
Open SQL Plus and stop the database with the SHUTDOWN ABORT; command.
•
Open the Backup Client and Restore the entire dumpfolder from the StorageCenter. Open the
Oracle Restore tab and restore all files including the control files.
•
Mount the database in SQL Plus: STARTUP MOUNT
•
RECOVER DATABASE USING BACKUP CONTROLFILE; (see next point if there are some
errors). Accept the default path that is suggested when restoring the log files. If the last log file
cannot be located run the RECOVER DATABASE USING BACKUP CONTROLFILE;
command again and supply the path to the redo folder that you restored as well as the
filename of the redo log file within that folder; or copy the redo log file from the restored redo
folder to the flash_recovery_area folder prompted in the message and run the RECOVER
DATABASE USING BACKUP CONTROLFILE; again.
•
If the redo logfiles cannot be located, use the following command to recover the database:
RECOVER DATABASE USING BACKUP CONTROLFILE UNTIL CANCEL;
•
Open the database: ALTER DATABASE OPEN RESETLOGS;
•
The Oracle database will be opened and ready
© 2008 by SWISSVAULT AG
Version 5
Page 25 of 37
User Manual
Server Edition Plug-ins for MS Windows
2.9 Email notification
The Email Notification plug-in enables you to receive email notification on backup activity. You can
configure the plug-in to notify you on a specified email address when a backup has been successful,
when it failed or both.
2.9.1 Installing the Email Notification Plug-in
This plug-in is included in the SWISSVAULT SE installer version. If it is not installed, run the Plug-in
Installer and select the Email Notification plug-in to install or upgrade the Email Notification plug-in.
After the installation, open the Backup Client interface.
2.9.2 Configuration and use
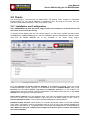
To configure the Email Notification plug-in, open the
Tools menu, select Plug-ins and click on Email
Notification. Enable the checkbox next to Use
Email notification to enable the plug-in. Select
whether you would like to receive notification for
successful and/or failed backups. You can also
modify the email subject. Note that the account
name is automatically included in the subject, e.g.
Backup Completed [User One].
If Notify me after a successful backup is enabled,
you can choose whether Warnings and/or Errors
must be highlighted in the email subject by enabling
the checkbox next to Append the subject line with
the following options and message. An example
of the message is displayed below the text box.
Supply the To and From email addresses and the
SMTP server address.
You can specify whether the backup log must be
included in the email. Choose between the
Summary, warnings and errors or the Entire log
file, as specified in the Advance Options Log level
setting.
Click on Test to verify that the settings are correct. A
message will confirm if the email was sent successfully. Click on OK to remove the message and OK
again to close the Notification settings window.
The Email Notification Plug-in is now activated and will start emailing reports during the next backup.
© 2008 by SWISSVAULT AG
Version 5
Page 26 of 37
User Manual
Server Edition Plug-ins for MS Windows
2.10 Script Plug-in
The Script plug-in enables you to execute scripts and batch files during the backup or restore
processes. This allows you to prepare an application for backup and to create a data dump of a
database. You can also stop and start applications or services before, during or after any backup.
2.10.1 Installing the Script Plug-in
To install the Script plug-in, run the Plug-in Installer and select the Script plug-in. After the installation,
open the Backup Client interface.
2.10.2 Configuration and use
To add scripts, open the Tools menu, select Plug-ins
and click on Scripting. The Scripting settings window
allows you to Add new and Edit or Delete existing
scripts.
Click on Add to create a new script. The image below
displays an example. Start by supplying a Script name
and specify when this script should run. You can choose
between:
• Backup / Restore start
• Backup data created
• Connection open
• Backup / Restore Transfer start
• Backup / Restore Transfer end
• Connection closed
• Backup / Restore end
Browse to the application or batch file
that should be executed. Supply a
location where it should be executed
as well as any other parameters
needed.
Specify whether you want the Backup
Client to wait for the process to be
completed before continuing with
backup process by enabling the
checkbox next to Wait for process to
complete.
Click on Ok to save the new script. You can enable/disable scripts by clicking in the checkbox next to
the Script Name. After you have configured all your scripts, click Ok to close the Scripting settings
window.
© 2008 by SWISSVAULT AG
Version 5
Page 27 of 37
User Manual
Server Edition Plug-ins for MS Windows
2.11 System State Backup Plug-in
The SWISSVAULT System State Backup plug-in enables you to backup a collection of systemspecific components that must be backed up as a unit. These components include (depending on the
Operating System) the following components:
•
•
•
•
•
Boot files, including system files, and all files protected by Windows File Protection (WFP)
The registry
COM+ Class Registration database
Active Directory
SYSVOL directory
Please follow the following steps to install and enable System State backup. Please note that this
plug-in is only available from MS Windows 2000 Server.
2.11.1 Installation and Configuration
This plug-in is included in the SWISSVAULT SE Installer version 4.2. If it is not installed or to update
the plug-in, run the SWISSVAULT Plug-in Installer and select the System State Backup plug-in. After
the installation, open the Backup Client interface.
From the Tools menu, select Plugins and then
System State.
Click in the checkbox next to Enable System State
backups to enable the plug-in. A local target folder is
required to create the System State backup. Please
supply or Browse to the target folder and click OK. If
the target folder does not exist, the Backup Client will
prompt whether the folder must be created. This
folder is automatically included in you backup
selection list.
The System State Backup plug-in is initiated at the beginning of each backup. It uses the Windows
Backup and Recovery tools to create the backup file. Server Edition continues with the rest of the
backup procedure after the System State Backup has been saved in the specified target folder.
2.11.2 Restore process
Open the
Restore tab in your
SWISSVAULT SE Client. Select the
backup date that you want to restore from
in the left-hand pane and restore the
sysstate.bkf file that is located in the
target folder.
Open the Windows Backup and Recovery
application (Start >> Programs >>
Accessories >> System Tools >>
Backup) and select the Restore Wizard
from the Tools menu. Click on Import
File and browse to the restored
sysstate.bkf file. The default restore
location
is
C:\Program
Files\SWISSVAULT SE\Restore.
Click OK to import the file. In the Left-hand pane, expand Media Created and select System State.
Click Next and Finish to compete the Restore Wizard.
© 2008 by SWISSVAULT AG
Version 5
Page 28 of 37
User Manual
Server Edition Plug-ins for MS Windows
2.12 Single Mailbox Recovery for Exchange 2000 / 2003
2.12.1 Introduction
The SMR plug-in is used to backup and restore single Exchange Server mailboxes. The SMR plug-in
makes use of a robust Exchange tool called ExMerge to actually perform the backup and restore
operations. However the plug-in presents a user interface to the ExMerge settings file (usually
exmerge.ini) so that the user is able to configure ExMerge from the SWISSVAULT SE Backup Client.
Once configured, ExMerge can be run in ‘batch’ mode that does not require user interaction.
SMR no longer requires MAPI or a MAPI profile to perform its functionality as the plug-in makes a
native call via the COM component to query LDAP for the list of Exchange mailboxes.
2.12.2 Installing the SMR Plug-in
To install the SMR plug-in on an existing SE Backup Client, run the Plug-in Installer and select the
Exchange 2003 Single Mailbox Recovery or Exchange 2000 Single Mailbox Recovery plug-in.
Additional files are created after running either SMR Backup, or SMR Restore, but these will be
detailed later in this chapter. These files pertain to ExMerge settings with SMR Backup files having a
‘smrb_’ prefix, and SMR Restore files having a ‘smrr_’ prefix.
2.12.3 Additional server configuration
You have to change the SWISSVAULT SE Service Log On during start-up from the Local System
account to an account with adequate permissions / administrative rights on the server to access the
Exchange Information Store. Open the Computer Management console by right-clicking on the My
Computer icon and selecting Manage. Expand the Services and Applications section and click on
Services. Right-click on the SWISSVAULT SE Service and select Properties. Click on the Log on
tab, select an Administrator account and supply the log on password.
Additionally, the user assigned to the SWISSVAULT service should have at least “Exchange View
Only Administrator”- rights to the Exchange Server. This must be configured in the “Exchange SystemManager”. Also, the user must have full access to the according storage group. Make sure by
checking the security settings of the storage group, that the user and all groups to which the user
belongs has full access (no deny on the “Receive as” and “Send as” rights).
© 2008 by SWISSVAULT AG
Version 5
Page 29 of 37
User Manual
Server Edition Plug-ins for MS Windows
2.12.4 SMR Backup – Configuring the backup settings
Select Plugins from the Tools menu and select
SMR Backup. A dialog box will appear as follows:
Enter the details as indicated in the dialog box.
Folder to backup to: Specify where your mailbox
PST’s must be stored. SMR will specify <SE Root
Dir> \pstbackups but this can be modified to any
location visible on your server, including mapped
drives.
Exmerge appends a PST file with the changes
since the last backup. The file may therefore
increase during each backup and Exmerge cannot
reduce the size of the PST file. The Delete
existing PST files option enables you to specify
that existing PST files must be deleted during the
backup process. A smaller file will be generated
and compared with the copy in the Cache to create
the patch. This option is especially useful after
reducing mailbox limits/sizes in the Exchange
server. Click on Customize to specify which days
of the week you wish to delete the PST files in the dump folder. All days are selected by default.
User mailboxes to back up: Here you must provide the name of your Exchange server in the Server
Name text field. The Add… and Remove buttons are used to select/remove the Exchange mailboxes.
See the Add Users… note below.
The Verify button can be used to verify whether the selected mailboxes are in sync with Active
Directory. The plug-in will list any missing mailboxes and provide you with the option to remove them
from the list.
Use the Localization button at the bottom of the SMR Backup window in case you are experiencing
problems connecting to the Exchange Server or using a NON-English version of the Exchange Server.
The default settings for a German Installation are as follows:
The Check Configuration button determines whether the SWISSVAULT SE service has sufficient
permissions to access Exchange and the SMR Configuration Results page will provide in depth
information about the configuration, and possible permission issues.
Please ensure that your service account or one of its associated groups is in the list of trustees with
Send-As and Receive-As rights set to Allow.
© 2008 by SWISSVAULT AG
Version 5
Page 30 of 37
User Manual
Server Edition Plug-ins for MS Windows
If it is not, you will have to correct your account configuration. Failure to do so may compromise your
SMR backups.
The one exception to this is if your SWISSVAULT SE service is setup as LocalSystem. In this case,
the ‘Check Configuration’ feature will simply warn you that it is set to LocalSystem. The onus will be on
you to ensure that LocalSystem is sufficient, or whether you need to setup a unique account for your
SWISSVAULT SE service.
Exmerge logging option enables you to specify the level of information logged in the Exmerge logfile.
You can enable log file rolling and a log file retention period to limit the space required by these logs.
Note that the plug-in will process these options before each backup, so files may exceed their size,
until the next backup.
Click on the Add… button to retrieve a list of available user mailboxes on the indicated server as
shown below.
Select the users from the ‘Available users’ list
by selecting the users and clicking the ‘Add
>’ button to add them to the list of ‘Selected
users’. Click OK to return to the previous
dialog. The selected users will now be shown
in the list of mailboxes that will be backed up.
Once you have completed your selection,
click the OK button on the ‘Backup Settings’
dialog box. This will store your settings in a
“.ini” file ready for your next manual or
automatic backup.
2.12.5 Backup settings
The settings you selected are stored in two files in the <SWISSVAULT SE Root Dir>. These files are:
• smrb_exmerge.ini – this is the main settings file that ExMerge will use for the backups
• smrb_mailboxes.txt – this indicates the mailboxes you selected from the list of available user
mailboxes
Once you have completed your first backup, you will find an additional log file in the directory where
you indicated your mailbox PST files to be stored:
• smrb_exmerge.log – this file provides detailed information about the backups performed and
can be examined if any errors are suspected to have occurred
2.12.6 Output during a backup
When you initiate a manual backup, you will see the
following output as evidence that the SMR Plug-in is
doing its job.
© 2008 by SWISSVAULT AG
Version 5
Page 31 of 37
User Manual
Server Edition Plug-ins for MS Windows
During the backup, when the line: “Launching
ExMerge” appears in the output, you will also
notice an additional dialog box, from ExMerge,
will be launched for the duration of the SMR
backup. This dialog box provides details about
the ExMerge backup in progress.
Once the ExMerge backup has completed, this
dialog box will be closed automatically.
Note: this dialog box does not appear for
automatic backups.
© 2008 by SWISSVAULT AG
Version 5
Page 32 of 37
User Manual
Server Edition Plug-ins for MS Windows
2.12.7 SMR Restore – Running a restore
Unlike the SMR Backup functionality, which
effectively configures the backup settings to be
used at a later stage (either when an automatic
backup runs, or the user manually requests a
backup), the SMR Restore functionality should
only be used when an actual restore operation is
required.
Select Plugins from the Tools menu and select
SMR Restore.
Folder to restore from: This indicates the folder
where the PST files can be found that match the
user mailboxes you selected for restore.
User mailboxes to restore: This is where you
indicate both the server to which the PST files
should be restored, and the mailboxes that
should be restored. Only previously backed up mailboxes available in the specified folder will be in the
list of available mailboxes. You can use the Verify button to determine whether the mailboxes you are
about to restore, actually exist in Active Directory, as this is a requirement of a successful restore.
As per the SMR Backup instructions specified
above, indicate a destination server in the
Destination server text field and click the Add…
button.
Select the users from the Available users list by
selecting the users and clicking the Add > button
to add them to the list of Selected users. Click
OK to return to the previous dialog. The selected
users will now be shown in the list of mailboxes
that will be restored (as is shown the previous
image).
Once you have completed your selection, click the Restore button on the Restore Settings dialog
box to begin the restore operation. This will store your settings in a .ini file and launch ExMerge to
perform the restore operation.
2.12.8 Restore settings
The settings that are saved prior to the restore being launched are stored in two files in the
<SWISSVAULT SE Root Dir>. These files are:
• smrr_exmerge.ini – this is the main settings file that ExMerge will use for the restore
• smrr_mailboxes.txt – this indicates the mailboxes you selected, to be restored, from the list of
available user mailboxes
Once you have completed the restore, you will find an additional log file in the <SWISSVAULT SE
Root Directory> as follows:
• smrr_exmerge.log – this file provides detailed information about the backups performed and
can be examined if any errors are suspected to have occurred.
© 2008 by SWISSVAULT AG
Version 5
Page 33 of 37
User Manual
Server Edition Plug-ins for MS Windows
2.12.9 Output during a restore
After you click ‘Restore’ and your restore settings
are saved, ExMerge will launch to perform the
restore. You will see the following output during
the process of the restore operation (see righthand image).
This details the activity during the restore,
including how many mailboxes will be
processed, and where ExMerge is in the restore
progress.
Upon completion, the SMR Restore plug-in will then determine whether any errors were detected and
report this to the user.
If no errors were detected then the following
dialog will be shown:
If errors were detected, the indicated log file will detail the errors for further troubleshooting or problem
solving.
© 2008 by SWISSVAULT AG
Version 5
Page 34 of 37
User Manual
Server Edition Plug-ins for MS Windows
2.12.10
Exmerge
ExMerge is a utility provided free by Microsoft™. Its initial intention was to alleviate the burden of
moving mailboxes between servers, and migrating mailboxes from, say, Exchange 2000 to Exchange
2003. It primarily uses MAPI to accomplish all of this functionality and is a very useful and configurable
tool.
You will find an “Exmerge.doc” Word document provided with the SMR plug-in. This document
provides some insight into the functionality ExMerge provides. In addition to information about the
various settings available for configuration with ExMerge, you should read this document to
understand what the various releases are, past and current bugs, limitations of ExMerge etc. While we
do not recommend that you manually change any of the settings in the various configuration files, it is
useful to know the full power of ExMerge’s capabilities.
Some important configuration settings to take note of are as follows.
MergeAction
;This setting controls which merge procedure to use:
;
; Possible values:
; 0 - Extract (Merge data to Personal Folders)
; 1 - Import (Merge data from Personal Folders)
; 2 - Extract&Import (Export from one server and Import into another server)
;
; Default value: 0
SMR Backup: 0
SMR Restore: 1
SourceServerName
; Name of the source Exchange server, from which data will be extracted.
; This setting must be specified if the MergeAction specified is Extract or Extract&Import
SMR Backup only: set to whatever user specifies in ‘Server name’ text field
DestServerName
; Name of the destination Exchange server, to which data will be written.
; This setting must be specified if the MergeAction specified is Import or Extract&Import
SMR Restore only: set to whatever user specifies in ‘Server name’ text field
LoggingLevel
; Set the level of logging:
;
; Possible values:
; 0 - None
; 1 - Minimum
; 2 - Medium
; 3 - Maximum
;
; Default value is 0
SMR Backup and Restore: 2
© 2008 by SWISSVAULT AG
Version 5
Page 35 of 37
User Manual
Server Edition Plug-ins for MS Windows
LogFileName
; Name of the log file to be used
; Default value: C:\ExMerge.log
SMR Backup: <PST Data Dir>\smrb_exmerge.log
SMR Restore: <SE Root Dir>\smrr_exmerge.log
DataDirectoryName
; Name of the directory to which .PST files will be written or where .PST files will be expected.
; If the directory does not exist, it will be created.
;
; Default value: C:\EXMERGEDATA
SMR Backup: set to value of ‘Folder to backup to’ text field
SMR Restore: set to value of ‘Folder to restore from’ text field
FileContainingListOfMailboxes
; Name of a text file containing the Exchange Distinguished Names (DN) of mailboxes to be
; worked on.
; Each line of the file should have the following format:
; <SourceDN> [, <TargetDN>]
; The TargetDN is optional. If it is specified, depending on what the selected merge action
; is, it will be used to get the name of the PST file to be generated, or the name of the
; mailbox into which data
; will be merged. By default, a comma is used as the delimiter between the source and
; target DNs. You can specify another delimiter, using the DelimiterUsedInMailboxFile setting.
;
; Blank lines are ignored.
; Lines beginning with a ##~ are ignored as comments
; If this setting is not specified, all mailboxes, except those for services (DS, IMS etc) on the
; specified server will be processed.
;
; Default value: Blank
SMR Backup: <SE Root Dir>\smrb_mailboxes.txt
SMR Restore: <SE Root Dir>\smrr_mailboxes.txt
DataImportMethod
; This setting controls how the data will be copied from the source store to the target store.
;
; Possible values:
; 0 - Copy all messages from the source store to the target store
; 1 - Merge messages into the target store. Copy only those messages that do not exist in the target
;
store.
; 2 - Replace existing messages in the target store. (If a message in the source store
;
exists in the target store, delete that message in the target store and then copy the
;
message from the target store.
; 3 - Archive existing messages from the source store into the target store. If this option
;
is selected, the program will copy data from the source store to the target store and
;
then delete the data from the source store.
;
; This option is only valid if the MergeAction is Extract.
;
; Default value: 1
SMR Backup and Restore: 1
© 2008 by SWISSVAULT AG
Version 5
Page 36 of 37
User Manual
Server Edition Plug-ins for MS Windows
3
SWISSVAULT Support
Please do not hesitate to contact us in case of any questions.
Note: You ideally reach us by email [email protected], where we will reply instantly.
SWISSVAULT AG
Baarerstrasse 57
CH-6300 Zug
Switzerland
Email:
Hotline:
Fax:
Homepage:
[email protected]
+41 (0)900 782 858 (CHF 2.- from the 3rd minute)
+41 (0)41 726 20 77
www.swissvault.ch
© 2008 by SWISSVAULT AG
Version 5
Page 37 of 37