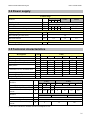
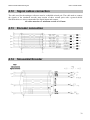
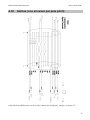
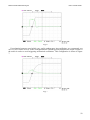
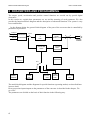
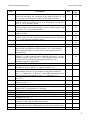
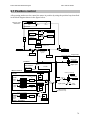
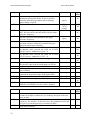
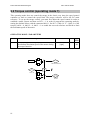
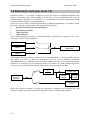
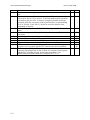
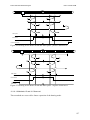
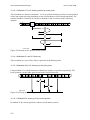
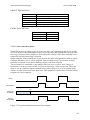
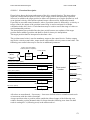
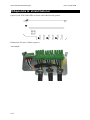
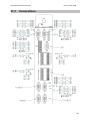
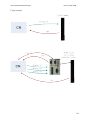
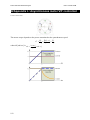
1
TPDM User’s manual Rev. 0.7 September 2012 Parker Hannifin Manufacturing Srl user’s manual TPDM This user manual is for the standard version of the converter. All information in this user manual, including methods, techniques and concepts described herein, are proprietary information of Parker Hannifin Manufacturing Srl and of its licensees, and they shall not be copied or used without express authorization. Parker Hannifin Manufacturing Srl is committed to a continuous product upgrade and reserves the right to modify products and user manuals at any time without prior notice. No part of this user manual may be howsoever reproduced without previous consent by Parker Hannifin Manufacturing Srl. Abbreviations FBK Pr… b… FFW R W Keypad-display Drive Feedback Decimal parameter Binary parameter (bit) Feedforward, control advance function Read parameter Write parameter Keypad Converter Cod 1209111700 1 Parker Hannifin Manufacturing Srl user’s manual TPDM Index: 1 SAFETY INSTRUCTIONS .............................................................................................. 7 1.1 Symbols and signals ............................................................................................................. 7 1.2 General information ............................................................................................................ 7 1.3 Safety instructions for transportation and storage ........................................................... 8 1.4 Safety instructions for commissioning ............................................................................... 8 1.5 Safety instructions for operation ........................................................................................ 9 1.6 Safety instructions for maintenance ................................................................................. 10 1.7 Compatibility with RCD devices ...................................................................................... 10 1.8 Applicable standards ......................................................................................................... 11 1.9 Materials and disposal ....................................................................................................... 11 1.10 Warranty............................................................................................................................. 11 2 INTRODUCTION........................................................................................................... 12 2.1 General information .......................................................................................................... 12 2.2 Product description ............................................................................................................ 12 2.3 Identification....................................................................................................................... 13 3 MAIN HARDWARE FEATURES .................................................................................. 15 3.1 Ambient conditions ............................................................................................................ 15 3.2 Vibrations and shocks........................................................................................................ 15 3.3 Available models ................................................................................................................ 15 3.4 Power supply ...................................................................................................................... 16 3.5 Technical characteristics ................................................................................................... 16 3.6 Other characteristics.......................................................................................................... 17 3.7 Main software features ...................................................................................................... 18 4 MOUNTING .................................................................................................................. 19 4.1 How to suppress interference ............................................................................................ 19 4.1.1 Grounding ............................................................................................................................ 19 4.1.2 Cable connections and shielding .......................................................................................... 20 4.1.3 General suggestions on cable connections ........................................................................... 20 4.2 Dimensions and weights..................................................................................................... 21 4.3 Mounting instructions........................................................................................................ 22 4.4 Connectors layout .............................................................................................................. 23 4.5 Connectors .......................................................................................................................... 24 4.5.1 TPDM single axis................................................................................................................. 25 4.5.2 TPDM two axes (A+B) ........................................................................................................ 26 4.5.3 TPDM three axes (A+B+C) ................................................................................................. 27 4.6 Cable lengths and cross sections ....................................................................................... 28 4.7 Protective Earth connections ............................................................................................ 29 4.8 Requirements for UL Compliance.................................................................................... 29 4.8.1 Solid-State Motor Overload Protection................................................................................ 29 4.8.2 Solid-State Short-Circuit Protection .................................................................................... 29 4.8.3 Protective earth .................................................................................................................... 29 2 Parker Hannifin Manufacturing Srl 4.9 4.10 4.11 4.12 4.13 4.14 4.15 4.16 4.17 4.18 4.19 4.20 4.21 4.22 4.23 4.24 user’s manual TPDM Requirements for CSA Compliance ................................................................................. 30 Motor connection diagrams .............................................................................................. 31 Resolver connection diagrams .......................................................................................... 31 Signal cables connection .................................................................................................... 32 Encoder connection ............................................................................................................ 32 Sinusoidal Encoder ............................................................................................................ 32 Sinusoidal Encoder + EnDat ............................................................................................. 33 Sinusoidal Encoder + Hiperface ....................................................................................... 34 Sinusoidal Encoder +Hall sensor ...................................................................................... 35 SinCos (one sin wave per pole pitch) ................................................................................ 36 DSL feedback...................................................................................................................... 37 Analog and digital I/Os connections ................................................................................. 38 Frequency input/output connection ................................................................................. 39 Connecting the drive to the digital-lock ........................................................................... 40 CAN line connection .......................................................................................................... 40 Layout ................................................................................................................................. 41 5 USING THE KEYBOARD ............................................................................................. 42 5.1 SD card management ......................................................................................................... 44 5.1.1 Alarm codes ......................................................................................................................... 46 6 START-UP .................................................................................................................... 47 6.1 Setting the default parameters .......................................................................................... 47 6.2 Selection of motor type ...................................................................................................... 47 6.3 Changing motor data ......................................................................................................... 48 6.4 Setting feedback ................................................................................................................. 48 6.4.1 Select supply feedback ......................................................................................................... 48 6.4.2 Feedback configuration ........................................................................................................ 49 6.5 Feedback from incremental encoder ................................................................................ 50 6.6 Encoder phasing ................................................................................................................. 50 6.6.1 Type 1 phasing ..................................................................................................................... 50 6.6.2 Type 2 phasing ..................................................................................................................... 51 6.6.3 Phasing procedure for encoder with EnDat, Hiperface or DSL digital interface ................ 52 6.6.4 Motor phases ........................................................................................................................ 52 6.7 First commissioning ........................................................................................................... 53 6.8 Speed control adjustment .................................................................................................. 54 7 ANALAOG, DIGITAL I/OS AND S.T.O. ....................................................................... 60 7.1 Digital I/Os .......................................................................................................................... 60 7.2 Analog inputs/outputs ........................................................................................................ 62 7.3 STO...................................................................................................................................... 62 8 PARAMETERS AND PROGRAMMING ....................................................................... 63 8.1 Main parameters ................................................................................................................ 66 8.2 Binary parameters ............................................................................................................. 71 9 3 OPERATING MODES................................................................................................... 77 Parker Hannifin Manufacturing Srl user’s manual TPDM 9.1 Position control ................................................................................................................... 78 9.2 Torque control (operating mode 1) .................................................................................. 81 9.3 Digital Lock + Positioner (operating mode 13) ............................................................... 82 9.3.1 TAB0: profiles in memory ................................................................................................... 82 9.4 Electronic cam (operating mode 14)................................................................................. 86 9.4.1 Positioning ........................................................................................................................... 86 9.4.2 Speed mode .......................................................................................................................... 87 9.4.3 Electronic cam...................................................................................................................... 87 9.4.4 OPM 14 Linear engage CAM .............................................................................................. 94 9.5 Electronic cam (op. mod. 11)............................................................................................. 96 9.5.1 Positioner ............................................................................................................................. 97 9.5.2 CAM1 and CAM2 ................................................................................................................ 97 9.5.2.1 Automatic activation of CAM tables ......................................................................... 101 9.6 Basic functions .................................................................................................................. 108 9.6.1 Homing function ................................................................................................................ 108 9.6.2 Speed adjustment ............................................................................................................... 109 9.6.3 Current or torque adjustment (typical) ............................................................................... 109 9.6.4 Frequency input/output (Encoder ports) ............................................................................ 109 9.6.5 Value comparators ............................................................................................................. 110 9.6.6 Value capture ..................................................................................................................... 110 9.6.7 Output cam programmer .................................................................................................... 111 9.6.8 Analogue output programmable......................................................................................... 112 9.6.9 Master reference ................................................................................................................. 112 9.6.10 Multiturn absolute encoder phasing on “zero” machine ................................................ 112 9.6.11 FeedForward of speed loop ............................................................................................ 114 9.6.12 Motor brake management .............................................................................................. 115 9.6.13 Encoder CAN ................................................................................................................. 118 10 10.1 10.2 10.3 PROGRAMMING DIGITAL INPUTS/OUTPUTS ................................................. 120 The pico-PLC.................................................................................................................... 120 Programming with MotionWiz ....................................................................................... 126 MotionWiz ........................................................................................................................ 127 11 11.1 SERIAL INTERFACE .......................................................................................... 128 Communication protocol ................................................................................................. 128 12 CAN BUS INTERFACE ....................................................................................... 133 12.1 CANopen dsp402 (D version) .......................................................................................... 133 12.1.1 Dictionary object summary of ds301 in drive ................................................................ 134 12.1.2 Dictionary object summary of dsp402 in drive .............................................................. 135 12.1.2.1 Object 6040h: Controlword ....................................................................................... 139 12.1.2.2 Object 6041h: Statusword .......................................................................................... 141 12.1.2.3 Object 605Bh: Shutdown option code ....................................................................... 143 12.1.2.4 Object 605Ch: Disable operation option code ........................................................... 144 12.1.2.5 Object 605Ah: Quick stop option code ...................................................................... 145 12.1.2.6 Object 605Eh: Fault reaction option code................................................................. 145 12.1.2.7 Object 6060h: Modes of operation............................................................................. 146 12.1.2.8 Object 6061h: Modes of operation display ................................................................ 146 12.1.3 Functional description .................................................................................................... 147 12.1.3.1 Modes of operation function ...................................................................................... 147 4 Parker Hannifin Manufacturing Srl user’s manual TPDM 12.1.4 Homing mode (operative mode 200) ............................................................................. 148 12.1.5 General information ....................................................................................................... 148 12.1.5.1 Input data description ................................................................................................. 148 12.1.5.2 Output data description .............................................................................................. 149 12.1.5.3 Internal states ............................................................................................................. 149 12.1.5.3.1 Controlword of homing mode ................................................................................ 149 12.1.5.3.2 Statusword of homing mode .................................................................................. 149 12.1.6 Object dictionary entries ................................................................................................ 150 12.1.6.1 Objects defined in this chapter ................................................................................... 150 12.1.6.2 Objects defined in other chapters ............................................................................... 150 12.1.7 Object description .......................................................................................................... 150 12.1.7.1 Object 607Ch: Home offset ....................................................................................... 150 12.1.7.2 Object 6098h: Homing method .................................................................................. 151 12.1.7.3 Object 6099h: Homing speeds ................................................................................... 151 12.1.7.4 Object 609Ah: Homing acceleration.......................................................................... 152 12.1.8 Functional description .................................................................................................... 153 12.1.8.1 Homing methods ........................................................................................................ 153 12.1.8.1.1 Method 1: Homing on the negative limit switch and index pulse ......................... 153 12.1.8.1.2 Method 2: Homing on the positive limit switch and index pulse .......................... 154 12.1.8.1.3 Methods 3 and 4: Homing on the positive home switch and index pul. ................ 154 12.1.8.1.4 Methods 5 and 6: Homing on the negative home switch and index pul. ............... 156 12.1.8.1.5 Methods 7 to 14: Homing on the home switch and index pulse ............................ 156 12.1.8.1.6 Methods 15 and 16: Reserved ................................................................................ 157 12.1.8.1.7 Methods 17 to 30: Homing without an index pulse ............................................... 158 12.1.8.1.8 Methods 31 and 32: Reserved ................................................................................ 158 12.1.8.1.9 Methods 33 to 34: Homing on the index pulse ...................................................... 158 12.1.8.1.10 Method 35: Homing on the current position......................................................... 158 12.1.9 Profile position mode (operative mode 201).................................................................. 159 12.1.9.1 Internal states ............................................................................................................. 159 12.1.9.1.1 Controlword of profile position mode ................................................................... 159 12.1.9.1.2 Statusword of profile position mode ...................................................................... 159 12.1.9.2 Object dictionary entries ............................................................................................ 160 12.1.9.2.1 Objects defined in this chapter ............................................................................... 160 12.1.9.2.2 Object 607Ah: Target position............................................................................... 160 12.1.9.2.3 Object 6081h: Profile velocity ............................................................................... 161 12.1.9.2.4 Object 6083h: Profile acceleration/deceleration .................................................... 161 12.1.9.2.5 Object 6085h: Quick stop deceleration .................................................................. 162 12.1.9.2.6 Object 6086h: Motion profile type......................................................................... 162 12.1.9.3 Functional description ................................................................................................ 163 12.1.9.4 Functional description ................................................................................................ 164 12.1.10 Interpolated Position Mode (operative mode 202) ........................................................ 166 12.1.10.1 Object 60C0h: Interpolation sub mode select ........................................................ 167 12.1.10.2 Object 60C1h: Interpolation data record ................................................................ 167 12.1.11 Mode Cyclic synchronous position (operative mode 203) ............................................ 170 12.1.11.1 Functional description ............................................................................................ 171 12.1.11.2 Use of controlword and statusword ....................................................................... 172 12.1.11.3 Detailed object definitions ..................................................................................... 172 12.1.11.3.1 Object 60B0h: Position offset ............................................................................... 172 12.1.11.3.2 Object 60B1h: Velocity offset .............................................................................. 173 12.1.11.3.3 Object 60B2h: Torque offset ................................................................................ 173 5 Parker Hannifin Manufacturing Srl user’s manual TPDM 12.1.12 Drive parameters ............................................................................................................ 174 12.1.12.1 OPM201 parameters .............................................................................................. 174 12.1.12.2 OPM202 parameters .............................................................................................. 175 12.1.12.3 OPM203 parameters (E5 version).......................................................................... 175 13 APPENDIX A: CONVENTIONS .......................................................................... 177 14 APPENDIX B: SOFTWARE TIMING .................................................................. 177 15 APPENDIX C: DEFAULT PROGRAM FOR PICO-PLC ..................................... 178 16 APPENDIX D: FLASH INFORMATION .............................................................. 179 17 APPENDIX E: SWITCHING FREQUENCY ......................................................... 180 18 18.1 APPENDIX F: TPDM ALARMS .......................................................................... 181 SUB Alarms table: ........................................................................................................... 182 19 APPENDIX G: SHIELD FASTENER ................................................................... 184 20 20.1 APPENDIX H: ETHERCAT OPTION .................................................................. 185 Setting parameters of EtherCAT communication ........................................................ 186 21 21.1 21.2 21.3 21.4 21.5 APPENDIX I: ANALOG EXPANSION BOARD .................................................. 187 Introduction ...................................................................................................................... 187 Connectors lay-out ........................................................................................................... 188 Connections....................................................................................................................... 189 Characteristics .................................................................................................................. 190 Parameters ........................................................................................................................ 190 22 22.1 APPENDIX L: ASYNCHRONOUS MOTOR V/F CONTROLLED ....................... 192 Parameters ........................................................................................................................ 193 23 REVISION HISTORY OF THE USER MANUAL ................................................. 194 6 Parker Hannifin Manufacturing Srl user’s manual TPDM 1 Safety instructions 1.1 Symbols and signals Several symbols and signals are used in this safety instruction. Pay attention to the following meanings : Extremely severe risk. Disregarding the following advise may involve danger of life. Severe risk. Disregarding the following advise may involve serious personal injury. Medium risk. Disregarding the following advise may involve personal injury 1.2 General information 7 • Only persons who are qualified and trained for the use and operation of the equipment may work on this device or within its proximity. The persons are qualified if they have sufficient knowledge of the assembly, transportation, installation and operation of the equipment as well as an understanding of all warnings and precautionary measures noted in these instructions. The user must also observe local safety regulations. • Before installing and commissioning the drive, read carefully this documentation and strictly observe all technical, safety and wiring information, including identifying labels placed on the drive (ratings). In case of doubt contact the Parker Hannifin service centre. • Drives are to be intended as components for use in machine or systems. Therefore they can be used only in machine or systems that are in compliance with the low voltage directive and with the electro-magnetic compatibility directive. • Electronic equipment are generally not “fail-safe” components. Therefore the machine manufacturers should carry out a risk analysis for the whole machine in order to ensure that moving parts (motors) cannot bring personal injury in case of failures of electronic devices. Parker Hannifin Manufacturing Srl user’s manual TPDM 1.3 Safety instructions for transportation and storage • • • The ambient conditions given in the product documentation must be observed for transportation and storage (temperature, humidity, mechanical stress and aggressive atmosphere). Drives contain components sensitive to electrostatic charges which can be damaged by inappropriate handling. Therefore during installation / removal of drives, provide the necessary safety precautions against electrostatic discharges (discharge electrostatic charges of the human body before touching the drive, always place the drive above conductive plates and avoid touching it with insulating material like synthetic fibres, polymeric materials etc…) Risk of injury by incorrect handling! Incorrect handing of the equipment may cause severe personal injury. Use appropriate tools for transportation, lifting, handling and mounting. Wear appropriate clothing for accidentprevention (safety shoes, safety glasses, safety gloves, etc...). 1.4 Safety instructions for commissioning • The high voltages inside the drive imply risk of electric shock. Make sure that drive and motor are properly grounded accordingly to national regulations. Furthermore the drive, before switching it on, must be closed in a protective cabinet in order to avoid direct contact with accessible live parts. • Only qualified and trained personnel is allowed to perform installation and commissioning, using appropriate tools and following the safety precautions given in this instruction. Make sure that supply voltage has been switched off before installing and wiring. • Drives are only allowed to be operated on TT, TN grounded industrial mains having maximum 480V+10% line to line rms voltage (480VAC 3-phase). Do not directly install the drive on ungrounded (IT) or asymmetrically grounded mains. In case of ungrounded mains, coupling with Dyn transformer with grounded secondary circuit is necessary. Refer to drive technical data and wiring instruction. • All the components used in the cabinet in which the drive is installed, (cables, contactors, inductors and transformers, fuses, etc...), and the connected motor, must be in compliance with the specification given in the product documentation, in addition to national regulations. Make sure that the maximum surrounding air temperature 40°C (104°F). If necessary, use an appropriate air conditioning. • The size and temperature rating of wires and cables used for connecting the drive must be in compliance with the specification given in the instruction manual (see NEC 310-16 for USA). Use also the specified tightening torque. • Make sure about the correct drive-motor matching: voltage and current ratings must be compatible. • The user is responsible for over-current and short circuit protection of the drive. Read carefully the specification given in the user manual. 8 Parker Hannifin Manufacturing Srl user’s manual TPDM 1.5 Safety instructions for operation • • • • • • • • • 9 High voltage! Risk of electric shock! Danger of life! All live parts must be protected against direct contact. The drive must be closed inside a cabinet before switching it on. Working on power live parts (terminals) must be conducted with the drive switched-off. Dangerous voltages may be present at power terminals even after the supply has been switched off and the motor stopped. Make sure the equipment cannot switched on unintentionally. Wait at least 10 minutes before working on live parts after the unit has been switched-off. In multi-axis systems with additional capacitor modules the DC capacitor discharge time is considerably increased, e.g. to 30 min. in case of PSC modules. Check discharge time instructions on all devices in the system for worst case conditions and make sure the system is de-energized before servicing. The drive and the motor must be permanently connected to earth accordingly to the connection diagram, even for brief measurements or tests. High leakage current! Risk of electric shock! Danger of life! Earth leakage current during operation may exceed 3,5 mA AC or 10mA DC. Earth connection must be permanent: use copper wire having a minimum size of 10mm2 throughout all the length, or two cables with the same section as power supply cables. Before switching the equipment on, make sure that all devices, including the motor, are permanently connected to earth, even for brief test or measurements, as shown in the wiring diagrams. Otherwise high voltages may appear on equipment conductive surfaces with danger of electrical shock. Always refer to current local regulations for grounding. For installation within European Community refer to EN61800-5-1 product standard, section 4.2.5.4.2. For installation in the USA refer to NEC (National Electric Code) and NEMA (National Electric Manufacturers Association). The product installation should always comply with the above said standards. Hot surfaces! Danger of injury! Danger of burns! Some external surfaces of the equipment and same internal part may reach very high temperatures. Danger of burn and injury if touching these parts. After switching the equipment, wait at least 15 minutes to allow it to cool before touching it. Parker Hannifin Manufacturing Srl user’s manual TPDM Dangerous movements! Danger of life! • Dangerous movements can be caused by faulty control of the connected motor. Same common examples are: Improper or wrong installation and wiring Wrong input parameters before or during operation (programming) Defective components (drive, motor, wires, sensors, etc...) Incorrect control (software or firmware errors) • In order to prevent personal injury due to unintended dangerous motor movements, pay the maximum attention and work on the machine with a qualified and tested safety system: Isolate the drive power connection. Mount the emergency stop switch in the immediate reach of the operator. Verify that the emergency stop works before start-up. Don’t operate the machine if the emergency stop is not working. Install properly fences, guards, coverings and light barriers in order to prevent people from accidentally entering the machine’s range of motion. Secure vertical axes against falling or dropping after switching off the motor power Make sure that the drives are brought to a safe standstill before accessing or entering the danger zone. 1.6 Safety instructions for maintenance • • It is extremely dangerous to remove covers or part of the external enclosure from the equipment. Risk of personal injury. The warranty immediately decays. In case of malfunction consult the alarm list described in the user manual or address Parker Hannifin. The drives are not field repairable. 1.7 Compatibility with RCD devices The use of RCD (Residual Current Devices) is strongly not recommended. If the use of RCD is mandatory, use type B only (for DC and AC prospective earth current). Set the trip level at 300mA (fire protection level) or more. Setting the trip level at 30mA (protection level against direct contact) is possible only using timedelayed RCD and low leakage current EMC filters, but in any case the drives are not guaranteed to operate with 30mA trip level. 10 Parker Hannifin Manufacturing Srl user’s manual TPDM 1.8 Applicable standards Safety 2006/95/EC EN61800-5-1 UL508C CSA22.2 Nr. 14-05 Low voltage directive Adjustable speed electrical power drive systems - Part 5-1: Safety requirements- Electrical, thermal and energy (USA) Power Conversion Equipment (Canada) Power Conversion Equipment The drive is CE marked in accordance with the Low Voltage Directive when installed and operated with reference to the product manual. The drive is considered as a component in machinery. The complete machinery or installation may only be put into service when in accordance with the safety considerations of the Machinery Directive 2006/42/EC. Electromagnetic Compatibility (Immunity/Emission) 2004/108/EC EMC directive EN 61800-3 Adjustable speed electrical power drive systems - Part 3: EMC requirements and specific test methods The drives are intended as components to be used in a second environment (industrial environment) and category C3, together with specific EMC filters and installed accordingly to the recommendations given in the user manual. When used in the first environment (residential / commercial environment), drives may produce radio-frequency interference dangerous for other equipment: additional filtering measures must be implemented by the user. 1.9 Materials and disposal - zinc coated steel sheet, thickness 1mm and 2mm - extruded aluminium AlSi - adhesive polycarbonate (front label) Electrolytic capacitor contains electrolyte and printed circuit boards contains lead, both of which are classified as hazardous waste and must be removed and handled according to local regulations. The Parker Hannifin Manufacturing Srl, together with local distributors and in accordance with EU standard 2002/96/EC, undertakes to withdraw and dispose of its products, fully respecting environmental considerations. 1.10 Warranty The warranty duration is 1 (one) year. The converter must not be opened, accessed or modified in any of its part. Any attempt to do so would cause the 1-year warranty to be cancelled with immediate effect. Parker Hannifin declines any responsibility for damages that may be caused by inappropriate use of the converter. 11 Parker Hannifin Manufacturing Srl user’s manual TPDM 2 INTRODUCTION 2.1 General information This manual describes the installation and commissioning of the frequency converter TPD for brushless motors. Read carefully all the sections. 2.2 Product description The TPD is a digital frequency converter for brushless motors and asynchronous motors (with or without feedback). The operator interface based on parameters makes it easy to configure the converter. Configurations of different kinds make it suitable for many applications. The TPD converter allows controlling one, two or three brushless motors with a single converter. This feature allows saving space into the electric panel in multi-axis configurations. The drive includes a series of auxiliary functions that reduce the control electronics into applications, with a considerable cost saving. It uses widely diffused industrial programming standards and guarantees a high degree of freedom in selecting inputs and outputs. The drive also offers the possibility to develop additional functions that are not included in the basic functionality of the converter such as gain correction for loops based on speed or space, monitoring the used torque for tool life control, etc. It can be configured through the keyboard, the serial line or the CAN bus (via EtherCAT using an optional card) 12 Parker Hannifin Manufacturing Srl user’s manual TPDM 2.3 Identification The converters of the TPD series are available in different models (see par. “models available”). The number that follows the TPD abbreviation corresponds to the rated current of the converter in amperes. Use the following table to specify the order code: TPDM Where : TPDM A1 A2 A3 B1 C1 D1 E1 F1 G1 A1 A2 A3 B1 C1 servodrive series drive size axis A (nominal current: 2, 5, 8… A) drive size axis B (nominal current: 2, 5, 8… A) drive size axis C (nominal current: 2, 5, 8… A) Field bus FBK sensor device Optional board Safety option Accessories Hardware version D1 E1 F1 G1 See par. “available models” A label attached on the right side (*) of the converter contains all the essential information to correctly identify the unit: Serial number Model Nominal plate data It is important to refer to this label before requesting any kind of technical information to Parker Hannifin Manufacturing Srl (*) on the internal side of the protective cover, there is a label that shows the Model and the Serial Number. Pay attention, before opening the protective cover, wait 5 minutes after have disconnected the mains supply. 13 Parker Hannifin Manufacturing Srl user’s manual TPDM An example of this label is given below. Model Serial number Output voltage Input voltage Input current Output current Output frequency The performance of converter is guaranteed only with synchronous motors with permanent magnets MB and SMB Series that have been manufactured by us. 14 Parker Hannifin Manufacturing Srl user’s manual TPDM 3 Main hardware features 3.1 Ambient conditions temperature humidity operation (*) storage transportation operation storage transportation Class 3K3, 0 … +40 °C (+32 …+104 °F) Class 1K4, -25 … +55 °C (-4 …+131 °F) Class 2K3, -25 … +70 °C (-13…+158 °F) Class 3K3, 5-85 % without ice and condensation Class 1K3, 5-95 % without ice and condensation Class 2K3, 95% at 40°C ≤ 1000 m slm (≤ 3281 feet asl) IP20 (only in close electric cabinet) UL open type equipment 2 or lower (no conductive dust allowed) altitude (**) Protection degree Pollution degree (*) up to +45°C (113°F) (**)For higher installation altitude, derate the output current by 1.5% each 100m up to 2000m maximum 3.2 Vibrations and shocks Vibration (IEC/EN 61800-5-1) operation (3M1 class) transportation (2M1 class) frequency [Hz] amplitude [mm] acceleration [m/s2] 2≤f<9 9 ≤ f < 200 2≤f<9 9 ≤ f < 200 200 ≤ f < 500 0,3 3,5 - 1 10 15 3.3 Available models Model 5A 10 A 15 A 30 A 2A+2A 5A+5A 15 N. axes 1 1 1 1 2 2 Available models Mec. size Model 1 8A+8A 1 15 A + 5 A 1 2A+2A+2A 2 5A+5A+5A 1 8A+5A+5A 1 N. axes 2 2 3 3 3 Mec. size 1 1 1 1 1 Parker Hannifin Manufacturing Srl user’s manual TPDM 3.4 Power supply Control stage Modules - Supply voltage Max ripple Current Control electronics dissipation 1 axis 5 10 15 30 2 axes 3 axes V= 24V (±10%) Vpkpk Do not go over the range A 1 1 1 1,5 1,3 1,5 W 24 24 24 36 31 36 Stationary brake V= 24V (±10%) A= 1,6 Supply voltage Max current (per each axis) Max total current A= 1,6 3,2 Power stage V= DC voltage supply 3,2 300 ... 750 3.5 Technical characteristics Description Models DC voltage range Rated output current Peak output current (2 sec) Shaft power Continuous service installed load Power stage dissipation Switching frequency Output frequency Modules Internal fan capacity Internal DC capacitors (±20%) Max continuous module output current Modules UdM V= Arms Arms kW hp kW hp W kHz Hz 5 3 m /h 27 µF 110 3 5A 2 4 1 1,3 1,2 1,6 20 5 10 2,7 3,6 3 4,0 45 8 15A 30A 15 30 8 10,7 9 12,1 105 4 30 60 16 21,5 18 24,1 230 450 - A 2A Value 8A 10A 300 ... 750 8 10 16 20 4,3 5,3 5,8 7,1 4,8 6 6,4 8,0 75 65 5 1 axis 10 15 35 220 30 100 440 2+2 10 30 4 15 2+2+2 Internal fan capacity m /h µF Internal DC capacitors (±20%) Max continuous module output A 6 current (*) the max continuous module current is clamped to 16A 3 axes 5+5+5 35 220 15 2 axes 5+5 8+8 35 220 10 16 15+5 16* 8+5+5 16* 16 Parker Hannifin Manufacturing Srl user’s manual TPDM 3.6 Other characteristics auxiliary encoder(1 per module) Auxiliary encoder input Max frequency encoder input kHz RS-422 encoder simulation output steps/rev Max frequency kHz input impedance Input High voltage range Input Low voltage range Type of driving required Reaction time 4 digital inputs kΩ V V µs 2 digital outputs open collector PNP External supply Vdc Output High voltage range V Output Low voltage range V Max current for single output mA Max current overload / Short circuit mA pull-down internal kΩ rise time µs rise time, with 50mA load µs voltage CMR resolution input impedance max frequency in quadrature 2000 22…218 2000 1 differential analog reference V dB bit kΩ Hz 20 ± 5% 15...24 0...12 PNP, NPN < 2,5 5 – 24 (±10%) > (Vsupply–1) <1 100 500/1500 20 ≤ 200 ≤ 20 ±10 >80 10 8.61kΩ± 5% 2000 1 single ended analog outputs (referred to 0VA) voltage V max current mA resolution bit Overload / Short circuit protection - 17 ±10 1,5 10 yes Parker Hannifin Manufacturing Srl user’s manual TPDM 3.7 Main software features The following functions have been implemented in the basic software: Speed controller Advanced manager of torque limits Management of speed windows Torque motor control Torque control with speed control overlaying Positioning with trapezoidal Speed profiles Provides the functions of an electrical shaft with variable ratio and phase correction Electronic cam Simulates a stepper motor It is provided with an internal PLC for programming inputs/outputs Serial interface RS485 integrated CAN bus interface 18 Parker Hannifin Manufacturing Srl user’s manual TPDM 4 MOUNTING • • The converter must be mounted vertically with the power block A space of at least 100 mm. must be left free above and beneath the converter. 4.1 How to suppress interference In order to meet the product requirements regarding electromagnetic compatibility, the installation must be carried out according to the following instructions. Because of strong PWM voltage fronts, undesirable currents of significant force can sometimes circulate through capacitive couplings and grounding systems (conducted interference). Besides, also high frequency interferes are generated in form of radiation, especially through the motor cable (radiated interference). The reduction/suppression of both conducted and radiated interference can be obtained through grounding, shielding and filtering. In particular filters reduce the interference conducted in the cables and the return of interference conducted at the source (the frequency converter) by using paths with the lowest possible impedance. In this way other systems connected to the same electrical line can be protected effectively and the frequency converter will also be protected from the interference of other systems. Basically, the criteria are essentially based on grounding, filtering and shielding. 4.1.1 Grounding In the electric panels where the drives are usually installed there are two ground systems: - EMC ground, or HF reference (high frequency), represented by the wall made of non-painted metal, onto which drives and filters are fixed. - The safety ground, or PE (protective earth), according to the EN60204-1 standard Fix drive and mains filters, the 24Vdc power supply etc. on the metal wall, making sure that there is a proper electric contact (HF connection). Carry the safety ground using cables having a minimum section of 10mm² 19 Parker Hannifin Manufacturing Srl 4.1.2 user’s manual TPDM Cable connections and shielding With the exception of mains cables to the filter, all power and control cables must be shielded and, wherever possible, kept segregated (minimum distance 20 cm). If control and power cables must cross, the intersection must be at a right angle. The shielded cables must be unbroken and grounded to a copper bar using the cable clamps connections as shown in the drawing (at 360º) in order to obtain a good conductivity. 360° shield connection Generally, the shield should be connected to each extremity. In certain circumstances, however, control cable shields may be connected only to one end to eliminate mains hum that could interfere with the control signal. Decide case by case as numerous factors must be considered. Adopt the following general approach: if the screen is solely for shielding, connect to both ends. If current flowing in the shield interferes with the shielded signals, connect to one end only. The incoming cable must be connected to an earth terminal trough a screw to ensure proper contact between screen and earth. Keep the power side (drive) and control side (PLC or NC) physically separated by isolating metal mounting plates. Inside the electrical cabinet, the two plates must be connected through a copper strap. 4.1.3 General suggestions on cable connections Avoid routing noise emitting cables in parallel with "clean" cables Avoid parallel cables, especially in the vicinity of the filter (ensure physical separation) Avoid cable loops (keep cables as much short as possible and close to the common potential). In particular, keep the main cables separate from motor cables. If the motor is of the embedded brake type, keep the 24Vdc brake cables separate from the other cables (resolver and motor). 20 Parker Hannifin Manufacturing Srl user’s manual TPDM 4.2 Dimensions and weights 50,5mm 263mm 90° 400mm 360mm 50mm Size 1 2 Size 1 2 21 46mm Dimensions Lenght Height Depht (*) [mm] [mm] [mm] 50 360 270 (410**) 100 (*)without connectors (**)with clamps TPDM Weight 1 axis 2 axis 4 kg 4 kg 6,8kg - 3 axis 4,2 kg - Parker Hannifin Manufacturing Srl user’s manual TPDM 4.3 Mounting instructions IMPORTANT Do not install in hazardous environments. Fasten the drive in the cabinet using the reamed holes on the mounting plate (see illustration). Size 1 Size 2 Measurements expressed in mm. Tolerance ±1.5 mm. IMPORTANT IMPORTANT IMPORTANT IMPORTANT • FIT IN VERTICAL POSITION. • To ensure drive cooling, leave a free space above, below and in front of at least 100 mm. The illustration shows how hot air cooling must be done in an external environment, to avoid damage caused by the formation of condensation. • The flow of air entering the converter must not come from or pass through other heat source parts. • Fit a suitable ventilation filter inside the switchboard. 22 Parker Hannifin Manufacturing Srl user’s manual TPDM 4.4 Connectors layout Serial link Opt. Board (field BUS or I/O) SD card CAN1 and CAN2 I/O and safety Feedback and AUX encoder Display Protective cover Power input (DC-BUS and 24V) Motor connection Mechanical brake X48 - DSL connections 12 23 1 Parker Hannifin Manufacturing Srl user’s manual TPDM 4.5 Connectors 1 2 3 4 5 6 7 8 9 DB9 poles male X11 CANbus CAN1 L (OUT) CAN1 L (IN) 0VA CAN2 L (IN/OUT) Shield 0VA CAN1 H (IN) CAN1 H (OUT) CAN2 H (IN/OUT) Mechanical brake X46 50 +brk C 51 -brk C 52 +brk B 53 -brk B 54 +brk A 55 -brk A 56 24Vdc 57 0Vdc 6 5 4 DB15 poles female HD X16 (A) - X17 (B) - X18 (C) “Feedback” 1 0VA 2 N.C. 3 Reserved 4 ECC+ +5V - FBK supply 5 PTC+ 6 CLK+ Hall B (TPDM-H) 7 SINA8 SIN+ A+ 9 CLKHall C (TPDM-H) 10 PTC11 COSB12 COS+ B+ 13 DATA+ Hall A (TPDM-H) 14 DATA15 ECC0V - FBK supply Motor connection A, B, C X45 CU U motor C CV V motor C CW W motor C FE Functional Earth C BU U motor B BV V motor B BW W motor B FE Functional Earth B AU U motor A AV V motor A AW W motor A FE Functional Earth A Motor+brake connection X43 (single axis) BR- Brake3 W W motor BR+ Brake+ 2 V V motor FE Functional Earth 1 U U motor DB15 poles female HD X19 encoder I/O 1 Enc. IN C+ 2 Enc. IN C3 0VA 4 Enc. OUT C5 Enc. OUT C+ 6 0VA Encoder supply 7 Enc. IN A8 Enc. IN B9 Enc. OUT A10 Enc. OUT B11 +5Venc Encoder supply 12 Enc. IN A+ 13 Enc. IN B+ 14 Enc. OUT A+ 15 Enc. OUT B+ DSL Terminal block X48 (Axes A,B;C) 12 DSL- (C) 11 DSL+ (C) 10 DSL- (B) 9 DSL+ (B) 8 DSL- (A) 7 DSL+ (A) 6 PTC- (C) 5 PTC+ (C) 4 PTC- (B) 3 PTC+ (B) 2 PTC- (A) 1 PTC+ (A) 24 Parker Hannifin Manufacturing Srl 4.5.1 25 user’s manual TPDM TPDM single axis 18 17 16 15 14 13 12 11 10 I/O Terminal block X13 (Axis A) Analog OUTput IN- analog reference IN+ analog reference Digital OUTput 1 Digital OUTput 0 Digital input 3 - b90.3 Digital input 2 - b90.2 Digital input 1 - b90.1 Digital input 0 - b90.0 9 8 7 6 5 4 3 2 1 I/O Terminal block X12 Safety Torque OFF_2 0V - Safety Torque OFF Safety Torque OFF_1 n.a. 24V OUT Digital OUT supply Reference digital IN 0V Digital OUT supply 0VA Parker Hannifin Manufacturing Srl 4.5.2 user’s manual TPDM TPDM two axes (A+B) 36 35 34 33 32 31 30 29 28 I/O Terminal block X14 (Axis B) Analog OUTput IN- analog reference IN+ analog reference Digital OUTput 1 Digital OUTput 0 Digital input 3 - b90.3 (*) Digital input 2 - b90.2 (*) Digital input 1 - b90.1 (*) Digital input 0 - b90.0 (*) 27 26 25 24 23 22 21 20 19 I/O Terminal block X15 Safety Torque OFF_2 (B) 0V - Safety Torque OFF (B) Safety Torque OFF_1 (B) n.a. n.a. Digital input – (b90.11 if b230.1=1) Digital input – (b90.10 if b230.1=1) Digital input – (b90.9 if b230.1=1) Digital input – (b90.8 if b230.1=1) 18 17 16 15 14 13 12 11 10 I/O Terminal block X13 (Axis A) Analog OUTput IN- analog reference IN+ analog reference Digital OUTput 1 Digital OUTput 0 Digital input 3 - b90.3 Digital input 2 - b90.2 Digital input 1 - b90.1 Digital input 0 - b90.0 9 8 7 6 5 4 3 2 1 I/O Terminal block X12 Safety Torque OFF_2 0V - Safety Torque OFF Safety Torque OFF_1 n.a. 24V OUT Digital OUT supply Reference digital IN 0V Digital OUT supply 0VA (*) if the bit b230.1=1,this input is not common to each axis (only TPDM multi axis): Digital input 3 - b90.7 Digital input 2 - b90.6 Digital input 1 - b90.5 Digital input 0 - b90.4 26 Parker Hannifin Manufacturing Srl 4.5.3 user’s manual TPDM TPDM three axes (A+B+C) 36 35 34 33 32 31 30 29 28 I/O Terminal block X14 (Axis B) Analog OUTput IN- analog reference IN+ analog reference Digital OUTput 1 Digital OUTput 0 Digital input 3 - b90.3 (*) Digital input 2 - b90.2 (*) Digital input 1 - b90.1 (*) Digital input 0 - b90.0 (*) 27 26 25 24 23 22 21 20 19 I/O Terminal block X15 (Axis C) Analog OUTput IN- analog reference IN+ analog reference Digital OUTput 1 Digital OUTput 0 Digital input 3 - b90.3 (**) Digital input 2 - b90.2 (**) Digital input 1 - b90.1 (**) Digital input 0 - b90.0 (**) 18 17 16 15 14 13 12 11 10 I/O Terminal block X13 (Axis A) Analog OUTput IN- analog reference IN+ analog reference Digital OUTput 1 Digital OUTput 0 Digital input 3 - b90.3 Digital input 2 - b90.2 Digital input 1 - b90.1 Digital input 0 - b90.0 9 8 7 6 5 4 3 2 1 I/O Terminal block X12 Safety Torque OFF_2 0V - Safety Torque OFF Safety Torque OFF_1 n.a. 24V OUT Digital OUT supply Reference digital IN 0V Digital OUT supply 0VA (*) if the bit b230.1=1,this input is not common to each axis (only TPDM multi axis): Digital input 3 - b90.7 Digital input 2 - b90.6 Digital input 1 - b90.5 Digital input 0 - b90.4 (**) if the bit b230.1=1,this input is not common to each axis (only TPDM multi axis): Digital input 3 - b90.11 Digital input 2 - b90.10 Digital input 1 - b90.9 Digital input 0 - b90.8 27 Parker Hannifin Manufacturing Srl user’s manual TPDM 4.6 Cable lengths and cross sections Choose a cable for flexible or static installation depending on the application. See the table below for cable sections: Model 2A 2,3 axes Motor X45 A–B–C 2,3 axes 1 axis Motor + Brake X43 A Mechanical brake X46 UL Compliance CE Compliance - Tightening torque - UL Compliance AWG10 CE Compliance 4mm2 Tightening torque UL Compliance CE Compliance Tightening torque Maximum length of motor cables, per axis (total for all axes) Max cable capacitance Section I/O X12-X13-X14-X15 Tightening torque Cable Motor Resolver Encoder EnDat Encoder Hiperface Incr. Enc. + HALL sensor 5A AWG10 4mm2 4,42 ÷ 5,3 lb-in 0,5 ÷ 0,6 Nm (M3) 8A - - 10A 15A 30A AWG10 AWG10 AWG8 2 2 4mm 4mm 6mm2 4,42 ÷ 5,3 4,42 ÷ 5,3 10,6 ÷ lb-in lb-in 13,3 lb-in 0,5 ÷ 0,6 0,5 ÷ 0,6 1,2 ÷ 1,5 Nm (M3) Nm (M3) Nm (M4) AWG10 AWG10 AWG10 4mm2 4mm2 4mm2 4,42 ÷ 5,3 lb-in 0,5 ÷ 0,6 Nm (M3) AWG10 4mm2 AWG14 1,5mm2 1,95 ÷ 2,21 lb-in 0,22 ÷ 0,25 Nm (M2) - 60 m (300m) <150pF/m 0,22 ÷ 1 mm2 (AWG16) 1,95 ÷ 2,21 lb-in 0,22 ÷ 0,25 Nm (M2) Max lenght Characteristics 60m (50m with See above encoder Hiperface DSL) 60m The conductor-conductor capacitance for the length used cannot exceed 10 nF and the section cannot be less than 0.22 mm2. 20m (60m with Supply: 4x0.5 mm2 Sense) Signals: 12x0.14 mm2 35m (60m if the ΔV of the cable, permits to supply the encoder) Description The motor cable must be shielded. The resolver cable must consist of four individually shielded and insulated twisted pairs protected by a shield. The cable must be shielded. 4 twisted pairs and 4 wirings shielded. The cables used for analogue signals must feature twisted and shielded pairs. Also use shielded cables for the digital inputs and outputs. 28 Parker Hannifin Manufacturing Srl user’s manual TPDM 4.7 Protective Earth connections It is necessary to minimize the length of the individual cables to be grounded. For this reason we recommend that a grounding bar is be placed as close as possible to the frequency converters. Length (m) Width (mm) 0.5 1 1.5 20 40 50 Thickness (mm) 6 6 6 The grounding bar must be made of low inductance copper and must be mounted on electrical cabinet back-plat. The table shows the minimum dimensions vs. length. To connect the converter to the grounding bar use either one cable with a minimum section of 10 mm2, or two cables with the same section as power supply cables. Use copper grounding cables. TPDM PSU 4.8 Requirements for UL Compliance 4.8.1 Solid-State Motor Overload Protection These devices provide Class 10 motor overload protection. The maximum internal overload protection level (current limit) is peak output current for 2 seconds (refer to chapter “Start-up” to setup and adjustment). An external motor overload protective device must be provided by the installer where the motor has a full-load ampere rating of less than 50% of the drive output rating; or when the function is disabled. 4.8.2 Solid-State Short-Circuit Protection These devices are provided with Solid-State Short-Circuit (output) Protection. Branch circuit protection requirements must be in accordance with the latest edition of the National Electrical Code NEC/NFPA-70. 4.8.3 Protective earth The (motor) protective earth (PE) has to be wired to the Protective Earth connection on the PSUP module only (Protective Earth Connections), in accordance with the NEC NFPA 70. The TPDM provides Motor Functional Earth connection only. Two supply protective earth connections are required for Europe one located on the PSUP and the other located on the TPDM. 29 Parker Hannifin Manufacturing Srl user’s manual TPDM 4.9 Requirements for CSA Compliance To CSA compliance, remove the EARTH bar when it’s present (see the following picture). 24Vdc 0Vdc - DCbus Earth + DCbus Caution! Risk of Electric Shock. Discharge time of the bus capacitor is approx. 10 minutes. Connect the protective earth using the dedicated “screw” for each module of TPDM: TPDM PSU 30 Parker Hannifin Manufacturing Srl 4.10 Motor connection diagrams MIL motor connector 4.11 Resolver connection diagrams MIL resolver connector 31 user’s manual TPDM Parker Hannifin Manufacturing Srl 4.12 user’s manual TPDM Signal cables connection The cable used for the analogue reference must be a shielded twisted pair. The cable used to connect the signals of the simulated encoder must consist of three twisted pairs with a general shield. Shielded cables are also recommended for digital inputs and outputs. All cables must have a minimum section of 0.22 mm2 4.13 Encoder connection 4.14 Sinusoidal Encoder 32 Parker Hannifin Manufacturing Srl 4.15 Sinusoidal Encoder + EnDat It’s possible to use a Heidenhain cable or one with the same features. The cable must not be longer than 20 metres. 33 user’s manual TPDM Parker Hannifin Manufacturing Srl 4.16 user’s manual TPDM Sinusoidal Encoder + Hiperface N.B.: the drive requires that the sin+ and sin- signals must be inverted, as shown above. 34 Parker Hannifin Manufacturing Srl 4.17 35 Sinusoidal Encoder +Hall sensor user’s manual TPDM Parker Hannifin Manufacturing Srl 4.18 user’s manual TPDM SinCos (one sin wave per pole pitch) Only with PowerROD motor, on drive side, connect pin 4 with pin 2, and pin 1 with pin 15. 36 Parker Hannifin Manufacturing Srl 4.19 37 DSL feedback user’s manual TPDM Parker Hannifin Manufacturing Srl 4.20 user’s manual TPDM Analog and digital I/Os connections 38 Parker Hannifin Manufacturing Srl 4.21 user’s manual TPDM Frequency input/output connection The drive has the possibility to “read” the input Encoder IN type. The input can receive signals in quadrature and frequency/sign, (b42.5), from an incremental encoder to 5 Volt-DC as from standard LineDrive-RS422. Follow the outline of connection for the reference of frequency, whether from an encoder or from an external module: 39 Parker Hannifin Manufacturing Srl 4.22 user’s manual TPDM Connecting the drive to the digital-lock In the example given above, is shown the connection of two drives to the Digital-Lock with a master, but the diagram could be extended to several converters respecting the series connection. The line charge resistors must be connected to the last converter. The master can be an encoder powered externally or an encoder simulator of another converter. The signal of the master encoder must in any case be of differential type 5V RS-422. You can connect up to 32 converters to the electrical shaft by using the same signal of the simulated encoder (standard RS-422). See par. “Digital Lock + Positioner” about the programming. 4.23 CAN line connection There is a CAN-bus interface on the drive, type Physical layer ISO/DIS11898, the DATA link is full CAN version 2.0 part A (ID 11 bit), and a subset used for application layer SBC CAN. Realize the ending only on the last node, like shown above. 40 Parker Hannifin Manufacturing Srl 4.24 41 Layout user’s manual TPDM Parker Hannifin Manufacturing Srl user’s manual TPDM 5 Using the keyboard The keyboard-display module is easy to use. It is used to program the functional data, control the status of the converter and send commands. It consists of only three keys located directly beneath the display. The keys are marked: [M], [+], [-]. The [M] key is used to modify the display and consequently the function of the [+] e [-] keys. There are two types of display: parameter mode and parameter value mode. When the converter is powered on, if there is no alarm, the user sees ‘o’ or ‘|’ on the screen, depending on whether the converter is on or off. This is also the position of the Pr0 parameter. Symbol Led description Drive in alarm Drive without alarm but not ready (undervoltage). Drive ready Drive enabled, motor stopped in torque. Drive enabled, the motor speed is different from 0. To view all the parameters, press the [+] o [-] keys. If you want to verify the value, press the [M] key. When the value is displayed, it can be modified by using the [+] e [-] keys. To return to parameter mode, press the [M] key again. The type of display depends on the type of parameter shown. If you need to increment or decrement quickly the value of a parameter, you can do this by pressing the [M] key while the increment [+] key or decrement [-] key is held down. 42 Parker Hannifin Manufacturing Srl user’s manual TPDM status + LoAd - Pr... + 0 + - + - +9 -9 b39.x M M 0 + - 1 0 - - In... M M dOnE M M + Pico-PLC +1 -1 + - Pb... + M M M PLC inst - + M 1st oper. - + M 2nd oper. - + M 3rd oper. M - SD card (b99.6=1) Hold M pressed for 2 sec. while the name of a parameter (PRxx) is displayed to make the keypad control switch to a different axis; a led will denote the active axis (A, B or C). The following messages may be displayed on the screen, in addition to the value of the parameters and the instructions of the pico-PLC: Pr. Xx Pb. Xx bxx.yy In. xx donE rESet triP.x Indicates the parameter xx whose value can be displayed by pressing the [M] key. Indicates the parameter at bit xx. Indicates the bit yy of parameter xx. By pressing the [M] key, the status of the bit is displayed. Indicates instruction xx of the PLC program. Is displayed for about 1 second whenever a command is sent. Is displayed for about 1 second whenever an alarm reset command is sent (b99.10). Indicates that the converter has malfunctioned. If you cannot modify the read-write parameters using the keypad, be sure that b99.7 is 0; is it was 0, probably the same parameters were modified by the pico-PLC program. 43 Parker Hannifin Manufacturing Srl user’s manual TPDM 5.1 SD card management The user can use a SD card to storage/load files to program the drive. Using the keypad (*) it’s possible to create the directories, save files, delete files, format the card (FAT16) and load files. The directory has this structure: Directory name |_____ /PAr ____ Pnnnor APnnn(parameter file “.slv”) |_____ /Fr ____ Frnn (firmware “.tpd“) |_____ /KEY ____ xx (activation file (**)) The maximum file number available, per directory, is 100. Functions: - Format : command to execute the quick format of the SD card (require a previous format by PC: FAT or Fat16). This command erases all files (parameters, firmware and activation files) into the SD card. - New directory : to create the directory. When the SD card is new or empty, it’s necessary create the structure to storage the file: PAR, by command , and FW, by command , directories, or the complete structure by command , and subdirectories /Par/FOOX. - Delete file (***): to erase the parameter files , or the firmware file . - List (***): file menu on SD card. This function permits to see the parameter files , or the firmware file, into the directories and . - Save (***), save the axis parameters selected on SD: o PAr function saves a file with a progressive number, where “nnn” identifies the file number, and it’s automatically incremented using the SAVE command. o AXPAr function saves a file where “nnn” identifies the CAN node (unique file per axis). Note: before saving files, it’s necessary create the directory (“PAr”). - Load (***), load the parameter file into the axis selected, or the firmware into the module, from SD: o PAr file is loaded into the selected axis. After , it’s necessary to save the file into the axis, through the commands b99.14 and b99.15. o Fr file (reserved function) is the firmware and is unique per “module”(require a firmware file in /FW, the activation file and the rel. software 3 or higher). (*) without the SD card, the function menu is not available. The SD card menu is after the pico-PLC instructions and before of parameters. (**) reserved. This file is necessary to enable the upgrade of the firmware. Parker Hannifin Manufacturing Srl reserves the right to grant the activation file. (***) this function requires the directories PAr and Fr. Note: a MotionWiz file (*.slv) must be copied on SD, into the characters. directory, with 5 maximum 44 Parker Hannifin Manufacturing Srl user’s manual TPDM In.xxx + + Format SD card + M M - + - - FORMAT M + New directory + Protect M NO detect M OK M nOK M + M M M - M /PAr All /Fr nOK OK M M M M M + + M M Delete file NO detect M - + - Protect + - NO detect - M - M + - NO detect + - File... 0 files + M M } M nOK M - M + + M - + M DELETE M File menu OK NO detect M - M - M NO detect + - + - File... 0 files + M 45 M - M } OK M nOK M M Parker Hannifin Manufacturing Srl + user’s manual TPDM + Save file on SD + M - Axis selected C M + - M SAVE /par/Pnnn.slv From MEM SAVE /par/APnnn.slv From MEM nOK OK M M + Load file from SD B C M + - - M - + + - + - File... 0 files + - Pr.. M M M NO detect Select file M NO detect A M M - + M + M Axis selected M M Protect B - M - NO detect A + M Restart the TPDM module M - } M nOK M OK M To save the file into the axis, set bit b99.14=1 and b99.15=1 status The function “SAVE” and “LOAD” are referred to the axis selected (led on). 5.1.1 FEr.01 FEr.02 FEr.03 FEr.04 FEr.05 FEr.06 FEr.07 FEr.08 FEr.09 FEr.10 FEr.11 FEr.12 FEr.13 Alarm codes SD file system doesn’t exist / SD broken Impossible to open/create/delete the file/directory – SD empty Impossible to add file, because the max number of files has been reached. Impossible to load the parameters area from file .slv Impossible to load the PLC area from file .slv Impossible to load the Tab area from file .slv Impossible to load the Tab1 area from file .slv Impossible to load the Tab2 area from file .slv Impossible to load the Tab3 area from file .slv Reinsert the SD card The SD card is protected, impossible to write Impossible format FAT16 (size out of range: < 4,1MB or > 2GB) Impossible to load the firmware 46 Parker Hannifin Manufacturing Srl user’s manual TPDM 6 START-UP In Its basic configuration the drive can control both synchronous permanent magnet motors (brushless) and asynchronous induction motors, with or without feedback. The setting of Pr217 can select either of the following: Pr217=0 synchronous motor (default setting). Pr217=1 asynchronous motor with feedback. Pr217=2 asynchronous motor without feedback - V/f control (see the relative appendix). The drive is supplied with default factory parameter settings (see Pr206 to set the rated voltage). See the following chapters for use and start-up. 6.1 Setting the default parameters If you want to set the default values of the converter as it was supplied by the manufacturer, follow these instructions: power off the converter using the hardware connect only 24Vdc power on the drive set b99.7 and b99.13 to 0 issue the command b99.12 save the set up using commands b99.14 and b99.15. 6.2 Selection of motor type The first time the converter is powered up, or following to a default command, the drive indicates a “E” condition (alarm Pr23=15). In order to leave the drive’s initial condition, the operator shall have to input the motor data. The parameters defining motor types are the following ones: Pr29 Pr32 Pr33 Pr34 Pr46 Pr47 Number of motor poles Rated speed of the motor rated motor current (ex. 2.5A, write 2.5) number of resolver poles phase-phase motor resistance (ex. 1,8Ω, write 1.8) phase-phase motor inductance (ex. 2.6mH, write 2.6) N. r.p.m. A N. ohm mH With asynchronous motors, the values above shall be supplemented with the following parameters: Pr217 = 1 or 2 Pr218 base speed r.p.m. Asynchronous motor only Pr219 slip r.p.m. Pr220 magnetizing current (*) A Pr308 motor voltage supply V If the thermal sensor of the motor is different from the PTC type, please select the correct sensor (b42.14 and b42.15). 47 Parker Hannifin Manufacturing Srl user’s manual TPDM After setting the parameters that fit the motor, the operator must give the save data command, b99.15. The drive will calculate the correct values of Pr2, Pr3, Pr16, Pr17, Pr18, and Pr19 and save the parameters. At this point the basic parameters cannot be modified. If you want to modify one of them, you must enter b94.3=1. The “E” alarm will be displayed again and after updating the value of the parameter, it must be saved by entering b99.15 again. (*) With configuration tool: MotionWiz, set the data plate in the custom motor table, because MotionWiz uses these data to calculate the magnetizing current. 6.3 Changing motor data After having entered a data save command, no other changes shall be made to the motor parameters . In order to change the entered parameter values (new motor), enter command b94.3. The drive shall return to its default condition and changing motor data shall be enabled again. Repeat the data save procedure with command b99.15 (with drive disabled) if you want to recalculate parameters Pr2, Pr3, Pr16, Pr17, Pr18 and Pr19 with the new motor data. 6.4 Setting feedback The drive can use various types of sensor for control of the speed and current loop. The choice of the type of drive must be made on order, because there are three types of configuration of the drive. The type of feedback is equal for each axis. Note: in case of TPDM multiaxis, the feedback type must be equal per each axis. 6.4.1 Select supply feedback The supply of feedback is between –ECC and +ECC pins. With resolver feedback, the drive has a sinusoidal supply to 8kHz with short circuit and overload protection, the value of voltage is 8V peak-peak. With encoder feedback, the drive has a variable supply and the user must set this value respecting the electric characteristics of the device, following this table: b231.6 (*) b231.7 (*) max current Supply voltage +ECC, -ECC 5 [Vdc] 5,5 [Vdc] 8,1 [Vdc] 8,6 [Vdc] 0 1 0 1 0 0 1 1 250mA for each axis with short circuit protection The selection of power input voltage is only performed at the drive’s start up. In order to enable the selected voltage, save the parameters, then switch off and on again the drive. The feedback must be connected after the correct programming. (*) Attention: the configuration of the feedback is realized only on A axis, for all axes. 48 Parker Hannifin Manufacturing Srl 6.4.2 user’s manual TPDM Feedback configuration The following table reassumes all the possible configurations and indicates the relative formulation of the parameters: Setting Type Resolver b42.9 0 b42.8 b42.7 0 0 default 0 0 b42.6 0 Encoder Encoder SinCos + EnDat Encoder SinCos + Hiperface SinCos SinCos (One sin wave per pole pitch) SinCos encoder with Hall sensor Incremental encoder with Hall sensor 0 1 1 0 1 0 DSL 1 1 1 0 N. of pulses revolution - Power supply +ECC, -ECC Drive TPDM Pr196 0 0 1 1 default Pr196 0 1 1 1 (only read) 0 1 0 0 Pr196 1 0 0 0 Pr196 1 0 0 1 +ECC, -ECC (selectable) TPDM E Pr196 +ECC, -ECC (selectable) TPDM H Pr196 +DSL, -DSL (selectable) TPDM L This selection configures the feedback of the speed control and of current and in the configuration of default it is used also in the position control. After to have saved the configuration, the activation of the selected feedback happens to the successive start-up of the drive. Note: in case of TPDM multiaxis, the feedback type must be equal per each axis. 49 Parker Hannifin Manufacturing Srl user’s manual TPDM 6.5 Feedback from incremental encoder In place of the resolver it is possible to use an incremental encoder (must be expressly requested when placing your order). When the feedback is incremental encoder see par. “setting feedback”. Modifications at this bit are available only after restarting of the drive. The phasing procedure must be run upon every drive start up. It’s possible choose among two type of procedure, and it’s necessary that the motor must be free to rotate, also when the motor is mounted into the system (the brake of the motor must be disable). During the phasing procedure 1, the drive checks the connections, and the movement of the motor is broadest, so this procedure is recommended for the first time. 6.6 Encoder phasing 6.6.1 Type 1 phasing b94.2 actives this procedure. The parameters are shown in the table below: Par. Pr196 b94.2 Pr89 b41.6 Description To insert number of the step to turn encoder Command phasing 1. It’s necessary to disable the software (b40.9=0); enable the hardware (b41.5=1), and driver OK (Pr23=0). The motor executes two movements and the last is about 90° degree electric, with control sign of the encoder feedback. Introduce the correct number of the motor poles (Pr29). Status: 0 if positive result 2 if wrong enabling 3 if positive feedback 4 if wrong motor poles (tolerance ±22.5 electric degrees) 5 if drive not ready (Pr23 ≠0 or open inrush) Phasing result :=1 if positive result of the procedure and necessary condition for drive OK (b41.4) Field/Unit Def. Type/ Notes ±32767 1024 R/W M 0 R 0 R 50 Parker Hannifin Manufacturing Srl 6.6.2 user’s manual TPDM Type 2 phasing b94.4 actives this procedure. The parameters are shown in the table below: Par. Description Pr196 To insert number of the step to turn encoder b94.4 Command phasing 2. It’s necessary to disable the software (b40.9=0); enable the hardware (b41.5=1), and driver OK (Pr23=0). The motor executes a vibration, the standing depends to the type of the motor and to the load. Pr89 Status: 0 if positive result 2 if wrong enabling 5 if drive not ready (Pr23 ≠0 or open inrush) 6 Pr201 parameter calculated (frequency of vibration) is different of 25 unit from starting value 7 Pr201 parameter calculated (frequency of vibration) exceeds 200 unit (max. value) Phasing result =1 if positive result of the procedure and necessary condition for drive OK (b41.4) b41.6 Field/Unit Def ±32767 1024 Type/ Notes R/W M 0 R 0 R The calculated value of Pr201 at the end of the procedure, if it is save, it permits at the new start-up that the procedure starts from this value, and if the mechanical conditions don’t change, is made only one vibration of standing fixed by Pr201. N.B.:(*) during the phasing procedure the motor must be motionless, so if the motor is on vertical axe, this system must be motionless without to use the brake. (**) the encoder simulation can’t use zero encoder track as reference for reset the machine, when the system uses an axis control and the FBK is an incremental encoder. 51 Parker Hannifin Manufacturing Srl 6.6.3 user’s manual TPDM Phasing procedure for encoder with EnDat, Hiperface or DSL digital interface The procedure of encoder phasing is not necessary with Parker Hannifin Manufacturing’s motor, but when the system requires the phasing, the procedure 1 and 2 of the phasing is the same for incremental encoder (see paragraph “Encoder phasing”) and it must finalized as follows. With EnDat, Hiperface or DSL digital interface, single turn or multiturn, after the phasing is possible to save this information so at every start up the phasing procedure isn’t necessary; for take it, to bring the motor shaft in the position that Pr28=0, disable the drive and save with command b99.9=1. After this command is necessary start again the drive. Alternative to this procedure, disable the drive and disconnect the motor cable, the motor can rotate even if it is installed inside the equipment (any emergency brake disabled), with motor is available to supply a positive tension between phase B and C respect the phase A (it’s important to verify that the phase-phase resistance limits the current to the rated value) so that the shaft aligned (only for S.B.C. motor, for other type see the paragraph “ motor phases”), set the command b99.9=1 and start again the drive. 6.6.4 Motor phases In this paragraph is showed a procedure not necessary for the motors of the S.B.C. Division, essential for the motor connection, because allows to find the motor phases (A=U, B=V, C=W). The procedures shown in this document are dangerous for the operator and could damage the motor under test. A qualified and trained personnel with advanced skills in electronics and drive technology is therefore needed, the operator must be sure that these procedures are proceeding in safety condition. Necessary instruments: power supply 24Vdc with output current equal or higher to the rated current of the motor under test. Verify that the phase-phase resistance of the motor limits the current at the rated value with 24V voltage applied. Necessary requisites: motor free without load and inertia applied. Procedure: connect the positive pin of the 24Vdc supply voltage at one motor phase (assign name A at this phase). Connect the negative pin at one of the other phases (at random). Feeding the circuit, the rotor will turn and to assume a new position. Observing the motor shaft, move the negative pin of the 24Vdc voltage on the other phase: if the rotor turns counter-clockwise (watching frontally the drive shaft), the phase connected to the negative pin is the phase C, otherwise if the rotor turns clockwise this phase connected to the negative pin is the phase B (*). Result: after to have connected the motor and the device of feedback to the drive, the counter of the feedback increases if the motor turns clockwise, and decrease if turns counter-clockwise sense. (*) To avoid to damage the motor winding, to power the circuit only for the necessary time. 52 Parker Hannifin Manufacturing Srl user’s manual TPDM 6.7 First commissioning The steps to be followed carefully the first time the converter is used are given below. 1) supply the drive with only 24V and insert the motor and feedback data, save (b99.15) and put off the device. 2) Connect the motor to the converter by following carefully the diagrams in the manual. 3) Disable the drive. 4) Power the converter on. 5) The “o” message will appear on the screen. 6) Set the analogue reference to 0 V and enable the converter on. 7) At this point the motor shaft should be stopped. Any change in the voltage of the analogue reference should produce a proportional change in the speed of the motor. If this does not happen, control the cabling. The enable bit of the drive (b41.5) can be set by a digital input used from pico-PLC, or via serial line or CAN bus. The converter comes with default values pre-defined that satisfy most applications. In the default status the pico-PLC in the converter runs the program (described in Appendix). 53 Parker Hannifin Manufacturing Srl user’s manual TPDM 6.8 Speed control adjustment SOME IMPORTANT CONCEPTS SPEED LOOP: The main task of a converter is to control motor speed so that it follows as faithfully as possible the speed request that is generally known as the REFERENCE. Faithfully following the reference means that the motor speed should equal the reference in static conditions and also that the motor speed is as equal as possible to the speed requested during dynamic conditions. To carry out this task, the converter must know some of the features of the motor used and the mechanical part attached to it. This information is communicated to the converter by using the so-called ADJUSTMENT PARAMETERS. ERROR: The error is the difference between the reference speed and the motor speed. The size of the error is used by the speed loop in order to evaluate how much current must be supplied to the motor, based on the adjustment parameters. TORQUE: The current that circulates in the windings of the motor is transformed in torque, thereby allowing the motor to accelerate or decelerate. GAIN: Given the typical applications of the converter, when we speak of gain in this document we refer to the rigidity of the axis, better known as the STIFFNESS. To better illustrate what stiffness means, we can imagine a motor controlled by a converter with a requested speed of 0. The motor shaft will appear immobile, but if we apply a torque to the shaft, it will demonstrate an angle that is proportional to the torque applied. Suppose we apply the rated torque of the motor and measure the stiffness in degrees. The measured degrees will be the index of the regulator tuning quality. Clearly, it is not the only quality index. WHAT IS NEEDED To adjust a converter correctly, an oscilloscope with memory must be used. A technician who can use it to carry out the operation will also be needed. If it is not possible to use an oscilloscope, a more approximate but applicable adjustment method will be illustrated at the end of this section. 54 Parker Hannifin Manufacturing Srl user’s manual TPDM BEFORE BEGINNING Study the diagram below carefully (Fig. 1): Fig. 1 This diagram shows the response of the system to a square wave speed reference. Channel 1 (Ch1) represents the speed and channel 2 (Ch2) the current of the motor. The two traces cannot be seen at the same time, but the trace to be displayed can be programmed using the binary parameter b42.4. The V/div scale and the time basis will not be discussed here since they can vary greatly. ESTIMATING THE Pr16 Before turning the converter on, the user should estimate the value of Pr16. The value of Pr16 is what defines the gain of the system. To convert the value of Pr16 into grades per rated torque, the formula to be used is the following: α = Pr 33 *100 ⋅ 28 where α represents the stiffness and Ipd is the peak Pr 16 * Ipd current of the drive. Before using the formula, Pr33 must be set with the correct value of the rated current of the motor. To evaluate the correct value of α, let’s consider that, if the mechanical part to be moved is rigid (non-elastic) and if there is no transmission play, the optimal stiffness would be about 4 degrees. If the mechanical part is not rigid enough, it could be necessary to reduce the gain. If the torque of the motor has been sized in order to obtain strong acceleration, but during the operation, the disturbing torques are very low, it is possible to choose stiffness angles of 20, 30 or 40 degrees, thereby maintaining acceptable performance. If it is difficult to choose the proper stiffness angle, the user can begin with 10 degrees that is the default adjustment if a motor with the same rated current as the converter’s is used. At this point, let us set the Pr16 to the estimate and turn on the axis with a square wave reference. The user must be careful to choose reference ranges and frequencies in order to avoid problems if the axis has a limited course. By observing the oscilloscope we will note that as Pr17 varies, the response will change. For decreasing values of Pr17, the response of the system will be as shown in figure 2 below: 55 Parker Hannifin Manufacturing Srl user’s manual TPDM Fig.2 For increasing values of Pr17, the response of the system will be similar to what is shown in figure 3 below: Fig.3 The optimal value of Pr17 will be attained with a response of the system as shown in figure 4 below: 56 Parker Hannifin Manufacturing Srl user’s manual TPDM Fig. 4 An overshoot of about 10% must be obtained. It is important that after the overshoot, an undershoot does not occur. Once the optimal value of Pr17 has been established, we must analyse the movement of the axis. If it moves without vibrations and acoustic noise, the adjustment of the system is complete. Otherwise, we must repeat the preceding procedures with lower values of Pr16. In some applications it is possible to reduce acoustic noise by using a higher value of Pr18. Figure 5 shows that once the optimal adjustment has been achieved, there is also an oscillation of the current that can produce acoustic noise and mechanical vibration. By raising the value of Pr18 to 3, the situation is much improved (fig. 6). Fig. 5 57 Parker Hannifin Manufacturing Srl user’s manual TPDM Fig. 6 If mechanical parts are used which very easily tend to enter into oscillation, we recommend you use very low values of Pr16. In this configuration the TPDM typically dampens the torque request of the motor in order to avoid triggering mechanical oscillations. This configuration is shown in figure 7. Fig. 7 58 Parker Hannifin Manufacturing Srl user’s manual TPDM ADJUSTMENT WITHOUT USING INSTRUMENTATION If you do not have an oscilloscope, you must: A. Determine the value of Pr16 as described above. B. Determine the Pr17 parameter by using the following formula: Pr 17 = 1488 ⋅ where: Jtot 153.41⋅ Pr 16 ⋅ J tot Nm picco is the total inertia (motor + load) expressed in kgm2. Nmpicco is the available torque with the peak current of the converter. C. Turn on the converter and use the external control to move the axis. Move Pr17 to find the value where the axis seems to move best. D. Estimate the value of Pr18 by using the following formula: Pr 18 = 0.68 ⋅ Pr 17 Pr 16 If the result is less than 1, Pr18 must be set to 1. If the adjustment is not satisfactory, repeat the procedure with lower values of Pr16. 59 Parker Hannifin Manufacturing Srl user’s manual TPDM 7 ANALAOG, DIGITAL I/Os and S.T.O. In according to the model, the TPDM drive includes per each axis: - 4 digital inputs (type PNP or NPN selected by the reference); - 2 digital outputs (require the supply); - 1 analog output (*); - 1 analog input (*). Moreover, every TPDM model includes a terminal block common, where there are: - voltage supply dedicated to the digital outputs; - reference (24Vdc or 0Vdc) for the digital inputs mode: PNP or NPN; - 2 channels dedicated to the safe torque (necessary to enable the drive) (**). (*) in case of 2 axes, the analog I/Os, of the terminal block X15, are dedicated to the control of safe torque of axis 2. (**) the safe torque OFF in the terminal block common X12, is dedicated to the axes A, B and C when the TPDM model has 3 axes. When the TPDM model has 1 or 2 axes, the S.T.O., in X12, is dedicated to the axis A; while, when the TPDM model has 2 axes, the safe torque, dedicated to the axis B, is located in the terminal block X15. 7.1 Digital I/Os In X13-X14-X15 terminal blocks there are 4 digital inputs per each axis, combined with binary parameters b90.0 ÷ b90.11 (in according to the TPDM model). The following table shows the details of each digital input reference: Axis Terminal pin 10 11 A X13 12 13 28 29 B X14 30 31 19 20 C X15 21 22 (*) only for TPDM 3 axes Binary parameter Binary parameter TPDM Digital input (all axis) (all axis) type b230.1 = 0 b230.1 = 1 IN 0 b90.0 b90.0 Always IN 1 b90.1 b90.1 (1 axis, 2 axes, IN 2 b90.2 b90.2 3 axes) IN 3 b90.3 b90.3 IN 0 b90.0 b90.4 IN 1 b90.1 b90.5 IN 2 b90.2 b90.6 IN 3 b90.3 b90.7 2 axes, or 3 axes IN 0 b90.0 (*) b90.8 IN 1 b90.1 (*) b90.9 IN 2 b90.2 (*) b90.10 IN 3 b90.3 (*) b90.11 These inputs can be PNP or NPN type, and it’s possible select the type trough the pin 3 of X12 “Reference digital IN” (pin 3 to 0V: PNP mode; pin 3to 24V: NPN mode). The following table explains the selection mode: 60 Parker Hannifin Manufacturing Srl Input user’s manual TPDM Pin Input voltage Mode +Vcc PNP switch 0V dc PNP DRIVER input Rin ref. in GND Reference digital IN 3 – X12 +Vcc ref. in DRIVER Rin input 24V dc NPN NPN switch GND In the same X13-X14-X15 terminal blocks, there are 2 digital outputs per axiscombined with binary parameters: 14 OUT 0 Binary parameter (single axis) b91.0 15 OUT 1 b91.1 32 33 23 24 OUT 0 OUT 1 OUT 0 OUT 1 b91.0 b91.1 b91.0 b91.1 Axis Terminal pin Digital output A X13 B X14 C X15 TPDM type Always (1 axis, 2 axes, 3 axes) 2 axes, or 3 axes 3 axes Output voltage depends on the voltage supplying digital outputs (terminals 4 and 2 of X12), than can range between 5 and 24 Vdc. 61 Parker Hannifin Manufacturing Srl user’s manual TPDM 7.2 Analog inputs/outputs Axis Terminal A X13 B X14 C X15 pin Analog 16-17 IN 18 OUT 34-35 36 25-26 27 IN OUT IN OUT TPDM type Always (1 axis, 2 axes, 3 axes) 2 axes, or 3 axes 3 axes 7.3 STO Through the STO the energy supply of the drive is interrupted, and the drive isn’t enabled to produce a torque; it’s necessary to enable the drive: − STO: uncontrolled stop by switching off the energy of the motor (consider if it’s necessary to use a brake or others mechanical stopping). Axis Terminal A X12 A+B X12 (axis A) X15 (axis B) A+B+C X12 pin STO 7-8 9-8 7-8 9-8 25-26 27-26 7-8 9-8 STO1 STO2 STO1 STO2 STO1 STO2 STO1 STO2 TPDM type 1 axis 2 axes 3 axes Characteristics: STO Nominal voltage Inputs VH VL Current at 24Vdc Status STO1-2 U. M. Vdc Vdc Vdc mA - Description 24 2 20…30 0…7 8 VH activated VL deactivated This represent the working condition for drive and motor (STO monitor by the bit b230.12 and b230.13). 62 Parker Hannifin Manufacturing Srl user’s manual TPDM 8 PARAMETERS AND PROGRAMMING The torque, speed, acceleration and position control functions are carried out by special digital electronics. In this section we explain how parameters are set and the meaning of each parameter. We also provide the functional block diagram and the description of advanced functions. The system is easy to use and flexible. In the diagram below the general block diagram of the part of the converter that is controlled by parameters is presented. analogue b40.2 digital REFERENCE internal MANAGEMENT LIMIT SWITCH & SPEED REGULATOR STOP TORQUE DEMAND OPERATING MODE TORQUE LIMIT MANAGEMENT ALARMS MANAGEMENT SPEED WINDOW Pr31 TORQUE CONTROL DIGITAL LOCK and POSITIONER ELECTR. CAM DOUBLE ELECTR. CAM REAL TIME CAN The main block diagram and the diagrams for special functions (operating modes) are described later in more detail. How to associate inputs/outputs to the parameters of the converter is described in the chapter, The pico-PLC. The parameters are divided on the basis of their function in the following way. 63 Parker Hannifin Manufacturing Srl user’s manual TPDM Pr0…Pr49, Pr151…Pr167, Pr188…Pr280 Pr50…Pr70 Pr71…Pr99 Pr100…Pr150, Pr168…Pr187 From Pr151 to Pr163 From In0 to In255 Main parameters Position loop pico-PLC parameters Operating mode parameters pico-PLC parameters pico-PLC instructions The units of measurement and the main resolutions of the parameters are: Parameter type Unit Speed Revolutions/minute Acceleration Seconds/1000 revolutions/minute. 4096 steps/revolution Position Current % of the peak current of the converter Resolution 1 0.001 1/4096 of a revolution 0.1 Below we describe how to interpret the symbols used in the block diagrams. The main block diagram describes graphically how the converter works. Each rectangular block represents one or more readwrite parameters. The rhomboid blocks represent read-only parameters. You can find other functional blocks in the diagram such as: GREATER THAN, EQUALTO, LESS THAN, logical AND/OR. For all these functional blocks, standard symbols are used. Binary parameters are represented as switches and the position in the diagram corresponds to the default value. Reduced and extended menu When the TPD is in the default status, only a limited number of parameters is displayed. These parameters are the only parameters necessary for those applications where the TPD is used as a simple converter and where the advanced functions of the converter, for example, if the TPD is used with a numeric control or with an intelligent axis board, are not used. To switch between the limited menu and the extended menu, enter b99.6: limited menu if equal to 0, extended menu is 1. The parameters in the limited menu are: Pr0 Actual speed of the motor shaft in rpm (revolutions per minute). Pr1 Offset for the main analogue reference. Pr2 Full scale of the analogue reference: this is the rpm value that corresponds to a reference voltage of 10 V. Pr8 Value of the acceleration/deceleration ramps in seconds per 1000 rpm, with a resolution of 1 millisecond. If the acceleration/deceleration ramps must be set differently, you must go to the extended menu in order to access the Pr9, Pr10 e Pr11 parameters. Pr16 Integral gain of the speed regulator. Pr17 Speed regulator damping. Pr19 Peak current supplied by the converter, expressed as a percentage of the peak drive rating. Pr29 Number of poles of the motor. Pr32 Rated speed (rpm). Pr33 Rated current supplied by the converter (which can be maintained indefinitely) expressed as rated current of the motor (A). Pr35 Instantaneous current required by the motor expressed as a percentage of the peak drive rating. Pb99 Bit parameter for the basic commands. The extended menu offers access to all the parameters, instructions of the pico-PLC and SD menu in addition to those specified above. 64 Parker Hannifin Manufacturing Srl A Pr X A • Read/write of the PrX parameter A = value of the PrX parameter B Pr X • Read/write of the PrX parameter B = value that depends on the values of A and PrX • Read-only parameter PrX indicates the value of A which can also be binary • Read/write of binary parameter The position of the switch indicates bx.y=0 A Pr X bx.y bx.y A user’s manual TPDM • The value of the binary parameter bx.y positions the switch. B • If A is less than B, C =1 (true). Otherwise, C = 0 (false). C A B C D E F A G A B C A B C + C • The value of G is the lowest value of A B C D E F. • Only if A = 1, B = 1 and C = 1. Otherwise, C = 0. • If A or B is equal to 1, C = 1. Otherwise, C = 0. • C = A – B. B • values coming from the hardware • values sent to the hardware A B A Pr X 65 • the value of A is converted to B. For example, if in the triangle symbol you see A/D, this means that the analogue value of A was converted into the digital value B. • The maximum value of A will be PrX. Parker Hannifin Manufacturing Srl user’s manual TPDM 8.1 Main parameters Legend: R: read; W: write; M: memory; K: key parameter. Par. Description Range Pr 0 Motor speed: a read-only parameter expressed in rpm; the Pr0 message is not ever displayed on the screen. Instead, the message indicating the status of the converter is displayed. Analogue reference offset. Expressed as a count of the input converter. ± 9000 [rpm] Pr 1 Pr 2 Pr 3 Pr 4 Pr 5 Pr 6 Pr 7 Pr 8 Pr 9 ± 10000 [1=~0.3 mV] ± 10000 [rpm] Def. 0 First full scale of analogue reference. If b40.0=0 and 3000 b40.12=0, the value of Pr7 will be equal to: Vin ⋅ Pr2 / 9.76 where Vin is the voltage at the analogue input. Second full scale of the analogue reference: If b40.0=0 ± 10000 3000 and b40.12=0, the value of Pr7 will be equal to: Vin ⋅ Pr2 / [rpm] 9.76 where Vin is the voltage at the analogue input. If b42.0=1, b42.1=0, and b42.5=1, Pr3 is the speed of the virtual axis. Full scale of frequency reference: If b40.12=1 and ± 32767 3000 b40.13=1, the value of Pr7 will be the following: [rpm] If b42.5=0, Pr7 = Fin ⋅ Pr4 *2 / 2000000 (frequency/sign signals) If b42.5=1, Pr7 = Fin ⋅ Pr4 *2 / 500000 (quadrature signals) where Fin is the frequency present at the encoder input: Fin=enc speed [Rpm] * enc pulses turn / 60 Internal reference: If b40.12=1 and b40.13=0, Pr7 will be ±9000 0 equal to Pr5. [rpm] Reserved speed reference (read-only). If b40.2=1, this ±9000 0 value is used as a reference for the speed regulator. The [rpm] active operating mode will write its speed request in parameter Pr6. Main reference (read-only): If b40.2=0 is used, Pr7 is the ±9000 reference for the speed regulator. In some operating modes [rpm] Pr7 can be used as a reference for other values (torque/acceleration) and in these cases Pr7 will be expressed in the most suitable unit of measurement. Acceleration ramp for positive speed: Positive speed 0.002÷ 0.002 acceleration required by the motor via the speed reference is 65.535 internally limited so that to achieve an acceleration of 1000 [s/krpm] rpm, Pr8 seconds are necessary. Deceleration ramp for positive speed: Positive speed 0.002÷ 0.002 deceleration required by the motor via the speed reference is 65.535 internally limited so that to achieve an acceleration of 1000 [s/krpm] rpm, Pr9 seconds are necessary. Type/ Note R W M W M W M W M W M R R R/W M R/W M 66 Parker Hannifin Manufacturing Srl user’s manual TPDM Par. Description Range Pr 10 Acceleration ramp for negative speed: Negative speed acceleration required by the motor via the speed reference is internally limited so that to achieve an acceleration of 1000 rpm, Pr10 seconds are necessary. Deceleration ramp for negative speed: Positive speed deceleration required by the motor via the speed reference is internally limited so that to achieve an acceleration of 1000 rpm, Pr11 seconds are necessary. Deceleration ramp for limit switch and stop functions: Deceleration required by the motor for limit switch and stop functions is internally limited so that to achieve an acceleration of 1000 rpm, Pr12 seconds are necessary. Overspeed limit: If the absolute value of the motor speed exceeds the value set in Pr13, b41.0 will be =1, Otherwise, it will be = 0. High speed limit: If b40.7=0 and if the difference of the speed of the motor and the reference is less than Pr14 and greater than Pr15, b41.1 will be = 1. Otherwise, it will be 0. If b40.7 = 1 and if the motor speed is less than Pr14 and greater than Pr15, b41.1 will be =1. Otherwise, it will be =0. Low speed limit: If b40.7=0 and if the difference of the speed of the motor and the reference is less than Pr14 and greater than Pr15, b41.1 will be =1. Otherwise, it will be =0. If b40.7=1 and if the motor speed is less than Pr14 and greater than Pr15, b41.1 will be =1. Otherwise, it will be =0. Integral gain of the speed regulator. 0.002÷ 65.535 [s/krpm] Pr 11 Pr 12 Pr 13 Pr 14 Pr 15 Pr 16 Pr 17 Pr 18 Pr 19 Pr 20 Pr 21 Pr 22 Pr 23 67 Type/ Note 0.002 R/W M Def. 0.002÷ 0.002 65.535 [s/krpm] R/W M 0.002÷ 0.002 65.535 [s/krpm] R/W M 0÷13000 [rpm] 3500 R/W M ±13000 [rpm] 20 R/W M ±13000 [rpm] -20 R/W M 0÷32767 120 R/W, M R/W M R/W M Damping of the speed regulator: If Pr16=0, Pr17 is the 0÷32767 2000 proportional gain of the speed regulator. Band width limiter: Pr18 is used to set the time constant of 1÷1000 3 a first order filter placed on the digital signal of the torque [1=128 request. The frequency of the filter cut will be: 1240/Pr18 µsec] Hertz. Peak current: This is the maximum current that the 0÷100.0 100.0 converter can supply to the motor. It is expressed as a [%Ip] percentage of the peak current of the converter. In general, it should never exceed three times the rated current of the motor. (see the appendix “switching frequency”) DC bus voltage: Displays the value of the voltage present 0÷850 on the DC bus. [Volt] Torque limiter (read-only): Can be used by the operating 0÷100 modes to limit the torque to the motor. [%Cn] Second analogue input: Represents the value of the main ±32767 analogue input. [±10V] Alarm code: This is the code for the alarm that is present. 0÷255 Code 0 represents the absence of alarms. Consult the table of alarm codes for more details. R/W M R R M R Parker Hannifin Manufacturing Srl user’s manual TPDM Par. Description Range Pr 24 Pr 25 Alarm sub code.. Software version code (read-only): Indicates the version of the software that has been installed. Serial line speed code: This is the code for programming the transmission speed. For more information, consult the section on the serial interface. Attention: the speed code is managed only by A axis for all axes. Serial line auto-address code: at the start-up, the addresses are setting in automatic.For more information, consult the relevant section. Attention: the address code is managed only by A axis for all axes. Motor shaft position (read-only): Indicates the absolute position of the motor feedback. Number of motor poles. 0÷255 0÷255 Pr 26 Pr 27 Pr 28 Pr 29 Pr 30 Pr 31 Pr 32 Pr 33 Pr 34 Pr 35 Pr 36 Pr 37 Offset of the resolver position: Used to correct electronically the mechanical position of the resolver. Operating mode: Used to select the active operating mode. The value 0 means that no operating mode has been selected. Rated speed: This is the rated speed of the motor. The speed that has been set is used to limit the speed request. Therefore, it should be set to about 10% greater than the maximum operational speed. Rated current of the motor: The rated current of the motor must be set.(see the appendix “switching frequency”) Number of poles on the resolver: must be ≤ Pr29 Torque monitor: Unit = % of the torque at peak current, resolution 0.1%. Indicates the percentage of the torque or of the current that the motor is supplying. Thermal image winding (read-only): Unit = % of the rated temperature. Indicates the estimate of the heat in the innermost coils of the motor. If this reaches the value of 100.0 % equal to the nominal value, b41.11 will become 1 and therefore the current will be limited to the nominal value. Description: if the drive generates the max current, starting from 0 current, after 2s, Pr36=100% and b41.11=1 result: the drive limits the current at the rated current. This situation remains until the drive generates “0” current and after 35s Pr36 is “0” again. Thermal image of the braking resistor (read-only): Unit = % of the rated temperature. Indicates the estimate of the heat of the braking resistor. If the value reaches 120.0 %, the converter issues an alarm. Def. Type/ Note R R 0÷9 9 R/W M 0÷31 0/1 R/W M 0÷4095 [count] 2÷64 0 ± 32767 0 0÷203 0 0÷10000 [rpm] 0 R/W K,M 0.1÷In [A] 2÷4÷8 0 R/W K,M R/W K,M R 0÷100.0 [%] R 0 R/W K,M R/W M R/W M 0÷100.0 [%Temp] R 0÷100.0 [%Temp] R 68 Parker Hannifin Manufacturing Srl Par. Pr 38 Pr 43 Pr 44 Pr 45 Pr 46 Pr 47 Pr 48 Pr49 Pr89 Pr164 Pr188 Pr189 Pr190 Pr191 Pr196 Pr197 Pr198 Pr199 69 user’s manual TPDM Description Range Def. Acc. i2t drive.I2t of the module: accumulation of all axes. 0÷100.0 Unit = % of the peak current of the module. [%] Zero encoder offset. This parameter is used to modify the 0÷4095 0 position of the output zero trace for the zero resolver (Pr28). [count] Number of pulses per revolution. This is the number of 4÷65000 1024 pulses per revolution that is used by the simulation encoder. [count] If b231.1=0 the range is from 4 to 65535 pulses per rev., if b231.1=1 the number is a exponent of base 2, the max value is 18. Main analogue input: Represents the value of the main ±32767 analogue input. [±10V] Motor resistance: The phase-phase resistance of the motor. 0.1÷300.0 0 [Ohm] Motor inductance: The phase-phase inductance of the 0.1÷500.0 0 motor. [mH] CAN bus speed code: see the section CAN bus 0÷7 1 CANopen address. see the section CANopen. Result of encoder phasing. At the end of phasing 0 0÷7 procedure, this parameter shows if the result is ok or it’s necessary to repeat the procedure according the conditions. 1÷255 100 Speed feedback filter. Analogue output pointer 1.The number indicates which 0 parameter to monitor (scope function and analog output). It comes used with to the Pr189. If the parameter pointed is Pr0, will be had in escape ±10V when Pr0=Pr32. if the parameter pointed is Pr35, will be had in escape ±10V when Pr35 is equal to the pick current. For the other parameters, the range in escape is ±2047 counts = ±10V. Therefore if the parameter to monitor necessity more counts, is necessary to attribute to Pr189 a such value to bring back the scale of reading of the parameter within the 2047 counts: 2Pr189 (see par. "analogue outputs programmable"). Analogue output scale 1. Defines the scaling of the ±2047 0 analogue output. Parameter pointer 2. The number indicates which 35 parameter to monitor (scope function only). Scale 2.Defines the scaling of the pointer 2. ±512 0 No. of FBK. Encoder pulses. Indicates the number of -32767÷ 1024 pulses per revolution (times 4 in the count) ranging from 1 +32767 to 32767, and it can be set <0 to reverse the count only with incremental encoders and not with SinCos encoders, as the latter require a correct cabling of sine-cosine signals (traces A and B). Encoder resolution. In case of encoder DSL, this 12÷20 parameter is the resolution of the encoder in bit to turn: 12 [bit] Pr196 2 = positions in a shaft turn. Feedback break threshold. Amplitude sinusoidal signals 1÷500 210 threshold (resolver and encoder). [count] [°C] Module temperature. [°C] Board temperature. Type/ Note R R/W M R/W M M K,M K,M M R R/W M R R Parker Hannifin Manufacturing Srl Par. user’s manual TPDM Description Range Pr200 N. of turn for Multiturn encoder. In the case of encoder [turn] multiturn the parameter show the maximum turn of the device. Pr201 Encoder vibration step. (see section “encoder phasing”) Pr202 Encoder CAN address. (see section “encoder CAN”) Pr203 Motor temperature pre-alarm. The user can fix the motor [count] (**) temperature to set pre-alarm flag (b232.12). [count] Pr204 Motor temperature alarm. The user can fix the motor (**) temperature to rise alarm event. Pr205 Motor temperature. Motor temperature estimate. [count] (**) Pr206 Nominal DC BUS. When the drive is supplied in [V DC] (*) continuous voltage, the power supply voltage value must be written in this parameter. This configuration is enabled at the start-up the drive. The default status of the drive is configured to 400VAC (=560V DC). For all other cases, it’s necessary to set the correct value of the voltage, and the configuration must be executed only by the first axis connected to the PSU device. To activate the new configuration, it’s necessary to save the parameter and restart the PSU unit. Pr208 Braking resistance. In “Ω”. [Not used] Pr209 Power of the braking resistance. In “W”. [Not used] Pr217 Selection (0) synchronous motor, (1) asynchronous 0÷2 motor, (2) Asynchronous motor without feedback. 0: rotative brushless motor; 1: asynchronous motor 4 poles to vectorial control with sensor; 2: Asynchronous motor V/F controlled Pr218 Base speed async. Asynchronous motor speed in [rpm] synchronism conditions. 60 × f n ω S = Pr 218 = Pr29 2 Pr219 SLIP ASYNC. Asynchronous motor slip. 0÷32767 [rpm] Pr220 MAGN CURR ASINC. Asynchronous motor magnetizing 0÷32767 current. [A] Def. 0 832 550 R/W R/W - R 560 W 40 120 0 R R R/W M 0 R/W M 0 R/W M R/W M 0 Pr 220 = Pr33 × 1 - cos 2ϕ Pn , in cui VnPr308; InPr33 η × 3 × Vn × I n Pr283 Speed FFWD gain. To enable the gain set the value 0÷2000 calculated, see the par. “feed forward speed loop”. If the value is 0, the FFWD gain is disabled. Pr284 Speed FFWD monitor. (see the par. “feed forward speed 0÷100.0 loop”) Type/ Note R Dove: cos ϕ = 0 R/W - R 70 Parker Hannifin Manufacturing Srl Par. user’s manual TPDM Description Pr285 Torque offset. To compensate the weight force. The value is referred to the peak current of the drive: 2048=100% of the drive peak current(see the par. “feed forward speed loop”) Pr286 Speed FFWD filter. Pr287 Torque monitor. (see the par. “feed forward speed loop”) Pr308 Motor voltage supply. Voltage between phases. Range Def. ±2048 0 0÷100.0 [V] 100 - Type/ Note R/W R/W R R/W M (*) see the par. “Parameters set-up” of the PSU manual. (**) Thermal sensor alarm: Example: type PTC KTY 84-130 standard DSL standard DSL b42.15 b42.14 0 0 0 0 0 1 0 1 Pre-alarm Pr203 689[count] 499[Ω] 120[°C] 120[°C] Alarm Pr204 455[count] 1270[Ω] 130[°C] 130[°C] Motor temp. Pr205 [count] [Ω] [°C] [°C] 8.2 Binary parameters Par. Description b39.2 b39.5 (1) if feedback supply is active. Motor speed. (1) Motor speed calculated every 6.144ms – (0) Motor speed calculated every 49.152ms (1) Enable CAN scope. (1) Encoder zero point fine tuning. (1) Enable the simulated encoder. (1) simulated encoder is enabled. In multi-axis configuration, only one axis can be set to 1 (see “frequency inputs/outputs”). CANopen: send user fault. User alarm message. CANopen Node Guard watchdog. (see par. “CANopen”). Watchdog encoder CAN (1024 µs). Selection of the first or second full scale of the speed reference: If = 0, Pr2 will be used to rate the analogue reference. If = 1, parameter Pr3 will be used. Activation of the algorithm to suppress vibration at 0 speed: If = 1, the algorithm is turned on. Selection of the reserved/user reference: If = 1, the reserved reference of the operating mode in use is used. If = 0, the reference selected by b40.0, b40.12 and b40.13 is used. b39.8 b39.9 b39.10 b39.13 b39.14 b39.15 b40.0 b40.1 b40.2 71 Def. 1 0 0 0 0 Type/ Note R W R W W R/W R/W R/W M R/W M R/W M Parker Hannifin Manufacturing Srl user’s manual TPDM Par. Description Def. b40.3 Reference hold: If = 1, the reference will not be updated and the motor will not follow the variations of the input reference. If = 0, the reference will follow the variation of the input reference. Left limit switch: If = 1 and the reference selected requires positive speed, the reference is set to 0 following the ramp set in Pr12. If = 0, no control is made. Right limit switch: Default=0. If = 1 and the reference selected requires negative speed, the reference is set to 0 following the ramp set in Pr12. If = 0, no control is made. Stop function: If = 1, the motor is set to zero speed following the ramp set in Pr12. Selection of the absolute/relative speed window: If = 0, the speed window Pr14 Pr15 b41.1 will function in relative mode. Otherwise, if = 1, it will function in absolute mode. Software enable. If = 0, the converter cannot be enabled. 0 b40.4 b40.5 b40.6 b40.7 b40.9 b40.11 Injection of third harmonic in modulation. b40.12 Selection of the digital/analogue reference: If = 0, the analogue input will be selected as the main reference. If = 1, the reference will be digital and b40.13 can be used to select parameter Pr4 or parameter Pr5. b40.13 Selector of internal reference Pr5 or frequency reference Pr4: If b40.12 = 1, b40.13 can be used to make the selection. If = 0, the internal reference can be used. If = 1, the frequency input (encoderin) which can be configured as frequency/direction or as a quadrature signal by using b42.5. b40.15 Reserved. b41.0 Overspeed. When the absolute value of the motor speed exceeds the value set in Pr13, b41.0 = 1. Otherwise, b41.0 = 0. b41.1 In speed. If b40.7 = 0 and if the difference in speed between the motor and the reference is less than Pr14 and greater than Pr15, b41.1 = 1. Otherwise, = 0. If b40.7=1 and if the motor speed is less than Pr14 and greater than Pr15, b41.1 =1. Otherwise, = 0. b41.2 Zero speed. If the motor speed (Pr0) = 0, b41.2=1. Otherwise, b41.2 = 0. b41.3 Forward. If the motor speed (Pr0) is positive, b41.3 = 0. Otherwise, b41.3 = 1. b41.4 Converter O.K. If = 1, there is no alarm. Otherwise, = 0. b41.5 Status of hardware enable. When hardware enable is present, = 1 (by pico-PLC, via serial line or CAN bus). b41.6 Phasing result :=1 if positive result. (0) phasing not performed. b41.7 External alarm. An alarm that can be used by the user. b41.8 Auxiliary alarm. A second alarm that can be used by the user. b41.9 CAN1 bus watchdog. This bit is set to 1 at every block sync reception via CAN. b41.10 Saturation of the speed regulator: b41.10=1 when the speed regulator is supplying the maximum current. b41.11 I2T active. Indicates that Pr36 has reached the 100.0 % value and therefore the converter is limiting the current to the nominal value. b41.12 Converter enabled. Type/ Note R/W M 0 R/W M 0 R/W M 0 R/W M R/W M 0 1 n.a. 0 0 R/W M W R/W M R/W M 0 R R R R 0 0 0 R R/W R R/W R/W R R R R 72 Parker Hannifin Manufacturing Srl Par. user’s manual TPDM Description b41.13 CAN1 bus warning. Indicates a momentary communication error on the CAN. b41.14 CAN1 bus off error. Indicates a permanent communication error on the CAN. b41.15 CAN1 bus watchdog. This bit is set to 1 at every sync (0 or 1) reception via CAN. b42.0 Virtual encoder enabled: 1= function enabled. See the section, Other useful functions.. b42.1 Encoder CAN. See par. “Encoder CAN”. b42.2 Torque control. If set to 1, the main analogue reference is assumed as the reference for the torque control (torque servo controlled mode). b42.3 Reinitializing the serial line and the CAN. Command to initialize serial communication whenever the speed value of the serial line (Pr26) has been modified. Command to initialize the CAN bus whenever the address or the function mode has been modified. The serial line and the CAN are in any case initialize when the converter is powered on. b42.4 IN2/IN3 frequency input If it is 1, the frequency input is programmed to receive two phases in quadrature. If it is 0, it is enabled to receive a frequency/direction input. b42.5 Encoder frequency input If it is 1, the frequency input is programmed to receive two phases in quadrature. If it is 0, it is enabled to receive a frequency/direction input. b42.6 Selection the type of feedback. Is possible choose between b42.7 resolver and encoder. (see the par. “setting feedback”) b42.8 b42.9 b42.11 Enable scope function via serial line. b42.12 ASCI signature on ASC0 command. b42.14 Motor thermal sensor selection. (0) PTC standard SBC: b42.15 (1)KTY 84-130 – (2) and (3) reserved. See the parameters Pr203 and Pr204. b94.1 Command to set the main reference offset to 0. This command is used to automatically set the Pr1 parameter in order to automatically set the voltage offset on the main analogue reference to 0. This operation can be done only if the absolute value of the offset is less than 200 mV. b94.2 Command phasing 1 b94.3 Basic parameters key lock. If set to 1, it is possible to modify the basic parameters. b94.4 Command phasing 2 b94.8 Value comparator. See the section, Basic functions. b94.9 Value comparator. See the section, Basic functions. b94.10 Value comparator. See the section, Basic functions. b94.11 Value comparator. See the section, Basic functions. b99.4 (1) disable power resistance alarm. b99.5 (1) Enable transmission CANopen blocks. 73 0 Type/ Note R 0 R 0 W 0 W 0 0 W W 0 W 1 W 1 W Def. M 0 0 0 W W W 0 R/W 0 W 0 W 0 0 0 W W W W W Parker Hannifin Manufacturing Srl user’s manual TPDM Par. Description Def. b99.6 Extended menu enable: If set to 1, the extended menu is enabled. Attention: this function is managed only by A axis for all axes. Safety: If set to 1, parameters cannot be modified. Motor phase saved on absolute encoder (EnDat interface). Command to reset alarms. This command sets Pr23 and Pr24 to 0. If the alarm continues, it is displayed on the screen. This command cannot be used if there is a check-sum error (Pr23 = 10, 11). In this case, it is necessary to set the default parameters (b99.12) and then reset the alarm. Default values of the parameters in operating mode. This command sets the operating mode parameters to the default values. The command is executed only if b40.2 = 0. Default values. This command sets all parameters to the default values and sets those used by the operating mode to 0. Furthermore, it sets the pico-PLC program as described in Appendix . There is a check-sum alarm, Pr23 and Pr24 will be set to 0, thereby permitting the alarm to be reset. The command is executed only if b99.13 = 0. pico-PLC. (1) pico-PLC enabled. Storing of the pico-PLC instructions. This command saves the pico-PLC program. It cannot be used if a check-sum alarm has been indicated. In this case, it is necessary to set the default parameters, reset the alarm and then store the new parameters. Storing of parameters. This command stores all parameters. It cannot be used if a check-sum alarm has been indicated. In this case, it is necessary to set the default parameters, reset the alarm and then store the new parameters. Encoder Input max frequency. (0) no filter, max frequency 5MHz. (1÷15) filter, max frequency: 2500÷321.5 kHz. 0 b99.7 b99.9 b99.10 b99.11 b99.12 b99.13 b99.14 b99.15 b166.4 b166.5 b166.6 b166.7 b166.8 b166.9 b166.10 b166.11 b166.12 b166.13 b166.14 b166.15 b230.0 Encoder Feedback max frequency. (0) no filter, max frequency 5MHz. (1÷15) filter, max frequency: 2500÷321.5 kHz. Encoder X19 max frequency. (0) no filter, max frequency 5MHz. (1÷15) filter, max frequency: 2500÷321.5 kHz. Resolution sec/msec of acceleration/deceleration ramps.(1)0.1 s/krpm: Pr8=000,2 sec/krpm (Pr9, Pr10 and Pr11); (0)0,001 s/krpm: Pr8=0,002 sec/krpm (Pr9, Pr10 and Pr11) b230.1 Digital IN: (0) standard – (1) in common. If b230.1=0 the parameter Pb90 is standard. If b230.1=1 the digital inputs are in common only for the axis enabled. b230.2 I2t on Pr38. (0) acc. I2t drive. b230.3 (1) pre alarm PSU brake chopper load. 0 Type/ Note W 0 W W W 0 W 0 W 1 0 W/M W 0 W 0 0 0 0 0 0 0 0 0 0 0 0 0 W W W W W W W W W W W W W 0 W 0 0 W R 74 Parker Hannifin Manufacturing Srl user’s manual TPDM Par. Description Def. b230.4 b230.5 b230.6 b230.7 b230.8 b230.9 b230.10 (1) pre alarm PSU rectifier load. (1) pre alarm PSU temperature. (1) disable RS485 auto addressing. (1) disable CAN auto addressing. (1) pre alarm module-temperature. (1) pre alarm board-temperature. Pico-PLC: (0) single axis; (1) all pico-PLC in one, pico-PLC common [only multi axes]. Parameters monitor: Pr160 = pointer, Pr162 = value, Pr163 = value STO1mon STO2mon Motor parameters calculation command. By this command, after changed the motor parameters, (1) EtherCAT parameters on Pr80… Set encoder pulses as exponent on base 2. Decides the value of Pr44 Multiturn feedback read. (1) Recognize a multiturn encoder. IEC 61131 automatic memory extension. (1) the pico-PLC is disabled (b99.13=0), the all instructions of the pico-PLC (512 byte) are used as automatic variables for the IEC 61131 programming language. Caught motor FBK: (0) = IN1; (1) = FBK C. Time out pico-PLC. Select supply voltage of feedback. (see the par. Select supply voltage). Attention: this function is managed only by A axis for all axes. (1) encoder CAN via EtherCAT. PWM motor control switching frequency. There are three possibility (see the appendix “switching frequency”). 0 0 0 0 0 0 n.a. Type/ Note R R W W R R W 0 W b230.11 b230.12 b230.13 b230.15 b231.0 b231.1 b231.2 b231.3 b231.4 b231.5 b231.6 b231.7 b231.8 b231.9 b231.11 b231.10 b231.12 b231.14 b231.15 75 Attention: the configuration is realized only on A axis, for all axes. (1) enable profiles on TAB0. Enable profile on Tab0. PTC motor pre-alarm (1). This pre-alarm allows to stop the machine before (around 125°C – 257°F) reaching the alarm limit (around 135°C – 275°F). Enable scope via COM. (1) Start. (0) Stop Enable IEC 61131. (1) Start. (0) Stop R R 0 W 0 0 R W 0 0 W R W 0 0 R W 0 0 W R 0 0 W W Parker Hannifin Manufacturing Srl user’s manual TPDM 76 Parker Hannifin Manufacturing Srl user’s manual TPDM 9 Operating modes Parameter Pr31 (default = 0) is used to select the operating mode. Every operating mode controls speed using parameter Pr6 and can use parameter PR21 to limit the torque at the motor (see the block diagram). Speed control will use as reference Pr7 or Pr6, depending on the value of b40.2. Before changing Pr31, b40.2 must be set to 0 in order to avoid unwanted movements of the motor. Therefore, it is possible to set Pr31 to the value that corresponds to the selected operating mode. The parameter b99.11 is used to load the default parameters for the selected operating mode. By setting b40.2 to 1, the operating mode will be turned on. All operating modes need to control the motor in position (11, 13, 14, 15) by using the position loop described in the diagram in the figure. 77 Parker Hannifin Manufacturing Srl user’s manual TPDM 9.1 Position control All operating modes need to control the motor in position by using the position loop described in the block diagram shown in the figure below. Pr106 Reference speed feedforward Feedforward scale b70.7 b70.6 Window of position error Pr55 Servo error Servo window 1 b70.4 Pr56 Servo error d dt Servo window 2 b70.5 abs() Pr51 Position error Pr6 Pr57 Pr61:60 Reference position Pr65:64 Proportional gain for the positioner regulator Speed reference Caugth position Position offset Pr50 Max speed Motor quota caugth b70.15 Quota caugth Pr69:68 Feedback Motor feedback Digital input 1 b70.1 encoder Motor position Pr63:62 Master reference Master speed Pr54 encoder b70.14 Reference multiplier encoder IN Encoder input b42.5 Pr52 Pr53 Counter encoder IN Reference CAN divider b180.14 Quota caugth Pr59:58 b70.9 Master speed reference CAN multiplier Pr154 Pr155 d dt Pr67:66 Reference divider encoder IN Encoder CAN input Master quota caugth b70.0 Digital input 0 Pr159 Pr157:156 Counter CAN input Zero encoder d dt b70.13 Master reference (operative mode) Reference Fre/dir multiplier IN2/IN3 Freq/Dir Quadra. b42.4 Pr212 Pr213 Reference Fre/dir divider Freq/dir – Quadrature Pr215:214 d dt counter Fre/dir Pr216 Master speed 78 Parker Hannifin Manufacturing Srl Par. Pr50 Pr51 Pr52 Pr53 Pr54 Pr55 Pr56 Pr57 Pr58:59 Pr60:61 Pr62:63 Pr68:69 Pr96:95 Pr98:97 Pr288 user’s manual TPDM Description Maximum speed. This parameter limits the maximum speed of the motor. It can be useful to limit the speed during a sudden link or during a quick change of speed. Position error. Reference multiplier. Using this parameter and Pr53, the user can set the ratio desired for the input reference frequency Reference divider. Using this parameter and Pr52, the user can set the ratio desired for the input reference frequency. Encoder-in rotation speed (read-only). Indicates the input reference frequency translated into rpm (based on 4096 imp/revolution).. Window for servo-error 1. If the position error as an absolute value exceeds the value set in Pr55, b70.4 is set to 1. Otherwise, b 70.4 = 0. Window for servo-error 2. If the position error as an absolute value exceeds the value set in Pr56, b70.5 is set to 1. Otherwise, b 70.5 = 0. Proportional gain for the position regulator. Quota captured. The value Pr66:67 is captured on the positive edge of the selected input (see b70.0). Regulator position reference. Motor position (fbk). If incremented by 4096 steps per revolution. Value captured. Value of the position of the motor captured on the positive edge of the input (IN0). Deposit of value comparator (b94.8). Deposit of value comparator (b94.9). Position loop resolution selection. Only for OPM202 and OPM203 (see the relative chapter). field/Unit 0÷9000 [rpm] -32768÷ +32767 [count] ±32000 0 R/W M 1 R/W M ±32000 [rpm] 1 R/W M [rpm] 0 R [count] 1000 R/W M [count] 100 R/W M 0 ÷ 32000 100 R/W M [count] 0 [count] [count] 0 0 R R [count] 0 R [count] [count] 1 1 12÷20 12 Par. Description b70.0 Encoder in capture. If = 0, the capture of the value encoder master is made from input 0. Otherwise, it is made by the input of the zero trace encoder. Feedback. If = 0, feedback is done by the resolver. If = 1, feedback is done by the encoder. In this last case, the parameters Pr52 and Pr53 serve to rate the pulses per revolution at 4096. Feedback direction. If = 1, the rotation of the motor is inverted (only main feedback). b70.1 b70.2 79 Def. Type /Note 3000 R/W M R/W M W Def. Type /Note 0 W 0 W 0 W Parker Hannifin Manufacturing Srl Par. b70.3 b70.4 b70.5 b70.6 b70.7 b70.12 b70.14 b70.15 b180.14 user’s manual TPDM Description Def. Type /Note W Output programmable on module (out1). Servo error. b70.4 will be set to 1 if the position error as an 0 R absolute value exceeds the value set in Pr55. Servo error. b70.5 will be set to 1 if the position error as an 0 R absolute value exceeds the value set in Pr56. Feed-forward enable. If set to 1, the feed-forward on the position 0(*) W regulator is enabled Pr106. Feed forward scale enable. If b70.6=1, is possible enable the feed 0 W forward scale. (1) enable Pr152 on emgy message. Command in CANopen, it 0 W generates an user message with value in Pr153:152. Automatic reset when the message is sent. Value master captured. If set to 1, this means that the value 0 R/W master has been captured. The user must set the bit to 1 (no auto reset). Value motor captured. If set to 1, this means that the value motor 0 R/W has been captured. The user must set the bit to 1. Master/Motor reference captured.(0) from master reference, (1) 0 R/W from motor position. The value captured is in Pr59:58. (*) [1] in OPM 14,[0] in the other cases. 80 Parker Hannifin Manufacturing Srl user’s manual TPDM 9.2 Torque control (operating mode 1) This operating mode does not control the torque in the classic way since the speed control continues to work to control the speed limit. The torque reference will be the Pr7 main reference. To set up the torque control, you must first adjust the speed control in order to establish a stable system and then set Pr31 = 1 in order to program the operating mode by setting the default values with the command b99.11. Set Pr2 = 1000 (10 V = 100.0 % of the torque), b40.0 = 0, b40.12 = 0, b40.2 = 1 to enable the reserved reference and Pr100 to limit the maximum speed of the motor. OPERATING MODE 1 PARAMETERS Par. Description Field/Unit Def. Pr100 Maximum speed. This parameter is used to limit the absolute maximum speed of the motor during the torque function. 0… 9000 [rpm] 3000 1 Pr 100 m ax speed Pr 6 -1 reserved reference Pr 7 m ain ref 1 Pr 21 -1 81 reserved current Type /Note R/W M Parker Hannifin Manufacturing Srl user’s manual TPDM 9.3 Digital Lock + Positioner (operating mode 13) Operating mode 13 includes the Digital Lock, dynamic positioner and flow speed functions in order to use them at the same time. The tracking function refers to the input frequency signal (X19 connector) set as an input encoder signal by setting b42.0 = 0 and b42.5 = 1. This encoder signal is counted at every end of the communication of A and B signals. The counter of the motor position is incremented at the rate of 4096 steps per revolution. The user can program the ratio between the master and the slave by using parameters Pr52 and Pr53. It is possible to choose the ramp to use during the engaging or release phase (Pr103). See the connection diagrams in the section, Input frequency connection. If you use a digital input for the engaging command, the digital input 0 in FAST-IN mode must be used in order to minimize phase errors. The positioner function follows a trapezoidal profile in which the acceleration and deceleration ramps are defined by Pr109 and by Pr107 (if b231.13=1), the full speed by Pr108 and the final position by Pr118:119 (one revolution of the motor equals 4096 steps). The parameters can be modified at any time. The current position of the positioner is given by the parameter Pr116:117. You can add a speed by using Pr104. 9.3.1 TAB0: profiles in memory In OPM13 is possible use the TAB0 to memory up to 51 trapezoidal profiles, and for everyone is possible memorize the speed, the acceleration/deceleration ramp and the final position in double word. The Pr193 parameter contains the number of the profile to execute, with b231.10=1 bit the function is able to transfer the block of 4 variables of profile in the positioner variables. TAB0 1a word – speed – Pr108 TAB0 2a word – acc/ dec ramp – Pr109 TAB0 2a word – dec ramp – Pr107 TAB0 4a e 5aword – final position – Pr118:119 With the qualified function, b231.10=1, is possible execute automatically another profile, simply setting up in the pointer parameter, Pr193, another value. Every scansion, the parameters are transferred from the table to the positioner variables, if the function is able, b231.10=1. In order to insert the values in variables of TAB0, using the “configuration” tool it is necessary open the “monitor” window, where it is possible to access from Pr2048 to Pr2302 parameter, where there are the variables of the 51 trapezoidal profiles, and it possible read and modify them. To insert the values via keypad, it necessary OPM14 or OPM11, and use the parameters Pr103 and Pr104 (see the paragraph “Automatic activation of CAM tables”). It is necessary save the parameters for guarantee the memory of the profiles inserted. 82 Parker Hannifin Manufacturing Srl Pointer to table Pr193 0 1 49 50 user’s manual TPDM b231.10=1 TAB0 activation by profiles TAB0 point Positioner variables Speed 0 Pr108 Accel/Decel. ramp. 1 Pr109 Decel. Ramp (b231.13=1) 2 Pr107 3 Pr118 Final position 4 Pr119 Speed 5 Pr108 Accel/Decel. ramp. 6 Pr109 Decel. Ramp (b231.13=1) 7 Pr107 8 Pr118 Final position 9 Pr119 245 246 247 248 249 250 251 252 253 254 Pr108 Pr109 Pr107 Pr118 Pr119 Pr108 Pr109 Pr107 Pr118 Pr119 Speed Accel/Decel. ramp. Decel. Ramp (b231.13=1) Final position Speed Accel/Decel. ramp. Decel. Ramp (b231.13=1) Final position OPERATING MODE 13 PARAMETERS Par. Pr103 Pr104 Pr107 Pr108 83 Description Field Range Def. Res. Acceleration and deceleration ramp (el. R/W 0÷ 0.500 1 ms Axis). The acceleration and deceleration 30000 required for the motor can be limited in order to [s/Krpm] achieve a jump of 1000 rpm that takes Pr103 thousandths of a second. This can be useful when the axis is suddenly attached. Addition speed. R/W 0 1 ±6000 Deceleration ramp (positioner). This is R/W 0.002÷ 0.5 1 ms enabled if the bit b231.13=1 (rel. softw. ≥6). It’s 30000 the deceleration ramp of the position profile. [s/Krpm] Full speed (positioner). This is the full speed R/W 0÷9000 1000 1 that will be used during the generation of the position profile. Parker Hannifin Manufacturing Srl user’s manual TPDM Par. Pr109 Description Field Range Acceleration ramp (positioner). This is the R/W 0.002÷ acceleration ramp that will be used during the 30000 positioning profile. If b231.13=0, this parameter [s/Krpm] defines the acceleration and deceleration ramps of the position profile. Pr114:115 Actual position (electrical shaft). Read-only R [count] parameter. Indicates the actual position with reference to the electrical shaft. Pr116:117 Actual position (positioner). Read-only R [count] parameter. Indicates the actual position with reference to the trapezoidal profile. Pr118:119 Final position (positioner). Used to set the R/W [count] final position that is desired for the generator of the trapezoidal profile, based on 4096 steps per revolution. Pr193 Profile selection from Tab.0. R/W Par. b150.0 b150.2 b150.3 b150.4 b150.6 b150.8 b150.10 b150.11 b150.13 b231.10 b231.13 Description Active positioner. During the positioning (Pr118:119 ≠ Pr116:117) this bit is high. Engaged electrical shaft. During the engaging phase when the ramp (Pr103) is not 0, this bit indicates the end of the transitory phase. Encoder in selection. If 0, the encoder input, conditioned by Pr52 and Pr53, is used as the master for the electrical axis function. If 1, it updates directly Pr118:119 to execute the step like function or pulses train. Profile direction. Read-only flag. Indicates the direction of the motion of the positioner.. Profile feed-forward. If 1 the profile feed-forward is disabled. El. Axis engaging/release. This bit it used to engage (= 1) and release (= 0) the axis from the input encoder reference. Type 1 reset. Command to set all the motor position and reference to 0. Type 2 reset. Command that sets the position of the motor shaft (Pr62:63) to the main reference (Pr60:61) and of the positioner (Pr116:117) by setting that of the electrical shaft to 0. Final position evaluation enable/disable (Pr118:119). If 0, eventual modifications to Pr118:119 will not be considered. Tab0 enable profile. Enable Pr107. (1) the parameter Pr107 is enabled as deceleration ramp, and Pr109 defines only the acceleration ramp of the position profile. Def. Res. 0.5 1 ms 1 1 1 0 1 Field R/W M R/W M Def. 0 R/W M 0 R M R/W M R/W M R/W 0 R/W 0 R/W M R/W R/W 1 0 0 0 0 0 0 84 Parker Hannifin Manufacturing Srl OPM13 85 user’s manual TPDM Parker Hannifin Manufacturing Srl user’s manual TPDM 9.4 Electronic cam (operating mode 14) Operating mode 14 is expressly designed to meet the needs of packaging machines that require electronic cams. This program is in the drive’s basic configuration and it can be programmed by selecting Pr31=14 and b99.11=1, parameters to select the operating mode and to select default parameters of operating mode. By setting b40.2 to 1, the OPM14 will be turned on, and using opportunely the mode selector Pr102, is possible select the source for the position loop. The possible sources are: Mode selector Pr102 NO source positioning 0 1 Reference position CAM1 Speed mode 2 3 In OPM14, counters for the position loop are visualized to module (Pr60:61; Pr62:63), and the value of the module is set on the parameter Pr114:115. 9.4.1 Positioning This is a trapezoidal profile generator, with the following user-definable parameters: • speed profile • acceleration and deceleration ramp • final value in motor step The parameter referred to the final position is absolute. The difference between the final position (Pr119:118) and the reference position (Pr60:61), generates the direction of the movement. The generator of the profile begins when the Pr102 is equal to 1, and when reached the position, the mode selector is automatically set to zero. Alternatively with the bit b150.3=1 (and Pr102=2), the quota written in the final position comes added algebraically with the reference of the master in the CAM1 generator. When the profile is finished, the bit b150.3 is automatically set to zero; it can be activated again if another quota is loaded in the final position (Pr119:118). 86 Parker Hannifin Manufacturing Srl 9.4.2 user’s manual TPDM Speed mode It actives with Pr102=3 and the parameters are Pr100, speed, and Pr101, acceleration and deceleration ramp. 9.4.3 Electronic cam Four tables are available, namely TAB0, TAB1, TAB2 and TAB3, that have been implemented to perform a series of cam functions. Each table is described by a vector made of 257 elements, that indicate the position to be taken by the controlled axis when the motor axis is in the position: Master position = element number • master modul 256 In each table the value of the vector elements is ranging between 0 and 9999, whereas 10,000 shall be the count number set in the slave module parameter. In order to generate a table, the axis route must be divided into 257 points; the value of each point will have to be rated to 10000, because this is the maximum value that can be written in the table elements. The 257th element of each table defines the cam as closed if it is = 0, or as open if it is = 10,000. The block diagram highlights that the OPM14 has only one cam generator, and is possible select one of four tables (Tab0, Tab1, Tab2 e Tab3). As a default OPM14, TAB0 is active. Some functions in which execute automatic loading of the tables are predefined, and in addition there are the commands who allow the activation of the other tables in the cam generator. The user can generate the function for every table through points construction (variable TAB); or through the motion laws predetermined in the drive in one of the four tables. Following comes illustrated like recalling the functions: Predetermined function Table y=x-senx y=x Pr102=5 Pr102=6 function y=x function y=x-senx profilo triangolare y=senx Pr102=7 Pr102=8 function y=senx 87 Triangular profile of speed Tab0 Parker Hannifin Manufacturing Srl user’s manual TPDM rampa aggancio Pr102=9 Tab1 Engage ramp rampa sgancio Pr102=10 Tab2 Disengage ramp y=x-senx profilo triangolare Pr102=11 Tab3 Pr102=12 Triangular profile of speed function y=x-senx Pr102=14 Adaptation module of CAM1 through Pr176:177 and Pr178:179 CAM1 Pr102 can be setting through serial line, CAN or pico-PLC internal to the drive. It’s not possible set this parameter using the display. The activation of the table in the cam generator, can be given by direct command that executes immediately the selected table, or defining one phase of the master and determining the activation point. It is to cure of the customer the synchronization of the functions during the passages between the tables. As a OPM14 default configuration, the CAM1 is scanned through the master module, using Adaptation module command (Pr102=14) the function is scanned in one sector of master module. The selected cam can be scaled in a sector of the master module by programming the starting point Pr177:176 and the space Pr179:178 in which the cam shall be executed. The parameter values “starting point” and “space” must be included between 0 and master module in Pr111:110. 88 Parker Hannifin Manufacturing Srl user’s manual TPDM b150.12 and b150.13 command the engage and the disengage in correspondence of the master phases written in Pr127:126 and in Pr 129:128, they are always referred to master module of CAM1. If adaptation module is used, the engage/disengage phase is always referred to master module. By setting the function (b150.8) the user can define the position of the master (Pr122:123) on the positive side of digital input 0 or of the zero trace encoder input (selector b70.0); b70.14 shows that the initialize has been achieved. The user must set this flag to 0. The scanning of Tab3 table can be substituted with a scanning of a virtual table, if setting b181.8=1. All points in Tab3 table have the value decided in Pr105. After the execution of the commands, the bits are automatically set to zero. All parameters that are not declared are reserved and must not be used. OPM14 parameters Par. Pr100 Pr101 Pr102 Pr103 Pr104 Pr105 Pr106 Pr108 Pr109 Pr110:111 Pr112:113 Pr114:115 Pr116:117 Pr118:119 89 Description Speed in speed mode. Field Range Def. Res. W ±6000 0 1 rpm Ramp time for Pr100. This is the acceleration ramp W 0.002÷ 0.500 1 that will be used by the speed mode. 30.000 ms s/krpm Function selector. Enables the functioning as: a W 0÷3 0 1 halted motor, positioning, electronic cam and speed. Pointer to the cam table. Pr103 is used to access the W 0÷1756 257 1 cam table. Pr104 will contain the value of the Pr103th element in the table. Table element value. Pr104 is the value of the R 0÷ 0 1 Pr103th element in the table. 10000 Virtual table value (b181.8) – Engage and W 1 disengage space in degree. Feedforward scale W 1 Full speed (positioner). This is the full speed that W 0÷9000 1000 1 will be used during the generation of the position rpm profile. Acceleration time (positioner). This is the W 0.002÷ 0.500 1 acceleration ramp that will be used during the 30000 ms positioning profile. s/krpm Master axis module. This is the value of the master W 0÷218 10000 1 axis module. Master axis position. This is the present position of R 1 the master axis. Slave axis module. This is the value of the slave axis W 0÷218 10000 1 module. Master position offset. W 0÷223 0 1 Final position (positioner). The parameter used to W 1 set the final position desired for the generator of the trapezoidal profile, based on 4096 steps per revolution. Parker Hannifin Manufacturing Srl user’s manual TPDM Par. Description Field Range Pr120:121 Master position. R Pr122:123 Master axis phase. If b150.8 = 1 at the first positive W 0÷223 front of digital input 0 or of the zero encoder input (see the block diagram), the position of the master axis become Pr122:123. Pr124:125 Master axis phase captured. At each positive front W 0÷223 of digital input 0 or of the zero encoder input (see the block diagram), the position of the master axis is copied into in Pr124:125. Pr126:127 Master axis phase for engaging. If b150.12 = 1, W 0÷223 when the position of the master Pr112:113 exceeds Pr126:127, Pr102 is brought to position 2 and b150.12 returns to 0 to indicate that engaging has been achieved. Pr128:129 Master axis phase for release. If b150.13=1, when W 0÷223 the position of the master Pr112:113 exceeds Pr128:129, Pr102 is brought to position 1 and b150.13 returns to 0 to indicate that the positioner has been enabled and will control the release phase. Pr132:133 Engage cam with ramp. This is the position on W 0÷223 which the engage ramp related to the master starts. Pr134:135 Slave cam position. Read only parameter, depends R 0÷223 of Pr102, that shows the position at the output of the cam. Pr136:137 Engage cam ramp. This is the step value performed W 1÷215 by the slave during the engage ramp; the value must be less then an half of the slave axis module. Pr154 Multiplicative factor of reference ENCODER W CAN. Pr155 Divisor factor of reference ENCODER CAN. W Pr157:156 ENCODER CAN input counter. W ±231 Pr158 ENCODER CAN pointer (b70.10). W Pr169:168 Master phase for engaging of Tab.0 (b180.0). W ±231 Pr171:170 Master phase for engaging of Tab.1 (b180.1). W ±231 Pr173:172 Master phase for engaging of Tab.2(b180.2). W ±231 Pr175:174 Master phase for engaging of Tab.3 (b180.3). W ±231 Pr177:176 Engage point inside to the master module of the W ±231 CAM. Pr179:178 Space in count of master module where the CAM W ±231 is executed. Pr185:184 Change of the value slave axis module in phase. W ±231 Variation of slave module, and with b181.12 slave module value is changed immediately. Def. Res. 1 0 1 0 1 0 1 0 1 0 1 - 1 0 1 1 1 1 - 1 1 1 1 1 1 1 1 1 1 90 Parker Hannifin Manufacturing Srl user’s manual TPDM Binary parameters Par. Description Field Def. b150.2 Position loop. If = 1 the position loop works on absolute positions, W 0 otherwise on slave axis module. b150.3 Master phase-shift command. If = 1, the positioner module is used to W 0 change the phase between the master and the slave or as the generator of the virtual axis. When the final position Pr118:119 equals Pr116:117, this bit is automatically set to 0. Do not use this command together with Pr102=1. b150.6 Encoder input enable (X19). If = 1, the reading of the encoder master W 1 is enabled. b150.8 Phase master axis enable. If = 1, the copying of parameter Pr122:123 W 0 to Pr112:113 to the first front of the rise of input 0 or the zero encoder is enabled. b150.10 Type 1 reset. Command to set all the motor positions and references to W 0. b150.11 Cam engaging in phase with ramp. Command to engage the cam W 0 movement when the master reaches the level of Pr126:127 with a ramp defined by the parameters Pr132:133 and Pr136:137. b150.12 Electronic cam engaging in phase. Command to engage the cam W 0 movement when the master reaches the level of Pr126:127. This bit is automatically set to 0 when the command has been enabled. b150.13 Electronic cam release in phase. Command to release the cam W 0 movement when the master reaches the level of Pr128:129. This bit is automatically set to 0 when the command has been enabled. b150.14 Immediate electronic cam engaging. Command to engage the cam W 0 movement. This bit is automatically set to 0 when the command has been enabled. b150.15 Immediate electronic cam release. Command to release the cam W 0 movement This bit is automatically set to 0 when the command has been enabled. b180.0 Start Tab0 on master phase of Pr168:169. =1 activates the Tab0 table W 0 to the specified phase master in Pr168:169. The values of the parameters for the activation on specific phase must be comprised between 0 and the written module master in Pr110:111. b180.1 Start Tab1 on master phase of Pr170:171. =1 activates the Tab1 table W 0 to the specified phase master in Pr170:171. The values of the parameters for the activation on specific phase must be comprised between 0 and the written module master in Pr110:111. b180.2 Start Tab2 on master phase of Pr172:173. =1 activates the Tab2 table W 0 to the specified phase master in Pr172:173. The values of the parameters for the activation on specific phase must be comprised between 0 and the written module master in Pr110:111. b180.3 Start Tab3 on master phase of Pr174:175. =1 activates the Tab3 table W 0 to the specified phase master in Pr174:175. The values of the parameters for the activation on specific phase must be comprised between 0 and the written module master in Pr110:111. b180.4 Start Tab.0. Immediate activation of Tab0. Show table activate in W 0 CAM1 generator. b180.5 Start Tab.1. Immediate activation of Tab1. Show table activate in W 0 CAM1 generator. 91 Parker Hannifin Manufacturing Srl user’s manual TPDM Par. Description Field Def. b180.6 Start Tab.2. Immediate activation of Tab2. Show table activate in W 0 CAM1 generator. b180.7 Start Tab.3. Immediate activation of Tab3. Show table activate in W 0 CAM1 generator. b180.14 (0)Caught quota master frequency input (1) Caught quota Motor W N.a. position-Storage in Pr58:59 b181.0 Enabled Tab.0 in the Cam. =1 Tab0 activates. R 0 b181.1 Enabled Tab.1 in the Cam. =1 Tab0 activates. R 0 b181.2 Enabled Tab.2 in the Cam. =1 Tab0 activates. R 0 b181.3 Enabled Tab.3 in the Cam. =1 Tab0 activates. R 0 b181.8 Enable virtual table (Tab.3) with value in Pr105. W 0 b181.12 Activation change value of the slave module in phase. W 0 92 Parker Hannifin Manufacturing Srl user’s manual TPDM OPM14 93 Parker Hannifin Manufacturing Srl 9.4.4 user’s manual TPDM OPM 14 Linear engage CAM With OPM14 exists the possibility to program a linear engage cam on master module. It’s necessary to define the space to use of the module master in which executing the engage cam of the slave. Program the Pr132:133 parameter like start point and the Pr126:127 parameter like final point; setting the bit b150.11 reserves the start of the slave in the start point of the module master programmed. It is necessary that in this point the value of Pr134:135 is equal to the position caught from the slave to end of the ramp, that is to start of the ramp the slave must be found in advance regarding the engage point in phase with equal distance to Pr136:137. The bit b150.11 is automatically set to zero after the engage. In the final point of the engage cam, automatically is activated the cam table wrote in the drive. The event is marked with the bit b150.12=1 (to the start of the ramp); after the activation of the table the b150.12 is automatically set to zero. As to the engage phase needs to define one internal point to the master module for the start of the disengage ramp. To difference of the engage cam executed, the disengage phase is a simply deceleration ramp and comes executed through the positioning of the OPM14. The release point is written in the Pr128:129 parameter (in step module master). Activating bit b150,13 reserves the start of disengage of the slave in the point programmed; the bit b150.13 is automatically set to zero after the disengage. Activated the disengage phase on the programmed point it is necessary to define the point of stop in which stopping the slave (in step module slave); this point of stop is written in the Pr118:119 parameter (in step module slave). This space must be sufficient to permit to stop the axis with the deceleration ramp programmed on the Pr109; in the start point in Pr128:129 and the final position point in Pr118:119 are too much near (pay attention to master/slave module conversion), is necessary to add to the final position one or more slave modules: Pr118:119 (slave module) + final position internal at the slave module. The compilation of the cam table is made in background and at the conclusion Pr102 is automatically set to zero; pay attention that if b40.2=0 the Pr102 parameter comes forced however to zero. Moreover there are two conditions for a corrected operation of this engage cam: 1. The final point of the disengage ramp is not accidentally chosen in the module slave, but direct consequence of the chosen space of the engage cam. The slave axis must be situated in advance regarding the position of Pr134:135 (when the master is in Pr126:127 position) of the quota: Advance quote = (Pr 127 : 126 − Pr 133 : 132) • Pr115 : 114 = Pr 137 : 136 2 • Pr111 : 110 2. The speed in the points of passage between cam and deceleration ramp must be concord. (Pr108= cam speed) 94 Parker Hannifin Manufacturing Srl user’s manual TPDM Cam table engage automatic b150.12=1 (autoset after engage and autoreset after engage to the drive’s TAB) Master Module Pr110:111=30000 Step/Motor Slave Module Pr114:115 = 10000 Step/Motor space covered in engage from slave Pr137:136=1000 step slave module Reservation engage slave axis, on master module b150.11=1 (autoreset) Master space engage 6000 Step Slave space engage 2000 Step Pr132:133=24000 step master module Pr126:127=30000 step master module Master module Pr110:111=30000 Step/Motor Slave module Pr114:115 = 10000 Step/Motor Reservation engage slave axis, on master module (Pr128:12), b150.13=1 (autoreset). Depends on dynamics of the machine Slave axis position, in step slave module, after dec. ramp. Pr118:119 = 9000. 0 30000 95 Parker Hannifin Manufacturing Srl user’s manual TPDM 9.5 Electronic cam (op. mod. 11) Operating mode 11 is expressly designed to meet the needs of packaging machines that require 2 electronic cams. This program is in the drive’s basic configuration and it can be programmed by selecting Pr31=14 and b99.11=1, parameters to select the operating mode and to select default parameters of operating mode. Some of the most widely used motion functions of industrial automation are available within this mode. Namely, this operating mode includes the following: • position reference generator (positioner) • speed mode generator • cam1 generator • cam2 generator The resulting position reference is incremental and is generated by algebraic sum of the references (see the following picture). Positionator + Cam 1 + + Resulting position reference Cam 2 This diagram allows to identify a general flow in operating mode 11. If you carefully analyze this mode, you will see that the programmer can use several enabling commands (programmable bits ) at different levels in order to address the flow of the generated position reference (or references), in several display modes. For instance, for each generator a position reference can be enabled in the position loop or into a general position counter. X Position loop Y Positioner reference generator Modul counter Counter at modul Incremental global counter When the position reference of at least one generator is enabled in the position loop, the reference loading into a global counter defined by module is automatically enabled. 96 Parker Hannifin Manufacturing Srl 9.5.1 user’s manual TPDM Positioner This is a trapezoidal profile generator, with the following user-definable parameters: • speed profile • acceleration and deceleration ramp • value target position in motor step The parameter referred to the target position is absolute. The difference between the target position and the reference position, generates the direction of the movement. The thus position reference generated in this way is loaded into the position loop by b181.15=0 command, and moreover is possible to unload the reference of the positioning to the inside of the cam generators through algebraic sum with the reference of the master, with the selection command b150.3. Pay attention if both commands (b150.3=1 and b181.15=0), because the reference of the positioning is used two times: algebraic sum to the reference of the master in input to two generators CAM1 and CAM2, and sum in output to the references of CAM1 and CAM2. Activating the command b181.10=1 is possible to unload the reference generated from the positioning in the global counter position (Pr131:130). 9.5.2 CAM1 and CAM2 The two CAM generators are specifically designed to meet the requirements of automatic machines using electronic cams. Four tables are available, namely TAB0, TAB1, TAB2 and TAB3, that have been implemented to perform a series of cam functions. A vector made of 257 elements describes each table, that indicate the position to be taken by the controlled axis when the motor axis is in the position: Master position = element number • master modul 256 In each table the value of the vector elements is ranging between 0 and 9999, whereas 10,000 shall be the count number set in the slave module parameter. In order to generate a table, the axis route must be divided into 256 points; the value of each point will have to be rated to 10000, because this is the maximum value that can be written in the table elements. The 257th element of each table defines the cam as closed if it is = 0, or as open if it is = 10,000. The cams will be able to perform the points listed in the table; if the required speed and torque are within the motor’s electric limits (Maximum Speed and Torque). Through a series of parameters it is possible to automatically program one of the motion laws that have been set in the drive in one of the four tables. Functions can be retrieved as follows: 97 Parker Hannifin Manufacturing Srl user’s manual TPDM Predetermined function Table y=x-senx y=x Pr102=5 Pr102=6 Function y=x Function y=x-senx profilo triangolare y=senx Pr102=7 Tab0 Pr102=8 Function y=senx Triangular profile of speed rampa aggancio Pr102=9 Tab1 Engage ramp rampa sgancio Pr102=10 Tab2 Disengage ramp y=x-senx profilo triangolare Pr102=11 Tab3 Pr102=12 Triangular profile of speed Function y=x-senx Pr102=13 Adaptation module of CAM1 through Pr176:177 and Pr178:179 Pr102=14 Adaptation module of CAM1 through Pr176:177 and Pr178:179 CAM2 CAM1 After selecting the function by Pr182, the parameter is automatically set to zero. The four tables are the same in both CAM generators; the same table with the same function can be selected in both generators. As a default drive configuration, TAB0 is active in CAM1 and TAB3 is active in CAM2. In order to change the default setting there are some immediate commands active for both CAM generators, or for CAM1 only of the enable commands on programmable master phase (see the OPM11 block diagram). The qualifications given from the parameters b181.9, b181.10 and b181.11, determine the algebraic sum of the references generated into the counter reference Pr131:130. This counter beyond visualizing the sum given from the references, can be employed in order to supply to Encoder CAN marks them whose increments are generate to you from a single generator, without to influence on the reference of position of the axis, being generated therefore a commanded virtual axis through the qualified reference. When the selected table is changed, the two generators will have a different behavior. Based on the executed command, CAM1 immediately activates the execution of the selected table as well as a change of module. The selection of engage/disengage of the CAM1 happens in correspondence of the master phases. The b180.9, beyond signaling the state of engage/disengage of the CAM1, it allows an engage/disengage immediate of the same without to consider the master phase. Modules with negative sign cannot be set in CAM1. 98 Parker Hannifin Manufacturing Srl user’s manual TPDM CAM2 will be engaged and disengaged only by command and always when the master is in phase 0, or by a single execution command (Single Shoot). The b180.12, beyond signaling the state of engage/disengage of the CAM2, it allows an engage/disengage immediate of the same without to consider the master phase. The user will have to check the synchronization of the new cam. A module with negative sign can be set in CAM2 (Pr185:184). With b180.8=0 command, the CAM2 variation, table and module, is calculated immediately without the engage/disengage commands of the cam. If the b180.8=1 command, the table and the module set up in CAM2 are updated through an engage command (b180.10 or b180.13 single shot). The user will have to check the continuity of speed and ramp during table and module changes and, especially, during the engage phase immediate. As a default configuration, the cams are scanned throughout the master module. In both masters the selected cams can be scaled in a sector of the master module by programming the starting point and the space in which the cam shall be executed. It is possible of course to scan the cam in this way also between two master modules. 99 Parker Hannifin Manufacturing Srl user’s manual TPDM Example 1 Speed profile axis slave without cam scale 3000 Scale CAM1: Pr115:114=10000 module Pr177:176=00 start point Pr179:178=10000 execution space Profilo risultante 2500 2000 1500 Speed [rpm] Scale CAM2: Pr185:184=10000 module Pr177:176=0 start point Pr179:178=10000 execution space CAM1 1000 500 0 -500 0 2000 4000 6000 8000 10000 Scale status of the OPM11 default of cam CAM2 -1000 -1500 -2000 Master module] Example 2 Speed profile axis slave with cam scale 5000 Scale CAM1: Pr115:114=10000 module Pr177:176=6500 start point Pr179:178=9500 execution space Pr102=14 calculation scale command CAM1 4000 CAM2 3000 Speed [rpm] 2000 1000 0 -1000 0 2000 4000 6000 8000 10000 Scale CAM2: Pr185:184=10000 module Pr177:176=0 start point Pr179:178=3000 execution space Pr102=13 calculation scale command -2000 -3000 -4000 -5000 Master module [count] After the default of operating mode, the CAM2 generator operates on table 3, but through the management of bit b182.6 and b181,7, is possible to change the reference table. The reference of position given from the algebraic sum of the three generators, pass through a ratio block that, Pr182 and Pr183, before being transmitted to the loop of position. 100 Parker Hannifin Manufacturing Srl user’s manual TPDM 9.5.2.1 Automatic activation of CAM tables Beside enabling tables on programmable master phase or by immediate command as shown above, the drive offers a default function providing for an automatic sequence to enable the tables in order to concur some functionalities like engage and disengage cam, with connection tables. The operation is enabled through the activation of bit b180.15=1 and by using bit 181.4 command in order to start sequence Tab0 and bit 231.14 command in order to start per a disengaging sequence. The switch between active tables always occurs during master phase 0. Tab1 and Tab2 are used as a link during the switch between Tab0 and Tab3 and the other way round, and therefore they cannot be active longer than one master module. T0 T0 T1 T2 T3 Master with positive speed T1 T2 T3 Master with negative speed As shown in the figures, the table switching sequence is automatically inverted when the speed is negative. The above-described function is essential, for instance, in applications where the user wants to complete an engage/disengage phase starting from a gearing function (Electrical axis) by means of linear linking ramps. By linear links we mean the tables describing the two engage and disengage ramps. Let’s suppose that Tab0 has been programmed with a y=x function (gearing) and that Tab3 has been programmed as a fixed axis, that is y=constant K. We will need to calculate both linking tables in Tab1 and Tab2 to be able to engage and disengage the axis. If we consider, for instance, the master cycle in a module in degrees (360°), we will have to set in Pr105 the master module sector value (ranging between 0° and 360°) that we are going to use in order to perform the two engaging and disengaging ramps. Using the Pr102 parameter and the predefined functions that already they previewed the two tables is possible to calculate the engage in Tab1 with Pr102=9 and the disengage in Tab2 with Pr102=10. Through the commands of the functions predefined is always estimated the function of Gearing (Y=X) in Tab0 with Pr102=5. The Tab3 can be replaced in this application with one fictitious table qualifying the bit b181.8=1, setting up the constant of the table in Pr105. It’s possible to extrapolate in this application the constant of Pr105; reading the first value of the table of Tab1 engage in Pr104 with Pr103=1256. 101 Parker Hannifin Manufacturing Srl user’s manual TPDM b181.14 Disengage comand b181.13 Engage comand Pr105 Sector disengage ramp Pr105 Sector engage ramp 0° Master module 360° 0° Master module 360° 0° Master module Tab 3 Tab 2 Tab 0 Tab 1 Tab 3 360° 0° Master module 360° 0° Master module 360° Speed curve for slave axe The above described tables are of course an example case to describe the engage and disengage functions of an axis by changing tables, and they are calculated in order to allow these functions for an axis that needs to be dynamically disengaged/engaged according to a gearing law (Pr102=5 _ Y=5). Of course it is possible to describe different tables for similar functions and load them in the relevant array. In order to accomplish this and more generally to ensure user access to cam tables, as it happened previously for Tab0, these can be either read and written using the keypad, or picoPLC by pointer Pr103 and value in Pr104, or through SBC CAN, or serial port RS422 using address 4096 (adjacent areas of 257 words per table): Keypad SBC CAN o serial Tab.0: 0<=Pr103<=256; Tab.1: 500<=Pr103<=756; Tab.2: 1000<=Pr103<=1256; Tab.3: 1500<=Pr103<=1756; 4096<= address<=(4096+513); (4096+514)<=address<=(4096+1027); 4096+1028)<=address<=(4096+1541); (4096+1542)<=address<=(4096+2055); With CANopen version you can use the tables by SDO as follow: CANopen Tab.0: Point 0….254 Index 0x2004 Point 255…256 Index 0x2005 Tab.1: Point 0….254 Index 0x2006 Point 255…256 Index 0x2007 Tab.2: Point 0….254 Index 0x2008 Point 255…256 Index 0x2009 Tab.3: Point 0….254 Index 0x200A Point 255…256 Index 0x200B 102 Sub-index 1…255 Sub-index 1….2 Sub-index 1…255 Sub-index 1….2 Sub-index 1…255 Sub-index 1….2 Sub-index 1…255 Sub-index 1….2 Parker Hannifin Manufacturing Srl user’s manual TPDM Decimal parameters Par. Description Pr101:100 Reference module position (addition as module of POS+CAM1+CAM2). Function selector. The value indicates one Pr102 predetermined function (see the predetermined function table). Once that the command has been given, the table comes generated with the selected function. It is an auto reset parameter. Pointer to the cam table. Through Pr103 it is Pr103 possible to approach the table cam. Pr104 will contain the value of the Pr103’ element of the table. Table element value. Pr 104 is the value of Pr104 Pr103’ element of the table. Pr105 Value virtual table (b181.8) - Value in degree to engage/ disengage axis. Pr106 Feed-forward scale. Regime speed (positioner). Is the regime speed Pr108 used during the generation of the position profile. Field W Range ±231 Def. Res. 0 1 W 0÷14 0 1 W 0÷ 1756 257 1 R 0÷ 10000 0 1 W Pr109 Speed-up time (positioner). Acceleration ramp used during the generation of the position profile. W Pr111:110 Pr113:112 Pr115:114 Pr117:116 Pr119:118 Master axis module. Module axis master. Master axis position. Master axis position. Slave axis module. Module axis slave. Master axis position offset. Target position (positioner). Parameter in which setting up the final position for the generator of trapezoidal profile, considering 4096 steps to the turn. Master position. Master axis phase. If b150.8=1, at first positive edge of 0 digital input or at zero encoder input (see block diagram) the position of master axe becomes Pr123:122. Master axis phase caught. At every positive edge of 0 digital input or at zero encoder input (see block diagram) the position of master axe becomes Pr125:124. Master axis engage phase. If b150.12=1, when master position, Pr113:112 exceeds Pr127:126 Pr102 is brought in position 2 and b150.12 returns 0 to indicate the engage. W R W W W 1 0÷ 1000 1 9000 rpm 0.002÷ 0.500 1 30000 ms s/krpm 0÷218 10000 1 1 0÷218 10000 1 0÷223 0 1 1 R R 0÷223 0 1 1 R 0÷223 0 1 W 0÷223 0 1 Pr121:120 Pr123:122 Pr125:124 Pr127:126 W W 1 103 Parker Hannifin Manufacturing Srl Par. Description Pr129:128 Master axis disengage phase. If b150.13=1, when master position, Pr113:112 exceeds Pr129:128 Pr102 is brought in position 1 and b150.13 returns 0 to indicate that the positioner is enabled and which will control the disengage phase. Pr131:130 Auxiliary incremental counter of POS, CAM1 and CAM2 reference. Pr133:132 Cam engages with ramp. Start point of the engage ramp according to the master position. Pr135:134 Slave position from cam. Only read and indicates the axe slave position in output to electronic cam, independent from selector Pr102. Pr137:136 Cam engage ramp.Defines the space to cover during the engage ramp in slave steps; the value must be however smaller of half of slave module. Pr154 Multiplicative factor of reference ENCODER CAN. Pr155 Divisor factor of reference ENCODER CAN Pr157:156 Encoder CAN counter. Pr158 Encoder CAN pointer (b70.10). Pr169:168 Master phase for engaging of the Tab.0 (b180.0). When the master phase matches the programmed value, then the slave engages to the master. TAB0 is enabled. Pr171:170 Master phase for engaging of the Tab.1 (b180.1). When the master phase matches the programmed value, then the slave engages to the master. TAB1 is enabled. Pr173:172 Master phase for engaging of the Tab.2 (b180.2). When the master phase matches the programmed value, then the slave engages to the master. TAB2 is enabled. Pr175:174 Master phase for engaging of the Tab.3 (b180.3). When the master phase matches the programmed value, then the slave engages to the master. TAB3 is enabled. Pr177:176 Scale CAM (start cam). If is enabled, when CAM1 arrives in this position in its module, then starts the engage of CAM1. Pr179:178 Scale CAM (Space cam) Pr182 Multiplicative factor of reference sum between POS, CAM1 e CAM2. Pr183 Divisor factor of reference sum between POS, CAM1 e CAM2. P185:184 CAM2 axis module. 104 user’s manual TPDM Field W Range 0÷223 Def. Res. 0 1 R 1 W 0÷223 R 0÷223 W 1÷215 0 1 1 0 1 W 1 1 W R W W 1 1 1 1 1 W 1 W 1 W 1 W 1 W W 1 1 1 W 1 1 W 1 Parker Hannifin Manufacturing Srl user’s manual TPDM Binary parameters. Par. Description b150.2 Position loop. If =1 the position loop is absolute value, otherwise is in slave module. b150.3 Command phase shift master. If =1 positioner module comes used in order to modify the phase between master and slave or like generator of virtual axis. When the final position Pr118:119 is equal to Pr116:117 this bit reset automatically. Not use this command and Pr102=1 at the same time. b150.6 Enable encoder input (X19). If =1 enable the read of master encoder. b150.8 Enable master axis phase. If =1 enable the copy of the parameter Pr123:122 on Pr113:112 at the first edge of input 0 or at zero encoder. b150.10 Type-1 reset. Reset command for motor positions and reference. b150.11 Electronic cam engages with linear ramp. Engage command for cam mode when the master arrives to Pr127:126 value with a linear ramp defined in Pr133:132 and Pr137:136 b150.12 In-phase electronic cam engage. Engage command for cam mode when the master arrives to Pr127:126 value, terminated the command the bit reset automatically. b150.13 In-phase electronic cam disengages. Disengage command for cam mode when the master arrives to Pr129:128 value, terminated the command the bit reset automatically. b150.14 Immediate electronic cam engage. Engage command for cam mode; terminated the command the bit reset automatically. b150.15 Immediate electronic cam disengage. Disengage command for cam mode; terminated the command the bit reset automatically. b180.0 Start Tab.0 on master phase of Pr168:169. =1 enables Tab0 at the master phase declared in Pr169:168. The parameter values to start on master phase must be between 0 and Pr111:110 master module. b180.1 Start Tab.1 on master phase of Pr170:171. =1 enables Tab0 at the master phase declared in Pr171:170. The parameter values to start on master phase must be between 0 and Pr111:110 master module. b180.2 Start Tab.2 on master phase of Pr172:173. =1 enables Tab0 at the master phase declared in Pr173:172. The parameter values to start on master phase must be between 0 and Pr111:110 master module. b180.3 Start Tab.3 on master phase of Pr174:175. =1 enables Tab0 at the master phase declared in Pr175:174. The parameter values to start on master phase must be between 0 and Pr111:110 master module. b180.4 Immediate start Tab.0. =1, TAB0 immediate activation.Indication of which table is active in CAM1 generator. b180.5 Immediate start Tab.1. =1, TAB1 immediate activation.Indication of which table is active in CAM1 generator. b180.6 Immediate start Tab.2. =1, TAB2 immediate activation.Indication of which table is active in CAM1 generator. b180.7 Immediate start Tab.3. =1, TAB3 immediate activation.Indication of which table is active in CAM1 generator. b180.8 (0)Upgrade automatically to CAM1-(1)Upgrade CAM1 only on engage (b180.10 or b180.13). b180.9 CAM 1 engaging immediately (Signal lock/Unlock CAM 1). Field W Def. 0 W 0 W 1 W 0 W W 0 0 W 0 W 0 W 0 W 0 W 0 W 0 W 0 W 0 W 0 W 0 W 0 W 0 W 0 R 0 105 Parker Hannifin Manufacturing Srl Par. b180.10 b180.11 b180.12 b180.13 b180.14 b180.15 b181.0 b181.1 b181.2 b181.3 b181.4 b181.5 b181.6 b181.7 user’s manual TPDM Description Electronic CAM2 engaging on master phase 0. Electronic CAM2 release on master phase 0. CAM 2 engaging immediately (Signal lock/Unlock CAM 2). Electronic CAM2 execution on single shot. (0)Caught quota master frequency input (1) Caught quota Motor position-Storage in Pr58:59. Enable swap table (engage/release linear). Enabled Tab.0 in the Cam. =1 TAB0 is enabled. Enabled Tab.1 in the Cam. =1 TAB1 is enabled. Enabled Tab.2 in the Cam. =1 TAB2 is enabled. Enabled Tab.3 in the Cam. =1 TAB3 is enabled. Command swap of Tab.3 (Tab.3-Tab1-Tab.0). The switching between the tables is showed in the picture. The switching starts from TAB3 to TAB0, clockwise direction. Command swap of Tab.0 ( Tab.0-Tab2-Tab.3). The switching between the tables is showed in the picture. The switching starts from TAB3 to TAB0, counterclockwise direction. Selection Table in the CAM 2. The state of this bit, together with bit b181.7, identifies the selected table (see table below*). Selection Table in the CAM 2. The state of this bit, together with bit b181.6, identifies the selected table (see table below*). * Table selection Tab0 Tab1 Tab2 Tab3 b181.6 1 1 0 0 Def. 0 0 0 0 0 W R R R R W 0 0 0 0 0 0 W 0 W 0 W 0 W W 0 0 W 0 W 0 W 0 W 0 W 0 b181.7 1 0 1 0 b181.8 Enable virtual table (Tab.3). b181.9 Enable counter position from CAM1 to global counter (Pr131:130). This command, b181.9=1, enable the reference of CAM1. This value is added algebraically to global counter of reference. b181.10 Enable counter position from CAM 2 to global counter ( Pr131:130). This command, b181.10=1, enable the reference of positioner. This value is added algebraically to global counter of reference. b181.11 Enable counter position from trapezoidal positioner to global counter (Pr131:130). This command, b181.11=1, enable the reference of CAM2. This value is added algebraically to global counter of reference. b181.13 Enable counter position from CAM 1 to reference position (Pr60:61). b181.14 Enable counter position from CAM 2 to reference position (Pr60:61). b181.15 Enable counter position from trapezoidal positioner to reference position (Pr60:61). 106 Field W W R W W Parker Hannifin Manufacturing Srl user’s manual TPDM Positioning OPM11 Speed Pr108 Acceleration Pr109 Target position Pr119:118 Master position Master axe position offset Pr117:116 b180.0 Reference module position TAB0 b150.3 Master axe module Pr111:110 Master position Pr121:120 Master axe position Pr113:112 Pr169:168 b180.4 b181.0 Pr101:100 CAM1 Slave position from cam Pr135:134 b180.1 b150.6 TAB1 Pr171:170 Cam data b180.5 b181.1 Pr115:114 Slave axe module b180.2 TAB2 Pr173:172 Master reference b180.9 b180.6 b150.12 b181.2 b180.7 Master axe phase b70.0 Zero encoder Master axe position Pr113:112 b150.8 Master axe phase caught Pr125:124 Positive edge detector b181.13 Pr182 Pr183 b150.13 b181.9 Pr129:128 Disengage phase Regulation reference position Pr61:60 Auxiliary incremental counter Pr131:130 b181.10 Positive edge detector Din 0 Multiplicative factor of reference b181.11 b181.3 CAM1 selection table Master quota and master rephasing b181.15 Divisor factorof reference TAB3 Pr175:174 Pr115:114 b181.14 Pr127:126 Engage phase b180.3 Pr123:122 Slave axis module Position value TAB3 CAM2 Pr187:186 Cam data TAB2 Pr185:184 Modulo asse slave TAB1 TAB0 Disengage b180.10 b70.14 Master quota caught Engage b180.11 Single shot b180.13 107 Parker Hannifin Manufacturing Srl user’s manual TPDM 9.6 Basic functions The standard drive functions include protection functions whose parameters can be set, such as automatic limitations of current delivered based on the estimated dissipation (thermal image or i2t drive and motor); diagnostic functions, always available to the user, who can always check the drive status; configuration functions for some drive inputs/outputs; the activation of parameter saving/restoring procedures, and further functions common to motioncontrol equipment. 9.6.1 Homing function The homing function, which is available exclusively with operating modes 13, 14 or 15, provides a typical axis reset procedure. Before using the homing function perform the following settings: connect the homing sensor to digital input 3 set the homing speed in parameter Pr4 (pay attention to the direction of rotation) set Pr5 = 0, b40.12=1, b40.13=0, b40.2=0. To activate the homing procedure set b94.12=1 for a type 1 reset, or b94.13=1 for a type 2 reset. When the homing procedure is concluded the respective activation bit will be reset. If you wish to abort the procedure, reset the command bit, stop the motor (e.g. by resetting Pr5) and, if necessary, read b40.2 which will remain on zero. RESET TYPE 1 - DESCRIPTION When the procedure is activated (b94.12=1) the axis is brought to the speed programmed in Pr4 (Pr5=Pr4); the axis is then brought to zero speed (Pr5=0) on the positive front of the homing sensor signal; after 150ms with the motor stopped parameters Pr61:60 and Pr63:62 are reset, the position loop is enabled by setting b40.2=1, and command b94.12 is reset. The homing sensor signal must be maintained active in high status for the entire duration of the motor stopping phase. If the homing sensor is already engaged when the procedure is activated, the axis moves at the speed programmed in Pr4 but in the opposite direction until the homing sensor is freed; at this point the procedure continues as described above. RESET TYPE 2 - DESCRIPTION When the procedure is activated (b94.13=1) the axis is brought to the speed programmed in Pr4 (Pr5=Pr4); the axis is then brought to zero speed (Pr5=0) on the positive front of the homing sensor signal; after 150ms with the motor stopped parameters Pr61:60 and Pr63:62 are programmed with the value of parameter Pr28, the position loop is enabled by setting b40.2=1, and command b94.13 is reset. The homing sensor signal must be maintained active in high status for the entire duration of the motor stopping phase. If the homing sensor is already engaged when the procedure is activated, the axis moves at the speed programmed in Pr4 but in the opposite direction until the homing sensor is freed; at this point the procedure continues as described above. 108 Parker Hannifin Manufacturing Srl 9.6.2 user’s manual TPDM Speed adjustment In the operating mode default conditions (Pr31=0), the drive adjusts the motor in speed based on the reference value. The reference origin can be selected with the main block parameters, between analogue (external potentiometer), internal (digital), or external pulse string. It is possible to make comparison by zero speed, and other speeds, set acceleration and deceleration ramps, change the current and torque limits, and check the drive status. The main block diagram shows the main drive structure, how the configuration parameters act (bit or Pb parameters) and the main numerical parameters (Pr). 9.6.3 Current or torque adjustment (typical) To set the converter to Current mode (torque adjustment), the speed ring is excluded by setting b42.2=1. The main analogue reference is assumed as torque reference (current). If the nominal current value is exceeded, the thermal image trips as in the speed operation. 9.6.4 Frequency input/output (Encoder ports) The frequency input/output connector X19can be configured by the software in different functional modes by using the binary parameters b42.0 b42.5 as given in the table below. b42.0, and b42.5. See App “Conventions” for the Signal and counter conventions used. PAR b42.0=0 b39.10=1 b42.0=1 b42.5=1 b42.5=0 Description of the modes Incremental Encoder simulation (*).On encoder out pin; the number of turn pulses must be programmed in Pr 44. The function Virtual encoder simulation is enabled (Dummy Master) Encoder input is programmed as input in quadrature (phases A and B), this configuration must be used with the operating modes 13 and 14. Encoder inputs are programmed as frequency/sign input. The mode must be set when you want to simulate a stepper motor or the pulses train function. The frequency connects to A /A input while the direction connects to B /B input After the programming, the configuration must be saved and the unit must be powered off and on again. When configured as encoder simulator or o virtual encoder, the counters Encoder In input used by the operating modes are active. With the “Virtual encoder” function enabled, a virtual encoder (dummy Master) will be available, whose speed will be that set in Pr3. The set speed has a resolution equal to 1 rpm, the limit is the maximum frequency (see the technical data). Output signals (phase A, phase B) will simulate an encoder of Pr44 step / revolution, with phase C of zero not coupled to a reference zero. (*) on TPDM multi-axes, the encoder simulation is unique for all axes. The command b39.10 follows this: TPDM Axis A Axis B Axis C Encoder OUT 109 Parker Hannifin Manufacturing Srl 9.6.5 user’s manual TPDM b39.10= b39.10= b39.10= 1 0 0 1 axis 2 axes 0 1 0 0 0 1 Axis A enabled Axis B enabled Axis C enabled 3 axes Value comparators These functions are enabled ONLY with operating mode 11, 13 and 14. The Pr96:95 and Pr98:97 parameters have the alternative function of value comparators. With b94.10 = 0, then b94.8 = 1 if Pr96:95 > Pr63:62 (or Pr66:67 if feedback encoder) With b94.10 = 1, then b94.8 = 1 if Pr96:95 > Pr61:60 With b94.11 = 0, then b94.9 = 1 if Pr98:97 > Pr63:62 (or Pr66:67 if feedback encoder) With b94.11 = 1, then b94.9 = 1 if Pr98:97 > Pr61:60 This function is run every 6.144 ms. If the value comparators functions are not used, the Pr95, Pr96, Pr97, Pr98, b94.10 and b94.11 parameters by the PLC program as general purpose registers. 9.6.6 Value capture At every positive front of digital input 1, the value of Pr63:62 (or Pr66:67) is captured and stored in Pr68:69 and b70.15 is set to 1 to signal the event. b70.15 is not reset automatically but must be executed by the pico-PLC or the serial line. Analogous situation, at every positive front of digital input 0, or from reference mark, the value of Pr66:67 is captured and stored in Pr58:59 and b70.14 is set to 1 to signal the event. b70.14 is not reset automatically but must be executed by the pico-PLC or the serial line. 110 Parker Hannifin Manufacturing Srl user’s manual TPDM The event can be selected by the parameter Pr221 (only for b70.14). PAR Pr221 Description of the modes Event selection (only for b70.14). The event is selected in according to the following table below: Bit 3 0 0 0 0 0 1 1 1 1 9.6.7 Bit 2 0 0 0 1 1 0 0 1 1 Bit 1 0 0 1 0 1 0 1 0 1 Bit 0 0 1 1 1 1 1 1 1 1 event Management indicated into the picture above Zero index by Encoder IN Zero index by Feedback Input Digital input 0 – positive edge Digital input 0 – negative edge Digital input 1 – positive edge Digital input 1 – negative edge Digital input 2 – positive edge Digital input 2 – negative edge Output cam programmer This function gives a digital output (OUT1) according to the present position of the motor in a module. The user has to set the value corresponding to the module in Pr144:145. Inside the module can be defined 2 further values (Pr146:147 and Pr148:149) indicating the position at which the digital output is toggled. The user has to initialise the value of the motor position at Pr142:143 and the output status at b91.1; the function is enabled by b70.3=1 and in this case Pr142:143 shows the motor position inside the module. An offset for this position may be set at Pr140. The refresh time of the digital output is 512 µs. The limits for the parameter values are: Pr140: range –215… 215 Pr142:143: range 0…231 Pr144:145: range 0…231 Pr146:147: range 0…231 Pr148:149: range 0…231 0 =< Pr146:147 =< Pr148:149 =< Pr144:145. 111 Parker Hannifin Manufacturing Srl 9.6.8 user’s manual TPDM Analogue output programmable In terminal block is available one analogue output programmable. The parameter Pr188 defines the parameter to monitor. The analogue output scale has a range from –2047 to +2047 counts corresponding ±10V. By parameter Pr189 is possible to modify the scale: the value is the exponent of base 2. There are three different cases: Pr188=Pr0, (monitor speed) has in output +10V when Pr0=+Pr32, while –10V when Pr0=Pr32 [with Pr189=0]. Pr188=Pr35, (monitor torque) has in output 10V when Pr35 is equal to pick current, if Pr19=100% [with Pr189=0]. In other cases: Pr188=Pr…, range in output ±2047 counts as ±10V. Therefore if the parameter to monitor necessity more counts, is necessary to attribute, to Pr189, a such value to bring back the scale of reading of the parameter within 2047 counts: 2Pr189. It’s possible programmable the output to show parameter value coming from other axis within the same module, as indicated in the following table: Pr188 = Pr […] = 1000+Pr […] = 2000+Pr […] = 3000+Pr […] 9.6.9 Value on analog output Pr […] of present axis Pr […] of axis A Pr […] of axis B Pr […] of axis C Master reference There is one type of master reference: • Encoder ref. The type of reference signal must be connected to the relative connector (see par. “frequency input/output connection”). Each reference has a input counter, that encoder signal is calculated on every edge of A and B signal. The counter of the motor position increases 4096 imp/revolution. It’s possible to set the relation between master and slave with multiplicative and divisor factors. 9.6.10 Multiturn absolute encoder phasing on “zero” machine With a multiturn absolute encoder, initialize the absolute position read at power up on the motor position by following the procedure below: - position the mechanical axis on the desired machine point - disable drive hardware: b41.5=0 - set reference of the operating mode: b40.2=1; - set desired position in Pr65:64; - enter command b94.14 to perform the write procedure in the absolute encoder. - After having entered a multiturn phasing command b94.14, bit b41.6, indicating “phasing ok” is set to zero. Switch the electronics off and on again to be able to perform other axis enabling procedures. 112 Parker Hannifin Manufacturing Srl user’s manual TPDM Par. Description b231.2 Multiturn position read. (1) if multiturn absolute position is read at power up The range of absolute position depends of the encoder and it’s equal to: number of turns ± 2 Pr169 • 2 Field Def. R 0 113 Parker Hannifin Manufacturing Srl user’s manual TPDM 9.6.11 FeedForward of speed loop The feedforward into the speed loop is realized to offset the torque, like this during the acceleration the speed error is reduced to zero. Usage case: • when the system needs high accelerations without error; • when is difficult to calibrate the system; in these case the feedforward of speed loop (Pr283) permits to increase the performances. The current is monitoring by two parameters Pr284, FFWD monitor, and Pr287, speed loop monitor. The optimal condition is to set-up the Pr283 until the speed torque, Pr287, is equal to 0 during the acceleration and deceleration phase. An offset of torque (Pr285) is possible set to compensate the weight force, for example when the payload is vertical. To calculate the value of the feedforward gain is possible use the following method, in according to the motor used: Rotary motor (SMB, MB): Pr 283 = 1 1 1 1 2π • • 2048 • 16384 • • •J• −6 256 60 128 • 10 Kt I peak Where: J [kg m2] = total inertia of the system; Kt [N m/A] = motor torque constant; Ipeak [A] = peak current of the drive. Linear motor (PowerROD, Trilogy): Pr 283 = 1 1 1 1 1 • 2048 • 16384 • • PP • M • • • −6 256 60 128 • 10 Kf I peak Where: Ipeak [A] = peak current of the drive; PP [m] = pole pitch; M [kg] = total mass in movement; Kf [N/A]= motor force constant. 114 Parker Hannifin Manufacturing Srl user’s manual TPDM 9.6.12 Motor brake management The new function “motor brake management” is available into the firmware Pr25=8 or greater and is activated by the bit b251.6. This function provides to supply the motor brake during the movement (b41.12=1) and it’s possible choose it by remote control or by standard mode: the bit b251.7permits to use the control by external control or by drive firmware. The function uses two drive parameters as timer to control the movement of the motor: the first timer is the delay to reset the command STOP, the second timer is the delay to disable the drive. Using the DS402 protocol, the function can use other two timers, 0x2065 and 0x2067 objects, to set the delay time to open or close the motor brake. The release management of brake is executed by two ways: • in normal condition or low priority alarm; • in emergency or high priority alarm. In the first case, the brake is released when the motor is stopped after a deceleration ramp, in according to the fault reaction code option. In emergency the brake is released immediately. The alarms of the drive can be devise in high priority or low priority alarms: HIGH Priority alarm Over voltage Under voltage Over current Feedback Checksum pico-PLC Checksum parameters Signature Default Hardware alarm PSU alarm Feedback initialization Pr23 1 2 3 4 10 11 12 15 17 24 25 115 Parker Hannifin Manufacturing Srl 116 user’s manual TPDM Parker Hannifin Manufacturing Srl user’s manual TPDM Follows a representation of management: Parameters: Par. Description Pr252 Delay time to operational enable (brake opened).Using the DS402 protocol, in remote, this value is insert at the start-up of the drive into the object 0x2068. Delay time to operational disable (brake closed).Using the DS402 protocol, in remote, this value is insert at the start-up of the drive into the object 0x2066. Pr253 Par. field Def. Unit 1count= 0 6,144ms Type Note R/W 1count= 6,144ms R/W Description b251.6 Brake management. (1) function enabled, the brake is command in according to the logical internal of the drive or by to the external control. b251.7 Brake logical. (0) the firmware of the drive commands the output to insert or release the motor brake. (1) the function is management by external control, in this status is preserved the compatibility of the previous systems. 0 Def. Type Note 0 R/W 0 R/W 117 Parker Hannifin Manufacturing Srl user’s manual TPDM 9.6.13 Encoder CAN If this function is enable, it is possible to generate and receive the “encoder like” signals by the CAN line, which replaces quadrature signal. The running is transparent, respect to the traditional encoder signals: the CAN line must be connected instead of quadrature signals, and must be considered that every encoder signal is available every 1,024msec over the CAN, and the signal has 4byte for data. It is possible to have up to a maximum of three encoder signals, if the speed of the CAN is 1Mbs, and only one encoder signal if the speed is 500kbs. TPDM drive needs some bit and parameters about the correct operation: b70.8: enable the encoder CAN function, it activates at the successive switching on after save the setting of the bit. b70.9: selects the counter by CAN or encoder input for the OPM. b70.10: enable the encoder CAN virtual through the parameter pointed from Pr158. Pr154: reduction ratio numerator of the input encoder counting by CAN. Pr155: reduction ratio denominator of the input encoder counting by CAN. Pr156:157: counting encoder CAN Pr158: pointer to the parameter to send as virtual encoder on the CAN. The encoder CAN is active in input and accepts the CAN signal with address setting into Pr202. The output encoder CAN is enable if Pb42.1=0 and it generates a encoder signal with the same address to CAN node. If the command b42.0 is enable, is possible to generate a encoder virtual signal. But differently to encoder traditional, setting b70.10=1 the reference isn’t the speed into Pr3 but is the position into the parameter pointed from Pr158. The bit b39.15 is watchdog bit for encoder CAN, and every time that an encoder message arrives the status is 1. 118 Parker Hannifin Manufacturing Srl user’s manual TPDM If the encoder CAN function is activated, the number of the free parameter decrease. See the next table. Par. Pr154 Pr155 Pr156 Pr157 Pr158 Pr159 Description ratio numerator encoder in CAN ratio denominator encoder in CAN encoder CAN counter encoder CAN counter pointer for encoder out via CAN Encoder CAN speed Field W W W W W W b42.0 Virtual speed encoder Address encoder CAN our Enable virtual axis Enable encoder CAN Enable reference encoder CAN by pointer b42.0 Pr27 b40.1 X1 (CAN) b70.8 Enable message encoder CAN out Virtual speed encoder Pr48 CAN baudrate b70.10 Pr158 Pointer encoder CAN Res. 1 1 1 1 1 1 X2 (encoder OUT) Pr44 Pr3 Motor position Def. 0 0 0 0 0 0 Pulse numebr per turn motor Motor position Pr3 Range ±32000 ±32000 ±231 ±231 0÷255 ±32000 Input encoder CAN counter CAN setpoint multiplicative factor Pr154 Pr157:156 Pr155 Pr202 Address encoder CAN read b70.8 X1 (CAN) CAN setpoint divisor 119 Parker Hannifin Manufacturing Srl user’s manual TPDM 10 Programming digital inputs/outputs 10.1 The pico-PLC The internal pico-PLC is used to connect the external world (inputs/outputs) with the world of the parameters of the drive. The PLC can be used to copy digital input to a binary parameter, to copy a binary parameter to a digital output and to execute mathematical and Boolean operations. The PLC program must be inserted as a list of instructions by using the keyboard. To change the instructions b99.13 must be set to zero. The default parameter setting (b99.12) corresponds to a PLC program (see Appendix) written for a large number of applications. In most cases it is not necessary to program the PLC itself. The main features of the pico-PLC are: Program steps scanning time number of timers number of instructions stack depth mathematical operations fast inputs 256 6,144 ms 2 15 1 16 / 32 bits 2 - (512 µs) Decimal parameters PLC Par. Pr 71 Pr 72 Pr 73 Pr 74 Pr 75 Pr76 Pr 77 Pr 78 Pr 79 Pr80 ÷Pr87 Pr 92 Description Constant value=-1 Double Word Constant value =0 Double Word Constant value =1 Double Word Constant value =2 Double Word Constant value =10 Double Word Constant value = 100 Double Word Constant value = 1000 Double word. Constant value = 1024 Double word. Constant value = 4096 Double word. Free parameters. Parameters that can be stored and available to the user (word). First timer of the PLC. Every 6.144 ms, if Pr92 is different to 0, it is decrement, if it is equal to zero, b99.0=1. Pr 93 Second timer of the PLC. Every 6.144 ms, if Pr93 is different to 0, it is decrement, if it is equal to zero b99.1=1. Pr151 Free parameters. Parameters that can be stored and ÷Pr163 available to the user (word). 120 field Unit ±32767 Def. -1 0 1 2 10 100 1000 1024 4096 0 Type Note R/W 0÷ 32767 0 R/W M R/W 0÷ 32767 0 R/W ±32767 0 R/W M Parker Hannifin Manufacturing Srl user’s manual TPDM Binary parameters of the pico-PLC Par. Description b90.0 Status of digital input 0. Status of digital input 1.This input is commononly for the axisenabled: bit b230.1=1. b90.1 Status of digital input 1. Status of digital input 2. This input is commononly for the axis enabled: bit b230.1=1. b90.2 Status of digital input 2. Status of digital input 3.This input is commononly for the axis enabled: bit b230.1=1. b90.3 Status of digital input 3. Status of digital input 4.This input is commononly for the axis enabled: bit b230.1=1. b90.4 Bit that can be stored.If the bit b230.1=0 this is a bit that can be stored by the user. Otherwise,Status of digital input 4 if the bit b230.1=1,this input is commonfor the axis enabled (only TPDM multi axis). b90.5 Bit that can be stored.If the bit b230.1=0 this is a bit that can be stored by the user. Otherwise, Status of digital input 5 if the bit b230.1=1,this input is commonfor the axis enabled (only TPDM multi axis). b90.6 Bit that can be stored.If the bit b230.1=0 this is a bit that can be stored by the user. Otherwise, Status of digital input 6 if the bit b230.1=1,this input is commonfor the axis enabled (only TPDM multi axis). b90.7 Bit that can be stored.If the bit b230.1=0 this is a bit that can be stored by the user. Otherwise, Status of digital input7 if the bit b230.1=1,this input is commonfor the axis enabled (only TPDM multi axis). b90.8 Bit that can be stored.If the bit b230.1=0 this is a bit that can be stored by the user. Otherwise, Status of digital input 8 if the bit b230.1=1,this input is commonfor the axis enabled (only TPDM multi axis). b90.9 Bit that can be stored.If the bit b230.1=0 this is a bit that can be stored by the user. Otherwise, Status of digital input 9 if the bit b230.1=1,this input is commonfor the axis enabled (only TPDM multi axis). b90.10 Bit that can be stored.If the bit b230.1=0 this is a bit that can be stored by the user. Otherwise, Status of digital input 10 if the bit b230.1=1,this input is commonfor the axis enabled (only TPDM multi axis). b90.11 Bit that can be stored.If the bit b230.1=0 this is a bit that can be stored by the user. Otherwise, Status of digital input 11 if the bit b230.1=1,this input is commonfor the axis enabled (only TPDM multi axis). b90.12 Status of motor brake unit. (1) 24V on brake. b90.X Bit that can be stored.If X is greater than 12 (only TPDM multi Def. Type Note 0 R/W 0 R/W 0 R/W 0 R/W 0 R/W 0 R/W 0 R/W 0 R/W 0 R/W 0 R/W 0 R/W 0 R/W 0 0 R/W R/W M R/W R/W R/W axis).This is a bit that can be stored by the user. b91.0 b91.1 b91.2 Status of digital output 0. Status of digital output 0. Status of digital output 1. Status of digital output 1. Motor brake command. Command to open(1)/close(0) the motor brake 0 0 0 121 Parker Hannifin Manufacturing Srl b91.3 b91.Y user’s manual TPDM Reserved. Available bit. If Y is greater than 3 this is a bit that can be stored by the 0 R/W 0 R/W 0 W 0 W 1 1 R R R R R/W M R user. b94.0 Force a double word formatted operation. When the unit is powered on, this is 0. If it is set to 1, the first mathematical operation executed by the pico-PLC is done by using three double word type operands. After the execution of the operation b94.0 is automatically set to 0. If Pr60…Pr68, Pr110...Pr148 are used, the double word formatting is implicit. b94.5 First fast input enables. (0) Enable the fast input. (1) Disable the fast input. b94.6 Second fast input enables. (0) Enable the fast input. (1) Disable the fast input. b99.0 Status of the first timer. Equal to 1 if Pr92 = 0. b99.1 Status of the second timer. Equal to 1 if Pr93 = 0. b99.2 Equal to 1 if the result of the last PLC operation is negative. b99.3 Equal to 1 if the result of the last PLC operation is 0. b99.13 PLC status. If set to 1, the PLC program is executed. If 0, the program is not executed, but the PLC instructions can be modified. b231.5 Time out pico-PLC (1). If the microprocessor is overloaded with work (the operating mode is active, there are frequent serial requests and the PLC program is long), it may take more than 6.144 milliseconds to scan the entire PLC program (b231.5=1). 122 1 0 Parker Hannifin Manufacturing Srl user’s manual TPDM PLC INSTRUCTIONS Pa.y LD Pa.y loads the y bit of the Pa parameter on the stack LDN Pa,y loads the negated y bit of the Pa parameter on the stack OUT Pa,y sets the y bit of the Pa parameter to the value loaded on the stack Pa.y Pa.y Pa.y OUTN Pa,y SET Pa,y places the y bit of the Pa parameter to the value of stack negating it if the stack = 1, the y bit of the Pa parameter is set to 1 RES Pa,y if the stack = 1, the y bit of the Pa parameter is set to 0 AND Pa,y the bit loaded on the stack contains the result of the logical AND operation between itself and the y bit of the Pa parameter the bit of the stack contains the result of the logical AND operation between itself and the y bit of the negated Pa parameter the bit loaded on the stack contains the result of the logical OR operation between itself and the y bit of the Pa parameter the bit on the stack contains the result of the logical OR operation between itself and the y bit of the negated Pa parameter if the bit on the stack = 1, the addition operation is executed on the parameters in which: Pc = Pa + Pb if the bit on the stack = 1, the subtraction operation is executed on the parameters in which: Pc = Pa – Pb if the bit on the stack = 1, the multiplication operation is executed on the parameters in which: Pc = Pa ⋅ Pb if the bit on the stack = 1, the division operation is executed on the parameters in which: Pc = Pa / Pb end of program Pa.y SET Pa.y RST Pa.y Pa.y Pa.y ANDN Pa,y OR Pa,y ORN Pa,y ADD Pa, Pb, Pc SUB Pa, Pb, Pc MUL Pa, Pb, Pc DIV DIV Pa, Pb, Pc END END Pa.y Pa Pb Pc ADD Pa Pb Pc SUB Pa Pb Pc MUL Pa Pb Pc Pa.y FIN FIN y, 0/1 input with fast scanning 123 Parker Hannifin Manufacturing Srl user’s manual TPDM FUNCTIONAL DESCRIPTION The Pico-PLC program is scanned every 6.144 milliseconds. Based on this sampling, the inputs are first read, then the two timers (Pr92, Pr93, b99.0 and b99.1) are updated, the user program is scanned and finally outputs are updated. For this reason, both input reading and output setting can vary by 6.144 ms with respect to the physical event. If the microprocessor is overloaded with work (the operating mode is active, there are frequent serial requests and the PLC program is long), it may take more than 6.144 milliseconds to scan the entire PLC program (b231.5). All the instructions of the Pico-PLC with the exception of the arithmetic instructions are single bit instructions. The available stack has a depth of only one bit. The LD (LDN) instruction loads the bit defined as an operand on the stack, while all the other logical instructions work on the stack. Arithmetic instructions are executed only if the stack bit is set to 1. For user convenience, truth tables of logical operations are given below. 0 0 1 1 AND logical operation bit A bit B result 0 0 1 0 0 0 1 1 0 0 1 1 OR logical operation bit A bit B result 0 0 1 1 0 1 1 1 The respective negative operations ANDN and ORN follow the same logic except that the negated value of the bit specified will be used. 9 bits from b90.7 to b90.15 are reserved on the PLC and can be stored. 14 additional bits from b91.2 to b91.15 are available on the PLC but cannot be stored. They are always set to 0 when the converter is powered on. 10 word parameters are also reserved. These are from Pr80 to Pr89. They can be stored and used as 5 double word parameters just as the 13 parameters from Pr151 to Pr163. 7 of this 13 parameters can be reserved if the Encoder CAN function is actives (see par. “encoder CAN”). The pico-PLC includes 9 constants for arithmetic operations. These are from Pr71 to Pr79 and can be the constants most used by normal applications. Remember that the array of the parameters is increased to complete the new operative mode, the parameters from Pr168 to Pr187 are available on the PLC but cannot be stored (N.B. the parameters from Pr164 to Pr167 are reserved and the user can not modify these. When the arithmetic operations (ADD, SUB, MUL, DIV) are used, the operators are assumed to be words and are signed. If a double word operation is required, set b94.0 = 1 before the operation itself. After the operation the PLC will automatically set this bit to 0. The parameters Pr58...Pr69 and Pr110...Pr149 are treated as double words so that in an operation such as [ADD 71 72 64] the result –1 will be written in the double word Pr64:65 without having to set b94.0=1 before the operation. If Pr80=-1 and Pr81=0 the operation [ADD 80 72 64] will give the result Pr64:65=-1, while the same operation executed with b94.0=1 will assume Pr81 as the high word of the double word Pr80:81 and the result will be Pr64:65=65535. In the first case, operators other than Pr58...Pr69, Pr110...Pr149 are treated as words, while in the second case they are treated as double words. 124 Parker Hannifin Manufacturing Srl user’s manual TPDM In the mathematical operations on double words, the operands and the result are defined as follows: the parameter of the operand defines the least significant part while the most significant part is represented by the next word. After every arithmetic operation, b99.2=0 if the result is positive and b99.2=1 if it is negative. In the same way b99.3=1 if the result is 0 and b99.3=0 if it is not 0. These settings remain active until the next arithmetic operation is executed (the operation is executed only if the stack bit is equal to 1). A mathematical operation can be executed by placing the result in one of the constant parameters (Pr71...Pr79) in order to set bit b99.2 and b99.3. If the DIV operation is executed on a double word, the most significant part of the result contains the remainder of the division, that is, if b94.0=1 and the operation [DIV 79 77 80] is executed, the result will be Pr80=4 and Pr81=96. The FIN instruction. Two instructions are available for the fast acquisition of inputs: in this case the scanning occurs at the rate of 512µs (normal scanning is at the rate of 6.144ms). If this is used, they must be the first instructions of the PLC. The first instruction FIN copies digital input 0 to the y bit of the Pb40 parameter (the second operand =0) or Pb150 (the second operand=1). The second FIN copies digital input 1 to the y bit of the Pb40 parameter (second operand=0) or Pb150 (second operand=1). If the value 2 is added to the second operand, the input must be negated before being copied. If an FIN instruction is inserted in a different position, it will not have any effect. The FIN instructions can be enabled/disabled using a bit for each FIN: the first FIN is enabled if b94.5=0; the second FIN is enabled if b94.6=0. The FIN instruction inserted in the PLC program after the first two instructions and in any case if it follows any instruction that is not a FIN instruction is ignored. The user can make use of two timers, Pr92 and Pr93. To use the first timer load the time as a number of sampling (6.144 ms) into PR92. For example, Pr92=100 is equal to 614 milliseconds. Pr92 will automatically be decremented as time goes by and the b99.0 bit will remain set to 0 until the timer has expired. When Pr92=0, then b99.0=1. The second timer works the same way using the PR93 parameter and the b99.1 bit. Pr92, Pr93, b99.0 and b99.1 are updated only before the pico-PLC program is scanned. The maximum number of instructions is 256. The arithmetic operations occupy the space of two logical operations. If they are used, the maximum number of instructions accepted is reduced. The PLC program must always end with the END instruction. The pico-PLC program can be edited via serial link or directly using the keyboard. In this last case, in order to facilitate the modification of the program, if you want to delete an instruction, go to the instruction to be deleted and hit the [M] key. The type of instruction is then displayed. By holding down the [M] key and pressing the [-] key, the instruction will be deleted when both keys are released. If you want to add an instruction after the In06, go to the next instruction In07 and hit the [M] key. The type of instruction is then displayed. By holding down the [M] key and pressing the [+] key, the FIN instruction will be inserted when both keys are released. In this last case make sure that the program does not exceed the maximum limit of the instructions, otherwise the last instructions will be lost. The pico-PLC program can be edited or modified only when the PLC is in stop (b99.13=0). 125 Parker Hannifin Manufacturing Srl 10.2 user’s manual TPDM Programming with MotionWiz The enclosed communication software (supplied free of charge) designated MotionWiz has the following HW/SW requirements: PII microprocessor or higher, Windows2000 or more recent version, mouse and serial port for drive connections. The main features of MotionWiz are: - serial connection of up to 32 axes - reading and setting of basic parameters and drive commands - reading and setting of commands and parameters of operating modes - functional block diagrams - pico-PLC program displayed as ladder diagrams - display of pico-PLC program status during operation - I/O status - file storage of parameterisation including pico-PLC program - uploading of parameterisation including pico-PLC program from a file that can be selected from among those previously stored - oscilloscope function 126 Parker Hannifin Manufacturing Srl 10.3 user’s manual TPDM MotionWiz The configuration tool is called “MOTIONWIZ” and is used to program the drive while controlling the whole system in real time. PLC programs can also be edited and new files can be generated. The first step is to install the program*: click on the icon “SetupMotionWiz.exe” Follow the instructions that appear during the installation. An icon linking to the program will be generated on your desktop at the end of the installation process : Click on the icon to start the configuration program. The following window will be displayed on your monitor: Lang. continued: File menu Data on drive Data on PC It is possible to select the desired language: Italian or English. How to generate a new file: to set the data for motor and drive, use the databases provided by the software, that can be accessed through the icons below the figures (when the drive and the motor pictures are out of focus, it means that the relevant data have not been set yet). Press “ENTER” to access the configuration functions. How to use an existing file: the “file menu” shows a list of most recent files. To open a file, click on a name in the list Alternatively, using the “Open” tab it is possible to “search” previously stored files selecting the relevant route. * The MotionWiz program can be found on the CD rom supplied with the drive or downloaded from our website: www.sbcelettronica.com System required Propriety video USB drivers FT232R O. S.: Windows2000 SP4, XP SP2; Browser: Internet Explorer ver. 6.0 Mouse. [SETTINGS] video resolution advised: 1024*768, 1280*1024; [SETTINGS ADVANCED] settings DPI: normal 96dpi; [APPARANCE] character dimensions: normal. install the drive and follow the cm file to settings the “property”. You can find the drivers at the following address: www.ftdichip.com/Drivers/VCP.htm 127 Parker Hannifin Manufacturing Srl user’s manual TPDM 11 SERIAL INTERFACE The serial communication of the converter is half-duplex, master-slave. The same serial line can be connected to up to 32 axes, the configuration of the address is automatic, or by setting a different serial address in each to the Pr27 parameter. It is also possible to set the transmission speed by using the Pr26 parameter as specified in the table below: Pr26 (decimal base) 5 6 7 8 9 (default) b/s 9600 19200 38400 57600 115200 time-out (ms) 32 23 23 23 23 For the connection diagrams, see the section, Connecting the serial line. 11.1 Communication protocol The column on the right in the table above shows the time-out value expressed in milliseconds for each communication speed. This is the time within which the message must be sent, beginning from the start of each message (STX). If a message is interrupted after this time, the converter ignores what has been received and waits for the beginning of a new message. The message consists of several consecutive bits. The format of the bits is the following: 1 start bit 8 bit of data defined by a following byte enclosed within brackets 1 parity bit (even) 1 stop bit The structure of the message is the following: [STX] [CMD+ADDR] [BK+LUN] [PAR] [D0]... [Dn] [CHK] where: [STX] = $7E indicator of transmission start. If a field in the message different from STX assumes the value $7E, this field is followed by a 0 ($00) so that it will not be interpreted as an [STX]. [CMD+ADDR] = command and address of the peripheral device. This is never 0. This data is composed in the following way: the first 5 bits (bits 0-4) define the address of the converter (from 0 to 31); the remaining 3 bits (bits 5-7) define the type of message sent, as described in the following table: CMD 1 2 3 4 5 6 7 128 bit 7 0 0 0 1 1 1 1 bit 6 0 1 1 0 0 1 1 bit 5 1 0 1 0 1 0 1 type of message converter response reading a pico-PLC instruction writing a pico-PLC instruction reading a parameter writing a parameter bit modification writing a parameter to all the slaves Parker Hannifin Manufacturing Srl user’s manual TPDM [BK+LUN] = the LUN field (first 3 bits) indicates the number of bytes of the data transmitted (a parameter or a PLC instruction); the values can range from 1 to 4. This value does not include eventual 0 characters ($00) which are inserted after the values that coincide with the character of transmission start ($7E). The length of each parameter is two bytes. The BK field is represented by the 5 most significant bits and represents the 5 most significant bits of the parameter address. [PAR] = write/read address of the parameter or PLC instruction. The parameter address is the number of the parameter * 2 with 13 bit field: PAR represents the least significant eight bits of the address, the 5 most significant bits must be written in the BK field. The table CAM0 used by electronic cam starts at the address from 4096 to 4609, the table CAM1 starts at the address from 4610 to 5123, the table CAM2 starts at the address from 5124 to 5637, the table CAM3 starts at the address from 5638 to 6151. The PLC instructions have the address from 0 up to 511. [D0]... [Dn] = data transmitted. [CHK] = 256 module sum of all the fields excluding the [STX] (checksum). Message types [CMD1] = is the response message of the converter to a data request. The response message has the following format: [STX] [001+ADDR] [BK+LUN] [PAR] [D0]... [Dn] [CHK] or it can be the confirmation message to a data write or data modify. In this case, the format is the following: [STX] [001+ADDR] where ADDR always identifies which converter is answering. [CMD2] = is the read message of an instruction in the PLC area. The message has the following format: [STX] [010+ADDR] [BK+LUN] [PAR] [CHK] [CMD3] = is the write message to an instruction in the PLC area. The message has the following format: [STX] [011+ADDR] [BK+LUN] [PAR] [D0]... [Dn] [CHK] [CMD4] = is the read message of a parameter. The message has the following format: [STX] [100+ADDR] [BK+LUN] [PAR] [CHK] [CMD5] = is the write message of a parameter. The message has the following format: [STX] [101+ADDR] [BK+LUN] [PAR] [D0]... [Dn] [CHK] [CMD6] = is the change bit message of a byte parameter. The message has the following format: [STX] [110+ADDR] [BK+LUN] [PAR] [D0] [D1] [CHK] In this case LUN=2 or else two bytes are sent for the data. The first byte is the mask containing the 0s in the positions of the bits to be changed and 1s in the other positions, while the second byte contains 1s in the positions of the bits that are to be set to 1 and 0s in the other 129 Parker Hannifin Manufacturing Srl user’s manual TPDM positions. The PAR address is that of the parameter (byte) where one or more bits are to be modified. If the parameter is a word and the bit to be modified is one of the first 8 (b0...b7): PAR = the parameter address; otherwise, if the bit to be modified is one of the upper 8 (b8...b15): PAR = the address parameter + 1. [CMD7] = is the write message of a parameter to all converters connected to the serial line. The message has the following format: [STX] [11100000] [BK+LUN] [PAR] [D0]... [Dn] [CHK] The address of the peripheral device (ADDR) must be 0. Notes: - The parameters that are represented on the screen with decimals must be treated as complete values. For example, a value of 978.5 is read and written as 9785. - All values that are receded by the $ symbol are to be understood as hex numbers. - The value included inside the brackets identifies the base unit (byte) of the message. - All messages must be terminated with a time-out which is a function of the speed, well defined to be considered valid and must have the exact parity and checksum. - The converter responds to a request or to a data send only if the message has been received correctly. In the case of an error in the message, no response is transmitted. The only exception is message type 7 that is used to send data with a single message to all the converters connected to the serial line. Initializing and managing the serial line The converter is delivered with auto-addressing (Pr27) and a speed of 115200 bps (Pr26=9). To modify the configuration, first set the speed in Pr26, then disable the auto-addressing by b230.6=1, and after set the serial address in Pr27, and finally initialise it by issuing the command b42.3. Use the b99.15 command to store the configuration. Each pico-PLC instruction occupies 2 or 4 bytes whose format is the following: Since the maximum length of each instruction in 2 bytes and the total area available in the PLC is 512 bytes, the PLC program can have at the most 256 instructions. 130 Parker Hannifin Manufacturing Srl user’s manual TPDM Instruction Code Length (bytes) LD Pa.y 0 2 LDN Pa.y 1 2 OUT Pa.y 2 2 OUTN Pa.y 3 2 AND Pa.y 4 2 ANDN Pa.y 5 2 OR Pa.y 6 2 ORN Pa.y 7 2 ADD Pa, Pb, Pc 8 4 SUB Pa, Pb, Pc 9 4 MUL Pa, Pb, Pc 10 4 DIV Pa, Pb, Pc 11 4 SET Pa.y 12 2 RES Pa.y 13 2 FIN b40.y/b150.y 14 2 FAX 142 2 END 15 2 The first 4 bits (b0..b3) of the first byte in each instruction contain the instruction code. In the first 8 instructions in the table (LD… ORN) and the SET and RES instructions, the remaining 4 bit of the first byte (b4..b7) contain the value y, while the second byte contains the value Pa. In the ADD, SUB, MUL e DIV instructions, the second byte contains the value Pa, the third byte the value Pb, and the fourth byte the value Pc. In the END instruction, the second byte is not used. In the FIN instruction, the fifth bit (b4) of the first byte selects the parameter: b4=0 if it refers to Pb40, b4=1 if it refers to Pb150; the sixth bit (b5) of the first byte is used for logical negation: b5=0 the bit is copied, b5=1 the bit is negated before being copied. The second byte of the FIN instruction contains the value of y. If the FIN instructions are used, they must be the first instructions of the program and cannot be more than 2. They occupy the addressed from 0h to 3h. If a FIN instruction is inserted beginning at the 4h address or after any other instruction, the FIN instruction does not function and is ignored (NOP). The instructions must follow each other beginning at address 0h and no byte can be left empty. There is only one program and it is terminated with the END instruction. Examples of using the serial line In order to better understand how to implement the communication protocol on the serial line, some examples of each type of message are given below. The values indicated are only indicative as examples. First example: reading a 1 byte parameter Suppose we want to read the value of the parameter Pr25 (release software) and that its value is 43. Suppose also that the converter has the serial address 0. The message to be sent is the following. [$7E][$80][$01][$32][$B3] 131 Parker Hannifin Manufacturing Srl user’s manual TPDM The converter responds with the message: [$7E][$20][$01][$32][$2B][$7E][$00] Second example: reading a 2 byte parameter Suppose we want to read the reference speed (Pr7) and that its value is 2000. Suppose also that the converter has the serial address 1. The message to be sent is the following: [$7E][$81][$02][$0E][$91] The converter responds with the message: [$7E][$21][$02][$0E][$D0][$07][$08] Third example: writing a 1 byte parameter Suppose we want to select operating mode 1 (Pr31). Suppose also that the converter has the serial address 3. The message to be sent is the following: [$7E][$A3][$01][$3E][$01][$E3] The converter responds with the message: [$7E][$23] Fourth example: writing a 2 byte parameter Suppose we want to set the rated current to 2.5 A (Pr33). Suppose also that the converter has the serial address 3. The message to be sent is the following: [$7E][$A3][$02][$42][$19][$00][$00] The converter responds with the message: [$7E][$23] Fifth example: setting a bit to 1 Suppose we want to send the command to save the PLC program (b99.14=1). Suppose also that the converter has the serial address 0. The message to be sent is the following: [$7E][$C0][$02][$C7][$BF][$40][$88] The converter responds with the message: [$7E][$20] Sixth example: setting a bit to 0 Suppose we want to disable the converter via software (b40.9=0). Suppose also that the converter has the serial address 0. The message to be sent is the following: [$7E][$C0][$02][$51][$FD][$00][$10] The converter responds with the message: [$7E][$20] Seventh example: writing a PLC instruction Suppose we want to set the first instruction of the PLC as: LD 90.4. Suppose also that the converter has the serial address 0. The message to be sent is the following: [$7E][$60][$02][$00][$40][$5A][$FC] The converter responds with the message: [$7E][$20] 132 Parker Hannifin Manufacturing Srl user’s manual TPDM 12 CAN bus interface A CAN bus interface based on the physical layer ISO/DIS11898 is included on the converter. The Data link layer is the full CAN version 2.0 part A (ID 11 bit). 12.1 CANopen dsp402 (D version) The CANbus node must be set through Pr49 with values from 1 to 127. Transmission speed depends onPr48 as the following table: Pr48 0 1 (default) 2 3 4 5 6 7 Transmission speed 125 kbps 1 Mbps 500 kbps 250 kbps 125 kbps 50 kbps 20 kbps 10 kbps All changes in speed, address or function mode are activated using the b42.3 command or when the converter is powered on again. In the CANopen implementation of drive an SDO channel is available (standard cob-id) with a changeable timeout value mapped at the index 0x2020 as Unsigned 16 with a default value of 5000 (1 unit 1.024 msec). Both standard guarding protocols are available , Node guarding and heartbeat (the two cannot exist in the same time) Heartbeat is activated when a producer heartbeat time is set different from 0.Three PDO channels PDO 1,2,4 from the predefined standard connection set are available PDO 1 and 2 are serviced by a cyclic routine executed every 2.048 msec and they are remappable (elements of 2 or 4 bytes can be mapped) the RTR is allowed event time and inhibit time are active they can handle synchronous requests serviced every 2.048 msec or they can be handled as event driven. PDO 4 is the PDO channel used for strictly realtime operation as controlling motor trajectory or position loop (the PDO is synchronous type 1) no RTR is allowed and a restricted set of parameters can be mapped , in particular(ID: to the second axis apply as offset 0x0800, while to the third axis the offset is 0x1000; PDO: to the second axis apply as offset 0x0040, while to the third axis the offset is 0x0080): PDO 4 rx : [0x6040] control word [0x60c1][1] position reference in counts [0x60c1][2] velocity reference in counts/sec [0x60c1][3] velocity reference in rpm PDO 4 tx : [0x6041] status word 133 Parker Hannifin Manufacturing Srl [0x6063] [0x6064] [0x2060] user’s manual TPDM position feedback in counts position feedback in counts (normally in user unit in this case as well in counts) Word composed with digital input and aux analog input . b0: In0 b1: In1 b2: In2 b3: In3 b4..b15 Analog input aux. Life guarding protocol is implemented and can be activated writing life time factor and guard time besides a missing guarding event ,life guarding protocol can be triggered by a missing sync (if b271.8=1) or a bus-off condition. In any case state machine present state of ds301 communication can be changed according to what is set in the object 0x1029 ‘error behaviour’ (0 enter pre-operational , 1 no change , 2 stop). Note NMT commands are handled every 1.024 msec, so subsequent commands should be sent to the drive not closer than 1.204 msec including broadcast NMT commands. 12.1.1 Dictionary object summary of ds301 in drive [0x1000] : device type [0x1001] : error register [0x1005] : sync cob-id [0x1006] : communication cycle period [0x100c] : guard time [0x100d] : life time factor [0x1014] : Cob-Id Emergency object [0x1017] : Producer heartbeat time [0x1018] : Identity object [0x1029] : Error behaviour [0x1200] : SDO server parameters //pdo [0x1400] : PDO 1 rx communication parameters [0x1401] : PDO 2 rx communication parameters [0x1403] : PDO 4 rx communication parameters [0x1600] : PDO 1 rx mapping parameters [0x1601] : PDO 2 rx mapping parameters [0x1603] : PDO 4 rx mapping parameters [0x1800] : PDO 1 tx communication parameters [0x1801] : PDO 2 tx communication parameters [0x1803] : PDO 4 tx communication parameters [0x1a00] : PDO 1 tx mapping parameters [0x1a01] : PDO 2 tx mapping parameters [0x1a03] : PDO 4 tx mapping parameters //manufacturer [0x2000] : parameters'array 0..254 read write access [0x2001] : parameters'array 254..NR_PAR read write access [0x2002] : parameters'array 0..254 set bit access 134 Parker Hannifin Manufacturing Srl user’s manual TPDM [0x2003] : parameters'array 254..NR_PAR set bit access [0x2004] : parameters'array 0..254 reset bit access [0x2005] : parameters'array 254..NR_PAR reset bit access [0x2006] : pico-plc area first 254 instructions [0x2007] : pico-plc area last 2 instructions [0x2008] : CAM 1 table first 254 points read write access [0x2009] : CAM 1 table first last 3 points read write access [0x200a] : CAM 2 table first 254 points read write access [0x200b] : CAM 2 table first last 3 points read write access [0x200c] : CAM 3 table first 254 points read write access [0x200d] : CAM 3 table first last 3 points read write access [0x200e] : CAM 4 table first 254 points read write access [0x200f] : CAM 4 table first last 3 points read write access [0x2020] : SDO timeout [0x2030] : (only for EtherCAT protocol) blocks’ array 0..254 read write access in double word. The parameters in double word can be read and written in “blocks” of two parameters: the block number is half of parameter even: Pr101:100 is 50th block and Pr103:102 is 51st block. [0x2060] : digital and analog input [0x2063] : encoder B counter [0x2065] : timer to set a time delay to open the motor brake [0x2066] :timer to set a time delay to enable the motor movement [0x2067] :timer to set a time delay to close the motor brake [0x2068] :timer to set a time delay to drive disable 12.1.2 Dictionary object summary of dsp402 in drive [0x6007] 'Abort connection option code': with the following available values 0: No action 1: Alarm (alarm MISSING_SYNC_TRIP (Er16) if sync is missing when b271.8=1 the sync signal interval exceeds the 120% of the nominal sync cycle lasting time of index 0x1006 communication cycle period the regularity of sync signal is checked with a resolution of 2.048 msec. (If the node does not receive the guarding message before its lifetime an ABORT_CONN_TRIP (Er13)) is generated. 2: disable voltage 3: quick stop [0x6040] 'Control word': [0x6041] 'Status word': [0x605a] 'Quick stop option code': valid values 0,1,2,5,6 [0x605b] 'Shut down option code': valid values 0,1 [0x605c] 'Disable operation option code': valid values 0,1 [0x605e] 'Fault reaction option code': valid values 0,1,2. [0x6060] 'Mode of operation': valid values 1 (om201), 6 (om200), 7 (om202), 8 (om203), -1(om11),-2 (om13), -3 (om14), -5 (om0). 135 Parker Hannifin Manufacturing Srl user’s manual TPDM [0x6061] 'Modes of operation display': see the previous. [0x6063] 'position actual value (counts)': If read by mean of SDO or mapped on PDO 1 or 2 returns the value of position feedback in counts from pr[63:62] if mapped on PDO 4 returns the value of the position feedback at the sync signal. [0x6064] 'position actual value (units)': If read by mean of SDO or mapped on PDO 1 or 2 returns the value in counts of position feedback pr[63:62] transformed in user units by mean of position factor if mapped on PDO 4 returns the value of the position feedback at the sync signal in counts (the algorithm of interpolated mode does not support factor group). [0x6065] 'Following error window': it is converted in counts by mean of position factor then set in SERVO1 (pr[55]) the parameters is used to test following error. The parameters of SERVO1 are changed by the firmware only if in remote mode. [0x6066] 'Following error timeout': resolution of 1.024 msec per unit [0x6067] 'Position window': in user units converted by mean of position factor and compared with the motor position to check if target reached in profile position and interpolated position modes. [0x6068] 'Position window time': resolution of 1.024 msec per unit [0x607a] 'Target position': in user units converted by mean of position factor and used in profile position mode (in this mode some elements of CAM tab 0 are used as spare memory and so affected by changes). [0x607c] 'Home offset': in position units converted by position factor [0x6081] 'profile velocity': profile velocity in profile position mode(in counts/sec o RPM depending on unit selection (standard or not) with b272.1) [0x6083] 'profile acceleration': acceleration of profile in profile position mode (in counts/sec^2 or ms/kRPM depending on unit selection (standard or not) with b272.1) [0x6084] 'profile deceleration': deceleration of profile in profile position mode (in counts/sec^2 or ms/kRPM depending on unit selection (standard or not) with b272.1) [0x6085] 'quick stop deceleration': deceleration in quick stop action [0x6086] 'Motion profile type': valid values 0. [0x6093][1] 'Position factor': Numerator position factor [0x6093][2] 'Position factor': Denominator position factor [0x6094][1] 'Velocity encoder factor': Numerator velocity factor [0x6094][2] 'Velocity encoder factor': Denominator velocity factor [0x6097][1] 'Acceleration factor': Numerator acceleration factor [0x6097][2] 'Acceleration factor': Denominator acceleration factor [0x6098] 'Homing method': all standard values available. [0x6099][1] 'Homing speeds': searching sensor velocity (in counts/sec or RPM depending on unit selection (standard or not) with b272.1) [0x6099][2] 'Homing speeds': searching index velocity (in counts/sec or RPM depending on unit selection (standard or not) with b272.1) [0x609a] 'Homing acceleration': acceleration homing (in counts/sec^2 or ms/kRPM depending on unit selection (standard or not) with b272.1) [0x60b8] 'Touch Probe function': this object shall indicate the configured function. Bit 0 (1) enable probe1, bit 4 (1) enable sampling at positive edge of probe1; bit 8 (1) enable probe2, bit 12 (1) enable sampling at positive edge of probe2. [0x60b9] 'Touch Probe status': this object shall provide the status of the touch probe. Bit 0probe1: (0) switched off, (1) enabled. Bit 1-probe1: (1) touch probe 1 positive edge 136 Parker Hannifin Manufacturing Srl user’s manual TPDM position stored. Bit 8-probe2: (0) switched off, (1) enabled. Bit 9-probe2: (1) touch probe 2 positive edge position stored. [0x60ba] 'Touch Probe pos1 positive value': this object shall provide the position value of the touch probe 1 at the positive edge. [0x60bc] 'Touch Probe pos2 positive value': this object shall provide the position value of the touch probe 1 at the positive edge. [0x60c0] 'Interpolation sub mode selection': valid values 0(linear interpolation),-1(cubic interpolation with position and velocity) , -2 (cubic interpolation with position) [0x60c1][1] 'Interpolation data record': INTEGER32 interpolator position reference [0x60c1][2] 'Interpolation data record': INTEGER32 interpolator velocity reference in counts/sec [0x60c1][3] 'Interpolation data record': INTEGER32 interpolator velocity reference in RPM [0x60f4] 'Following error': this object shall provide the actual value of the following error. [0x6502] 'Supported drive modes': see 0x6060 [0x6504] 'Drive Manufacturer': " Parker Hannifin Manufacturing Srl " [0x6505] 'http drive catalog address': "*** http://www.sbcelettronica.com *** http://www.parker-eme.com ***" Following modes of operation of DSP402 are implemented beside the device control state machine: Homing mode Profile position mode Interpolated position mode The field Error Code will contain a specific code based on the different drive alarm: - Er01 - Er02 - Er03 - Er04 - Er05 - Er06 - Er07 - Er08 - Er10 - Er11 - Er14 - Er15 - Er16 - Er17 - Er22 - Er24 - Er25 - Er27 (over voltage) : (under voltage) : (over current) : (motor feedback break) : (over temperature motor) : (over temperature drive): (aux trip 1) : (aux trip 2) : (checksum PLC) : (checksum Parameter): (braking resistance alarm) : (default Parameter) : (CANopen myssing sync): (calibration alarm) : (over temperature ambient): (PSU alarm): (speed feedback error) : (overload digital outputs): 0x3210 0x3220 0x2340 0x7310 0xff07 0x4310 0xff00 0xff01 0x6310 0x6310 0x7113 0x6320 0x5210 0x4110 0x7112 0xff0e When alarms are reset with b99.10, Error code will be 0x0000 . 137 user’s manual TPDM Device Control state machine Homing mode Device Profile 402 Modes of operation CAN node Application layer and communication profile DS 301 Parker Hannifin Manufacturing Srl Motor Profile Position mode Interpolated Position mode Here by the schematic of device control with controlword e statusword Control word (6040h) State machine Status word (6041h) Actions 138 Internal events Parker Hannifin Manufacturing Srl user’s manual TPDM Fault Power disable 13 start Fault reaction active 0 14 Not ready to switch On Fault 1 15 Switch On disabled 12 7 2 Ready to Switch On 10 3 Power enable 6 9 8 Switched On 4 5 16 Quick stop active Operation enable 11 If I2t current clamping is active bit 11 of the statusword rises. If b272.10=1 and in remote mode, the command bit of the static brake is driven by the bit 15 of the controlword. If a fault on static brake occurs it is reported on bit7 (warning) of the statusword. 12.1.2.1 Object 6040h: Controlword The controlword consist of bits for: • the controlling of the state, • the controlling of operating modes and • manufacturer specific options. OBJECT DESCRIPTION 139 Parker Hannifin Manufacturing Srl user’s manual TPDM INDEX Name Object Code Data Type Category 6040h Controlword VAR UNSIGNED16 Mandatory ENTRY DESCRIPTION Access PDO Mapping Value Range Default Value rw Possible UNSIGNED16 No DATA DESCRIPTION The bits of the controlwordare defined as follows: 15 11 10 9 8 7 6 4 3 2 Manufacturer specific Reserved Halt O O O Fault reset Operation mode specific Enable operation O M M LSB MSB 1 0 Quick stop Enable voltage Switch on M M M 0 -Optional M –Mandatory BITS 0 – 3 AND 7: Device control commands are triggered by the following bit patterns in the controlword: Command Shutdown Switch on Switch on Disable voltage Quick stop Disable operation Enable operation Fault reset Fault reset 0 0 0 Bit of the controlword Enable Enable Quick stop operation voltage X 1 1 0 1 1 1 1 1 Switch on Transitions 0 1 1 2,6,8 3* 3** 0 X X 0 X 7,9,10,12 0 X 0 1 X 7,10,11 0 0 1 1 1 5 0 1 1 1 1 4,16 X X X X 15 Table 4: Device control commands (bits marked X are irrelevant, * ... In the state SWITCHED ON the drive executes the functionality of this state., ** ... It exists no functionality in the state SWITCHED ON. The drive does not do any in this state.) 140 Parker Hannifin Manufacturing Srl user’s manual TPDM BITS 4, 5, 6 AND 8: These bits are operation mode specific. The description is situated in the chapter of the special mode. The following table gives an overview: Bit 4 5 6 8 Operation mode Profile velocity mode reserved reserved reserved Halt Velocity mode rfg enable rfg unlock rfg use ref Halt Profile torque mode reserved reserved reserved Halt Table 5: Mode specific bits in the controlword BITS 9, 10: These bits are reserved for further use. They are inactive by setting to zero. If they have no special function, they must be set to zero. BITS 11, 12, 13, 14 AND 15: These bits are manufacturer specific. Bit 15 is a command of the static brake. 12.1.2.2 Object 6041h: Statusword The statusword indicates the current state of the drive. No bits are latched. The statusword consist of bits for: • the current state of the drive, • the operating state of the mode and • manufacturer specific options. OBJECT DESCRIPTION INDEX Name Object Code Data Type Category 6041h Statusword VAR UNSIGNED16 Mandatory ENTRY DESCRIPTION Access PDO Mapping Value Range Default Value ro Possible UNSIGNED16 No 141 Parker Hannifin Manufacturing Srl Bit 0 1 2 3 4 5 6 7 8 9 10 11 12 - 13 14 - 15 user’s manual TPDM Description Ready to switch on Switched on Operation enabled Fault Voltage enabled Quick stop Switch on disabled Warning Manufacturer specific Remote Target reached Internal limit active Operation mode specific Manufacturer specific M /O M M M M M M M O O M M M O O BITS 0 – 3, 5 AND 6: The following bits indicate the status of the device: Value (binary) State xxxx xxxx x0xx 0000 Not ready to switch on xxxx xxxx x1xx 0000 Switch on disabled xxxx xxxx x01x 0001 Ready to switch on xxxx xxxx x01x 0011 Switched on xxxx xxxx x01x 0111 Operation enabled xxxx xxxx x00x 0111 Quick stop active xxxx xxxx x0xx 1111 Fault reaction active xxxx xxxx x0xx 1000 Fault Table 7: Device state bits (x ... irrelevant for this state) BIT 4: VOLTAGE ENABLED High voltage is applied to the drive when this bit is set to 1. BIT 5: QUICK STOP When reset, this bit indicates that the drive is reacting on a quick stop request. Bits 0, 1 and 2 of the statusword must be set to 1 to indicate that the drive is capable to regenerate. The setting of the other bits indicates the status of the drive (e.g. the drive is performing a quick stop as result of a reaction to a non-fatal fault. The fault bit is set as well as bits 0, 1 and 2). BIT 7: WARNING A drive warning is present if bit 7 is set. The cause means no error but a state that has to be mentioned, e.g. temperature limit, job refused. The status of the drive does not change. The cause of this warning may be found by reading the fault code parameter. The bit is set and reset by the device. If a fault on static brake occurs it is reported on bit7 (warning). 142 Parker Hannifin Manufacturing Srl user’s manual TPDM BIT 8: This bit may be used by a drive manufacturer to implement any manufacturer specific functionality. BIT 9: REMOTE If bit 9 is set, then parameters may be modified via the CAN-network, and the drive executes the content of a command message. If the bit remote is reset, then the drive is in local mode and will not execute the command message. The drive may transmit messages containing valid actual values like a position actual value, depending on the actual drive configuration. The drive will accept accesses via SDO in local mode. BIT 10: TARGET REACHED If bit 10 is set by the drive, then a set-point has been reached. The set-point is dependent on the operating mode. The description is situated in the chapter of the special mode. The change of a target value by software alters this bit. If quick stop option code is 5, 6, 7 or 8, this bit must be set, when the quick stop operation is finished and the drive is halted. If halt occurred and the drive has halted then this bit is set too. BIT 11: INTERNAL LIMIT ACTIVE This bit set by the drive indicates, that an internal limitation is active: I2t current clamping is active. BIT 12 AND 13: These bits are operation mode specific. The description is situated in the chapter of the special mode The following table gives an overview: Bit vl 12 reserved 13 reserved pp Set-point acknowledge Following error Operation mode pv tq Speed Max slippage error reserved hm Homing attained reserved Homing error ip ip mode active reserved Table 8: Mode specific bits in the statusword BIT 14 AND 15: These bits may be used by a drive manufacturer to implement any manufacturer specific functionality. 12.1.2.3 Object 605Bh: Shutdown option code The parameter shutdown option code determines what action should be taken if there is a transition OPERATION ENABLE ⇒ READY TO SWITCH ON. 143 Parker Hannifin Manufacturing Srl user’s manual TPDM OBJECT DESCRIPTION INDEX 605Bh Name Shutdown option code Object Code VAR Data Type INTEGER16 Category Optional ENTRY DESCRIPTION Access PDO Mapping Value Range Default Value rw No INTEGER16 0 DATA DESCRIPTION Value -32768 ... –1 0 1 2 ... 32767 Description manufacturer specific Disable drive function Slow down with slow down ramp; disable of the drive function reserved 12.1.2.4 Object 605Ch: Disable operation option code The parameter disable operation option code determines what action should be taken if there is a transition OPERATION ENABLE ⇒ SWITCHED ON. OBJECT DESCRIPTION INDEX Name Object Code Data Type Category 605Ch Disable operation option code VAR INTEGER16 Optional ENTRY DESCRIPTION Access PDO Mapping Value Range Default Value rw No INTEGER16 1 DATA DESCRIPTION Value -32768 ... -1 0 1 2 ... 32767 144 Description manufacturer specific Disable drive function Slow down with slow down ramp and then disabling of the drive function reserved Parker Hannifin Manufacturing Srl user’s manual TPDM 12.1.2.5 Object 605Ah: Quick stop option code The parameter quick stop option code determines what action should be taken if the Quick Stop Function is executed. OBJECT DESCRIPTION ENTRY DESCRIPTION INDEX Name Object Code Data Type Category 605Ah Quick stop option code VAR INTEGER16 Optional Access PDO Mapping Value Range Default Value rw No INTEGER16 2 DATA DESCRIPTION Value Description 0 disable drive function 1 slow down on slow down ramp 2 slow down on quick stop ramp 5 slow down on slow down ramp and stay in QUICK STOP 6 slow down on quick stop ramp and stay in QUICK STOP 12.1.2.6 Object 605Eh: Fault reaction option code The parameter Fault reaction option code determines what action should be taken if a fault occurs. OBJECT DESCRIPTION INDEX Name Object Code Data Type Category 605Eh Fault reaction option code VAR INTEGER16 Optional ENTRY DESCRIPTION Access PDO Mapping Value Range Default Value rw No INTEGER16 2 145 Parker Hannifin Manufacturing Srl user’s manual TPDM DATA DESCRIPTION Value -32768 ... -1 0 1 2 Description manufacturer Specific disable drive, motor is free to rotate slow down on slow down ramp slow down on quick stop ramp 12.1.2.7 Object 6060h: Modes of operation The parameter modes of operation switches the actually choosen operation mode. OBJECT DESCRIPTION INDEX 6060h Name Modes of operation Object Code VAR Data Type INTEGER8 Category Mandatory ENTRY DESCRIPTION Access PDO Mapping Value Range Default Value rw No INTEGER8 No DATA DESCRIPTION Value 1 6 7 Description Profile Position Mode Homing Mode Interpolated Position Mode NOTE A read of modes of operation shows only the value of modes of operation. The actual mode of the drive is reflected in the object modes of operation display. It may be changed by writing to modes of operation. 12.1.2.8 Object 6061h: Modes of operation display The modes of operation display shows the current mode of operation. The meaning of the returned value corresponds to that of the modes of operation option code (index 6060h). 146 Parker Hannifin Manufacturing Srl user’s manual TPDM OBJECT DESCRIPTION INDEX Name Object Code Data Type Category 6061h Modes of operation display VAR INTEGER8 Mandatory ENTRY DESCRIPTION Access PDO Mapping Value Range Default Value ro Possible INTEGER8 No DATA DESCRIPTION Same as for object 6060h modes of operation. NOTE The actual mode is reflected in the modes of operation display (index 6061h), and not in the modes of operation (index 6060h). 12.1.3 Functional description 12.1.3.1 Modes of operation function The device behavior depends on the activated modes of operation. It is possible to implement different device modes. Since it is not possible to operate the modes in parallel, the user is able to activate the required function by selecting a mode of operation. An example of exclusive functions are those for position and torque control, which can only control one variable at any one time. The variables can perform at most a limited function. Such hybrids are regarded as the particular characteristics of a mode of operation. Position control operation and encoder profile support can be active at the same time, for example. Consequently encoder profile support is not regarded as a mode of operation. Modes of operation (6060h) Profile velocity mode Operation mode function Velocity mode (n.a.) Profile torque mode (n.a.) Modes of operation display (6061h) 147 Parker Hannifin Manufacturing Srl user’s manual TPDM 12.1.4 Homing mode (operative mode 200) In homing mode (Pr31=200) all the standard methods are available the index is referred to the feedback C encoder input track Z, it is also possible to refer the index to the absolute (in the shaft revolution) position of zero of the position feedback (resolver, SinCos absolute etc) setting the homing method to the same absolute value as for track Z indexing but negative .In this case the presetting of the position counters on the index is completed without axis movement. For homing procedures 3 predefined bit are use b91.4 : Right limit switch b91.5 : Left limit switch b91.6 : home switch The active level of the 3 bit can be inverted by mean of a bit mask mapped at index 0x2021 as U16 where bit4,5,6 are processed by a XOR operation with the logical status of b91.4, 91.5 and 91.6 (ex.: by pico-PLC). Note: in this mode, the firmware manages b40.2, b40.6, Pr8, Pr9, Pr10, Pr11, Pr12 and Pr55. 12.1.5 General information This chapter describes the method by which a drive seeks the home position (also called, the datum, reference point or zero point). There are various methods of achieving this using limit switches at the ends of travel or a home switch (zero point switch) in mid-travel, most of the methods also use the index (zero) pulse train from an incremental encoder. Control word Status word Homing option code Homing speed Homing Homing acceleration Position demand value Home offset Figure 20: The homing function 12.1.5.1 Input data description The user can specify the speeds, acceleration and the method of homing. There is a further object home offset which allows the user to displace zero in the user’s coordinate system from the home position. There are two homing speeds; in a typical cycle the faster speed is used to find the home switch and the slower speed is used to find the index pulse. The manufacturer is allowed some 148 Parker Hannifin Manufacturing Srl user’s manual TPDM discretion in the use of these speeds as the response to the signals may be dependent upon the hardware used. 12.1.5.2 Output data description There is no output data except for those bits in the statusword which return the status or result of the homing process and the demand to the position control loops. 12.1.5.3 Internal states The homing mode will control by the bits of the controlword and statusword. 12.1.5.3.1 Controlword of homing mode 15 9 8 7 6 5 4 3 0 Halt reserved Homing operation start MSB LSB Name Value Description 0 Homing mode inactive 0 → 1 Start homing mode Homing operation start 1 Homing mode active 1 → 0 Interrupt homing mode 0 Execute the instruction of bit 4 Halt 1 Stop axle with homing acceleration Table 11: Homing mode bits of the controlword 12.1.5.3.2 Statusword of homing mode 15 14 13 12 11 10 9 Homing error Homing attained Target reached MSB 0 LSB Name Value Target reached 0 1 Homing 0 attained 1 Homing error 0 Description Halt = 0: Home position not reached Halt = 1: Axle decelerates Halt = 0: Home position reached Halt = 1: Axle has velocity 0 Homing mode not yet completed Homing mode carried out successfully No homing error Homing error occurred; Homing mode carried out not successfully; 1 The error cause is found by reading the error code Table 12: Homing mode bits of the statusword 149 Parker Hannifin Manufacturing Srl user’s manual TPDM 12.1.6 Object dictionary entries 12.1.6.1 Objects defined in this chapter Index 607Ch 6098h 6099h 609Ah Object VAR VAR ARRAY VAR Name Home offset Homing method Homing speeds Homing acceleration Type INTEGER32 INTEGER8 UNSIGNED32 UNSIGNED32 Attr. rw rw rw rw M/O O M M O 12.1.6.2 Objects defined in other chapters Index Object Name 6040h VAR Controlword 6041h VAR Statusword Type Chapter UNSIGNED16 dc UNSIGNED16 dc 12.1.7 Object description 12.1.7.1 Object 607Ch: Home offset The home offset object is the difference between the zero position for the application and the machine home position (found during homing), it is measured in position units. During homing the machine home position is found and once the homing is completed the zero position is offset from the home position by adding the home offset to the home position. All subsequent absolute moves shall be taken relative to this new zero position. This is illustrated in the following diagram. Zero position Home position HOME OFFSET Figure 21: Home offset If the home offset is not implemented then it shall be zero. OBJECT DESCRIPTION INDEX 607Ch Name Home offset Object Code VAR Data Type INTEGER32 Category Optional 150 Parker Hannifin Manufacturing Srl user’s manual TPDM ENTRY DESCRIPTION Access PDO Mapping Value Range Default Value rw Possible INTEGER32 0 12.1.7.2 Object 6098h: Homing method The homing method object determines the method that will be used during homing. OBJECT DESCRIPTION INDEX Name Object Code Data Type Category 6098h Homing method VAR INTEGER8 Conditional; Mandatory, if hm supported ENTRY DESCRIPTION Access PDO Mapping Value Range Default Value rw Possible INTEGER8 0 DATA DESCRIPTION Value -128 .. -1 0 1..35 36 .. 127 Description manufacturer specific No homing operation required Methods 1 to 35 (see the functional description) reserved 12.1.7.3 Object 6099h: Homing speeds This entry in the object dictionary defines the speeds used during homing and is given velocity units. OBJECT DESCRIPTION. INDEX Name Object Code Data Type Category 6099h Homing speeds ARRAY UNSIGNED32 Mandatory, if hm supported 151 Parker Hannifin Manufacturing Srl user’s manual TPDM ENTRY DESCRIPTION Sub-Index Description Entry Category Access PDO Mapping Value Range Default Value Sub-Index Description Entry Category Access PDO Mapping Value Range Default Value Sub-Index Description Entry Category Access PDO Mapping Value Range Default Value 0 number of entries Mandatory ro No 2 2 1 Speed during search for switch Mandatory rw Possible UNSIGNED32 0 2 Speed during search for zero Mandatory rw Possible UNSIGNED32 0 12.1.7.4 Object 609Ah: Homing acceleration The homing acceleration establishes the acceleration to be used for all accelerations and decelerations with the standard homing modes and is given in acceleration units. OBJECT DESCRIPTION INDEX Name Object Code Data Type Category 609Ah Homing acceleration VAR UNSIGNED32 Optional ENTRY DESCRIPTION Access PDO Mapping Value Range Default Value 152 rw Possible UNSIGNED32 No Parker Hannifin Manufacturing Srl user’s manual TPDM 12.1.8 Functional description By choosing a method of homing by writing a value to homing method will clearly establish the homing signal (positive limit switch, negative limit switch, home switch) the direction of actuation and where appropriate the position of the index pulse(*). The home position and the zero position are offset by the home offset, see the definition of home offset for how this offset is used. Various homing positions are illustrated in the following diagrams. An encircled number indicates the code for selection of this homing position. The direction of movement is also indicated. Further homing methods may be defined by the manufacturer using the negative values of homing method. There are four sources of homing signal available, these are the negative and positive limit switches, the home switch and the index pulse from an encoder. In the diagrams of homing sequences shown below, the encoder count increases as the axle's position moves to the right, in other words the left is the minimum position and the right is the maximum position. For the operation of positioning drives, an exact knowledge of the absolute position is normally required. Since for cost reasons, drives often do not have an absolute encoder, a homing operation is necessary. There are several, application-specific methods. The homing method is used for selection. The exact sequence of the homing operation is clearly described by the method. In some circumstances, a device has several methods to choose from, using the homing method. (*) with resolver feedback, it’s necessary set the object 0x6098 with negative sign. In this case the homing function is stopped immediately after the home sensor, and the actual position becomes the home position. 12.1.8.1 Homing methods The following sub-sections describe the details of how each of the homing modes shall function. 12.1.8.1.1 Method 1: Homing on the negative limit switch and index pulse Using this method the initial direction of movement is leftward if the negative limit switch is inactive (here shown as low). The home position is at the first index pulse to the right of the position where the negative limit switch becomes inactive. 153 Parker Hannifin Manufacturing Srl user’s manual TPDM (1) Homing on the negative limit switch and index pulse 12.1.8.1.2 Method 2: Homing on the positive limit switch and index pulse Using this method the initial direction of movement is rightward if the positive limit switch is inactive (here shown as low). The position of home is at the first index pulse to the left of the position where the positive limit switch becomes inactive. (2) Index pulse Figure 23: Homing on the positive limit switch and index pulse 12.1.8.1.3 Methods 3 and 4: Homing on the positive home switch and index pul. Using methods 3 or 4 the initial direction of movement is dependent on the state of the home switch. The home position is at the index pulse to either to the left or the right of the point where the home switch changes state. If the initial position is sited so that the direction of movement must reverse during homing, the point at which the reversal takes place is anywhere after a change of state of the home switch. (3) (3) (4) (4) Index pulse Home switch Figure 24: Homing on the positive home switch and index pulse 154 Parker Hannifin Manufacturing Srl user’s manual TPDM 155 Parker Hannifin Manufacturing Srl user’s manual TPDM 12.1.8.1.4 Methods 5 and 6: Homing on the negative home switch and index pul. Using methods 5 or 6 the initial direction of movement is dependent on the state of the home switch. The home position is at the index pulse to either to the left or the right of the point where the home switch changes state. If the initial position is sited so that the direction of movement must reverse during homing, the point at which the reversal takes place is anywhere after a change of state of the home switch. (5) (5) (6) (6) Index pulse Home switch Figure 25: Homing on the negative home switch and index pulse 12.1.8.1.5 Methods 7 to 14: Homing on the home switch and index pulse These methods use a home switch which is active over only portion of the travel, in effect the switch has a ‘momentary’ action as the axle's position sweeps past the switch. Using methods 7 to 10 the initial direction of movement is to the right, and using methods 11 to 14 the initial direction of movement is to the left except if the home switch is active at the start of the motion. In this case the initial direction of motion is Dependent on the edge being sought. The home position is at the index pulse on either side of the rising or falling edges of the home switch, as shown in the following two diagrams. If the initial direction of movement leads away from the home switch, the drive must reverse on encountering the relevant limit switch. 156 Parker Hannifin Manufacturing Srl user’s manual TPDM (10) (8) (9) (7) (10) (7) (8) (9) (9) (7) (8) (10) Index pulse Home switch Positive limit switch Figure 26: Homing on the home switch and index pulse - positive initial move (14) (12) (11) (13) (14) (11) (13) (12) (13) (14) (11) (12) Index pulse Home switch Negative limit switch Figure 27: Homing on the home switch and index pulse - negative initial move 12.1.8.1.6 Methods 15 and 16: Reserved These methods are reserved for future expansion of the homing mode. 157 Parker Hannifin Manufacturing Srl user’s manual TPDM 12.1.8.1.7 Methods 17 to 30: Homing without an index pulse These methods are similar to methods 1 to 14 except that the home position is not dependent on the index pulse but only dependent on the relevant home or limit switch transitions. For example methods 19 and 20 are similar to methods 3 and 4 as shown in the following diagram. (19) (19) (20) (20) Home switch Figure 28: Homing on the positive home switch 12.1.8.1.8 Methods 31 and 32: Reserved These methods are reserved for future expansion of the homing mode. 12.1.8.1.9 Methods 33 to 34: Homing on the index pulse Using methods 33 or 34 the direction of homing is negative or positive respectively. The home position is at the index pulse found in the selected direction. (33) (34) Index pulse Figure 29: Homing on the index pulse 12.1.8.1.10 Method 35: Homing on the current position In method 35 the current position is taken to be the home position. 158 Parker Hannifin Manufacturing Srl user’s manual TPDM 12.1.9 Profile position mode (operative mode 201) In profile position mode (Pr31=201) the buffer of targets allowed is 2 elemets long one for the profile in execution the other for the next, the motion profile type only valid value is 0 (trapezoidal profile with linear ramp). 12.1.9.1 Internal states The profile position mode will control by the bits of the controlword and statusword. Index 607Ah 6081h 6083h 6085h 6086h Object VAR VAR VAR VAR VAR Name Target position Profile velocity Profile acc./dec. Quick stop deceleration Motion profile type Type INTEGER32 UNSIGNED32 UNSIGNED32 UNSIGNED32 INTEGER16 Attr. rw rw rw rw rw M/O M M M O M 12.1.9.1.1 Controlword of profile position mode 15 9 8 7 6 5 4 3 0 Halt abs / rel Change set immediately New set-point MSB LSB Name Value Description New set0 Does not assume target position point 1 Assume target position Change set Finish the actual positioning and then start the next 0 immediately positioning Interrupt the actual positioning and start the next 1 positioning 0 Target position is an absolute value abs / rel 1 Target position is a relative value Halt 0 Execute positioning Stop axle with profile deceleration (if not supported with 1 profile acceleration) Table 9: Profile position mode bits of the controlword 12.1.9.1.2 Statusword of profile position mode 15 14 13 12 11 10 9 0 Following error Set-point acknowledge Target reached MSB LSB 159 Parker Hannifin Manufacturing Srl Name Target reached Set-point acknowledge Following error user’s manual TPDM Value Description 0 Halt = 0: Target position not reached Halt = 1: Axle decelerates 1 Halt = 0: Target position reached Halt = 1: Velocity of axle is 0 Trajectory generator has not assumed the positioning values (yet) Trajectory generator has assumed the positioning values No following error Following error 0 1 0 1 Table 10: Profile position mode bits of the statusword 12.1.9.2 Object dictionary entries 12.1.9.2.1 Objects defined in this chapter Index 607A Object VAR Name Target position Index 6081 6083 6085 6086 Object VAR VAR VAR VAR Name Profile velocity Profile acceleration / deceleration Quick stop deceleration Motion profile type Index 6040 6041 605A 6093[1,2] 6094 [1,2] 6097 [1,2] Object VAR VAR VAR ARRAY ARRAY ARRAY Name Controlword Statusword Quick stop option code Position factor Velocity encoder factor Acceleration factor Type INTEGER32 Attr. M/O rw M Type UNSIGNED32 UNSIGNED32 UNSIGNED32 INTEGER16 Attr. M/O rw M rw M rw O rw M Type UNSIGNED16 UNSIGNED16 INTEGER16 UNSIGNED32 UNSIGNED32 UNSIGNED32 Chapter dc dc dc fg fg fg 12.1.9.2.2 Object 607Ah: Target position The target position is the position that the drive should move to in position profile mode using the current settings of motion control parameters such as velocity, acceleration/deceleration, motion profile type etc. The target position is given in user defined position units. It is converted to position increments using the position factor. The target position will be interpreted as absolute or relative depending on the ‘abs / rel’ flag in the controlword. 160 Parker Hannifin Manufacturing Srl user’s manual TPDM OBJECT DESCRIPTION INDEX Name Object Code Data Type Category 607Ah Target position VAR INTEGER32 Conditional; Mandatory, if pp or pc supported EN TRY DESCRIPTION Access PDO Mapping Value Range Default Value rw Possible INTEGER32 No 12.1.9.2.3 Object 6081h: Profile velocity The profile velocity is the velocity normally attained at the end of the acceleration ramp during a profiled move and is valid for both directions of motion. The profile velocity is given in user defined speed units. It is converted to position increments per second using the velocity encoder factor. OBJECT DESCRIPTION ENTRY DESCRIPTION INDEX Name Object Code Data Type Category 6081h Profile velocity VAR UNSIGNED32 Conditional; Mandatory, if pp or pv supported Access PDO Mapping Value Range Default Value rw Possible UNSIGNED32 No 12.1.9.2.4 Object 6083h: Profile acceleration/deceleration The profile acceleration/deceleration is given in user defined acceleration units. It is converted to position increments per second2 using the normalizing factors. 161 Parker Hannifin Manufacturing Srl user’s manual TPDM OBJECT DESCRIPTIION INDEX Name Object Code Data Type Category 6083h Profile acceleration/deceleration VAR UNSIGNED32 Conditional; Mandatory, if pp or pv supported ENTRY DESCRIPTION Access PDO Mapping Value Range Default Value rw Possible UNSIGNED32 No 12.1.9.2.5 Object 6085h: Quick stop deceleration The quick stop deceleration is the deceleration used to stop the motor if the ‘Quick Stop’ command is given and the quick stop option code (see 605Ah) is set to 2. The quick stop deceleration is given in the same units as the profile acceleration. OBJECT DESCRIPTION INDEX Name Object Code Data Type Category 6085h Quick stop deceleration VAR UNSIGNED32 Optional ENTRY DESCRIPTION Access PDO Mapping Value Range Default Value rw Possible UNSIGNED32 No 12.1.9.2.6 Object 6086h: Motion profile type The motion profile type is used to select the type of motion profile used to perform a profiled move. Value Description 0 Linear ramp (trapezoidal profile) 162 Parker Hannifin Manufacturing Srl user’s manual TPDM OBJECT DESCRIPTION INDEX Name Object Code Data Type Category 6086h Motion profile type VAR INTEGER16 Conditional; Mandatory, if pp or pv supported ENTRY DESCRIPTION Access PDO Mapping Value Range Default Value rw Possible INTEGER16 0 12.1.9.3 Functional description Two different ways to apply target positions to a drive, are supported by this device profile. Set of set-points: After reaching the target position the drive unit immediately processes the next target position which results in a move where the velocity of the drive normally is not reduced to zero after achieving a set-point. Single set-point: After reaching the target position the drive unit signals this status to a host computer and then receives a new set-point. After reaching a target position the velocity normally is reduced to zero before starting a move to the next set-point. The two modes are controlled by the timing of the bits ‘new set-point’ and ‘change set immediately’ in the controlword and ‘set-point acknowledge’ in the statusword. These bits allow to set up a request-response mechanism in order to prepare a set of set-points while another set still is processed in the drive unit. This minimizes reaction times within a control program on a host computer. DATA New setpoint (2) (4) (6) Change set immediately (1) Setpoint acknowledge (3) (5) Figure 17: Set-point transmission from a host computer 163 Parker Hannifin Manufacturing Srl user’s manual TPDM Figure 17, Figure 18 and Figure 19 show the difference between the "set of set-points" mode and the "single set-point" mode. The initial status of the bit ‘change set immediately’ in the controlword determines which mode is used. To keep simple these examples, only trapezoidal moves are used. If the bit ‘change set immediately’ is "0" (continuously drawn line in Figure 17) a single setpoint is expected by the drive (1). After data is applied to the drive, a host signals that the data is valid by changing the bit ‘new set-point’ to "1" in the controlword (2). The drive responds with ‘set-point acknowledge’ set to "1" in the statusword (3) after it recognized and buffered the new valid data. Now the host may release ‘new set-point’ (4) and afterwards the drive signals with ‘set-point acknowledge’ equal "0" its ability to accept new data again (5). In Figure 18 this mechanism results in a velocity of zero after ramping down in order to reach a target position x1.at t1. After signaling to the host, that the set-point is reached like described above, the next target position x2 is processed at t2 and reached at t3. Figure 18: Single set-point If the bit ‘change set immediately’ is "1" (dashed line in Figure 17) the new target position will be active immediately. In Figure 19 the drive receives the first target position at t0. At the time point t1 the drive receives a second target position. The drive readapts the actual move to the new target position immediately. Figure 19: Change set immediately 12.1.9.4 Functional description Figure 33 shows the meaning of the sub-function position reached. Symmetrically around the target position a window is defined for the accepted position range. If a drive is situated in the accepted position range over the time position window time the bit target reached (bit 10) in the statusword is to set. 164 Parker Hannifin Manufacturing Srl user’s manual TPDM Position Accepted position range Position window Position not reached Position window Position reached Position not reached target position Figure 33: Position reached Figure 34 shows the meaning of the sub-function following error in the profile position mode. Symmetrically around the reference position a window is defined for the accepted following error tolerance. If a drive is situated out of the accepted position range for more than following error time out time the bit following error (bit 13) in the statusword is set. Accepted following Position Error tollerance Following error Following error Following error window window No following error Following error reference position Figure 34: Following error The following error window is used to signal by mean of status word the servo error condition on user defined BIT14 when Interpolated position mode is active and with standard bit 13 in profile position mode. If the user sets b70.12 a fault reaction sequence is entered and according to the fault reaction option code (valid values 0,1,2) the motor is stopped and finally disabled sending an emergency message with error code 0xff11 and user data loaded with pr[153:152]. 165 Parker Hannifin Manufacturing Srl user’s manual TPDM 12.1.10Interpolated Position Mode (operative mode 202) In Interpolated Position Mode (Pr31=202) the cycle time is set in the object 0x1006 'communication cycle period' and depending on the value set in this object different ways of regulation are possible. If the value is less than 2500 µsec the position loop is executed at the moment the sync signal is received the position reference received on the PDO is directly processed as target of the position loop. If the value is more or equal than 2500 µsec the position reference received is interpolated according the interpolation sub mode index 0x60c0 , the interpolation may be cubic or linear. If object 0x60c0 is 0 the interpolation algorithm is linear otherwise if –1 is cubic with both position and velocity reference, if –2 is cubic with position reference only. If on the synchronous PDO 4 rx it is not mapped the position reference the position loop is not executed but the velocity reference received is set, the velocity reference may be supplied in counts/sec or RPM respectively mapping object 0x60c1.2 or 0x60c1.3, in this case the external controller executes position loop. Note: In interpolated position mode factor group conversion are not active. If the cycle time is less than 2500 µsec the feedforward of velocity may be computed by the drive (if bit 247.7 is set) from the delta of position reference in the cycle time (gain of feedforward component should be set accordingly with the cycle time). Otherwise feedforward of velocity may be sent with PDO4 rx mapping in RPM units the object 0x60c1.3. Depending on the different algorithms of interpolation there is a different delay between the moment the target position is received on the PDO and validated by the sync and the moment when the target position is active in the trajectory setpoint of the motor. In case of cycle time less than 2500 µsec the position loop trajectory setpoint is immediately upgraded with the last received position setpoint as soon as the sync signal is received. In case of cycle time longer than 2500 µsec, both with linear interpolation and cubic interpolation with position and velocity, the point specified in the target position received on the PDO will be activated as trajectory setpoint at the end of the cycle time started with the sync signal that validated the target position, so with a cycle time delay. As last, in case of cycle time longer than 2500 µsec and cubic interpolation with position reference only, the point specified in the target position received on the PDO will be activated as trajectory setpoint at the end of the next cycle time started with the sync signal that validated the target position, so with two cycle time delay. Index Object Name Type Attr. M/O 60C0h VAR Interpolation sub mode select INTEGER16 rw O 60C1h ARRAY Interpolation data record INTEGER32 rw O Index 6040h 6041h 605Ah 6060h 6061h 6063h 166 Object VAR VAR VAR VAR VAR VAR Name Controlword Statusword Quick stop option mode Modes of operation Modes of operation display Position actual value* Type UNSIGNED16 UNSIGNED16 INTEGER16 INTEGER8 INTEGER8 INTEGER32 Chapter dc dc dc dc dc pc Parker Hannifin Manufacturing Srl Note: user’s manual TPDM the position loop resolution can be selected through parameter Pr288, that would be considered as the exponent of 2 elevated to the nth power: 2Pr288. 12.1.10.1 Object 60C0h: Interpolation sub mode select For the interpolated position mode a manufacturer may offer different interpolation algorithms. This object reflects or changes the actually chosen interpolation mode. OBJECT DESCRIPTION INDEX Name Object Code Data Type Category 60C0h Interpolation sub mode select VAR INTEGER16 Optional ENTRY DESCRIPTION Access PDO Mapping Value Range Default Value rw Possible 0..-2 0 DATA DESCRIPTION Value -2 -1 0 +1..+32767 Description Cubic interpolation only position Cubic interpolation speed+position Linear interpolation reserved 12.1.10.2 Object 60C1h: Interpolation data record The interpolation data record are the data words which are necessary to perform the interpolation algorithm. The number N of data words in the record is defined by interpolation data configuration. The interpretation of the data words in interpolation data record may vary with the different possible interpolation modes as set by the interpolation sub mode select. For the linear interpolation mode each interpolation data record simply can be regarded as a new position set-point. To describe a cubic spline interpolation e.g., four or more data words are needed for the spline coefficients, and further interpolation parameters. After the last item of an interpolation data record is written to the devices input buffer, the pointer of the buffer is automatically incremented to the next buffer position. OBJECT DESCRIPTION INDEX 60C1h Name Interpolation data record Object Code ARRAY Data Type INTEGER32 Category Optional 167 Parker Hannifin Manufacturing Srl user’s manual TPDM ENTRY DESCRIPTION Sub-Index Description Entry Category Access PDO Mapping Value Range Default Value 0 number of entries 3 Mandatory ro No 3 No Sub-Index Description 1 Position setpoint in counts the first parameter of ip function fip(x1, .. xN) Entry Category Mandatory Access rw PDO Mapping Possible Value Range INTEGER32 Default Value No Sub-Index Description 2 Velocity setpoint in counts/sec the second parameter of ip function fip(x1, .. xN) Entry Category Optional Access rw PDO Mapping Possible Value Range INTEGER32 Default Value No Sub-Index Description 3 Velocity setpoint in rpm the 3-rd parameter of ip function fip(x1, .. xN) Entry Category Optional Access rw PDO Mapping Possible Value Range INTEGER32 Default Value No 168 Parker Hannifin Manufacturing Srl user’s manual TPDM Changoing the mode of operation or deselect interpolated position mode Quick stop Disable interpolation Interpolation inactive Enable interpolation Disable voltage shutdown Interpolated position mode selected Operation enbled Interpolation active 169 Parker Hannifin Manufacturing Srl user’s manual TPDM 12.1.11Mode Cyclic synchronous position (operative mode 203) The overall structure for this mode Cyclic synchronous position (Pr31 = 203 – only for EtherCAT protocol) is shown in Figure: Torque offset (60B2h) Velociy offset (60B1h) Position offset (60B0h) + + + Position control Target position (607Ah) + + Velocity control + Torque control M S Torque actual value (6077h) Velocity actual value (606Ch) Position actual value (6064h) With this mode, the trajectory generator is located in the control device, not in the drive device. In cyclic synchronous manner, it provides a target position to the drive device, which performs position control, velocity control and torque control. Optionally, additive velocity and torque values can be provided by the control system in order to allow for velocity and/or torque feedforward. Measured by sensors, the drive device may provide actual values for position, velocity and torque to the control device. The behaviour of the control function is influenced by control parameters like limit functions, which are externally applicable. The drive internal control function is not specified more precisely in this part of profile specification as it is highly manufacturer-specific, but the format and content of the control parameters are provided. Index 60B0h 60B1h 60B2h Object VAR VAR VAR Name Position offset Velocity offset Torque offset Attr. rw rw rw Type VALORE ASSOLUTO16 VALORE ASSOLUTO16 INTERO 16 M /O O O O Index 6040h 6041h 605Ah Object VAR VAR VAR Note: the position loop resolution can be selected through parameter Pr288, that would be considered as the exponent of 2 elevated to the nth power: 2Pr288. 170 Name Controlword Statusword Quick stop option mode Type INTEGER32 INTEGER 32 INTEGER 16 Chap. dc dc dc Parker Hannifin Manufacturing Srl user’s manual TPDM 12.1.11.1 Functional description Figure below shows the inputs and outputs of the drive control function. The input values (from the control function point of view) are the target position and optionally a position offset (to be added to the target position to allow two instances to set up the position) as well as an optional velocity offset and an optional torque offset used for feedforward control. Especially in cascaded control structures, where a position control is followed by a velocity or torque control, the output of the position control loop is used as an input for a further calculation in the drive device. Limit functions may be used to restrict the range of values to avoid unintended positions. The interpolation time period defines the time period between two updates of the target position and/or additive position and shall be used for intercycle interpolation. The target position shall be interpreted as absolute value. The position actual value is used as mandatory output to the control device. Further outputs may be the velocity actual value, torque actual value and the velocity sensor actual value. The following error actual value may be used as an additional parameter. Position range limit (607Bh) Software position limit (607Dh) Polarity (607Eh) Target position (607Ah) Position offset (60B0h) + Limit function Multiplier Position actual value (6064h) + Following error window (6065h) Following error (60F4h) actual value Following error time out (6066h) [ms] Max motor speed (6080h) Velocity offset (60B1h) Multiplier Polarity (607Eh) Drive control function Velocity actual value (606Ch) Quick-stop deceleration (6085h) Velocity sensor (6069h) actual value Quick-stop option code (605Ah) Motion profile type (6086h) Interpolation time period (60C2h) Torque offset (60B2h) Multiplier Torque actual value (6077h) Motor rated torque (6076h) Max torque (6072h) Multiplier Motor rated torque (6076h) All values are transformed – if necessary – from user-defined units to normalized units such as increments with the relative functions. A target position value or position offset outside the allowed range of the following error window around a position demand value for longer than the following error time out shall result in setting bit 13 (following error) in the statusword to 1. 171 Parker Hannifin Manufacturing Srl user’s manual TPDM 12.1.11.2 Use of controlword and statusword The cyclic synchronous position mode uses no mode specific bits of the controlword and three bits of the statusword for mode-specific purposes. Figure 64 shows the structure of the statusword. Table 236 defines the values for bit 10, 12, and 13 of the statusword. 15 14 13 Following error 12 Target position ignored 11 MSB 10 Reserverd 9 0 LSB Name Value Description Bit 10 0 Reserved 1 Reserved Bit 11 0 Target position ignored 1 Target position shall be used as input to position control loop Bit 12 0 No following error 1 Following error Definition of bit 10, bit 12, and bit 13 12.1.11.3 Detailed object definitions 12.1.11.3.1 Object 60B0h: Position offset This object shall provide the offset of the target position. The offset shall be given in userdefined position units. NOTE The value itself is absolute and thus independent of how often it is transmitted over the communication system, for example, transmitted twice does not mean double value. Since the additive position value represents an offset to the target position it can be also used to control the drive with relative values with regard to the target position. Object description INDEX Name Object code Data type Category 60B0h Position offset VAR INTEGER 32 Optional Entry description Sub-index Access PDO mapping Range value Default value 172 00h rw See /CiA402-3/ Integer 32 0 Parker Hannifin Manufacturing Srl user’s manual TPDM 12.1.11.3.2 Object 60B1h: Velocity offset This object shall provide the offset for the velocity value. The offset shall be given in userdefined velocity units. In cyclic synchronous position mode, this object contains the input value for velocity feed forward. NOTE The value itself is absolute and thus independent of how often it is transmitted over the communication system, for example transmitted twice does not mean double value. Since the additive velocity value represents an offset to the target velocity, it can be also used to control the drive with relative values with regard to the target velocity. Object description INDEX Name Object code Data type Category 60B1h Velocity offset VAR Integer 32 Optional Entry description Sub-index Access PDO mapping Range value Default value 00h rw See /CiA402-3/ Integer 32 0 12.1.11.3.3 Object 60B2h: Torque offset This object shall provide the offset for the torque value. The offset shall be given in per thousand rated torque. In cyclic synchronous position mode, this object contains the input value for torque feed forward. NOTE The value itself is absolute and thus independent of how often it is transmitted over the communication system, for example transmitted twice does not mean double value. Object description INDEX Name Object code Data type Category 60B2h Torque offset VAR Integer 16 Optional Entry description Sub-index Access PDO mapping Range value Default value 00h rw See /CiA402-3/ Integer 16 0 173 Parker Hannifin Manufacturing Srl user’s manual TPDM 12.1.12Drive parameters Some debug commands and parameters are added concerning CANopen Par. Description Pr273 CANOPEN_CTRL_WORD. Control of drive status. Field R Pr274 CANOPEN_STATUS_WORD. Status of the drive. R Pr275 CANOPEN_DS301_STATUS. Status of communication profile DS301. R Range Def. Ris. -32768÷ 0 1 +32767 -32768÷ 0 1 +32767 -32768÷ 0 1 +32767 Par. b271.8 Description Field Def. Enable sync check. (1) enables missing sync check DSP402 R/W 0 CANopen R/W 0 b272.1 Conversion of velocity. (1) conversion in internal units of velocity [rpm*256] and acceleration [count/(sec2*520)]. (0) conversion of velocity and acceleration in rpm e msec/krpm 0 b272.2 Touch Probe function. (1) enable the touch probe function on DS402 R/W R/W 0 b272.3 Fault reaction sequence. (1) a fault reaction sequence is entered and according to the fault reaction option code(valid values 0,1,2) the motor is stopped and finally disabled sending an emergency message. R/W 0 b272.9 Remote mode.(1) Remote mode CANopen (0) remote disabled R/W 0 b272.10 Stationary brake command. (1) Command to enable the stationary brake by CANopen controlword. Note: When in remote mode the bit b40.6, b40.2 and the parameters Pr8, Pr9, Pr10, Pr11, Pr12 and Pr55 are handled by firmware according to CANopen network setting and commands and should not be modified by the user. Note: When in interpolated position mode Feed-forward of speed enable in case of sync frequency is >400Hz, set b247.7=1, b70.6=0 and b70.7=0. Otherwise when the frequency is <400Hz, set b247.7=0, b70.6=0 and b70.7=0. 12.1.12.1 OPM201 parameters Par. Pr237:236 Pr239:238 Pr241:240 Pr243:242 Pr244 Pr245 174 Description Speed positioner opm201. Acceleration positioner opm201. Deceleration positioner opm201. Target position opm201. Acceleration positioner opm201. Acceleration positioner opm201. Field R R R R R R Range ±231 ±231 ±231 ±231 ±215 ±215 Def. Ris. 0 1 0 1 0 1 0 1 0 1 0 1 Parker Hannifin Manufacturing Srl user’s manual TPDM Par. b247.0 Description Field Def. Profile in execution. (1) theory profile of the trapezoidal profile in R 0 execution. W 0 b247.12 Enable FFWD speed. (1) enables the FFWD on speed regulator of the trapezoidal positioner. 12.1.12.2 OPM202 parameters Par. Pr237:236 Pr238 Pr239 Pr241:240 Pr243:242 Pr244 Pr245 Pr249:248 Pr250 Pr261:260 Pr263:262 Pr288 Description Speed reference opm202. Cyclic CMD opm202. Cyclic STAT opm202. Speed reference FFWD FBK Speed. Corr_PLL. Delta Sync Interpolation time. Speed reference RPM. Final position. FBK position. Position loop resolution selection. The position loop resolution can be selected by parameter Pr288. Ranging from 12 to 20 bit. The parameter change is effective the next time the drive is powered up. Field R R R R R R R R R R R W Par. Description b247.7 Component calculation FFWD from position reference. b247.15 Watchdog. This bit is set to 1 at every block sync reception Range Def. Res. ±231 0 1 15 ±2 0 1 15 ±2 0 1 ±231 0 1 31 ±2 0 1 ±215 0 1 15 ±2 0 1 ±231 0 1 15 ±2 0 1 31 ±2 0 1 ±231 0 1 Pr[288] 12÷20 12 2 Field W R Def. 0 0 12.1.12.3 OPM203 parameters (E5 version) The EtherCAT optional (code: E5) realizes the messages in according to the CANopen DSP402 standard: CoE EtherCAT – CANopen DSP402 Par. Pr233 Pr288 Description Lifetime factor. Position loop resolution selection. The position loop resolution can be selected by parameter Pr288. Ranging from 12 to 20 bit. The parameter change is effective the next time the drive is powered up. Par. Description b232.0 Emergency disabled. b232.1 Enable SSC Filter. b232.13 Added axes onto EtherCAT. Field W W Range Def. Res. 6 1 0÷10 Pr[288] 12÷20 12 2 Field Def. R/W 0 R/W 1 R/W - 175 Parker Hannifin Manufacturing Srl b232.14 b232.15 b247.7 Component calculation FFWD from position reference. b247.15 Watchdog. This bit is set to 1 at every block sync reception 176 user’s manual TPDM W R 0 0 Parker Hannifin Manufacturing Srl user’s manual TPDM 13 Appendix A: Conventions Reference Motor shaft movement (motor shaft view) Torque Feedback counter Encoder output Tachometer signal Iu Iv Encoder In. A B Positive Positive Increments A B Positive couple • sin (ϑ ) 2 •π couple • sin ϑ + 3 Increment counter 14 Appendix B: Software timing 64 µs 128 µs Period 512 µs 6.144 ms 49.152 ms Task Current control Speed control Torque limits control Speed reference management Braking resistor management FIN management Thermal motor image Digital inputs Program scanning pico-PLC Digital outputs Speed window management 177 Parker Hannifin Manufacturing Srl user’s manual TPDM 15 Appendix C: default program for pico-PLC 90.0 41.5 90.1 40.6 41.4 41.11 END 178 LD OUT 90.0 41.5 digital input 0 used to power the drive LD OUT 90.1 40.6 digital input 1 used for the stop function LD OUT 41.4 91.0 digital output 0 indicates that the converter is OK LD OUT 41.11 91.1 digital output 1 indicates that the thermal motor image is active 91.0 91.1 END end of the program Parker Hannifin Manufacturing Srl user’s manual TPDM 16 Appendix D: Flash information • TO SAVE USE THE BIT b99.15 PARAMETERS • TO SAVE THE PLC USE THE BIT b99.14 PROGRAM • TO CHANGE THE INSTRUCTIONS, PLC b99.13 MUST BE 0 • WHEN THE OPERATING MODE IS CHANGED, YOU MUST USE b99.11 TO LOAD THE DEFAULT PARAMETERS (b40.2 MUST BE 0) • BEFORE CHANGING Pr31, BE SURE THAT b40.2=0 • THE SPEED REFERENCE WILL BE LIMITED TO THE VALUE OF Pr32 • USING THE TORQUE CONTROL, Pr2 AND Pr3 MUST BE SET TO 1000 • TO USE THE ACTIVE OPERATING MODE, b40.2 MUST BE 1 • IF YOU CANNOT MODIFY THE READ-WRITE PARAMETERS USING THE KEYPAD, BE SURE THAT E b99.7 IS 0. IF IT WAS 0, PROBABLY THE SAME PARAMETERS WERE MODIFIED BY THE PLC PROGRAM. 179 Parker Hannifin Manufacturing Srl user’s manual TPDM 17 Appendix E: Switching Frequency The configuration of the frequency is realized only on A axis, for all axes, by the bit b231.9 and b231.11: Frequency 8 kHz 4 kHz 16 kHz 231.9 0 0 1 231.11 0 1 0 The default configuration uses the full characteristics of the drive; in some cases the switching frequency reduces the current. See the following data: Axis Description 2A Rated output current [Arms] Peak output current (2 sec) [Arms] Pr19 (and Pr33) max value [%] 5A Rated output current [Arms] Peak output current (2 sec) [Arms] Pr19 (and Pr33) max value [%] 8A Rated output current [Arms] Peak output current (2 sec) [Arms] Pr19 (and Pr33) max value [%] 10 A Rated output current [Arms] Peak output current (2 sec) [Arms] Pr19 (and Pr33) max value [%] 15 A Rated output current [Arms] Peak output current (2 sec) [Arms] Pr19 (and Pr33) max value [%] 30 A Rated output current [Arms] Peak output current (2 sec) [Arms] Pr19 (and Pr33) max value [%] 4 kHz 2 4 100% 5 10 100% 8 16 100% 10 20 100% 15 30 100% 30 60 100% 8 kHz 2 4 100% 5 10 100% 8 16 100% 7,5 15 75% 10 20 66% 21 42 70% 16 kHz 1,33 2,67 66,2% 3,33 6,67 66,2% 5,33 10,67 66,2% 3,8 7,6 38% 5 10 33% 12 24 40% The data in evidence are the default configuration of the drive. Attention: when the switching frequency is different to the default configuration, the parameters Pr19 and Pr33 are limited in according to the peak output current. Pay attention at the motor nominal current and the torque limit, because reducing the switching frequency, the parameters Pr19 and Pr33 remain to the last switching frequency. 180 Parker Hannifin Manufacturing Srl user’s manual TPDM 18 Appendix F: TPDM Alarms Malfunction error code (Pr23) Alarm 0 1 No alarm DC circuit overvoltage 2 3 DC circuit undervoltage Overcurrent 4 FBK error (resolver or encoder) 5 PTC motor alarm 6 Power module overtemperature 7 External alarm 8 Auxiliary alarm 10 (*) Check sum pico-PLC 11 (*) Check sum parameters 12 13 15 Signature firmware CANopen DS402 abort connection Default parameters 16 17 (**) CANopen missing sync Hardware alarm 22 Ambient over temperature 24 PSU alarm Remedies If Pr24 is not 0, see the par. “SUB Alarms table” Check the three-phase power line (max 480V + 10%). Check the brake circuit and the braking resistor Check the three-phase power line. If Pr24=0 is overcurrent; check the motor connections and any phase-phase or phase-ground short-circuits. Check the motor data. If Pr24 is not 0, see the par. “SUB Alarms table” Check the connections of the speed loop and the connectors on both sides (drive-motor). Check the feedback parameters. Check the PTC connection cable. Check the parameters Pr33 (Inom) and Pr19 (Ipeak). Check the cooling fans and for any restrictions to air flow. Check the braking cycle. Check the ambient temperature in the electric cabinet where the drive is installed, as well as the ambient temperature outside the cabinet. Depends on the application (b41.7 – see PicoPLC program) Depends on the application (b41.8 – see PicoPLC program) Set and save default parameters, switch off and on again the drive and repeat programming. Set and save default parameters, switch off and on again the drive and repeat programming. The signature is not installed, to send to repair. Check the connections Set and save default parameters, switch off and on again the drive and repeat programming. Check the connections Internal damage, to send to repair. (see the “SUB Alarms table”) The ambient temperature in the electric cabinet is excessive (>45°C). Check the cooling fans and for any restrictions to air flow. See the par. “SUB Alarms table” 181 Parker Hannifin Manufacturing Srl Malfunction error code (Pr23) user’s manual TPDM Alarm 25 (**) Speed loop FBK initialization error 27 31 TripP.x “x” is a number Overloads digital outputs Communication error Hardware broken Remedies Check the speed FBK settings. Check the speed FBK connection. Motor shaft in movement during the start-up. The encoder is not phased. See the procedure. Check the load of the digital outputs Check the field-bus connection Internal damage, to send to repair. The drive goes in I2T mode due to an overload (the current required is more than the current that “The display can be supplied). shows Check : decimal The wiring between drive and motor (there points on all should be no inverted phases). Take special care characters ” with motors where the connector is replaced by a terminal block : it’s easy to make a mistake. Adhere strictly to the wiring diagrams. Mechanical dimensioning (*) reset only after default values have been loaded and saved. (**) can be only reset at the next power on. I2 T 18.1 Current limit (I2T) SUB Alarms table: Malfunction error code Pr23 Pr24 0 3 17 182 SUB Alarms 4 5 1 2 3 1 2 3 Serial line error Power supply not 3-phases Hardware from FPGA I2t maximum reached Stall status of V/F Different number of axes Number of axes configuration Feedback configuration 4 ADC on FPGA error 5 6 7 8 9 10 11 12 EEprom error FPGA fault EEprom checksum error NIOS SDRAM checksum error NIOS RAM checksum error FPGA blocked FPGA watchdog alarm NIOS watchdog alarm Remedies Insert the terminal plug-in Check the main supply Internal damage, to send to repair. Internal damage, to send to repair. Internal damage, to send to repair. Switch off the drive. Wait one minute before of restart the drive. Internal damage, to send to repair. Internal damage, to send to repair. Internal damage, to send to repair. Internal damage, to send to repair. Internal damage, to send to repair. Internal damage, to send to repair. Internal damage, to send to repair. Internal damage, to send to repair. Parker Hannifin Manufacturing Srl Malfunction error code Pr23 Pr24 13 14 15 16 17 18 bit 0 user’s manual TPDM SUB Alarms Communication error ExpBoard checksum error ExpBoard EEprom program error ExpBoard not compatible ExpBoard EEprom error ExpBoard ADC error Check the serial connection. Power supply not 3-phases Undervoltage PSU Check the main supply Check the main supply. Check the set up of the parameter Pr206 (by the first axis connected to the PSU). Check the main supply Check the environment temperature. Check the cooling fans and for any restrictions to air flow. Check the cycle and if it’s necessary use an external braking resistor. Check the connection of the temperature switch (X40). Short circuit on Braking control circuit. The current required is more than the current that can be supplied Check for any mechanical blockage and make sure the motor is the appropriate size for its current use. Check the motor connections and any phase-phase or phase-ground short-circuits. Check the length and type of the motor cable in use. Make sure a mains filter isn’t connected to the motor! Check the configuration (Pr206 of the first axis connected to the PSU) of the mains supply because it’s not correct. Check the serial connection. bit 1 bit 2 Over voltage PSU Over temperature bit 3 bit 4 Over load braking resistor Temperature switch bit 5 24 bit 6 Over load on DC-bus Over current on DC-bus bit 7 AC supply configuration bit 14 bit 15 Remedies Time-out data exchange 183 Parker Hannifin Manufacturing Srl 19 Appendix G: shield fastener Option (code: EXP-GROUND) to fix the cable shield to the ground: Dimensions: 80 mm x 150mm (approx.) An example: 184 user’s manual TPDM Parker Hannifin Manufacturing Srl user’s manual TPDM 20 Appendix H: EtherCAT option IN – X20 OUT - X21 S2 S1 D1 D2 ETHERCAT Off No error Flickering Booting error Invalid configuration Single Flash Unsolicited Error state change Status D1 LED Blinking Double flash Application watchdog timeout On PDI watchdog timeout Off Init Blinking Pre operational The EtherCAT communication of the device is in working condition. Booting error was detected. INIT state reached, but parameter “Change” in the AL status register is set to 0x01: change/error. General Configuration Error. Slave device application has changed the EtherCAT state autonomously: parameter “Change” in the AL status register is set to 0x01: change/error. An application watchdog timeout has occurred. A PDI watchdog timeout has occurred The device is in state INIT The device is in state PREOPERATIONAL Single Flash Safe The device is in state SAFED2 operational OPERATIONAL On Operational The device is in state Run OPERATIONAL Status Flickering Initialization or The device is booting and has not yet bootstrap entered the INIT state, or the device is in state BOOTSTRAP. Firmware download operation in progress S1 Address selector “alias”. Digit less significant Selectors S2 Address selector “alias”. Digit more significant IN Input connection (*) Connections OUT OUTput connection (*) (*) use a direct cable shielded in 5 category [Standard CAT5 cable shielded, without “crossover”], in according to the standard EtherCAT: EtherCAT Technology Group 185 Parker Hannifin Manufacturing Srl user’s manual TPDM 20.1 Setting parameters communication of EtherCAT Additional axes: Drive version TPDM TPDM Single axis 0 added axis TPDM 2 axes 1 added axis TPDM 3 axes 2 added axes Bit 0 b232.13 0 1 0 Bit 1 b232.14 0 0 1 Bit 2 b232.15 0 0 0 The setting of the additional axes must be executed only on the drive with the EtherCAT board. Note: the maximum number of the additional axes: 2 Setting the following parameters: − Enable the remote mode: b272.9=1; − Conversion units of speed in count/sec and the acceleration in count/sec2: b272.1=1. 186 Parker Hannifin Manufacturing Srl user’s manual TPDM 21 Appendix I: Analog expansion board 21.1 Introduction The analog expansion board (E7 in the TPDM order code).This board permits to the TPDM the connection to CN machine: analog reference and the simulation encoder. This option must be used when the analog reference resolution of the standard TPDM is not sufficient, because major resolution is required and when are required 2 or 3 encoder signal as feedback. The analog expansion board includes: - 3 analog references (14bit + sign); - 2 auxiliary encoder Input (power supply requested externally by X22); - 2 simulated encoder Output. The analog expansion board can be used on TPDM 2 axis or 3 axes: • The option E on TPDM 2 axes introduces 2 analog references (1 dedicated to axis A and 1 dedicated to axis B), and 1 auxiliary encoder INput (dedicated to axis B), and 1 simulated encoder OUTput (dedicated to axis B). • The option E on TPDM 3 axes introduces 3 analog references (1 dedicated to axis A, 1 dedicated to axis B and 1 dedicated to axis C), and 2 auxiliary encoder INput (1 dedicated to axis B and 1 dedicated to axis C), and 2 simulated encoder OUTput (1 dedicated to axis B and 1 dedicated to axis C). This option excludes the EtherCAT board, and requires a firmware release ≥ 6. 187 Parker Hannifin Manufacturing Srl 21.2 1 2 3 4 5 6 7 8 9 10 11 12 13 14 15 user’s manual TPDM Connectors lay-out Enc. B(connector DB15-HD) X23 (Axis B) Enc. IN C+ Enc. IN CGND Enc. OUT CEnc. OUT C+ GND Enc. IN AEnc. IN BEnc. OUT AEnc. OUT B+5V ENC. supply Enc. IN A+ Enc. IN B+ Enc. OUT A+ Enc. OUT B+ 8 7 6 5 4 3 2 1 X23 1 2 3 4 5 6 7 8 9 10 11 12 13 14 15 Enc. C(connector DB15-HD) X24(Axis C) Enc. IN C+ Enc. IN CGND Enc. OUT CEnc. OUT C+ GND Enc. IN AEnc. IN BEnc. OUT AEnc. OUT B+5V ENC. supply Enc. IN A+ Enc. IN B+ Enc. OUT A+ Enc. OUT B+ I/O Terminal block X22 Analog Ref. IN axisA- Ref Analog Ref. IN axisA- Ref + Analog Ref. IN axisB- Ref Analog Ref. IN axisB- Ref + Analog Ref. IN axisC- Ref Analog Ref. IN axisC - Ref + VCC encoder GND X24 SD card X22 188 Parker Hannifin Manufacturing Srl 21.3 user’s manual TPDM Connections 189 Parker Hannifin Manufacturing Srl 21.4 user’s manual TPDM Characteristics 2 auxiliary encoder(1 per axis B and 1 per axis C) Auxiliary encoder input in quadrature Max frequency encoder input kHz 2000 Power supply V 5V (requested externally) RS-422 encoder simulation output steps/rev 22…218 Max frequency kHz 2000 Analog reference Nr. V dB bit kΩ kHz Number Type Voltage CMR resolution input impedance max frequency 21.5 3 (1 per each axis) differential ±10 >80 14 + sign >18 2 Parameters function Analog reference IN (TPDM) Analog reference IN (exp. Board) Auxiliary Enc. IN(TPDM) 2 encoder IN (exp. Board) TPDM + analog exp. B. description parameter Auxiliary reference Pr22 14 bit – Main reference Pr45 Dedicated to axis A only Dedicated to axis B and C Auxiliary Enc. OUT (TPDM) Dedicated to axis A only 2 encoder OUT (exp. Board) Dedicated to axis B and C Pr66:67 Ratio: Pr52/Pr53 Pr66:67 Ratio: Pr52/Pr53 Enable command: b39.10 (*) Number of pulses: Pr44 Enable command: b39.10 (*) Number of pulses: Pr44 connector X12 (A) X13 (B) X14 (C) X22 (A-B-C) X19 X23 (B) X24 (C) X19 X23 (B) X24 (C) Encoder IN Power One connection of power supply X22 supply (exp. Board) for 2 Enc. IN of exp. Board. (*) it’s necessary save the parameters and restart again the drive to enable the function. 190 Parker Hannifin Manufacturing Srl user’s manual TPDM Usage example: 191 Parker Hannifin Manufacturing Srl user’s manual TPDM 22 Appendix L: Asynchronous motor V/F controlled Under construction The motor torque depends to the power transmitted at the synnchronous speed: CT = where Ω [rad/sec] is: Ω1 = 192 PM PT (1 − s ) PT = = Ω 2 Ω1 (1 − s ) Ω1 2π • f1 [rad / s ] p Parker Hannifin Manufacturing Srl 22.1 user’s manual TPDM Parameters Par. Description Pr300 Iq torque current. Determines the torque applied to the load. Pr301 Current magnetizing. Determines the magnetizing of the motor. In case of defluxing at constant power and the speed is over the value of parameter Pr208, this value decrease. Pr302 Slip gain compensation. This parameter is used to to have the real speed equal to the reference speed (tuning with load). During the tuning of fixed boost, set to 0 this parameter. Pr303 Auto boost compensation. Compensation of voltage boost, so to realize a linear voltage in output (tuning with load). During the tuning of fixed boost, set to 0 this parameter. Pr304 Stabilization gain. Stabilization of torque current, for big sizes of motors. Pr305 Speed fixed boost. This parameter is used to fix the speed, from 0 to the speed set into the parameter Pr305, following a linear function: starting from Pr307 (speed 0) until to Pr306. For speed higher, the boost is constant and equal to Pr306. Pr306 Max voltage fixed boost. This parameter is used to minimize the torque current Iq (Pr300): motor in movement at half of nominal speed and without load, the value of torque current must be near to 0. Can be estimated a starting value using this rule: Pr 306 = R phase− phase × Pr 220 Pr307 Min voltage fixed boost. This parameter is used to minimize the torque current Iq (Pr300): motor in movement, with speed between 0 and Pr305, and without load, the value of torque current must be near to 0. Can be estimated a starting value using: Pr307 = Pr306 Pr309 Speed reference (frequency) after ramps. Speed (frequency) commanded after the ramp. Pr310 Speed (frequency) in output, current limit. This value reduces the frequency when the current required is higher of the motor rated current. At the stall is equal to the reference frequency, so the frequency commanded is zeroed. Pr311 Output frequency. Speed (frequency) commanded. Pr312 Total current absorbed. Total current of the motor, composed vectorially between Iq (Pr300) and Id (Pr301). Field Range Def. Ris. R 0÷2000 1 [%Ipeak] R 0÷2000 1 [%Ipeak] W [%] -32768÷ 100 +32767 1 W [%] -32768÷ 100 +32767 1 W [%] W [rpm] -32768÷ +32767 -32768÷ +32767 0 1 0 1 W [V] -32768÷ +32767 0 1 W [V] -32768÷ +32767 0 1 R [rpm] R [rpm] -32768÷ +32767 -32768÷ +32767 - 1 - 1 R [rpm] R [0.1A] -32768÷ +32767 -32768÷ +32767 - 1 - 0.1 193 Parker Hannifin Manufacturing Srl user’s manual TPDM 23 Revision history of the User Manual - - - - - Rev 0 – November 2009 First edition Rev 0.1 – December 2009 Switching frequency Rev 0.2 – April2010 SD card management Shield fastener EtherCAT option Static brake by controlword Rev 0.3 – July 2010 OPM203 Encoder OUT Code: option G Rev 0.4 – September 2010 Brake connection – single axis Rev 0.5 – May 2011 Internal fan capacity Analog expansion board Feedforward of speed loop Model 15+5A Motor brake management OPM200, modified bits of “Left limit switch”:b91.5 and of “Home switch”: b91.6 Rev 0.6 – April 2012 Encoder CAN Touch Probe function Asynchronous motor V/F DSL Resolution 20bit (opm202, opm203) Rev 0.7 – July 2012 UL certified STO certified For other information log into website www.parker-eme.com. Arranges to the manual data can be made by the manufacturer without advance notice. The data shown in the manual correspond to the specifications relating to the revision date 194