1
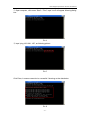
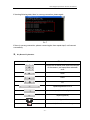
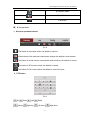
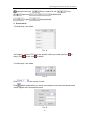
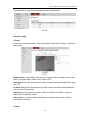
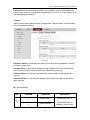
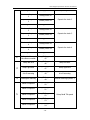
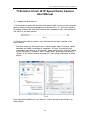
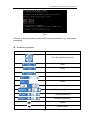
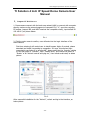
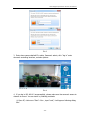
HD Intelligent Speed
Dome Camera
User Manual
HD Intelligent Speed Dome Camera User Ma nual
Description
Type
Suitable Model
Hisilicon solution IR IP
Speed Dome camera User
Manual
All Hisilicon Solution Series
TI solution 6 inch IR IP
Speed Dome camera
TI Solution 6 inch Speed Dome Camera Series
TI solution 4 inch IP Speed
Dome camera
TI Solution 4 inch Speed Dome Camera Series
Thank you for buying our company product, any question or request please
feel free to contact us.
The manual only use for our IP speed dome camera.
This manual maybe includes some inaccurate information on
technology/product function/ operation or print error, we will update it in
the new versions manual in future.
Attentions:
Please read this manual carefully before you install and operate the IP dome camera.
● Transportation Security
Heavy stress, violent vibration or water splash are not allowed during transportation,
storage. Every unit should be transported in separated packing. In shipments of
distributor and delivery of maintenance, any damages caused by integral packing are
not covered by warranty.
● Installation Security
It has 2 installation ways: wall mounting and ceiling mounting, avoid mixing
installation!
The dome camera must be handle with care! Avoid heavy stress and violent vibration
during installation. Don’t touch the dome cover directly by hand. When connecting
the power source, please follow all electric safety standards and only use the power
supply designed for this device. Keep the video and control signal in a decent
distance with high voltage devices and cable. Don’t apply power to dome before
finishing the installation.
● Don’t remove
Internal removing, assembly, repair and operations should be only performed by our
company or qualified service personnel.
●Electrical Safety
-1-
HD Intelligent Speed Dome Camera User Ma nual
The video image would be interfered when the dome is installed from Television,
radio transmitter, voltage changer and audio amplifier.
●Camera Protection
Avoid shooting very bright objects directly into the camera (such as the sun or light
fittings) and avoid fixating the camera lens on bright static object for long time, as it
will cause Irreparable damage to the camera.
●Cleaning Method
Avoid heavy stress and violent vibration! Please don’t use abrasive and violent
detergent to clean the dome. Please choose dry fabric and neutral detergent. And
please use lens paper to clean the lens.
●Please use our product according the work environmental standards.
-2-
HD Intelligent Speed Dome Camera User Ma nual
CONTENTS
Hisilicon Solution IR IP Speed Dome Camera User Manual......................................... - 4 Ⅰ、Computer IE Web Browser ................................................................................ - 4 Ⅱ、Key Button Explanation .................................................................................... - 6 Ⅲ、IE UI Operation................................................................................................ - 7 Ⅳ、Menu Of Dome Camera ...................................................................................- 10 Ⅴ、Config Management .......................................................................................- 12 Ⅵ、Instruction List ...............................................................................................- 17 TI Solution 6 Inch IR IP Speed Dome Camera User Manual .......................................- 20 Ⅰ、Computer IE Web Browser ...............................................................................- 20 Ⅱ、Key Button Explanation ...................................................................................- 23 Ⅲ、IE UI Operation...............................................................................................- 24 Ⅳ、System Setup .................................................................................................- 25 Ⅴ、Instruction List ...............................................................................................- 29 TI Solution 4 Inch IP Speed Dome Camera User Manual ...........................................- 32 Ⅰ、Computer IE Web Browser ...............................................................................- 32 Ⅱ、Key Button Explanation ...................................................................................- 35 Ⅲ、IE UI Operation...............................................................................................- 36 Ⅳ、System Setup .................................................................................................- 37 Ⅴ、Instruction List ...............................................................................................- 41 Appendix ....................................................................................................................- 46 Appendix I: Lightning and Surge Protection ...............................................................- 46 Appendix II: Basic Troubleshooting...........................................................................- 46 -
-3-
HD Intelligent Speed Dome Camera User Ma nual
Hisilicon Solution IR IP Speed Dome Camera
User Manual
Ⅰ、Computer IE Web Browser
1、Dome camera connect with the local area network(LAN) or connect with
computer directly, make sure the network segment of computer IP is “1”, open the
computer IE browser, input default IP: 192.168.1.160, as below picture:
Pic.1
2、Refresh the log in interface then user can enter into the log interface, as below
picture:
Pic.2
3、Input the default User Name: admin, Password:12345, click “log in” enter into
camera’s control interface, as below picture:
Pic.3
4、If you land 192.168.1.160 unsuccessfully, please make sure the camera access
to network correctly. You can test it via following methods:
-4-
HD Intelligent Speed Dome Camera User Ma nual
① Open computer, click menu “Start”—”Run”, input “cmd” will appear following dialog
box:
Pic.4
② Input “ping 192.168.1.160”, as following picture:
Pic.5
Click Enter, it means connection is successful if showing as the data below:
Pic.6
-5-
HD Intelligent Speed Dome Camera User Ma nual
If showing following data, there is a wrong connection, please again.
Pic.7
If there is a wrong connection, please connect again, then repeat step2, until connect
successfully.
Ⅱ、Key Button Explanation
Icon
Illustration
Control the horizontal and vertical movement
of the camera ,and open/close automatic
scan
zoom
focus
iris
Speed adjustment of PTZ
open/close Lamp light
Wipers(optional)
close/open video
main/sub code stream change
-6-
HD Intelligent Speed Dome Camera User Ma nual
3D function switch
Sound Monitor
Full screen
Ⅲ、IE UI Operation
1、Shortcut operation buttons
Pic.8
The button of close/open video, the default is opened.
If the buttons of the main/sub code stream change, the default is main stream.
The button of sound monitor (camera with audio function), the default is closed.
The button of 3D function switch, the default is closed.
The button of Full screen switch, the default is none full screen.
2、PTZ button
Pic.9
Up;
Down;
Left top;
Left;
Right top;
Right;
Left down;
-7-
Right down;
HD Intelligent Speed Dome Camera User Ma nual
Automatic line scan;
Zoom in and zoom out ;
;Aperture;
Focus;
Pan&tilt speed;
IR light;
Wipers(optional);
3、Preset setup
①Preset setup, call, delete
Pic.10
;As image 11, turn the PTZ cam to the position where you need, and click
setup, click
to call, click
to
to delete
②Cruise setup ,call, delete
Pic.11
Click
can choose 8 cruise;
Click
add the preset which you need, and setup the cruise time and speed, each
cruise support max 16 presets as below
Pic.12
-8-
HD Intelligent Speed Dome Camera User Ma nual
After adding required preset, please click
to save the cruise, as below
Pic.13
Click
to call this cruise, click
to stop the cruise
Click
to delete the preset in the cruise, click
after deleting and editing, click
to save.
can edit the preset in the cruise,
4、Scan settings
Support A, B two points auto scan, random scan, pattern scan
① Random scan
Click
to call 360 degree random scan, click again to stop;
Pic.14
② A、B two dots automatic scan
Rotate the dome camera to the needed position, click
limited position of scan;
to set up the left
Rotate the dome camera to the needed position, click
limited position of scan;
to set up the right
Then click
thus can start the scan of the set up area between A,B two
dots; click it again to stop scanning
-9-
HD Intelligent Speed Dome Camera User Ma nual
③Pattern scan
Support 4 pattern scan routes
Click
to start to record the track route of patrol scan, after finishing
recording click
Click
to stop recording;
to start the pattern of patrol scan, click it again to stop scanning;
Ⅳ、Menu Of Dome Camera
1、For 1st version speed dome camera ,Call 95# preset enter the menu of
dome camera, see picture below:
Pic. 15-1(V1)
01 is information of module specification, resolution, frame rate;
02 is open/close zoom display, default is closed;
03 is white balance, multiple patterns are selectable defaults to ATW(auto white
balance)
04 is day/night change, defaults to AUTO;
05 is
Gamma of day;
06 is
Gamma of night;
07 is Auto sens up, defaults is closed.
08 is BLC function, defaults is closed.
09 is DWDR function, defaults is closed.
10 is function of light passing through fog, default is closed;
11 is left and right mirror function, default is closed;
12 is up and down mirror function, default is closed;
13 is 3D noise reduction function;
- 10 -
HD Intelligent Speed Dome Camera User Ma nual
14 is auto gain control function;
15 is brightness adjustment function;
16 is contrast adjustment;
17 is Saturation adjustment.
18 is Sharpness adjustment;
19 is factory reset;
20 is save and exit;
Function illustration:
①open 08 BLC function, it is suitable for strong backlighting environment, for
example under the scene of the automotive lighting is broken, you need the
recognize the license plate;
②open 09 DWDR function, it is suitable for such backlighting environment such as
lighting outside the window, under the environment of needing to see the prospect
indoor and outdoor;
③open 10light passing through fog function, it is suitable for foggy weather, the
camera can penetrate the clouds, to observe the forward scene clearly;
④open 3Dnoise reduction function, can eliminate the clutter in the clouds effectively,
make the image clear, fine and smooth;
2、For 2nd version speed dome camera, call NO.95 preset, and enter to the
Menu of the speed dome camera, as follow picture:
Option “1” is the Mirror image for left and right: ON/ OFF
Option “2” is the flip function: ON/OFF
Option “3” is the zoom display: ON/OFF
Option”4” is to adjust the sharpness: User can set it, the default is 192.
Option”5” is to adjust the AGC: User can set it, the default is 8.
Option”6” is to restore defaults.
Option”7” is to exit
- 11 -
HD Intelligent Speed Dome Camera User Ma nual
Pic. 15-2(V2)
Function description
①Option “1” is the Mirror image for left and right: If turn on, the camera image is
opposite to the real image for left-right direction.
②Option “2” is the Flip function: If turn on, the camera image is opposite to the real
image for up and down direction.
③Option “3” is the zoom display on/off: if turn on, it will display the zoom when zoom
in/out at the left bottom of the screen.
④Option”4” is to adjust the sharpness value of camera module, and user can set it
as liked image.
⑤Option”5” is to adjust the AGC value of camera module, and user can set it as liked
image.
Ⅴ、Config Management
Base configuration
Click “config” to set the parameters of the camera as needs, see picture as below:
- 12 -
HD Intelligent Speed Dome Camera User Ma nual
Pic.16
1.System
The system menu contains information, such as “version”, “time”, “maintain”.
Version: it can check the equipment ID of the camera, software version information
etc.
Time: it can set and synchronize the time of the dome camera。
Maintain: it can reset the dome, simple recovery, complete recovery, system
integration to the dome camera.
2.Network
The network menu contains information like “ETH” ,”services”.
ETH: It can modify the IP address, gateway, DNS etc of the camera.
Services: It can check the dome camera’s message port, RTSP port, HTTP port,
RTMP port.
Pic.17
Note: If you rewrite the “IP address”, click the “Save” button to storage the data; if
you rewrite the network segment at same time, remember to rewrite the gateway. For
example, the IP address is 192.168.2.88, the gate way need to be rewritten as
192.168.2.1, then save it. If not, it will be connection fail.
3.Audio & Video(AV)
The specification in the audio and video OSD menu,
- 13 -
HD Intelligent Speed Dome Camera User Ma nual
Pic.18
It can be set for the stream type, frame rate, code rate and other information.
4.Image
The image menu includes the information of “Display”, “OSD”, “Video mask”, “ICR”.
Pic. 19
Display: It can be set for the brightness, contrast ratio, mirror image flip (on/off)
Demist (on/off), BLC(backlight compensation) function.
OSD: The code rate, time, video information can be optionally display on the screen.
Video mask: There are 4 privacy masking region can be set for each channel.
ICR: The switch model can be set for the IR LED.
5.Safe
- 14 -
HD Intelligent Speed Dome Camera User Ma nual
The safe Menu is used to the management of the Administrator.
Pic. 20
Advance config
1.Event
Event menu include the setup of the motion detect, Hide detect, IO alarm, abnormal,
alarm snap.
Pic.21
Motion detect: In the setting Time Bucket, if anyone break in and take a action with
alarm, it can auto alarm via the video, Email or FTP.
Hide detect: when the camera was masked, it can be auto alarming by Email, Video
and FTP.
IO alarm: Setting the external alarming model of input and output (the speed dome
camera need be supported)
Abnormal: It can be alarming when no HDD, the HDD is full, HDD is wrong, no
internet and IP address conflict.
Alarm snap: It can be set capture the photo or not when action alarm, and the
interval time can be set.
2. Store
- 15 -
HD Intelligent Speed Dome Camera User Ma nual
Store menu contains ptz dome camera "Record", "Disk ", "time snap" function.
Pic. 22
Record: Set recording time, stream type and other information
Disk: Management of TF card (Need to insert TF card into ptz dome camera)
Time snap: Set timing capture and capture interval time
3. PTZ
PTZ dome camera menu contains "PTZ ", the "task", "Park Action" function.
Pic. 23
PTZ: Reflect PTZ dome configuration information/
Task: Set the ptz dome camera in the implementation of some period to execute
actions, such as dispatching presets, cruise, auto scanning, random scan, and
dispatching track,etc.;
- 16 -
HD Intelligent Speed Dome Camera User Ma nual
Park action: Set camera idle time without any operation, perform automatically by
setting action, such as using presets, dispatching the cruise, auto scan, random scan,
and dispatching the track,etc.
4. Status
Status menu shows hardware status, storage video, channel status, channel stream
of the speed dome camera.
Pic. 23
Hardware Status: It could real-time display information of the speed dome camera
hardware configuration.
Storage Video: It could real-time display using condition of SD card in the speed
dome camera (need to insert SD card in the speed dome camera)
Channel Status: It could real-time display the working status of the speed dome
camera.
Channel Stream: It could real-time display code stream information of the speed
dome camera.
Ⅵ、Instruction List
No.
1
Function
Operation
Description
Start recording track
1
Setup preset 41
Operate the track 1,
Stop recording track
1
Delete preset41
If the preset can’t be
deleted,you can stop
- 17 -
HD Intelligent Speed Dome Camera User Ma nual
2
3
4
5
Calling track 1
Calling preset 41
Start recording track
2
Setup preset 42
Stop recording track
2
Delete preset 42
Calling track 2
Calling preset 42
Start recording track
3
Setup preset 43
Stop recording track
3
Delete preset 43
Calling track 3
Calling preset 43
Start recording track
4
Setup preset 44
Stop recording track
4
Delete preset 44
Calling track 4
Calling preset 44
Calling the Menu of
the camera module
Setup/Calling preset
45
Setup left limit
Setup/Calling preset
46
Setup left limit
Setup right limit
Setup/Calling preset
47
Setup right limit
A to B scanning
Setup/Calling preset
48
A to B scanning
360degree scanning
Setup/Calling preset
49
Default scanning speed is 1
Pan& Tilt speed 1
Setup/Calling preset
50
Pan& Tilt speed 2
Setup/Calling preset
51
Pan& Tilt speed 3
Setup/Calling preset
52
Pan& Tilt speed 4
Setup/Calling preset
53
Pan& Tilt speed 5
Setup/Calling preset
54
- 18 -
record by calling the track.
Operate the track 2
Operate the track 3
Operate the track 4
Setup Pan& Tilt speed
HD Intelligent Speed Dome Camera User Ma nual
6
Scanning speed 1
Setup/Calling preset
60
Scanning speed 2
Setup/Calling preset
61
Scanning speed 3
Setup/Calling preset
62
Scanning speed 4
Setup/Calling preset
63
Scanning speed 5
Setup/Calling preset
64
Setup Scanning speed
Note:
1、Stop recording track:If the presets can’t be deleted,you can stop record by
calling the track;
2、Stop calling track:The operation to control Pan & Tilt, it can stop calling track.
- 19 -
HD Intelligent Speed Dome Camera User Ma nual
TI Solution 6 Inch IR IP Speed Dome Camera
User Manual
Ⅰ、Computer IE Web Browser
1. Dome camera connect with the local area network(LAN) or connect with computer
directly, make sure the network segment of computer IP is “0”, open the computer
IE browser (support IE8, and WIN7 need set the compatible mode), input default IP:
192.168.0.12, as below picture:
Pic.1
2. Click the enter menu to confirm, user will enter into the login interface of the
dome camera.
First time entering it will remind user to install browser Active X controls, please
download and install it according to suggestion. If it says “this site has been
prevented to use Active X by unsafe way”, please enter into the ”security” setting
of IE’s tool option of “Internet”, open “Custom level”, and choose the option of
“Enable” of all “ActiveX controls and plug-ins”, then refresh and install, as below
picture:
Pic.2
After successful installation for the “ActiveX”, refresh and log in the interface, as
below picture:
- 20 -
HD Intelligent Speed Dome Camera User Ma nual
Pic.3
3、Enter dome camera default User name: admin, Password: admin, click “log in”
enter into camera’s control interface, as below picture:
Pic.4
4、If you land 192.168.0.12 unsuccessfully, please make sure the camera access to
network is correct. You can test it via following methods:
① Open PC, click menu “Start”—Run , input “cmd”, it will appear following dialog
box:
- 21 -
HD Intelligent Speed Dome Camera User Ma nual
Pic.5
② Input ping 192.168.0.12, please check following picture.
Pic.6
Click Enter, showing below data means connect successfully
Pic.7
If show below data, it means have a wrong connection, please check and confirm if
the connection is ok.
- 22 -
HD Intelligent Speed Dome Camera User Ma nual
Pic.8
If there is a wrong connection, please rectify, and repeat instruction ②, until connect
successfully
Ⅱ、Key Button Explanation
Icon
Explanation
Pan, tilt, auto scan on and off
Zoom
Focus
Aperture
Pan&tilt speed
Preset
Preset add&call
Brightness adjustment
Contrast adjustment
Saturation adjustment
Capture
Record on&off
- 23 -
HD Intelligent Speed Dome Camera User Ma nual
Audio on &off
Ratio adjustment
Ⅲ、IE UI Operation
1、 Key button
Pic.9
Video capture
Video record
Audio on&off(need PTZ camera support)
Video ratio adjustment
2、PTZ control
Pic.10
up;
down;
zoom;
left;
right;
focus;
;lens iris control;
3、PTZ setup
①PTZ speed setup
- 24 -
HD Intelligent Speed Dome Camera User Ma nual
Pic.11
As picture 11 adjust PTZ dome camera’s speed by choosing different speed from
menu
, there are 8 levels for speed adjustment totally;
②Preset position’s add and call
Pic.12
Fill in the number of preset positions separately, click ”add” to set and click “call” to
run it.
4、Image setup
Support the adjustment to the brightness, contrast, saturation of image
Pic.13
Click
can reduce the setting value, and click
can increase the setting value.
Ⅳ、System Setup
Click “system setup”, set up the parameters of dome camera based on requirement,
see picture as below:
- 25 -
HD Intelligent Speed Dome Camera User Ma nual
Pic.14
1、Basic information
The basic information menu contains “Device Info”, “events log” information.
Device Info: Can check the dome camera’s information of camera name, camera
type, software version, hardware version, language selection and so on.
Event log: User can check the information of registering and visiting to the dome
camera
2、Network param
The network parameters menu contains such information of ”network setup”, ”FTP
setup”, ”SMTP setup”, ”SNTP setup”, ”RTSP setup”.
Network setup: can modify the dome camera’s information of IP address, default
gateway, Primary namesever, HTTP port number and so on.
FTP setup: can set up the dome camera’s uploading server address of alarm linkage,
screen shot and so on.
SMTP setup: can set up the dome camera’s address of sending email of alarm
linkage, screen shot and so on.
SNTP setup: can set up the time zone of the time which showed by the dome
camera.
RTSP setup: can start multi-channel broadcast.
- 26 -
HD Intelligent Speed Dome Camera User Ma nual
Pic.15
Note: If rewrite the IP address, click save button to finish operation; if rewrite the
network segment, it must rewrite the gateway at same time. For example, the IP
address is 192.168.2.88, so the gateway must rewrite as 192.168.2.1, then save it; if
not, it will connection fail.
3、Video and Audio
The video and audio menu includes the information: code param, video param, audio
param, and OSD display.
Pic.16
Code param: It can change the information: code stream type, large or small code
stream, frame rate.
Video param: It can set the information: video quality, IR switch mode, video
brightness, contrast ratio and Saturation.
Audio param: Open the sound recording, adjust volume. (The camera need has the
function)
OSD Display: It can turn on/off the display of time, text and zoom.
- 27 -
HD Intelligent Speed Dome Camera User Ma nual
4、Alarm setup
Alarm setting includes the information: motion detection and enable alarm.
Pic.17
Motion detection: it can turn on the alarming function of motion detection;
Enable alarm: Broken network alarming, action with alarming can be set.
5、Storage setup
Storage setting menu includes the information: Video File, FTP storage, SD card
setting, SD File profile, SMTP setup, Enable record, record plan.
Pic.18
Video File: select the video format when recording;
FTP storage: FTP recording setting;
SD setup: view the capacity of the SD card;
SD Files: Viewing and taking the SD card information;
SMTP Setting: setting the Email address;
Enable record: Turn on the recording, and storage to the SD card;
- 28 -
HD Intelligent Speed Dome Camera User Ma nual
Record plan: setting the recording time;
6、System setup
The system management includes the information: User, PTZ, Update, date & time,
IO setup, factory reset, equipment restart.
Pic.19
User: Set User Information PTZ dome management, change passwords, etc.
PTZ Manage: Set dome PTZ control protocol, baud rate, etc.
Update: dome PTZ firmware upgrade;
Date and Time: Set the real-time PTZ dome camera;
IO Setup: set the digital input and output level type;
Factory Reset: PTZ dome to perform restore factory operation;
Reset Equipment: Restart operations on PTZ dome.
Ⅴ、Instruction List
NO
.
1
Function
Operation
Explanation
Starting auto
scanning
Calling 99
Default starting the first group
of scanning
Starting auto cruise
Calling 98
Default starting the first group
of cruise
- 29 -
HD Intelligent Speed Dome Camera User Ma nual
2
3
4
5
Starting mode path
Calling 97
Stop auto / end
setting
Calling 96
Right boundary
scanning setting
Setting 93
Left boundary
scanning setting
Setting 92
scanning speed
setting
Setting 87+Calling pp
cruise setting of the
starting of preset
position
Setting 84+Calling
pp+……
cruise setting of the
ending of preset
position
Calling 96
cruise setting of the
residence time
Setting 83+ Calling
qq
Set starting of mode
path
Setting 86
Set ending of mode
path
Calling 96
Start scanning the N
group
Calling 80+ Calling
pp+ Calling 99
Set right boundary
scanning the N group
Calling 80+ Calling
pp+Setting 93
Set left boundary
scanning the N group
Calling 80+ Calling
pp+Setting 92
Set speed scanning
the N group
6
Default starting the first group
of mode path
Default setting the first group
PP means speed :1-30
PP for the preset number, up
to 32
qq means residence time:160s
Default setting the first group
Default setting the first group
pp means group number:1-8
qq means speed value:1-30
Calling 80+ Calling
pp+
Calling 87+ Calling
qq
Starting cruise the N
group
Calling 80+ Calling
pp+ Calling 98
Setting cruise of the
preset position’s
starting of the N
group
Calling 80+ Calling
pp+Setting 84+
Calling qq
- 30 -
pp means group number:1-8
qq means preset position’s
number,up to 32
N means residence time:1-60s
HD Intelligent Speed Dome Camera User Ma nual
Setting cruise of the
preset position’s
ending of the N group
Calling 96
Setting cruise of the
N group’s residence
time
Calling 80+ Calling
pp+Setting 83+
Calling n
Starting mode path of
the N group
Calling 80+ Calling
pp+ Calling 97
Setting mode path of
the N group’s starting
Calling 80+ Calling
pp+Setting 86
Setting mode path of
the N group’s ending
Calling 96
8
Remote reset
Calling 94
9
Restore factory
setting
Calling 82
7
- 31 -
pp means the group
number:1-4
HD Intelligent Speed Dome Camera User Ma nual
TI Solution 4 Inch IP Speed Dome Camera User
Manual
Ⅰ、Computer IE Web Browser
1. Dome camera connect with the local area network(LAN) or connect with computer
directly, make sure the network segment of computer IP is “0”, open the computer
IE browser (support IE8, and WIN7 need set the compatible mode), input default IP:
192.168.0.2, as picture below:
Pic.1
2. Click the enter menu to confirm, user will enter into the login interface of the
dome camera.
First time entering it will remind user to install browser Active X controls, please
download and install it according to suggestion. If it says “this site has been
prevented to use Active X by unsafe way”, please enter into the ”security” setting
of IE’s tool option of “Internet”, open “Custom level”, and choose the option of
“Enable” of all “ActiveX controls and plug-ins”, then refresh and install, as below
picture:
Pic.2
After successful installation for the “ActiveX”, refresh and log in the interface, as
below picture:
- 32 -
HD Intelligent Speed Dome Camera User Ma nual
Pic.3
3、Enter dome camera default ID: admin, Password: admin, click “log in” enter
camera’s controlling interface, as below picture:
Pic.4
4、If you log in 192.168.0.2 unsuccessfully, please make sure the camera’s access to
network is correct. You can test it by following methods:
① Open PC, click menu “Start”—Run , input “cmd”, it will appear following dialog
box:
- 33 -
HD Intelligent Speed Dome Camera User Ma nual
Pic.5
② Input ping 192.168.0.2, please check following picture:
Pic.6
Click Enter, showing below data means connect successfully.
Pic.7
- 34 -
HD Intelligent Speed Dome Camera User Ma nual
If show below data, it means have a wrong connection, please check and confirm if
the connection is ok.
Pic.8
If there is a wrong connection, please rectify, and repeat instruction ②, until connect
successfully
Ⅱ、Key Button Explanation
Icon
Explanation
Pan, tilt, auto scan on and off
Zoom
Focus
Aperture
Pan&tilt speed
Preset
Preset add &call
Brightness adjustment
Contrast adjustment
Saturation adjustment
- 35 -
HD Intelligent Speed Dome Camera User Ma nual
Capture
Record on & off
Audio on & off
Ratio adjustment
Ⅲ、IE UI Operation
1、 Key button
Pic.9
Video capture
Video record
Audio on & off (need PTZ camera support)
Video ratio adjustment
2、 PTZ control
Pic.10
up;
down;
zoom;
left;
right;
focus;
;lens iris control;
3、PTZ setup
- 36 -
HD Intelligent Speed Dome Camera User Ma nual
① PTZ speed setup
Pic.11
As picture 11, adjust PTZ dome camera’s speed by choosing different speed from
menu
, there are 8 levels for speed can be optional.
②Preset’s add and call
Pic.12
Fill in the number of preset positions separately, click ”add” to set and click “call” to
run it.
4、Image setup
Support the adjustment to the brightness, contrast, and saturation of image.
Pic.13
Click
can reduce the setting value, click
can increase the setting value.
Ⅳ、System Setup
Click the “system setup” to set the parameters of dome camera based on
requirement, see picture as below:
- 37 -
HD Intelligent Speed Dome Camera User Ma nual
Pic.14
1、Basic information
The basic information menu contains “Device Info” and “events log”.
Device Info: it can check the dome camera’s information of camera name, camera
type, software version, hardware version, language select and other information.
Events log: User can check the information of registering and visiting to the dome
camera.
2、Network param
The network parameters menu contains such information of ”network setup”, ”FTP
setup”, ”SMTP setup”, ”SNTP setup”, ”RTSP setup”.
Network setup: can modify the dome camera’s information of IP address, default
gateway, Primary namesever, HTTP port No and so on.
FTP setup: can set up the dome camera’s uploading server address of alarm linkage,
screen shot and so on.
SMTP setup: can set up the dome camera’s address of sending email of alarm
linkage, screen shot and so on.
SNTP setup: can set up the time zone of the time which showed by the dome
camera.
RTSP setup: can start multi-channel broadcast.
- 38 -
HD Intelligent Speed Dome Camera User Ma nual
Pic.15
Note: If rewrite the IP address, click save button to finish operation; if rewrite the
network segment, it must rewrite the gateway at same time. For example, the IP
address is 192.168.2.88, so the gateway must rewrite as 192.168.2.1, then save it; if
not, it may connection fail.
3、Video and Audio
The video and audio menu includes the information: code param, video param, audio
param, and OSD display.
Pic.16
Code param: It can change the information: code stream type, large or small code
stream, frame rate.
Video param: It can set the information: video quality, IR switch mode, video
brightness, contrast ratio and Saturation.
Audio param: Open the sound recording, adjust volume. (The camera need has the
function)
OSD Display: It can turn on/off the display of time, text and zoom.
- 39 -
HD Intelligent Speed Dome Camera User Ma nual
4、Alarm setup
Alarm setting includes the information: motion detection and enable alarm.
Pic.17
Motion detection: it can turn on the alarming function of motion detection;
Enable alarm: Broken network alarming, action with alarming can be set.
5、Storage setup
Storage setup menu includes the information: Video File, FTP storage, SD setup, SD
File, SMTP setup, Enable record, record plan.
Pic.18
Video File: select the video format when recording;
FTP storage: FTP recording setting;
SD setup: view the capacity of the SD card;
SD Files: Viewing and taking the SD card information;
SMTP Setting: setting the Email address;
Enable record: Turn on the recording, and storage to the SD card;
- 40 -
HD Intelligent Speed Dome Camera User Ma nual
Record plan: setting the recording time;
6、System manage
The system management includes the information: User, PTZ, Update, date & time,
IO setup, factory reset, restart equipment.
Pic.19
User: Set User Information PTZ dome management, change passwords, etc.
PTZ Manager: Set dome PTZ control protocol, baud rate, etc.
Update: dome PTZ firmware upgrade;
Date and Time: Set the real-time PTZ dome camera;
IO Setup: set the digital input and output level type;
Factory Reset: PTZ dome to perform restore factory operation;
Restart equipment: Restart operations on PTZ dome.
Ⅴ、Instruction List
NO
.
1
Function
Operation
Explanation
Starting auto
scanning
Calling 99
Default starting the first group
of scanning
Starting auto cruise
Calling 98
Default starting the first group
of cruise
- 41 -
HD Intelligent Speed Dome Camera User Ma nual
2
3
4
5
Starting mode path
Calling 97
Stop auto / end
setting
Calling 96
Right boundary
scanning setting
Setting 93
Left boundary
scanning setting
Setting 92
scanning speed
setting
Setting 87+Calling pp
cruise setting of the
starting of preset
position
Setting 84+Calling
pp+……
cruise setting of the
ending of preset
position
Calling 96
cruise setting of the
residence time
Setting 83+ Calling
qq
Set starting of mode
path
Setting 86
Set ending of mode
path
Calling 96
Start scanning the N
group
Calling 80+ Calling
pp+ Calling 99
Set right boundary
scanning the N group
Calling 80+ Calling
pp+Setting 93
Set left boundary
scanning the N group
Calling 80+ Calling
pp+Setting 92
Set speed scanning
the N group
6
Default starting the first group
of mode path
Default setting the first group
PP means speed :1-30
PP for the preset number, up
to 32
qq means residence time:160s
Default setting the first group
Default setting the first group
pp means group number:1-8
qq means speed value:1-30
Calling 80+ Calling
pp+
Calling 87+ Calling
qq
Starting cruise the N
group
Calling 80+ Calling
pp+ Calling 98
Setting cruise of the
preset position’s
starting of the N
group
Calling 80+ Calling
pp+Setting 84+
Calling qq
- 42 -
pp means group number:1-8
qq means preset position’s
number, up to 32
N means residence time:1-60s
HD Intelligent Speed Dome Camera User Ma nual
Setting cruise of the
preset position’s
ending of the N group
Calling 96
Setting cruise of the
N group’s residence
time
Calling 80+ Calling
pp+Setting 83+
Calling n
Starting mode path of
the N group
Calling 80+ Calling
pp+ Calling 97
Setting mode path of
the N group’s starting
Calling 80+ Calling
pp+Setting 86
Setting mode path of
the N group’s ending
Calling 96
8
Remote reset
Calling 94
9
Restore factory
setting
Calling 82
7
- 43 -
pp means the group
number:1-4
HD Intelligent Speed Dome Camera User Ma nual
After-Sales Service
Dear user, in order to get the high quality service for the speed dome camera, please read the
below service charters.
1. We can offer the service of limited warranty and life-long maintenance
(1)In the limited warranty (within 24 month from getting the camera), you can enjoy the
maintenance free service. Note: improper operation, man-made fault and other irresistible
reasons are excluding of the limited warranty.
(2) If beyond 24 months from you getting the camera, our company promises that we will
provide a payment that if customer needs maintenance service for life.
2. Repair response time
(1) When the camera arrives at our company, the response service is within 24 hours.
(2) The customer need contact our company staff before sending camera back; if not,
customer will be responsible for the risk of untimely repair.
In the warranty period, our company offer free repair; but it will pay for the material
cost when include any of below situation:
(1) It is damaged due to not follow the manual to operate.
(2) It is damaged due to lightning, fire disaster and other force majeure factors.
(3) It is damaged due to matching with other poor design products, which produced by other
manufacturer.
Statement:
Because of continuous new technology, so there is no further notice for change of
specifications.
Company has the authority to ultimate interpretation for the manual.
User Name:
__________________________________________
Address:
_____________________________________________
Tel:____________ Fax:____________ Post code:____
_________
Email:_______________________________________________
Model:______________________________________________
_
- 44 -
Production date:________ Year_________ Month__________
Day
HD Intelligent Speed Dome Camera User Ma nual
- 45 -
HD Intelligent Speed Dome Camera User Ma nual
Appendix
Appendix I: Lightning and Surge Protection
This product is adopted the protection circuit which is composed of the gas discharge tube
and TVS diode. It can effectively prevent the damage of equipment by transient lightning
under 3.0 kV, surge and other kinds of pulse signal. But, for outdoor installation, we should
do the necessary protective measure on the premise of guarantee the electrical safety
according to the actual situation.
1. Signal transmission lines must keep at least 50 meters with the high voltage equipment or
high voltage cable.
2. You shall choose to wire under the eave when you wire outside.
3. For empty area, you must wire through the way of sealing steel pipe buried, and also the
steel pipe need to be earthed in one-point. Wiring overhead is absolutely forbidden.
4. In strong thunderstorms or high induction voltage region (e.g., high voltage transformer
substation), It must be taken measures to add extra high power lightning protection equipment
and install lightning rod or other measures
5.Lightning protection of outdoor installation and wiring and grounding design must be
combined with the building lightning protection requirements into consideration, as well as
conform to the requirements of relevant national standards and industry standards
6. The way of equipotential grounding is necessary for the system. Grounding device must
meet requirements of the system anti-interference and electrical safety, and it cannot null line
short or mixed wire with strong power grid. System separate grounding, grounding resistance
is not greater than 4Ω.
Appendix II: Basic Troubleshooting
1. PTZ can’t be controlled?
A: Check equipment IE interface RS485 parameter control protocol and baud rate to see if it
is correct or not.
2. IE explorer or client-sdie can connect successfully, but there is no image. The video
windows are all black?
A: First check whether the IP address is the same with other network camera within the
network; Checking whether the graphics driver or ActiveX control is installed correctly or not.
3. Why the NVR can't search the camera, or it can be searched, but it can't be connected?
A: Make sure the Onvif protocol is compatible between NVR and camera, and the IP address
of the NVR and camera must in the same network segment.
4. I have more than 250 units IP camera, how to assign IP addresses?
A: You can use the second type IP, such as 10.0.0.1(subnet mask: 255.255.255.0) IP address,
please consult to your network administrator.
5. I just received two cameras, why the first can visit, the second can’t to visit?
- 46 -
HD Intelligent Speed Dome Camera User Ma nual
A: For convenient debugging, every network IP camera uses the same default IP address. But
each camera’s MAC address is not the same, and the operating system will cache IP and
MAC address information of the former network camera, so the second network camera with
the same IP address will can’t visit.
- 47 -