1
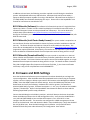
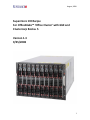
August, 2008 Supermicro ICR Recipe For OfficeBlade™ ‘Office Cluster’ with GbE and Clustercorp Rocks+ 5 Version 1.3 9/25/2008 1
August, 2008 Table of Contents 1. System Configuration .................................................................................................................. 3
Bill Of Materials (Hardware) ........................................................................................... 3
Bill Of Materials (Software)............................................................................................. 4
Bill Of Materials (Intel Cluster Ready License)................................................................ 4
Bill Of Materials (Download Bundle) .............................................................................. 4
2. Firmware and BIOS Settings ........................................................................................................ 4
3. Installation................................................................................................................................... 5
Cluster Head Node Installation ....................................................................................... 5
Cluster Compute Node Installation ................................................................................ 6
4. Verify a Correct Cluster Build ...................................................................................................... 6
Responsibilities of Reseller ............................................................................................. 6
Cluster Validation with ICR ............................................................................................. 7
Power and Cooling Requirements .................................................................................. 8
Permissible Configuration Variants ................................................................................ 8
5. Contacts....................................................................................................................................... 9
6. Release Notes .............................................................................................................................. 9
2
August, 2008 1. System Configuration Bill Of Materials (Hardware) The primary bill of materials, orderable from Supermicro’s distributors, is shown in Table 1. The BOM in Table 1 corresponds to that used for the cluster certification. It is expected that the reseller will customize this somewhat based on end user requirements per the limitations specified below in section 4. Note that the actual certification certificate, included in the download bundle, has a BOM for 7 nodes; however the full 10 blade system is certified under the rules of the program. Hardware Components
Quantity
Item
Manufacturer
Model
SBE-710E
1
SuperBlade® Chassis
Supermicro
4
4
PSU
Power Cord
Supermicro
Supermicro
PWS-1K41-BR
CBL-0223L
2
GbE Switch Module
Supermicro
SBM-GEM-001
1
Management Module
Supermicro
SBM-CMM-001
Compute Blade
Xeon L5420 Processors
2GB DDR2-667 Memory
2.5" SAS Hard Drive
Supermicro
Intel
Quimonda
Seagate
SBI-7125C-S3
Quad-Core 2.5GHz / 1333 FSB, 2x6MB L2
HYS72T256300EP-3S-C
Saavio 15K.1 ST973451SS
10
20
40
11
Table 1: OfficeBlade™ Bill of Materials 3
August, 2008 In addition to these items, the following are either required or useful during the installation process: USB keyboard and mouse, USB DVD drive, USB 4 port hub, two Ethernet cables, a laptop or desktop computer capable of running a web browser. Microsoft Internet Explorer 7 (7.0.6000.16681) was used while developing this recipe. Please refer to the SuperBlade® user manual for instructions to assemble the unit. Bill Of Materials (Software) The software bill of materials consists of a single DVD from Clustercorp, Rocks+ 5 Jumbo. In order to build and deploy ICR certified clusters with Rocks+, a software and support license must be purchased from Clustercorp. This can be obtained in multiple ways as described at http://www.clustercorp.com/hardware/supermicro.html . During the certification process an LG External Super‐Multi DVD Rewriter, model GSA‐E60N, USB DVD drive was used. Bill Of Materials (Intel Cluster Ready License) The system vendor is required to run the Intel Cluster Checker tool both before it leaves the factory and after installation at the end user site. The Cluster Checker tool requires a license file to be installed on the cluster. The license file can be obtained free of charge directly from Intel at http://www.intel.com/go/cluster (registration required) if desired. Alternatively, the reseller can use Supermicro’s pass through license included in the download bundle from the Supermicro web site along with this recipe. Bill Of Materials (Download Bundle) The system vendor is required to run the Intel Cluster Checker tool both before it leaves the factory and after installation at the end user site. See Section 4 below. The Cluster Checker tool requires several files bundled together as a single download from the Supermicro web site along with this recipe. The bundle includes: Checksum files, XML Config & Output files, Supermicro ICR license file (COM_*), the cluster certification certificate, a copy of this recipe document and a README file. 2. Firmware and BIOS Settings Once the hardware and software system components have been obtained you can begin the system configuration. After the blades have been populated into the chassis plug in the power supplies, connect a laptop or desktop system with a web browser to the Management Module (CMM). Reset the CMM firmware to default settings. Access the CMM setup interface via the web browser and verify the following: Hardware Rev is 0x22 or greater, Firmware Rev is 02.02.43 (Build 5420) or greater, Firmware Description is 2 – 04 – may 31 and that Virtual Media / Options / Disable USB. Refer to the SuperBlade® User Manual for details on these and the following SuperBlade® specific setup procedures. Connect the KVM dongle to the blade in position 1, which will become the cluster head node. Power the blade up and enter the LSI SAS configuration utility. Verify that the LSI MPTBIOS is rev 6.18.01.00 (2007.08.08) or later and that the firmware is rev 1.24.00.05‐IT or later. Configure the SAS controller. The controller was configured in a JBOD arrangement with two drives on the head node. Save and reboot the blade. Enter the BIOS setup. Verify that the BIOS Rev is 4/21/08 or later. Reset the BIOS settings to their defaults. Verify that PXE boot is disabled for both GbE ports under Advanced / PCI Configuration. Save and exit. 4
August, 2008 Repeat the above procedure for each of the remaining blades in the system, although those will have only one disk drive. These will become cluster compute nodes. After resetting the BIOS to defaults, modify the following: under Advanced / PCI Configuration, disable the option ROM on the 2nd GbE device, which will disable PXE boot capability on that port. Leave PXE boot enabled on the 1st GbE port. In the Boot list move the remaining IBA GE device to the top of the boot list followed by the SAS array. It is essential that the 2nd GbE port have PXE boot disabled while it is enabled on the 1st port. Save and exit and power off the compute node blades. 3. Installation Cluster Head Node Installation Connect the KVM dongle to the head node blade and connect the USB keyboard and USB DVD drive to the dongle. Insert the Rocks+ 5 Jumbo DVD into the drive and power on the blade. Press the blue button on the front of the blade and verify that the blue light near it comes on. Refer to the Rocks Installation Guide and User Guide on the DVD for details on the procedures outlined below. It may be useful to have a 2nd copy of the DVD available in the laptop or desktop mentioned above so these guides are readily available. • When the Rocks splash screen comes up type ‘frontend’ and enter. • Enable IPv4 / Manual and disable IPv6. Use the following: 192.168.10.5 / 255.255.255.0, 192.168.10.1, 192.168.10.5 • At CDROM not found, cdrom:/ks.cfg select OK and enter • Tab to CD/DVD based roll & enter o Select all but kernel update, moab, totalview & submit • Tab to next and enter • Set the FQDN to superblade.supermicro.com or your preferred FQDN • Set the cluster name to superblade or consistent with the FQDN • Config eth0 as: 10.1.1.1 / 255.0.0.0, leave eth1 as already configured above • Select manual disk partition, o Delete any partitions on the disk (/dev/sda) o Tab to new, enter and use the following: mount point is /, file system is ext3, size is 15000; tab to ok and enter (the recommended minimum size is 15000) o Tab to new, enter and use the following: tab to file system type, down arrow to swap and enter, size is 4000, tab to ok and enter (the recommended minimum size is 4000) o Tab to new, enter and use the following: mount point is /export, file system is ext3, size is ‘fill to maximum allowable’ o Select the second drive (/dev/sdb) o Tab to new, enter and use the following: mount point is /scratch, file system is ext3, size ‘fill to maximum allowable’, tab to ok and enter • Insert disc as prompted, system will install and boot to Linux • Log in as root, open a terminal window, hit return three times to generate ssh keys • Enter the command ‘rocks sync users’ 5
August, 2008 •
•
•
•
Fix the GbE drivers o Included in the download bundle is a file igb‐1.2.22‐1.x86‐64.rpm. Copy this file into /root o Enter ‘rpm –ivh igb‐1.2.22‐1.x86‐64.rpm’ o Reboot o Log in; enter commands ‘modprobe igb’, ‘modinfo igb’. Ensure that the driver rev is 1.2.22 Start the web browser, go to Roll Docs / intel‐icr / 5.0, open section 3.1 and follow the directions to install the icr license obtained above in the Bill of Materials section. Enter the command ‘insert‐ethers’, select compute and hit ok You are now ready to begin installing the compute nodes Cluster Compute Node Installation Power up the first compute node (blade position 2). Attach the KVM dongle to blade 2 and verify that it begins to PXE boot and install Rocks. Move the KVM dongle back to the head node and verify ‘found appliance compute‐0‐0’. Wait 10 seconds and power up the second compute node (blade position 3). Continue as above until all the compute nodes have started their install. The install will take about 30 minutes. Move the KVM dongle back to the head node and wait until all the compute nodes have finished installing. Exit the insert‐ethers GUI. Fix /etc/resolv.conf on the compute nodes as follows. • On the head node, open /etc/resolv.conf in an editor and remove ‘suprmicro.com’, save and exit • Enter the command ‘scp –p /etc/resolv.conf compute‐0‐0:/etc/resolv.conf’ • Copy /resolv.conf to each compute node in turn The copy commands may take awhile to execute. Please be patient as the above modification to resolv.conf will fix that. Reboot the compute nodes and verify minimal functionality as follows. • Enter the command ‘tentakel shutdown –r now’, this make take some time to finish • After the compute nodes have rebooted enter the command ‘tentakel uptime’. This should finish within a second or two. If it does not, verify the resolv.conf on each compute node by entering ‘tentakel cat /etc/resolv.conf’. 4. Verify a Correct Cluster Build Responsibilities of Reseller Under the terms of the pass through certification clause of the ICR program agreement (between Supermicro and Intel), the reseller runs the cluster checker tool against the checksum files & XML configuration file provided by Supermicro along with this recipe. The cluster must 6
August, 2008 pass the tests listed below before it leaves the reseller’s factory. In addition, the reseller must make provision to re‐run the tests once the cluster is installed at the end user site. This helps ensure that the system is functional after shipping (loose cables for example). The cluster checker tests are not burdensome. They could typically be incorporated into the reseller’s system burn in procedure for example. Cluster Validation with ICR You are now ready to validate extended cluster functionality with the ICR Cluster Checker. Refer to the ICR documentation and Cluster Checker manual for details on the procedures outlined below. The ICR documents can be found at http://www.intel.com/go/cluster. Begin the cluster validation process as follows: • Log in to the head node as root, open a terminal window, and hit return three times to generate SSH keys • Enter the command ‘su – icr’ and cd ~, which will take you to the preinstalled ICR account & home directory. All the required environment variables should now be set • Open a web browser and access ‘Roll Docs’. The home page should default to the Rocks+ documentation already installed on the head node. • In the terminal window copy the Download Bundle from the Bill of Materials above in Section 1 to the icr account home directory. The Download Bundle should be extracted from the WinZip archive before copying to the SuperBlade®. • Copy the checksum files to /tmp. These files are named compute‐0‐0‐root‐*.out and superblade‐root‐*.out. Each file is several MB. • Next make a subdirectory /temp in the icr account home directory. Move all of the *.out and *.xml files to that subdirectory. These are saved here for later reference. • Next copy /temp/icr_config_gige.xml to the icr account home directory. • You are now ready to verify that the cluster configuration is compliant, functional and performant. The detailed procedure can be found in the Roll Docs, Section 6.1, Running the Cluster Checker. There are however some important differences. There is no need to generate the checksum files. The checksum files from the download bundled copied to /tmp will be used instead. This will ensure that the file tree matches that certified by Supermicro. For the convenience of the reseller, the key commands are given below. • In the icr account, run the command ‘cluster‐check –compliance 1.0 icr_config_gige.xml’. This will verify that the cluster installation is compliant with the ICR specification. Note that the dashes in the command are double dashes. • In the icr account, run the command ‘cluster‐check –exclude=copy_exactly –
exclude=comp –exclude=hdparm icr_config_gige.xml’. This will verify basic cluster functionality and the performance of various subsystems including CPU, memory bandwidth, network bandwidth and latency. 7
August, 2008 •
•
In the root account, cd to the icr account home directory. Run the following commands: ‘cluster‐check –compliance 1.0 –include_only=gige icr_config_gige.xml’ and ‘cluster‐check –include_only=hdparm –
include_only=copy_exactly –include_only=dmidecode icr_config_gige.xml’. Either of the above procedures may fail. Screen output from the cluster‐check tool is saved into a file *.out. Detailed output from the cluster‐check run is saved in a corresponding *.xml file. If the cluster‐check tool flags an error for any of the above commands, the output must be examined and fixed in order to certify the cluster as compliant. Some failures are expected & normal. They do not imply that the cluster has failed certification. Check the corresponding *.out file in the /temp directory for similar errors. If a matching type of error is found in the /temp *.out file, it may be safely ignored. If a matching type of error is not found in the /temp *.out file, it must be fixed to certify the cluster as compliant. If the error occurs during the –compliance checks, it is often easiest to start by re‐installing the compute nodes. This is easily done under Rocks+ as root : ‘rocks set host pxeboot compute‐0‐0 action=install’ followed by ‘ssh compute‐0‐0 “shutdown –r now” ‘. Repeat for each compute node in turn, compute‐0‐1, compute‐0‐2 etc. If the errors persist after re‐install, contact Supermicro support. If the cluster installation is flagged as functionally incorrect or failing subsystem performance, then examine the cluster checker output to determine which subsystem(s) is failing. Some typical failures might include: • Node Failures o Stream test fails – reseat DIMMs, ensure all channels are populated. o DGEMM test fails – check scaled performance vs that of the certified system (2.5 GHz / 1333 MHz FSB Quad Core processors) to determine if this is an actual failure. o HDParm test fails – swap out the failing hard drives and rerun the test Note that performance failures may be reasonable and expected. A different processor may not pass the DGEMM test, so scaling the result (in the *.xml file) to the actual processor frequency is needed. Similarly the Stream test can fail if for example the user specified a cluster where not all memory channels are populated. HDParm failures are very common. Different drive model or RAID configurations will give different performance. This is expected. The reseller must examine the *.xml out and determine if the measured performance is reasonable for the given configuration. Power and Cooling Requirements The cluster configuration described in the BOM was measured as consuming 2.3 kW at 208V AC running Linpack on each node. This is expected to be highly configuration dependant, for example depending on the CPU power rating, number of DIMMs installed and so on. Therefore this measurement should be used only as a reference point. Permissible Configuration Variants The pass through cluster certification is valid for certain variations on the configuration detailed in this recipe. Different processor types, 8
August, 2008 memory manufacturer, density and number of DIMMs, disk drive manufacturer, capacity and count are permitted. Different models of compute blade, Infiniband card and Rocks software stack are not permitted. In that case the reseller may complete the full certification procedure themselves and apply to the ICR program web site for certification certificate. Important minimum configurations limits include • Memory – 1 GB per processor core • Disk – the head node must have 65GB of available storage. Available storage is formatted capacity minus swap. A 73GB SAS drive can be used but only if swap is 3GB or less. The minimum recommended drive size for the head node is 80GB. 5. Contacts The reseller is responsible for first level product support with the end user. A comprehensive 2nd / 3rd level support package (for the reseller) is available as follows: • Initial support requests can be made through the Supermicro support center via phone, email or web. It is essential to have the unit serial number on hand in order to process the request. The Supermicro support center can be found at http://www.supermicro.com. Resellers may use the SuperServer support hotline. • The Supermicro support center will make a determination as to whether the problem is hardware related or software related. Hardware related issues will be handled by the Supermicro support center in the usual fashion. • Software related issues will be redirected to Clustercorp. It is essential to have purchased Rocks+ from Clustercorp to be licensed to use the software and receive support. 6. Release Notes 9