1
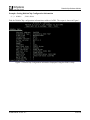
User Manual
®
DiskOnChip Software Utilities
NOVEMBER 2002
91-SR-002-02-7L REV. 4.1
DiskOnChip Software Utilities
Table of Contents
1
Introduction ................................................................................................................................ 3
1.1 DiskOnChip Product Family ................................................................................................. 3
1.2 Terms and Abbreviations...................................................................................................... 4
2
DFORMAT Utility ........................................................................................................................ 5
2.1 DFORMAT Syntax................................................................................................................ 5
2.2 Using DFORMAT Flags........................................................................................................ 6
2.2.1 Device-Specific Flags (DiskOnChip Millennium Plus and Mobile DiskOnChip) ..........................8
2.2.2 Flags for Advanced Operations ...................................................................................................9
2.2.3 DFORMAT Usage Examples .......................................................................................................9
3
Configuring DiskOnChip as a Bootable Disk ........................................................................ 11
4
DINFO Utility............................................................................................................................. 12
4.1 DINFO Syntax .................................................................................................................... 12
4.2 Using DINFO Flags ............................................................................................................ 12
5
GETIMAGE/PUTIMAGE Utilities: Duplicating DiskOnChip .................................................. 14
5.1 GETIMAGE Utility: Reading the DiskOnChip Image .......................................................... 14
5.2 PUTIMAGE Utility: Writing an Image into a Target DiskOnChip ........................................ 15
5.3 Creating the Source DiskOnChip ....................................................................................... 15
5.4 Copying the Source DiskOnChip to an Image File ............................................................. 16
5.5 Copying the Image File to Target DiskOnChip Devices ..................................................... 16
5.6 GETIMAGE/PUTIMAGE Error Messages .......................................................................... 17
6
Additional Documents and Tools........................................................................................... 18
How to Contact Us .......................................................................................................................... 19
91-SR-002-02-7L Rev. 4.1
2 of 19
DiskOnChip Software Utilities
1 Introduction
This manual describes the following DiskOnChip utilities for DOS to be used with the DiskOnChip
products, supplied by M-Systems.
•
DFORMAT
•
DINFO
•
GETIMAGE
•
PUTIMAGE
This document provides a description of the utility flags, including specific examples and basic
instructions to assist you in easy and quick installation of DiskOnChip on your target platform.
This document is intended for system integrators who are familiar with the PC environment and the
operating system in use. It is also recommended to read the relevant DiskOnChip data sheets and
installation instructions for your specific operating system. Refer to Section 6 for additional
documents and tools available.
The latest version of the DiskOnChip utilities can be downloaded from M-Systems’ website at
http://www.m-sys.com.
1.1
DiskOnChip Product Family
M-Systems’ DiskOnChip is a family of high-performance flash disks. The DiskOnChip series
provides flash disks in five standard form factors (32-pin DIP, 144-pin SODIMM, 32-pin TSOP-II,
48-pin TSOP-1 and 69 ball BGA):
•
DiskOnChip Millennium Plus
•
Mobile DiskOnChip Plus
•
DiskOnChip Millennium
•
DiskOnChip 2000
•
DiskOnChip DIMM 2000
A TrueFFS driver is required to work with any of the DiskOnChip products. TrueFFS is natively
supported by every major OS, such as Windows CE, Windows 2000, QNX, and VxWorks. The latest
TrueFFS drivers can be obtained from M-Systems for these operating systems and others, such as
DOS, Linux, pSOS and NT Embedded at http://www.m-sys.com/download. For other environments
(including OS-less) the TrueFFS Software Development Kit (SDK) can be obtained. When using
DiskOnChip as the boot device in a non-x86 environment, M-Systems’ Boot Software Development
Kit (BDK) package is required. Contact M-Systems regarding availability for both packages.
The following sections describe the DiskOnChip utilities and how they are used. Section 2 describes
how to use the DFORMAT utility. Section 3 describes how to configure DiskOnChip as a bootable
device. Section 4 describes the DINFO utility, and Section 5 describes the procedures for duplicating
the contents of a source DiskOnChip to a target DiskOnChip.
91-SR-002-02-7L Rev. 4.1
3 of 19
DiskOnChip Software Utilities
1.2
Terms and Abbreviations
Table 1: Glossary of Terms and Abbreviations
Term
Definition
Binary Partition
Partition on DiskOnChip that generally contains executable code (usually
OS loader or boot code). This partition is not accessed through the
TrueFFS driver, but through low-level functions that are part of the
DiskOnChip Boot SDK API (BDK).
Disk Partition / BDTL
Partition
A disk partition on DiskOnChip that contains data. This partition is
accessed by your OS file system through the TrueFFS driver.
IPL
[Initial Program Loader] Code that is executed during the BIOS extension
search, and loads the SPL (see below). When working in non-PC
architectures, this code should be ported to work with your specific boot
code.
SPL
[Secondary Program Loader] Code that loads and runs the code found in
the first binary partition of DiskOnChip (usually the TrueFFS driver and the
OS loader).
NFTL
[NAND Flash Translation Layer] M-Systems’ patented algorithm, used by
the TrueFFS driver for the following devices:
- Most models of DiskOnChip 2000 (see excluded models below).
- DiskOnChip Millennium 8Mbytes.
INFTL
[Inverse NAND Flash Translation Layer] M-Systems’ latest flash
management algorithm, used by the TrueFFS driver for the following
devices:
- DiskOnChip Millennium Plus
- Mobile DiskOnChip Plus
- DiskOnChip 2000 DIP (high), 384Mbytes and higher.
- DiskOnChip 2000 DIP (low), 192Mbytes and higher.
91-SR-002-02-7L Rev. 4.1
4 of 19
DiskOnChip Software Utilities
2 DFORMAT Utility
Before the TrueFFS driver can access DiskOnChip, the device must be formatted (similar to a floppy
disk). Formatting initializes the flash media and writes a new and empty DOS FAT file system to
DiskOnChip. When formatting is complete, DiskOnChip contains only a root directory.
DiskOnChip can be formatted more then once, however, all stored data on the device is erased during
the formatting process.
Note: When DiskOnChip is reformatted, the boot-image (i.e. firmware file DOCxx.EXB) is retained by default.
Identical versions of the DFORMAT utility and the firmware file are required for formatting. If the
versions are different, the formatting procedure stops and DFORMAT returns an error message.
Currently, the latest version of the DFORMAT utility and the firmware version is 5.1. The following
sections describe how to use the DFORMAT utility and provide a description of its flags.
2.1
DFORMAT Syntax
The DFORMAT syntax is:
DFORMAT [Drive-letter]
OR
[/WIN:segment] [/Flag:n:parameter:size suffix]
Where:
Drive letter
DOS drive letter of the DiskOnChip drive
WIN
Memory address where DiskOnChip resides
Flag
See full flag list and their description below
n:
Partition number (n=0 for devices using NFTL; n=0-3 for
devices using INFTL). Default value is 0.
Size suffix
M *0x100000
K*0x400
Example:
DFORMAT /win:D000 /BDKL0:1M
Formats the DiskOnChip located at memory address D000 with a 1MB binary partition, while the
rest is formatted by default as a disk partition.
91-SR-002-02-7L Rev. 4.1
5 of 19
DiskOnChip Software Utilities
2.2
Using DFORMAT Flags
The following tables define the various flags used with the DFORMAT utility.
Table 2: Most Commonly Used DFORMAT Flags
DFORMAT Option
/WIN:Segment
/S:firmware | ! | *
[Default value = *]
Memory address at which DiskOnChip is located. Use either this
parameter or the drive letter. The segment should be specified in
hex (for example, /WIN:D000).
Firmware: Write the DiskOnChip firmware image from file
DOCnn.EXB, where nn=version number (for example,
DOC51.EXB).
*: Erase the disk partitions, but leave the content of the binary
partitions intact.
!: Erase the contents of the firmware binary subpartition from the
DiskOnChip.
Use this flag to program DiskOnChip to be the first available disk
(drive [C:]) when there is more than one disk installed in the
system. This flag has no effect if DiskOnChip is the only disk in
the system.
The /S:firmware parameter must be supplied when the
/FIRST flag is used. When using the /FIRST flag in
conjunction with the /NOFORMAT flag (DFORMAT … /FIRST
/NOFORMAT), the information on DiskOnChip is preserved.
/FIRST
/NOFORMAT
Use this flag when you wish to update the DiskOnChip firmware
or the DiskOnChip Millennium Plus IPL without reformatting the
entire device. It can also be used to read the Bad-Block Table,
using the LOG option, without reformatting the device.
NOFORMAT can be used with the following flags:
/S, /LOG, /IPL
Loads the TrueFFS driver in silent mode, meaning that no
messages are displayed onscreen during boot-up. Can only be
used with the /S flag.
/SILENT
Instructs the system not to pause for confirmation before
beginning to format.
/Y
/?
Description
&
/H
Shows the full Help screen.
Note: By default, DiskOnChip is shipped from the factory configured as the last drive in the system.
When other hard drives are installed, DiskOnChip will be installed as the last drive, However,
if no hard drives are installed then DiskOnChip is still installed as drive [C:]. When configured
as the first drive, (using the /FIRST option), DiskOnChip is always installed as drive [C:].
91-SR-002-02-7L Rev. 4.1
6 of 19
DiskOnChip Software Utilities
Table 3: DiskOnChip Firmware (IPL/SPL) Flags
DFORMAT Option
/XL
/EMPTY
/NOINT15
/EBDA
/2K43
/NOPNP
/SIS5598
Description
Sets the DiskOnChip SRAM to comply with bus controllers that do not toggle
the CS and OE signals. Examples of platforms with such bus controllers are
XSCALE based platforms and the TI OMAP platforms (applicable to the
16Mbytes DiskOnChip Plus products only).
Leaves the space reserved for the firmware (defined with the /S flag) empty.
The firmware can later be placed in this reserved space using the
NOFORMAT flag.
Disables the TrueFFS driver from hooking INT15. Used mainly when
DiskOnChip is used in systems running Windows NT and 128 MB of DRAM
is seen as 64 MB only.
Use this flag when working with BIOSs that include EBDA (Extended BIOS
Data Area) support.
Loads the old firmware version. Use ONLY if your application is accessing
DiskOnChip 2000 DIP or DIMM using the IOCTL mechanism of TrueFFS
5.0.x or lower.
Do not place the PNP BIOS header
If you are using chipset SIS5598, C&T 65555 or 690000, the system may
experience a problem related to INT15, function AX=E820; you may get a
blue screen when booting Windows NT. This flag resolves the problem.
Additional flags related to the DiskOnChip firmware are /S, /NOFORMAT, /FIRST and /SILENT
(described in Table 2).
Table 4: Binary Partition (BDK Partition) Flags
DFORMAT Option
Description
/BDKF[n]: Boot
Image File
Places the boot image file in the binary (BDK) partition [n]. Up to three
binary partitions can be defined in DiskOnChip devices managed by
INFTL. DiskOnChip devices managed by NFTL support only one binary
partition.
This flag can also be used to load a custom IPL onto pages 0 and 1 of
DiskOnChip Millennium 8MB (MD2810), provided that the data is padded
to the required size. Loading a customer IPL onto DiskOnChip Millennium
Plus or Mobile DiskOnChip requires the /IPL flag (refer to Section 2.2.1).
Binary (BDK) partition [n] signature (4 characters).
/BDKN[n]: BDK
Partition
Signature
[Default value = BIPO]
/BDKL[n]: BDK
Partition Size
/LEAVE:k
/O[n]:
Signature
Offset
Defines the size of the binary (BDK) partition [n]. Useful for reserving
space in the binary partition (over the size of the binary program placed
using the /BDKF flag), for later upgrades.
Leave the content of the first k binary partitions.
Binary (BDK) Partition [n] signature offset. Can be 0 or 8.
[Default value = 8]
91-SR-002-02-7L Rev. 4.1
7 of 19
DiskOnChip Software Utilities
Table 5: DOS/FAT File System Flags
DFORMAT Option
Description
/LABEL[n]: Label
The string used as the DOS volume label of the formatted partition n.
[Default value = NULL]
/NODOS[n]
/DOSID[n]: ID
/FAT[n]: Number
/OLD_FORMAT[n]
Use this flag to prevent creating a DOS FAT file system while formatting
partition [n]. Only low-level formatting is performed. Useful for systems
using file systems other then FAT.
FAT partition [n] identification number (ID).
Number of FAT copies on the partition [n]. The default is 2.
Format disk partition n with one sector per cluster
2.2.1 Device-Specific Flags (DiskOnChip Millennium Plus and Mobile
DiskOnChip)
This section describes the DFORMAT flags that can be used only with DiskOnChip Millennium Plus
and Mobile DiskOnChip (refer to Table 6).
Table 6: Device-Specific DFORMAT Flag Options
DFORMAT Option
Description
(INFTL-Related Flags)
/BDTLL[n]:Partition
Size
Sets the size of the disk (BDTL) partition [n]. The size of the last
disk partition does not have to be defined. For example,
/BDTL0:1MB creates two partitions the first 1MB (n=0) in size,
and the second (n=1) the remaining size of the flash disk.
Up to 4 partitions (including binary partitions) can be defined in
DiskOnChip Millennium Plus and Mobile DiskOnChip. This flag
is not applicable in older DiskOnChip devices, as they support
only one disk (BDTL) partition.
/IPL:File | !
file: Writes a custom IPL (up to 1024 bytes). Useful in
non-x86 systems where the standard IPL is not relevant.
!: Erases the IPL (the first 1024 bytes).
/BDKP[n]:RWCL:Password Sets the protection type (Read/Write/Change/Lock) and the
[Default value = no protection]
protection key (password) of the binary partition [n] (n=0-2):
Read: Read-only mode
Write: Write-only mode
Change: Enable changing the protection type (R/W or both).
Lock: Defines if the #Lock pin overrides the password.
/BDTLP[n]:RWCL:
Password
Sets the protection type (Read/Write/Change/Lock) and the
protection key (password) of the disk (BDTL) partition [n] (n=03).
[Default value = no protection]
/BDKZ[n]: Password
91-SR-002-02-7L Rev. 4.1
Inserts the key of the BDK partition number [n] (n=0-2, default
0). Useful when formatting devices previously defined protected
partitions.
8 of 19
DiskOnChip Software Utilities
DFORMAT Option
Description
/BDTLZ[n]: Password
Inserts the key of the disk (BDTL) partition number [n] (n=03,default 0) Useful when formatting devices previously defined
protected partitions.
Note: Up to two partitions may be protected. Only one of them may be set to Change.
2.2.2 Flags for Advanced Operations
Table 7 defines the DFORMAT flag options for advanced operations.
Table 7: Advanced Operation Flag Options
DFORMAT Option
/LOG:file
Description
Copies the Bad-Block Table (BBT), stored on DiskOnChip, to a file. Required
when a test that destroys the BBT is performed on DiskOnChip.
When this flag is used, DiskOnChip is also reformatted. If you want to
preserve data on DiskOnChip and only read the BBT, use the /NOFORMAT
flag.
/USELOG:file
Restores the BBT from the file where it was saved to DiskOnChip. This is
necessary after destructive testing is completed (see previous).
/NOISRAM
Cancels the DiskOnChip verification test. Use this if DFORMAT does not
perform properly.
/USE:k
Percent of usable space to be formatted. Lower capacity increases write
performance. Default is 98.
/SPARE[n]:k
Number of spare units of disk partition n. Starting from 5.1.x default is 2.
/UNFORMAT
Removes any existing DiskOnChip formatting and restores DiskOnChip to its
virgin state. This flag is used, for example, when you have two cascaded
DiskOnChip Millennium TSOPs and want to add another TSOP device.
Regular DFORMAT on the extra TSOP device will not be effective in building
the shared BBT. The /UNFORMAT flag must be run to integrate the three
TSOPs as one unit.
2.2.3 DFORMAT Usage Examples
Example 1
DFORMAT C:
This formats DiskOnChip, assuming that DiskOnChip is set as disk [C:].
Example 2
DFORMAT /WIN:D000 /s:DOCnn.EXB
This formats the DiskOnChip located at memory address D000h, and installs firmware file
DOCnn.EXB. If any other hard disk is present in the system, DiskOnChip is identified as the last
drive. If there are no other hard disks present in the system, DiskOnChip is installed as drive [C:].
Note: The firmware and the DFORMAT utility must be of the same version, namely, DFORMAT
from version 5.0.4 (for example) can be used only with firmware version 5.0.4
(DOC504.EXB).
91-SR-002-02-7L Rev. 4.1
9 of 19
DiskOnChip Software Utilities
Example 3
DFORMAT /WIN:D000 /S:DOCnn.EXB /FIRST
This formats the DiskOnChip located at memory address D000h, and installs firmware file
DOCnn.EXB. With this usage, DiskOnChip is the first drive [C:], even if there are other hard disks
present in the system.
Example 4
DFORMAT /WIN:D000 /S:DOCnn.EXB /USELOG:BBT.TXT
This formats the DiskOnChip located at memory address D000h, installs firmware file DOCnn.EXB
and installs the BBT described in the BBT.TXT file. It is imperative that the BBT saved to
DiskOnChip (using the USELOG flag) was extracted from the device itself. DiskOnChip is the first
drive [C:], even in if there are other hard disks present in the system.
Example 5
DFORMAT /WIN:D000 /BDKF0:CEIMAGE.bin /BDKL1:1M /BDKF1:RegistryFile
This formats DiskOnChip with two binary partitions and one disk partition. One binary partition is
used to load and run the Windows CE image, and the other is used to store up to 1MB of registry
information. The disk partition occupies the reminder of the media.
Example 6
DFORMAT /WIN:D000 /s:DOCnn.EXB /FAT1
This formats the DiskOnChip located at memory address D000h and installs firmware file
DOCnn.EXB. It also places a single FAT copy on DiskOnChip (Many OSs do not use the second
FAT copy).
Example 7
DFORMAT /WIN:D000 /BDTLZ2:xxxxxxxx /S:DOCnn.EXB
This reformats DiskOnChip with a protected disk (BDTL) partition. If the password provided in the
command line is not correct, the format operation fails.
Example 8
DFORMAT /WIN:D000 /BDTLL0:12M /BDTLP1:WC:xxxxxxxx /S:DOCnn.EXB
This formats DiskOnChip with two disk (BDTL) partitions. The second partition has a 20MB
capacity, and can be write protected and changed (the protection can be switched later, to either read
protection or read/write protection).
Example 9
DFORMAT /WIN:D000 /s:DOCxx.EXB /NOFORMAT
This replaces the firmware on DiskOnChip with DOCxx.EXB, without reformatting the device.
Example 10
DFORMAT /WIN:D000 /LOG:BBT.TXT /NOFORMAT
This reads the DiskOnChip BBT to the BBT.TXT file without reformatting the device.
91-SR-002-02-7L Rev. 4.1
10 of 19
DiskOnChip Software Utilities
3 Configuring DiskOnChip as a Bootable Disk
DiskOnChip can be configured as a bootable disk drive. To configure DiskOnChip as a bootable
disk, refer to the relevant DiskOnChip installation manual for your particular OS (see Section 3).
Below is a general example describing how to configure DiskOnChip as a bootable drive in DOS.
Note: DiskOnChip is shipped from the factory DOS formatted, without OS files and configured as
the last drive.
To configure the DiskOnChip as the first bootable disk in DOS:
1. Boot the system and ensure that DiskOnChip is correctly installed as the last drive [D:].
2. Transfer the system files to drive [D:] by running FORMAT D: /S or SYS D: to make
DiskOnChip bootable.
3. DiskOnChip should now be made the only disk in the system, as follows:
•
Remove your hard drive.
OR
•
Using the DFORMAT utility, configure DiskOnChip as the first disk in the system (refer to
the /FIRST flag in Table 2).
4. After rebooting the system, DiskOnChip appears as drive [C:], and the hard drive becomes drive
[D:].
Examples (assuming DiskOnChip is already recognized as drive [D:])
DFORMAT /WIN:D000 /S:DOCnn.EXB /FIRST
SYS D:
OR
SYS D:
DFORMAT /WIN:D000 /S:DOCnn.EXB /FIRST /NOFORMAT
Both examples accomplish the following:
•
Format DiskOnChip as the first disk in the system
•
Store the DOCnn.EXB firmware file on DiskOnChip
•
Copy the DOS system files to DiskOnChip
DiskOnChip is now a bootable drive. The second example (using the /NOFORMAT flag) is useful
when you do not want to reformat DiskOnChip, thereby losing the data stored on your media.
91-SR-002-02-7L Rev. 4.1
11 of 19
DiskOnChip Software Utilities
4 DINFO Utility
4.1
DINFO Syntax
The DINFO syntax is:
DInfo [/WIN:segment] [/FLAG:parameter]
Where:
/WIN: Memory window address. (If not imputed, Dinfo Search for all DiskOnChips connected and
displays their information)
/FLAG: See the flag list in Table 8 for details (at least one parameter should be called).
4.2
Using DINFO Flags
Table 8 defines the various flags used with the DINFO utility.
Table 8: Typical DINFO Flags
DINFO Option
/WIN:Segment
Description
Memory address where DiskOnChip is located. The segment
should be specified in Hex (for example, /WIN:D000). If the /WIN
option is not specified, the utility will search for DiskOnChips
between addresses 0xC8000 – 0xE0000. All DiskOnChips that
are located will be related. The provided segment address is
multiplied by 16 to get the actual physical address.
/BBT
Displays BBT information.
/OTP
Displays OTP and device ID information.
/BDTL
/BDK
Displays the disk (BDTL) partition information for the selected
DiskOnChip, including the number of partitions on the media,
capacity data, format and protection for each individual partition.
Displays the binary partition information for the selected
DiskOnChip, including the number of partitions on the media, start
unit, end unit, capacity data, signature, and protection for each
individual partition.
/EXB
Displays the firmware information of the selected DiskOnChip,
including version, runtime ID and flags.
/REG
Displays the status of selected registers of the DiskOnChip
controller.
/IPL
Provides information about the DiskOnChip Initial Program
Loader (IPL).
/H
Displays the usage screen.
/More
Displays one screen of output at a time.
/Log: filename
91-SR-002-02-7L Rev. 4.1
Saves the information to a log file. DINFO prints the selected
information to the screen, and saves the information to a
specified file.
12 of 19
DiskOnChip Software Utilities
Example: Getting DiskOnChip Configuration Information
C:\> DINFO
/WIN:d200
Find the DiskOnChip configuration information at address 0xd200. The output is shown in Figure 1.
Figure 1: DiskOnChip Configuration Information Displayed Using the DINFO Utility
91-SR-002-02-7L Rev. 4.1
13 of 19
DiskOnChip Software Utilities
5 GETIMAGE/PUTIMAGE Utilities: Duplicating DiskOnChip
Duplicating the contents of a DiskOnChip to another device requires copying the contents of a
“source” DiskOnChip to an image file, and then copying the image file contents to a “target”
DiskOnChip. As a result, all target DiskOnChip contents are identical to the source DiskOnChip,
meaning that they have the same functionality when inserted into the target platform.
Warning: All target DiskOnChip devices must have the identical part number and capacity as the
source DiskOnChip. For example, if the source DiskOnChip is a DiskOnChip 2000 32MByte, then
the target DiskOnChip must also be a DiskOnChip 2000 32MB.
The duplication process includes the following three stages:
•
Preparing the source DiskOnChip.
•
Copying the contents of the source DiskOnChip to a virtual image file with the GETIMAGE
utility.
•
Copying the image file to the target DiskOnChip device(s) with the PUTIMAGE utility.
Note: To mass-duplicate DiskOnChip efficiently, it is recommended to use the M-Systems GANG
Programmer. Contact M-Systems for availability and refer to the GANG Programmer User
Manual for additional information.
5.1
GETIMAGE Utility: Reading the DiskOnChip Image
The GETIMAGE syntax is:
GETIMAGE ImageFile [/WIN:segment] [/N#:password][/T#:password]
Table 9 describes the GETIMAGE flag options.
Table 9: GETIMAGE Flag Options
GETIMAGE Option
ImageFile
/WIN
Description
Name of the image being created.
DiskOnChip memory address location. Use either this parameter or the
drive letter. The segment should be specified in Hex (for example,
/WIN:D000).
/N#:password
Protection key of the protected binary partition (the default is 0). Inserting
this flag disables the read/write protection of the specific binary partition.
/T#:password
Protection key of the protected disk partition (the default is 0). Inserting
this flag disables the read/write protection of the specific disk partition.
91-SR-002-02-7L Rev. 4.1
14 of 19
DiskOnChip Software Utilities
5.2
PUTIMAGE Utility: Writing an Image into a Target DiskOnChip
The PUTIMAGE syntax is:
PUTIMAGE ImageFile [/WIN:segment] [/FLAG:parameter]
Table 10 describes the PUTIMAGE flag options.
Table 10: PUTIMAGE Flag Options
PUTIMAGE Option
ImageFile
/WIN
/N#:password
/T#:password
/Single:#
5.3
Description
Name of the image to be created.
DiskOnChip Memory address location. Use either this parameter or the
drive letter. The segment should be specified in Hex (for example,
/WIN:D000).
Used if the password for the binary partition on the target DiskOnChip
needs to be changed during a PUTIMAGE operation. If the partition of
the source image is not protected, the /N flag has no effect.
Used if the password for the disk partition on the target DiskOnChip
needs to be changed during a PUTIMAGE operation. If the partition of
the source image is not protected, the /N flag has no effect.
Used for off-board programming of cascaded devices. It reads the
relevant floor image from the cascaded source image, and places it on a
single device intended to be assembled in this floor.
Example: PUTIMAGE Blaa.img /single:3 programs a
DiskOnChip intended to be assembled as the third device in a group of
cascaded devices. The Blaa.img file contains the information of all the
devices in the cascaded structure.
Creating the Source DiskOnChip
The source DiskOnChip includes all target application files and is usually bootable. The preparation
process for the source DiskOnChip comprises the following steps:
•
Formatting DiskOnChip, using the DFORMAT utility, on the target platform.
•
Copying all target application files to DiskOnChip.
•
If required, making DiskOnChip bootable (refer to Section 3).
After the source DiskOnChip device has been properly prepared, follow the guidelines described in
the following sections to duplicate it (as many times as required).
91-SR-002-02-7L Rev. 4.1
15 of 19
DiskOnChip Software Utilities
5.4
Copying the Source DiskOnChip to an Image File
At this stage, the source DiskOnChip includes all target application files, and it is ready to be
duplicated. Use the GETIMAGE utility to copy the source DiskOnChip contents to an image file on
your hard disk. This information will be used later as the source file for the duplication process.
To copy the source DiskOnChip to an image file:
1. Power OFF the system.
2. Insert the source DiskOnChip into the appropriate socket.
3. Power ON the system.
4. Run: GETIMAGE image_file_name.IMG.
Note: When duplicating a DiskOnChip with active hardware protection, you must use GETIMAGE
with the /N# or /T# flags in order to disable the protection. The password will be included in
the virtual image for later use by PUTIMAGE.
Example
GETIMAGE MYDOC.IMG /N0:mypassword
Copies the contents of a “source” DiskOnChip with a protected disk partition into the file
MYDOC.IMG on the hard disk.
5.5
Copying the Image File to Target DiskOnChip Devices
At this stage, the contents of the source DiskOnChip are stored on the hard disk in an image file.
Copying this image file to the target DiskOnChip results in an identical DiskOnChip target device.
The PUTIMAGE utility is used for this purpose.
To copy the image file to the target DiskOnChip:
1. Power OFF the system.
2. Insert a target DiskOnChip device, with the same part number and capacity as the source
DiskOnChip device, into the appropriate socket.
3. Power on the system.
4. Run: PUTIMAGE image_file_name. When the duplication process is complete, the target
DiskOnChip has the identical contents and functionality as the source DiskOnChip. If the source
DiskOnChip is protected, then the target DiskOnChip is also protected with the same attributes
and using the same passwords.
5. Repeat steps 1 to 4 as many times as required to duplicate additional target DiskOnChip devices.
Note: If the target device is already protected (DiskOnChip Millennium Plus), you must first
reformat it to remove the protection.
Example 1
PUTIMAGE MYDOC.IMG
Copy the contents of the MYDOC.IMG file to the target DiskOnChip.
91-SR-002-02-7L Rev. 4.1
16 of 19
DiskOnChip Software Utilities
Example 2
GETIMAGE c:\image.IMG /N2=12345678 /T1 = qwertyui
PUTIMAGE c:\image.IMG
The source DiskOnChip has the second binary partition protected with password 12345678, and the
first disk partition is protected with the password qwertyui. An image of the source DiskOnChip is
created and copied to a target DiskOnChip.
5.6
GETIMAGE/PUTIMAGE Error Messages
Table 11 describes the GETIMAGE and PUTIMAGE error messages.
Table 11: GETIMAGE/PUTIMAGE Error Messages
Error Message
Description
Memory allocation error
There is not enough system memory to complete the operation.
File open error
The system cannot open the image file. This may occur during
read or write cycles (for example, if GETIMAGE is trying to write
the image to a write-protected drive).
Media header not found
The source DiskOnChip is not formatted, or is corrupted.
File write error
The system cannot write to the image file. This may occur in
GETIMAGE or PUTIMAGE when the media on which they are
writing suddenly becomes unavailable (Disk Full).
Bad format of file
PUTIMAGE detected that the image file being written to the target
device is not a valid image file.
Partition protected
Trying to write to a target device with protected partitions. You
must first remove the protection (DFORMAT using the
BDTLZ[n] or the BDKZ[n] flag).
Too many bad blocks
The number of bad blocks on the target device is outside the
acceptable range. Not enough space is available for writing the
image.
Note: This type of error does not normally occur unless
DiskOnChip was misused.
Media not compatible
The target DiskOnChip is not the same model and capacity as the
master DiskOnChip.
91-SR-002-02-7L Rev. 4.1
17 of 19
DiskOnChip Software Utilities
6 Additional Documents and Tools
A variety of application notes, user manuals, data sheets and tools are available from M-Systems for
use with DiskOnChip products under various OSs and environments.
These documents are available through M-Systems distributors, directly from M-Systems offices
worldwide, and on the M-Systems website (www.m-sys.com).
Document/Tool
Description
Data Sheet
DiskOnChip Millennium
Data Sheet
DiskOnChip Millennium Plus
Data Sheet
DiskOnChip DIMM2000
Data Sheet
DiskOnChip 2000
Data Sheet
DiskOnChip 2000 TSOP
Application Note, AP-DOC-012
Loading DiskOnChip 2000 S/W as a Device Driver
Installation Manual, IM-DOC-016
Using DiskOnChip with QNX
Installation Manual, IM-DOC-017
Using DiskOnChip with Windows CE
Installation Manual, IM-DOC-021
Using DiskOnChip with Linux
Installation Manual, IM-DOC-022
Using DiskOnChip with pSOS
Installation Manual, IM-DOC-023
Using DiskOnChip with VxWorks
Developer Guide
DiskOnChip Boot Software Development Kit (BDK)
Developer Guide
Extended Functions of the TrueFFS Driver for DiskOnChip
91-SR-002-02-7L Rev. 4.1
18 of 19
DiskOnChip Software Utilities
How to Contact Us
Internet:
http://www.m-sys.com
E-mail:
[email protected]
USA
China
M-Systems Inc.
8371 Central Ave, Suite A
Newark CA 94560
Phone: +1-510-494-2090
Fax: +1-510-494-5545
25A International Business Commercial Bldg.
Nanhu Rd., Lou Hu District
Shenzhen, China 518001
Phone: +86-755-2519-4732
Fax: +86-755-2519-4729
Taiwan
Europe and Israel Office
Room B, 13 F, No. 133 Sec. 3
Min Sheng East Road
Taipei, Taiwan
R.O.C.
Tel: +886-2-8770-6226
Fax: +886-2-8770-6295
M-Systems Ltd.
7 Atir Yeda St.
Kfar Saba 44425, Israel
Tel: +972-9-764-5000
Fax: +972-3-548-8666
Japan:
M-Systems Japan Inc.
Asahi Seimei Gotanda Bldg., 3F
5-25-16 Higashi-Gotanda
Shinagawa-ku Tokyo, 141-0022
Phone: +81-3-5423-8101
Fax: +81-3-5423-8102
© 2002 M-Systems Flash Disk Pioneers, Ltd. All rights reserved.
This document is for information use only and is subject to change without prior notice. M-Systems Flash Disk Pioneers Ltd. assumes no responsibility
for any errors that may appear in this document. No part of this document may be reproduced, transmitted, transcribed, stored in a retrievable manner or
translated into any language or computer language, in any form or by any means, electronic, mechanical, magnetic, optical, chemical, manual or
otherwise, without prior written consent of M-Systems.
M-Systems products are not warranted to operate without failure. Accordingly, in any use of the Product in life support systems or other applications
where failure could cause injury or loss of life, the Product should only be incorporated in systems designed with appropriate and sufficient redundancy
or backup features.
Contact your local M-Systems sales office or distributor, or visit our website at www.m-sys.com to obtain the latest specifications before placing your
order.
DiskOnChip®, DiskOnChip Millennium®, DiskOnKey® and TrueFFS® are registered trademarks of M-Systems. FFD™ and SuperMAP™ are
trademarks of M-Systems. Other product names mentioned in this document may be trademarks or registered trademarks of their respective owners and
are hereby acknowledged.
91-SR-002-02-7L Rev. 4.1
19 of 19