1
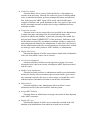
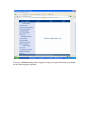
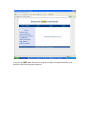
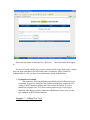
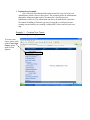
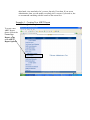
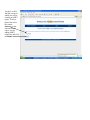
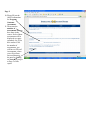
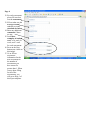
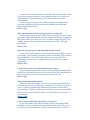
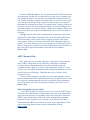
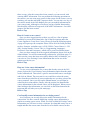
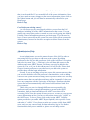
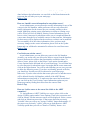
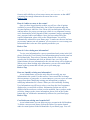
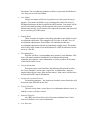
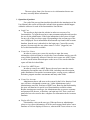
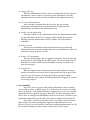
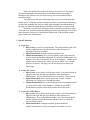
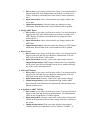
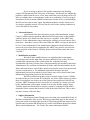
Interactive Accreditation System
IAS – User Manual
Introduction
Purpose of project
The purpose of this software system is to create a web based system,
which allows professors to access a folder, which has been created for each class
the professor teaches per semester per year. In each folder there will be an
accreditation document which contains the ABET requirements the course is
fulfilling, comments from the professor about the work by the students, including
topics on which they are being examined and assessment that are applied to their
work, including statistics added by the professor on the student work from the
class.
The folders will contain subfolders to hold A, B and C level examples of
student work for each of the outcomes, which fulfill the accreditation
requirements for that class. Each folder may contain one or several accreditation
requirements plus the accompanying subfolders of student work and
documentation. The folders will be user name and password protected and held on
the CIS system server for a period up to six years. The system shall be able to be
accessed by an Internet service or from within the campus on the University of
Michigan Dearborn’s local intranet service.
Operating environment
The system is run on the University of Michigan – Dearborn server. The
UMD server currently runs within a Linux operation system environment. The
IAS software will have to be compatible with this environment as well as
Windows based environments of client machines. Additionally, any restrictions
within the Linux operating system will be inherent constraints of the IAS
software.
General functionality
The following process functionalities are provided by the system:
♦ Login User
Function will check the user type and access options of the user upon
login to the system. The password and user name will be checked for secure
access to the system. If the user is not allowed access to the system the user
will be denied entry to any aspect of the system. Correct login will direct the
user to the options available to their level of access.
♦ Create New Course
Function allows user to create a folder specific for a class taught for a
semester at the university. Function also creates file space for storing student
work, accreditation document, professor comment document, and statistical
data. In that space the ABET report will be stored, which includes three
examples of student work, grade distribution in the class, topics for the course
and the assessment outcomes with the class averages, additional professor
comments and files.
♦ Create New Account
Function creates a new account with access specified by the administrator.
A unique user name consisting of the first initial and last name of the
professor is added to the database. A password consisting of the month, day
and year in the format of MMDDYYYY of the professors’ birth date is used
for the initial password. The accreditation committee will have a unique user
name and password defined by the administrator. E-mail field is also entered,
because administrator sends user an email stating an account has been created.
Account type can be either professor, ABET member, or Administrator.
♦ Display All Courses
Function that displays all of the courses that are found in the IAS database
to the user from which a course can be selected.
♦ View Course Information
Function available to all three account types lets a person view course
information after it has been selected, including the ABET Report associated
with the course.
♦ Modify Course Information
Function lets either professor or administrator modify course information
and also the faculty course assessment report associated with a given course.
Any comments entered by the user, or class averages, or loaded files can be
modified and new information will then be stored in the IAS database.
♦ Delete Course
Function available to only Administrator allows to delete a course
information and all of the associated files from the system.
♦ Assign ABET Visibility
Function allows an Administrator to assign courses that are then displayed
to the ABET committee.
♦ Display All Users
Function that displays all of the user accounts that are found in the IAS
database to the administrator from which an account can be selected.
♦ View Account Information
Function available to only Administrator lets him view the user
information from the account that he has selected.
♦ Modify Account Information
Function available to only Administrator allows to modify any user
information in his or her account.
♦ Delete Account
Function available to only Administrator allows to delete a user from the
system
♦ Retrieve File Information
Function retrieves file information stored in the course database.
♦ Store Files
Function is a part of the Create New ABET Report or Modify ABET
Report functionalities, which stores student file examples on the server. Files
will be stored in a flat file format on the server. Each file will have an A, B or
C ranking according to the folder specifications. Each file with have a record
associated with it on the Course database.
♦ Archive Folders
Function retrieves folders no longer required for archival purposes.
Folders and all related files or documents will be removed from the server file
space and archived to a location designated by the administrator.
♦ Log Out User
Function logs user out of the system. User will not be able to access
folders or files until securely logged back into the system.
Special features
Assign /Remove ABET Visibility option lets the Administrator specify
which courses he would like to be available for the review to the ABET users. If
the Administrator forgets to assign visibility to any of the courses, then none will
be listed when an ABET user logs in and wants to view course information.
Additionally, if the Administrator makes courses visible and then changes his
mind, then he can always select that course and click on the Remove Visibility
function that will remove the course from the list visible to the ABET committee.
Limitations
Need for Internet / UMD intranet Connection (Software Limitation) – As
specified by the client, the IAS software system will exist online on the UMD
server. Therefore, for a user to access their account they must have access to
an Internet ready computer, or be on a computer connected to the UMD
server.
UMD Server Availability (Network Limitation) – As with most computing
environments, the UMD server may crash from time to time, or be shutdown
for schedule system maintenance. Since the IAS software will be entirely
stored and accessed from this server; if it is unavailable, the software system
will be unavailable also.
Browser Compatibility (Software Limitation) – The IAS software will support
the usage of the popular web browsing software Internet Explorer by
Microsoft® and Mozilla by Netscape®. The IAS software may or may not
function on other web browsers.
IAS Access (Software Restriction) – Only users created by the IAS
Administrator will have access to the software to be developed. Each user
will have to enter a user name and password for each session they intend to
use their respective IAS functionality.
User Functionality (Permissions Restriction) – Not all functionality is
available to all user classes of the IAS software. The Administrator user is
allowed to do everything, however the professor users and ABET user will
have limited access. The professor user is limited to usage and manipulation
of the courses they have created, while the ABET user has read-only access to
each course tracked by the IAS software.
System Security (Networking Constraint) – The IAS software will operate as
a client / server model does. There will be necessary client / server
communication. As with all other systems requiring this kind of
communication, security is an issue. The IAS software will be limited to the
security built in to the UMD server and may not protect against all security
violations.
Documentation conventions
As a Senior Design class in the CIS Department of the University of
Michigan – Dearborn we were to follow Roger S. Pressman Software Engineering
Templates for our documentation. You can access the templates for all of the
documents in this report by the following link: http://www.rspa.com/docs/.
Installation
Physical requirements
The system will be uploaded onto the University of Michigan – Dearborn
server. The amount of space that the system files would occupy will not exceed
1GB of memory. However, additional space was provided to our system to store
all of the ABET documents uploaded by the professors onto the server. The server
side also has to have a Apache, PHP and Postgre modules installed, so that IAS
functions as it should.
No additional installations of the system are required on the client side.
However, to be able to use the system client should have an Internet connection
available with an Internet browser installed, such as Internet Explorer by
Microsoft® and Mozilla by Netscape®, JavaScript enabled on the pages, Word or
Excel programs by Microsoft® or Acrobat Reader by Adobe®, depending on the
type of a file the will be either uploading or downloading from the IAS.
Copying & backup
University of Michigan – Dearborn school of Engineering and Computer
Science will keep a CD copy of the IAS system files and all of the documentation
completed during this semester. In addition to that, each member of our team
keeps a current backup copy of the system either on their hard-drives or jump
drives. Thus if any accidental changes to the system are made by any of the
system users, working copy of the system can always be retrieved.
On the other hand, the examples of student work uploaded by the
professors will not be automatically backed up. Therefore, if that information is
lost for any reason, it is gone forever. Manual backup of student work files could
be done as a future maintenance for the IAS.
Software installation
IAS files will be moved and tested on the server before the software will
be deployed. No further installations of the system will be required either on the
server or the client side, because the system will be accessed on-line.
Customizing product
This product was developed as a website used by the CIS Department of
the University of Michigan – Dearborn and ABET committee that reviews
documents for the CIS Department. Therefore, the mail goal for customizing our
product was to build a user-friendly interface that would be easy to use and
accessible to the IAS audience. We tried to make the website very simple to use,
but at the same time performing the functionality required. We also had to make it
look professional based on our audience. That is why we have used blue color for
the most part – it matches the colors of our school.
Everywhere on the website where information has to be entered by the
user, for example when creating new courses or adding new users to the system,
examples of the input values are provided. Help page, discussed in the next
section – Tutorial – also guides the user through all of the functionalities of the
system and how to correctly use them.
We have discussed with our customer whether the navigational elements
provided are sufficient and all of the text is easy to see. We tried to provide
Alternative text where possible for people with disabilities, and also leave
elements as text instead of images, so that when the user wants to use large font
size on the page, the web page content does get clearer to those who cannot see
very well.
Tutorial
Example 1 – Logging In
Walkthrough of example
To log in, please
enter your
username and
password and press
on Login.
If you are a new
user, then please
follow this link to
write e-mail to the
Administrator
asking to be added
as an IAS user.
If you have
forgotten your
password, please
follow this link to
also write another
e-mail to the
Administrator
asking for your
password again.
If you are an Administrator and you have logged in using your login information, you
should see the following page displayed:
If you are a Professor and you have logged in using your login information, you should
see the following page displayed:
If you are an ABET user and you have logged in using your login information, you
should see the following page displayed:
Please note the names on the page after “Welcome _” vary based on the user logged
in.
If instead of seeing another page you get re-directed to the Login page again, it means
that your login information was not found in the IAS database. Please contact the
Administrator to verify you have correct information stored in the database.
Explanation of example
The importance of having different pages displayed to a different user type
is immense, because we should not have professors modifying somebody else’s
courses or ABET members adding some new users to the system. Everyone
should have separate roles. If for some reason you do not get a correct page
displayed when logging, please contact the Administrator to have your account
type modified in the Accounts Database.
Example 2 – Adding New User
Walkthrough of example
To add a new user,
please click on the
Add New User
option under
Account Options.
After Add New User
template opens up,
please enter the
following information:
1. First Name of a user
(i.e. John)
2. Last Name of a user
(i.e. Smith)
3. Select Account Type
– very important!!
Select correct
account type for the
user you are adding.
Default is adding a
Professor.
4. Create username for
the user – make sure
it is easy to
recognize the user
based on their
username, because to
view user
information all lists
will be listing their
usernames, instead
of first and last
names. (i.e. jsmith.)
5. Please create a
password for the
user, and, make it
hard to decode. For
example, use
numbers to replace
letters pr0f3ss0r.
6. Repeat entered
password for
validation.
7. Enter user’s e-mail
address to contact.
the user (i.e.)
8. Press on the Submit
button to save all of
the entered user
information.
Explanation of example
One of the first steps that should be taken when IAS is used is to have an
Administrator add new users to the system. This example guides an Administrator
through the information that needs to be entered to correctly store user
information in the IAS. This information can always be modified at a later time.
We started off adding a Professor type user, because they would need to start
creating courses that they are teaching. Adding ABET users would be your next
step.
Example 3 – Creating New Course
Walkthrough of example
To create a new
course, please click
on the Create New
Course option
under Course
Options.
After Create New
Course template opens
up, please enter the
following information:
1. Please enter the
current semester,
including a year in a
YYYY format, the
course is going to be
taught (i.e.
FALL2006).
2. Please enter Course
Name (i.e. CIS 400)
3. Please enter Section
number (i.e.001)
4. Please enter Course
Title (i.e.
Programming
Languages)
5. Please enter
professor’s first
name who is
teaching the
following course the
semester specified
(i.e. John)
6. Please enter
professor’s last
name (i.e. Smith)
7. To save course
information, please
click on the Submit
button.
Explanation of example
After Administrator adds professors to the system than they will have an
option to create new courses in the system and create new ABET reports
associated with those courses (discussed in the next example). When the course is
created a folder is dynamically allocated for the ABET documentation that will
later be filled in.
Course information can be modified, but if you are a Professor you can only
modify course information for the courses you have created. You can, on the
other hand, view somebody else’s courses, but only View them. If you are an
Administrator, then you can modify everybody else’s courses if you need to, but
we recommend consulting with the creator of the course first.
Example 4 – Creating New ABET Report
Walkthrough of example
To create a new
ABET Report,
please click on the
Create New
Report option
under ABET
Report Options.
You have to first
find the course for
which you will be
creating an ABET
report. To do so,
please first select
the current
semester (or the
semester for the
course you are
adding ABET
report for) and click
on Submit.
Then select the
course from the
drop down list that
will be displayed to
you and click on
Submit.
Then select the
section number
from the drop down
list that will be
displayed to you
and click on
Submit.
You should then receive a page with a template that resembles a Faculty
Assessment Report that you can fill out on-line. There is a series of 5 pages that need to
be filled out. You do not have to fill out the entire report at once, but you do have to get
till the last page to Submit the information that you have entered.
Page 1:
1. First enter catalog
description for the
current course.
2. Enter grade
distribution at the
end of a semester for
that course.
3. Please enter
modifications made
to course if there
were any.
4. Enter Prerequisite
Assessment for
which the students
were judged on.
5. Please enter the
number of topics in
the Prerequisite
Assessment (up to 15
topics). That number
of topics will be
displayed on the next
page.
6. Click on Next to
have that number of
topics generated on
the next page(not
visible on this
image).
Page 2:
7. Please fill out all of
explanation of a
topic, average score
and standard
deviation based on
what people got on
the assessments for
those topics, and any
comments that you
might have. Topics
will be listed one
after another on the
same page. The
number of topics
depends on the value
you have entered on
page 1 of the report.
8. After you are done
filling out all topics,
click on Next.
9. You can click on the
Previous if you
would like to modify
any entered
information.
**When you click on
Previous or Next your
information is saved, but
not submitted to the
database until you press
on Submit.
Page 3:
10. Please fill out the
ABET information
for Program
Outcome
Assessment.
11. Then enter the
number of
assessments that you
have done in the
course. Each of those
assessments will be
displayed on a page
separately. So if you
have entered 5 for
the number of
assessments, you
will have to fill out 5
Assessments, where
you will get from
one assessment to
the next by clicking
on Next until you get
to Page 5 of this
report.
Page 4:
12. For each assessment
please fill out what
was the assessment.
13. Fill out what was the
average score of
students on it and
standard deviation.
14. Enter any additional
comments if there
are any.
15. Load three
examples of student
work: of A work, B
work, and C work
for each assessment.
16. Press on the Next
button (not visible on
this image).
17. Go to fill out
assessment
information for the
next assessment in
the number of
assessments you
have entered is
greater than 1. When
you are done filling
out all of the
assessments, you
will get to Page 5 of
this report template.
Page 5:
18. When you are done
filling out all of the
assessments, fill out
the Communication
Component of the
course.
19. Then fill out the
Ethics Component.
20. Then Student
Feedback…
21. Reflection follows…
22. Finally, please enter
Proposed actions
for the course
improvement.
23. Make sure you have
entered all the
information that you
needed. You can go
back to review
previous pages by
clicking on
Previous.
24. When you have
reviewed all of your
entered data, please
click on Submit, so
that your ABET
report information is
stored in the
database.
Explanation of example
After a course has been successfully created in the IAS, an ABET Report for
this course can then be added. All of the information entered for this report will be
saved in the course folder allocated when the course was established. That
information can always be modified, but not deleted unless the course itself is
permanently deleted from the system.
There is no error-checking performed when the user enters ABET report
information, therefore the user is responsible for the validity of the entered data.
The report can be started at one point in time and then completed later. However,
the user does have to get till page 5 to click on the Submit button to save any
changes that have been made.
Using help (online & text)
We have created a Help Page on our Website that can be accessed at any
point in time even before logging in. It is written in a FAQ style and divided into
4 topics – General Help, ABET user help, Professor Help, and Administrator help.
The following are the contents of the Help page:
IAS Help
General Help
What is IAS?
I am a new user. What do I do?
I forgot my password.
The system does not recognize me when I log in.
Why am I taken back to the login page when I try to log in?
How can I change my account information in the system?
I do not receive the correct functionality when I log in.
Where is my information stored?
I got to a page, but I don't know how to get out of it.
What do I do to create an online ABET report?
ABET Member Help
Where do I start?
What functionality am I provided?
How do I access ABET Reports?
I don't see any courses listed. What happened?
Professor Help
Where do I start?
What functionality am I provided?
How do I create a new course?
What do I do to create an online ABET report?
How can I view course information?
Can I modify course information for an existing course?
Can I delete an existing course?
Administrator Help
Where do I start?
What functionality am I provided?
How do I create a new course?
What do I do to create an online ABET report?
How can I view course information?
How can I modify course information for an existing course?
Can I delete an existing course?
How can I add a course to the course list visible to the ABET
committee?
How do I add a new user to the system?
How do I view existing user information?
How can I modify existing user information?
Can I delete an existing user from the IAS?
General Help
What is IAS?
The Interactive Accreditation System (IAS) is a server-based software
program that assists in the accreditation procedures for the University of
Michigan - Dearborn. IAS allows faculty to easily organize their
accreditation portfolios and also allows for offsite access for the current
accreditor through the World Wide Web.
Back to Top
I am a new user. What do I do?
As a new user you should first contact the Administrator to create a
username and password for you. The Administrator may also ask you for
additional information, such as your name and e-mail address. All of that
information will be stored in the IAS database, and if you ever forget your
password it can be retrieved. You should also read this help manual to
understand what functionality you will be assigned in IAS.
Back to Top
I forgot my password.
If you have forgotten your password, please e-mail the Administrator by
clicking on the Forgot Password? link on the home page. The
Administrator will then be able to retrieve your password or modify it if you
would like to change it.
Back to Top
The system does not recognize me when I log in.
If you have already been assigned a username and password when trying
to access the system, then check your spelling to make sure you have not
made a mistake. If you still cannot get in, please contact the system
Administrator.
If you are trying to log into IAS without having been assigned login
username and password, please contact the Administrator to add that
information into the system.
Back to Top
Why am I taken back to the login page when I try to log in?
If you trying to log in but the system keeps on returning you to the login
page again, that means that your username or password are not recognized in
the system. Make sure your Caps Lock is off and try loggin in again. If the
problem persists, please contact the Administrator to verify your login
information.
Back to Top
How can I change my account information in the system
If you need to make changes to your account information in the system,
for example, your username, password, e-mail or your name, please contact
the Administrator of the IAS to make changes to your account. The
Administrator is the only one who has access to the IAS user accounts
information.
Back to Top
I do not receive the correct functionality when I log in.
If you are able to log into the system, but the page that gets displayed do
not offer the functionality that you need, please contact the Administrator to
make sure you have correct account type specified in the IAS.
Back to Top
Where is my information stored?
When you either add courses or users to the system your information is
stored on the University of Michigan - Dearborn server. When you create a
course, a folder is automatically allocated to that course to store ABET
documentation. Therefore, when you would like to view your stored ABET
report it comes directly from the folder associated with the course that you
have selected.
Back to Top
I got to a page, but I don't know how to get out of it.
If you have gotten to page that says that you have successfully either
modified, created, or deleted some information from the IAS then you can
go back to your main options by clicking on the Home button, on the top
menu of your page.
If you are "stuck" on any other page you can still click on the Home
button up on the top menu and you will be re-directed to your main options.
If you close the window you are in, you will be automatically logged out of
the IAS. So, if you wish to use IAS again you will have to log in one more
time.
Back to Top
What do I do to create an online ABET report?
Functionality available to only Professors and the Administrator.To
create a new ABET Report, please click on the Create New Report option
under ABET Report Options. You have to first find the course for which you
will be createing an ABET report. To do so, please first select the semester,
course, and section number for the course that you are going to create an
ABET Report for.
The next part is filling out the actual template that represents the Faculty
Course Assessment Report. There are five distinct template pages that are
numbered. You will see the number of the pages as well as the information
of the course for which you are filing out a report on the top of the page.
Please note that Page 4 represents one outcome assessment and will be
repeated as many times as you will specify on Page 3. You don't have to
enter all of the information at once. You can edit the report as many times as
you want by selecting Modify ABET Report option under ABET Report
Options.
For Page 1, first enter description for the current course. Second, enter
grade distribution at the end of a semester for that course. Third, enter
modifications made to course if there were any. Fourth, enter Prerequisite
Assessment for which the students were judged on. Fifth, please enter the
number of topics in the Prerequisite Assessment (up to 15 topics). All of
those topics will be displayed on the next page (Page 2) one after another.
make sure to fill out all of the ones listed. Review your information on Page
1 and click on the Next button. You can always go back and make changes
to the entered information by clicking on teh Previous button. Please notice
that when you click on Previous or Next buttons your information is saved
but not submitted to the database until you press on the Submit button on
Page 5.
On Page 2, first please fill out explanation of a topic, average score and
standard deviation based on what people got, and any comments that you
might have. Topics will be listed one after another on the same page. The
number of topics depends on the value you have entered on Page 1 of the
report. After you are done filling out all of the topics, click on Next.
On Page 3, please fill out the ABET information for Program Outcome
Assessment. Then enter the number of assessments that you have done in the
course. Each of those assessments will be displayed on a separate page. So,
if you have entered 5 for the number of assessments, you will have to fill out
5 assessments, where you will get from one assessment to the next by
clicking on the Next button until you get to Page 5 of this report.
On each of the Page 4 pages, for each assessment please fill out what was
the assessment. Second, fill out what was the average score of students on it
and standard deviation. You can enter any additional comments if there are
any. Finally, load three examples of student work: of A work, B work, and C
work for each assessment. Press on the Next button when you are done. If
the number of assessments on Page 3 was greater than 1, then by clicking on
Next you will get to the next assessment. When you are done filling out all
of the assessments, you will get to Page 5 of this report template. Please note
that you can leave any of the assessments blank if you wish to edit them at a
later time.
On Page 5, please fill out the communication Component of the course,
and then fill out the Ethics Component. Fill out the Student Feedback and
Reflections made. Finally, please enter Proposed Actions for the course
improvement. Make sure you have entered all of the information that you
needed. You can go back to review previous pages by clicking on Previous.
When you have reviewed all of your entered data, please click on Submit, so
that your ABET Report information is stored in the IAS database.
Back to Top
ABET Member Help
Where do I start?
First, make sure you are in the right place. If you have been assigned to
review ABET information for the University of Michigan - Dearborn
Computer Science Department from the School of Engineering and
Computer Science - then, yes, you are in the right place. Otherwise, if you
are here to review ABET documentation for any other department or school
of the University of Michigan - Dearborn, then IAS will not be of any
assistance to you.
If you are in the right place and that's your first time using the system,
then you should contact the Administrator to have you added as a user to the
IAS. Once the Administrator has provided you with the login information,
you will be able to access the documents available to you for the review.
Back to Top
What functionality am I provided?
As an ABET member you only have access to review the ABET reports
selected by the Administrator. Each professor in the IAS has created course
pages for each course they are teaching. Each course page has a link to the
ABET reports that have been filled out on-line using provided template.
From the courses available to you, each one can be selected and course
information and ABET reports can be reviewed. If any information for the
course is missing, please contact system Administrator for help.
Back to Top
How do I access ABET reports?
Once you are logged in as an ABET user, you will have all of the reports
available on the system listed for you. Find the report that you would like to
review from the ones listed, and click on View Report. Once you are done
viewing one report you can go back your main page by clicking on the
Home button on the top menu.
Back to Top
I don't see any courses listed. What happened?
When searching for courses if you do not see any courses listed for the
semester selected, the problem might be that the Administrator forgot to
select courses for your review. Every semester the Administrator should go
through the courses that have been created and add "visibility" to the courses
that will then be displayed to you. If he does not make any courses visible,
then none will be available for you. Please contact the Administrator to
remind him that he has to assign course visibility to the courses of his
preference, in order for the IAS to be of any use to you.
Back to Top
Professor Help
Where do I start?
Welcome, Professor! We hope that IAS will make your life easier with
the submission of the ABET reports. First thing, if you have not done so yet,
please contact the Administrator to create you as a new user in the system.
The Administrator will create a username and a password for you in the
system, so that you can enter that information on the Login page and enter
the system.
Once you are able to login into IAS, you should start entering
information for the courses that you are teaching this current semester for
which ABET reports need to be created. To do so, please press on the Create
New Course option. Please see help section "How do I create a new course?"
on detailed information on how to create a new course in the IAS.
Once you have set up a course information you can then create an ABET
Report for that course by following directions described in the section "What
do I do to create an online ABET report?" Other functionalities provided to
you by the system are described in the next section. Please note that the
Administrator is in charge of the system and if any problems arise, he is the
one to contact.
Back to Top
What functionality am I provided?
As a Professor you have several functionalities available for you in the
IAS. Once you are able to login into the system, you should start filling out
course information for the courses that you are teaching this semester, if
there are any. After the courses have been created, you can proceed with
entering ABET information. You can perform the following operations on
the courses: you can create new courses in the system for the courses you are
teaching, you can then add ABET reports to them. You can also view any of
the courses stored in the IAS database, but you can modify information for
your courses only. Although as a Professor you have limited functionality,
this should be sufficient to keep track of the ABET information - for which
purpose IAS has been created.
Back to Top
How do I create a new course?
Once you have logged into the website you will see a list of options
available to you on the left-hand side. One of the first options under the
Course Options is Create New Course. Please click on the following option.
A page will open up with a template. Please fill in all of the fields provided,
such as: Semester, including year (i.e.FALL2006), Course Name (i.e. CIS
400), Section Number, Course Title (i.e. Programming Languages),
Professor's First and Last names - which will be your first and last names.
Once you have entered all of the required information, please click on the
Submit button. You will be automatically redirected to your Home page. To
make sure the course has been successfully added to the IAS database, you
can select to View Existing Course Information that is also one of the
options provided to you.
Back to Top
How can I view course information?
To view course information for a course that already exists in the IAS,
please click on the View Existing Course Information option from the panel
on the left-hand side. Then select a specific semester that course was taught
and click on Submit. The next step for you would be to select the course
name from the provided list of courses and make sure you have selected the
correct semester. Once you click on the Submit button, you will then be
asked for the section number. Finally, after the section was identified the
course information for the selected course will be displayed. When you are
done looking at the information, you can click on the Home button on the
top menu that will take you to your main page.
Back to Top
Can I modify course information for an existing course?
As a Professor you are only allowed to modify information for the
courses that You have created. Modifying existing course information is
similar to creating a new course. When you click on Modify Existing Course
Information you will have to select a semester for when that course was or is
taught and then the course name from the list of available courses for that
semester. Information for that course will be displayed in the text boxes, so
that it can be modified. You can modify all of the course information. Once
you have made necessary changes to the course information, please click on
the Update button and you will then be automatically redirected to your
Home page.
Back to Top
Can I delete an existing course?
As a Professor you are not allowed to delete a course from the IAS
database, including all of the ABET information for that course. You can
modify any course that you have created on your own by going into Modify
Existing Course Information option on your main page. If you do need to
have a course removed from the system for some reason, please contact the
Administrator, because he does have an option to delete courses from the
system.
Back to Top
Administrator Help
Where do I start?
As an Administrator you are the master-keeper of the IAS. In order to
start using IAS first you have to add users to the system. By adding
professors to the IAS (to add a professor click on the Add New User option
and select Account Type --> Professor), who will then add courses to the
database and create ABET Reports. Professors can only be added to the
system by You, so if you do not add anyone, IAS will be idle. Please don't
forget to contact professors or any other users you add to the system to
provide them with the login information.
Second, if you are teaching at least one course this current semester, then
you are also entitled to all of the professor's functionalities, such as adding
courses to the system and and creating ABET reports for them. IAS will only
contain courses that you and other professors add to it manually. It does not
have any connection with the University of Michigan - Dearborn schedule
system and will not automatically add courses based on those listed for a
given semester.
Third, after you can view through different courses posted by the
professors and you have enough information to present to the ABET
committee, then go ahead and add specific ABET users that will be
accessing IAS to view the reports on-line. However, in order to view specific
course information on-line, you have to allow that course to be "visible" to
the ABET users. To do so, please click on the Assign ABET Visibility
option provided to you under ABET Report Options, select specific course
and make it "visible". If you forget to make any courses visible, then ABET
users won't see any courses listed for them when they log in. For further
functionalities that you are entitled to, please see next help section.
Back to Top
What functionality am I provided?
As an Administrator you have all of the available functionalities provided
by IAS. You can manipulate information stored for both courses in the IAS
database and user accounts. While you are the only one in charge of the user
accounts, courses can also be added by the professors. You do have to add
the professors to the IAS database first, before they can add any courses.
You can perform the following operations on courses: create new
courses, create new ABET Reports for those courses, view existing course
information, modify course information, including associated ABET Report,
delete courses from the system or delete specific ABET reports, assign
visibility to course that should be displayed to the ABET committee or later
remove it. All of the described course options are available to you once you
log into IAS using your administrator username and password.
You also control user accounts using the following options: add new user,
view existing user information, modify user information, and delete user
from the system. Similar to course options, you have to log in first, in order
to be able to access user options. The following help sections will describe in
detail how to use each of the functionalities provided to you.
Back to Top
How do I create a new course?
Once you have logged into the website you will see a list of options
available to you on the left-hand side. One of the first options under the
Course Options is Create New Course. Please click on the following option.
A page will open up with a template. Please fill in all of the fields provided,
such as: Semester, including year (i.e.FALL2006), Course Name (i.e. CIS
400), Section Number, Course Title (i.e. Programming Languages),
Professor's First and Last names.
Once you have entered all of the required information, please click on the
Submit button. You will be automatically redirected to your Home page. To
make sure the course has been successfully added to the IAS database, you
can select to View Existing Course Information that is also one of the
options provided to you.
Back to Top
How can I view course information?
To view course information for a course that already exists in the IAS,
please click on the View Existing Course Information option from the panel
on the left-hand side. Then select a specific semester that course was taught
and click on Submit. The next step for you would be to select the course
name from the provided list of courses and make sure you have selected the
correct semester. Once you click on the Submit button, you will then be
asked for the section number. Finally, after the section was identified the
course information for the selected course will be displayed. When you are
done looking at the information, you can click on the Home button on the
top menu that will take you to your main page.
Back to Top
How can I modify course information for an existing course?
As an Administrator you are allowed to modify information for any of the
courses in the IAS database, unlike professors who are only allowed to
modify information for the courses they are currently teaching or have
taught. Modifying existing course information is similar to creating a new
course. When you click on Modify Existing Course Information you will
have to select a semester for when that course was or is taught and then the
course name from the list of available courses for that semester. Information
for that course will be displayed in the text boxes, so that it can be modified.
You can modify all of the course information. Once you have made
necessary changes to the course information, please click on the Update
button and you will then be automatically redirected to your Home page.
Back to Top
Can I delete an existing course?
As an Administrator you can delete any course in the IAS database.
Actually, you are the only user allowed to delete a course from the database,
because professors do not have that functionality available to them. To
delete a course, please click on the Delete Course option located under
Course Options on the left-hand side of your Home page. You will then have
to select semester for when that course was taught and the course name and
click on the Delete button. You will be asked whether you are sure you want
to delete the following course. If you have accidentally pressed on Delete,
you should say No and you will be redirected to your Home page.
Otherwise, if you do want to delete that course press on Yes and that course
will be deleted from the IAS database with all of the ABET Report
information associated with it. To make sure that course has been deleted
you can click on the View Existing Course Information option on your
Home page and try finding that course from the courses listed.
Back to Top
How can I add a course to the course list visible to the ABET
committee?
To Assign/Remove ABET Visibility to a course, please click on the
Assign Visibility option under Course Options. Then select a semester and
click on Submit. For that semester courses will be displayed. Select a course
and click on Submit one more time. If that course has been previously
"invisible" then you will see an "Assign Visibility" button underneath it. If
the course was previously "visible", and you go under Remove ABET
Visibility option then you will see "Remove Visibility" button. As a
reminder, when courses are created they are initially invisible. Please don't
forget to add visibility to at least some courses per semester, so that ABET
committee has enough information for an on-line review.
Back to Top
How do I add a new user to the system?
Once you have logged into the website you will see a list of options
available to you on the left-hand side. One of the first options under the
Account Options is Add New User. Please click on that option. Fill in first
and last names of a person, account type (which is very important, because
user's functionality in IAS depends on that), username (assign a meaningful
one), password, and e-mail address. Once you have entered all of the
required information, please click on the Submit button. You will be
automatically redirected to your Home page. To make sure the user has been
successfully added to the IAS database, you can select to View Existing User
Information that is also one of the options provided to you.
Back to Top
How do I view existing user information?
To view user information for a user account that already exists in the IAS,
please click on the View Existing User Information option from the panel on
the left-hand side. Then select a username from the list of user accounts
stored in the IAS database and click on Submit. Once you click on the
Submit button, the user information for the selected course will be displayed.
When you are done looking at the information, you can click on the Home
button on the top menu that will take you to your main page.
Back to Top
How can I modify existing user information?
As an Administrator you are the only allowed to modify any user
information in the system. For this reasion, if users would like to change
their usernames, or passwords, or e-mail addresses, you will receive an email
request from them. Modifying existing user information is similar to
modifying information for a course. When you click on Modify Existing
User Information you will have to select a user from the list of usernames
displayed to you and click on Select. Information for that user will be
displayed in the text boxes, so that it can be modified. Once you have made
necessary changes to the course information, please click on the Update
button and you will then be automatically redirected to your Home page.
Back to Top
Can I delete an existing user from the IAS?
As an Administrator you can delete any user account in the IAS database.
To delete a user account, please click on the Delete User option located
under Account Options on the left-hand side of your Home page. You will
then have to select a username from the list of available user accounts in the
database and press on the Delete button. You will be asked whether you are
sure you want to delete the following user from the system. If you have
accidentally pressed on the Delete, you should say No and you will be
redirected to your Home page. Otherwise, if you do want to delete that user
account, please press on Yes and that user will be deleted from the IAS
database and will no longer have access to IAS. To make sure that user
account has been deleted you can click on the View Existing User
Information option on your Home page and try finding that user from the
usernames listed.
Back to Top
Copyright © 2006 RMDS, Inc. All rights reserved.
Detailed Instruction
Output from product
♦ GUI
A GUI will allow users to access the system using either an outside
Internet service provider or the intranet on the University of Michigan
Dearborn campus. The GUI will allow professors to login to access their class
folders using a password. Once the professors have admission into the folder
the GUI will allow a professor to upload student work, accreditation
documents, comments concerning student work, or class statistics for student
work. The GUI will allow the accreditation committee to view all professors’
work from outside the campus environment. The administrator will be able to
use the GUI to create accounts, retrieve passwords, or view the professors’
folders.
♦ Database Information
The Administrator account will have access to all information inside
both databases – the Course Database and the Account Database. This will
allow for retrieval, addition, deletion, or verification of the data contained
inside the databases.
♦ Help Information
The help on how to use IAS will be provided as either a PDF report
document which can be downloaded from the IAS website, or as a link to a
created Internet page in a FAQ format.
♦ User Account Information
When the Administrator wants to view user information and then selects
a given user from the list, then account information for that user will be
displayed. Account information includes the following: username, user’s first
and last names, account type, and e-mail.
♦ Course Information
When the user wants to view course information and then selects a
semester and then the course from the list given, then course information for
that user will be displayed. Course Information includes the following: CRN,
course name and title, semester taught, professor’s first and last names, and all
of the ABET report information associated with the course.
♦ Files
The files that have been uploaded by the professors that represent the
examples of student work can easily be downloadable for review from the
website.
♦ List of users
The list of usernames will be listed when the Administrator would like
to view account information of a specific user.
♦ List of courses
List of courses will be listed when any user selects to view course
information and has already selected for which semester the courses need to
be displayed.
♦ List of semesters
List of semesters is listed first when the user wants to view course
information. The courses will not be listed until the user selects the semester
for which to list those courses.
Input to product
Accounts
Accounts will be created by the administrator for each professor and the
accreditation committee. The level of usage will be dependent upon the type
of account being created. Professors will be able to upload, store, and delete
files and documents for each class taught. The accreditation committee will be
a view only access of all class folders.
Passwords
Passwords will be used to gain access to the folders created by the
administrator for each class taught. There will be an administrator password
which will provide access to an account database where all passwords and
user names are stored for retrieval/verification, deletion and viewing. The
administrator password will also allow access to all class folders, files, and
documents. The accreditation committee will have a password which allows a
view only access to all class folders.
User Names
Unique user names will be used to gain access to the system for log in
purposes. User names will follow a pre-existing policy at the University of
Michigan Dearborn with the first initial plus the last name. User names will be
stored on the database along with the password for retrieval/verification,
deletion and viewing. Log in features will require the user name and password
for successful log in of the system.
Student Work
Three examples of student work will be uploaded to each folder for each
accreditation requirement. The examples will be for the A, B and C level of
accreditation requirements. Some folders will contain more then one
accreditation requirement with the accompanying example work. The student
work will be in the format of a word document or a PDF file and stored on the
server as a flat file.
File Information
Each file will have a corresponding entry into the Course Database. This
entry will contain statistical information, accreditation information,
comments, descriptions, course information, as well as a path to the location
of the flat file on the server.
Course Information
Each new course created will have the following information stored in
the Course Database: course name, course title, section number, semester
taught, and professor’s name (first and last names). Each course will also have
an associated ABET report information.
Location for Archived Courses
For archiving purposes – the location to which the course directories will
be moved when deleted from the IAS.
Course Selection
The user selects from a course list to view information about a course, or
modify a course, or delete a course.
Semester Selection
An ABET user selects from a list of semesters and then from a list of
courses available to view course information.
User Selection
The user selects from a list of users to view information about a user
account, or modify/delete information.
Operation of product
For each of the process functionalities described in the introduction of the
User Manual, this section will describe in detail what operations should happen
within the software for each of the functionalities listed below:
♦ Login User
The user has to login into the website in order to access any of its
functionalities. To login the user has to enter username and password issued to
the user by the administrator. If the login information in the system is found
for any type of the user, then a page corresponding to the account type of the
user is displayed. If user information did not match any found in the accounts
database, then the user is taken back to the login page. Created for security
purposes, because only the user whose status is “active” (logged in) can
access the functionalities available.
♦ Create New Course
In order to create a new course, the user has to enter the course
information, which will then be saved in the Course Database and in a specific
course folder dynamically allocated. Once the user creates new ABET report,
it will be stored in that allocated space on the server. Files stored within the
report will also be in that folder.
♦ Create New ABET Report
In order to create a new ABET Report, the user has to enter the course
information first and the enter all of the fields, including course description,
grade distribution, Prerequisite Assessment topics, average scores, standard
deviation, program outcome assessments and many other fields.
♦ Create New Account
Administrator has to add users to the system for the IAS to function. Each
user will have a designated account type – either Administrator (only 1
Administrator can exist), Professor or ABET user. Based on that functionality
the users will then have a special set of functionalities available to them.
Besides entering an account type, the Administrator has to create a username
and password for the user, so that they can login into IAS. Their e-mail and
name also has to be stored to have complete user information in the Accounts
Database.
♦ Display All Courses
Functionality varies on the user type. When professor or administrator
select to view course information, all of the course names listed in the Course
Database of IAS are displayed. However, when an ABET user selects to view
course information, only courses designated as “visible” by the Administrator
are listed.
♦ Display All Semesters
Function lists all of the semesters (i.e. Fall 2006) listed in the Course
Database – the same for all of the three user types.
♦ View Course Information
Course Information is retrieved from the Course Database information is
retrieved from the dynamically allocated folder for that course. That
information is then displayed to the user.
♦ View Report Information
Course Information is retrieved from ABET Report information is
retrieved from the dynamically allocated folder for the specified course. That
information is then displayed to the user.
♦ Modify Course Information
Varies for the account type. ABET users cannot modify any of the course
information within IAS. Administrators can modify any information entered
for an existing course. Professors can modify course information for only the
courses that they themselves have created.
♦ Modify Existing ABET Report
Varies for the account type. ABET users cannot modify any of the ABET
reports within IAS. Administrators can modify any information entered for an
existing course, including the ABET Report. Professors can modify ABET
information only for the courses that they themselves have created.
♦ Delete Course
Only Administrator can delete a course from the system. If he does, then
all of the course information from the Database, including the allocated folder
with the ABET information in it, will be permanently deleted from the server.
♦ Delete Existing Report
Only Administrator can delete an existing ABET report from the system.
If he does, then all of the ABET information in it will be permanently deleted
from the server.
♦ Assign/Remove ABET Visibility
The Administrator has to specify visibility for some of the courses. If he
doesn’t, then all of the courses will remain invisible (default state). To make a
course visible to the ABET users it has to be changed to “visible”. To do so,
the Administrator will have to go into Assign Visibility option and click on
Assign Visibility to a selected course. He can always remove that visibility at
a later time by clicking on the Remove Visibility option.
♦ Display All Users
When the Administrator wants to view user information he has to choose a
username for a user in order to see his/her account information. All of the
usernames from the system are listed. Available to the Administrator only.
♦ View Account Information
After selecting a username from the given list, the user account
information retrieved from the Accounts database is displayed to the
Administrator. Available to the Administrator only.
♦ Modify Account Information
Function available to only Administrator allows lets Administrator modify
account information for the user. Changes will be stored in the Accounts
Database when the Administrator clicks on Update. All of the fields are
modifiable.
♦ Delete Account
All of the user information will be deleted from the system when the
Administrator selects to delete him/her from the Accounts Database. That user
will then no longer be able to use IAS.
♦ Retrieve File Information
The user can download a file of a student work when it has been uploaded
by the professor when filling out an ABET report. The files are then retrieved
from the server and available for downloading or viewing. Available to all
three account types.
♦ Log Out User
When the logged in user selects to log out, his status changes to inactive
and the user cannot access any of the IAS pages until s/he logs in again. If the
user leaves the IAS website by closing the window or going to another
website within the same window, he will automatically be logged out. Created
for security purposes.
Error handling
If you ever receive an error while entering information, such as creating
user account, a course, or ABET report, be it a browser error or some extra script
shown on the page – you should discontinue creating whatever you were creating,
logout and start over again by logging in. Hopefully, this does not happen often,
but if it does we strongly recommend that you start over because if you don’t your
information might not be stored in the correct place or might not be stored at all.
If you get a “web browser needs to close” error, please close the browser
and re-login. You will be automatically logged out when the browser closes.
However, if you were in the middle of entering or modifying information you will
have to redo the changes you have made, because they were not saved.
Do not use Back button of the web browser, because a lot of the pages
were protected against that and clicking on the Back button (or pressing of
Backspace in a web browser) will only mess up you session and will lead to
erroneous results.
Any alert boxes with error information that you receive on the page that
inform you of a field that you have forgotten to enter, or passwords not matching,
or other little mistakes that you have made while entering some information on
the page you should be noted and error should be fixed before you can proceed.
If you have lost all of the data that you have entered by checking in either
View course or account information although you have not explicitly received any
errors from the system, try re-entering that information. If the problem persists,
please contact the Administrator.
Specific functions
♦ Login User
o How to run: access IAS on the Internet. The actual address of the IAS
will be established based on the decisions of the University of
Michigan-Dearborn committee.
o Input data needed: username and password of a user.
o Output interpretation: once you successfully login a page based on
your account type should be displayed. If you are an Administrator you
should receive one set of options. If you are a Professor – another set of
options (a more limited one). And if you are an ABET user – another
small set of options. The page you will see displayed is called your
Home page.
♦ Create New Course
o How to run: access using a web browser on-line. User must already be
logged in into IAS and user type should be either Professor or
Administrator. The user then clicks on the Create New Course option.
o Input data needed: course name, course title, section, semester
(including year), professor’s first and last names.
o Output interpretation: the course information has been submitted and
it is now stored in the Course Database. A folder for the ABET
documentation for that course has been allocated on the server.
♦ Create New ABET Report
o How to run: access using a web browser on-line. User must already be
logged in into IAS and user type should be either Professor or
Administrator. The user has clicked on the Create New Report option
and has already selected the semester and the course for which the
report is being created.
o Input data needed: catalog description, grade distribution,
modifications made to course, prerequisite assessment overview,
prerequisite assessment topics, statistics (average scores), comments,
program outcomes, program outcome assessments, communication and
ethics components, student feedback, reflections, proposed actions for
improvement, and examples of student work.
o Output interpretation: first a user has to go through a series of 5
pages where s/he inputs data for the ABET Report. Then after the user
is done and has submitted all of the information it is stored in the
Course Database.
♦ Create New Account
o How to run: access using a web browser on-line. User must already be
logged in into IAS and user type should be Administrator. The user
then clicks on the Create New Account option.
o Input data needed: first and last names of a user, account type,
username, password, and e-mail address.
o Output interpretation: Once username and password have been
established for the user in the system along with the Account type, new
user should then successfully login into the IAS.
♦ Display All Courses
o How to run: access using a web browser on-line. User must already be
logged in into IAS.
o Input data needed: semester has been selected
o Output interpretation: the list of courses available for that semester is
listed. If account type is ABET user, then only courses “visible” to the
ABET users are displayed.
♦ Display All Semesters
o How to run: access using a web browser on-line. User must already be
logged in into IAS.
o Input data needed: user has clicked on option that requires listing all
of the courses.
o Output interpretation: all of the semesters entered into the system
when creating a new course are listed.
♦ View Course Information
o How to run: access using a web browser on-line. User must already be
logged in into IAS.
o Input data needed: course has been selected.
o Output interpretation: all of the information entered for the course
and stored in the Course Database has been displayed. ABET Report
information is displayed when the user selects to View Existing ABET
Report from the ABET Report Options.
♦ Modify Course Information
o How to run: access using a web browser on-line. User must already be
logged in into IAS. Only Administrator can modify everybody else’s
courses. Professors can modify their own courses, but not somebody
else’s.
o Input data needed: course selected and/or any changes made to the
course data.
o Output interpretation: if user has made any changes to course
information, then the data in the Course Database will be updated.
♦ Modify ABET Report
o How to run: access using a web browser on-line. User must already be
logged in into IAS. Only Administrator can modify everybody else’s
ABET Reports. Professors can modify their own reports, but not
somebody else’s.
o Input data needed: course selected and/or any changes made to the
ABET data.
o Output interpretation: if user has made any changes to ABET Report
information, then the data in the Course Database will be updated.
♦ Delete Course
o How to run: access using a web browser on-line. User must already be
logged in into IAS and user type should be Administrator. The user
then clicks on the Delete Course option.
o Input data needed: semester, course name, and section# selected
Output interpretation: ABET Report located in the Course Database
for the course specified was deleted from the server without affecting
any of the course information itself.
♦ Delete ABET Report
o How to run: access using a web browser on-line. User must already be
logged in into IAS and user type should be Administrator. The user
then clicks on the Delete Existing Report option.
o Input data needed: semester, course name, and section# selected.
o Output interpretation: course information along with the ABET
Report located in the folder that was dynamically allocated have been
deleted from the server.
♦ Assig/Remove ABET Visibility
o How to run: access using a web browser on-line. User must already be
logged in into IAS and must be the Administrator. The Administrator
clicks on the Assign/Remove Visibility Option.
o Input data needed: semester, course name, and section# selected and
clicked on the button provided to either Assign or Remove visibility to
the course.
o Output interpretation: IF the course has already been assigned
visibility then the provided button will say “Remove Visibility.” If
course is not currently visible to the ABET committee then the
provided button will say “Assign Visibility”. Initially, all of the courses
are invisible and need to have visibility assigned to them.
♦ Display All Users
o How to run: access using a web browser on-line. User must already be
logged in into IAS and must be the Administrator. The user clicks on
the Display All Users option.
o Input data needed: user has clicked on option that requires listing all
of the user accounts.
o Output interpretation: all of the usernames entered into the system
from the Accounts Database are listed.
♦ View Account Information
o How to run: access using a web browser on-line. User must already be
logged in into IAS and must be the Administrator. The Administrator
clicks on the View Existing User Information option.
o Input data needed: username has been selected.
o Output interpretation: All of the information stored for the user
stored in the Accounts Database under a given username is returned to
the user.
♦ Modify Account Information
o How to run: access using a web browser on-line. User must already be
logged in into IAS and must be the Administrator. The Administrator
clicks on the Modify Existing User Information option.
o Input data needed: username has been selected and/or changes to the
account information made.
o Output interpretation: If the user has made any changes to the user
account information then they will be saved under a given username in
the Accounts Database.
♦ Delete Account
o How to run: access using a web browser on-line. User must already be
logged in into IAS and user type should be Administrator. The user
then clicks on the Delete User Account option.
o Input data needed: username for the user selected.
o Output interpretation: all of the user information has been deleted
from the Accounts Database and the user can no longer use IAS.
88
♦ Retrieve File Information
o How to run: access using a web browser on-line. User must already be
logged in into IAS and ABET Report should already be open.
o Input data needed: user clicks on the View File button.
o Output interpretation: the user will receive a window that will ask
whether you wants to save the file, and then to which directory, or open
it. If the user saves it, then the user can open it up any time. If the user
selects to open it, it will just be opened once.
♦ Archive Folders
o How to run: access using a web browser on-line. User must already be
logged in into IAS and user type should be Administrator. The user
then clicks on the Archive Courses option.
o Input data needed: courses and location for archival selected.
o Output interpretation: when the user selects to archive courses, they
will be permanently removed from the IAS database, but they will be
stored in some other location specified by the Administrator.
♦ User Logout
o How to run: access using a web browser on-line. User must already be
logged in into IAS.
o Input data needed: user clicks on the Logout button, or the user
closed the main window, or the user went to another website by typing
in new URL.
o Output interpretation: user status turns to “inactive” and the user can
no longer access of the IAS functionality until s/he logs in again.
Technical Details
Principles of operation
The website is to be accessed from the Internet by using a web browser.
Once on the website, the user should login and then the page corresponding to their
user privileges will be displayed. In order to view and use the website correctly the
user should have JavaScript enabled on the client side. On the server side, for the
website to function Apache, PHP, and Postgre modules need to be installed. If PHP is
not installed or not functioning on the server due to some error, then IAS cannot be
usable.
All of the files uploaded onto the server by the professors or the
Administrator will be saved in a directory dynamically allocated for each course.
There is plenty of server space allocated to the IAS by the University of Michigan –
Dearborn, therefore the file size does not make a big difference.
The user should have a connection of at least 56kbps to use the website
properly. If for some reason a page does not get displayed, do not try to Go Back – it
will not let you. You are better off typing the address of the IAS again and logging in
one more time. If the problem persists, then there might be a problem with the
University of Michigan – Dearborn.
If you ever lose any of the information that you have entered, for example
– you have just created a new course, but it is not listed as one of the courses when
you go into View Course Information option, then try logging out and then logging in
one more time.
If you are trying to upload a file and the connection keeps aborting,
contact CIS Department of the University of Michigan – Dearborn to see whether the
problem is indeed with the server. If not, then contact the person in charge of the CIS
lab to see whether there is enough space on the server remaining. If you are trying to
download a file but it cannot establish a connection with the server, try downloading
that file at a later time because, again, the problem might be with the school server.
As you have probably noticed, IAS very heavily relies on the working conditions of
server allocated for our product.
Advanced features
As discussed in the Special features section of the Introduction, Assign
Course Visibility option required an additional field for each course in the database –
visibility option. As a default all of the courses are “invisible” to the ABET users.
However, as the Administrator logs in and assigns visibility to several courses of his
preference – then those courses will be listed when the ABET user logs in and selects
to View Course Information. If the Administrator changes his mind and decides to
remove the course from the list outputted to the ABET users, then he can select the
course and click on the Remove Visibility button, which will then make the course
“invisible.”
Modification of product
We had to make modifications to our original product requirements
several times based on the input from our future end-users of the system. We have
expanded the requirements of the system a little bit, so that they not only
accommodate our client, but also some of the functionality also needed for the future
Administrator. We could not accommodate all of the asked for functionalities by the
future end-users because it would have greatly increased the scope of our project and
our time was limited as is. The additional requirements that have not been
implemented, but have been asked for by the future users will be listed in the Future
Maintenance Suggestions section of this document.
We have modified our product scope to include Assign Course Visibility
described in the previous section. Dr. Elenbogen, our client, did not require us to have
those. His main goal was to have an on-line system where professors could fill out
and store ABET documents for the courses they are teaching. Dr. Grosky, who will
be the Administrator of the system, wanted us to not only include Assign Course
Visibility option, but also be able to compile a report by combing all of the ABET
documents for the courses that he makes visible at the end of the term. This we have
not done, because of the time limit.
Support information
IAS being our Senior Design project our team is not responsible for any of
the future maintenance of the system. We have provided Help page on the website, so
please take a look at the help topics provided. If the Help page has not answered your
question and you cannot find the answer to it in this User Manual, then please contact
future system administrator – Dr. Grosky. His contact information follows:
Dr. William Grosky, Chair
Email: [email protected]
Phone: 313.583.6424, Fax: 313.593.4256
Department of Computer and Information Science
University of Michigan - Dearborn
4901 Evergreen Road
Dearborn, MI 48128-1491
Website: http://www.cis.umd.umich.edu