1
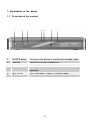
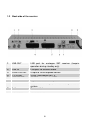
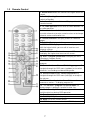
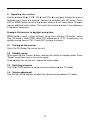
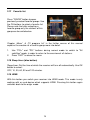
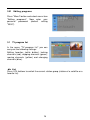
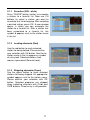
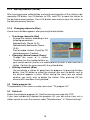
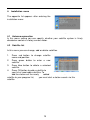
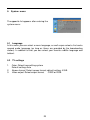
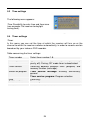
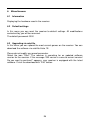
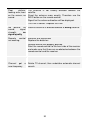
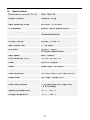
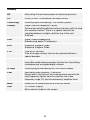
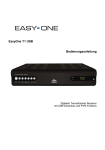
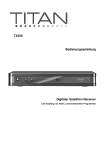
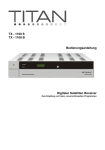
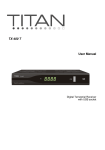
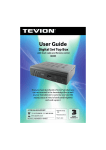
TX-700 H
Instruction Manual
Digital Satellite Receiver with HDMI output
For receiving free-to-air channels.
INTRODUCTION
This User Manual will help you to operate your Satellite Receiver in a safe
manner while enjoying all the features and benefits it provides for your
entertainment
The instructions contained in this User Manual assume that the user of the
Satellite Receiver already has a basic general knowledge on how to operate
entertainment electronic devices
This User Manual must be read by every person that is:
•
Installing
•
Connecting
•
Operating
•
Cleaning
•
Disposing
of this Satellite receiver
DISPOSAL OF USED ELECTRICAL AND ELECTRONIC DEVICES
The disposal of used Electrical and electronic devices must be conducted in
accordance with the rules and regulations of the European Union (EU) and that
of other European Countries
All products that are marked either directly or labeled on their packaging with
the following icon:
can not be disposed of through the normal household waste channels. These
products must be disposed of through specialized collection centres for the
recycling of electric and electronic devices
By disposing of this product as required by law, you are contributing to the
protection of the environment and the health of your fellow human beings
Incorrect disposal can be dangerous to human health and hazardous to the
environment
2
Table of contents
1
1.1
1.2
1.3
2
2.1
2.2
2.3
2.4
2.5
2.6
2.7
2.8
2.9
2.10
2.11
2.12
2.13
2.14
2.15
2.16
2.17
2.18
2.19
3
3.01
3.1
3.1.1
3.1.2
3.1.3
3.1.4
3.1.5
3.2
3.3
Introduction
Disposal of used electrical devices
Table of Contents
Explanation of the device
Front side of the receiver
Backside of the receiver
Remote control
Safety precautions
The right location
Operating the receiver
Turning on the receiver
Standby Mode
Switching channels
Volume adjustment
Channel number
Mute (Turning sound off)
Adjusting the channel sound
Switching between TV and radio
TXT (teletext)
SUB (subtitle)
EPG (Electronic Program Guide)
LAST
Channel list
Switching satellites
Information
Changing the screen mode
Favorite list
Sleep timer
HDMI
Menu
Editing channels
TV program list
Favorites
Locking channels
Skipping channels
Moving channels
Changing channels
Radio program list
Delete all (channels)
3
2
2
3
5
5
6
7
8
9
10
10
10
10
10
11
11
11
11
11
11
12
13
13
13
13
13
14
14
14
15
16
16
17
17
17
18
18
18
18
4
4.1
4.2
4.3
4.4
4.5
4.6
5
5.1
5.2
5.3
5.4
5.5
5.6
5.7
5.8
6
6.1
6.2
6.3
7
7.1
7.2
8.
9
10
Installation menu
Antenna connection
Satellite list
Antenna settings
Searching single satellites
Searching multiple satellites
TP list (transponder)
System menu
Language
TV settings
Time settings
Timer settings
Parental lock (passwords)
OSD settings
Favorites
Miscellaneous (LNB supply, channel display)
Miscellaneous
Information
Default settings
Upgrade via satellite (software)
Games
Tetris
Othello (Reversi)
Disassembly
Trouble-shooting
Specifications
Warranty
Declaration of Conformity
Glossary
4
19
19
19
20
21
21
22
23
23
23
24
24
25
25
25
25
26
26
26
26
27
27
27
28
29
31
32
32
33
1. Explanation of the device
1.1
Front side of the receiver
1
2
3
4
POWER button
▼button
▲button
LED POWER
5
6
7
LED LOCK
IR
Standby
Turning on the device or switching to standby mode.
Switching channels backwards.
Switching channels forward.
LED illuminates during normal and standby
operation.
LED illuminates if signal is strong enough.
Infrared receiver for signals from remote control.
Standby indicator
5
1.2
Back side of the receiver
1
LNB-OUT
2
3
4
5
6
7
LNB IN
HDMI DIGITAL
TV SCART
VCR SCART
DIGITAL
Audio
8
9
0/I
Mains cable
LNB port for analogue SAT receiver (Loop-in
operation during standby only).
LNB-port fro antenna cable
Output to HDMI-capable device
SCART connection for TV.
SCART connection for VCR
Digital coaxial audio output.
Stereo Sound Output, for connecting a stereo
system.
Power switch
Power cord 230V
6
1.3
Remote Control
1. Sound on/off Mutes the sound. Press again to turn on
sound.
2. On/Off (Standby) Press to turn off the receiver or to
switch to Standby.
3. Audio – Select sound channel Displays all available
sound channels.
4. TV/ radio operation Press once to switch between TV
or radio operation.
5. Number buttons 0 - 9 Use these buttons to switch to
a certain channel or to enter numeric values or to change
channel names and favorite lists.
6. Teletext/Videotext To display teletext or videotext
pages.
7. Subtitles To display subtitles.
8. MENU – OSD display menu To enter display menu,
with the help of which you can edit all receiver and
channel settings.
9. EXIT – Exit menu To close the current OSD menu and
to display the higher-level menu or full screen.
10. EPG – Program information To display the EPG
(Electronic Program Guide).
11. LAST To switch between the current and last viewed
program.
12. Control buttons: Channel/Switching programs To
navigate through the OSD menu (up/down) or to switch
channels in ascending and descending order.
13. Control buttons VOL/ volume adjustment To
navigate through the OSD menu (left/right) or to adjust
the volume.
14. OK/ confirmation button Press OK to confirm or
execute an action. • To display program list.
15. / 17. PG-/PG+ - program list up and down To
browse pages in program, favorite or other lists.
16. Function key i To display program information;
multi-function key during OSD operation.
18. Function key
19. FAVOR (White) Favorite programs.
20. Mode To set the screen format.
21 HDMI Switches the receiver into HDMI Mode
7
Safety precautions
Before operating the receiver, please read thoroughly the following safety
precautions
You are required to read all the notes, instructions and warnings contained in
this User Manual
Basic safety precautions
Connecting to the mains
· During disturbances unplug the receiver from the mains.
· To avoid the risk of fire and electric shock do not expose the receiver to rain or other
humidity.
· Never open the housing. Otherwise there is the risk of electric shock.
· Only connect the receiver to a properly installed 100-240V, 50-60 Hz mains socket.
· The total power input at the LBN IN antenna socket of the receiver must not
exceed 500mA.
· In case of non-use of the appliance for a longer period of time, please
disconnect the plug from the mains. Only pull at the plug, not at the cable.
· Disconnect the plug from the mains during thunderstorms.
· If objects or liquids enter the receiver, immediately pull the plug. Refer the
appliance to qualified service personnel before using it again. Otherwise there is
a risk of electric shock.
· Please make sure that the power supply (socket) is easily accessible.
· Do not bend or squeeze the mains cable.
· If the mains cable is damaged, you have to refer the receiver to qualified
service personnel for repair before using the receiver again. Otherwise there is
the risk of electric shock.
· Do not allow children to use the receiver without supervision or to play with the
antenna appliance.
· Always refer maintenance to qualified service personnel. Otherwise you
endanger yourself and others. Purchase spare parts from the manufacturer only.
8
The right location
Place the receiver on a stable, even surface.
Avoid placing it near:
Heating sources, like radiators,
Naked flames, like candles,
Devices with strong electromagnetic fields, like speakers.
Do not place objects filled with liquids (such as vases) on the receiver.
· Avoid direct sunlight and exceptionally dusty places.
· Never cover the ventilation openings. Ensure sufficient ventilation of the
receiver.
· Do not place heavy objects on the receiver.
· Humidity can occur inside when moving the receiver from a cold to a warm
place. In this case, wait for about 1 hour before operating the unit.
Run the antenna cable so that no one can step on or stumble across it.
9
2.
Operating the receiver
Use the buttons CH▲, CH▼, VOL► and VOL◄ to navigate through the menus.
Selected menu items are marked. Confirm the selection with OK button. Press
EXIT or MENU button to return to previous menu or to exit main menu. Changes
require additional confirmation. The use of the number buttons in the submenus
is moreover necessary.
Example: Set receiver to daylight saving time.
MENU button, select system settings, select time settings, OK button, select
time, OK button. Under GMT select UTC difference of +1:00. If necessary, set
daylight saving time to "On". Press EXIT to close the menu.
2.1 Turning on the receiver
Press On/Off (Power) to turn on the unit.
2.2 Standby mode:
When pressing the "Power" button, receiver will switch to standby mode. Press
"Power" once more to turn the unit on again.
To completely turn off the unit, unplug the mains cable.
2.3 Switching channels
Use CH▲, CH▼ buttons to switch channels during radio or TV mode.
2.4 Volume adjustment
Use VOL◄, VOL► buttons to adjust the volume during radio or TV mode.
10
2.5 Channel number
During radio or TV mode press any number button followed by "OK" button to
directly switch on a channel.
2.6 Mute (Turning sound off)
1. Press "Mute" to switch off the sound.
2. Press "Mute" once more to switch sound on again.
2.7 Changing sound channel
Press "Audio" and select a desired
language (as long as provided by
broadcasting station) using the CH
buttons.
Press VOL buttons to select a desired
mode (Stereo/Mono/Left/Right).
2.8 TV/RADIO
Press "TV/Radio" button to switch to radio
mode. Press again to return to TV mode.
2.9
TXT
Teletext is an information system that
displays text pages on your TV screen.
To receive teletext pages the selected
channel must support this function.
When switching channels, the TXT
symbol is displayed if the channel
supports teletext. Press "TXT" button to
turn on teletext function. Press "EXIT" or
"TXT" button to turn teletext off. Enter
the desired teletext page number using
number buttons. Use CH button to turn
to next or previous page.
2.10 SUB (Subtitle)
Displaying and hiding subtitles (if provided by broadcasting station).
11
2.11 EPG
Electronic Program Guide. Not every
broadcasting station broadcasts the
electronic program guide (EPG), as is the
case with teletext. The extent also varies.
For this reason verbalizations like "as long
as provided by broadcasting station" will
have been foregone. The EPG shows an
overview of current or future broadcasts
with the respective broadcasting times. Use
OK button to display broadcast information
in a new window.
Press the button (red) to switch to "time
table" (time) display.
The navigation within the EPG overview
takes place as follows:
Back to normal view.
Back to program overview.
One broadcast backward/forward.
Two broadcasts backward/forward.
One day backward/forward.
When you find an interesting broadcast you
can save it in the timer using the (green)
button! The satellite receiver switches on at
the selected time and the broadcast can be
recorded by a video recorder. Timer
functions are explained in the further
course of this manual.
12
2.12 LAST
The receiver skips to the previously selected program when pressing "Last"
button.
2.13 Program list (OK button)
Press OK button to display a complete list
of all saved programs.
Use the CH buttons to navigate within this
list. Use the PG-/PG+ buttons to faster
"browse" the list. When you have found a
desired program, confirm with OK or press
EXIT to hide the list. Use the VOL buttons
to display the stations of the single
connected satellites.
2.14 Changing satellites
The receiver automatically switches to the next programmed satellite when
pressing "PG+" or "PG-" during normal operation.
2.15 INFO
Date/time
Program name
Broadcast title (current and next)
Teletext available/not available; satellite
name and position
Type of program list (e.g. All satellites,
Favorites)
2.16
Changing screen modes
Press "Mode" button to select color (recommended setting: "Auto"), screen
format (recommended setting: „4:3LB“) and type of video output signal
(recommended setting: „CVBS“).
13
2.17
Favorite list
Press "FAVOR" button to open
previously created favorite groups. Use
the CH buttons to select a favorite list.
Please note that after selecting a
favorite group only the stations of this
group can be switched on.
Chapter „Menu“ „TV program list“ in the further course of this manual
explains the creation of a favorite group more into detail.
1.
2.
Use "PG+" and "PG-" buttons during normal mode to switch to "All
satellites" mode, in order to return to the overview of all stations.
Press "EXIT" to close the menu.
2.18 Sleep timer (blue button)
Sleep timer: Set the time at which the receiver will turn off automatically. Use OK
button to select:
OFF, 10, 30, 60, 90 and 120 minutes.
2.19 HDMI
With this button you switch your receiver into HDMI mode. This mode is only
working with an end device which supports HDMI. Pressing this button again
switches back to the origin mode.
14
3. Menu
Press MENU button. The main menu opens. Press EXIT to close it again.
Navigate through the menus in the following way:
Up:
Menu name (function symbols are displayed thereto).
Subsequent: Submenu or menu items.
Down:
The information bar displays buttons, with the help of which you
can move through the current menu
Menu structure
Main menu
Sub menu
Editing programs
(Symbol: TV)
TV program list
Radio program list
Delete all
Installation menu
(Symbol: Globe)
Antenna connection
Satellite list
Antenna settings
Single satellite search
Multi satellite search
TP list
System menu
(Symbol: Film reel)
Language
TV setting
Time settings
Timer settings
Parental lock
OSD settings
Favorites
Miscellaneous
Miscellaneous
(Symbol: Carton)
Information
Default settings
Upgrade via satellite
Games
(Symbol: Circle)
Tetris
Othello
15
3.01
Editing programs
Press "Menu" button and select menu item
"Editing programs". Now enter your
personal password (default setting
"0000").
3.1
TV program list
In the menu "TV program list" you can
carry out the following settings:
Editing favorites (white button), locking
channels (red), skipping channels (green),
moving channels (yellow) and changing
channels (blue).
◄► List
Press VOL buttons to switch the current station group (station of a satellite or a
favorite list).
16
3.1.1 Favorites (FAV - white)
Press "FAVOR" button (white) to associate
a station to a favorite list. Now use CH
buttons to select a station you want to
associate to a favorite group. After selecting
a desired station, press OK. A new window
opens, in which you can associate the
station to a favorite list. After a station has
been associated to a favorite list, the
symbol ♥ appears next to the station name
in the list.
3.1.2
Locking channels (Red)
Use the red button to mark selected
station for being locked. Please confirm
your selection with OK button. Next to the
station name in the list appears a symbol
of a key lock. Selected stations then
require a password (Parental lock).
3.1.3 Skipping channels (Green)
Use the green button to mark selected
stations for being skipped. An appropriate
symbol appears next to the station name.
Please confirm your selection with OK
button. Selected programs are skipped
when switching channels with CH▲ and
CH▼ buttons. Direct entry is still possible.
17
3.1.4
Moving channels (Yellow)
After having pressed yellow button and confirmed selection of the station to be
moved by OK button, use CH buttons (or PG+ and PG-) to move the station to
the desired channel position. Press OK button once more to save the station at
the desired memory location.
3.1.5 Changing channels (Blue)
A new menu window appears after pressing the blue button.
• To arrange channels (Red)
Arrange the stations according to the
following parameters:
Alphabetically (Name (A-Z))
Alphabetically backwards (Name
(Z-A))
Free or coded stations (Free/Pay TV)
Locked programs (Locked)
• Changing channel names (Green)
Change the name of a station.
Therefore use the number buttons on
your remote control (similar to a mobile phone) to enter a new name for a
station. Confirm the new name with the yellow button.
• Deleting channels (Blue)
You can delete a station for good from the program list pressing the blue
button. Use OK button to select the channel you want to delete; next to
the channel appears a cross. When exiting the menu you are asked,
whether you really wish to delete the station. After pressing OK the
channel will have been finally deleted.
3.2 Radio program list
The procedure is the same as under menu item "TV program list".
3.3 Delete all
Delete the complete program list. Confirm warning message with YES.
If you have accidentally deleted the program list, you can either carry out a
station search or reset the receiver under "Miscellaneous" "Default settings".
18
4.
Installation menu
The opposite list appears after entering the
installation menu:
4.1 Antenna connection
In this menu setting you can specify, whether your satellite system is firmly
directed or contains a rotary current motor.
4.2
Satellite list
In this menu you can change, add or delete satellites.
1.
Press red button to change satellite
name and position.
2. Press green button to enter a new
satellite.
3. Press blue button to delete a selected
satellite.
4. Press OK button to add a satellite to
your list of receivable satellites. To
add the stations of the newly
added
satellite to your program list,
you must start a station search via this
satellite.
19
4.3 Antenna settings
In this menu you can carry out necessary settings that comply with your
satellite system. After selecting a menu item and pressing OK button, the
possible options are displayed.
The current signal strength and signal quality are displayed at the button of the
screen.
1.
Satellite: Select a satellite
2.
LNB frequency:
Select LNB type and further settings (only for experts! - default setting:
digital)
3.
Transponder: Select transponder directly via number.
4.
DiSEqC1.0: DiSEqC position for DiSEqC1.0 switch.
5.
22 KHz: automatic setting.
6.
Polarization: Auto, horizontal, vertical.
20
4.4
Single satellite search
In this menu you can search a single satellite for stations.
1. Satellite: Select the satellite on which you want to search for new stations.
2 Free stations only: Select, whether you only want to search for decoded
programs (OK) or also for coded programs (NO).
3 Searching: Select, whether you want to search for TV and radio programs
or only for TV or radio programs.
4 Network search: Presetting: "No"
5 Searching mode: Preset search (only searches the programmed
transponders); automatic search (searches all receivable stations).
6
Search: Start the search.
Cancel the search with the EXIT button.
4.5
Multi satellite search
In this menu you can search all satellites programmed in a satellite list for
stations.
1
2
3
4
5
Satellite: Displaying all satellites, on which the search is carried out.
Free stations only: Select, whether you want to search for TV and radio
programs or only for TV or radio programs.
Network search: Presetting: "No".
Searching mode: Preset search (only searches the programmed
transponders); automatic search (searches all receivable stations).
Search: Start the search.
Cancel the search with the EXIT button.
21
4.6 TP list
In this menu you can change, add or delete the transponder on a satellite.
Select the desired satellite using the VOL buttons.
1.
Press red button to change the frequency, symbol rate and polarization on
the selected transponder.
2.
Press green button to create a new transponder or to edit parameters.
3.
Press yellow button to delete the marked transponder.
4.
Press blue button to search the new transponder for new channels.
22
5.
System menu
The opposite list appears after entering the
system menu:
5.1 Language
In this menu you can select a menu language, as well as pre-select a first and a
second audio language (as long as these are provided by the broadcasting
station). In addition to that you can select your favorite subtitle language and
teletext.
5.2
TV settings
1.
Color: Select transmitting system
Default setting: Auto
Screen format: Select screen format; default setting: 4:3LB.
Video output: Select output format
CVBS or RGB.
2.
3.
23
5.3
Time settings
The following menu appears:
Time: Possibility to enter time and time zone
(see example: Set receiver to daylight
saving time).
5.4
Timer settings
Timer:
In this menu you can set the time at which the receiver will turn on or the
channel to which the receiver switches automatically, in order to record a certain
broadcast by your video or DVD recorder.
Table concerning the timer settings:
Timer-number
Timer-repetition
Timer-service
Switch-on program
Date
Switch-on time
Duration
Select timer number 1-8.
Type of repetition (once, daily, weekly, monthly,
yearly, off). During „Off“ mode timer is deactivated.
Switching between program timer (program) and
memory function (message).
Timer service: message: Birthday, anniversary,
general
Timer service: program: Program selection
Date entry
Time entry
Duration of switch-on time
24
5.5
Parental lock
The default password is “0000”.
1. Menu lock: Switching on/off the password entry in installation menu.
2. Program lock: Switching on/off password entry for locked programs.
3. New password: Specify new password.
(It is essential to keep the new password in mind).
4. Confirm password: Enter new
password again for confirmation.
5.6
OSD settings
In this menu you can carry out settings on subtitle display, menu displaying time
(OSD displaying duration), as well as on menu transparency (OSD
transparency).
Under menu pre-settings you can recover the original settings.
5.7 Favorites
In this menu you can associate your own name to the favorite lists. Enter the
name using the number buttons on the remote control (similar to a mobile
phone).
Press yellow button to confirm the new name.
5.8 Miscellaneous
Switch on or off the LNB power supply (Presetting: On).
Here you can also specify, whether the program list
• displays all stations (complete)
• displays coded stations only
• displays free stations only.
25
6.
Miscellaneous
6.1
Information
Displaying the hardware used in the receiver.
6.2
Default settings
In this menu you can reset the receiver to default settings. All modifications
carried out by you will be reversed.
The default password: 0000
6.3 Upgrading via satellite
In this menu you can upload the most current games on the receiver. You can
download the software via satellite Astra 1E.
Please do not modify any preset parameter.
Select the icon "Start". The receiver is searching for an updated software
version for the receiver. If the message ‘SW version is same to current version!
Do you want to continue?’ appears, your receiver is equipped with the latest
software. Finish the download with "Exit" button.
26
7. Games
In the game menu you can play Tetris or Othello.
7.1 Tetris:
1. Playing instructions
Set your desired start level under "Setup", using the ◄/► buttons.
• Press "Start" to start a new game.
• Press "Cancel" to exit the game.
•
•
•
•
•
2.
Use VOL◄ and VOL► buttons to move the characters from left to
right.
Press CH▲ to turn character clockwise.
Press CH▼ to faster place the characters.
Press OK button to pause or restart the game.
Press MENU button to exit the current game and return to game menu.
Othello (Reversi)
Set your desired start level under "Setup", using the ◄/► buttons.
• Press "start" to start a new game.
• Press "Cancel" to exit the game.
• Use VOL◄, VOL►, CH▼ and CH▲ buttons to move on the hairs
cross and to select the spot on which to place your stone.
• After selecting the spot, press OK to place the stone.
• Press Menu button to exit the current game and return to game menu.
27
8.
Disassembly
•
Disconnect the receiver and all connected devices from the power
supply.
•
Unscrew the LNB cable from the receiver.
•
Remove the batteries from the remote control, if you do not use the
receiver over a longer period of time.
•
Pack the receiver, cables and remote control in the box.
•
Store the receiver and all accessories at a dry and dust-free location.
•
Protect the receiver from frost.
Care
Caution!
The receiver must not get wet. Never clean with a wet cloth.
Do not use solvent-containing cleaners like benzene or thinner. These cleaners
can damage the surface housing.
Clean the housing of the receiver with a dry cloth.
28
9. Trouble-shooting
Problem
Possible cause and solution
Satellite can not
be found or no
signal
Example: ASTRA 19E
Button 1: (Presetting: „Das Erste“)
Button INFO („Das Erste“, FR11837)
Signal AND quality are both 0%
Direct the vertical mirror south.
Turn few millimeters left or right, wait about 3 seconds
and repeat until signal and quality are displayed.
If signal is at approx. 60%, the black background
disappears and TV picture is displayed.
Please select a current program from the preset
channel list for choosing another satellite and then
press INFO button.
The satellite guide in the accessory menu will give you
further notes on the correct direction of the mirror.
Front indicator is
off;
LED
not
illuminating
The mains cable is not connected.
Connect the power adapter to the mains.
Switch on the circuit breaker.
Possible short circuit at the antenna input lead: Check
the connections.
Red and green
LED illuminate.
Receiver is in standby operation mode.
Press the POWER button on the remote control (or
receiver). The receiver switches on and the program is
displayed on the TV screen.
No
sound
or
picture,
but
menus of receiver
displayed.
The antenna is not directed towards the satellite. Direct
the antenna correctly.
Red
LED
illuminating;
no
picture on TV
screen.
The system is not connected properly.
Check the connection of the SCART cable.
No signal (with symbol).
Check the cable connections from the LNB to the
receiver and from the receiver to the connected
devices. Direct the antenna.
TV is not in AV operating mode.
Switch on the right AV input of the TV.
29
Poor
picture;
locking error; bars
on the screen; no
sound.
The antenna is not exactly directed towards the
satellite.
Direct the antenna more exactly. Therefore use the
INFO button on the remote control.
Signal for the antenna direction will be displayed.
The LNB is defect. Replace the LNB.
No picture, no
sound,
signal
strength,
no
signal quality
Satellite antenna is directed towards a wrong satellite.
Remote
control
not working.
Batteries are exhausted.
Replace the batteries.
Remote control not properly pointed.
Point the remote control to the front side of the receiver
and make sure that there are no obstacles between the
remote control and the receiver.
Channel got
new frequency
a
Delete TV channel; then undertake automatic channel
search.
30
10. Specifications
Dimensions in mm (B x D x H)
265 x 158 x 39
Weight in grams
Receiver 1000g
Input frequency range
950 MHz ~ 2150 MHz
IF Bandwidth
55MHz / 8MHz (below 5MS/s)
Power supply LNB
13/18V GS, 500mA max.
Overload protection
LNB Control
22KHz ± 2KHz
DiSEqC Control
Version 1.0 and 1.2
Input symbol rate
2 ~ 45 Mbit/s
Bit stream
ISO/IEC 115200
Bit-Stream-Specification
Input speed
Max. 15Mbit/s
Error correction (FEC)
1/2, 2/3, 3/4, 5/6, 7/8
Video
MPEG-2 MP@ML
Audio
Audio Layer 1 or Layer 2
Height-side-ratio
4:3 Letterbox, 4:3 Pan Scan, 16:9
Video resolution
720 x 576 (PAL), 720 x 480 (NTSC)
Audio mode
Left, Right, Stereo. AC3
Power adapter – input voltage
100-240 V ~, 50/60 Hz
Power consumption
11 W (operation with single LNB)
< 8 W (standby)
Operating temperature
+5 °C ~ +40 °C
Storage temperature
-10 °C ~ +65 °C
31
Warranty:
The warranty of this satellite receiver is in compliance with the legal regulations
applicable on the date of purchase.
Declaration of conformity
The manufacturer of this Satellite receiver herewith declares that this product
has been manufactured in conformity with the following standards and industry
directives:
Low voltage directive 73/23/EWG
•
EN 60 335-1
•
EN 60 335-2-15
Directive on electromagnetic compatibility 89/336/EWG
•
EN 55 013:2001
•
EN 55 020
•
EN 61000-3-2000
•
EN 61000-3-:1995+A1:2001
• EN 61938
Type: Digital Satellite Receiver
Your device carries the CE symbol.
DiSEqC is a registered trademark by EUTELSAT.
DVB is a registered trade mark by the DVB Digital Video Broadcasting Project.
32
Glossary
AC
Alternating Currentconnection for alternating current
DC
Direct Current connection for direct current
Cinch-Plug
Coaxial plug for connecting TV or stereo systems
DiSEqC
Digital Satellite Equipment Control
System for controlling different external devices with the help
of a satellite receiver. There is a special need for the
selection between multiple satellites (e.g. Astra and
Eutelsat).
DVB
Digital Video Broadcasting
Broadcasting digital TV programs.
EPG
Electronic Program Guide
Electronic Program Guide
FTA
Free-to-Air Services
Free-of-charge services that can be received without a
special decoder.
HDMI
The High-Definition Multimedia Interface (HDMI) is a
licensable audio/video connector interface for transmitting
uncompressed, encrypted digital streams
IF Plug
Coaxial plug for connecting the LNB antenna cable
LNB
Low Noise Block Amplifier / Converter
Device within the focus of the antenna which converts the
high frequency signals from the satellites into a low
frequency range (IF) and simultaneously amplifies them.
Mute
Button on the remote control to mute the sound.
OSD
On Screen Display
Menu control visible on the screen.
33
PID
Code number of a received data stream
PIDs make sure that data packets of a channel are searched
and combined correctly within a data stream.
Receiver
Receiving appliance that converts the antenna signals into
video and audio signals.
SCART
21-pin plug-and-socket connection for connecting a TV to
the receiver.
Transponder
Satellite frequency. Multiple digital programs can be sent on
one transponder simultaneously.
34
For your own notes:
35
Probox GmbH
Rebgartenweg 27
D – 79576 Weil am Rhein
[email protected]
Thank you for choosing one of our products.
This product complies with the legal standards and is manufactured under
constant quality control.
The technical specifications are up-to-date at the time of printing. Subject to
changes without prior notice.
V1.02
36