1
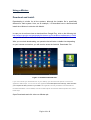
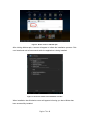
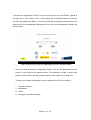
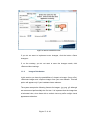
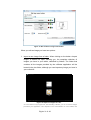
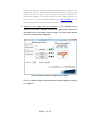
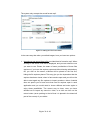
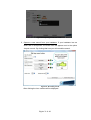
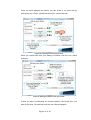
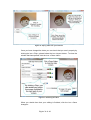
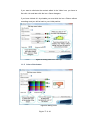
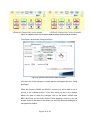
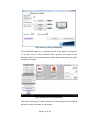
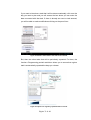
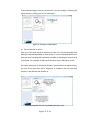
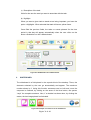
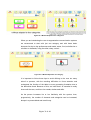
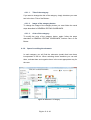
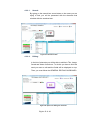
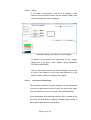
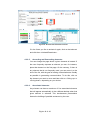
Operating Manual
Fondation Orange (France) a commandité la version Française.
The English version has been financed by Fondation Orange (France)
CONTENTS
- Introduction
3
- e-Mintza applications
4
- Minimal hardware requirements
4
For Windows download
For MacOS download
For Android download
4
5
5
- Using e-Mintza
6
Download and Install
6
Opening e-Mintza
10
Exiting e-Mintza
10
- Supporting Person Tools
11
1. TOP MENU BUTTONS
13
1.1. GENERAL EDITING GUIDELINES:
13
Buttons START and AUTHOR
13
Buttons YES, NO and EXIT
14
1.1.1. Title of the button
1.1.2. Image of the button
1.1.3. Sound of the button
1.1.4. Video of the button
1.1.5. Color of the icon
1.2. DRAG AND DROP
14
15
19
24
27
28
1.3. ABOUT ME
30
1.4. SCHEDULE
31
2. WHITEBOARD
36
3. COLOR OF THE SCREEN AND SENSITIVITY
37
4. CATEGORIES AND ITS ELEMENTS
37
4.1. Introduction to categories and personalization possibilities
37
4.2. Deciding the number of categories
40
4.3. Editing a category and its elements
40
4.3.1. Space for editing categories
4.3.1.1. Title of a category
4.3.1.2. Image of the category button
4.3.1.3. Color of the category
40
41
41
41
4.3.2. Understanding elements and their editing
41
4.3.2.1. Search
4.3.2.2. Editing
4.3.2.3. New
4.3.2.4. Activate and deactivate
4.3.2.5. Ascending and Descending elements
4.3.2.6. Associated elements
42
42
43
43
44
44
- Final remarks
47
- Acknowledgements
48
Página 2 de 48
Introduction
e-Mintza (electronic language in Basque) is a free application that generates a
communication board with pictograms or other images and that by combining them with
their associated sounds, fosters simple and effective communication. There are four
versions with different real voices, donated by community volunteers, which can be
selected to fit the age and the sex of the user (young female, adult female, young male
and adult male). The communication board can be easily personalized in terms of the
language used, texts, images, videos and sounds. Although it is recommended to
preferentially interact through the tactile screen of a tablet device, the system accepts
the use of the mouse in the case of a non-tactile screen computer.
Although initially considered for augmentative / alternative communication in people
with autism, with whom the application was developed, e-Mintza can be hopefully used,
given its flexibility, by many other people in need. Thus, it can be helpful for young
children with deafness that are still mute, people with significant intellectual disability,
patients with acquired brain damage because of accidents or stroke, senior citizens
with neurodegenerative diseases, people that can not speak because they require a
mechanical ventilation device...
e-Mintza is a joint initiative of Dr. Carlos Elósegui Foundation from Policlínica Gipuzkoa
and Orange Foundation (Spain). This current translation into English and French has
been supported by Fondation Orange (France) and by Orange Foundation
(International)
The firm Nesplora Technology & Behavior has done its technical development, and
Gautena (Gipuzkoa Autism Society) has played a significant collaborative role in the
different phases of the project. Almost all the pictograms included have been taken
from ARASAAC: the Aragon (Spain) free portal for graphic resources and materials.
e-Mintza received funding from the Avanza2 Program of the Ministry of Industry,
Tourism and Commerce (Government of Spain)
Página 3 de 48
e-Mintza applications:
The system includes two applications:
- e-Mintza board: a communication board is generated with diverse basic categories.
When clicking each category, a new screen is displayed presenting a group of pictures.
When one is clicked, the appropriate voice-sound is produced and the picture goes
automatically to the whiteboard to facilitate building a sentence.
- Supporting Person Tool: from this application the supporting person (family member,
teacher or therapist) or the person using the e-Mintza when appropriate, can
personalize the system and design a communicative tool adapted to the specific needs
and wishes of the user. New pictograms, photographs, sounds or videos can be easily
added and edited in each category. All updates made at the Supporting Person Tool
get automatically saved in the e-Mintza board.
In addition, the program allows making a personal visual diary or schedule.
Minimal hardware requirements :
e-Mintza operates in diverse tactile and no-tactile digital devices: desktop computers,
netbooks, laptops and tablets that support Adobe Air technology. The minimal screen
display size is 10 inches, with a minimal resolution of 1024x600 pixels. The program is
ready to operate in several platforms, such as Windows, MacOS and Android (starting
from the 2.2 version)
Download for Windows
Requirements for using e-Mintza in Windows devices:
- Operating systems: Microsoft® Windows® XP Home, Professional, or PC Tablet
Edition with Service Pack 2 or 3 (including editions in 64-bits); Windows Server® 2003
o 2008; Windows Vista® Home Premium, Business, Ultimate, o Enterprise (including
editions in 64-bits); with Service Pack 2; or Windows 7 (including editions in 64-bits).
- Processors: Intel® Pentium® III 1GHz or superior; or Intel Pentium 4 2GHz or
superior.
- RAM: minimal 512MB (1GB recommended).
Página 4 de 48
Download for MacOS
Requirements for using e-Mintza in MacOS devices:
- Operating systems: Mac OS X v10.5 o v10.6.
- Processors: Intel Core™ Duo 1.83GHz or superior.
- RAM: minimal 512MB (1GB recommended).
Download for Android
It is mandatory to have a tablet both compatible with Adobe AIR technology (see list
of tablets certified by Adobe at
http://www.adobe.com/flashplatform/certified_devices/tablets.html ) and that
has the following minimal requirements:
- Operating systems: Google Android™ 2.2 or superior.
- Processors: ARMv7 or superior.
- RAM: minimal 256MB.
CAUTION: THE CURRENT VERSION IS NOT COMPATIBLE WITH iPad.
Página 5 de 48
Using e-Mintza:
Download and Install:
Downloading is similar for all the systems, although the installer file is specifically
different for each system. Here, as an example, it is described how to download and
install the e-Mintza in a device with Adroid:
In case you do not know how to download from Google Play, click on the following link
http://support.google.com/googleplay/bin/answer.py?hl=en&hlrm=es&answer=113409
and you will be able to follow the indicated process to download and install e-Mintza.
Whe you conclude downloading, an operation that will take a vaiable time depending
on your internet connection, you will need to acces the Android Downloads* file.
Figure 1: Android Downloads File.
If you cannot locate your Downloads icon in your desktop, you will need a file explorer to access the
application eMintza.apk. You can use the free application ES File Explorer from Estrongs, which will allow
you to explore the files you have in your tablet. This application is freely available in Adroid Market for
inmediate installation. Once installed, execute ES File Explorar and find the eMintza.apk file. Next, follow
these steps:
Open Downloads and click twice on eMintza.apk
Página 6 de 48
Figure 2: Double click on <eMintza apk>.
After clicking eMintza.apk, a screen will appear to initiate the installation process. Click
over Install and wait a few seconds while the application is being installed.
Figure 3: Click over <Install> and installation will start.
When installation has finished a screen will appear informing you that e-Mintza has
been successfully installed.
Página 7 de 48
Figure 4: Click <Open> to open e-Mintza.
Using the left section of the wheel, you must select one of the following languages
offered by the program: Spanish, French, English or Basque.
Figure 5: Area to select language and voice
Using the right section of that wheel you must then select the <voice> that you want
to download. The application offers you four type of voices, donated by real people,
to facilitate adjustment to the final user of e-Mintza. These voices correspond to:
-
Girl.
-
Woman.
-
Boy.
-
Man.
Página 8 de 48
If you wish to have only one language in your e-Mintza, you can click <Install> and
can move to the following section <Entering e-Mintza>.
If, on the contrary, you want to download a bilingual e-Mintza version, you must
click on the box < Select second language>. A new wheel will be presented and
you can proceed to select language and voice for this second language.
Figure 6: Area to select a second language and a second voice
After selecting both langauges you must click <Install>. A screen will appear,
alerting you to maintain an Internet connection during the installation process.
Figure 7: Informative text about connectivity
Now, select your mode of connection and click to continue and e-Mintza will install
automatically.
If you have created a bilingual version, a new window will ask you which one of the
two languages is the one you want to use to start your session.
Página 9 de 48
Figure 8: Chose your preferential language to interact with e-Mintza
Everytime you enter e-Mintza, this window will be presented. Once you have selected
the language e-Mintza will open. To change the language, you must exit the program
and start again, this time selecting your second language.
Opening e-Mintza:
When you open e-Mintza the communication board chosen for the user will be
displayed. The first time you open e-Mintza 12 available categories will be shown. By
clicking in any of them a new screen with pictograms will appear. Each pictogram has
an associated sound and when you click on the pictogram, its sound will be produced
and the icon will move to the whiteboard, to help the user building a sentence. For
instance, in the food category, diverse plates and foods are offered and the user can
choose among all of them (represented by photographs or pictograms).
Exiting e-Mintza:
To avoid accidental exit by a non-informed user, when the icon <Exit> is clicked, a text
will be presented in the blackboard, indicating the need to introduce an exit sequence.
This required exit sequence consists in clicking <Yes><Yes> that is, clicking twice on
the icon <Yes>.
Página 10 de 48
Figure 9: Exit sequence: click twice on the <Yes> icon.
If you modify the content of the <Yes> picture by another concept, the exit sequence
will require you to use this new item. For example, if you substitute the element <Yes>
by the item <I like it>, the exit sequence will require you to click twice on the button <I
like it>.
Supporting Person Tool:
To personalize the program and adapt it to the needs and skills of the final user you
need to enter the Supporting Person Tool. From this section you can familiarize
yourself with the application and master its diverse functionalities.
It is highly recommended that before starting you create a general folder (with the eMintza name, for example) in you computer or tablet, with sub-folders named for the
different elements (documents, images, sounds, videos). In these folders you can save
all the information that you are introducing in the program. Also, it is good to create a
copy of this general folder with another name (for example e-Mintza for the first and eMintza1 for the second), and that you work with the second one (the copy), avoiding
entering the original one once you have personalized the information contained in the
program. This is a crucial security advice, since if by accident you eliminate elements
from these sub-folders or even the complete folder, you will still have essential
personalized data secured for you.
Página 11 de 48
To access the Supporting Person Tool you must click the icon <AUTHOR>, placed at
the right top of your screen. Then, a box dialog will be displayed and you need to
introduce the password <admin>. You will see that when clicking the password box, the
keyboard will be automatically displayed and you can type the password (always the
same): admin
Figure 10: Access box to open the Supporting Person Tool. Password: admin
Once you have accessed the Supporting Person Tool you will appreciate that the
screen is very similar to the general screen. The difference, though, is that in this
area you will be able to edit the program based on the needs of your final user.
To help you to master the program, we are dividing the tool in four sections:
1. Top menu buttons.
2. Whiteboard.
3. Colors.
4. Categories and their elements.
Página 12 de 48
Figure 11: Outline of the four sections that will be discussed now.
1. TOP MENU BUTTONS:
We have grouped the buttons depending on its editing possibilities. This
explains why in some sections more than one button is included, since their
editing mechanisms and editable parts are similar.
1.1 GENERAL EDITING GUIDELINES:
Buttons START and AUTHOR:
These are the only buttons that cannot be edited.
The purpose of the button <START> is to return to the starting point of the
program. When you select this button all the items placed in the whiteboard
will disappear.
Clicking the button <AUTHOR> you access the Supporting Personal Tool.
You will be required to type the password <admin>, to make sure that no
accidental openings take place. This same button self converts into <eMintza> when you are working on the Supporting Person Tool. By clicking
on this button, you will exit the section and return to the program.
Página 13 de 48
Buttons YES, NO and EXIT:
The buttons <YES>, <NO> and <EXIT> all have the same editing
possibilities. By clicking in any of these three buttons you can change their
physical properties.
1. Title.
2. Image.
3. Sound.
4. Video.
5. Colors.
Figure 12: Section for editing the buttons.
1.1.1.
Title of the button:
Introduce the name that you want to see in the button. Please, consider that
there is a limited space and it is therefore important to visualize your text as
pre-view.
Página 14 de 48
Figure 13: Box to introduce the title.
If you do not want to implement more changes, click the button <Save
changes>.
If, on the contrary, you do not want to save the changes made, click
<Return without saving>.
1.1.2.
Image of the button:
In this section you have the possibilities of <Import an image> (from a file),
<Eliminate image> and <Capture image> from your own webcam. This last
option will appear only if your hardware has a webcam.
The system accepts the following formats for images: .jpg .png .gif, although
we recommend preferentially the first two. It is important that the image has
a horizontal view, since those with a vertical view may suffer a slight visual
appearance distortion.
Página 15 de 48
Figure 14: Box to edit the image of the button.
When you edit an image you have two options:
1. Import a new image from a folder. When clicking on the button <Import
image> a window wil open, showing you, the complete collection of
images you have in your tablet, classified by folders. The folder that
contains all the images provided by the e-Mintza application will be
hosted in the pics folder, although you can import any image you have in
your collection.
Figure 15: Import an image from a file.
*In some tablets it may happen that, after installing e-Mintza, you do not see the images
provided by the application. This depends on the characteristics of some tablets, that
Página 16 de 48
require to be restarted to be able to visualize the installed sounds or images. If that
happens, shut down (turn off) the tablet, restart again and test that you can see now the
images. There are some ways to “force” the system to update the multimedia files,
without needing restarting. If your tablet contains a SD card, it works to remove it and
insert it again. You can also install a free application such as
Rescan Media, that will
make your tablet performing this task, without the need to shut down and restarting.
2. Capture a new image from your webcam. If your hardware has a
webcam or you have a webcam connected, the photograph camera icon
will appear next to the option <Import image>. By clicking that camera
icon a new window will be displayed.
Figure 16: Button to capture an image from your webcam.
Click on <Capture Image> and the captured image will appear in the box
of <Capture>.
Página 17 de 48
Figure 17: Capturing an image from the webcam.
If you want to repeat, click again on <Capture Image>. Please, be aware
that when you capture a new image, the other one gets lost.
Figure 18: Ending image capture.
If you do not want to save the captured image, click on <Exit>.
Once you have imported the image, you must review its appearance
inside the button.
Página 18 de 48
Figure 19: Visualizing the captured image in its button.
If you prefer now to eliminate the image, click on “X” and then click on
<Save changes>.
Figure 20: Ending edition of the image in its button.
1.1.3.
Sound of the Button:
In this section you will have the possibilities of <Charge sound> (from a file),
<Eliminate Sound> and <Capture Sound> from the own hardware. This last
option will only appear if your hardware has a sound system and a
microphone.
Página 19 de 48
The system only accepts the sound format mp3.
Figure 21: Editing the sound of a button.
In the same way that when you edited images, here you have two options:
1. Importing a new sound from a file, provided that its format is mp3. When
clicking on the arrow, a list will be displayed, and you can select the one
you want to use. Please, be aware of some peculiarities of these files
explorers: if you have the explorer open and without having selected any
file, you click on the screen, e-Mintza will be placed on the first line,
hiding the file explorer placed. This may give you the impression that the
explorer has been closed, when in fact remains open and you will not be
able to start again any file explorar to import sounds or videos. Android
does not permit you to have more than one file explorer open in each
application and you would need to close e-Mintza and enter again to
enjoy these possibilities. The correct way to close, once you have
decided not to import any sound or video, is to click one time on the
return button (arrow pointing to the left that it is placed in the down-left
part of the screen) of your tablet.
Página 20 de 48
Figure 22: Importing sound from a file.
2. Capture a new sound from your hardware. If your hardware has an
audio and a microphone, the audio icon will appear next to the option
<Import sound>. By clicking that icon you will record the sound.
Figure 23: Recording sound.
After clicking the icon a widow will be displayed:
Página 21 de 48
Figure 24: First window for recording a new sound
When you have ended recording, click the icon <End recording> that
appears in the same place where you find <Start recording>.
Figure 25: Second window for recording a new sound.
Página 22 de 48
Once you have imported the sound, you can check if you hear well by
clicking the icon <Play>, placed below the icon <Import Sound>.
Figure 26: Listening a new-recorded sound.
When you decide then that your editing is finished, click the icon <Save
changes>.
Figure 27: Ending the edition of the new sounds.
If what you want is eliminating the content edited in the Sound Icon, you
have to first click <X> and later click the icon <Save changes>.
Página 23 de 48
If you have clicked <X> by mistake. You must click the icon <Return without
recording> and you will be back to your initial position.
1.1.4
Video of the button:
In e-Mintza videos are optional. The program does not bring a video clip
associated with each element, but you can see that there is a video in the
system as an informative example. If you estimate that the user will
understand better an element because of the video support, you can
yourself import a video clip. Please, consider that videos take up many
Megabytes of storage space.
In the same way that we discussed in the section of sound and image, you
can import a clip through the video <Import video> (from a file), <Eliminate
video> and <Capture video> from your own webcam. This last option will
appear always if your hardware has a webcam or you have plugged one
external camera to your hardware.
The system only accepts the flv video format.
Figure 28: Window for editing the Video Button.
Página 24 de 48
When you import a video clip you have two options:
1. Importing a video from an already existing file, provided that its format is
flv. When clicking on the arrow, a list will be displayed, and you can select
the one you want to use. Please, be aware of some peculiarities of these
files explorers: if you have the explorer open and without having selected
any file, you click on the screen, e-Mintza will be placed on the first line,
hiding the file explorer placed. This may give you the impression that the
explorer has been closed, when in fact remains open and you will not be
able to start again any file explorar to import sounds or videos. Android
does not permit you to have more than one file explorer open in each
application and you would need to close e-Mintza and enter again to
enjoy these possibilities. The correct way to close, once you have decided
not to import any sound or video, is to click one time on the return button
(arrow pointing to the left that it is placed in the down-left part of the
screen) of your tablet.
Figure 29: Importing video from your files.
2. Capture video from your webcam. If your hardware has a webcam or you
have one plugged to your system, you will find the camera icon next to the
option <Record video>. When clicking this icon, a recording window will
open. To start recording click the icon <Tape> and when you have
finished click <Stop>. The video will be automatically transferred to the
video section.
Página 25 de 48
Figure 30: Taping video from your webcam.
Once you have charged the video you can check that you see it properly by
clicking the icon <Play>, placed below the icon <Import video>. To close the
window that has opened, click the icon <Close video>.
Figure 31: Reviewing the video.
When you decide then that your editing is finished, click the icon <Save
changes>.
Página 26 de 48
If you want to eliminate the content edited in the Video icon, you have to
first click <X> and later click the icon <Save changes>.
If you have clicked <X> by mistake you must click the icon <Return without
recording> and you will be back to your initial position.
Figure 32: Ending edition of a video clip.
1.1.5. Color of the button:
Figure 33: Editing colors.
Página 27 de 48
Once you have finished your editing click on <Save changes>.
If you have selected a color that you do not like, start again.
1.2 DRAG and DROP:
There will be times when you see a screen, that you will want to modify the
order of the elements, following other criteria; for example the frequency
they are used, the association of different elements of a given group or
other considerations. The function <Drag and Drop> allows you to move
the elements in a given screen from the e-Mintza board (that is, without
exiting to the Supporting Person Tool)
Figure 34: DRAG and DROP button.
You can edit the title, the image, the sound and the colors of this button in a
similar way that explained for the buttons <Yes>, <No> and <Exit>. See
GENERAL EDITING GUIDELINES.
This function can be activated or de-activated from the Supporting Person
Tool. When it is activated you can use it at the program, in the window you
are watching. When de-activated the button <Drag and Drop> will disappear
from the visible program window.
Página 28 de 48
Figure 35: e-Mintza screen with the button DRAG and Drop activated and de-activated.
To activate o de-activate <Drag and Drop>:
Figure 36: Activate and de-activate DRAG and DROP.
Click the icon <Save changes> to make appear or disappear the icon <Drag
and Drop).
When the function <DRAG and DROP> is active you will be able to use it
directly in the e-Mintza screen. To do this, when you are in the window
where you want to make the changes, click on the button <DRAG and
DRP> and when you see that a Yellow Frame appears in this icon, you will
be able to move and place in the space you want the elements displayed in
that particular window.
Página 29 de 48
Figure 37: Using the DRAG and DROP function.
When you have finished ordering the icons you must click again the button
<Drag and Drop>. No more placements will be allowed until you activate
again the function.
1.3 About me:
You can edit the title, image, sound and colors of this button in a similar
manner you did with the buttons <Yes>, <No> and <Exit>. Please, review
the GENERAL EDITING GUIDELINES.
Figure 38: Editing the ABOUT ME button.
Página 30 de 48
Also, this button ABOUT ME (or “I”) contains a section on personal
information. To introduce all the personal data click on <Editing personal
data> and a box will be displayed, where you can enter all the data that you
consider important (Identification, contact phones, medications, security
aspects, health coverage, allergies, hobbies…)
When you have finished, click <Save and return> and you will be redirected
to the initial window.
Figure 39: Editing PERSONAL DATA.
1.4 SCHEDULE:
In the same usual way you can edit the title, image, sound and colors of this
button. Please, review GENERAL EDITING GUIDELINES.
Página 31 de 48
Figure 40: Box for editing the SCHEDULE.
The SCHEDULE helps you to organize the life of the person you support.
To do this, click on <Edit Schedule Data> and you will access to the
planning section for the activities that will take place during the time space
you want to consider.
Figure 41: Editing box for the SCHEDULE.
This function allows you to plan a maximum of six activities for the temporal
period you want to consider in a given day.
Página 32 de 48
If you want to introduce a task that it will be done occasionally, click over the
day you want to plan and you will access the box where you can enter the
data connected with that task. If there is already an event or task entered,
you will be able to make modifications clicking on the pencil icon.
Figure 42: Window where data of the task can be entered.
But, there are other tasks that will be periodically repeated. For them, the
function <Programming periodic activities> allows you to secure that a given
task is automatically repeated the days you choose.
Figure 43: Options for regularly repeated tasks or events.
Página 33 de 48
If you click first the arrow and then one of the listed options in the periodic
activities list (for example, every Monday), you will be able to add new tasks
or modify those entered previously.
You should remember that if you click on a date where there is a periodic
activity and modify it, this change would take place in all the dates included
for this option of periodic activities.
To enter any task or event you must fill the following fields:
Figure 44: Sequence to introduce a task or event.
a) Enter an image:
To load the image related to the task or event, click on <Enter image> and a
new window will open. Search the file where the image is saved and select
the image. Click on <Open>.
Figure 45: Loading an image from a file.
Página 34 de 48
If the selected image is not the correct one, you can change it following he
same process o clicking on <X> to eliminate it.
Figure 46: Viewing the image loaded.
b) Time of the task or event:
Here you must enter the given area for the task. You should remember that
tasks get ordered depending on their timing. It is recommended therefore to
enter the time following this framework: HH:MM, H standing for hours and M
for minutes. For example, 9 AM should be 09:00, and 9 PM will be 21:00.
If the plan consists in a sequence of tasks / events without a related timing,
you can fill the time box with a sequence of numbers, the first task with
number 1 and the last with number 6.
Figure 47: Required sections to be added to the task / event.
Página 35 de 48
c) Description of the task:
Write for the user the word you want to associate with the task.
d) Highlight:
When you want a given task to stand out as being important, you have the
option <Highlight>. When selected that task will have a yellow frame.
Once filled the previous fields, the tasks or events planned for the time
period in that day will appear automatically when the user clicks on the
button <Schedule> on the e-Mintza board.
Figure 48: SCHEDULE in the e-Mintza board.
2.
WHITEBOARD:
The whiteboard is a field placed in the superior third of the desktop. There, the
elements selected by the user go automatically and appear. The maximum
number shown is 6. Using this function sentences can be built and, once the
sequence is finalized, by clicking on the arrow of the blue button, the system
“says” the complete sentence. Also, if a mistake has been done, by clicking the
eraser, the last image placed is eliminated.
Figure 49: Example of a sentence on the whiteboard.
Página 36 de 48
Please, remember that if you click on the icon <Start> all the selected images will
disappear and you will be sent to the initial e-Mintza screen.
From the Supporting Person Tool you can edit the colors of the border and the
background of the blackboard. Just follow the GENERAL EDITING GUIDELINES.
3.
COLOR OF THE SCREEN AND SENSITIVITY:
The background and the borders of the e-Mintza screen can be personalized,
avoiding colors that generate discomfort in the user. Just follow the GENERAL
EDITING GUIDELINES.
The tactile sensitivity of the buttons can be personalized. In this way you can
modify the time the button needs to remain presed in order to have the program
identify the icon and make the vocalization. In this way, the program can be
adjusted to the motor skills of the user. By default the timing is placed in 0
seconds and if you want to increase this timing (that is the time you need to
continue pressing the icon to access the content), you can roll the wheel up or
down to modify this characteristic.
4.
CATEGORIES AND ITS ELEMENTS:
4.1.Introduction to categories and personalization possibilities:
e-Mintza has 12 categories, 10 of them bring already incorporated elements
and two others (PERSONALIZATION1 AND PERSONALIZATION2) are
optional and can be filled depending on the needs of the user.
Predetermined
categories
are:
OBJECTS.
ACTIONS,
PEOPLE,
ENVIRONMENT, INTERESTS, HEALTH, ADJECTIVES, SET PHRASES,
FOOD AND DRINKS, AND LEARNING.
Página 37 de 48
Figure 50: Maximum categories in e-Mintza.
Each category incorporates a series of elements (containing its title, image
and sound) that belong to its concept. For example, in the OBJECTS
category you will find elements such as: wardrobe, scissors, sweater, and
drawer…
Figure 51: Elements of ACTION category in the top level (12 icons per window).
It is recommended to start using e-Mintza by reducing the number of
categories and elements to those the user is familiar with. That is, if the user
normally manages an analogical augmentative communication system, you
must benefit from what the person knows and does… “transplanting” those
known elements to e-Mintza while respecting categories, elements, colors
and images. In this way, adaptation to the digital platform will be easier.
Página 38 de 48
Figure 52: e-Mintza adapted to four categories.
When you are introducing the user to augmentative communication systems
we recommend to start with just one category and with those basic
elements for day to day preferences and needs: water, food, activities he or
she likes or demands, using the toilet, sleep, school…
Figure 53: e-Mintza adapted to one category.
It is important to follow these tips to avoid offering to the user too many
stimuli to process, with the resulting difficulties to focus attention and
understand the function of the tablet or even generating frustration due to
the difficulties faced. Because of this, we insist that it is essential to really
know well the user, and his or her needs, wishes and skills.
As the person increases his or her familiarity with the system, then,
progressively, the number of elements and categories can be increased,
always in a personalized and careful way.
Página 39 de 48
4.2. Deciding the number of categories:
The process for choosing the number of categories that you want the user
to “see” is simple. Above each category button you will see a mark where
<Visible> is written. When you click on that mark, you reject that category
and it will not be visible later on the e-Mintza desktop.
Figure 54: Selecting or rejecting categories.
4.3. Editing a category and its elements:
Click over a category and you will access the editing space for the category
and its contained elements.
Figure 55: Space for editing categories.
4.3.1. Space for editing a category:
In the category button you can edit its Title, Image and Color in the
following manner:
Página 40 de 48
4.3.1.1.
Title of the category:
If you want to change the title of the category, simply introduce your new
text in the box <Title of the Button>.
4.3.1.2.
Image of the category button:
To change the image of the category button you must follow the usual
steps described in GENERAL EDITING GUIDELINES.
4.3.1.3.
Color of the category:
To modify the color of the category button, again, follow the steps
described in GENERAL EDITING GUIDELINES, Section Color of the
Button.
4.3.2.
Space for editing the elements:
In each category you will find the elements (words) that have been
incorporated in the list. When selecting those elements you can edit
them, activate them and organize them in the most appropriate way for
the user.
Figure 56: Elements in a category.
Página 41 de 48
4.3.2.1.
Search:
By typing on the search box some letters or the name you are
trying to find, you will be presented with the elements that
coincide with the searched text.
Figure 57: Search window.
4.3.2.2.
Editing:
In the list of elements you will be able to edit their Title, Image,
Sound and Video of each one. To do this you have to click the
word you want to edit and the fields will be displayed on top.
Then, you must follow the GENERAL EDITING GUIDELINES.
Figure 58: Space for editing the elements.
Página 42 de 48
4.3.2.3.
New:
If you want to incorporate in the list of a category a new
element click the button <New> and the window <Add a new
element (Category)> will be displayed.
Figure 59: Creating a new element in a given category.
To create a new element you must enter its Title, Image,
Sound and, if you want, Video. Please, review GENERAL
EDITING GUIDELINES.
One you have done this click on <Save changes>. If you want
to return to the category, click in any other element of its list
and the button <Return to category> will appear.
4.3.2.4.
Activate and Deactivate:
The elements contained in a given category can be deactivated
if you do not want them to remain visible, by clicking over those
elements and then use the command <Activate/Deactivate>
Once deactivated, that particular element will be placed at the
end of the list and instead of having a location page number, it
will be associated with the word “erased”.
Página 43 de 48
Figure 60: Activate and Deactivate elements.
If in the future you like to activate it again, click on that element
and click then <Activate/Deactivate> .
4.3.2.5.
Ascending and Descending elements:
You can change the page where a given elements is located. If
the user frequently requests an element you can, for instance,
place that element on the first page. On the contrary, if there is
any element that is not frequently used, you can move it to the
end of the list, with the goal of making customization as friendly
as possible in generating communication. To do this, click on
the element you want to move and later click on <Going up> or
<Going down>, depending on your choice.
4.3.2.6.
Associated elements:
Any element can have a maximum of five associated elements
that will appear automatically in the e-Mintza desktop when that
given element is selected. This simultaneous presentation
fosters the building of possible sentences by the user.
Página 44 de 48
Figure 61: View of associated elements.
.
It is important to remember that the elements you want to
associate must be already created elements that are listed in
any category. To characterize them as a related associated
element you have to take the following steps.
Figure 62: Steps to follow for characterization of an element as an associated element.
Página 45 de 48
a) Category:
You can select the category that includes the element you want to
associate, by rolling smothly the wheel up or down.
b) Element :
Choose in the wheel the element you want to associate.
c) Add:
Click on the button <Add> in order to include the selected element.
Following this, a new window will be displayed for characterization of
another associated element. You have a maximal number of five
associated elements per image. Please, see figure 61.
d) Eliminate:
If you want to eliminate any of the associated elements click on
<Remove> and that element will disappear.
Página 46 de 48
Final remarks:
This is all. You now know how to personalize the e-Mintza application. We really wish
that it will be helpful for the user and we insist that this tool should be considered in the
context of a coherent comprehensive and functional support plan. In the web site for eMintza you will find some videos (In Spanish and Basque) with information on the
origin, the functionality and the handling of e-Mintza.
http://fundacionorange.es/emintza.html
If you have any suggestions, please include them when you fill the survey that you will
access in the web site where you downloaded the application. Your anonymous data
and your feedback are very important for all of us. Thank you very much!
Figure 63: Sending feedback.
Página 47 de 48
Acknowledgements:
Principal Investigator:
Joaquín Fuentes (Fundación Carlos Elósegui de Policlínica Gipuzkoa and Gautena)
Project Investigators:
Ane Basurco (Fundación Carlos Elósegui de Policlínica Gipuzkoa) [+
Blanca Villamía (Fundación Orange)
Fermín Sánchez (Nesplora)
Inge Lazkoz (Gautena)
Nerea Azpiazu (Fundación Carlos Elósegui de Policlínica Gipuzkoa)
Verónica Pensosi (Fundación Orange)
Project Management:
Arantxa Arozena (Fundación Dr. Carlos Elósegui de Policlínica Gipuzkoa)
Manuel Gimeno (Fundación Orange)
Teresa Serrano (Fundación Orange)
Public Relations and Communication:
Víctor Suárez (Fundación Orange)
Maintenance:
Fundación Orange
Ane Basurco has done the French translation and Joaquin Fuentes has done the English translation.
The e-Mintza team recognizes the generous contribution of people of different ages
that donated their voices and also, the support of families that have made this project
possible. As we say in Basque: Mila esker denori. Thank you very, very much!
www.fundacionorange.es
www.policlinicagipuzkoa.com
Página 48 de 48