1
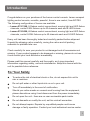
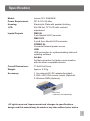
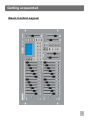
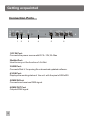
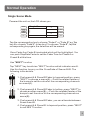
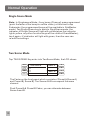
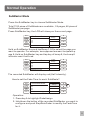
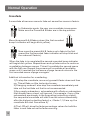
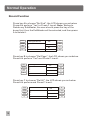
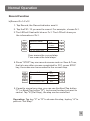
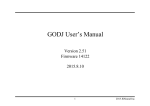
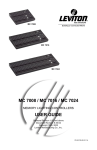
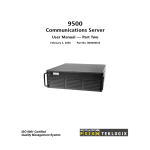
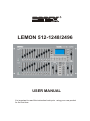
R
LEMON 512-1248/2496
USER MANUAL
It is important to read this instruction book prior using your new product
for the first time.
Table of Contents
Introduction ....................................................................... 1
For Your Safety ........................................................1
Notice Information ....................................................2
.
Specifications ....................................................................3
Getting Acquainted .......................................................4~8
Features ......................................................................... 4
Basic Control Layout....................................................... 5
Basic Control Parts.......................................................6~7
Connection Ports............................................................. 8
Normal Operation..........................................................9~27
Single Scene Mode..... ........................................................9~10
Next Function....................................................................10
Two Scene Mode..... ...............................................................10
SubMaster Mode..... ..........................................................11~16
Crossfade....................................................................12~16
Record Function................................................................12
Record SubMaster..................................................13~14
Record Fx1~F12.....................................................15~17
How to Edit a scene......................................................16
How to Trigger Fx.........................................................17
How to Delete Fx..........................................................17
ML(Moving Light)..... ...............................................................18
LED Mode..... ....................................................................19~22
Table of Contents
Mem Playback Mode..........................................................23~24
MENU..... ...........................................................................25~28
ASL Patch..........................................................................25
DMX Patch...................................................................26~27
1. Channel Patch...........................................................26
2. DMX Ptach..........................................................26~27
3. Default.......................................................................27
LCD Set..............................................................................27
Update Software................................................................28
Update Vga-P.....................................................................28
Rev1.00..............................................................................28
Introduction
Congratulations on your purchase of the Lemon control console. Lemon compact
lighting control console, versatile, powerful, three in one control, from BOTEX.
The following configuration of Lemon are available.
----Lemon 512-1248, 24 faders control conventional, moving light and LED fixture
channels, control 8 ML fixtures up to 40 channels each and 8 LED fixtures.
----Lemon 512-2496, 48 faders control conventional, moving light and LED fixture
channels, control 24 ML fixtures up to 40 channels each and 24 LED fixtures.
Every unit has been thoroughly tested and carefully packed before shipment.
Unpack the shipping carton carefully, saving the carton and all packing
materials for possible later use.
Check carefully for sure your product is not damaged and all accessories not
missing. If your product appears to be damaged or missing, please do not use
it and contact your local distributor immediately.
Please read this manual carefully and thoroughly, as it gives important
information regarding safety, use and maintenance. Keep this manual with the
unit for possible future reference.
For Your Safety
To reduce the risk of electrical shock or fire, do not expose this unit to
rain or moisture.
Do not spill water or other liquids into or on to your unit.
Turn off immediately in the event of malfunction.
Should you notice smoke or unusual smell coming from the equipment,
please discontinue using it and disconnect from the power immediately.
Do not open the unit - there are no user serviceable parts inside.
Do not dismantle or modify the unit, as this voids all warranties.
Do not attempt repairs. Repairs by unqualified people could cause
damage or faulty operation. Contact your local authorized service center.
1
Introduction
Notice Information
Keep dry
This product is not waterproof, and may malfunction if exposed to high levels of
humidity. Rusting of the internal mechanism can cause irreparable damage.
Do not drop
This product may malfunction if subjected to strong shocks or vibration.
Keep away from strong magnetic fields
Do not use or place this device in vicinity of equipment that generates strong
electromagnetic radiation or magnetic fields. Strong static charges or the magnetic
fields produces by equipment such as radio transmitters could interfere with the
display or affect the product's internal circuitry.
Cleaning
Due to fog residue, smoke, and dust cleaning the exterior of the case may become
necessary. Use normal glass cleaner and soft cloth to wipe down the outside casing.
Copyright Notice
No part of the manual included with this product may be reproduced, transmitted,
transcribed, stored in a retrieval system, or translated into any language in any form,
by any means, without authorized written permission.
2
Specification
Model:
Lemon 512-1248/2496
Power Requirement:
Housing:
LCD:
DC 9~12V 2A Max
Electrolytic Plate with powder finishing
60x128 dot, TFT LCD with contrast
adjustment
Inputs/Outputs
DMX IN:
3 pin Neutrik XLR Connector
DMX OUT:
3 pin& 5-pin Neutrik XLR connector
POWER IN:
Connects External power source
USB:
USB connection for up/downloading data and
updating software
Art-Net:
Art-Net connection for faster communication
with the other compatible devices
Overall Dimensions:
71.8x26.5x6.5mm
Weight:
Approx. 6.5 Kg
Accessory:
1. An external AC~DC adaptor(Included) ;
2. 800 x 600 VGA monitor output (Optional)
3. Wireless DMX (Optional)
VGA Card
---optional, sold separately
All rights reserved. Improvement and changes to specifications,
design and this manual may be made at any time without prior notice.
3
Getting acquainted
Principle Features
Professional DMX512 console, ideal for conventional lights,
moving lights and LED fixtures
Versatile, powerful, three in one control
LCD display for easy operation with contrast adjustment
USB port for uploading/downloading data or updating software
Artnet port for faster communication with compatible device
DMX IN allows 3 pin XLR connector to connect external console
DMX output accepts two group DMX512 3 pin & 5 pin XLR
connector from the dimmers or any other DMX device
Back lighting buttons changes color depending on their state
Grand Mater fader for total output control
1152 recordable scenes(24 pages x 48 scenes) in Sub Master
mode for conventional lights
24 faders(48 faders for Lemon 512-2496) control conventional,
moving light and LED fixture channels
Controls 8 ML fixtures(24 ML fixtures for Lemon 512-2496) up to
40 channels each.20 playbacks x 99 steps in Moving Light mode
Controls 8 LED(RGBA) fixtures(24 LED fixtures for Lemon 5122496) .20 playbacks x 99 steps in LED mode
12 built-in FX just records contents in Single Scene, Two Scene,
Sub Master modes to instead of contents in ML and LEDs. Each
FX has his individual Fade Time and Step Time, max 99 steps
for each FX.
Available in six operation modes: Single Scene, Two Scene,
Sub Master, Moving Light(ML), LED and Memory Playback
modes.
Blackout enables to shut all fixtures off
Memory Playback mode allows a combination of Sub Master,
LED and Moving Light playback
Power requirement of DC 9~12V 2A power supply
Wireless DMX (optional)
VGA (optional) allows for 800 x 600 monitor output
4
Getting acquainted
Basic Control Layout
5
Getting acquainted
Basic Control Parts
Key 1-48 & Key 49-96:
Used to Page up/down for fader.To choose Key 1-48 to master fader
1-48, to choose Key 49-96 to master fader 49-96.
Key 1,Key 2, Key 3,...Key48 :
Means Bump 1,Bump 2,Bump 3,...Bump48.
SingleScene :
Tap this key, the unit will work in SingleScene Mode .
TwoScene :
Tap this key, the unit will work in TwoScene Mode .
SubMaster :
Tap this key, the unit will work in SubMaster Mode .
ML(Moving Light) :
Tap this key, the unit will work in ML Mode .
PlayBack :
ap this key, the unit will work in PlayBack Mode .
NEXT :
Tap this key to process CrossFade for Scene AB under SingleScene
Mode.
Record :
Used to record Scene(SubMaster and Fx1-12).
EXT 1,EXT 2,...EXT 4 :
The key of on/off .
Key A,Key B ,Key C,Key D:
Soft key A,Soft key B,Soft key C, Soft key D.
Menu :
The key used to program each parameter .
FX :
Tap this key, the key Fx1-12 are available for FX mode.
6
Getting acquainted
Basic Control Parts
DmxBase :
Tap this key,the Chase 1-12 will be under the FX Mode .Maximum
of 99steps per chase, 12 chases can be running synchronously.
FD/ST TIME:
The Fader Time is available when the indicator is red. The Step
Time is available when the indicator is yellow.
STEP :
Manually run FX1-12.
GO/STOP :
Used to start or stop the running of FX1-12.
SOLO :
I t means bump 1-12 has Solo function or not.
FADERS
1.Fader1,Fader 2, Fader 3,..Fader48:
Means channel 1,channel 2, Channel 3,..Chanel 48. If you choose Key 49-96,
it means Channel 49-96.
2.Preset A and Preset B:
The control fader of scene Preset A and PresetB .
3.Flash Level:
The value of Bump key output.
4.Step Rate:
It is used to set the running time for FX.
5.GrandMaster:
the master controller of DMX output.
7
Getting acquainted
Connection Ports
1
2
3
4
5
6
1.DC IN Port:
Connects the power source with DC 9~12V,2A Max
2ArtNet Port:
Used to carry out the function of Art-Net.
3.USB Port:
Connects Disk U for posing file or download updated software.
4.VGA Port:
Displays the working status of the unit with the pixel of 800x600.
5.DMX IN Port:
Connects and receives DMX signal.
6.DMX OUT Port
Outputs DMX signal
8
Normal Operation
Single Scene Mode
Powered the unit on,the LCD shows you
MENU
CLEAR
BUFFER
DMX
BASE
FX
Single Scene
01:
13:
25:
37:
Fader:xxx
Fade
A
A
B
Fade
B
C
D
Tap the corresponding key to choose "Fade A" or "Fade B",eg.Tap
key A to choose "Fade A" or tap key C to choose "Fade B", tap the
corresponding key again,the selection will be erased.
Once Fader A or Fader B is selected which will be highlighted. You
can push StepRate Fader to set the FaderTime for Preset A or
Preset B at this time.
Use "NEXT" function
Tap "NEXT" key to activise "NEXT" function which indicator was lit.
Use this function to carry out the CrossFade of Scene A & B. The
following is the details.
1: Push preset A & Preset B Fader to topmost position, press
"NEXT" to choose a scene(A)---Push the related feader of
the bumps to set the value for the corresponding channels
as scene(A).
2: Push preset A & Preset B Fader to bottom, press "NEXT" to
choose another scene(B)----Push the relatedd feader of the
bumps to set the value for the corresponding channels as
scene(B).
3: Push preset A & Preset B Fader, you can alternate between
Scene A and B.
4: Push preset A & Preset B to topmost position, press "NEXT"
to exit NEXT function .
9
Normal Operation
Single Scene Mode
Note: In Singlescene Mode, if any bump (Channel) was programmed
(push the fader of the bump to set the value), at this time to tap
Submaster, the programmed bump will be available in SubMaster
model. Tap Single Scene key to back to SinglScene mode, the
indicator of Single Scene will light with yellow(when the indicator
lights yellow, any other function keys will be void but GrandMaster) ,
tap it again, it's indicator will light with green, then the user can
re-edit the settings.
Two Scene Mode
Tap TWO SCENE Key enter into TwoScene Mode, the LCD shows
MENU
CLEAR
BUFFER
DMX
BASE
FX
Two Scene
01:
13:
25:
37:
Fader:xxx
Fader A
A
B
Fader B
C
D
The Fader on the front panel which consists of Preset A(Scene A)
and Preset B( Scene B).The Scene A & B correspond the same
channel.
Push Preset A & Preset B Fader, you can alternate between
Scene A and B.
10
Normal Operation
SubMaster Mode
Press the SubMaster key to choose SubMaster Mode.
Total 1152 piece of SubMaster are available, 24 pages, 48 piece of
SubMaster per page.
Press SubMaster key, the LCD will show you the current page.
MENU
CLEAR
BUFFER
DMX
BASE
FX
SubScene Mode
Fader
Assign
01:
13:
25:
37:
P:01
A
B
C
D
Record Sub
Hold on SubMaster Key and tap Bump 1-24 to select the page you
want to operate. For example, we supposed we want to operate p
age 8 :Hold on SubMaster key and tap key of bump 8, the bump 8
indicator was lit with red.
MENU
CLEAR
BUFFER
DMX
BASE
FX
SubScene Mode
Fader
Assign
A
01:
13:
25:
37:
B
SubMaster pg:08
D
C
The recorded SubMaster will display red (Half intensity).
How to set the Fade Time for each SubMaste?.
MENU
CLEAR
BUFFER
DMX
BASE
FX
SubScene Mode
Xx:
Xx:
Xx:
Xx:
SubMaster:xxx
Fader
Assign
A
B
C
pg:xx
D
Operation:
1: Press key A to highlight FadeAssign.
2: Hold down the button of the recorded SubMaster you want to
configure and push StepRate Fader to modify the FadeTime
for it.
11
Normal Operation
Crossfade
A crossfade allows one scene to fade out as another scene is fade in.
In Submaster mode, the user can crossfade in sequence.
Make sure the Preset A & B fader are in the top position.
Move the preset A & B faders down (the first recorded
bump's indicator will begin blink yellow).
Now move the preset A & B faders up to fade in the first
scene(the first recorded fader indicator will stop blink and
the scene will fade in) .
When the fade in is completed the second recorded bump indicator
will begin blink yellow. Repeat down and up fader action to continue
crossfading between scenes. This will crossfade the second scene
with the first one. Repeat the process will crossfade all available
scene until it reaches the last scene of page two and returns to the
first recorded scene of page one again.
Additinal information for crossfading.
1)To stop the crossfade, move only preset A fader down and then
up. This willfade out the last output scene .
2)Changing mode will also stop the crossfade immediately and
take out the last fade out that is not recommended.
3)Any empty submasters, submasters with effects or submasters
that already have a level, will ignored. For example, if any of the
submasters are already in the up position(outputting a level),
the sequential crossfade will start from the scene immediately
after the highest outputting fader(i.e, if fader 1,3,5 are up, the
crossfade will start from scene 6).
4)The LCD will show the fader percentage values for both the
fader in and fade out as the fade occurring.
12
Normal Operation
Record Function
a)Record SubMaster
1: Tap Record Key to light Record indicator. Among Bump 1-48,
the indicators of those blank bumps will flash, and the indicators
of those recorded Bumps will black out.
2: Push StepRate fader to set FadeTime for SubMaster.
3: To choose the one of the Bump1-48 to record the current output
Scene and FadeTime into this Bump. For example, we take the
Bump 34 as an instruction.
Tap Record key, the LCD shows you
MENU
CLEAR
BUFFER
DMX
BASE
Record SubMaster
01:
13:
25:
37:
Pg08 Record sub
FX
Del
Sub
Del
Page
Del
All
Exit
A
B
C
D
Tap the key of bump 34, the unit records the current output Scene
and FadeTime into bump 34 .
MENU
CLEAR
BUFFER
DMX
BASE
FX
Record SubMaster
01:
13:
25:
37:
Del
Sub
Del
Page
Del
All
A
Exit
D
B
C
Repeat the above step for the next SubMaster Recording.
After recordation, the indicator of bump 34 will light red as well
and the button Record will black out .
Also, in Record Submaster mode, the user can select the
function of "Del Sub", "Del Page" and " Del All".
13
Normal Operation
Record Function
Press key A to choose "Del Sub", the LCD shows you as below.
Press A to perform "Yes" or Press C to exit. Note: Before to
Delete any SubMaster, the user should press the key of the
bump first, thus the SubMaster will be selected, and then press
A to delete it.
MENU
CLEAR
BUFFER
DMX
BASE
FX
Del Pg08 Subxx?
01:
13:
25:
37:
Yes
A
B
No
Pg08
C
D
Record Sub
Press key B to choose "Del Page", the LCD shows you as below.
Press A to perform "Yes" and Press C to exit.
MENU
CLEAR
BUFFER
DMX
BASE
FX
Del Pg:08 ?
01:
13:
25:
37:
Yes
A
B
No
Pg08
C
D
Record Sub
Press key C to choose "Del All", the LCD shows you as below.
Press A to perform and Press C to exit.
MENU
CLEAR
BUFFER
DMX
BASE
FX
14
Del All Sub ?
01:
13:
25:
37:
Pg08
Yes
A
B
No
Record Sub
C
D
Normal Operation
Record Function
b)Record Fx1~Fx12
1. Tap Record ,the Record indicator was lit.
2. Tap the FX1-12 you want to record. For example, choose Fx1.
3.The LED will flash with blue on Fx1. The LCD will show you
the information of Fx1.
MENU
CLEAR
BUFFER
DMX
BASE
FX
Record FxBase
01:
13:
25:
37:
FX: 01 Sxxx Txxx
Del
Step
Del
FxBase
A
Next
C
Back
D
B
Sxxx means the current step.
Txxx means the total steps.
4.Press "STEP" key can record a scene and run Sxxx & Txxx,
that is to say after a scene completed for FX1, press STEP
key, the scene can be recorded to the current step.
MENU
CLEAR
BUFFER
DMX
BASE
FX
Record FxBase
01:
13:
25:
37:
FX: 01 Sxxx Txxx
Del
Step
Del
FxBase
A
Next
C
Back
D
B
5.If want to cancel any step, you can use the Next(Tap button
"C") or Back(Tap button "D") to choose the step you want to
cancel. Tap "A"(Del Step), the step can be cancelled.
Operation: Tap key "C" or "D" to choose the step, tap key "A" to
perform "Del Step".
15
Normal Operation
Record Function
MENU
CLEAR
BUFFER
DMX
BASE
FX
Record FxBase
01:
13:
25:
37:
FX: 01 Sxxx Txxx
Del
Step
Del
FxBase
A
Next
C
Back
D
B
6.As the item 5 shows, if you want to insert a Scene before any
step, you can use the Next or Back to select the step you want
to insert a Scene before of it, tap STEP to insert the Scene
before the step.
7. How to adjust FadeTime and StepTime for FX?
Operation:Tap FD/ST time key, the indicator will be lit, the red
means FdTime and the yellow means StepTime. Push StepRate
fader to adjust the Fade/Step time.
Record FxBase
01:
13:
25:
37:
Fade Time:2.00
Del
Step
Del
FxBase
Record FxBase
Next
01:
13:
25:
37:
Back
Step Time: 7:00
The SD/ST TIME key is red.
Del
Step
Del
FxBase
Next
Back
The SD/ST TIME key is yellow.
8:Tap Fx1 again to complete FX posting.
9. Exit Record
Tap Record key to quit from the recording status.
How to edit a scene?
In Record Fx Mode, tap the key of the Fx(1~12), eg, tap Fx1, the
indicators of bump are flashing with red, push the fader of the
bumps you desire to edit, tap "FD/ST" key and push it's fader
or StepRate fader to set your value(Fade time and Step time),
tap STEP key to record the value to current step(eg. Step001),
to repeat the above process to set the value for the next step for
16
Normal Operation
Record Function
Fx1. After setting complete, Tap Fx1 again to record the value. In
terms of this method, the user can set the value for the other Fx.
MENU
CLEAR
BUFFER
DMX
BASE
FX
Record FxBase
01:
13:
25:
37:
FX: 01 S001 T001
Del
Step
Del
FxBase
A
Next
C
Back
D
B
How to trigger FX?
After the recording complete for a Fx(1~12), press the key of it,
it's indicator will be lit with red, tap it again, the indicator will
flash with yellow, tap GO/STOP key, it's indicator will blink red
and the unit will run as Runstep(sequence). To tap theisFx(1~12)
key, it's indicator will flash yellow, tap GO/STOP key, the chasing
will stop and the Fx(1-12) indicator will light with red.
Note: The total 12 chases can be running synchronously,
max. 99 steps per chase.
How to Delete FX?
In Record Fx mode ,as the following LCD shows, tap B to choose
Del FxBase, and then tap the key of the programmed Fx1~12.
The selected Fx can be deleted.
MENU
CLEAR
BUFFER
DMX
BASE
FX
Record FxBase
01:
13:
25:
37:
FX: 01 S001 T001
Del
Step
Del
FxBase
A
Next
C
Back
D
B
17
Normal Operation
ML Mode
Press the ML key to choose ML Mode which consisting of Focus,
Group, Attrib and Shape.
MENU
ML Mode
CLEAR
BUFFER
Group
DMX
BASE
FX
Focus
Attrib
Fade Time:24.0
Shape
A
B
C
D
Press button D to enter into "Shape" sub-mode".The LCD shows you
MENU
ML Shape
CLEAR
BUFFER
DMX
BASE
FX
Fade Time:24.0
Circle
CW
Circle
CCW
Figure
CW
Next
A
B
C
D
Press button D to enter into next page of "Shape" sub-mode. The LCD
shows you
MENU
ML Shape
CLEAR
BUFFER
DMX
BASE
FX
MENU
Fade Time:24.0
ML Shape
CLEAR
BUFFER
DMX
BASE
FX
Fade Time:24.0
Figure
CCW
Pan
Fan CW
Pan
FanCCW
Next
A
Tilt
Fan CW
Tilt
Fan CCW
Remove
Shape
Back
A
B
C
D
B
C
D
At this time, the user can tap the button(A,B, C) to perform the related
function.
MENU
Circle CW
CLEAR
BUFFER
DMX
BASE
FX
18
Master:xxx
Radius
Up
Radius
Down
A
Speed
C
Run
D
B
Normal Operation
LED Mode
Press the LED key to choose LED Mode.
MENU
LED MODE
CLEAR
BUFFER
Attrib
DMX
BASE
FX
Group
Shape
A
B
C
D
Master: xxx
The user can choose the function want to perform.
Tap C to select the "Shape" function.The LCD shows
MENU
Led Shape
Rain
bow
A
CLEAR
BUFFER
B
DMX
BASE
C
FX
Solo: xxx
Exit.
Led Rainbow
Run
D
Tap A to choose Rain bow
MENU
CLEAR
BUFFER
DMX
BASE
FX
Solo: xxx
A
Stop
B
DirBy
Left
Speed
C
Fix
Patch
Asl
Patch
Edit
Group
Next.
A
Delete
A
List
Fix
Auto
DMX
B
Next
D
D
Tap MENU key, the LCD shows
MENU
Led Menu Mode
CLEAR
BUFFER
DMX
BASE
FX
MENU
Master: xxx
Led Menu Mode
CLEAR
BUFFER
DMX
BASE
FX
Master: xxx
B
C
D
C
19
Normal Operation
LED Mode
MENU
Led Menu Mode
Modify
PlaBK
A
CLEAR
BUFFER
B
DMX
BASE
C
FX
Master: xxx
Back
D
The function "Fix Patch" and "Asl Patch" are available only when a
USB is insert into the unit. Otherwise the LCD will show you
MENU
USB not ready!!
A
CLEAR
BUFFER
B
DMX
BASE
FX
C
Solo: xxx
Exit
D
Once a USB is insert into the unit, to select function" Fix Patch", the
LCD will show you
MENU
CLEAR
BUFFER
DMX
BASE
FX
Red xx Fixture
01:xx
02:xx
03:xx
04:xx
Back
A
Next
B
More
C
Exter
D
Total:xx
Master: xxx
Press "A" to perform "Back"
Press "B" to perform "Next"
Press "C" to perform "more" to view the more fixture
Press "D" to perform "Exter", the LCD will enter
into another page
MENU
CLEAR
BUFFER
DMX
BASE
FX
20
Fixture Patch
Other
Fix
Pat-Bandc
To DMX[001]
Preset Swop To
Make Patch
Master: xxx
A
B
C
Exit
D
Normal Operation
LED Mode
To choose the function "Asl Patch", the LCD will show you
MENU
CLEAR
BUFFER
DMX
BASE
Asl Patch
UP
A
Start
Down
B
Dim: xxx > xxx
Led: xxx
xxx
ML: xxx
xxx
Used Solo Fader
A: 000
FX
Press
Press
Press
Press
Press
End
T:-----
C
>
Enter
D
"A" to increase the figure
"B" to decrease the figure
"C" to move ">"
"D" to perform "Enter" for confirmation
"Menu" to cancel
If the user choose the function "Edit Group", at this time the bump
1~12 will blink and the LCD will show you
MENU
CLEAR
BUFFER
DMX
BASE
FX
Edit group
A
Record Group
Select a bump
as a group
Solo: xxx
B
C
Exit
D
The user can press a bump from 1~12 to make it as a group. To
repeat this step to set the more groups.
To choose the function "Delete", the LCD will show you
MENU
Delete Menu
CLEAR
BUFFER
Delete
Fix
Delete
Chase
DMX
BASE
FX
A
B
C
Master: xxx
Exit
D
The user now can choose "Delete Fix" or "Delete Chase", and
then to choose "Delete One" or "Delete All".
MENU
Delete Menu
CLEAR
BUFFER
Delete
One
Delete
All
DMX
BASE
FX
A
B
C
Master: xxx
Exit
D
21
Normal Operation
LED Mode
To choose the function "List Fix", the LCD will show you the devices
status.
MENU
CLEAR
BUFFER
DMX
BASE
FX
Patch By Hanle
A
Num Device Dmx
01:<Empty>
02:<Empty>
03:<Empty>
04:<Empty>
Fade Time: xxx
B
C
More
D
Tap D to learn more devices or tap MENU to exit.
To choose the function "Auto Dmx", the unit will auto patch DMX.
MENU
Auto Patch Dmx
Yes
CLEAR
BUFFER
B
DMX
BASE
FX
A
No
Fade Time: xxx
C
D
If the user choose the function "Modify PlayBK", the LCD will show you
MENU
Modify
PalyBk
A
B
DMX
BASE
C
FX
22
Hit a Playbck
CLEAR
BUFFER
Master: xxx
Back
D
Normal Operation
Mem Playback Mode
Press the MEM PLAYBACK Key, the unit will transfer to Mem Playback
Mode from the current working mode such as Single Scene,Two Scene,
Submastter Scene, ML and LED.
MENU
CLEAR
BUFFER
DMX
BASE
Single Scene
01:
13:
25:
37:
Fade
A
B
Fade
B
Fader:xxx
FX
MENU
CLEAR
BUFFER
DMX
BASE
FX
A
Single Scene
C
D
Yes
A
B
Are You Sure
Into Playback?
No
C
D
Master: xxx
Tap A to choose "Yes", the unit will enter into Mem Playback Mode.
MENU
CLEAR
BUFFER
DMX
BASE
FX
Mem PlayBack
SubMaster Page:
[003]
Assign
Fade
Page
UP
Page
Down
A
B
C
D
Master: xxx
Tap C to choose "No", the unit will work as the current mode.
In Mem PlayBack mode, the user can tap A to highlight "Assign Fade",
tap B or C to select "page Up" or "Page Down" ,and then adjust the
related parameter.
MENU
CLEAR
BUFFER
DMX
BASE
FX
Mem PlayBack
SubMaster Page:
[003]
Master: xxx
Assign
Fade
Page
UP
Page
Down
A
B
C
D
23
Normal Operation
Mem Playback Mode
At this time, the user choose the another mode with pressing the
related button. The unit will indicate as below.
MENU
Mem PlayBack
CLEAR
BUFFER
Are You Sure
Exit<PLAYBACK?>
Into
<Single Scene>
DMX
BASE
FX
A:000 T:-----
Yes
A
B
No
C
D
Tap A to choose "Yes", the unit will go into the mode you desire to
enter.
Tap C to choose "No", the unit will work as the Mem Playback mode.
24
Normal Operation
MENU
Menu mode consists of the following related parameter.
1: ASL Patch
2: DmxPatch
3: LcdSet
4: Update Sw
5: Update Vga_p
6: REV 1.00
Menu
MENU
CLEAR
BUFFER
DMX
BASE
FX
P:01 Select 1-24
ASL
Patch
Dmx
Patch
A
LcdSet
C
Next
D
B
Press "D" to perform "Next" to
alternate between the two
pages.
Menu
MENU
CLEAR
BUFFER
DMX
BASE
FX
P:01 Select 1-24
Update
SW
Update
Vga_p
REV
1.00
A
Next
D
B
C
ASL Patch:
Used to set the DMX channel of Dimmer, LED and MI. The "Up" ,
"Down" and ">" are used to set related parameters.
MENU
CLEAR
BUFFER
DMX
BASE
FX
Asl Patch
UP
A
Start
Down
B
End
Dim: xxx > xxx
Led: xxx
xxx
ML: xxx
xxx
Used Solo Fader
A: 000
T:-----
>
Enter
C
D
25
Normal Operation
MENU
Press
Press
Press
Press
Press
"A" to increase the value
"B" to decrease the value
"C" to move ">"
"D" to perform "Enter" for cofirmation
"Menu" to cancel
DmxPatch
Used to set the corresponding configuration of Channel to DMX
and DMX to Channel.
1. ChanPatch
Used to set the setting of Channel to DMX. The SoftKey can
be used to configure the DMX of each Channel.
MENU
CLEAR
BUFFER
DMX
BASE
FX
address Patch
UP
A
Patch By Cha>01
Dimmer:
001 002
Down
B
A: 000
Enter
Press
Press
Press
Press
Press
T:-----
C
>
D
"A" to increase the value
"B" to decrease the value
"C" to move ">"
"D" to perform "Enter" for cofirmation
"Menu" to cancel
2. DmxPatch
Used to set the setting of DMX to Channel. The SoftKey can
be used to configure the Channel of each DMX .
MENU
CLEAR
BUFFER
address Patch
UP
A
Patch By Dimmer
D: > 001 C: 01
Down
B
DMX
BASE
FX
26
>
A: 000
T:-----
Enter
C
D
Normal Operation
MENU
Press
Press
Press
Press
Press
"A" to increase the value
"B" to decrease the value
"C" to move ">"
"D" to perform "Enter" for cofirmation
"Menu" to cancel
3. Default
Used to resume the initial settings.
MENU
Default Patch?
Yes
CLEAR
BUFFER
B
DMX
BASE
FX
A
No
A: 000
T:-----
C
D
Press "A" to perform "Yes"
Press "C" to perform "No"
LcdSet
Used to set the contrast and backlight brightness of the LCD.
MENU
CLEAR
BUFFER
DMX
BASE
FX
Lcd Contrast
Up
A
Contrast: > xx%
Light: High
Down
B
>
A: 000
T:-----
Enter
C
D
The contrast can be adjusted from 0~FL% and backlight brightness
can be adjusted as "High", "Middle" and "Low"
.
Press "A" to perform "UP"
Press "B" to perform "Down"
Press "C" to move ">"
Press "D" to perform "Enter"
Press "Menu" to cancel
27
Normal Operation
MENU
Update SoftWare
Used to update software.
The download file is saved in the path of \LM\BOOTLOAD.BIN
\LM\LEMON512.BIN
NOTICE: The path and name of file can not be changed.
MENU
CLEAR
BUFFER
DMX
BASE
FX
Update SoftWare
1: Insert USB
PASSWORD
[ ------ ]
A: 000
Yes
A
B
No
C
D
T:-----
1. Insert the disk U which saves the download files.
2. Input password:168168.
3. Press "A" to choose "yes".
4. After automatic updating, restart the unit.
Update Vga_p:
Used to update the vga and download the new pictures.
MENU
CLEAR
BUFFER
Update Picture
1:Insert USB
A
Next
DMX
BASE
FX
C
A: 000
T:-----
Exit
REV 1.00:
Shows the current soft ware version is 1.00.
28
B
D