1
User Manual
© 2000 - 2006 AJSystems.com Inc.
Oakville, Ontario, Canada
-- Version 6.0.6 -October 2006
OutBack Plus 6
© 2000 - 2006 AJSystems.com Inc.
All rights reserved. No parts of this work may be reproduced in any form or by any means - graphic, electronic, or
mechanical, including photocopying, recording, taping, or information storage and retrieval systems - without the
written permission of the publisher.
Products that are referred to in this document may be either trademarks and/or registered trademarks of the
respective owners. The publisher and the author make no claim to these trademarks.
While every precaution has been taken in the preparation of this document, the publisher and the author assume no
responsibility for errors or omissions, or for damages resulting from the use of information contained in this document
or from the use of programs and source code that may accompany it. In no event shall the publisher and the author be
liable for any loss of profit or any other commercial damage caused or alleged to have been caused directly or
indirectly by this document.
Windows, Windows 95, Windows 98, Windows NT, Windows 2000, XP are registered trademarks of
Microsoft Corporation. All other trademarks are property of their respective holders.
Contents
I
Table of Contents
Part I Introduction
1 Overview
4
................................................................................................................................... 4
2 Getting Started
................................................................................................................................... 5
3 The Main Window
................................................................................................................................... 6
Part II How To Make a Backup or Archive
7
1 Backup - Introduction
................................................................................................................................... 7
2 Backup - Step...................................................................................................................................
1
8
3 Backup - Step...................................................................................................................................
2
9
4 Backup - Step
...................................................................................................................................
3
11
5 Backup - Step
...................................................................................................................................
4
15
6 Backup - Internet
...................................................................................................................................
Explorer Data
17
7 Backup - FireFox
...................................................................................................................................
Browser Data
18
8 Backup - Personal
...................................................................................................................................
Groups
19
9 Backup - Personal
...................................................................................................................................
Folder Group
20
10 Backup - Personal
...................................................................................................................................
Files Group
22
Part III How to Restore from the Backup
24
1 Selecting the...................................................................................................................................
Restore Type
24
2 More about Restore
...................................................................................................................................
Types
25
3 Restore - All/Selected
...................................................................................................................................
Data
26
4 Restore - Search
...................................................................................................................................
Personal Folder Data
27
5 Restore - Import
...................................................................................................................................
Outlook Data Files
29
6 Restore Tips................................................................................................................................... 31
7 Migrating to ...................................................................................................................................
a new machine
32
Part IV Program Options
33
1 Program Options
...................................................................................................................................
- Introduction
33
2 Program Options
...................................................................................................................................
- Backup Logs
34
3 Program Options
...................................................................................................................................
- Compression
35
4 Program Options
...................................................................................................................................
- No Compress Items
36
5 Program Options
...................................................................................................................................
- Backup Folder
37
6 Program Options
...................................................................................................................................
- Multi-Part Files
38
7 Program Options
...................................................................................................................................
- Miscellaneous Settings
39
8 Program Options
...................................................................................................................................
- Jobs
41
Job Options -..........................................................................................................................................................
Folder, etc.
41
© 2000 - 2006 AJSystems.com Inc.
I
II
OutBack Plus 6
Job Options -..........................................................................................................................................................
Groups
42
Job Options -..........................................................................................................................................................
Password
42
Job Options -..........................................................................................................................................................
Purge
43
Job Options -..........................................................................................................................................................
Copy
43
Job Options -..........................................................................................................................................................
Shortcut
44
9 Program Options
...................................................................................................................................
- Restore Options
45
Part V Tools Menu
46
1 Tools Menu -...................................................................................................................................
Introduction
46
2 Tools - Find ...................................................................................................................................
Item in Tree
47
3 Tools - Set Backup
...................................................................................................................................
Reminder
48
4 Tools - Set Backup
...................................................................................................................................
Purge
49
5 Tools - Set Log
...................................................................................................................................
File Purge
50
6 Tools - Schedule
...................................................................................................................................
Backups
51
7 Tools - Close...................................................................................................................................
& Start Programs
54
8 Tools - Test Backup
...................................................................................................................................
File
56
Part VI Live Update and In Touch
57
1 Live Update ...................................................................................................................................
- Introduction
57
2 Live Update ...................................................................................................................................
- Operation
58
3 Live Update ...................................................................................................................................
- Options
59
4 In Touch
................................................................................................................................... 60
Part VII Backup Now!
61
1 Backup Now!................................................................................................................................... 61
Part VIII FAQ - Technical Details
62
1 Choosing Backup
...................................................................................................................................
Media
62
2 Safe Practices
................................................................................................................................... 63
3 Saving to CD's
...................................................................................................................................
and DVD's
64
4 Command Line
...................................................................................................................................
Parameters
65
Part IX Product Support
66
1 Product Support
...................................................................................................................................
- Contact Us
66
Part X Appendices - Troubleshooting
67
1 What are Jobs
...................................................................................................................................
- Why would I use Jobs?
67
2 "Contacts Moved
...................................................................................................................................
or Displayed..." Error Message
68
3 Error 503 - while
...................................................................................................................................
creating a backup
69
4 Error 507 - while
...................................................................................................................................
creating a backup
70
5 Windows and
...................................................................................................................................
Outlook Version Differences
71
6 Outlook File ...................................................................................................................................
Compatibility
73
7 Backup - Which
...................................................................................................................................
Outlook Files are Included
74
© 2000 - 2006 AJSystems.com Inc.
Contents
III
8 Microsoft Outlook
...................................................................................................................................
Data Files not found
75
9 Cautionary notes
...................................................................................................................................
regarding Ofline Storage Files (OST)
76
10 Outlook shortcuts
...................................................................................................................................
do not work
78
© 2000 - 2006 AJSystems.com Inc.
III
4
OutBack Plus 6
1
Introduction
1.1
Overview
The OutBack Plus utility is designed to make it easy to create a backup or archive file of your
Personal Folder Information from Microsoft Outlook™. If the Business Contact Manager add-in is
installed (an optional component for Outlook 2003 and 2007), the Business Contact Manager
Database will also be included in the backup.
You may use the resulting backup file, in conjunction with OutBack Plus, to easily restore your
Outlook data in event of a system failure, or to copy Outlook data from one machine to another.
Within Outlook, all of information (e-mail messages, tasks, journals, etc) is stored in Personal Folder
files (.pst files). In networked environments, you may also have Off-line Storage files (.ost files).
In addition to the 'pst" files, there are a number of other critical files. Each system will likely have a
different compliment of these support files. OutBack Plus will also backup any of the additional files
detected.
Outlook, Exchange, Windows 95,98,ME,NT,2000, and XP are a trademarks of Microsoft Corporation.
All other trademarks are property of their respective holders.
© 2000 - 2006 AJSystems.com Inc.
Introduction
1.2
Getting Started
We suggest that you start by looking at the sections in the following order:
Choosing Backup Media - Where to backup.
Safe Practices - Recommendations on how to keep your data safe.
The Main Window - The initial entry point to the program.
The Backup Function - Make a backup to see how it is done.
© 2000 - 2006 AJSystems.com Inc.
5
6
1.3
OutBack Plus 6
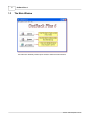
The Main Window
The main user interface provides quick access to the three main functions.
© 2000 - 2006 AJSystems.com Inc.
How To Make a Backup or Archive
2
How To Make a Backup or Archive
2.1
Backup - Introduction
7
The OutBack Plus - Backup function is performed by a "Wizard" type of interface using 4 steps:
Step 1 - Select the Groups of data to include in the Backup.
Step 2 - Select the Data Items to be included in the Backup.
Step 3 - Select a Backup Location.
Step 4 - Create the Backup.
© 2000 - 2006 AJSystems.com Inc.
8
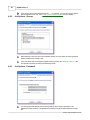
2.2
OutBack Plus 6
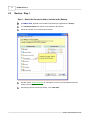
Backup - Step 1
Step 1 - Select the Groups of data to include in the Backup.
In OutBack Plus, the data to be included in the backup is organized into "Groups".
The "Standard Groups" are shown on the left side of the window.
Check the "Groups" to be included in the backup.
See the section "Personal Groups" for information on how to include additional files and
folders in the backup.
Once the groups are selected (checked) - click "Next Step"
© 2000 - 2006 AJSystems.com Inc.
How To Make a Backup or Archive
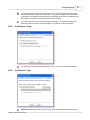
2.3
9
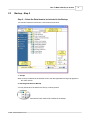
Backup - Step 2
Step 2 -- Select the Data Items to be included in the Backup.
The selection window is divided into 5 main areas and functions:
1. Groups
When a Group is selected in the leftmost column, the data applicable to that group appears in
the center column.
2. Selecting Data Items to Backup
You may include all of the data for the Group, or select portions:
Items with a Check mark will be included in the backup.
© 2000 - 2006 AJSystems.com Inc.
10
OutBack Plus 6
The green square will be solid green only if all of the items in a folder are
selected (checked).
If no items are selected in a folder - the square will be empty.
3. Quick Select Functions
The "Select All" and "Clear All" buttons may be used to select (or clear)
all of the items in the current Data Group or in all Data Groups.
4. Status Information
The amount of data to save and other information is shown at the bottom.
5. Wizard Functions
When all desired items in all groups are selected, choose 'Next Step" to proceed to step 3.
© 2000 - 2006 AJSystems.com Inc.
How To Make a Backup or Archive
2.4
11
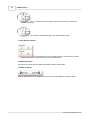
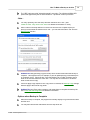
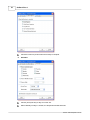
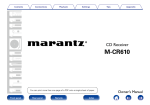
Backup - Step 3
Step 3 -- Select a Backup Location
The first time the program is run, you will be prompted to find the disk and folder which
you wish to use for the backups. This becomes the default location for the next backup.
Each time you make a backup, you may select a different location. If you select a new
location - this location will become the default for the next run.
Choose the location by clicking the "Browse" button.
The backup files will automatically be named with the "user name" and "date and time" as
a part of the file name.
You may remove the "date & time" via the Options menu.
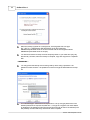
Multi-Part Files...
You may, optionally, create the backup file in multiple parts or segments which may then
be copied to a other media (e.g., Zip Disks). The image shows the setting to create a
multi-part file which will be copied to Zip100 disks (which really have a 95mb capacity).
See: Program Options - Mutli-Part Files for more information.
© 2000 - 2006 AJSystems.com Inc.
12
OutBack Plus 6
When the backup is saved as a multi-part set, each segment has a file type
like ".e02" (e.g., OBP6Backup.JIM.2005-09-28.16-43.o02 followed by
OBP6Backup.JIM.2005-09-28.16-43.o03 followed with the final segment named
OBP6Backup.JIM.2005-09-28.16-43.opz).
You would first save the backup to some temporary folder on your main drive (say "My
Documents") and then, when the backup is complete, copy each segment to a separate
disk.
Passwords...
You may protect the backup file from being read by others using a password. The
password is case sensitive. The password is used to encrypt the data within the backup
file.
The "Password type" selects the level of protection. The Zip 2.0 type password is a the
weakest protection but requires the least time. This type of encryption can resist attacks
by amateurs if the password is well chosen and long enough (at least 16 characters) but it
will probably not resist attacks by determined users or experts.
© 2000 - 2006 AJSystems.com Inc.
How To Make a Backup or Archive
13
The "AES" options provide "industrial strength" encryption. The 192bit and 256bit AES
options are approved by the US Government for "Top Secret" levels of protection.
Jobs...
You may, optionally, save the Group and Item selections as a "Job". [See
"What are Jobs - Why would I use Jobs?" for additional information on Jobs.]
Enter a name in the drop down box or select one from the box to update a prior job.
Once you have saved the selection as a "Job" - you can select the same "Job" from the
Backup Now! function.
OutBack Plus will (optionally) copy the backup file to another folder when the backup is
complete. This might be used, for example, to save an additional copy of the backup file
on a network server. Check the box "Copy the Backup File to Folder" and then enter a
folder in the text area below the check box. You may also click "Browse" to locate the
folder for the second copy.
If the box Apply Purge Options to the "copy folder" is checked, the Backup Purge settings
will also apply to the second copy folder.
OutBack Plus can Close other programs, and restart them to complete the backup Job.
See "Close and Start Programs" for additional information.
Options when Backup is Complete
When the backup is complete, the program will normally display a log of the actions taken
and then end.
You may also choose other alternatives from the drop down list:
© 2000 - 2006 AJSystems.com Inc.
14
OutBack Plus 6
Note: the Hibernate mode is only applicable if supported by your computer.
Passwords
You may protect the backup file from being read by others using a password by checking:
"Password Protect File":
Choose Backup Now to make the backup.
© 2000 - 2006 AJSystems.com Inc.
How To Make a Backup or Archive
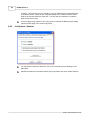
2.5
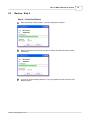
Backup - Step 4
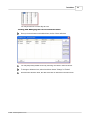
Step 4 -- Create the Backup
While the backup is being created, a window displays the progress:
After the all of the files are saved, the data is verified. (See Backup Options further
information).
A log file is created showing all activity. The log is displayed unless turned off in the
Backup Options.
© 2000 - 2006 AJSystems.com Inc.
15
16
OutBack Plus 6
© 2000 - 2006 AJSystems.com Inc.
How To Make a Backup or Archive
2.6
17
Backup - Internet Explorer Data
If Internet Explorer is found on your machine, OutBack Plus will also (if desired) make a
backup of the Internet Explorer Favorites, Cookies, Offline Web Folders, and critical
Internet Explorer settings.
Please note that many of the web sites that you visit will store information in the "cookies"
folder. Many people dislike cookies but they are quite helpful if you often visit a site which
relies upon them.
To backup the Internet Explorer data, check the items in the Internet Explorer data group.
© 2000 - 2006 AJSystems.com Inc.
18
2.7
OutBack Plus 6
Backup - FireFox Browser Data
OutBack Plus includes logic to backup and restore the data associated with the
"FireFox" web browser.
"FireFox" is often used in place of, or as an adjunct to, Internet Explorer.
To backup the FireFox data, check the items in the FireFox data group.
© 2000 - 2006 AJSystems.com Inc.
How To Make a Backup or Archive
2.8
19
Backup - Personal Groups
In addition to the data shown in the "Standard Groups", you may add any file(s) or folders
you wish to have included in the backup.
There are two types of "Personal Groups":
(1) Personal Folder Group -- to include a selected folder in the backup.
(2) Personal Files Group -- to include selected files in the backup.
The "Personal Groups" are created or modified at the first step of the backup using the
buttons:
The details for each type of "Group" follow in the next sections.
© 2000 - 2006 AJSystems.com Inc.
20
2.9
OutBack Plus 6
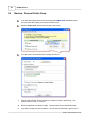
Backup - Personal Folder Group
If you have data folders which are not covered by the OutBack Plus "Standard Groups",
you may include the folder(s) as a "Personal Folder Group".
Select the "Add Folder" button at the first step of the backup:
The "Add Folder" wizard window (with 5 steps) will show as:
1.
Click the "Select Folder" button to browse for a folder to include in the backup. (The
example uses the folder "C:\Cassini\).
2.
Select any additional "conditions" to apply. "All sub folders" will be included by default.
3.
If you wish to change any of the conditions - click on the text underlined in green in box 3.
© 2000 - 2006 AJSystems.com Inc.
How To Make a Backup or Archive
21
You may also choose to show the Group in summary (i.e. not showing all items in the
folder). This will make the group load faster on large folder groups. (Note - the option may
not be available in all releases of OutBack Plus).
4.
Assign a "Name" to use for the group (the folder name will show by default).
5.
Assign a "Title" for the group.
When done, click "Apply" to save the definition.
The new "Personal Group" will show in the list of "Groups" available to backup.
© 2000 - 2006 AJSystems.com Inc.
22
2.10
OutBack Plus 6
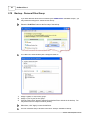
Backup - Personal Files Group
If you have data files which are not covered by the OutBack Plus "Standard Groups", you
may include the files(s) as a "Personal Files Group".
Select the "Add Files" button at the first step of the backup:
The "Add Files" wizard window (with 3 steps) will show as:
1.
2.
3.
Assign a "Name" to use for the "group".
Assign a "Title" to use for the "group".
Click the "Select Files" button to browse for and select files to include in the backup. You
may select files from multiple locations (folders).
When done, click "Apply" to save the definition.
The new "Personal Group" will show in the list of "Groups" available to backup.
© 2000 - 2006 AJSystems.com Inc.
How To Make a Backup or Archive
© 2000 - 2006 AJSystems.com Inc.
23
24
OutBack Plus 6
3
How to Restore from the Backup
3.1
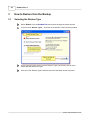
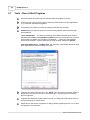
Selecting the Restore Type
Select "Restore" from the OutBack Plus main window to begin the restore process.
There are three "Restore Types" - as shown on the left side of the first restore window:
As you move the mouse cursor over the "Restore Types" (on the left), hints for each
restore type will show on the right.
Click one of the "Restore Types" and then select the "Next Step" button to proceed.
© 2000 - 2006 AJSystems.com Inc.
How to Restore from the Backup
3.2
25
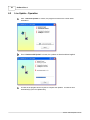
More about Restore Types
Restore All/Selected Data
This will restore all or selected data files and settings from the backup file.
You would use typically this type of restore:
when moving data files to a new machine
to recover accidentally deleted data file(s)
to recover from a system hardware failure
to copy data to/from a laptop for a trip
Note: the data restored from the backup file will replace the data currently on the
machine where the restore is done.
Search Personal Folder Data
This will restore selected Outlook Personal Data files from the backup file for review or
analysis.
Note: the Personal Folder data will not replace the currently in Outlook.
The restored data can be opened within Outlook without disturbing the existing data.
Additional Help will be shown after the data files are restored to assist with the operation
in Outlook.
Import Outlook Data Files
This will restore selected Outlook Personal Data files from the backup for Import into
Outlook.
You would use typically this type of restore:
when moving to Outlook 2003 or 2007 from any older version of Outlook
to merge Outlook data from the backup with the data currently in Outlook.
Additional Help will be shown after the data files are restored to assist with the operation
in Outlook.
© 2000 - 2006 AJSystems.com Inc.
26
3.3
OutBack Plus 6
Restore - All/Selected Data
Selecting a Backup File
OutBack Plus will retain the name and location of the last backup/archive done. You
may browse to restore from any backup or archive file.
Select Items to Restore
The items available in the backup file are shown on a list just as shown when they were
saved.
The date and time of the backup file are shown in the OutBack Plus title area for
reference.
Select the "Group" in the column on the left. (1 above).
Click on the check box beside the name for each Item which you wish to restore from the
backup (2 above).
Click the "Restore Now" button to do the Restore (3 above).
During the restore, the files and folders being restored will be shown to indicate that the
restore is progressing.
© 2000 - 2006 AJSystems.com Inc.
How to Restore from the Backup
3.4
27
Restore - Search Personal Folder Data
Selecting a Backup File
OutBack Plus will retain the name and location of the last backup/archive done. You
may browse to restore from any backup or archive file.
Select Items to Restore
The Outlook Personal Data items available in the backup file are shown.
Check the item(s) which you wish to reload to search.
Each selected (checked) item will be restored under a different name (as shown in the
status bar - see above) so as not to interfere with the data currently in Outlook.
Click the "Restore Now" button to restore the selected item(s).
OutBack Plus will reload the data item(s) from the backup and show a "Guide" window in
the upper right corner of the screen.
© 2000 - 2006 AJSystems.com Inc.
28
OutBack Plus 6
Follow the "Guide" to open the restored data item(s).
© 2000 - 2006 AJSystems.com Inc.
How to Restore from the Backup
3.5
29
Restore - Import Outlook Data Files
Selecting a Backup File
OutBack Plus will retain the name and location of the last backup/archive done. You
may browse to restore from any backup or archive file.
Select Items to Restore
The Outlook Personal Data items available in the backup file are shown.
Check the item(s) which you wish to reload for Import.
Each selected (checked) item will be restored under a different name (as shown in the
status bar - see above) so as not to interfere with the data currently in Outlook.
Click the "Restore Now" button to restore the selected item(s).
OutBack Plus will reload the data item(s) from the backup and show a "Guide" window in
the upper right corner of the screen.
© 2000 - 2006 AJSystems.com Inc.
30
OutBack Plus 6
Follow the "Guide" to import the restored data item(s).
© 2000 - 2006 AJSystems.com Inc.
How to Restore from the Backup
3.6
31
Restore Tips
As all Outlook data is stored in a single large data file (Personal Folder) you must take some
care when doing the restore otherwise you may get unexpected results. The restore
possibilities can be broken down into categories:
New install of Outlook or a damaged copy Outlook
This method would be used when Outlook is unused or unusable on the target machine.
You would typically use this method:
when moving to a new machine
after re-installing Outlook
after re-installing Windows
copying data from a desktop machine to a laptop for a trip
Follow the instructions under: "Restore - All/Selected Data".
Check ALL items to do a full restore.
Recover lost data
You would typically use this method when restoring data to recover accidentally deleted
messages.
Follow the instructions under "Restore - Search Personal Folder Data".
Merge Outlook data
You would typically use this method when restoring data from a laptop (after a trip) but
retaining the existing data.
Follow the instructions under: "Restore - Import Outlook Data Files".
Warnings on Restore (files in red)
OutBack Plus may show one or more personal files in red. This can be a result of:
A - There may be Personal Folders (PST files) in backup which are not yet in use on the target
copy of Outlook. This will happen most often when there are Archive Folders in the backup
and the backup is being restored to a new machine. The new install of outlook will not have an
Archive Folder set so the archive folder in the backup will not match.
In this case check the Archive Folder and restore it. Then, after the restore is complete, go to
the Outlook menu "File" - "Open Outlook Data File" to re-open the restored Archive Folder.
B - There may be file name mismatches due to variations in the way that Outlook is installed.
See: "Windows and Outlook Version Differences" for more information.
Restoring from an old version of Outlook to Outlook 2003 or 2007
Restore the older Outlook data files using the method described under "Restore Import Outlook Data Files"
© 2000 - 2006 AJSystems.com Inc.
32
3.7
OutBack Plus 6
Migrating to a new machine
Migration or transfer of Outlook data to a new machine can, at times, be difficult. If the new
machine is running the same version of Outlook as the old machine, then a "Full Restore" of
the Outlook data (The first restore option of OutBack Plus) is the usually all that is required.
If the new machine is running a newer version of Outlook than some items may not be
transferable. For example, if moving from Outlook 2000 to Outlook 2002, the email accounts
and message rules will not transfer. This is due to design differences in the versions of
Outlook - it is not a "bug" in OutBack Plus.
Special care must be taken when transferring to a machine running Outlook 2003 or 2007. If
the old machine has Outlook 2003 or 2007 that was installed as an upgrade of a prior version
of Outlook, it must be considered to be an older version of Outlook (as the data files will still be
in the older format even though Outlook 2003/2007 is installed. The "Full Restore" of Outlook
Personal Folders should only be done if you are sure that Outlook 2003 or 2007 was installed
(on the old machine) as a new copy of Outlook (i.e. it was not an upgrade).
To transfer Outlook data to machine running Outlook 2003 or 2007:
1.
2.
3.
Use the OutBack Plus restore option 1 (Restore All/Selected Data).
Locate the backup file to restore from.
Once the items available to be restored is shown check all Outlook items except the main
Outlook Personal Folder file (this is usually Outlook.pst). Do NOT restore the main
Outlook data file at this time.
4. Do "Restore Now".
5. Run OutBack Plus 5 again.
6. Select the restore option 3 (Import Outlook Data Files).
7. Locate the backup file to restore from.
8. Once the available Personal Folder files are shown, select the main Personal Folder
(usually Outlook.pst). Hint - when you hold the mouse cursor over an item in the list - the
name of the file is shown in the OutBack Plus status bar.
9. Check the main Personal Folder (the item not checked in step 3).
10. Do "Restore Now".
11. The Personal Folder will be restored with a unique name. The data in this file must be
imported into Outlook 2003 or 2007. OutBack Plus will show a Help window to guide you
through the import process.
See the AJSystems Knowledge Base ( http://ajsystems.com/kb/) for possible additional
information.
© 2000 - 2006 AJSystems.com Inc.
Program Options
4
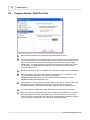
Program Options
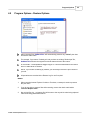
4.1
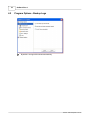
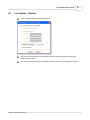
Program Options - Introduction
The Program Options are available via the menu "Options"
Select (click) an Item on the left of the Options Window
© 2000 - 2006 AJSystems.com Inc.
33
34
4.2
OutBack Plus 6
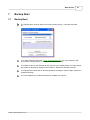
Program Options - Backup Logs
By default - the logs will be shown automatically.
© 2000 - 2006 AJSystems.com Inc.
Program Options
4.3
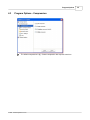
Program Options - Compression
The default compression is [6]. Greater compression also requires more time.
© 2000 - 2006 AJSystems.com Inc.
35
36
4.4
OutBack Plus 6
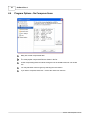
Program Options - No Compress Items
Many files contain compressed data.
The most popular compressed files are shown in the list.
Further compressing these files while storing them in the OutBack Plus file is of limited
use.
You may add other more file types by selecting the "Add" button.
If you wish to compress these files - remove the check from the item.
© 2000 - 2006 AJSystems.com Inc.
Program Options
4.5
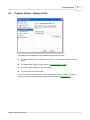
Program Options - Backup Folder
The backup folder is assigned using the first folder definition found from:
A:
The folder specified from the "Backup Now" button -- if the backup is started using this
button.
B:
The default folder assigned for the Job (see "Program Options - Jobs").
C:
The default folder assigned on this option page.
D:
The folder used for the last backup.
If none of the above provides a folder, you will be promoted to supply a folder. The folder
location may also be manually altered using the Browse button at Backup Step 3.
© 2000 - 2006 AJSystems.com Inc.
37
38
4.6
OutBack Plus 6
Program Options - Multi-Part Files
When possible, OutBack Plus will save the entire backup file as one file.
However, the device being used for the backup may not be able to accommodate the file
(e.g., insufficient space). In the simplest case, when a removable disk is being used, the
system may ask for a second disk (and perhaps more) to allow the backup to "span"
multiple disks. If your drive supports a "span" then check the box to enable the creation
of a "spanned" file. Note: when using this option, the drive label will be modified to
identify the spanned file.
Not all devices allow a "span" so OutBack Plus can split the backup file into multiple parts.
When the backup is saved as a multi-part set, each segment has a file type like ".o02"
(e.g., OBP6Backup.AEP.2005-09-28.16-43.e02 followed by
OBP6Backup.AEP.2005-09-28.16-43.o03 followed with the final segment named
OBP6Backup.AEP.2005.09-28.16-43.opz).
As an example, to save the backup in multiple parts to be copied to 100mb zip disks, set
the option to create multiple parts of 95mb (as a 100mb zip disk can really only
accommodate 95mb). Once the backup is done, copy each part to a separate disk.
To restore data from a Multi-Part backup, all "parts" must reside in the same folder.
Multi-Part backups are particularly useful when saving very large backups (i.e. a backup
larger than 4gb) to a disk that is formatted with the FAT32 file system. The FAT32 file
system will allow a maximum file size of 4gb but a huge backup can be saved to this type
of disk if saved in multiple parts with each part not exceeding 4000Mb.
© 2000 - 2006 AJSystems.com Inc.
Program Options
4.7
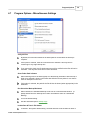
39
Program Options - Miscellaneous Settings
Verify All Files
By default, all of the files included in the backup will be verified when the backup is
complete.
If this option is checked, each file is extracted to be validated. This may be time
consuming for very large backup files.
If you remove the check, the file backup structure will be verified but the files will not be
extracted. This may save some time in some situations.
Show Folder Path in Status
When selecting files for the backup (Step 2 of the backup) information about the file or
folder to be selected is shown in the status bar while the mouse pointer is over the file
name or description in the "tree".
If this option is selected, the path for the file will also be shown (when appropriate) in the
status bar.
Run Scheduled Backup Minimized
When checked, the Scheduled Backup will be run as a minimized task window. (A
backup started from the "Backup Now" button is treated the same as a Scheduled
Backup).
This is the default setting.
See the associated option: Backup Logs
Include Date & Time in File Names
If checked - the system default setting - the date and time will be included in name of
© 2000 - 2006 AJSystems.com Inc.
40
OutBack Plus 6
each backup file.
For example, the file name would look like:
OBP6Backup.JIM.2005-05-10.16-16.opz
The backup file above would have been made on May 10, 2005 at 4:16 pm for user
name: Jim.
If not checked, the backup file would be named like:
OBP6Backup.JIM.opz
If the file name does not include the date and time, a new backup will replace any prior
backup of the same name in the same target folder. In some cases this may be
desirable. However, note that this will mean that you have only one copy of the backup. If
that copy is damaged or lost - you will not have any backup protection.
Start Outlook when Backup is Complete
Use this option if you wish to automatically start Outlook when the backup has finished.
Show File Icons
The list of items to backup or restore will normally show the icon associated with a
particular file (item). If this option is unchecked - the file icons will not show. The display
of large lists if files is much faster if the icons are not shown. Note: changing this setting
does not affect a list that is already showing.
Do "My Documents" in Summary
If this option is checked, the items from "My Documents" will not be shown in detail in the
list of items to backup. This will make the backup list load much quicker in cases where
there are a large number of items in "My Documents". (Note - the option may not be
available in all releases of OutBack Plus).
This option also applies to the "My Pictures" and "My Music" folders.
Do not include OutBack Plus files in the Backup
If checked, OutBack Plus Backup files (opz files) will automatically be omitted. This is
useful if you happen to save the backups in "My Documents" and wish to save that folder.
© 2000 - 2006 AJSystems.com Inc.
Program Options
4.8
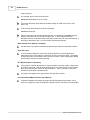
41
Program Options - Jobs
See the FAQ "What are Jobs - Why would I use Jobs" for more information.
You may set a number of options for each "Job". The "Job Options" mirror the general
system options.
The "Job Options" are described in more detail below:
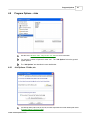
4.8.1
Job Options - Folder, etc.
If a backup folder path is set for the Job, this will supersede the overall default path set at
[Program Options - Backup Folder]
© 2000 - 2006 AJSystems.com Inc.
42
OutBack Plus 6
If the "Use custom Close and Start options ......" is checked, you may set "Close" options
that are specific to the Job, See Tools - Close & Start Programs for more details.
4.8.2
Job Options - Groups
When defining a new Job (as in the Schedule Setup) you may select the major groups of
data to include in the backup "Job".
If the Job name was set during the regular backup process (see "Backup - Step 3" ), the
Groups will have been set during the backup process.
4.8.3
Job Options - Password
You may protect the backup file from being read by others using a password. The
password is case sensitive. The password is used to encrypt the data within the backup
file.
© 2000 - 2006 AJSystems.com Inc.
Program Options
43
The "Password type" selects the level of protection. The Zip 2.0 type password is a the
weakest protection but requires the least time. This type of encryption can resist attacks
by amateurs if the password is well chosen and long enough (at least 16 characters) but it
will probably not resist attacks by determined users or experts.
The "AES" options provide "industrial strength" encryption. The 192bit and 256bit AES
options are approved by the US Government for "Top Secret" levels of protection.
4.8.4
Job Options - Purge
You may set a purge option specifically for the "Job", or use the overall system setting.
4.8.5
Job Options - Copy
OutBack Plus will (optionally) copy the backup file to another folder when the backup is
© 2000 - 2006 AJSystems.com Inc.
44
OutBack Plus 6
complete. This might be used, for example, to save an additional copy of the backup file
on a network server. Check the box "Copy the Backup File to Folder" and then enter a
folder in the text area below the check box. You may also click "Browse" to locate the
folder for the second copy.
If the box Apply Purge Options to the "copy folder" is checked, the Backup Purge setting
(above) will also apply to the second copy folder.
4.8.6
Job Options - Shortcut
You may create a shortcut to allow the "Job" to be run directly from the Desktop or the
Start Menu.
Select the location for the shortcut and the style of operation, then click "Create Shortcut".
© 2000 - 2006 AJSystems.com Inc.
Program Options
4.9
45
Program Options - Restore Options
When restoring files, OutBack Plus will automatically preserve any "critical" prior data
file with the same name.
For example, if you restore "Outlook.pst" and you have an existing "Outlook.pst" file,
OutBack Plus will save the original file with the date and time of the restore.
In more detail -- Outlook[2005-04-03@10:22].pst is a file that existed before the restore
done on 2005-04-03 at 10:22am.
Hence, if you restore something by mistake, you can always recover the prior version of
your file.
All operations are recorded in the Restore Log for use if required.
Notes:
1.
When restoring Internet Explorer Cookies or Favorites, no attempt is made to preserve
the prior data.
2.
If you do not wish to preserve files while restoring, remove the check mark beside
"Preserve Replace Files".
3.
Non-critical files (e.g., a signature file) will be sent to the recycle bin when being replaced
rather than being preserved as above.
© 2000 - 2006 AJSystems.com Inc.
46
OutBack Plus 6
5
Tools Menu
5.1
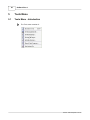
Tools Menu - Introduction
The Tools menu consists of:
© 2000 - 2006 AJSystems.com Inc.
Tools Menu
5.2
47
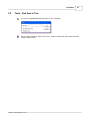
Tools - Find Item in Tree
The "find" is available while the main folder "Tree" is showing.
This is used to search for any file in the Tree. It will be of particular use to those that have
a large number of files.
© 2000 - 2006 AJSystems.com Inc.
48
5.3
OutBack Plus 6
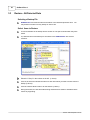
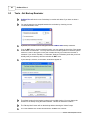
Tools - Set Backup Reminder
OutBack Plus will check to see if a backup is overdue and advise if you have not done a
backup.
You may change the time elapsed between the reminders by choosing menus:
"Tools\Set Reminder Time".
By default, the reminder is done using the internal OutBack Plus Backup scheduler.
If you do NOT wish to use the schedule function, you may enable the check box "Use startup
in Start Menu for Reminder". You may wish to do this on older systems to conserve system
resources. Note: if this option is used, the reminder will only occur when the machine is
restarted. If you use the "Standby: or "Hibernate" features of Windows (such that you do not
actually start your machine), then the reminder will NOT occur
If your backup is overdue, a "Reminder" window will appear as:
The default location for the backup is shown in the middle window. You may change the
location for the backup using the button labelled: "Browse for Alternate Location".
The "Backup Now" button will run the backup without showing the "wizard" steps.
The "Run OutBack Plus" button will launch the OutBack Plus "wizard".
© 2000 - 2006 AJSystems.com Inc.
Tools Menu
5.4
49
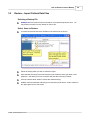
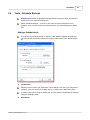
Tools - Set Backup Purge
OutBack Plus will retain the location of the previous backup file.
If you always save the backups to the same physical disk, (e.g., a network disk drive), the
disk space used will continue to increase unless you delete the older backup files.
OutBack Plus will, optionally, delete old backup files found at the same location.
The "Set Backup Purge" option is available from the menu "Tools"
AFTER the current backup is completed successful, OutBack Plus will check to see how
many backup files are present at the same location.
If there are more files that specified in the option list, OutBack Plus will delete the oldest
ones leaving only the requested number of files.
The automatic purge is only done after the current backup is completed. Hence, you
require enough space on the backup medium to accommodate the new file before the old
one(s) are deleted
© 2000 - 2006 AJSystems.com Inc.
50
5.5
OutBack Plus 6
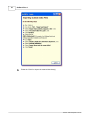
Tools - Set Log File Purge
OutBack Plus will retain backup logs for each backup.
OutBack Plus will, optionally, delete old log files found in the standard data history folder.
The "Set Log File Purge" option is available from the Tools menu.
The purge of log files is done only after the current backup is successfully completed.
© 2000 - 2006 AJSystems.com Inc.
Tools Menu
5.6
51
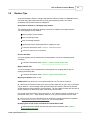
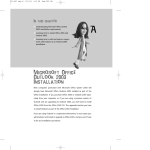
Tools - Schedule Backups
OutBack Plus includes an integrated scheduler which provides the ability to schedule a
backup to be run at a pre-determined time.
Select "Schedule Backups..." from the "Tools" menu to add or change item in the
schedule. If you have not created any scheduled items, you will be prompted to add an
item.
Adding a Scheduled Job
The first time the schedule function is used, the "Add" wizard will appear automatically.
You may also add a new scheduled event using the "Add" button on the Scheduled job
list.
A.
Job Selection
Select the source for the "Job" information. When adding a new event, you may elect to
(a) define a new Job, (b) use an existing Job, or (c) simply run the last backup again.
If creating a new Job or using an existing Job, you may define or update the Job Settings
(using the "Settings" button.
B.
End Options
© 2000 - 2006 AJSystems.com Inc.
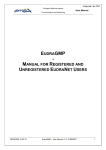
52
OutBack Plus 6
Choose the action to perform when the backup is complete.
C.
Schedule
Choose (check) the day or days to run the Job.
When "Monthly on Days" is chosen, the drop-down window shows as:
© 2000 - 2006 AJSystems.com Inc.
Tools Menu
You may choose one or more days at once.
Viewing and Managing the List of Scheduled Items
Once you have at least one scheduled item, the list of items will show.
You may temporarily disable an item by removing the check in the first column.
To change or delete an item, select it and then choose "Change" or "Delete"
Once the item has been done, the date of the last run will show in the last column.
© 2000 - 2006 AJSystems.com Inc.
53
54
5.7
OutBack Plus 6
Tools - Close & Start Programs
Microsoft Outlook will exclusively lock data files while the program is running.
Outlook may be running even though not visible to provide services to other applications
(e.g., Palm Pilot Synchronize programs).
It is generally not possible to include exclusively locked files in the backup.
OutBack Plus provides two options to circumvent the problems associated with open
and locked files:
"Open File Manager" -- The Open File manager is an optional windows driver module
which will allow OutBack Plus to produce a reliable copy of any file which in-use or locked.
If this module is installed, the "Use Open File Manager....." check box (see illustration
below) will be enabled. If checked (the default), then the other settings are ignored.
Auto Close Applications -- OutBack Plus will, optionally, automatically attempt to close
other applications to allow the backup to proceed.
Programs are closed if checked in the list. NOTE: If you do not have a program shown in
the list there is no need to remove or uncheck the item. If the program is not running the item is ignored.
Programs are closed in the order shown in the list. To change the order, select and item
and click "Move Up" or "Move Down".
Select an Item and choose "Properties" to change details regarding the Item. Or, to add a
new program, click "Add Item"
© 2000 - 2006 AJSystems.com Inc.
Tools Menu
55
If "Close" and/or "Kill" boxes are checked, OutBack Plus will request that the application
"Close". You may enter a time delay (in seconds) that OutBack Plus is to wait for the
program to close.
In some cases, a program will not "Close". This will typically happen if the program is
waiting for input (e.g. waiting with a message "Save changes Y/N ?"). To close the
program without waiting for any response select "Kill" as well. Note: killing a program can
lead to loss of data (e.g. if the program is waiting for input). (See "Open File Manager"
above for a practical solution to this dilemma).
If the "Start" box is checked, OutBack Plus will start the program after the backup is
completed. The program will only be started if it was closed by OutBack Plus unless you
check the ["Start" even if the program was nor previously running] box.
If you wish to start a program that is not normally running - you should provide the path to
the program in the box labelled "EXE Path". This is NOT required for standard programs
like Outlook.
The program may be restarted with parameters. Parameters containing blanks must be
enclosed in quotes ("). Separate multiple parameters with blanks.
If the "Run" box is checked, OutBack Plus will run the program (under "EXE Name") with
parameters (optional) before beginning the backup. If the program ("EXE Name") is not
registered in the system, you must provide the path to the program in the box labelled
"EXE Path".
When using the "Run" option, you have the option to wait until the task has completed. Do
not use this setting for tasks that may not complete.
When adding a new program, you must enter the actual program exe name under "EXE
Name".
© 2000 - 2006 AJSystems.com Inc.
56
5.8
OutBack Plus 6
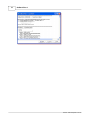
Tools - Test Backup File
The "Test Backup" function will perform a detailed test of the backup file.
The function operates as follows:
1.
Select "Test Backup" from the menu
2.
Browse to find the backup file to test
3.
A progress window will be shown while the file is being tested.
4.
If errors are found, a log will show providing details of the problems.
The "Test" will typically show:
© 2000 - 2006 AJSystems.com Inc.
Live Update and In Touch
6
Live Update and In Touch
6.1
Live Update - Introduction
57
OutBack Plus is updated to add features and correct any deficiencies reported.
The Live Update function allows you to retrieve the current update(s) via the Internet.
An Internet connection is, of course, required for this function but the connection is NOT
required for the general day-to-day operation of OutBack Plus.
The main Live Update window appears as:
Click "Check for Updates" to initiate the "Live Update"
Click "In Touch" to fetch current information of OutBack Plus.
Click "Options" for the Live Update Options
© 2000 - 2006 AJSystems.com Inc.
58
6.2
OutBack Plus 6
Live Update - Operation
After "Check for Updates" is chosen, the program will retrieve the current status
information:
Once "Continue with Update" is chosen, the updates are downloaded and applied.
A restart of the program will be required to complete the updates. This will be done
automatically by the Live Update utility.
© 2000 - 2006 AJSystems.com Inc.
Live Update and In Touch
6.3
59
Live Update - Options
The Live Update Options window appears as:
If a Proxy Server is required to access the Internet, enter the parameters in the upper
portion of this window.
You will be reminded to check for updates unless you set the "Do not remind me" option.
© 2000 - 2006 AJSystems.com Inc.
60
6.4
OutBack Plus 6
In Touch
The In Touch window will fetch and index of current product information available from
AJSystems.com
Browse down the list (click the [+] to expand items) and click on any item of interest to
display more information.
© 2000 - 2006 AJSystems.com Inc.
Backup Now!
7
Backup Now!
7.1
Backup Now!
61
The "Backup Now!" function allows you to start a backup quickly. It will show a window
as:
If you have Scheduled Jobs (See "Tools - Schedule Backups"), you may choose the "job"
to run from the drop-down list; or, choose to redo the last backup.
The default location for the selected backup is shown in the middle window. You may change
the location for the backup using the button labelled: "Browse for Alternate Location".
The "Backup Now" button will run the backup without showing the "wizard" steps (similar to a
scheduled backup).
The "Run OutBack Plus" button will launch the OutBack Plus "wizard".
© 2000 - 2006 AJSystems.com Inc.
62
OutBack Plus 6
8
FAQ - Technical Details
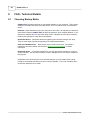
8.1
Choosing Backup Media
OutBack Plus will make a backup on most media available on your computer. This includes
diskettes, removable disk drives, fixed disk drives, CD-R / CD-RW devices, and networked
drives.
Diskettes - While diskettes may be used, they are far from ideal. The capacity of a diskette is
quite limited. However OutBack Plus will allow the backup to 'span' multiple diskettes. In our
experience, diskettes fail more often than other media. It appears as if the failure is directly
related to the importance of the data on the diskette.
Removable Drives - Removable drives are typified by the venerable Iomega "ZIP" drive.
They are much larger capacity and typically more reliable than diskettes.
CD-R and CD-RW Devices - Most modern PC's include a CD-R drive. The media is
inexpensive and quite reliable. See the notes "Saving to CD's and DVD's" for further
information.
Networked Drives - If you have multiple PC's you may also save the backup to a drive on
another machine. We recommend that you create a mapped drive to the remote machine for
this purpose.
Regardless of the media chosen, we recommend that you try to use media which is large
enough to accomodate the backup file in it's entirety if possible. This is not mandatory but it
does make operations much easier.
© 2000 - 2006 AJSystems.com Inc.
FAQ - Technical Details
8.2
63
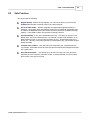
Safe Practices
We recommend the following:
Regular Backup - Make a backup regularly. You never know when you will need one.
OutBack Plus includes a reminder function for just this purpose.
Use removable media - Modern computers are supplied with high speed USD 2.0
interfaces. Large disks drives with USB 2.0 interfaces are available at reasonable costs.
In addition, the USB flash drives (also known as memory sticks) are available with large
capacity. These USB 2.0 disks are excellent for backup purposes.
Cycle the Backup - If you use re-recordable media (e.g., a zip disk) do not rely on one
backup disk. Use a set of backup disks. For example, use three sets (labelled A, B, C).
Make a backup on set A , then on set B, and then on set C. Restart again using set A,
then B, etc. This way, if the media goes bad (not impossible at all), you still have the prior
backup available.
Consider CD's or DVD's - CD's and DVD's are inexpensive and, if handled properly,
very reliable. While these are much slower and less convenient than USB type disks they
are a good choice.
Keep the Backup Safe - The backup file (or at least one copy from a set) should be
kept away from the computer, preferable off site. A backup disk that is in the computer
that is stolen is not very much good.
© 2000 - 2006 AJSystems.com Inc.
64
8.3
OutBack Plus 6
Saving to CD's and DVD's
The OutBack Plus - backup file can be saved to a CD or a DVD disk.
Direct saving to CD or DVD disk is supported as long as the disks have been pre formatted to
accept direct file writes. You will need to have some type of CD/DVD software installed on
your system that makes your CD/DVD drive act as a standard drive.
Most modern machines are supplied with software to support this function. The most popular
software packages are:
Roxio "Easy CD Creator" -- Later versions (i.e. version 6 and 7) of the "Easy CD
Creator", include a function called "Drag-To-Disc". The "Drag-To-Disc" allows all other
programs on the system to save data directly to a CD-R, CD-RW, DVR-R or DVD-RW
disk. It is used as follows:
1. -- insert a blank disk
2. -- if Windows shows a window asking what to do - "cancel" this window.
3. -- look for the "Drag-To-Disc" window (lower right corner of the screen).
4. -- right click on this window
5. -- choose "Format"
6. -- wait until the format is done.
You are now ready to save data files directly to the CD or DVD drive.
Roxio "Easy CD Creator" -- Legacy versions (prior to version 6) are supplied with a
module named "DirectCD" which performs the functions similar to "Drag-To-Disc". The
"DirectCD" module is started from the "Data Project" selection on the Roxio project
selector. Note: DirectCD Version 5 was very problematic on Windows XP. You MUST
have the latest release of version 5 to operate reliably on Windows XP.
Nero Burning Rom -- Most versions of NERO are supplied with a module named "InCD"
which provide the direct write support. "InCD" requires that you use CD-RW, DVD+RW or
DVD-RW disks only.
When you start your computer, InCD starts automatically. There is no link to InCD in the
Programs folder. The InCD icon appears in the system tray, which is usually in the bottom
right-hand corner of the screen. The InCD icon shows information about the CD, which is
currently in the drive, or about the drive itself. You must format unformatted discs before
you can use them with InCD.
Sonic RecordNow Max -- The Sonic product includes a module named "DLA" (Drive
Letter Access). The DLA module provide the required functionality. You must format the
discs before you can use them with DLA.
Windows XP Users Note: Windows XP includes built-in functionality to use CD media as a
destination to write files to within Windows Explorer. This functionality is only included for
Windows Explorer. This does not allow other applications such as OutBack Plus to write to
the CD.
If you do not have the direct write software (as above), you can still save the backup file to the
CD by:
1.
Make a backup to some temporary location on your hard drive (say c:\MyBackup ).
2.
Copy the completed backup file to the CD using the software supplied with the Windows
XP or the CD/DVD drive.
© 2000 - 2006 AJSystems.com Inc.
FAQ - Technical Details
8.4
65
Command Line Parameters
OutBack Plus will accept command line parameters. These command line parameters may
be used (for example) to launch OutBack Plus from the Windows Scheduler or from a
shortcut.
The parameters are:
\Q -- Run without showing the "wizard" interface. This is required for a scheduled task
\QS -- Run (as for \Q) and "ShutDown" the machine when done.
\QH -- Run (as for \Q) and "Hibernate" when done.
\QL -- Run (as for \Q) and "Logoff" the user when done.
\QR -- Run (as for \Q) and "Reboot" the machine when done.
\D="...path specification..." -- use the specified path for the backup. This over-rides any other
normal default save paths.
\J="...Job Name..." -- run the designated Job Name. If a Job name is not present when any of
the \Qx parameters are used, the last backup done will be repeated.
\W=n -- Issue a warning showing the backup will begin in "n" minutes. i.e. the backup will be
delayed by "n" minutes.
© 2000 - 2006 AJSystems.com Inc.
66
OutBack Plus 6
9
Product Support
9.1
Product Support - Contact Us
Product Support
If you have a question that is not covered in this document, please consult the AJSystems
Knowledge Base: http://ajsystems.com/kb/ for additional current information.
If you are still having a problem, please use the OutBack Plus menu item "Help" - "Request
Support by Email" to send a message requesting support. This menu item will create an email
message which includes critical information to assist with support.
If you are unable to use this menu item, send an e-mail message to [email protected]
In either case, be sure to include:
·
the version number of the OutBack Plus program (from the "Help" / "About" window).
·
the version of Windows which are you running - Windows 95, W98, ME, NT4, W2000, or
Windows XP
·
details about the problem you are encountering.
OutBack Plus is developed and supported by:
AJSystems.com Inc.
Oakville, Ontario, Canada
Sales E-mail:
[email protected]
Support E-mail:
[email protected]
Web Site:
http://ajsystems.com
Phone:
905-847-9106
© 2000 - 2006 AJSystems.com Inc.
Appendices - Troubleshooting
10
Appendices - Troubleshooting
10.1
What are Jobs - Why would I use Jobs?
67
OutBack Plus is designed to make backups/archives of data on a regular basis.
You may choose the applications data "groups" (e.g. Outlook Express) to be included in a
backup/archive. In addition, you may wish to include only some critical portion of the
application data in a backup/archive. For example, you may wish to make a backup of just
the "InBox" and "Sent Items" of Outlook Express. This is easily done by selecting the mail
folder(s) in question.
However, suppose you wish to make a backup/archive of all of Outlook Express once a
week but make a copy of only the "InBox" and "Sent Items" daily.
"Jobs" are intended to simplify this process. You would make a backup selecting the
data you wish to include in your daily backup and save it as the "Daily" Job. Then, at the
weeks end, make a new backup selecting the data you wish to include on a weekly basis
and save it as a "Weekly" Job.
OutBack Plus will remember your selections for each of the Jobs.
You may have any number of "Jobs".
© 2000 - 2006 AJSystems.com Inc.
68
10.2
OutBack Plus 6
"Contacts Moved or Displayed..." Error Message
After upgrades, you may receive the message:
The address list could not be displayed. The Contacts folder associated with this address list could not
be opened; it may have been moved or deleted, or you do not have permissions. For information on
how to remove this folder from the Outlook Address Book, see Microsoft Outlook Help
If you are running Outlook 2000, see Microsoft Knowledge Base Article:
http://support.microsoft.com/default.aspx?scid=kb;EN-US;q251416
If you are running Outlook 2002 (Outlook XP) or Outlook 2003, see Microsoft Knowledge
Base Article:
http://support.microsoft.com/default.aspx?scid=kb;EN-US;q319901
© 2000 - 2006 AJSystems.com Inc.
Appendices - Troubleshooting
10.3
69
Error 503 - while creating a backup
The Error 503 is generally the result of a problem with access to the backup device.
If saving to a CD, possible causes of this error are:
The CD is not formatted for direct save of data.
A CD-RW disk has developed a 'bad area' - may be corrected by a reformat.
A CD-RW disk is marked Read-Only.
The CD is formatted but the access software (e.g. Drag-To-Disk or InCD) is not ready.
Out of date driver software for a CD writer. Note: this is a common problem when using
Roxio Easy CD Creator 5 with Windows XP. (Creator 6 and 7 do not suffer from the same
problems).
See the AJSystems Knowledge Base article "How do I save the backup to CD's or DVD's"
for additional information.
If saving to a network drive, or a local drive under Windows 2000/XP, you may not have the
appropriate permission to save to the target drive or target folder.
See the AJSystems Knowledge Base: http://ajsystems.com/kb/ for additional
information.
© 2000 - 2006 AJSystems.com Inc.
70
10.4
OutBack Plus 6
Error 507 - while creating a backup
The Error 507 is generally a result of an I/O problem with the target device. Some possible
causes of this error are:
Target device is full.
A "bad spot" on a CD-RW disk (possibly cured with a reformat).
Loss of connection on a network disk (especially with wireless networks).
Out of date driver software for a CD writer.
Hardware problems with the a disk, disk controller or network.
Attempting to save a backup file greater than 4gb on a disk formatted with the FAT32 file
system. You must use the NTFS disk format (the default format for Windows XP) if files
are larger than 4gb. If you can not use the NTFS format - save the backup in smaller
"chunks" - see: Multi-Part Backups in Backup - Step 3.
See the AJSystems Knowledge Base: http://ajsystems.com/kb/ for additional
information.
© 2000 - 2006 AJSystems.com Inc.
Appendices - Troubleshooting
10.5
71
Windows and Outlook Version Differences
Outlook is available in multiple versions (e.g., 98 and 2000, 2002) and Windows is also
available in multiple versions (e.g., XP, W2000, 98). The actual storage location and/or
the name of the main "Outlook Today" data file (pst file) is NOT standardized. In addition,
the user may change the name and location of the data files.
This variability is not generally a problem when saving and restoring to the same or similar
systems.
However, when upgrading or moving between versions of Outlook or Windows, this
variability can be more than a nuisance. To accommodate the situation, OutBack Plus
examines the system registry to determine the name and location of the main data files.
When Restoring, the names and paths (storage locations) of the various main files on the
current system are compared to the same data in the backup file.
Files in the Backup - NOT on the current system
You will receive a warning if Outlook Personal files are found in the Backup which are not
on the current system.
If this is mismatch is detected, the files in the backup which do not match to locations on
the new system are shown in red.
Why does this happen?
This could occur when upgrading from one version of Outlook to another. As an
example, the backup file may have a personal file "Outlook.pst" while the new system
may have a personal file called "Mailbox.pst".
Or, you may have multiple pst files on the system and only one pst file in the backup (or
vice versa).
It is most likely that a non-matched file in the backup should be restored as the file that is
mismatched on the system. In the above example, it would mean restoring the
"Outlook.pst" as "Mailbox.pst" (i.e. the version differences of Outlook and/or Windows
has caused a name mismatch).
In many cases, there will be one or more "Archive" folders in the backup which do not
exist on the machine where the restore is being done. The Archive folders may be
restored as follows:
1.
2.
3.
4.
5.
Select (check) the Archive folder(s) ... even though flagged in red.
Restore the folder(s)
Once the restore is done, go to the Outlook menu "File" - "Open" - "Outlook Data File"
Select the Archive folder (".pst" file)
Open it.
What does OutBack Plus do automatically?
If the names match but the paths differ, OutBack Plus will automatically resolve the
differences in storage location.
If you have multiple names which do not match, automatic correction is not possible.
© 2000 - 2006 AJSystems.com Inc.
72
OutBack Plus 6
What should be done?
Do NOT restore the file(s) in red (other than Archive folders -- see notes above) while
doing "Restore All/Selected Data".
You may restore other items if you wish
Follow the instructions under "Restore - Import Outlook Data Files" to complete the
restore of the files in red.
© 2000 - 2006 AJSystems.com Inc.
Appendices - Troubleshooting
10.6
73
Outlook File Compatibility
The Outlook "Personal Folder" files (".pst" files) may be in one of two formats:
Outlook 97/98/2000 format
Outlook 2003/2007 format
Outlook 2003 introduced a new format that is "Unicode" compatible and removes the
maximum file size limit of 2GB that applied to the Personal Folder files prior to Outlook
2003.
Outlook 2003 and Outlook 2007 can use the older format (97/98/2000) Personal Folder
files. However, Outlook 97/98/2000 can NOT use the Personal Folders files created in
the Outlook 2003/2007 format.
It is possible to create the Outlook 97/98/2000 format files with Outlook 2003/2007 (even
though the default is to create all files in the new "Unicode" format). Unfortunately, all
Personal Folder files have the same file type extension (".pst").
OutBack Plus will provide a warning when restoring files which may be incompatible.
© 2000 - 2006 AJSystems.com Inc.
74
10.7
OutBack Plus 6
Backup - Which Outlook Files are Included
OutBack Plus automatically includes the following files and file types from Outlook:
·
OUTLOOK.PST - the Outlook.pst file contains "Outlook Today" folders.
·
*.PST files - other "personal folders" (e.g., archive.pst)
·
*.OST files - Offline Storage files
·
*.OAB files - Offline Address Books
·
*.OFT files - Outlook Forms Templates
·
*.PAB file - personal address books
·
*.FAV - Outlook bar settings (Outlook 97, 98, and 2000).
·
OUTCMD.DAT - your global views and menu customizations
·
*.NICK - nicknames files
·
*.RWZ - rules wizard files
·
*.VCF - Virtual Business Card files
·
Signature files - including *.RTF, *.HTM, and *.TXT signatures
·
'Adult Content Senders' and 'Junk Senders' files (Outlook prior to Outlook 2003/2007).
·
Outlook.xml - Outlook 2003/2007 link customization.
In addition to the standard files above, OutBack Plus will backup critical information from your
registry:
·
Internet email accounts - the settings for the Internet Only mode email accounts
·
Outlook Options settings - these are the settings found under the Outlook menu
"Tools\Options". Note that in some cases (e.g., Journals) this data is only complete when
combined with data in the file "outcmd.dat". Hence both should be saved and restored.
If the Business Contact Manager is installed with Outlook 2003 or 2007, the Business Contact
Manager data base will also be included in the backup.
© 2000 - 2006 AJSystems.com Inc.
Appendices - Troubleshooting
10.8
75
Microsoft Outlook Data Files not found
"Microsoft Outlook Data Files not found" error on starting OutBack Plus
You may receive this error message for any of the following reasons:
A - Outlook has not been configured
Before running a backup or a restore, you must run Outlook at least once on the machine
to establish the data locations which Outlook will use.
If Outlook has not been run, launch the program. You may skip the entry of email
account data if you will be restoring the account data from the backup.
B - Outlook is configured for use with Microsoft Exchange Server
OutBack Plus is designed to operate on local Outlook data files. When Outlook is used
with Exchange Server, the "Outlook Today" data will reside on the Exchange Server
rather than the local machine.
When Outlook is used with Exchange, you may also have local copies of data. The local
data is typically in Offline Storage Files (OST files) or Personal Address Books (PAB
files). You may also have local Personal Folder Files (PST files).
If you are using Outlook with Exchange, configure the local files before using OutBack
Plus. Once the local files are configured, you may backup or restore the local data using
OutBack Plus.
© 2000 - 2006 AJSystems.com Inc.
76
10.9
OutBack Plus 6
Cautionary notes regarding Ofline Storage Files (OST)
Excerpt from MS Support:
Offline Folder files (OSTs) are considered slave replicas of the server-based folders. If you delete
the master, the slave is orphaned. If the original Microsoft Exchange profile was not modified, you
can sill start the Microsoft Exchange client offline with the old OST and recover the data by
moving the messages from the OST to a PST file. However, if the old profile was deleted or
modified (by using it to log onto a different mailbox) then the data in the OST is lost.
MORE INFORMATION
You can recover mail stored in an OST, provided that you have not tried to modify the profile that
was used to create the OST file. If the profile used to create the OST file has been modified to
point to a new mailbox, the information contained in the OST file may be lost. This is because
security on an OST works so that Windows NT authentication cannot be used when you work
offline. Therefore, you must "prove" that you're allowed to log onto the server-based master before
the OST file gives you local access. To do this, Exchange Server creates an encrypted "cookie"
from your mailbox's unique entry ID while you are successfully logged into the Exchange Server
computer. This cookie is securely stored in your Exchange Server profile. Essentially, your profile
stores this key for the OST. Every time you try to access the OST file it checks your profile for the
existence of this key. If you modify the profile or try to connect to a new mailbox or new server
with the current profile, Microsoft Exchange replaces this key with a new value from the mailbox
that was created. At this point, you cannot access the data that was contained in the OST created
against the first mailbox. For more information, see the Microsoft Exchange Disaster Recovery
Document on Microsoft TechNet or on the Internet at:
http://www.microsoft.com/exchange/techinfo/BackupRestore.htm
STEPS TO RECOVER
If you have not modified your profile or attempted to log on to the new mailbox, use the following
steps to copy the offline messages to a PST:
1. Start the Exchange Client OFFLINE.
2. On the Tools menu, click Services.
3. Click Add.
4. Add a Personal Folders (PST) service.
5. Select the messages that you want to copy.
6. On the File menu, click Copy.
7. In the Copy to dialog box, select the personal folders (PST) that you created in step 4.
8. Click OK.
9. Repeat steps 5 through 8 for each folder that contains messages.
At this point, the messages are copied to a PST. You can create a new profile and you can log on
to the new server-based mailbox. After you complete this successfully, you can add a Personal
Folders service (by referencing the PST created above), and you can copy the messages from the
PST back to the server-based mailbox. NOTE: offline folders (OSTs) should not be considered as
backups of your server based store. For more information on proper server backups, refer to the
© 2000 - 2006 AJSystems.com Inc.
Appendices - Troubleshooting
Microsoft Exchange Server Administrator's Guide, Chapter 15.
© 2000 - 2006 AJSystems.com Inc.
77
78
OutBack Plus 6
10.10 Outlook shortcuts do not work
On occasion, after a restore of Outlook data, the Outlook Shortcut icons no longer work.
This can be resolved by:
Ensure that the "Folder List" is visible (enable it from the "View" menu).
Right click on the "Inbox" icon in the Outlook Bar (leftmost column)
Choose "Remove from Outlook Bar"
Ensure that the "InBox" is visible in the Folder List (you may need to expand the list by
clicking on the + beside Outlook Today).
Right click on the "InBox" in the Folder List
Choose "Add to Outlook Bar"
Repeat the above for any shortcuts that do not work.
© 2000 - 2006 AJSystems.com Inc.