1
COMMANDconcrete
Users’ Guide
CS08 3.12
3/27/13
Copyright © 2013 Command Alkon Incorporated. All rights reserved.
Command Alkon Incorporated believes the statements contained herein are accurate as of the date of
publication of this document. HOWEVER, COMMAND ALKON INCORPORATED HEREBY
DISCLAIMS ALL WARRANTIES EITHER EXPRESSED OR IMPLIED, INCLUDING
WITHOUT LIMITATION ANY IMPLIED WARRANT OF MERCHANTABILITY OR FITNESS
FOR A PARTICULAR PURPOSE. In no event will Command Alkon Incorporated be liable for any
damages, including any lost profits, lost savings, or other incidental or consequential damage arising
out of the use of or inability to use any information provided through this publication, even if
Command Alkon Incorporated has been advised of the possibility of such damages, or for any claim by
any other party. Some states do not allow the limitation or exclusion of liability or consequential
damages, so the above limitation may not apply.
This information is not intended to be an assertion of future action. The contents of this document are
for informational purposes only and are subject to change without notice. Command Alkon
Incorporated expressly reserves the right to change or withdraw current products that may or may not
have the same characteristics listed in this publication. Should Command Alkon Incorporated modify
its products in a way that may affect the information contained in this publication, Command Alkon
Incorporated assumes no obligation whatever to inform any user of the modification.
This publication may contain technical inaccuracies or typographical errors. Command Alkon
Incorporated assumes no responsibility for any errors that may appear in this manual. This publication
is intended only for the direct benefit of users of Command Alkon Incorporated products. This
manual may not be used for any purposes other than those for which it is provided. Information
disclosed herein was originated by and is the property of Command Alkon Incorporated, and, except
for rights granted by written consent, such information shall not be disclosed, disseminated, or
duplicated in whole or in part. Command Alkon Incorporated reserves all patent, proprietary, design,
manufacturing, use, and reproduction rights.
Command Alkon Incorporated
1800 International Park Drive, Suite 400
Birmingham, AL 35243-4232
(205) 879-3282
5168 Blazer Parkway
Dublin, OH 43017-1339
(614) 799-6650
www.commandalkon.com
COMMANDseries (and the names of its components, such as COMMANDconcrete and
COMMANDnetwork), Spectrum, Eagle, and COMMANDbatch are registered trademarks of
Command Alkon Incorporated. All rights reserved.
Microsoft and Windows are trademarks of Microsoft Corporation of Redmond, Washington.
Contents
Welcome to COMMANDconcrete
Product Features
................................................... 13
.................................................................................. 13
How to Use This Document
.......................................................... 15
Style .................................................................................................. 15
Before You Begin .................................................................................. 15
Setting Up the System .......................................................................... 16
Starting COMMANDseries ...................................................................... 16
Logging into COMMANDseries .............................................................. 17
Exiting COMMANDseries ..................................................................... 17
Entering Master File Information .......................................................... 17
Toolbars ............................................................................................. 18
Accessing Help ..................................................................................... 18
Five Important Functions ....................................................................... 19
Entering Dates .................................................................................. 19
The <Tab> Key ................................................................................. 19
Accepting (Saving) Screens ................................................................ 20
Add Occurrence ................................................................................. 20
Detailing .......................................................................................... 21
SmartLookup ....................................................................................... 22
Standard Lookup ............................................................................... 22
Customized Lookup ............................................................................ 23
.NET Fndcode ...................................................................................... 24
Setup .............................................................................................. 24
Operations ........................................................................................ 24
Options ............................................................................................ 25
Code Lists ........................................................................................ 28
Exporting Lookup Information ............................................................. 30
The Calendar ....................................................................................... 31
Order Entry
.................................................................................. 32
Standard Order Entry ............................................................................ 34
Order Haul Information ...................................................................... 38
Order Pricing Information ................................................................... 39
Entering Other Order Information ........................................................ 41
Entering Products on an Order ............................................................. 43
Other Order Line Information .............................................................. 50
Associated Products ........................................................................... 51
Forecasted Shipped Quantity ............................................................... 52
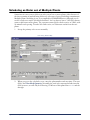
Scheduling an Order ............................................................................. 54
Scheduling an FOB Order ...................................................................... 61
Simplified Order Entry ........................................................................... 61
Standing Order Entry ............................................................................ 64
Entering a Standing Order .................................................................. 65
Switching Between the Standing and Regular Order File .......................... 66
Creating Standing Orders from Projects ................................................... 67
Scheduling Standing Orders ................................................................ 67
3/27/13
3
Advanced Order & Schedule Tools
................................................ 70
Customer-Project-Order Lookup ............................................................. 70
The COD Calculator .............................................................................. 71
The Volume Calculator .......................................................................... 72
Updating Projects from Order Entry ........................................................ 73
Changing Units of Measure .................................................................... 73
Removing Orders ................................................................................. 73
Copying and Moving Orders ................................................................... 74
Order Types ......................................................................................... 75
Suggested Shipping Plants .................................................................... 76
Round Trip Trucking .............................................................................. 77
Truck Unavailability .............................................................................. 78
Journeys ............................................................................................. 79
Creating a New Journey ...................................................................... 79
Editing an Existing Journey ................................................................. 81
Ticketing a Journey ............................................................................ 81
Truck Counts Screen ............................................................................. 82
Pouring Methods .................................................................................. 83
Order Hold Functions ............................................................................ 84
Bid Price Calculator .............................................................................. 85
Order-Level Mix Design ......................................................................... 87
Product Sales Option ............................................................................ 90
The Order Tree ..................................................................................... 92
Configuring the Order Tree .................................................................. 92
Right-Click Mouse Functionality Using the Order Tree .............................. 94
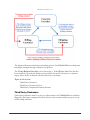
The Options Menu ................................................................................ 95
When the Order Entry screen is displayed, the Options menu becomes available. Use the Options menu to navigate quickly to commonly used functions in
COMMANDseries.Prefix Screen ............................................................ 95
Switch to Concrete / Aggregate / Block / Asphalt ................................... 95
Test Order Print ................................................................................. 95
Change Order to Metric ...................................................................... 95
Addition/Selection of Notes ................................................................. 95
Re-Verify Credit Limit ......................................................................... 96
Default Schedule & Pricing Plants in Order Entry ....................................... 96
Setup .............................................................................................. 96
Workflow .......................................................................................... 98
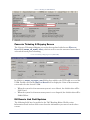
Economic Sourcing ............................................................................. 100
Using Economic Sourcing .................................................................. 100
Notes ............................................................................................. 102
Pricing Authority - Display Percentage Discount ...................................... 102
Transport Pricing ................................................................................ 104
New Fields ...................................................................................... 104
System Logic .................................................................................. 105
Journeys ........................................................................................... 105
Creating a New Journey .................................................................... 106
Editing an Existing Journey ............................................................... 108
Ticketing a Journey .......................................................................... 108
Multi-Drop Concrete Deliveries ............................................................. 109
4
3/27/13
Overview ........................................................................................ 109
Plants Editor ................................................................................... 109
Order Entry .................................................................................... 110
Ticketing ........................................................................................ 110
Ticket Report .................................................................................. 111
Aggregates Sold Through Ready-Mix Plant
Sampling & Testing Plan
................................ 114
............................................................ 116
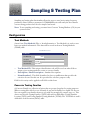
Configuration ..................................................................................... 116
Test Methods .................................................................................. 116
Concrete Testing Families ................................................................. 116
Item-Testing Methods ....................................................................... 117
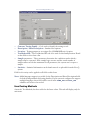
Users ............................................................................................. 118
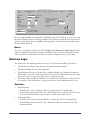
Selection Logic ................................................................................... 118
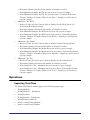
Operations ........................................................................................ 120
Importing Test Plans ........................................................................ 120
Order Entry & Ticketing .................................................................... 121
Rebates and Royalties
................................................................ 124
Configuration ..................................................................................... 124
Workflow ........................................................................................... 125
Contact Type Codes ......................................................................... 125
Item Editor ..................................................................................... 126
Jobs/Quotes/Projects > Products Tab ................................................. 127
Ticketing ........................................................................................ 129
Update Costs & Prices for Orders & Tickets .......................................... 130
Reporting .......................................................................................... 130
Ticketing
.................................................................................... 133
Ticketing Screen ................................................................................ 135
Ticketing — Load Size Logic ................................................................. 138
Reprinting Tickets ............................................................................ 138
Canceling Tickets ............................................................................... 139
Ticketing With Prebatched Material ....................................................... 140
Maximum Gross Truck Weight .............................................................. 141
Proof of Delivery ................................................................................ 142
Process Goods Returned ...................................................................... 142
Unscanned Hauler Tickets Report ......................................................... 142
Print Certification Text on Delivery Notes .............................................. 142
Certification .................................................................................... 143
Configuration .................................................................................. 145
HTML Tickets .................................................................................. 148
Greek Cancelled Ticket Print ................................................................ 150
Next Numbers Editor ........................................................................ 150
Plants Editor ................................................................................... 150
Ticketing ........................................................................................ 152
HTML Document Format Interface ........................................................ 154
Post-Production Out of Tolerance Loads ................................................. 155
Set Up ........................................................................................... 156
Data In/Out .................................................................................... 157
Print/Send Tax & Cement Info to Batching System .................................. 159
5
3/27/13
Setup ............................................................................................ 159
Record Sampled Tickets ...................................................................... 161
Set Up ........................................................................................... 161
Ticketing ........................................................................................ 162
Database Fields ............................................................................... 164
Future-Day Ticketing .......................................................................... 165
Overview ........................................................................................ 165
Configuration .................................................................................. 165
Concrete Ticketing and Shipping ........................................................ 167
Truck Punch In ................................................................................ 167
Tracking and Scheduling ................................................................... 167
COMMANDfleet ................................................................................ 168
Print User-Defined Fields ..................................................................... 169
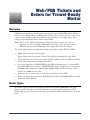
Web/PDA Tickets and Orders for Trowel-Ready Mortar
............. 170
Overview .......................................................................................... 170
Order Types ....................................................................................... 170
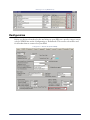
Configuration ..................................................................................... 171
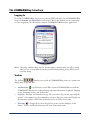
The COMMANDlog Interface ................................................................. 172
Logging In ...................................................................................... 172
Toolbar ........................................................................................... 172
Summary Tab ................................................................................. 173
Order Tab ....................................................................................... 174
Tickets Tab ..................................................................................... 175
Details Tab ..................................................................................... 176
Controls ......................................................................................... 177
Importing Tickets at the End of the Day ................................................ 177
Order and Ticket Data In .................................................................. 177
Automated Data In/Out .................................................................... 178
Tasks, Conditions, and Driver Overtime
..................................... 180
Tasks ................................................................................................ 180
Driver Overtime ................................................................................. 180
Conditions ......................................................................................... 181
Tracking & Scheduling ......................................................................... 182
Ticketing ........................................................................................... 182
Deadheading ..................................................................................... 183
Managing Driver Overtime ................................................................... 184
Time and Task Manager ....................................................................... 184
Editing Ticket Times ......................................................................... 185
Editing Truck Times .......................................................................... 186
Editing Driver Times ........................................................................ 187
....................................................................................................... 187
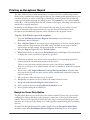
Preliminary Invoice Register
...................................................... 188
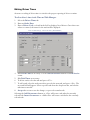
Saving Report Configurations ............................................................... 188
Printing a Priced Orders Report ............................................................ 189
Summary Pages .............................................................................. 191
Printing an Exceptions Report .............................................................. 192
Exception Items Only Option ............................................................. 192
Printing a Preliminary Detail Invoice Register ......................................... 193
6
3/27/13
Preliminary Summary Invoice Register ............................................... 195
Transfer Orders Register ...................................................................... 195
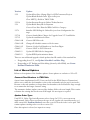
Suspending Orders and Tickets
.................................................. 199
Manual Suspension of Orders, Tickets, or Products .................................. 200
Automatic Customer Suspension of Orders ............................................ 201
Exception Suspension ......................................................................... 201
Suspended Orders & Tickets Report ...................................................... 201
Releasing Suspended Orders & Tickets .................................................. 202
Editing Suspended Tickets on Invoiced Orders ........................................ 203
Edit Orders and Tickets
.............................................................. 205
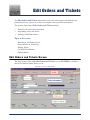
Edit Orders and Tickets Screen ............................................................. 205
General Order & Ticket Prep ................................................................ 206
Order Pricing Information ................................................................. 209
Other Order Information ................................................................... 211
Order Haul Information .................................................................... 212
Editing Tickets ................................................................................ 213
Removing Items .............................................................................. 217
Removing/Editing Charges ................................................................ 218
Credit & Debit Memos ...................................................................... 220
Credit Memos .................................................................................. 220
Debit Memos ................................................................................... 222
Options Menu .................................................................................... 224
Change Order to Metric/Customary .................................................... 225
Ticket Times ................................................................................... 225
Reprinting Tickets ............................................................................ 225
Display Individual Ticket ................................................................... 226
Display Taxes .................................................................................. 227
Display Haul Charges ....................................................................... 227
Suspend Order/ Suspend Product/Edit Suspended Tickets ..................... 227
Addition/Selection of Notes ............................................................... 228
Daily Invoicing
........................................................................... 229
Process Overview ............................................................................... 229
Reconciling Tickets ............................................................................. 230
Price Updates .................................................................................... 233
Update Costs & Prices for Orders & Tickets .......................................... 233
Calculate Unloading Charges ............................................................. 235
Create Orders for Separate Invoices ................................................... 236
Price Review ................................................................................... 236
Run a Priced Orders Report/Preliminary Invoice Register ....................... 237
Update Cartage Tickets ....................................................................... 237
Zero-priced Exception Items Only Report ............................................ 238
Invoice Print (if licensed) ..................................................................... 239
Post to Receivables (if licensed) ........................................................... 239
Plant-level Invoices for Cash Sales ........................................................ 239
Configuration .................................................................................. 239
Operations ...................................................................................... 241
Order Discount Form ........................................................................ 243
7
3/27/13
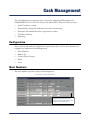
Cash Management
...................................................................... 246
Configuration ..................................................................................... 246
Next Numbers ................................................................................... 246
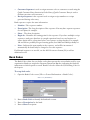
Bank Codes ....................................................................................... 247
Contact Types/Contacts ....................................................................... 248
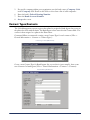
Plants ............................................................................................... 249
Main Tab ........................................................................................ 249
Communication Tab ......................................................................... 249
Next Numbers Tab ........................................................................... 250
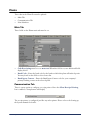
Users ................................................................................................ 250
Cash Management–Order Entry ............................................................ 251
Entering a COD Order ...................................................................... 251
Quick Customer Entry ...................................................................... 252
Payment Entry ................................................................................ 252
COD Orders .................................................................................... 253
Open Payments ............................................................................... 255
Receipt Allocation ............................................................................ 256
Emergency Cash Receipts ................................................................. 259
Cash Management Tools ...................................................................... 259
Cash Reconciliation .......................................................................... 260
Cancel Cash Reconciliation ................................................................ 262
Reconciliation Report ........................................................................ 263
Uncollected Tickets Report ................................................................ 264
Unallocated Receipts Report .............................................................. 264
Document Formats .......................................................................... 265
Purging Quick Customers .................................................................... 265
Purge Records ................................................................................... 266
Reports .......................................................................................... 267
Direct Deposits .................................................................................. 268
Configuration and Workflow .............................................................. 268
Cash Reconciliation .......................................................................... 269
Preliminary Reconciliation Report .......................................................... 270
Customer Notes
......................................................................... 272
Types of Notes ................................................................................... 272
Entering Notes ................................................................................... 273
Managing Customer Notes ................................................................... 276
Notes Listing ..................................................................................... 277
Dispatch Memos in Order Entry ............................................................ 278
Configuration .................................................................................. 278
Operations ...................................................................................... 279
Reports .......................................................................................... 281
Deleting, Managing & Purging Completed Notes ...................................... 281
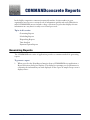
COMMANDconcrete Reports
....................................................... 283
Generating Reports ............................................................................. 283
Scheduling Reports ............................................................................. 286
Order Schedule Report ..................................................................... 286
8
3/27/13
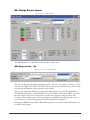
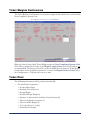
Truck Demand Graph ....................................................................... 287
Plant Loading Report ........................................................................ 288
Driver Callout Report ....................................................................... 288
Dispatch Sheet Report ...................................................................... 289
Dispatching Reports ............................................................................ 290
Order Report ................................................................................... 291
Ticket Report .................................................................................. 291
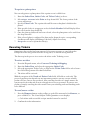
Enhanced Ticket Report .................................................................... 292
COD Recap Report ........................................................................... 295
Order Recap Report ......................................................................... 297
Plant Production Report .................................................................... 298
Customer Sales Recap Report ............................................................ 298
Inventory Usage Report .................................................................... 298
Product Sales/Usage Report .............................................................. 299
Raw Materials Requirements Report ................................................... 299
Batching Comparison Report ............................................................. 300
Batch Info Report ............................................................................ 300
Order Audit Log Report ..................................................................... 301
Time Analysis .................................................................................... 301
Driver Times and Truck Times ........................................................... 302
Order Snapshot Report ..................................................................... 302
On Time Delivery Report ................................................................... 303
Time Analysis Reports ...................................................................... 303
Missing Times Report ....................................................................... 305
Overtime Report .............................................................................. 306
Payment Option Reports ...................................................................... 307
Reconciliation Report ........................................................................ 307
Uncollected Tickets Report ................................................................ 308
Unallocated Receipts Report .............................................................. 308
....................................................................................................... 309
Application Management
........................................................... 310
Calculate a Price Change ..................................................................... 310
Mix Design Interface - QA .................................................................... 313
Initialize TESYS Data .......................................................................... 313
Batch Interface Queued Tickets ............................................................ 314
Batch Code Generator ......................................................................... 314
Edit Project Expiration Dates ................................................................ 315
Lien Legacy Invoice Manager ............................................................... 315
Realign Accounts and Cost Centers ....................................................... 316
Error Log Report ................................................................................ 318
Update Zone Salesman ....................................................................... 318
Update Inactive Customers .................................................................. 319
....................................................................................................... 320
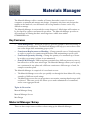
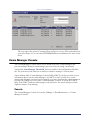
Materials Manager
..................................................................... 322
Key Features ..................................................................................... 322
Material Manager Setup ...................................................................... 322
System License ............................................................................... 323
Lab Location ................................................................................... 323
Sort Codes ..................................................................................... 323
3/27/13
9
Item Setup ..................................................................................... 325
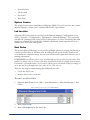
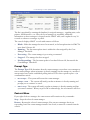
Material Manager Screen ..................................................................... 326
Filtering Items ................................................................................ 326
Mixes ............................................................................................. 327
Constituent Tabs .............................................................................. 327
Item Replacement ........................................................................... 328
Mix Design ........................................................................................ 335
Mix Design Screen Layout ................................................................. 336
Using a Generic Mix ......................................................................... 339
Item Substitution ............................................................................... 341
Constituent Replacement Log ............................................................... 343
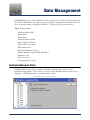
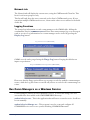
Data Management
..................................................................... 345
Initialize/Analyze Files ........................................................................ 345
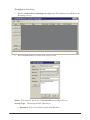
Import Data ...................................................................................... 346
Export Data ....................................................................................... 348
Import Orders & Tickets ...................................................................... 349
Export Orders & Tickets ...................................................................... 350
Automated Data In/Out ....................................................................... 351
Data Maintenance .............................................................................. 353
Retrieve a Specific Record or Set of Records ........................................ 355
Global Replace ................................................................................ 357
Special Search Operators .................................................................. 358
Automatic Database Updates ............................................................... 358
Manual Database Updates ................................................................... 362
Upgrade Options ............................................................................. 363
List of Manual Updates ..................................................................... 364
Maintenance Routines ...................................................................... 369
SQL Worksheet .................................................................................. 372
Database Locks .................................................................................. 373
Service Control .................................................................................. 374
Comm Manager Console ...................................................................... 375
Console .......................................................................................... 375
Prompt Type ................................................................................... 376
Context Menu ................................................................................. 376
Network tab .................................................................................... 377
Logging Functions ............................................................................ 377
Run Comm Managers as a Windows Service ........................................... 377
Auto-Signaling ................................................................................... 379
....................................................................................................... 379
Appendix A: Examples
............................................................... 380
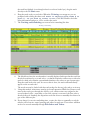
Multiple Loads on One Truck ................................................................ 380
Two Mix Products on One Truck ............................................................ 382
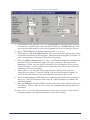
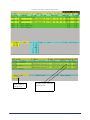
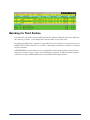
Scheduling an Order out of Multiple Plants ............................................. 383
Batching for Third Parties .................................................................... 387
Third Party Customers ...................................................................... 388
Third Party Customer Projects ........................................................... 389
10
3/27/13
Third Party Company Document Formats ............................................ 390
....................................................................................................... 391
Appendix B: Credit Checking
...................................................... 392
Credit Checking Overview .................................................................... 392
Standard (no license needed) ............................................................ 392
Credit Checking (licensed feature) ..................................................... 394
Credit Checking Configuration .............................................................. 394
Credit Codes ................................................................................... 394
Reason Codes ................................................................................. 395
Assigning Customer Credit Codes ......................................................... 396
Using the Credit Checking Function ....................................................... 397
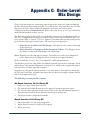
Appendix C: Order-Level Mix Design
......................................... 400
Order-Level Mix Design ....................................................................... 401
Mix Design Interface - QA .................................................................... 404
Ticketing ........................................................................................... 405
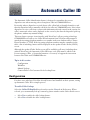
Automatic Caller ID
.................................................................... 407
Configuration ..................................................................................... 407
Workflow ........................................................................................... 408
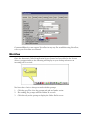
Manual Lookup ................................................................................ 410
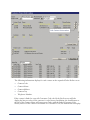
Contact-Deliver To-Customer Order Lookup Form ................................. 410
Truck Ahead-Truck Behind
......................................................... 414
Document Tags/Formats ...................................................................... 415
Signaling Units ................................................................................... 415
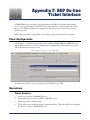
Appendix F: SAP On-line Ticket Interface
.................................. 418
Plant Configuration ............................................................................. 418
Operations ........................................................................................ 418
................................................................................Ticket Creation 418
............................................................................... Ticket Removal 419
Ticket Reactivation ........................................................................... 419
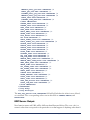
XML Formats ..................................................................................... 419
COMMANDseries .............................................................................. 419
ERP Server Output ........................................................................... 420
Appendix G: Batch Confirmation and EU Link Enhancements
..... 422
Logic ................................................................................................ 423
Setup ............................................................................................... 423
Add New Reason Code ..................................................................... 423
Set Configuration ............................................................................ 424
Plants Editor ................................................................................... 424
Items Editor ................................................................................... 425
Concrete Ticketing & Shipping Screen ................................................ 426
EU Generic Link Field Updates ........................................................... 426
Generic EU Link Enhancements ............................................................ 427
Ticket Weights Confirmation ................................................................ 428
Ticket Print ........................................................................................ 428
3/27/13
11
Appendix H: Counter Sales
(Cash and Carry) ........................................................................ 430
Cash & Carry Orders ........................................................................... 430
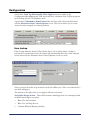
Cash & Carry Configuration .................................................................. 430
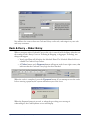
Cash & Carry – Order Entry ................................................................. 431
Cancelling an Order ......................................................................... 433
Appendix I: Assigning Mixes to Technical Products
.................... 434
Concrete Classes & Specifications ......................................................... 434
Configuration ..................................................................................... 435
Item Lookup ................................................................................... 435
Reason Codes .................................................................................... 436
Material Classes ................................................................................. 436
Items Editor ...................................................................................... 436
Appendix J: Validate Reused Concrete
....................................... 438
Setup ............................................................................................... 438
Reason Codes ................................................................................. 438
Configuration .................................................................................. 438
Appendix K: Lime Spreader Functionality
....................................... 1
Overview .............................................................................................. 1
Background ........................................................................................ 1
General Notes ..................................................................................... 2
Items Set Up ......................................................................................... 2
Item Groups ....................................................................................... 2
Item Category ..................................................................................... 2
Items Editor ....................................................................................... 3
Assigning Item Groups to Customers and Projects .................................... 5
Projects Editor ....................................................................................... 6
Hauler Editor ......................................................................................... 7
Order Entry ........................................................................................... 7
Cartage Changes .................................................................................... 8
Cartage Sequence Code ....................................................................... 8
Removing an Original Cartage Ticket ...................................................... 9
Update Cartage Ticket Changes ............................................................. 9
Terms Code Modifications ...................................................................... 12
Edit Orders and Tickets ......................................................................... 13
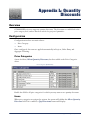
Appendix L: Quantity Discounts
..................................................... 1
Overview .............................................................................................. 1
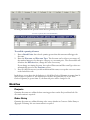
Configuration ......................................................................................... 1
Price Categories .................................................................................. 1
Items ................................................................................................. 1
Workflow ............................................................................................... 2
Projects .............................................................................................. 2
Order Entry ........................................................................................ 2
Invoice Prep ....................................................................................... 3
Index
12
............................................................................................. 4
3/27/13
Welcome to
COMMANDconcrete
Welcome to the COMMANDconcrete User Guide. The COMMANDconcrete software
package is designed to establish sound ready-mix dispatch control, improve customer
service, reduce delivery costs, decrease the dispatcher’s workload, provide immediate
management reports, and capture information for invoicing and accounting.
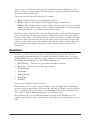
Product Features
•
•
•
•
•
•
•
•
•
•
•
•
•
•
•
•
•
•
•
•
Allows entry of orders for the current day or multiple dates.
Retains past orders for future reference or copying.
Allows orders to be canceled, reactivated, moved to a different date, or duplicated today
or in the future.
Allows inclusion of extra product and admix sales. These products can be varied from
one ticket to the next.
Permits toggling between Order Entry and Ticketing without losing information.
Estimates the required volume for slabs, footings, slabs with integral footings, walls,
columns, and steps with the volume calculator. If the calculated volume is accepted, it
will default into the quantity ordered field.
Provides for unique ticket formatting during system setup to provide flexibility.
Allows orders with multiple mixes and/or non-mix products.
Prints tickets at the plant within seconds of the dispatcher's demand.
Automatically prices, extends, and taxes COD deliveries, and displays the amount the
customer owes.
Allows tickets to be canceled, uncanceled, or retyped.
Provides valuable information on daily activity reports for the current day's and prior
day's orders, production, and deliveries. These reports can be directed to the screen or
any printer.
Allows for easy ticket editing.
Permits changing of the map page, zone, distance, job number, purchase order number,
and order status from the ticketing screen.
Applies minimum load charges.
Automatically pulls up load information, and defaults load quantities to ticketing.
Allows change of delivery date.
Allows typing of temporary tickets and test tickets.
Allows for ticket reprint, next ticket number display, and ticket retrieval.
Offers easy access to data through drop-down menus and lists.
Welcome to COMMANDconcrete
13
•
•
•
•
•
•
•
•
•
•
14
Allows project or job information to default into Order Entry so the order can be
entered quickly.
Handles dumped and resold concrete.
Handles GST/PST taxing issues for intangible products.
Prices products sold according to various pricing formulas. These formulas include
quotes by project, customer, discount, etc. Prices for minimum loads and other special
charges can be determined.
Provides Sales, Dispatch, and Time Analysis Reports.
Computes taxing according to user defined tax formulas.
Creates a priced order register which prints price, tax, and extended orders for
validation prior to editing the data.
Allows editing of all past orders and tickets.
Exports data to third-party invoice accounting systems. The data can be tailored as
required.
Supports a caller ID interface to easily look up contacts when they call the office.
Welcome to COMMANDconcrete
How to Use This Document
This section provides guidance so you can more easily locate information within our
manuals.
Topics in this section:
Style
Before You Begin
Setting Up the System
Starting COMMANDseries
Accessing Help
Add Occurrence
Detailing
SmartLookup
.NET Fndcode
Five Important Functions
Style
This document uses a style designed to help you identify specific functionality.
•
Button names are capitalized and bold. For example:
Select the Pricing button.
•
Field names are capitalized and bold. For example:
Enter the Order Code in this field.
•
Forms (also called screens or windows), Menu names, and Options are capitalized.
For example:
On the Edit menu, if you select Volume Calculator, the Item Code screen may
appear first.
•
Required user input examples use Courier New plain. For example:
Enter 123 Main Street in this field.
•
Braces and arrows { > } indicate how to navigate to a specific screen. For example:
To navigate to the Tickets screen, go to the Dispatch menu and select Tickets
from the drop-down menu {Dispatch > Tickets}.
Before You Begin
The COMMANDseries client runs under Windows 2000 or Windows XP Professional
Edition. If you are not comfortable using Windows, you will not feel comfortable using
How to Use This Document
15
COMMANDseries. It would be helpful to spend some time acquainting yourself with the
environment.
Certain functions are unique to COMMANDseries. To help you with these functions, we
have provided a COMMANDseriesGetting Started in the Workplace manual. This
manual will show you how to work effectively in COMMANDseries applications. We
encourage you to look through the manual before you begin working in the system, and we
also hope that you will refer to the manual when questions about the functionality of
COMMANDseries arise.
Setting Up the System
COMMANDseries manipulates a large database of information, and most of this data is
unique to your construction materials business. For COMMANDseries to efficiently and
properly operate, a basic set of information must be entered before you can perform your
daily tasks with the system. Files such as products, plants, trucks, and customers must be
entered, along with files pertaining to taxes, minimum load charges, and accounting
periods. There is a large amount of information that must exist before you can begin using
COMMANDseries.
With this in mind, Command Alkon has provided a Setting Up the System document to
assist you as you enter the information that will make your system unique to your business.
As the size of the Setting Up the System document shows, there is a great deal of
information to enter. However, once this initial information exists in the system, the only
products, projects, customers, etc. that you will have to enter are new ones.
Properly built files make COMMANDseries extremely easy to use. The information you
need is either already in place or just a mouse click or keystroke away.
Starting COMMANDseries
There are several ways to start your COMMANDseries applications:
•
•
•
•
Select COMMANDseries from the Windows Start menu.
Select the application module icon from the COMMANDseries Program group in
Windows Explorer.
Select the COMMANDseries shortcut on your Desktop.
Implement the COMMANDstart feature, which starts COMMANDseries
automatically upon start-up of your computer.
After entering a COMMANDseries program, you can switch to another
COMMANDseries application by selecting the program from the Alternate Menu list in
the Misc drop-down menu of all COMMANDseries applications.
When COMMANDseries is loaded, it tests for the presence of COMMANDnetwork. If
COMMANDnet is not running, COMMANDseries will launch it automatically.
Topics in this section:
Logging into COMMANDseries
16
How to Use This Document
Exiting COMMANDseries
Entering Master File Information
Logging into COMMANDseries
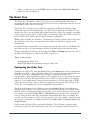
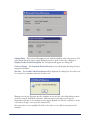
Effective with version 5.57.7, COMMANDseries provides two different options for user
verification.
Windows Security
This option integrates COMMANDseries security with Windows security. When you
launch COMMANDseries, the program retrieves the current Windows username and
validates it against the COMMANDseriesUser list. If the Windows username matches a
COMMANDseries user, that user is automatically logged onto COMMANDseries. No
username/password entry is required.
COMMANDseries (Standard) Security
After launching COMMANDseries, you are prompted to enter a username and password.
Note: Usernames and passwords are set up by your system administrator.
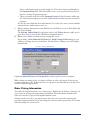
To log into COMMANDseries:
1.
2.
Enter your assigned username in the User field and press <Tab>.
Enter the assigned Password and press <Tab>.
The COMMANDseries application module opens.
Exiting COMMANDseries
There are several ways to exit COMMANDseries:
•
•
•
Click the Exit button in the upper right portion of the screen
Press <Alt+F4>
Select Exit from the leftmost menu. The name of the menu depends on the current
module; in Concrete or Aggregate, for example, it’s Dispatch, but in Receivables, it’s
Transactions.
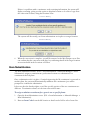
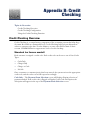
A screen appears which asks you to confirm that you want to close, the program entirely,
restart the program entirely, or close all open forms and log on as another user.
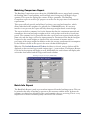
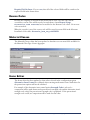
Entering Master File Information
Once inside the application, you will find that most of the screens used to enter Master File
information are located in the Files menu.
The menu options under the Files menu vary from module to module. If, for example, you
want to create or modify A/R accounting periods, you need to be in either
COMMANDinvoicing or COMMANDreceivables—A/R Accounting Periods will not
be an option if you are in COMMANDconcrete.
How to Use This Document
17
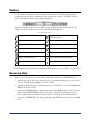
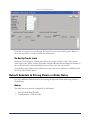
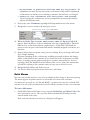
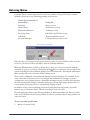
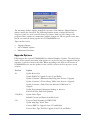
Toolbars
Use the mouse to quickly execute common commands. The Toolbar displays changes
according to the necessary commands for the current active screen. To identify an icon,
point to the button and note the tool tip that appears.
Toolbar Icons
To perform a task included on the toolbar, simply click the button with the mouse. For
example, to exit from the current screen, click on the Exit button.
Standard Toolbar buttons
Exits the current screen
Opens a screen assigned to the icon
(such as Orders)
Clears the current screen
Opens a Save As screen
Opens a Request & Search screen
Deletes the current screen
Sorts the entries of a list
Prints the current screen
Opens screen-specific help
Opens a Search screen
Opens keyboard-specific help
Runs the Replication Filter
Opens the Help file
Accepts the current screen
Other buttons can be added to the toolbar on the Preferences screen. {Misc > Preferences}
Accessing Help
There are several ways to access the online Help while working in COMMANDseries:
•
•
•
•
18
For help specific to the screen in which you are currently working, press <Ctrl+Alt +
F1> or click the Screen Help icon on the toolbar.
For help with the functions of the keyboard, press <Shift+F1> or click the Keyboard
Help icon on the toolbar.
From any COMMANDseries application, click on the Help menu located on the far
right of the COMMANDseries menu bar. Select a specific help function, such as
Screen Help, Keyboard Help, Contents, How to Use Help, or the About window.
From the COMMANDseries Program Group in the Windows menu, select the Help
icon.
How to Use This Document
Five Important Functions
COMMANDseries has a wide variety of tools and commands, and new users can easily find
themselves overwhelmed by the different options. Despite the large number of options,
four commands will serve you in most situations.
Entering Dates
The <Tab> Key
Accepting (Saving) Screens
Add Occurrence
Detailing
Entering Dates
You enter a lot of dates in COMMANDseries, and you have a great deal of flexibility in how
you enter them:
•
•
•
•
•
<Tab> through the field to enter the current date.
The days of the week are numbered 1-7, with 1 being Monday. Entering a number
between 1-7 will enter the next occurrence of that particular day. If it is Wednesday,
September 27, and you enter a 4 (Thursday), the system will convert that to September
28. If, however, you enter 3 (Wednesday), the system will convert that to October 4—
the next occurrence of Wednesday.
Enter the first three letters of the day. The system will enter the next occurrence of that
day.
Enter +1 for tomorrow’s date, +2 for the day after tomorrow, etc.
COMMANDseries recognizes standard date separators. You can enter January 3, 2009
as 1/3/09, 1-3-09, or 1.3.09. You can also omit separators altogether; however, when
omitting separators you should include leading zeroes to prevent any confusion:
010309. If no year is specified, COMMANDseries will default the current year.
The standard display format, as well as the default on the Date Order (Month before day or
vice versa) is configurable at both the system (Configuration > Defaults) and user
(Preferences > Users) level.
The <Tab> Key
COMMANDseries is a form-based program – most screens are essentially simply forms.
To move from field to field, press <Tab>. Doing so will move the flashing cursor (which
may also be referred to as the focus) through the entire form.
There are a couple of additional things to remember about the <Tab> key:
•
•
<Shift+Tab> takes you back one field, which can be useful if you overshoot your
target.
The cursor not only moves from field to field, but also moves across the buttons on the
screen. If the cursor is resting on a button, a faint box appears inside it.
How to Use This Document
19
The cursor is on this button.
•
If you can’t find the cursor in a field, look at the buttons. If the cursor is on a button,
you can access the button by pressing <Enter>.
For a standard keyboard, COMMANDseries remaps the numeric keypad <Enter>
key to function as a <Tab> key. This mapping allows for more efficient data entry. This
remapping is only for COMMANDseries; in most other programs, the key functions
as a standard <Enter> key.
To issue the <Enter> command, use the main <Enter> key (the one that is equivalent to
<Return> on a typewriter). This key is sometimes referred to as the “Center Enter” key.
Accepting (Saving) Screens
Throughout COMMANDseries you will often need to save your work (also known as
committing data to the database). There are a host of different screens in
COMMANDseries, but they all have one thing in common: the Accept command. The
Accept command is the same as Save, OK, Execute, etc. There are a number of different
ways to accept a screen:
•
•
•
•
Pressing <F2> is the most common method.
Clicking on the toolbar Accept button (a green checkmark).
Selecting the File > Accept menu option.
Clicking on the screen’s Exit button. When you close a screen that contains new or
changed information, a dialog box displays, asking whether or not you want to save this
new information.
Because the command “Accept” does not refer to a single button or key, in the
documentation, the word accept will not have any special formatting. For example, “you
must accept the screen to continue.”
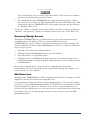
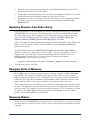
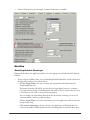
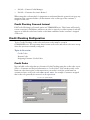
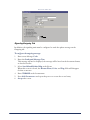
Add Occurrence
Many forms in COMMANDseries call for varying amounts of data. For example, one order
might have only one item, but the next might have four.
For any situation in which you finish entering something and say, “I need to enter another
one of these,” use the Add Occurrence button. The hooked arrow on the button is taken
from the symbol on a typewriter’s <Return> key—the key you pressed whenever you
needed a new line. Anytime you see it, you can select it to create another line for data entry.
For example, if you are entering job types and need to enter a new one, press the Add
Occurrence button:
20
How to Use This Document
Example of the Add Occurrence button
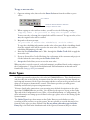
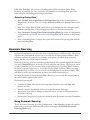
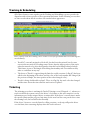
Detailing
Many COMMANDseries fields link to other data sources. For example, the Customer
Code field on the Order screen is linked to the Customer file, item codes to the Item file,
etc. Such fields will only accept values that already exist in those linked records.
Sometimes you know what needs to be entered in these fields; in those cases, you can
simply enter the data, press <Tab>, and move on. However, sometimes you need to look
up the appropriate entry, such as a Customer Code, an Item, a charge table, etc. If you need
to look up an value from a list of available options, press <Enter>. A form will display a list
of selections available for that field.
Some fields allow for more advanced lookup options. These options are discussed in the
next section, SmartLookup.
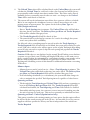
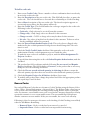
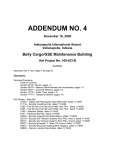
Some fields also have small buttons next to them that have the same effect:
Example of fields with detail buttons
These small buttons are called detail buttons. Clicking on the detail button will do the same
thing as pressing the <Enter> key. In this example, to retrieve a list of all the architects in
the system, you could either:
•
Press <Tab> until the cursor is in the Architect field, then press <Enter>
•
-orClick on the detail button to the left of the Architect field, regardless of the location of
the cursor.
The act of bringing up a list of available choices, whether by using the detail button or the
<Enter> key, is referred to as “detailing on a field.”
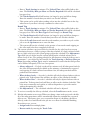
Some types of fields have specialized detail buttons, such as date fields:
Example of a Date button
How to Use This Document
21
Even though the button is different, its place to the immediate left of the Order Date field
lets you know that it is a detail button.
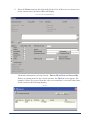
SmartLookup
Many COMMANDseries procedures involve entering codes. It is important that you feel
comfortable finding customer-related information in the system. These directions are based
on an order entry screen; however, this procedure will work anywhere you have to enter a
customer code.
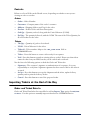
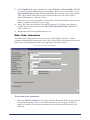
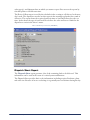
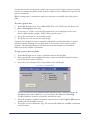
SmartLookup is available for many fields which are linked directly to a database tables.
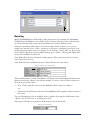
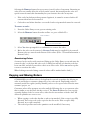
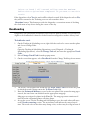
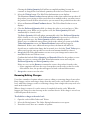
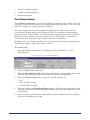
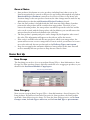
Standard Lookup
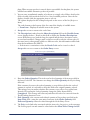
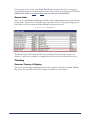
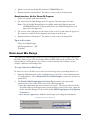
To look up a customer code:
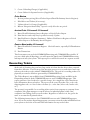
1.
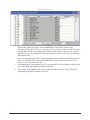
Enter the first few characters of the customer’s Sort Name, and press <Enter>. The
system will display a list of all customers whose Sort Name begins with those
characters:
Customer Lookup
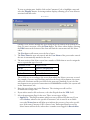
2.
•
•
22
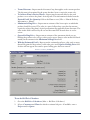
The lookup screen displays reference information above the actual list:
The active lookup file (Customer)
The entered search string (“C”)
Sort key (Records selected by: Sort name)
Double-click on the Customer Code to load a specific customer into the active editor.
If only one customer matches the entered search string, it will be automatically loaded
into the active screen.
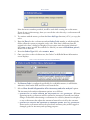
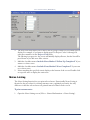
If the search finds more than 5000 matching records, the system will warn you with the
message, This listing will retrieve more than 5,000 records and
will take longer than normal. Cancel and Continue buttons will allow you to
decide whether to continue with the lookup.
How to Use This Document
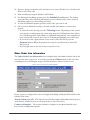
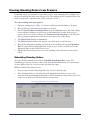
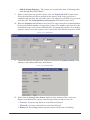
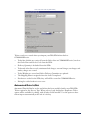
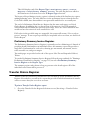
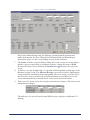
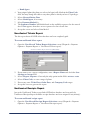
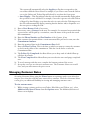
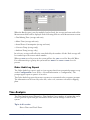
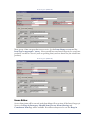
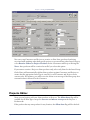
Customized Lookup
In some cases, you may need to modify a search.
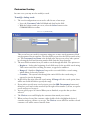
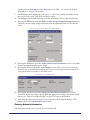
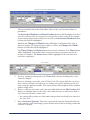
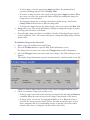
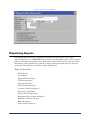
To modify a lookup search:
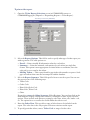
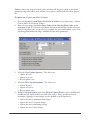
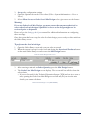
1.
The search configuration screen can be called in one of two ways:
Leave the Customer Code field blank and detail on the field.
With the lookup results on screen, select the Select button on the
COMMANDseries toolbar.
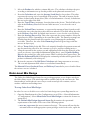
Select screen (FNDCODE)
2.
3.
4.
5.
6.
7.
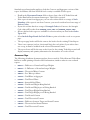
This screen lets you search for customers using one or more search parameters. Each
search parameter has its own line. The first field lets you select the field you wish to key
on. The Customer Sort Name is the default value, but you can select other options
by selecting the field and choosing another field from the drop-down list.
The next field determines how you wish to search through that field. The options are:
Begins as - Looks at the beginning of each field entry for the specified search string.
This is most useful for searching for names, as opposed to numbers.
Range of - Similar to Begins as, but provides a second field for a search string,
which allows for broader searches.
Contains - The system looks through the entire field for the search string, as
opposed to just the beginning.
In the field to the right, enter the search string. If Range of is the search option, there
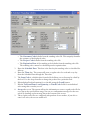
will be two fields in which to specify the range.
If you wish to specify more search criteria, press the Add Occurrence button and
then place your cursor in the next field (to the right of the number 2). If not, accept the
screen and proceed to step 6.
You can specify up to 10 criteria. When you are finished, accept the data you have
selected.
The Choices screen will display the customers that match your criteria.
When you have located the customer, either double-click or highlight the desired
customer and press <Enter> to accept. The Choices screen will close and the selected
customer code will be entered into the form.
How to Use This Document
23
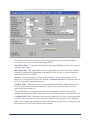
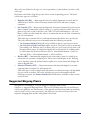
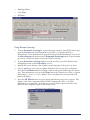
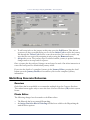
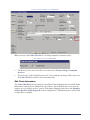
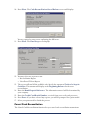
.NET Fndcode
A .NET version of FNDCODE, the COMMANDseries lookup utility, is now available.
This new utility provides additional functionality as well as greater flexibility as
COMMANDseries continues to develop.
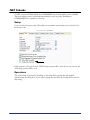
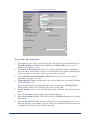
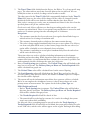
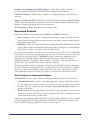
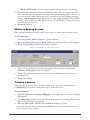
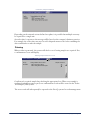
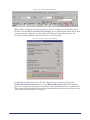
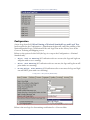
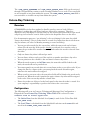
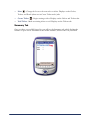
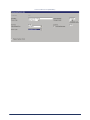
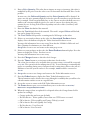
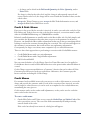
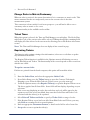
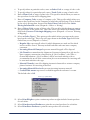
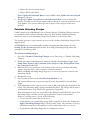
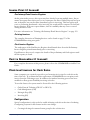
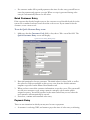
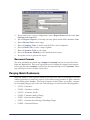
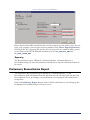
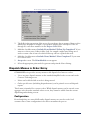
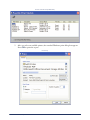
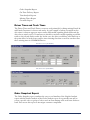
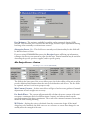
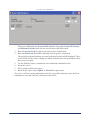
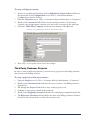
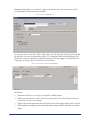
Setup
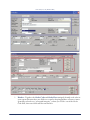
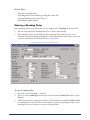
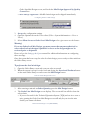
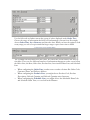
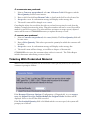
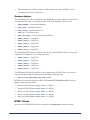
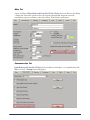
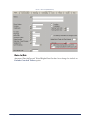
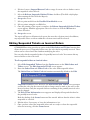
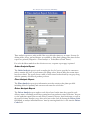
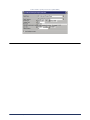
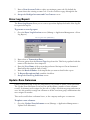
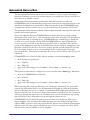
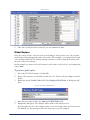
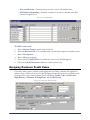
Users can choose between the old lookup screen and the new lookup screen on the UserPreferences tab:
User Preferences (SYSPREF2)
If this option is selected, the new .NET lookup system will be used. If it is not selected, the
old lookup system will be used.
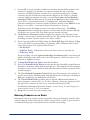
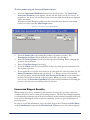
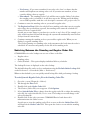
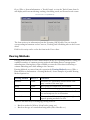
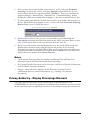
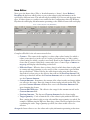
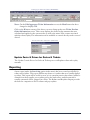
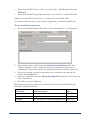
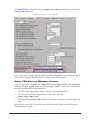
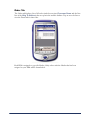
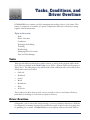
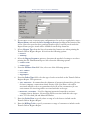
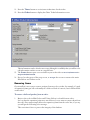
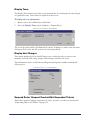
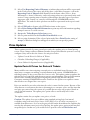
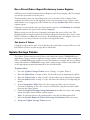
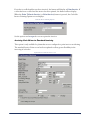
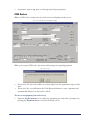
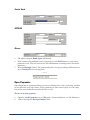
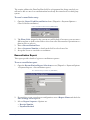
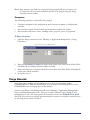
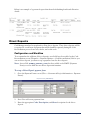
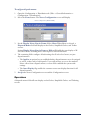
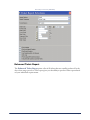
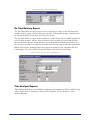
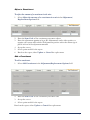
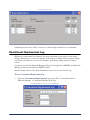
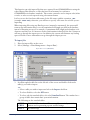
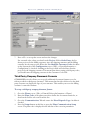
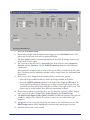
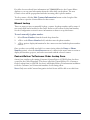
Operations
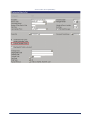
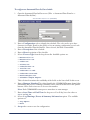
The new lookup is invoked by detailing on a lookup field, just like the old method.
SmartLookup is still in place; if you enter a string into the field, the lookup will search for
that string.
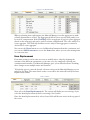
24
How to Use This Document
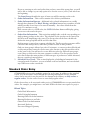
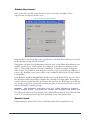
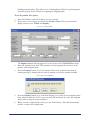
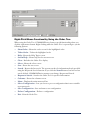
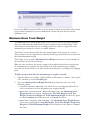
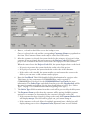
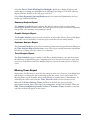
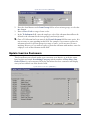
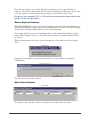
Customer lookup, “A”
To load a record, double click anywhere on the line; in the CS08/Uniface lookup, you had
to double-click on the Primary Key field (in this case, the Customer Code). You can also
select a record using the up/down arrow keys.
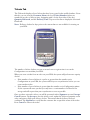
The screen supports basic Windows functionality:
•
•
•
•
Clicking on a column header will sort the list on that column. Clicking on the column
again will toggle between ascending and descending sort order.
You can resize a column either by dragging the separator between column headers,
which allows you to set the column width as desired, or by double-clicking on the
separator, which automatically sets the column width to the width of the longest field
in the column.
You can rearrange the columns by dragging and dropping the column headers.
You can enter a different search string in the Fine Tune field; the lookup list will update
automatically. Anything you type will automatically go into this field.
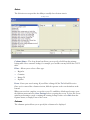
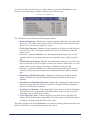
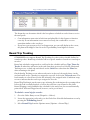
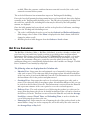
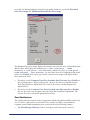
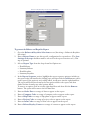
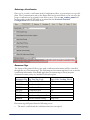
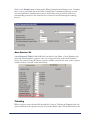
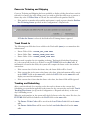
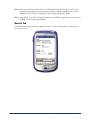
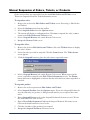
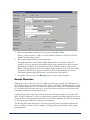
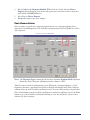
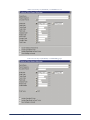
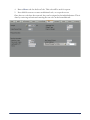
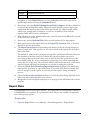
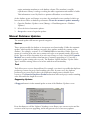
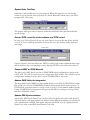
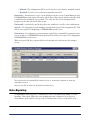
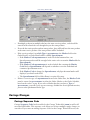
Options
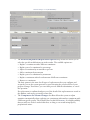
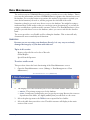
If you right-click anywhere on the screen but the title bar, the options menu will display.
Options
How to Use This Document
25
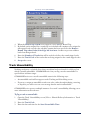
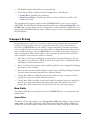
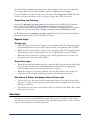
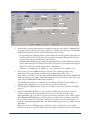
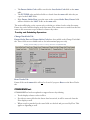
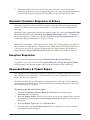
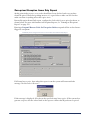
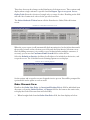
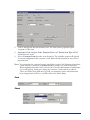
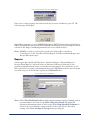
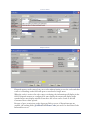
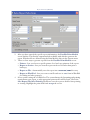
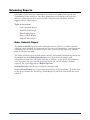
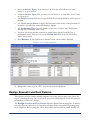
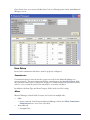
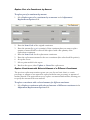
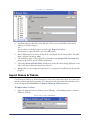
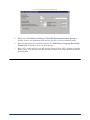
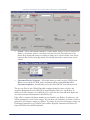
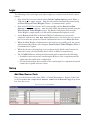
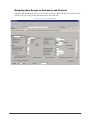
Select
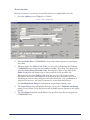
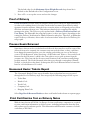
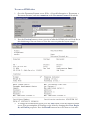
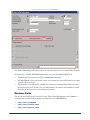
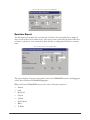
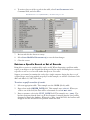
The Selection screen provides the ability to modify the selection criteria.
Lookup-Select
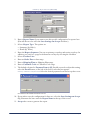
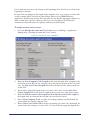
Column Name – The drop-down box allows you to specify a field from the primary
lookup table. On a customer lookup, for example, you can filter on any field in the CUST
table.
Filter – Allows you to select a filter type:
•
•
•
•
Begin As
Contains
Range Of
Equal to
From – Enter your search string. If your Filter is Range Of, the To field will be active.
Once you’ve entered the column criterion, Add the operator to the search window at the
bottom.
When your search is complete, accept the screen. To establish a default search setup, open
the Options menu and select Save Settings before accepting the screen. To close the screen
without performing a search--retaining the existing lookup results--select Exit from the
Options menu, or simply X out of the screen.
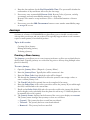
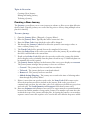
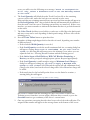
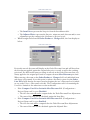
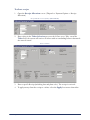
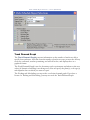
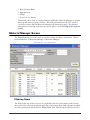
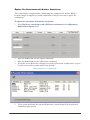
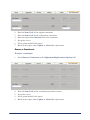
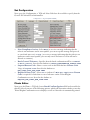
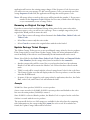
Columns
The columns option allows you to specify the columns to be displayed.
26
How to Use This Document
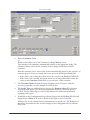
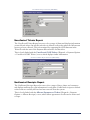
Columns
The left column displays all of the fields available for display. The middle column lists the
current fields, and the right column shows the database name of those fields.
To add a field, either double-click on the field in the left column or select it and press the
right-pointing double arrow.
To remove a field, select the field in the middle column and press the left-pointing double
arrow.
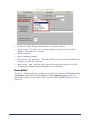
By default, the middle column shows the standard database label for each field. That name
will be used as the column header in the lookup display. If you want to change that label,
double click on the label.
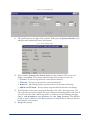
Changing Column Labels
Enter the new label and accept the screen.
Once you’ve finished modifying the columns, accept the screen to enact the changes in the
lookup screen.
How to Use This Document
27
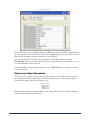
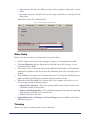
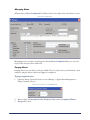
Save Settings
This command will save the configuration of your current lookup for future use.
Configurations are maintained for each lookup–customer, item, order, etc.
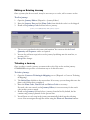
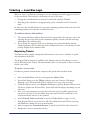
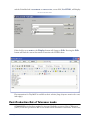
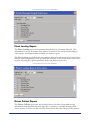
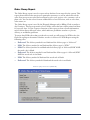
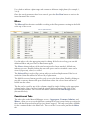
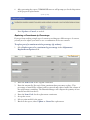
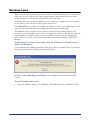
Show Query
The Show Query option displays the actual SQL query command that was used to generate
the current list.
Show Query
This option is primarily used as a troubleshooting tool.
Note: You cannot enter new queries in this screen.
About
This option displays the information screen for FNDCODE.
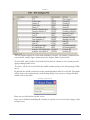
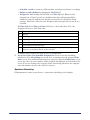
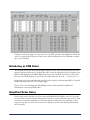
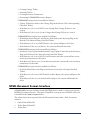
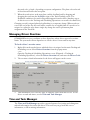
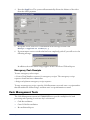
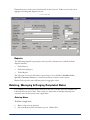
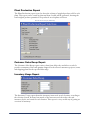
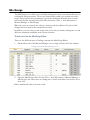
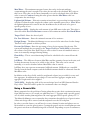
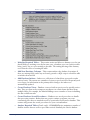
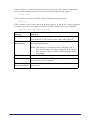
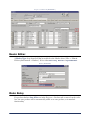
Code Lists
Many fields in COMMANDseries, such as the Item Type field in the Item Category editor,
are Code List fields.
Item Category editor (EDTICAT)
When you look at the Item Type drop down, you see descriptions of different item types.
But when you select one, a numeric code is saved in the database–that code is linked to a
code list. This method of data storage saves space–only two characters per item type are
required, as opposed to a 20-30 character description. Multiply that difference by several
thousand, and you can better appreciate the practice.
The downside of this method is that previously, if you were to retrieve an item category
record in Data Maintenance, all that would be listed in the Item Type field would be a
number–which doesn’t help.
28
How to Use This Document
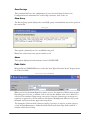
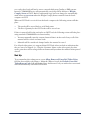
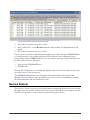
The new Lookup screen can include both the field value and the associated label for code
list fields. To enable this feature, you simply have to import data into two tables, CDLS
(Code Lists) and MSGS (Messages). These two files are located in the CMDSERIES\Import
folder.
Once they have been imported, code list fields will be displayed in the lookup field by the
description, followed by the code in parentheses.
Code Lists (Item Type)
Code List Editor
An editor has been added to COMMANDseries (Files > System Information > Code
Lists) so that users may review and even edit code list entries.
How to Use This Document
29
Code Lists (ECDLS)
To use the editor, select a database table in the File drop-down. All of the codelist fields in
the selected table can then be selected from the Column drop-down. If no fields are listed,
then the selected table currently contains no code list fields.
Once you’ve selected a field, the system will pair each Code with it’s associated
Description. You may edit descriptions, but you cannot change the code values, nor can
you add additional codes to the list.
Command Alkon strongly suggests that you use COMMANDseries security to control
access to this form.
Exporting Lookup Information
The Select screen allows you to create relatively complex searches. If necessary, you can
now export the lookup results, either to an Excel spreadsheet or to Notepad, using the
buttons at the upper right of the lookup screen.
Exporting Lookups
Both buttons export the current lookup screen, using only the active columns. Notepad
exports will be semi-colon delimited:
30
How to Use This Document
Export to Notepad
The Calendar
Use the Calendar feature in COMMANDseries to simplify date entries. You can use it
whenever you see the Calendar button. The Calendar button will usually be found next to
the Date field. You can also invoke the calendar by pressing <Enter> when the cursor is in
a Date field.
Keystroke
<Tab> / Left Arrow
<Shift+Tab> / Right Arrow
Up / Down Arrow
<PgUp> / <PgDn>
<Ctrl+R>
<F11>
<F2>
{File > Search}
Function
Advances one day
Backs up one day
Previous Week/Next Week
Previous Month/Next Month
Invokes the Calendar
Searching toggle
Closes the Calendar
Searches for a month
You can also press <F6> to execute the Add Occurrence command.
How to Use This Document
31
Order Entry
Order entry is the foundation of COMMANDconcrete and COMMANDaggregate.
Orders are taken and tickets generated while capturing data for invoicing and reporting.
Topics in this section:
Standard Order Entry
Scheduling an Order
Scheduling an FOB Order
Standing Order Entry
Contract Integration in Order Entry
Order Entry Screen Layout
A lot of information is contained on the Orders screen, so it’s a good idea to be familiar
with the layout.
32
Order Entry
Order Entry Layout (EDTCORD)
1.
Order Entry
Header – Together, the Order Code and Order Date uniquely identify each order in
your system. Because these two fields are central to keeping database references intact
(generally referred to as “referential integrity”), when you <Tab> out of the Order
Code field, these two fields will become inactive.
33
2.
3.
4.
5.
If you are entering an order and realize that you have entered the wrong date, you will
not be able to change it; your only option is to clear the screen (<F4>) and start from
the beginning.
The Item Group identifies the type of items you will be entering on the order.
Order Information – This section contains order delivery information.
Order Information Buttons – Additional order related information is accessible
through these buttons. The Haul, Pricing, and Other buttons have a number of fields
which generally do not have to be entered manually – the values default from the
project or customer record.
If the current order is a COD order, the COD Calculator button will display, giving
you access to the total order price.
Order Line Information – This section has multiple tabs, each tab corresponding to a
single primary product on the order. The schedule for the product can be entered on
the tab as well, simplifying order entry. The first product on the first schedule tab
defines the item group that will be used for that order.
Each item type is entered on a separate schedule tab. The first product you enter will be
considered the main product, with other products treated as extra products.
Only one item group is allowed per order. For instance, a concrete product (block) and
a ready-mix product cannot be on the same order, but two ready-mix products can be
on the same order. You will need to create different orders for different item groups,
even if they are delivered to the same customer or address. The first product on the
order line defines the main product; if different types of products are added afterward,
they are considered extra products.
Schedule Price Totals – This section displays the scheduling information for the
current Item tab. From here, you can schedule each load and ticket, and can schedule
any COD items on the current tab.
Standard Order Entry
COMMANDseries provides multiple options for order entry. In addition to the standard
screen, you can also enter orders through the ticketing and dispatch screens. Standard
orders can be entered for any day, and are also known in the industry as daily orders or
regular orders. Use the orders screen to enter daily/regular orders.
Orders do not have to be associated with a project. COMMANDseries accepts stand-alone
orders. For example, you might have a one-time FOB order that is not a part of a project.
Related Topics:
Order Haul Information
Order Pricing Information
Entering Other Order Information
Entering Products on an Order
Other Order Line Information
Associated Products
Forecasted Shipped Quantity
34
Order Entry
To enter an order:
Because of variances in versions, screen fields may be in a slightly different order.
1.
Go to the Orders screen {Dispatch > Orders}.
Orders - header (EDTCORD)
2.
3.
4.
5.
Order Entry
Enter an Order Date. COMMANDseries provides many options for entering an
order date.
The next field is the Order Code. If this is a new order, tab through this field and
COMMANDseries assigns the next number available. To look up an existing order,
enter the Order Date and Order Code. Pressing the <Enter> key while in the
Order Code field will display a list of orders entered for the specified day.
When you tab out of the Order Code field, the top part of the form becomes
unavailable; this header information is now locked, to prevent another user from
attempting to make an entry using the same order date/order code combination. If
either field is incorrect, the entire form must be cleared and entered anew.
See Standing Order Entry for information on entering a standing order.
The Item Group value will defaults from the current user’s Default Item Group
setting, located on the Users-Preferences tab. Available options depend on the system
license.
The User Plant defaults from the Plant Code specified when the user logged into
COMMANDseries.
35
Orders (EDTCORD)
6.
7.
8.
9.
36
Enter a Customer Code
-or-
Detail on the field to access the Customer Lookup Choices screen.
The customer code and name automatically transfer to the appropriate fields. The
Customer Name can be edited; you may need to change the Name for COD
customers.
After the customer code is entered, the system automatically checks for the existence of
customer projects. If any are found, the cursor moves to the Project Code field.
If the credit code is valid, the system moves the cursor to the Project Code field.
If the credit code is invalid, the system warns you of the problem and returns the
cursor to the Customer Code field so you can enter a valid customer.
The Customer Name defaults from the Customer record. It can be edited if
necessary; generally, it is only changed for COD orders.
The Order Type can default from the project file; Regular Sale will be the most
frequently used option. Use the drop-down button to select a different option if
needed. (See the Order Types section of this manual for additional information
regarding order types.)
If enabled on the Configuration-Project/Frame Project tab, the Deliver To field will
display. Enter a Deliver To code or Detail on the field to select from a list.
A Deliver To record contains delivery information to a specific site. The Behavior of
this field is determined by the various settings on the Configuration-Project/Frame
Project tab
Order Entry
10. If this is a project order, enter a Project Code. Press <Enter> to display a list of
projects for the selected customer.
If you select a project, the system verifies the project’s credit code. If you do not enter a
project, the system will check the customer’s credit code. Depending on the results of
the verification, the system behaves as follows:
If the customer has been cleared for charge orders only, the Payment Form field
will display Charge. The field will be grayed out; you cannot change it.
If the customer credit code allows for multiple payment forms, a dialog box will
display asking you to select a Payment Form—Payment Forms are user defined.
Select a radio button and accept the dialog box. The selected option will display in
the Payment Form field. The field will be active: you can press the drop-down
button to change the payment option.
There is a button to the right of the Payment Form field, labeled with a dollar sign
($). This button brings up a screen for additional information about the customer’s
payment. For checks, you can enter bank and check information; for credit cards,
enter the last four digits of the card number, the card type, and expiration dates.
If you have multiple cash-only payment forms, the Payment Form field will
activate; press the drop-down button to select from the list.
A dialog box may appear with some sort of warning message: Contact Credit
Dept. before taking an order for this customer. Press OK to
continue. The Payment Form field will then display whatever method has been
approved for the customer. You may be prompted to select a payment form.
If the Customer has been assigned a No Sale credit code, a dialog box reading No
Sale will appear. Once you select OK, the order form will clear. You cannot take an
order for a customer with a No Sale credit code.
If you do not select a project, the system verifies the customer’s credit code and then
performs one of the steps below, as necessary. To continue with the order, you will need
to enter a Delivery Address (required field). You may also enter a Purchase Order,
Job Number, Map Page, Zone Code, and Additional Instructions as necessary. If
the selected customer has no projects, the field will not be available.
If you have purchased COMMANDcredit, a credit checking module, additional credit
management features are available. Please refer to Appendix B: Credit Checking for
additional information.
11. Enter the Lot/Block. This field identifies lot/block information for a project order.
This feature is a key component of COMMANDlien, and is required if
COMMANDlien is licensed. See the COMMANDlien User Guide for more
information.
12. The Map Page field identifies the map page on which the job site is located. Unlike
the Zone Code, which is associated with the map page, the map page represents the
distance from a given plant to a specific location, identified by its location on a map
page in your company’s map book. If map pages have been entered,
COMMANDseries dynamically inserts travel times based on travel times entered for
the time period when the delivery is made. The Show Map Page in Orders/Tickets
checkbox on the Dispatch tab of the Configuration screen must be marked for this
field to be available.
Order Entry
37
13.
14.
15.
16.
17.
18.
19.
20.
If you change the Map Page that defaulted from the project, COMMANDseries
automatically changes the Travel Time to correspond with the corrected map page.
The Delivery Address, Instructions, Zone Code, Purchase Order, and
Customer Job default from the project file. Edit this information as desired.
If you do not select a project, enter a Delivery Address (required field).
Enter a Lot/Block code.
The Delivery Address is the address of the job site where products are scheduled for
delivery. This may include city, state, and code. Although there is no practical limit to
the length of the address that can be keyed into the system, the physical printing space
available on the order form and ticket form must be considered. This field is required.
Detailing on the Delivery Address field opens a text box. If you are interfaced to
Microsoft MapPoint, refer to the Microsoft MapPoint User Guide.
The Instructions field contains order-specific instructions that can be printed on the
order's tickets. The text box allows for lengthy instructions; however, practically you
are limited to the available space on the ticket. These layouts are defined in the
Document Formats editor {Files > General Information > Document Formats}.
The Zone Code may be required to establish cartage rates, zone charges, or tax
authority. The Zone Code value can default from a project or from a map page. Press
<Enter> or detail on the field to display a list of zones entered in the system.
The customer’s Purchase Order number is optional by default; to make it required,
go to either the Customer or Project screen and select the Accounting tab. Check
the Purchase Order box in the Required in Order Entry section. If this field is
required, the entire field will be shaded.
Enter the Delivery Method. Select a delivery method from the available list. The
Delivery Methods field identifies the order as Delivery F.O.B. Various levels of detail
can be set up for Delivery and F.O.B. delivery methods {Files > Plant & Delivery
Information > Delivery Methods}.
Enter the Current Status. This is the current status of the order. Choose from
Normal
Will Call
Weather Permitting
Hold Delivery
Completed – An order with a status of Completed will not display on the
Tracking and Scheduling screens, regardless of whether or not the order has actually
been completed.
Review – Any order entered or edited by a customer user (a COMMANDseries
user assigned to a customer for order entry) will automatically be assigned to this
status.
Once an order has been ticketed, Will Call and Weather Permitting are not available.
Order Haul Information
Order haul charges are initially established by the customer and/or project files. Most of the
time, there is no need to modify these settings during order entry. In some cases, however,
38
Order Entry
you may want to modify or review the haul charges for an order. The settings on this screen
serve as defaults for order line (item-level) haul information.
The haul charge settings are accessible through the Haul button on the order screen.
To modify order-level haul charges:
1.
2.
On the Order Entryscreen, enter a customer code and, if necessary, a project code.
The Haul button will not display until a valid customer code has been entered.
Select the Haul button. The Order Haul Information screen displays.
Order Haul Information (EDTORDR1)
The existing information has defaulted from the customer or project files. Any changes
made to this screen will not affect those files, but will instead affect only this order.
3. Enter a Cartage Charge Table, or detail on the field to select from a list.
4. Charge tables have a default rate (or rates). If you want to change that rate for this order,
enter an Override Rate for the cartage charge.
5. Enter a Surcharge Code, or detail on the field to select from a list.
6. If necessary, enter an Override Rate for the surcharge.
7. If necessary, select Apply Surcharge to Hauler Pay.
8. If necessary, select Add Occurrence to add another surcharge.
9. Enter an Override Pay Table, or detail on the field to select from a list.
10. If necessary, enter an Override Rate for the pay table.
11. If necessary, select Apply Minimum Haul Pay.
12. Accept the screen to save the settings and return to the Orders screen.
Order Pricing Information
The Order Pricing Information screen {Dispatch > Orders > Pricing} lets users set
various pricing and taxing related information. This information defaults from either the
customer or project Pricing Information screen. While order takers sometimes open this
screen for reference, changes are seldom needed.
Order Entry
39
Access to this screen can be controlled through user privileges.
To enter order pricing information:
1.
Open the Order Pricing Information screen by pressing the Pricing button on the
Order Entry screen {Dispatch > Orders > Pricing}.
Order Pricing Information (EDTCORD2)
2.
3.
4.
5.
40
Change the Pricing Plant Code if necessary. This field identifies which plant these
products are priced from for this specific order. This code is found in the Plant Code
field in the Plants file {Files > Plant & Delivery Information > Plants}.
The pricing plant can default from the scheduled delivery plant by selecting Default
Pricing Plant from Scheduled Plant in the configuration of COMMANDseries
{File > General Information > Configuration > Dispatch}.
If you choose to apply Minimum Load, Seasonal, or Unloading Charges, you must also
specify what charge table to use. When the boxes are checked, a field will display to the
right of the label. Detail on the field to select from a list.
Select Apply Zone Charges if necessary. Zone charges are calculated based on the
Zone Code field. This option is rarely used in the aggregate industry. Check with your
CA customer service representative for further information.
To Apply Seasonal Charges, select that checkbox. The seasonal charges are
calculated based on the Seasonal Charge Table field. Select the seasonal charge table
using the detail button.
To Apply Unloading Charges, select that checkbox. Unloading charges will be
calculated based on the Unloading Charge Table field. Select the unloading charge
table using the detail button.
Order Entry
6.
7.
8.
9.
10.
11.
12.
13.
14.
15.
16.
17.
Enter a Cartage Charge Table, or detail on the field to select from a list.
Charge tables have a default rate (or rates). If you want to change that rate for this order,
enter an Override Rate for the cartage charge.
Enter an Override Pay Table, or detail on the field to select from a list.
If necessary, enter an Override Rate for the pay table.
Enter a Surcharge Code, or detail on the field to select from a list.
If necessary, enter an Override Rate for the surcharge.
If necessary, select Apply Surcharge to Hauler Pay.
If necessary, select Add Occurrence to add another surcharge.
To Apply Sundry Charges to an order, select that checkbox. Sundry Charges are extra
charges added to an order, such as after-hours delivery, a weekend delivery,
environmental charges or a minimum ticket charge. Sundry Charges provide you with
a way to charge customers for purchases that exceed normal circumstances.
You can assign sundry charges at the project, customer, and order level.
Enter the Tax Code for the plant/order. This field identifies the tax code representing
the location where the load ownership changes. This code will be the taxation point for
the order and all of its tickets. Origination-based taxation, destination-based taxation,
all taxable and non-taxable sales, and the tax amount itself, are related to the tax
authority/locations assigned to this tax code. The Order Tax Code can default from
several different locations: Customer, Project, or Zone.
Because some orders have more than a single taxation point, you can adjust both the
Plant Tax Code and the Order Tax Code separately, if necessary. Once the order
ships, however, only the Plant Tax Code may be modified.
In the Taxable field, choose whether the order is Taxable or Non-Taxable.
If the order is non-taxable, the Non-Taxable Reason Code field will display. This
field identifies the reason the order is non-taxable. Enter a code or detail on the field to
select from a list.
The system will not save a non-taxable order unless a reason code is specified.
If an order is set to be non-taxable, each order line on the Order Report shows as nontaxable, regardless of how the item is set up.
Accept the Order Pricing Information screen.
Entering Other Order Information
The Other Order Information screen {Dispatch > Orders > Other} contains additional
fields related to the order. Any of these fields can be printed on the order and/or ticket by
including the fields in the appropriate document format. Salesman and Tracking Order
Color are required to accept the order.
All of this information generally defaults during order entry. You will not have to change
values on this screen very often.
Order Entry
41
Other Order Information (EDTORDR3)
To enter other order information:
1.
2.
3.
4.
5.
6.
7.
8.
42
The employee code of the person entering the order into the system defaults into the
Taken By Employee Code field, but only if the COMMANDseries user code is
linked to the employee’s code.
The Taken on Extension field lets you record the extension number on which the
order was taken. Some phone systems record all calls based on extension. Entering the
extension on this screen makes it easier to retrieve the stored call.
The Ordered by Name/Ordered by Phone fields are used to store site-specific
information relating to the order.
Tracking Order Color determines the color used to display the order on the Tracking
and Scheduling screen.
If the scheduling plant is changed after the order is accepted, the Tracking Order
Color defaults to the color specified by the order, not the plant.
Pocket Number lets you store the filing pocket where the hard-copy order form was
placed.
Enter the Salesman who generally works with this customer.
Enter a Sales Analysis Code. This field is used by COMMANDexecutive to generate
Sales Reports.
Enter the Resale PO number where necessary. This is an optional field used to store
the resale purchase order number of goods. This is an optional field which can be used
to display in the details section of Ticket Data Out.
Order Entry
9.
10.
11.
12.
13.
14.
15.
16.
It is possible to set up a number of different customers that play different parts in the
system. For example, you may have one customer making the order (reference
customer) on behalf of another customer. The customer that will pay for it (billing
customer) may also be different. It may then be shipped to one of those or another
customer (shipping customer). In order to use this functionality the Use Multiple
Customer Codes checkbox must be checked on the Main tab of the Configuration
screen {Files > General Information > Configuration}. Individual Shipping
Customer and Reference Customer details can then be defined on the Main tab of the
Projects screen {Files > Customer & Project Information > Projects}.
In the Projects file, the billing customer is the owner of the project. The Billing
Customer defaults to display the customer code and name for the customer that will
be billed for the current order. This field is greyed-out and read only.
The Reference Customer defaults to display the customer code and name for the
reference customer that is defined in the Projects file. This will typically be the same as
the billing customer, but there may be cases where it differs.
If your system is enabled for GPS tracking, the Truck Poll Type field displays. Polling
refers to the GPS base system polling, or requesting, GPS coordinates when a truck
enters On Job status. The options for this field are:
Do Not Poll
Poll First Truck – Poll the first truck on an order to arrive at a specific site
Poll Every Truck
If you are polling, select the Update Order Map Coordinates field to have the newly
polled coordinates written back to the order. This option is useful if an order is to be
delivered to multiple locations.
To Print Mix Weights on Ticket, mark that checkbox.
Select Use Alternate Scale Printer to state that the ticket should be printed from an
alternative scale printer, rather than the principle one. This might be used for a number
of business reasons, but is commonly used when the business wishes to print the ticket
on different paper.
The User Defined Comments Code field lets you select messages to be printed on
an order and/or ticket. Detailing on the field will display a list of messages containing an
ALL type, available for use with Orders and Tickets.
The User Defined Fields area allows users to append additional information on
orders, payments, customer files, etc. To add a comment, click in the appropriate field
and type in the comment. In some cases, comments will already be there.
For additional information about these features, see the Message Text and Configuration
sections in the Setting Up the System manual.
Accept this screen to save your changes, if any.
Entering Products on an Order
Information entered up to this point has determined who is purchasing the material, where
it will be shipped, and how the customer will be charged. Now it’s time to get to the heart
of the matter and specify exactly what item the customer is purchasing.
Order Entry
43
Obviously, every order requires at least one product. However, some orders require
multiple products, and some mixes have additional products—admixtures—associated with
them.
If you have products that are associated with the mix (primary product), removing or
changing the mix product will remove all associated products from the order. The extra
products will remain with the order.
Each primary product, along with its delivery schedule, is entered on a separate tab.
To add products to an order:
1.
Enter the Item Code, or detail on the field to select from a list.
Product Order details (EDTCORDTAB)
2.
44
The first product on the first schedule tab defines the item group that will be used for
that order.
Each item type will be entered on a separate schedule tab (up to a maximum of ten).
The first product you enter will be considered the main product, with other products
treated as extra products.
Only one item group is allowed per order. For instance, a concrete product (block) and
a ready-mix product cannot be on the same order, but two ready-mix products can be
on the same order. You will need to create different orders for different item groups,
even if they are delivered to the same customer or address. The first product on the
order line defines the main product; if different types of products are added afterward,
they are considered extra products.
Each Schedule is entered on a new tab. You cannot create a second schedule until you
have filled out the current one. Create a new tab via one of the following methods:
Click on the + tab icon.
Press F6 while the cursor is in the schedule line.
Right-click with your mouse on the order and select Add Schedule.
Remove a schedule tab via one of the following methods:
Press F5 while the cursor is in the schedule line to clear the schedule line, then press
F5 again to remove it.
Right-click with your mouse and select Remove Schedule.
Regarding Economic Sourcing, when a product is entered on the Order Entry screen,
the product with the best cost for available plants will be assigned to the scheduling
Order Entry
3.
4.
5.
plant. When an extra product is entered that is not available for that plant, the system
will find an available alternative product if possible.
You can enter an unlimited number of products on a single order. Either detail on the
field or double-click inside the field to see a list of available products. Once the list
displays, double-click the appropriate item to select it.
The options displayed in the lookup list depend on the source of the list (Project or
Item).
The radio buttons at the bottom of the list control the display of available items.
From Item - Displays all saleable items in the system.
Accept the screen to return to the order lines.
The Description is taken from the Short description field on the Possible Items
screen, displayed above. Detail on this field to display the Product Descriptions
screen. With this screen, both the long description and the short description can be
accessed and modified. Changes made on this screen affect only the current order. If
the same item is subsequently added to a different order, this information will default
from the Item Master file (IMST).
If the item is a constituent or mix, the Batch Code can be viewed or edited.
Accept this screen to return to the Order Entry screen.
Product Descriptions (EDTSHIP5)
6.
7.
8.
Order Entry
Enter the Order Quantity. This is the total ordered quantity of the item specified in
the Item Code field. The customer can change the Order Quantity the day it is being
delivered.
If the customer decreases the ordered quantity, or stops delivery before the ordered
quantity is reached, it is advisable to keep this field at the original quantity ordered.
This strategy lets you analyze whether this customer over-orders on a regular basis.
Instead of decreasing the ordered quantity, change the Order Status field to
Completed. This strategy will cause any undelivered loads to be removed from the
Truck Tracking function screen.
Delv Quantity is the current total ticketed quantity of the product specified in the
Item Code field—using the same unit of measure as the Order Quantity field.
Delivered Quantity cannot be edited through the Order Entry screen.
The Price is a default value associated with the item code, the project, or the customer.
The field is grayed out and cannot be edited unless the Allow Price Change in O/E
45
checkbox on the Pricing tab of the Projects screen {Files > Customer & Project
Information > Projects} is checked.
9. The Ext Price field displays the total price, i.e., the order quantity multiplied by the
price of the order item. This field can also be edited.
10. The Slump value defaults from the item file, although it may be edited at this time.
11. Pressing the H button opens the Order Line Cartage Charge Information screen.
This lets you add cartage charge information for this particular item on the current
order.
Order Line Cartage Charge Information (EDTORDR7)
12. Pressing the O button opens the Other Order Line Information screen. See Other
Order Line Information for more details.
13. Pressing the I button opens the Item Inquiry screen. This screen lets you view the
inventory for a particular plant with regard to the current item. Inventory must be in
your system license in order to view this screen.
Item Inquiry Screen (EDTLCIN7)
14. Pressing the A button opens the Order Line Associated Products screen. See
Associated Products for more details. With the appropriate settings, this may be an M
button. See ”Order-Level Mix Design” on page 87 for more information.
15. If the item that has been ordered is a project product, the C button displays. This
button opens the Calculation Project screen.
Entering Schedule Information
Schedule information can be entered on each product tab.
46
Order Entry
EDTCORDTAB - Schedule detail
1.
If the order is part of a project, the Plant code defaults from the Project record.
If the order is not part of a project, specify the plant code for the plant from which you
plan to ship the scheduled order when it is ticketed.
The Plant field defaults to the most economical plant choice for delivering this order.
This can be altered on the Economic Sourcing screen.
To help you choose a plant, select the $ button. The Economic Sourcing screen
displays, listing the costs for each plant and the difference in costs between them and
the least expensive plant. This screen calculates material cost and delivery cost for each
plant for one unit of material (concrete or aggregate), and lists those plants in ascending
order by total cost.
Economic Sourcing (SELECON)
2.
3.
4.
Order Entry
The dispatcher can determine which is the best plant to schedule an order from to
receive the most profit.
The Must Finish checkbox states whether or not an order must finish. Concrete
orders default to a state of Must Finish when the mix is designed with TQS, regardless
of whether the box is checked or not. For any other mix, this check box must be
selected in order to state that the order must finish.
Enter the Start Time--the time the customer wants the first load to arrive. This value
will be used as the basis for all scheduling calculations. To speed order entry, you can
just enter the hour—for example, 9—and tab through. The system will automatically
convert the 9 to 9:00.
COMMANDseries defaults to military time. To override this default, for example, if
you need to enter 3:00 pm, enter 3p and press <Tab>.
Select a Truck Type. This field can default from the Project file. The field can be left
blank if a specific truck type is not required.
47
5.
6.
7.
8.
9.
48
The Travel Time fields default from the Project, the Deliver To, or from specific map
pages. The values indicate travel time from the plant to the site and back. You can
modify these times as needed, for things such as weather or traffic.
The value entered in the Time To Job field is automatically duplicated in the Time To
Plant field; however, the values can be changed. If the values are changed from the
default, the fields will become shaded to indicate that they have been altered.
If the order is a non-project order, enter an estimated travel time for the drive from the
specified plant to the job site, and then back.
Good service and delivery efficiency are based upon sending trucks at the rate the
customer can unload them. There are exceptions, but generally there is no need to send
trucks at a 15-minute spacing when the unloading time is 30 minutes.
Exceptions:
The customer wants the first few trucks sent close together but will take longer to
unload such as for a footing or foundation wall.
The customer demands trucks at a high rate but cannot sustain that rate.
The order is being supplied simultaneously from two or more plants. The delivery
rate from each plant will be twice (or three times) longer than the rate ordered, as
trucks will be scheduled to arrive alternately from each plant.
The customer is unloading in several places simultaneously. Here the unload rate
will be twice the delivery rate.
These time values are used to calculate scheduling information used in dynamic
scheduling and truck tracking. While dispatchers and order takers frequently have to
estimate travel time, it is important that those estimates be as accurate as possible. One
underestimated schedule can disrupt the entire day’s deliveries.
Enter a Truck Spacing time in minutes. The Unload Time value will default to this
time, but it is irrelevant. The Delivery Rate per Hour and Trucks Required fields
will be calculated but grayed out.
The Unload Time value will be calculated based on the entered Spacing.
The Load Quantity values will default from the Truck Type, and can be edited if
necessary. Once a value has been entered, the number of Loads requried to complete
the schedule will be displayed.
The system will use the information entered thus far to generate a delivery schedule.
Before it can complete the calculations, however, it has to know what to use as the
primary means of measurement. The options for the delivery Rate Type are:
FOB (Freight on Board)
Enter a Truck Spacing time in minutes. The Unload Time value will default to
this time, but it is irrelevant. The Delivery Rate per Hour and Trucks Required
fields will be calculated but grayed out.
The Trucks Required field will be cleared of data.
The material will be picked up by someone else’s truck. Accordingly, the system
won’t worry about truck availability.
For delivered orders, something must be entered in either the Truck Spacing or
Trucks Required fields. If both fields are left blank, the system will consider the order
as an F.O.B. order, and the order will not appear on the regular Tracking & Scheduling
Order Entry
screen! If only one truck is required, skip the truck spacing and populate the Trucks
Required field with 1.
Caution: FOB orders are not displayed on the normal Truck Tracking screen but have
a separate screen of their own (Tracking will display FOB orders on the main screen;
please consult Tracking documentation for configuration details); consequently, orders
that are inadvertently entered as FOB may not get delivered! Please refer to the
Tracking and Scheduling section of this manual for additional information concerning
FOB orders.
Minutes Apart
Minutes between trucks’ arrival on site -- Enter a Truck Spacing in minutes. The
Unload Time value will default to this time, but can be edited. The Delivery Rate
per Hour and Trucks Required fields will be calculated but grayed out.
In all scheduling calculations (or recalculations), the system will make changes in
order to maintain the specified Truck Spacing interval, regardless of other factors.
Quantity per Hour
Tab through the Truck Spacing and Unload Time fields and enter a quantity per
hour in the Delivery Rate per Hour field. The Trucks Required field will be
calculated but disabled; the Truck Spacing and Time fields will also be disabled.
Particularly with large pours, the contractor is more interested in making sure that
the mix is arriving at a steady rate. This rate keys primarily on individual load sizes.
Quantity per Hour - Unload (Optimization only)
This option is similar to the existing quantity per hour option, but this option will not
be affected by the actual pouring rate at the job site. It is intended for use by concrete
suppliers who have promised a delivery rate that is independent of the unload rate.
Trucks Required
Enter a Truck Spacing in minutes. The Unload Time value will default to this
time. The Delivery Rate per Hour and Trucks Required fields will be calculated
but grayed out.
The Trucks Required field will activate (no longer be gray) and allow change.
Enter the number of trucks that you wish to use for this schedule.
This option can be useful when working orders into the schedule later in the day,
when most of your fleet is already committed to other orders.
Round Trip
Enter a Truck Spacing in minutes. The Unload Time value will default to this
time. The Delivery Rate per Hour and Trucks Required fields will be calculated
but grayed out. Tab to the Rate Type field and change it to Round Trip.
The Trucks Required field will activate (no longer be gray) and allow changes to
be made. Enter the number of trucks that you wish to use for this schedule.
Select the Loads button and enter the truck numbers you wish to recycle on this
job or use the Options menu to enter this data.
The system will base the schedule on the premise of one truck round–tripping on
the order until it has been completely delivered.
Order Entry
49
10. If you are going to ticket the order fron this screen, enter a Truck Code, or detail on the
field to select from a list.
11. If the truck has an assigned Hauler, it will default.
12. For additional scheduling options, press the Schedule Loads button. The button
opens the Order Line Schedule Information screen, which provides more advanced
scheduling options (see Scheduling an Order).
13. To enter an additional primary product on the order, press the + tab.
14. Once you have finished entering order and schedule information, you have three
options:
To ticket the order directly, press the Ticketing button. Depending on the system
and customer configuration, the system may open the Cash Payments form (please
see Cash Management–Order Entry for additional information); once payment has
been entered and accepted, the Concrete Ticketing and Shipping screen will open.
If you need to take a payment but do not need to ticket the order, press the
Payment button. When the payment is accepted, you will return to the Order
Entry screen.
If you simply want to save the order, accespt the screen.
Other Order Line Information
The Other Order Line Information screen displays basic information related only to the
item (not the entire order). It is accessed by pressing the Other button on the order line
containing the item. Editing the usage code and tax status is allowed in this screen.
Other Order Line Information (EDTORDR5)
If your system is configured for concrete Sample Scheduling, additional fields will be at the
bottom of the form:
Testing Labratory Code – The lab to be used for this sample will default from the project
of the system default. You can use the drop-down to select from a list.
Contracted Samples – The required number of samples to be taken from this order,
based on the configuration options.
50
Order Entry
Exclude from Sampling Scheduling Report – If the flag is checked, then the
Contracted Samples will not be reflected on the Sampling Schedule Report.
Additional Samples – Allows entry of number of additional samples requested by the
customer.
Apply to Contracted Total – If the flag is checked, then the customer additional samples
will be counted toward the total number of contracted samples during calculations of the
number of samples already taken for a project/product.
Total Samples to Take – Sum of the above sample values.
Associated Products
Admixtures fall into two general groups, Modifiers and Must Contains:
•
•
Must Contains - These are the components that must be in the mix or the mix will
not perform as designed. When a mix is designed, the Must Contains components are
entered in the mix design.
Modifiers - These are components that do not generally affect the basic mix, but that
can be added to make the mix behave differently while retaining its core functionality.
May include retarders, accelerators, color, and fiber mesh.
In entering an accelerator to an order, you can’t just add it to the order as you would with a
pair of gloves or a stack of expansion joints; the system needs to know that the accelerator is
to be added to the specific mix. COMMANDconcrete connects the admixture to the
appropriate mix through what are called Associated Products. Associated products,
primarily admixtures, are products that are linked – associated – with a specific mix on a
specific order. The mix file itself is not permanently changed.
This functionality has obvious advantages; however, users should be cautioned that when
the ordered product is changed, deleted, or replaced, the associated products are changed,
deleted, or replaced along with the ordered product. Such cases are particularly crucial
when admixtures such as accelerators or retarders are included as associated products.
Extra Products vs. Associated Products
COMMANDseries uses a pair of terms to distinguish different types of non-mix items:
•
•
Associated Products are items—generally admixtures—that are added directly into
the mix. Other types of items, such as color or fiber, can also be considered associated
products. They are added to an order through the Associated Product button for a
specific ordered mix.
Extra Products are any other items, such as gloves, expansion joints, or rebar, that are
included on an order, but do not go into the mix. Extra Products are added to an order
on the main order screen, just like a mix.
Some items, most notably additives like fiber or color (if added manually), can be classified
as either extra products or associated products. In such cases, the key is consistency--it is
best to establish company guidelines to ensure accurate reports.
Order Entry
51
To add a product using the Associated Products button:
1.
Select the Associated Products button from the Order Line. The Order Line
Associated Products screen displays. On the title bar of the screen, you can see, in
parentheses, the Item Code and Description of the mix with which the items displayed
will be associated.
If Order-level Mix Design is enabled, the Associated Products button on the main
Orders screen becomes the Mix Design button.
Order Line Associated Products (EDTORDR6)
2.
3.
4.
5.
6.
Select the Item Code representing the product you wish to associate. The
Description and Price default from the product file, may be edited.
Enter the Order Quantity for the associated product. Detailing allows changing the
products unit of measure.
Enter a Trim Percentage if necessary.
Select the Other button if you would like to alter any of the product information for
the associated product.
If you would like to associate more than one product with the ordered product, use the
Insert Occurrence button and repeat Steps 2 - 4. When you have associated all
necessary products, accept the Order Line Associated Products screen to save these
products in association with the ordered product. When you return to the primary
order screen, the Associated products (A) button will be illuminated, indicating the
presence of at least one associated product for the mix.
Forecasted Shipped Quantity
When setting up projects, estimates for the quantity of each project product required to
complete the project can be entered for quoting purposes. The forecasted shipped quantity
is a calculation performed to show the user how much of that estimated quantity has already
been ordered and shipped and how much is remaining, in order to give an indication of
project progress.
In order to access this information, users can either click on the C button in Order Entry ,
or the Calculations button on the Edit Orders & Tickets screen. One button displays
52
Order Entry
for each order line item. Pressing one of these buttons opens the Calculation screen,
which is a read-only display of figures related to the order line item.
Calculation screen (EDTCALP)
The Calculation screen shows the following information:
Estimated Quantity - Displays the estimated quantity of the line item required for
the project. This value comes from the Project Product table and is entered on the
Projects screen at the time of project creation.
Total Order Amount - Displays the total quantity of the project product that has
been ordered to date. This figure excludes all removed, credit memo, and debit
memo orders.
S (button) - Opens the Detail screen. Pressing this button displays the ordered
quantity of the project product that exists on suspended orders, split by suspend
type.
Total Delivered Amount - Displays the total quantity of the project product that
has been ticketed to date. This figure excludes any removed, debit memo, or credit
memo tickets and any returned quantities are subtracted from the total.
S (button) - Opens the Detail screen. Pressing this button displays the ticketed
quantity of the project product that exists on suspended tickets, split by suspend
type.
Remaining Scheduled Amount - Displays the remaining scheduled amount
which is calculated as being the Estimated Quantity minus the Total Ordered
Amount.
Non-delivered Scheduled Amount - Displays the remaining scheduled amount
that has not been delivered, which is calculated as being the Estimated Quantity
minus the Total Delivered Amount.
Total Invoiced Amount - If Invoicing (IG) is in the license, this field will display.
This field shows the total quantity of all tickets where an invoice date is present,
excluding credit and debit memo tickets.
Ticket Data Out Total - If Invoicing (IG) is not in the license, this field will
display. This field shows the total quantity of all tickets where the Data Out Date is
not blank, excluding credit and debit memo tickets.
The figures displayed on the Calculation screen will not include quantities that have been
added or edited for an order until changes have been saved.
Order Entry
53
Scheduling an Order
When entering a delivery schedule in the system, you need to make sure that the customer
receives the ordered material in a timely manner without hindering the timing of your
other deliveries. The Scheduling section of the Order Entry screen lets you enter
scheduling information specific to the current order This scheduling information is used in
Dynamic Scheduling and Truck Tracking to help ensure on-time delivery.
Many of the fields on the Scheduling screensdefault from other files, primarily the project
and items files.
Schedules are required for concrete orders.
Scheduling Logic
COMMANDseries creates a new load when the scheduled quantity is exceeded. For
example, if a schedule is entered for 60.00 tons, and each load is targeted for 20.00 tons,
COMMANDseries creates three loads. If a fourth load is generated, an additional load
shows on the Loads screen.
When multiple schedules are entered by plant for one product, the shipping plant on the
ticket determines which schedule to update. For example, three schedules are entered for
one product. Each schedule is for a different plant. If a schedule is found that matches the
ticket's shipping plant, that schedule is updated. If no match is found, the first available
schedule is updated regardless of the plant.
To schedule an order:
1.
If the order is part of a project, the Plant code defaults from the Project record.
If the order is not part of a project, specify the plant code for the plant from which you
plan to ship the scheduled order when it is ticketed.
The Plant field defaults to the most economical plant choice for delivering this order.
This can be altered on the Economic Sourcing screen.
To help you choose a plant, select the button. The screen displays, listing the costs for
each plant and the difference in costs between them and the least expensive plant. This
screen calculates material cost and delivery cost for each plant for one unit of material
(concrete or aggregate), and lists those plants in ascending order by total cost.
Economic Sourcing (SELECON)
54
Order Entry
2.
3.
4.
5.
6.
7.
Order Entry
The dispatcher can determine which is the best plant to schedule an order from to
receive the most profit.
The Must checkbox states whether or not an order must finish. Concrete orders
default to a state of Must Finish when the mix is designed with TQS, regardless of
whether the box is checked or not. For any other mix, this check box must be selected
in order to state that the order must finish. To state that an order must finish, check the
checkbox.
Enter the Start Time--the time the customer wants the first load to arrive. This value
will be used as the basis for all scheduling calculations. To speed order entry, you can
just enter the hour—for example, 9—and tab through. The system will automatically
convert the 9 to 9:00.
COMMANDseries defaults to military time. To override this default, for example, if
you need to enter 3:00 pm, enter 3p and press <Tab>.
Select a Truck Type. This field can default from the Project file. The field can be left
blank if a specific truck type is not required.
The Scheduled Quantity will default to the Order Quantity. You will only need to
adjust this field if you use multiple schedules (discussed later).
If you wish to suspend delivery on the order after a certain amount has been delivered,
enter a Hold Quantity. Once this amount has been ticketed, this schedule will be
placed on hold. Other schedules on this same order will not be affected.
The fields default from the Projects screen or from specific map pages. The values
indicate travel time from the plant to the site and back. You can modify these times as
needed, for things such as weather or traffic.
The value entered in the Time To Job field is automatically duplicated in the Time To
Plant field; however, the values can be changed. If the values are changed from the
default, the fields will become shaded to indicate that they have been altered.
If the order is a non-project order, enter an estimated travel time for the drive from the
specified plant to the job site, and then back.
Good service and delivery efficiency are based upon sending trucks at the rate the
customer can unload them. There are exceptions, but generally there is no need to send
trucks at a 15-minute spacing when the unloading time is 30 minutes.
Exceptions:
The customer wants the first few trucks sent close together but will take longer to
unload such as for a footing or foundation wall.
The customer demands trucks at a high rate but cannot sustain that rate.
The order is being supplied simultaneously from two or more plants. The delivery
rate from each plant will be twice (or three times) longer than the rate ordered, as
trucks will be scheduled to arrive alternately from each plant.
The customer is unloading in several places simultaneously. Here the unload rate
will be twice the delivery rate.
These time values are used to calculate scheduling information used in dynamic
scheduling and truck tracking. While dispatchers and order takers frequently have to
estimate travel time, it is important that those estimates be as accurate as possible. One
underestimated schedule can disrupt the entire day’s deliveries.
55
8.
9.
The Unload Time value will be calculated based on the Unload Rate; the system will
calculate the Unload Time for each load, so that a 3m clean-up load will be given a
proportionally smaller unload time than a standard 10m3. This value can be entered
manually; however, manually entered values are static—no changes to the Unload
Time will be made based on load size.
The system will use the information entered thus far to generate a delivery schedule.
Before it can complete the calculations, however, it has to know what to use as the
primary means of measurement. The options for the delivery Rate Type are:
FOB (Freight on Board)
Enter a Truck Spacing time in minutes. The Unload Time value will default to
this time, but it is irrelevant. The Delivery Rate per Hour and Trucks Required
fields will be calculated but grayed out.
The Trucks Required field will be cleared of data.
The material will be picked up by someone else’s truck. Accordingly, the system
won’t worry about truck availability.
For delivered orders, something must be entered in either the Truck Spacing or
Trucks Required fields. If both fields are left blank, the system will consider the order
as an F.O.B. order, and the order will not appear on the regular Tracking & Scheduling
screen! If only one truck is required, skip the truck spacing and populate the Trucks
Required field with 1.
Caution: FOB orders are not displayed on the normal Truck Tracking screen but have
a separate screen of their own (Tracking will display FOB orders on the main screen;
please consult Tracking documentation for configuration details); consequently, orders
that are inadvertently entered as FOB may not get delivered! Please refer to the
Tracking and Scheduling section of this manual for additional information concerning
FOB orders.
Minutes Apart
Minutes between trucks’ arrival on site -- Enter a Truck Spacing in minutes. The
Unload Time value will default to this time, but can be edited. The Delivery Rate
per Hour and Trucks Required fields will be calculated but grayed out.
In all scheduling calculations (or recalculations), the system will make changes in
order to maintain the specified Truck Spacing interval, regardless of other factors.
Quantity per Hour
Tab through the Truck Spacing and Unload Time fields and enter a quantity per
hour in the Delivery Rate per Hour field. The Trucks Required field will be
calculated but disabled; the Truck Spacing and Time fields will also be disabled.
Particularly with large pours, the contractor is more interested in making sure that
the mix is arriving at a steady rate. This rate keys primarily on individual load sizes.
Quantity per Hour - Unload (Optimization only)
This option is similar to the existing quantity per hour option, but this option will not
be affected by the actual pouring rate at the job site. It is intended for use by concrete
suppliers who have promised a delivery rate that is independent of the unload rate.
Trucks Required
56
Order Entry
Enter a Truck Spacing in minutes. The Unload Time value will default to this
time. The Delivery Rate per Hour and Trucks Required fields will be calculated
but grayed out.
The Trucks Required field will activate (no longer be gray) and allow change.
Enter the number of trucks that you wish to use for this schedule.
This option can be useful when working orders into the schedule later in the day,
when most of your fleet is already committed to other orders.
Round Trip
Enter a Truck Spacing in minutes. The Unload Time value will default to this
time. The Delivery Rate per Hour and Trucks Required fields will be calculated
but grayed out. Tab to the Rate Type field and change it to Round Trip.
The Trucks Required field will activate (no longer be gray) and allow changes to
be made. Enter the number of trucks that you wish to use for this schedule.
Select the Loads button and enter the truck numbers you wish to recycle on this
job or use the Options menu to enter this data.
The system will base the schedule on the premise of one truck round–tripping on
the order until it has been completely delivered.
10. The system calculates a projected delivery schedule for the order based on current
information; however, reality is going to alter that schedule. If a load is ticketed a little
late or a little early, how is the system going to adjust the schedule? The Adjustment
Type field lets you define how the system will adjust the schedule when a load is
ticketed early or late. The guiding principle for this function is that the delivery rate is
paramount — once deliveries have started, the Truck Spacing or Delivery Rate per
Hour (depending on Rate Type) must be maintained to ensure that the final product
can be finished adequately. There are four options:
Always adjusted — If a load is ticketed five minutes early, all subsequent loads for
the order will automatically be shifted up five minutes, to maintain the requested
truck spacing. If a load is ticketed two minutes late, all subsequent loads will be
pushed back two minutes.
When ticketed early — An order’s schedule will only be adjusted when a ticket is
printed early. Tickets printed late will have no affect on the calculated schedule.
When ticketed late — An order’s schedule will only be adjusted when a ticket is
printed late. Tickets printed early will have no affect on the calculated schedule. This
is the most commonly used option, as it allows dispatchers to pre-ticket trucks
without disrupting the schedule.
No Adjustments — The calculated schedule will not be adjusted.
11. To review or modify the delivery schedule, select the Loads button on the screen.
12. Edit the information as necessary. When you change a time in the projected schedule,
all of the subsequent times will be automatically adjusted to maintain the requested
delivery rate. This feature gives you a convenient means of scheduling a break in a
delivery, either for a lunch break at the job site or to allow for additional finishing.
From this screen, you can
Assign loads from multiple plants.
Roster trucks by entering the Truck Code.
Order Entry
57
Schedule a truck to return to a different plant, and adjust travel times accordingly.
Adjust overall schedule by changing the On Job field.
Designate a load (usually the last load) as a Clean Up load. When a load is
designated as a Clean Up load, its scheduled ticket time will automatically be
adjusted to coincide with the time that the previous load is scheduled to finish
pouring. This feature will reduce the disruption that clean up loads can wreak on a
schedule.
All Time To Job and Time to Plant fields have a code beside them. The code
designates the source of the field value:
P
R
M
N
O
U
D
Project/plant
Project
Map Page
Map Page-default value
Overridden at the schedule level
User-entered at the load level
Defaulted from schedule--If a user enters a specific time, all subsequent
times are recalculated based on the schedule.
If changes to the schedule are made, be sure to accept them.
13. Accept the Order Line Schedule Information screen to save the scheduling
information. The Scheduling screen will close, returning you to the primary Order
Entry screen. If no additional information is required, accept the Order Entry screen
to save the order. An order number will be assigned and displayed at the bottom of the
screen. If you are writing orders on paper forms, then keying them into the computer,
write this number on your order form for reference.
Optimized Scheduling
If Optimization is in the system license, a customized scheduling screen displays.
58
Order Entry
Order Line Schedule Information screen (Optimization-EDTORDO4)
The basics of this form are the same as the standard Order Line Schedule Information
screen; there are only a few additional/changed fields.
Start/Thru Time – To provide the Optimizer with some flexibility, you have the option of
entering a time range.
Max Truck Size – the maximum load size for optimized operations. This value defaults
from the Configuration-Optimization tab; while the field is active, as a general rule this
value should never be changed.
Priority – This field assigns a priority to the schedule. 1 is the lowest priority, 9 is the
highest. 0 or [null] will be interpreted as 9. Note: A Default Priority for all orders can be set
on the Configuration-Optimization screen.
Job Wait Time – This field specifies how many minutes should be allowed between the
time the truck finishes loading and the time it leaves for the job. This time is used for
inspections, batch testing, etc.
This field is linked to a configuration setting in the Optimizer interface that specifies
whether this lead time should be applied to every load of the schedule or just the first load.
Leading Order Code – If another order must be finished before delivery can begin on this
schedule, enter that order code here. Doing so links the orders together for the optimizer.
Gap – The required gap (in minutes between the finish pour time of the leading order and
the desired on-job time of the linked order/schedule)
Order Entry
59
Schedule Requirements
Some orders have specific requirements for driver, truck types and plants. These
requirements are entered on this screen:
Schedule Requirements (EDTORDOC)
Only one Driver and Truck Type can be specified for a schedule. These attributes are passed
to the Optimizer along with the schedule.
Only plants configured for Optimization (which is done on the Plants-Scheduling tab) are
available on this screen. Other options are configured on the Resource Attibutes screen
(Files > General Information > Resource Attributes). If a plant (or plants) is flagged as
either required or forbidden, then when the screen is accepted, you will be prompted for a
reason code. Available reason codes will be codes configured with a Reason Usage of Plant
Unavailability.
If the Restrict Loads to Single Plant checkbox is selected, If this field is set to yes, then
the Optimizer will be instructed to optimize the schedule for a single plant. Ticketing has
been modified to validate the field on all tickets after the first one. If the flag is set to Yes and
you attempt to ship from a plant different than the plant of the first ticket for the order, the
system will display a warning message:
WARNING: The Schedule indicates that all loads should be shipped
from a single plant! The previous ticket was shipped from Plant xxx.
If a subsequent ticket is, in fact, shipped from a plant different than the first ticket, the field
is set to No, preventing the message from displaying on any subsequent tickets.
Optimized Loads
If Optimization is in the license, The Loads button will call and expanded screen:
60
Order Entry
Changes made in the upper section of the screen will be passed to the Optimizer when the
order is accepted; the lower part of the screen will be updated once the Optimizer returns
the revised schedule.
Scheduling an FOB Order
To schedule an order as an FOB (Freight on Board) order, enter the start time as the time
that the customer will arrive to pick up the order. Leave the right side of the schedule screen
blank; FOB displays in the Rate Type field. Accept the schedule and return to the Order
Entry screen; FOB displays as part of the schedule summary: F.O.B. @ 13:00 plt 1.
Previously entered rate information, such as trucks required, will automatically be cleared if
FOB is subsequently selected as a Rate Type.
Please refer to the Tracking and Scheduling section of this manual for additional
information concerning FOB orders.
Simplified Order Entry
Order entry can be fast and easy if you use the Simplified Order Entry screen. This order
screen includes the basic functionality of the Orders screen but eliminates the need to enter
secondary screens through buttons. All items and their admixtures are displayed on this
single screen. The screen is also structured to display customer and delivery information
more logically.
Order Entry
61
To use the Simplified Orders screen as the default order entry screen, mark the Simplified
Orders checkbox on the Preferences screen {Misc. > Preferences}. To switch from
Simplified Orders to regular Orders and vice versa, select Switch Order Forms from the
Options menu.
•
•
Switching between forms is only allowed when the form is empty. Once order data has
been entered, the system will not switch order forms.
The Simplified Orders screen does not have any Detail buttons. Double-click any
field to view a list of choices, if any are available.
To enter an order using simplified order entry:
1.
Go to the Simplified Orders screen {Dispatch > Orders > Options > Switch Order
Forms}.
Simplified Orders (EDTSORD)
2.
3.
4.
5.
6.
62
Enter an Order Date or tab through for the current day.
Do not enter an Order Code unless the order is already in the system. For a new order,
Tab through this field and an order number automatically assigns, according to Next
Number settings.
Press <Enter>, type a Customer Code, or double-click on the field. The Customer
Name and related information defaults from the customer file.
After the customer code is entered, the system automatically checks for the existence of
customer projects. If any are found, the cursor moves to the Project Code field.
If no projects are found, the system automatically checks the customer’s credit code.
What happens next:
If the credit code is valid, order entry proceeds.
If the credit code is invalid, the system warns you of the problem and returns the
cursor to the Customer Code field so you can enter a valid customer.
The Order Type, and Payment Method default automatically when the customer
code is entered. (See the Order Types section of this manual for additional information
regarding order types.)
If this is a project order, enter a Project Code. Detail or press <Enter> to display of
list of projects for the selected customer.
The system verifies the project’s credit code, or the customer’s credit code if the project
has no credit code. Depending upon the results of the verification, the system behaves
as follows:
If the customer has been cleared for charge orders only, the Payment Method field
will display Charge. The field will be grayed out; you cannot change it.
If the customer has been cleared for both charge and C.O.D. orders, a dialog box
will display asking you to select a Payment Method: Charge, Cash, Check or
Credit Card. Select one, and that option will display in the Payment Method field.
The field will be active—you can press the drop-down button to change the
payment option.
There is a button next to the Payment Method field, labeled with a dollar sign ($).
This button brings up a screen for additional information about the customer’s
Order Entry
7.
8.
9.
10.
11.
12.
13.
14.
15.
Order Entry
payment. For checks, you can enter bank and check information; for credit cards,
enter account numbers and expiration dates.
If the customer has been assigned a Cash Only credit code, a dialog box will alert
you. The Payment Method field will activate; press the drop-down button to select
between cash, check, and credit card.
A dialog box may appear with a customized warning message: Contact Credit
Dept. before taking an order for this customer. Press OK to
continue. The Payment Method field will then display whatever method has been
approved for the customer.
If the Customer has been assigned a No Sale credit code, a dialog box reading No
Sale will appear. Once you select OK, the order form will clear. You cannot take an
order for a customer with a No Sale credit code.
If this is not a project order, the system verifies the customer’s credit code and then
performs one of the bulleted steps above, as necessary.
If the selected customer has no projects, the Project Code field will not be available.
If you selected a project, the Delivery Address, Instructions, Zone Code,
Purchase Order, and Customer Job default from the customer and project files. Edit
this information if desired.
If you did not select a project, you nevertheless must enter a Delivery Address before
you can complete the order. Enter a Purchase Order, Customer Job, Map Page,
Zone Code, and Instructions as necessary.
In COMMANDaggregate, scheduling an order is optional. If the order needs to be
scheduled, continue with this procedure.
Enter a mix for this order in the Item Code field. The Description field defaults
automatically.
You can enter only one mix per order using the Simplified Order screen.
On the Simplified Order Screen, you cannot enter an associated product or an
extra product unless you first enter a mix.
Enter the amount of the order in the Order Qty field.
Enter the slump or trim, if necessary, in the Slump/Trim field. Tab through to
continue.
Enter associated products and extra products on the lines that follow. When you
complete entry on one line, another line displays underneath.
Select the Plant field and enter the plant from which this order will be shipped.
Double-click on the field for plant selections.
Enter the remaining information for the order including Start Time, Scheduled
Quantity, Truck Type, Load Size, Travel Time and Truck Spacing. At this point,
the Unload Time, Quantity Per Hour, and Number of Trucks are calculated and
entered automatically. Edit this information if necessary.
Select a Current Status from the drop-down list:
Normal — The order has a normal status. The system defaults this status unless
otherwise specified.
Will Call — The order is waiting on a confirmation call from the customer to be
shipped. It does not display in the load sequence and has not been dispatched.
63
Weather Permitting — The order is on hold due to unfavorable weather
conditions. It does not display in the load sequence and has not been dispatched.
Hold Delivery — The order has been put on hold for undelivered loads. The
undelivered loads are not canceled and should be shipped when the order is
returned to a Normal status. It does not display in the load sequence. The loads that
were shipped on the order can be invoiced in COMMANDinvoicing.
Completed — The order has been completed. This may occur with loads
remaining. The remaining loads on the order are canceled and will not be delivered.
The order is not reflected in Truck Tracking. The loads that were shipped on the
order can be invoiced in COMMANDinvoicing.
16. Use the Haul, Pricing, Other, and Scheduling screens if this particular order
requires special pricing, haul or scheduling information that is different from the
information in the Customer or Project file. Select the buttons as necessary to edit
defaulted project and customer information on the order level.
17. Accept the Simplified Orders screen to save the order.
Standing Order Entry
Some customers get the same material every single day. To avoid having to re-enter identical
orders day after day, COMMANDseries offers support for Standing Orders. A standing
order contains all relevant order information except for the order date and the delivery
schedule.
Once the standing order is created, you may use the Schedule Standing Orders function to
schedule an order for delivery. The Schedule Standing Orders function uses the standing
order as a template to create standard orders for the specified dates. Concrete standing
orders must be scheduled before they can be delivered. Aggregate standing orders, on the
other hand, can be dispatched or ticketed from a dispatch/ticketing screen. At the time of
dispatch ticketing, a daily order is created from the standing order.
When scheduling standing orders, it is important to remember that you can only schedule
for a range of days; you cannot schedule a standing order for every other day, or every
Friday. In some situations—for example, a customer who gets the same material every
Wednesday—it is more effective to copy an existing order than to use standing orders.
Standing orders may be based on a project and may be created automatically from the
project file. The contents of the project are automatically moved to the standing order table
and the Standing Order code is set to be the Project Code.
One feature that distinguishes standing orders from regular orders is that a standing order
requires an expiration date. If there is a project associated with the order, the expiration date
defaults from the project. If not, enter the date you want the standing order to expire; a date
often selected is the day before the annual price increases go into effect. You cannot create a
regular order from a standing order that has expired.
Even though a standing order is created from the Order Entry screen, it is in itself not a true
order. Simply creating a standing order will not place the order on the delivery schedule.
The Schedule Standing Orders function takes the standing order template and creates
standard orders.
64
Order Entry
Related Topics:
Entering a Standing Order
Switching Between the Standing and Regular Order File
Creating Standing Orders from Projects
Scheduling Standing Orders
Entering a Standing Order
Enter standing orders using the Orders screen. Simply select Standing in the date field.
•
•
You can only schedule a Standing Order for Concrete Item Groups.
If the Standing Order is scheduled from the standard Order Entry screen, a new
selection form, Scheduling Standing Orders, will be displayed; only products you select
on this screen will create schedule tabs for each product.
Scheduling Standing Order screen (EDTSCHD)
To enter a standing order:
1.
2.
3.
Order Entry
Go to the screen {Dispatch > Orders}.
Type S or select Standing from the drop down box in the Order Date field, and tab
through.
Unlike regular orders, which get an Order Code assigned automatically, Order Codes
for standing orders must be entered manually. You can enter anything you like for the
standing order code, but here are some useful guidelines:
65
Use letters – If you enter a number for an order code, there’s a chance that the
number will duplicate an existing order code. If you must use numbers, at least
consider adding a letter as a prefix.
Plan ahead – The standing Order Code will become a regular Order Code when
the standing order is scheduled—it will show up on the Tracking and Scheduling
screen. When possible, make the code descriptive: customer code, project code, etc.
Continue to enter the standing order as you would a regular order.
The Expiration Date field is the only field on a standing order that is not in a regular
order. Once the specified date is passed, the standing order cannot be scheduled or
ticketed. This is a required field.
A quick way to enter future or past dates is to use the + and – keys. If, for example, you
enter +30 in any date field and tab through, the system will automatically enter the date
30 days from the current date.
Continue entering the standing order as you would a regular order. When you are
finished, accept the standing order.
The Order Quantity on a standing order is the amount needed each time the order is
scheduled. It is not the total quantity for the life of the standing order.
4.
5.
6.
Switching Between the Standing and Regular Order File
COMMANDseries order lookups can use one of three order files:
•
•
•
Regular orders
Standing orders
Order/Schedule – This option displays individual delivery schedules
The lookup file in use is displayed on the order lookup:
The default lookup file can be set for a workstation using the Default Order Lookup field
on the Preferences > General tab {Misc > Preferences}.
Whatever that default is, you can quickly switch lookup files while performing a lookup.
To switch from the Regular Order file to the Standing Order File:
1.
2.
3.
4.
5.
6.
66
Go to the screen {Dispatch > Orders}.
Tab through the Date field.
Double-click in the Order Code field.
The Choices (Order File) screen appears. Click Options.
Select Switch Order File to change from the regular order file to either the standing
order file, the order/schedule file, or vice versa. The lookup screen will change to the
selected lookup file.
Double-click on the order you want. COMMANDseries loads that order’s
information into the Order screen.
A quick way to view the standing order file is to enter an S in the Order Date field,
and detail on the Order Code field. This opens the choices screen with the standing
order file.
Order Entry
Creating Standing Orders from Projects
If standing orders are relevant for a particular project, create standing orders straight from
the project and skip the daily order entry process. The standing order’s expiration date is the
same as the project’s expiration date, unless otherwise noted.
To create standing order from projects:
1.
2.
3.
4.
5.
6.
7.
Open an existing project {Files > Customer and Projects Information > Projects}.
Review all project information and update as needed.
Select Create/Update Standing Orders from the Options menu. The Order Entry
screen will open with the selected project’s information pre-loaded. If the project’s
credit code is set to Cash or Charge, the Payment Form Selection screen will open.
Select a payment option and accept the screen to proceed to Order Entry.
The Order Date defaults to Standing.
The Order Code defaults to the project code of the project you had open.
Review the information, making sure that the new standing order has an Expiration
Date. If you defined an Expiration Date in the projects screen, it will be used as the
Expiration Date on the Order Entry screen.
Accept the Order Entry screen to save the standing order and return to the project
editor.
Scheduling Standing Orders
You can schedule standing orders on the Schedule Standing Orders screen. The
scheduling process lets you enter a date range and schedule information. The system then
creates regular orders for every day in the specified date range.
With the tabbed Order Entry screen:
•
•
You can only schedule a Standing Order for Concrete Item Groups.
If the Standing Order is scheduled from the standard Order Entry screen, a new
selection form, Scheduling Standing Orders, will be displayed; only products you select
on this screen will create schedule tabs for each product.
Scheduling Standing Order screen (EDTSCHD)
Order Entry
67
•
•
•
•
•
You can select multiple product lines on this screen; however, only one main product is
allowed per selection.
If you select one main product and one or more extra products, without grouping
them, they will default into one schedule tab on the Order Entry form.
If you select multiple main ready-mix products, you can right-click to Group the items,
just like you do already on the Project > Product tab. When you group multiple
products with one main product:
The checkbox for the main product is selected.
The Plant will not display for extra products.
All products will default into one schedule.
Standard delivery quantities are measured individually; customer credit rules remain
the same.
You cannot select an extra product without selecting the main product first.
The Delivered Quantity and Remaining Quantity are calculated when the
above form is called for a specific Standing Order.
Concrete standing orders must be scheduled before they can be ticketed.
Aggregate standing orders do not have to be scheduled. If you attempt to dispatch or
ticket an aggregate standing order, the system will automatically create a daily order
based on the current date and the standing order, and then will dispatch or ticket that
daily order.
You can schedule a standing order when rostering to see the order on any tracking screens
or if planning the delivery time for specific loads.
To schedule a standing order:
1.
2.
68
Go to the Schedule Standing Orders screen {Dispatch > Schedule Standing
Orders}.
Enter the Order Code for the standing order. Detail to get a list of standing orders.
This code will become the Order Code for the scheduled regular orders. The system
will retrieve the standing order—additional order information will populate the top
part of the form.
Order Entry
Schedule Standing Orders (EDTSCHD)
The Customer Code defaults from the standing order file. This uniquely identifies
the customer of the displayed order.
The Project Code defaults from the standing order file.
The Expiration Date of the standing order defaults from the standing order file.
The standing order cannot be scheduled past the expiration date.
Enter the Schedule Date. This date is the first day the standing order is scheduled for
delivery.
Enter the Thru date. The system will create a regular order for each and every day
from the Schedule Date through the Thru date.
The Item Code is a default value from the Order Entry screen, but may be edited by
the load. Use the drop-down list to change the product for a particular load.
Edit individual load information for a schedule using the Loads button.
Edit the To/From Plant, Load Quantity, or Truck Code fields for an individual
order using this secondary screen.
Accept the screen. The system will use the information to create a regular order file for
every day in the specified date range. You can see confirmation messages for the new
orders by detailing on the message line at the bottom of the screen:
These regular order files are completely independent of one another; if you edit or
cancel one order, the rest are unaffected.
3.
4.
5.
6.
7.
8.
9.
Order Entry
69
Advanced Order &
Schedule Tools
This section contains information on COMMANDseries features that bring additional
functionality to Order Entry and Scheduling. You may not use these features often, or you
may use them every day, depending on your business requirements.
Topics in this section:
Customer-Project-Order Lookup
The COD Calculator
The Volume Calculator
Updating Projects from Order Entry
Changing Units of Measure
Removing Orders
Copying and Moving Orders
Order Types
Round Trip Trucking
Truck Unavailability
Truck Counts Screen
Pouring Methods
Order Hold Functions
Bid Price Calculator
Order-Level Mix Design
The Order Tree
The Options Menu
Default Schedule & Pricing Plants in Order Entry
Economic Sourcing
Pricing Authority - Display Percentage Discount
Transport Pricing
Journeys
Multi-Drop Concrete Deliveries
Customer-Project-Order Lookup
The Customer-Project-Order Lookup (CPOL) function lets you list customers, their
assigned projects, and their completed orders using general search parameters.
70
Advanced Order & Schedule Tools
Use the Lookup screen to place an order. It simplifies and speeds up the process by allowing
you to populate order information, customer information, and project information quickly
and accurately.
The CPOL screen comes up automatically when the Order Entry is opened if the Use
Order Prefix Screen checkbox is selected in the {Misc > Preferences} menu. Otherwise,
it is available from the Options menu in the Order screen {Dispatch > Orders > Options
> Prefix Screen}.
To find information using the Customer-Project-Order Lookup:
1.
2.
3.
4.
5.
Enter a character, group of characters, or a specific name to search for a customer sort
name in the Name field. <Tab> to display the results of your search. The system will
search your entry for Customer Names, not Customer Codes.
If necessary, use the field adjoined to the Name field to add single characters to the
current search value.
If desired, enter a specific Project Code and/or Order Date to narrow the search. A
dash ( - ) in front of the date indicates that the order was canceled.
The Customer section displays the results of your Name search. As you highlight a
customer, that customer’s projects are displayed in the Project section. You may transfer
a customer or project to the Order Entry screen by selecting the Detail button to the
left of the display.
Select the Orders button to display a chronological (starting with most current) list of
the highlighted customer's orders. Selecting the button to the left of the order opens
the old or current order for copying or moving.
The list of orders will include every single order that customer/project has ever had. If
your company does not purge expired orders on a regular basis, this list can get quite
long and may take some time to load.
The COD Calculator
Whenever a customer places a COD order, the person taking the order must be able to tell
the customer what the total will be. The Order COD Calculation function calculates and
displays the COD amounts for the order. Any time an order is entered with a Payment
Method other than Charge, the COD Calculator button will appear on the right side of the
Order screen. Press the button, and the total amount due is displayed along with the
individual parts that make up the total amount. Calculations are based on the ordered
quantity of the products entered on the order. The detail button next to the Sundry
Charges field displays a detailed listing of all the sundry charges that make up this total on
the Sundry Charge Distribution screen. The detail button beside the Tax Amount field
displays a detail listing of the tax amounts on the Order Sales Tax Distribution screen.
There are two factors that can result in the final total being different from the Order Total
listed in the COD Calculator:
•
•
Differences between the ordered quantities and the delivered quantities. This is
generally more of an issue for aggregate operations than for concrete.
Unloading charges, because unloading charges cannot be calculated until after the
delivery. Two common means of compensating for this type of discrepancy are to
Advanced Order & Schedule Tools
71
charge a higher price for COD deliveries, or to let customers know that they may be
billed for excess unloading charges.
A detail button next to an amount indicates that there is breakout information on that total.
For example, if you press the detail button next to the Tax Amount, a screen displays,
showing the tax broken down by tax authorities.
Order Sales Tax Distribution - COD Calculator breakout (EDTORDRI)
The Volume Calculator
The Volume Calculator lets you calculate the needed quantity of ready-mix product for any
of the following common construction components:
•
•
•
•
•
•
•
Slabs: Flat, broad, fairly thick, and rectangular blocks.
Footings: A base for walls, columns, etc.
Integral footings: Combination of a slab on top of a footing.
Walls: Vertical dividers.
Columns: Cylindrical solids, caissons, piers.
Steps: On a level grade, a series of vertical steps on a flat base.
Stairs: Self-explanatory.
The Volume Calculator can be accessed from the main menu {Misc > Volume Calculator},
from the keyboard (<Ctrl + B> ), or from the Order Entry screen. To access the Volume
calculator from the Order Entry screen, press <Enter> while the cursor is in the Order
Quantity field.
In order to use the volume calculator with a weighted product such as aggregate, each item
must have a volume-to-weight conversion factor entered on the Item > Conversion tab.
To calculate a volume amount:
1.
72
Select the a construction component from the Volume Calculator by clicking on its
icon.
Advanced Order & Schedule Tools
2.
3.
4.
Enter the measured amounts as prompted on the Volume Dimensions screen. The
system will calculate the needed volume.
Accept the Volume Dimensions screen to return to the Volume Calculator screen. The
system will round the calculated quantity up to the next 0.25 unit.
If you have accessed the Calculator from the Order Entry screen, accept the Volume
Calculator screen. The system will insert the rounded quantity into the Order
Quantity field.
Updating Projects from Order Entry
Project information is often incomplete or subject to change when a project is entered into
COMMANDseries. As a result, maintaining project records can substantially streamline
the order entry process. You can update project information during regular or standing
order entry. The following project information is updated: Purchase Order, Job
Number, Delivery Address, Instructions, Map Page, and Zone.
Some or all of these fields are updated, depending on which fields differ on the Project and
Order screens. If only the delivery address is different, only the Delivery Address is
updated in the project.
To perform this function, the Allow Project Updates from Order Entry/Tickets
checkbox on the User editor must be selected {Files > System Information > Users >
Options tab}. Users can still perform normal editing functions related to the user’s
privilege and the current screen. If you are allowed to make project updates,
COMMANDseries prompts you as follows:
Project information has been changed – Update Project Yes/No
To update the project, click Yes.
Changing Units of Measure
Every salable item or constituent in the system is assigned a number of unit of measure
tags (UOM). The UOM tag establishes how that particular item is to be measured at
different stages in the business cycle. A unit of measure drop-down menu located on the
toolbar lets you toggle between Metric and Customary units of measure. However, the
option only lets you view the order’s quantities in the opposite unit of measure.
Order entry also gives you the ability to enter order line information in the opposite unit of
measure. The application, in turn, automatically converts your information to the original
unit of measure. For example, if your current unit of measure is U.S. Customary, the entry
of 15m3 in the Order Qty field would be automatically adjusted to 19.61 cubic
yards once you have tabbed out of that field.
Removing Orders
Order screens in COMMANDseries let you remove orders. However, to remove an order,
you must supply a reason for removal. These reason codes provide documentation for later
reporting.
Advanced Order & Schedule Tools
73
Selecting the Remove button lets you remove (cancel) orders of any status. Removing an
order does not actually delete the order from the system, but instead puts the order in a
special removed status; this functionality lets you reactivate the order at any time.
•
•
If the order has had any tickets generated against it, it cannot be removed unless all
current tickets have been removed.
Cash orders and tickets that have a reconciled cash receipt attached cannot be removed.
To remove an order:
1.
2.
From the Order Entry screen, open an existing order.
Select the Remove button from the toolbar -or- press <Shift+F5>.
Remove Button
Select the Remove button to put the
order into removed status.
3.
4.
Select Yes when prompted for a confirmation to remove the order.
Before the order can be removed, a Reason Code must be supplied for its removal.
Reason codes are entered on the Reason Codes editor {Files > General Information >
Reason Codes}.
Reactivating Orders
A removed order can be easily reactivated. Bring up the Order Entry screen and enter the
removed order’s order date and order code. A dialog box will tell you that the order has
been cancelled, and ask if you wish to edit it as an active order. Select Yes and accept the
screen to reactivate the order.
When looking at an order listing, removed orders will be marked with a dash (-).
Copying and Moving Orders
COMMANDseries allows orders to be duplicated or moved to another day. Moving an
order is useful when a customer changes his or her order needs. Duplicating orders is
extremely useful for regular (weekly, monthly) orders or for repeat orders from the same
customer, project, etc.
Customers often call to postpone an order until the following day, or to request an order
that is similar to one they have already received. The Save As button lets you copy the
currently displayed order to a new order, either for the current date or future dates. All
delivered quantities are reset to zero.
•
•
74
When copying a cash order that has a cash receipt attached, if the receipt is not fully
allocated, the receipt code is also copied to the new order. If the receipt is fully
allocated, no receipt is attached.
The ordered products and order quantities can be modified, if necessary.
Advanced Order & Schedule Tools
To copy or move an order:
1.
Open an existing order, then select the Save As button from the toolbar or press
<F9>.
Save As Button
Select the Save As button or select F9
to copy or move an order.
2.
3.
4.
5.
6.
When copying an order with no tickets, you will receive the following prompt:
Copying order – Do you wish to keep the original order?
To move an order, select No; the original order will be removed. To copy an order, select
Yes; the original order will be retained.
Respond to the next prompt:
Do you wish to retain the schedule(s) on this order?
To copy the scheduling information on this order, select Yes; all the scheduling details
from the original order will be copied to the new order. To copy the order with no
scheduling information, select No.
Enter the new Order Date and <Tab> through the Order Code field to apply the
next order code.
If you are licensed for Credit Checking, the credit status of the customer and project is
checked when the cursor tabs past the Order Code field.
Accept the Order Entry screen to save the new order.
When an order is copied or moved, order information is revalidated based on the settings on
the Configuration > Copy Order Revalidation tab. Full information on that tab can be
found in the Setting up the System manual.
Order Types
An Order type must be assigned to each order in COMMANDseries. This classification not
only describes the order, but also determines how the order is processed, from dispatch to
invoicing and inventory. Order Types determine whether or not an order gets invoiced, and
what sort of inventory transaction is created. This feature provides you with greater
flexibility and efficiency in processing transactions.
To better classify sales transactions, you can assign user-defined descriptions to the order
types that COMMANDseries provides. User-defined order types are set up on the Order
Types tab of the Configuration screen {Files > General Information > Configuration}. For
more information on setting up user defined order types, please refer to the Setting Up the
System manual.
The Order Types drop-down menu on the Order Entry screen defaults to a value
according to how you have set up the system. You are not able to override this and select
from the order types you have defined if the Do not allow edit order type in Order
Entry flag is checked in the distribution tab of the Quotes/Customers/Projects editors.
Advanced Order & Schedule Tools
75
After each user-defined order type is a code in parentheses () that indicates its hard-coded
order type.
Each hard-coded Order Type has specific effects on the dispatching process. The hardcoded order types are as follows:
•
•
•
•
Regular Sale (RS) — Represents all orders for which shipments are made and for
which invoices will be created. This may include both Trade and intra-company
customers.
Job Transfer (JT) — Represents the shipment of inventoried materials to job sites for
intra-company, construction-related activity (e.g., gravel provided to make a base for a
plant access road). A Job Cost Phase code {Files > General Information > Job Cost
Phase} will be associated with the order to accommodate the needs of the construction
job cost environment.
This order type is intended for use with internal material transfers for a specific job.
The order and ticket are processed normally with the following exceptions:
The Payment Method field will not be available as this is a non-invoiced order.
Job Cost Job and Job Cost Phase will be required. The Job Cost Job is an internal
job tracking code, while the Job Cost Phase refers to a set of codes used to track a job
through various stages of completion. Both Job Cost Job and Job Cost Phase must
be entered into the system in advance {Files > General Information > Job Cost
Job} and {Files > General Information > Job Cost Phase}.
Review (RV) – Automatically assigned to any order that is created or edited by an
external-access (customer-assigned) user. These orders will display on the Tracking
screen, but they cannot be ticketed until a regular user reviews them and changes the
status to Regular Sale.
Material Transfer (MT) — Represents inventoried materials shipped to an intracompany plant or business for subsequent sale.
This order type is used for simple material transfers, in which inventory is being shifted
for one reason or another. The order and ticket are processed normally with the
following exception: the Payment Method field will not be available as this is a noninvoiced order.
Suggested Shipping Plants
An option for scheduling is to use the Suggested Shipping Plant feature
{Options > Suggested Shipping Plant}. This screen calculates material cost and delivery
cost for each plant for one unit measure of the material, and lists those plants in ascending
order by total cost. For your convenience, the difference in total cost between the least
expensive shipping plant and the other plants is also listed.
76
Advanced Order & Schedule Tools
Suggested Shipping Plants (EDTORDRQ)
The dispatcher can determine which is the best plant to schedule an order from to receive
the most profit.
•
•
Cost information must exist in both item and plant files for this feature to function
correctly. If cost inforamtion is not entered correctly, the result will be a screen
somewhat similar to the one above.
If you have your system set for Cost Suppression, no costs will display in the screen;
the plants will simply be listed in order of profitability, from highest to lowest.
Round Trip Trucking
COMMANDseries supports Round Trip Trucking for orders with a schedule defined as
round trip orders. Round trip schedules will set a specific number of trucks to round trip to
an order.
Round trip schedules assign trucks to each load in the schedule and base Type Times for
Trucks on when they will arrive in the yard from their previous load. On the Horizontal
Tracking screen, a round trip truck shows on the Order line rather than the Plant line
when returning to the plant.
On the Analog Tracking screen, when trucks arrive in the yard, the trucks show—in the
yard and on the order—that they are assigned to a specific order in the Ticketed status. The
truck number is colored based on the Pre-ticketing color assigned in the Conditions setup
screen to indicate that the truck is pre-assigned to an order.
Round Trip Trucking is not the same as pre-ticketing. Pre-ticketing involves queuing tickets
before the load is actually batched, or before the truck has even returned to the plant.
Round Tripping a truck establishes the schedule for the truck, but does not automatically
print tickets. A Round Tripped truck, however, can be pre-ticketed.
To schedule a round trip for an order:
1.
2.
3.
Go to the Order Entry screen {Dispatch > Orders}.
Locate the appropriate order and go to the Order Line Schedule Information screen by
pressing the Scheduling button.
Select Round Trip from the Options menu {Options > Round Trip}.
Advanced Order & Schedule Tools
77
Round Trip Trucks (EDTORDRU)
4.
5.
6.
7.
8.
When the Round Trip Trucks screen appears, select Yes for Round Trip.
By default, trucks assigned for a round trip on a schedule will continue to be assigned to
subsequent loads even after the schedule quantity has been met. Select the Remove
Round Trip when Order/Sched Qty has been met chcekbox to prevent addition
loads from being ticketed.
Enter the Number of Trucks that will be needed to deliver the round tripped order.
Enter the Truck Code of the trucks that are being assigned to the round tripped order.
Accept the screen.
Truck Unavailability
Nothing can destroy a schedule faster than a truck that has been slotted for a delivery, but
which is actually unavailable. COMMANDseries lets you flag a truck as unavailable for
specified date and time ranges.
COMMANDseries uses a truck’s unavailable status in the following ways:
•
•
An unavailable truck will not appear on the Tracking and Scheduling screen.
If you try to assign an unavailable truck to an order, either through ticketing, rostering,
or dispatch, you will receive an error message that the truck in unavailable.
COMMANDseries can store multiple instances for a truck’s unavailability, allowing you to
enter information well in advance.
To flag a truck as unavailable:
1.
2.
3.
78
Open the Truck Unavailability screen {Files > Plant & Delivery Information > Truck
Unavailability}.
Enter the Truck Code.
Enter the date and time for the Start Unavailable Time.
Advanced Order & Schedule Tools
4.
5.
6.
Enter the date and time for the End Unavailable Time. The system will calculate the
total number of days and hours affected by the date range.
If necessary, enter an unavailable Reason Code. Reason Codes, if present, can help
you manage and track unavailability statistics for a large fleet.
Reason Codes must be set up in advance {Files > General Information > Reason
Codes}.
If necessary, press the Add Occurrence button to enter another unavailability range
or accept the screen.
Journeys
A journey is a feature of COMMANDseries that allows you to schedule a truck to make
one trip with several stops and one product. This typically happens when several customers
require a small quantity of an identical product.
Topics in this section:
Creating a New Journey
Editing an Existing Journey
Ticketing a Journey
Creating a New Journey
The Journey screen allows you to create journeys in advance to allow you to plan deliveries
ahead of time. Typically journeys are created the day prior to delivery using multiple orders
placed for that day.
To create a journey:
1.
2.
3.
4.
5.
6.
7.
8.
Open the Journey Editor {Dispatch > Journey Editor}.
Enter the Journey Date. Typically this will be tomorrow’s date.
Enter the Plant Code from which the order will be shipped.
Tab through the Journey Code field to allow the system to auto-assign a value, or
enter a custom journey code.
The Truck Code field is optional, but can be completed if necessary.
Enter the Order Date of the orders you wish to add to the journey. If you tab through
the field, it will default to the current date.
Detail on the Order Code field and select an order to add to the journey. By default,
the list displays orders scheduled from the plant selected in step 3. A different plant can
be manually selected if required.
The Journey Status, displayed at the bottom of the screen, now displays as Created.
The journey status messages that you may see here are as follows:
Created - The journey has been created but not ticketed.
Ticketed - The journey has been created and ticketed.
Removed - The journey has been cancelled.
Advanced Order & Schedule Tools
79
Added during Shipping - The journey was created at the time of ticketing rather
than through the Journey Editor.
If there is more than one product on the order, the Item Code field becomes active.
Select the item that you wish to include in the journey. If the order you selected
contained only one item, the order date, order code, and item code fields are greyed out
and read-only. The Load Quantity and Sequence fields then become active.
10. Enter any Sequence information as necessary. The entries must be sequential numbers
between one and the number of stops on the journey. The number represents the order
in which the stops of the journey will take place. Accepting the Journey screen with no
sequence entries causes the sequence to be saved in the order that the stops were added.
9.
Journey screen (EDTJOUR)
11. The detail button to the right of the sequence field opens the Journey Detail screen,
which provides additional journey information.
Journey Detail (EDTJOUR0)
12. Notice that the Journey Line Status displayed at the bottom of the screen now
displays as Created. The journey status messages that you may see here are:
Created - A journey stop has been created but not ticketed.
Ticketed - A journey stop has been created and ticketed.
Removed - An existing journey stop was removed at the time of ticketing.
80
Advanced Order & Schedule Tools
Added and Ticketed - A new journey stop was added at the time of ticketing.
13. To add another order to the journey, tab through or hit <F6> and repeat steps 7-10.
The order that you select from the list must contain an identical product to the first. If
you select an order with a different product, you will receive the following message:
“Can’t add different mix products on the same Journey.” You will then
be able to select a different order. Repeat this process until all the necessary orders have
been added to your journey.
14. Accept the journey.
Editing an Existing Journey
Once a journey has been created, it may be necessary to re-order, add or remove orders.
To edit a journey:
1.
2.
3.
Open the Journey Editor {Dispatch > Journey Editor}.
Enter the Journey Date and the Plant Code from which the order is to be shipped.
Detail on the Journey Code field and select a journey.
Journey screen (EDTJOUR) - Edit journey sequence
4.
5.
6.
The screen is populated with journey information. You can now edit the Load
Quantity and Sequence entries as required.
You can also add new stops/orders to the journey by tabbing onto the next line, or
pressing <F6>.
Accept the changes.
Ticketing a Journey
Once you have created a journey, you must ticket each of the orders on that journey.
COMMANDseries provides a convenient way to do this all at once.
To ticket a journey:
1.
2.
3.
Open the Concrete Ticketing & Shipping screen {Dispatch > Concrete Ticketing
& Shipping}.
The Order Date defaults to the current date. If necessary you can change this once the
plant code field has been completed.
Enter the Plant Code, Truck Code and Driver Code as necessary.
If a truck code was entered on the Journey Editor, it is not necessary for the truck
code in this screen to match.
Advanced Order & Schedule Tools
81
4.
5.
Detail on the Journey field and select a journey from the list. By default, the list
contains only journeys planned for the present date.
You will now see each stop in the journey automatically loaded into the ticketing
screen. You can navigate through the tickets using the Next and Previous buttons.
Concrete Ticketing & Shipping (EDTSHIP) - Ticketed journey
6.
7.
To add a stop/order to the journey at this point, press the Add button. This adds an
occurrence to the screen and allows you to select an Order Code to add to the journey.
Tab through the Ticket Code field to create the new ticket. You can also remove any
stops that are not required by navigating it and pressing the Remove button.
Accept the screen. The journey stops are ticketed and the journey is updated with any
changes made to its stops and/or sequence.
Once a journey has been ticketed changes can no longer be made. One ticket instruction is
sent to the batch panel for all individual journey tickets.
If you view the details of a completed journey in the Journey Editor, pressing the detail
button opens the Journey Details screen and lets you view the completed journey
information.
Truck Counts Screen
COMMANDseries dispatch licensing is based on a maximum number of trucks being used
at a given time. The Truck Counts screen lets you compare your current truck use against
your license limit, as well as display current ticketing, trucks (including licensed trucks),
and scheduling counts. By tracking the number of trucks that are punched in service on a
daily basis, COMMANDseries can monitor the number of licenses in use. If you punch in
more trucks than you are licensed for, you will receive an error message stating that the daily
maximum truck allowance has been exceeded.
82
Advanced Order & Schedule Tools
Go to {Files > System Information > Truck Counts} to view the Truck Counts form. It
will display with current ticketing, tracking, scheduling, truck, and licensed truck counts.
Truck Counts screen (DBALICN)
The form retrieves its information from the Licensing (LICN) table. You can view the
corresponding information on the Concrete, Tracking, and Scheduling tabs on the License
editor.
Field-level security can be set for the form in the Users editor.
Pouring Methods
Pouring methods allow for more standardization in the use of pouring methods, letting you
establish a number of common pouring methods and linking them to an appropriate
unloading time. Having these values available prevents the order taker from having to
estimate unloading rates while talking to the customer.
Pouring Methods are entered into the system in the Pouring Methods screen {Files >
Plant & Delivery Information > Pouring Methods}. Some examples of possible Pouring
Method options are:
Pouring Method
Standard
Rate/CY
5 min
Pump
Curb
Wheel barrow
2 min
15 min
10 min
Front loader
4 min
Comment
A baseline rate, particularly useful if all the company’s trucks are the same type
We’re going for volume here, not neatness
Curbs take time to do properly.
In some cases, mix must be poured into a wheelbarrow and transported to its destination.
If the you have different truck types, you might need
separate pouring methods for each.
There are two basic ways of setting up pouring methods:
•
•
Based on method of delivery (front loader, pump, etc.)
Based on the type of construction being made (slab, sidewalk, etc.)
Advanced Order & Schedule Tools
83
These two options are not an either/or proposition; you can set them up any way you want.
Once a Pouring Method has been established, it can be used by entering its assigned code in
the Pouring Method field on the Order Line Schedule Information screen.
In addition to considering what pouring methods are needed, you might also want to
consider if your unloading charge practices should mirror your pouring rates. If a company
can let you know ahead of time that more pouring time is necessary, do you want to charge
the company the same as another customer that cannot supply advance notice? You might
end up with one or two unloading charge tables for each pouring method.
Pouring methods cannot be set at the project level.
To enter pouring methods:
1.
Open the Pouring Methods screen {Files > Plant & Delivery Information > Pouring
Methods}.
Pouring Methods (EDTPMET)
2.
3.
4.
5.
6.
Enter a Pouring Method code to identify the entry. The code can be alphanumeric, up
to four characters in length.
Enter a Description of the method.
Enter a Short description of the method.
Enter an Unload Rate per Hour. Detail on this field to select a rate UOM.
Press Add Occurrence to add another pouring method, or accept the screen.
Order Hold Functions
An order can be designated as a hold order in one of two ways:
•
•
84
The entire order can be placed in Hold Delivery status on the Order Entry screen.
Orders are generally not placed on hold when they are initially entered; if the customer
is uncertain that the material will be needed, the order can be placed in Will Call
status.
A Hold Quantity can be specified in the delivery schedule. When an order has a hold
quantity value, the order will display as a normal order until the hold quantity amount
has been ticketed. Once the amount has been ticketed, the order is automatically placed
Advanced Order & Schedule Tools
on hold. When the customer confirms that more material is needed, the order can be
returned to normal delivery status.
The order hold function has an immediate impact on Tracking and Scheduling.
If an order has a hold quantity but that quantity has not yet been ticketed, that order displays
normally on the Tracking and Scheduling screen. The full ordered quantity is displayed on
the order line, and all loads, including those that may be affected by the hold quantity
amount, are displayed.
Once the hold quantity has been ticketed, and the order placed in a hold status, two things
happen to the Tracking and Scheduling screen:
•
•
The order is still displayed on the screen, but the Ordered and Delivered Quantity
fields change color to white. If the Plant is displayed in the final column, that field is
changed to white as well.
All loads placed on hold disappear from the Orders to Load column.
Bid Price Calculator
The Bid Price Calculator {Misc > Bid Price Calculator} is used to calculate a realistic bid
price based on costs and desired profit according to specified product and plant related
information. This feature can be called from the COMMANDquote module, or from the
Misc menu. The calculator provides material, overhead, delivery, and finance costs, and
computes the minimum selling price required to meet the plant’s desired profit. The
minimum selling price is automatically updated when other variables are changed. The Bid
Price Calculator is used mainly by salespeople.
The following values are displayed on the Calculator tab:
•
•
•
•
Material Cost - Represents the total estimated cost of materials for this product (per
cubic yard or meter). This value may differ from plant to plant. A detailed breakdown
of the cost can be viewed on the Material Costs tab. This information is retrieved from
the Item Master file for the product and plant entered.
Overhead Cost - Represents the total cost of overhead expenses (per cubic yard or
meter). This value may differ from plant to plant. A detailed breakdown of the cost can
be viewed on the Overhead Costs tab. This information is retrieved from the Plant file
and represents estimates of the cost required to cover the overhead expenses.
Delivery Cost - The total estimated cost of delivering the product (per cubic yard or
meter) from the plant to the job site. A detailed breakdown of the cost can be viewed on
the Delivery Costs tab. This data is retrieved from the Plant file and, with the Average
Load Size, estimated Travel Time, and Unloading Time, is used to calculate the
cost of delivering the product to the site.
Financing Cost - Represents the cost of financing the sale of the product, based on the
annual finance charge rate in the company file, and is affected by the value entered in
the Average Days to Pay field.
Advanced Order & Schedule Tools
85
•
•
•
•
•
Terms Discount - Represents the discount, if any, that applies to the current product.
The discount is determined by the terms that have been set up in the terms code.
To Achieve Plant’s Desired Profit - Represents the amount added to the total
product cost to achieve the plant’s desired profit. This information defaults from the
Desired Profit Per Quantity field on the Plants screen {Files > Plant & Delivery
Information > Plants}.
Minimum Selling Price - Represents an estimate of the lowest price at which this
product should be quoted. The value is a sum of all product costs plus the amount
required to achieve the plant’s desired profit minus any applicable terms discounts. The
value in this field is affected by all cost and discount fields located above it on the
screen.
Quoted Selling Price - Represents an estimate of the amount at which you are
bidding the product to be sold, per cubic yard or meter. Enter a value in this field based
mainly on the amount in the Minimum Selling Price field.
With An Estimated Profit - Represents the estimated profit per cubic yard or meter
that will be gained if the product is sold at the price in the Quoted Selling Price field.
A value will not appear here until a quoted selling price has been entered.
Bid Price Calculator (FNDBPRC1)
To use the Bid Price Calculator:
1.
2.
86
Go to the Bid Price Calculator {Misc > Bid Price Calculator}.
Select a Customer and Plant for which to estimate bid price. If available, enter a
Project and/or Quote.
Advanced Order & Schedule Tools
Select the Product for which to estimate bid price. The calculator calculates the price
according to information set up for this product at the plant and customer level.
4. From the Calculator tab, enter the Average Load Size for the product. This value
represents the average size of a truckload of the product. The unit of measure for the
product, defined on the Items editor {Files > Item Information > Items}, defaults into
the area to the right of the field.
5. Enter the Travel Time, in minutes, from the plant to the job site. This field affects the
value in the Delivery Cost field. As travel time increases, so too does the cost of
delivery.
6. Enter the Unload Time, in minutes, to represent the amount of time from the truck’s
arrival at the site to the time the product has been unloaded. This field affects the value
in the Delivery Cost field. As unload time increases, so too does the cost of delivery.
7. Enter the Average Days to Pay. This value represents the average number of days the
typical invoice will be outstanding in Accounts Receivable. The annual percentage rate
defaults from the plant file and represents the cost of financing the outstanding
receivable. Therefore, the value in the Financing Cost field grows larger with the
increase in days to pay.
8. Select a Terms Code for the bid. This code uniquely identifies the payment terms and
any discount being offered for the customer or project, and the resulting invoices.
9. Using the amounts in the various cost and adjustment fields along the right side of the
screen as reference (especially the Minimum Selling Price), enter a Quoted Selling
Price for the product per cubic yard or meter. When a value has been entered here, the
With An Estimated Profit field displays the estimated profit that will be gained if the
product is ultimately sold at this price.
10. Review the contents of the Bid Price Calculator and change amounts as necessary.
The cost and adjustment field values are recalculated immediately.
3.
The Material Costs, Overhead Costs, and Delivery Costs tabs let you see details of how
the various costs are calculated.
Order-Level Mix Design
The Order-level Mix Design feature lets users with appropriate access design a mix from
the Order Entry screen. This mix design will be available only for the current order. This
functionality is useful when it is necessary to work around specific restraints, such as
weather conditions and loading times.
To set up Order-Level Mix Design:
In order for a user to be able to use order-level mix design, two system flags must be set:
1.
2.
Open the Distribution tab of the Configuration screen {Files > General Information
> Configuration}. Select Allow Order Level Mix Design to activate the feature at a
system level.
The Default Mix Design Approval Status flag determines the operational
requirements of the feature. Select one of the following options:
Mix Not Approved (the most common selection) - The system will not ship the
mix until someone with appropriate system privileges retrieves the order, opens the
Advanced Order & Schedule Tools
87
Order Line Mix Design screen, and checks the Mix Design Approved by Quality
Control box.
Mix Design Approved - Modified mix design can be shipped immediately.
Configuring Order-level Mix Design
3.
4.
5.
Accept the configuration settings
Open the Options tab on the Users editor {Files > System Information > Users >
Users}.
Select Allow Access to Order Level Mix Design to let a given user use the feature.
Warning!
If you use Order-level Mix Design, you must ensure that anyone authorized to
enter order-level mix designs is qualified to do so as the design might not be
reviewed prior to shipment!
Please refer to the Setting up the System manual for additional information on configuring
these two flags.
Once the system has been set up for order-level mix design, you are ready to edit a mix from
the Order Entry screen.
To perform order-level mix design:
1.
2.
Open the Order Entry screen and create an order as normal.
When the system is set up for order-level mix design, the Associated Products button
on the main Order Entry screen becomes the Mix Design button.
Order Level Mix Design-Order screen
3.
4.
After entering a mix and an Order Quantity, press the Mix Design button.
The Order Line Mix Design screen displays. The screen title bar will also show the
selected mix.
If you are licensed for the Technical Quotation System (TQS) and use it to create a
mix, opening the Order Line Mix Design screen will only let you view the mix
details; you cannot edit them.
Order Line Mix Design screen (EDTORDRP)
88
Advanced Order & Schedule Tools
Order-Line Mix Design screen (EDTORDRP)
5.
6.
7.
8.
9.
10.
11.
12.
13.
Enter the Scheduled Plant.
If you want to begin with the standard mix design, press the Defaults button. The
mix design for the mix at the selected plant will display.
The Sort Order number automatically displays in this field. If changes are necessary,
detail on the field to adjust.
For each item in the mix, enter a Sort Order, the Item Code for the Constituent
Product, and the Quantity. Use the Add Occurrence button to add additional
constituents.
All constituents included in this section of the screen will be included in the base mix
price. To add an item for which the customer will be charged extra, use the Item Code
field below.
If the order is to be shipped out of multiple plants, you have two options:
Select the Copy to All checkbox to make the design available at all plants.
Select the Add Occurrence button to the right of the Copy to All button. A
new design form will appear, allowing you to enter a separate mix design. You can
scroll between these mix designs using the scroll bar on the right of the screen. This
feature may be useful if plants have different constituents on hand.
If you want to add an associated product, one for which the customer will be charged
extra, enter the product’s Item Code, Order Quantity, and Trim Percent.
The Mix Design Approved by Quality Control checkbox determines if the mix can
actually be shipped. Use field-level security to restrict access to this field to QC
engineers.
Accept the screen to save the mix design and return to the Order Entry screen. The
Mix Design button will be highlighted to indicate that a mix design is present.
Schedule and save the order as usual.
Advanced Order & Schedule Tools
89
The modified mix is stored at the user level, and has no effect on the mix design in the Item
Master File. Once the order has been created, the sequence of events is dependent on how
your system is configured.
Product Sales Option
The Product Sales Option simulates a Point of Sale environment in Orders by providing an
inventory inquiry for products ordered and an automatic generation of a ticket from the
Orders screen. It also provides for limited reporting capability for block equivalent units.
You must have a license for the Product Sales Option unless you use
COMMANDinventory; however, without the inventory license, you cannot query onhand inventory amounts.
To set up the product sales option:
1.
2.
3.
4.
5.
From the Locations screen {Files > Item Information > Locations}, set up an
inventory location and a corresponding plant {Files > Plant & Delivery Information >
Plants} for the block/building material operation.
Assign the plant to specific ticket printers for dispatch copy order printing and report
printing on the Plant Communication Setup screen {Files > Plant & Delivery
Information > Plants > Communication tab > Setup}.
Set up a standard unit of measure to provide equivalent units for block products. It
should be in the 80000 range, and assigned as an Other Unit of Measure Type.
Otherwise, it can be set up similar to 80001 - Each.
Set up an item category (or categories) for block, building materials, etc. There are item
types for both of these. The UOMs for this category should all be 80001 - Each,
except for the reporting UOM for the Block category, which should be assigned the
equivalent unit’s UOM. For non-block products, the reporting UOM should be the
same as all other UOMs.
Assign the block and building material products to the appropriate item category. For
block products, the Conversions button on the UOM form will be used to assign the
equivalent units conversion factor for each product. Typically, for block products, sales
are stated in terms of equivalent units, with an 8 X 8 X 16 block equaling one (1) EU.
The conversion can be either from the product’s delivered quantity UOM - 80001 - to
the reporting UOM - or vice versa, at the appropriate conversion factor. Therefore, a 4
X 8 X 8 block would need a conversion factor set up in one of the following manners:
Convert from UOM
Del Qty UOM 80001
-orRept UOM 800??
6.
90
Convert to UOM
Rept UOM 800??
Multiplier
.35
Del Qty UOM 80001
2.85714290 (which is 1/.35)
All block products, including the standard 8 X 8 X 16, must have a conversion factor
even when that conversion factor is 1.0.
The user record {Files > System Information > Users > Plant} for users who will run
orders and tickets for this feature, must be set up with the plant assigned as the block/
Advanced Order & Schedule Tools
building materials plant. This will serve as a default plant in Orders for performing the
inventory inquiry, and in Tickets for assigning the shipping plant.
To use the product sales option:
1.
2.
Enter information on the Order Entry screen as normal.
If you enter a non-concrete product in the Product Code field, two new buttons
display on the screen: Ticket and Inquiry.
Orders screen (EDTORDR)
3.
4.
The Inquiry button will only appear if you are licensed for COMMANDinventory.
Enter the quantity in the field. This quantity is checked against the inventory of the
product at the assigned plant.
Press the Inquiry button to see how much of the item is on hand at the plant. A
warning message is displayed if the ordered quantity exceeds the quantity available.
Inquire Warning (QTYWARN)
5.
6.
Press the Inquiry button to go to the Item Inquiry screen. You can select another plant
from which to make the order, or you can select OK and ticket the order. Selecting OK
will result in a negative inventory balance.
When you have completed the order, press the Ticket button. This will automatically
produce a ticket at the default plant.
Advanced Order & Schedule Tools
91
7.
If this is a cash order, press the COD button to produce the Order Total Amount
before the ticket is generated.
The Order Tree
The Order Tree {Dispatch > Order Tree} gives you a powerful and flexible means of
navigating through your order history. It lets you search, sort, and display all orders in your
system based on the criteria you specify.
The Order Tree is designed to resemble the organization of Windows Explorer, using
folders that represent roots and branches. The base level of organization is called the “root.”
At this level, orders are sorted into folders based on specific criteria. For example, you might
want to sort your orders based on Order Date and Customer Name. Each folder at the root
level would be labeled with a specific Date/Customer combination.
Within each root folder are “branches.” The branches, or folders, closest to the root level are
the individual orders. You can control how these folders are labeled to expedite order
identification.
Each Order folder contains folders for each mix and extra product on the order. Within each
mix folder are file icons representing the delivery schedule and any associated products.
Navigate through the Order Tree by clicking on the Plus and Minus buttons to the left of
the folder. This expands or collapses the folder, respectively.
Topics in this section:
Configuring the Order Tree
Right-Click Mouse Functionality Using the Order Tree
Configuring the Order Tree
Configure the Order Tree using the Select, Sort, and Column tabs on the Configuration
Settings screen {File > Select, when the Order Tree is open} to show the information you
need. Accept the new configuration. You can have several different Order Tree
configurations—all serving different purposes. You might look at one exclusively for orders,
and another for tickets. You might want to look at orders by delivery address for shipping
purposes, or you might want to sort by delivery method to see all the picked up, or FOB,
orders. You also have the option to delete a configuration if necessary. The title bar of the
Order Tree screen displays the current configuration in parentheses.
The Root is the primary level of folders you see when Order Tree is selected from the
Dispatch menu. Choose a sort method for the root level using the Root Level field on the
Sort tab of the Configuration Settings screen {File > Select, when the Order Tree is open}.
For example, if you select Order Date, COMMANDseries sorts the orders on the Root
level according to their order date, and displays them within those dates accordingly. You
can add sort criteria at the root level to fit your specific needs. For example, if your company
uses projects extensively, you might sort the Root by Order Date, Customer Name, and
Project Name.
Folders inside the Root folder represent the Branches. The selections you make on the
branch level of the Sort tab determine how the orders are displayed on the branch level.
92
Advanced Order & Schedule Tools
Configuration Settings (FNDOTRE2)
Use the Select tab to further narrow the group of orders displayed in the Order Tree.
Choose the range of information the Root level information is chosen from. You might
choose Order Date, As or Between, and then the dates. While you have the option to look
at any range you select, keep in mind that larger ranges require more time to build.
Configuration Settings (FNDOTRE3)
The Columns tab determines how the Order Tree labels the various folders and delivery
schedules. There are five different branches of information that appear on the screen below
the Order Line; the Root, Order Line, Product Line, Associated Product Line, and Schedule
Line.
•
•
•
When configuring the Order Line, it makes sense to make selections like Order Code,
Customer Name, and Delivery Address.
When configuring the Product Line, you might choose Product Code, Product
Description, Ordered Quantity, and Ordered Quantity unit of measure.
When configuring the Schedule Line, you might choose the Scheduled Plant Code
and Scheduled Start Time, or even look at the Distance.
Advanced Order & Schedule Tools
93
Configuration Settings (FNDOTRE4)
Right-Click Mouse Functionality Using the Order Tree
When using the Order Tree, COMMANDseries features special functionality when you
click the right mouse button. Right-clicking while the Order Tree is open will give you the
following options:
•
•
•
•
•
•
•
•
•
•
•
•
•
•
•
94
Show Order - Shows the order screen for the highlighted order.
Ticket Order - Tickets the highlighted order.
Help - Shows the Help Topics screen.
Screen Help - Shows help for the current screen.
Clear - Refreshes the Order Tree display.
Select - Shows the select screen.
Sort - Shows the sort screen.
Search - Repeats the last search. The system searches for information already specified
using the Request & Search function. If you click the Search button, but have no last
search defined, COMMANDseries assumes your doing a Request and Search.
Request & Search - Searches the Order Tree for specified information.
Columns - Shows the columns screen.
Menu - Displays the main menu tool bar.
Select Configuration - Lets you choose a pre-set configuration that is more suitable
to present needs.
Save Configuration - Save and name a new configuration.
Delete Configuration - Deletes a configuration.
Exit - Exits the Order Tree.
Advanced Order & Schedule Tools
The Options Menu
When the Order Entry screen is displayed, the Options menu becomes available. Use the
Options menu to navigate quickly to commonly used functions in
COMMANDseries.Prefix Screen
Select this menu option to call the Customer-Project-Order Lookup screen.
Switch to Concrete / Aggregate / Block / Asphalt
If you are licensed for both COMMANDconcrete, COMMANDaggregate, and
COMMANDasphalt, use these commands to switch from a concrete order form to an
aggregate or asphalt order form. For companies that have a concrete plant and an aggregate
quarry at the same location, switching order forms is a convenient feature for order takers.
Use Switch to Block to change the order form to a block order form. This option only
works when viewing a completely blank order form. If any order information has been
entered, the system will not switch screens.
Test Order Print
Use the Test Order Print option to test print an order. You should test print a single order
before printing a series of orders to determine if the information printed correctly, if the
print format is correct, and whether or not the order information printed out on the right
printer.
Change Order to Metric
Use this feature to switch between metric and US customary.
Addition/Selection of Notes
This option calls the main Addition/Selection of Notes screen.
Advanced Order & Schedule Tools
95
Customer Notes (EDTCNOT)
From this screen you can sort through all customer notes stored in the system. Please see
the Customer Notes section for additional information.
Re-Verify Credit Limit
Re-Verify Credit Limit for existing non-delivered current or future orders. The current
value of the order will be removed from the calculated Booked but not Shipped Amount of
the credit limit and credit check will be done as if the order was a new order.
Current Day orders that have been delivered or past-day orders will not be available for the
Re-Verify Check Limit option.
Default Schedule & Pricing Plants in Order Entry
You can establish default hierarchies for loading the Schedule Plant and Pricing Plant in
Order Entry.
Setup
Two different areas must be configured for this feature:
•
•
96
User Schedule Plant Default
{Configuration > Dispatch Tab}
Advanced Order & Schedule Tools
User Schedule Plant Default
A new form, Schedule Plant Default for Order Entry (EDTSPDO), has been added to
{File > System Information > User Schedule Plant Default}.
This screen lets you establish a default sequence to be used in determining the Scheduling
Plant for a new order.
To enter a default sequence:
1.
2.
3.
Enter a User ID or a Group ID in the User field and press <Tab>. If the user belongs
to a group, the Group Name will display. If the entered ID is a Group ID, the Group?
flag will be checked.
If the Do not Default checkbox is selected, no schedule plant will default in Order
Entry for the selected user/group. The user/group will have to enter the schedule plant
manually. Checking this box will also deactivate the Priority fields.
Select up to four levels of Priority. Options are:
4.
User login Plant
Economic Sourcing
Customer/Project
Deliver To (this option will only be available if Use Deliver To is set to Enable
on the {Configuration > Project/Frame Project tab}.)
Accept the screen.
Configuration > Dispatch tab
A number of changes have been made:
•
•
The Default Pricing Plant from Scheduling Plant has been renamed Overwrite
Pricing Plant from Scheduling Plant.
A new field, Default Pricing Plant from User Login Plant, has been added.
These two fields are mutually exclusive; if one is selected, the other is grayed out.
Advanced Order & Schedule Tools
97
•
Various fields have been rearranged to make the tab more accessible.
Workflow
Defaulting Schedule Plant Logic
During Order Entry, the application will test for the appropriate default Schedule Plant as
follows:
•
If user setup is available in the User Scheduling Plant Default table, it will act based on
the flag and priorities as described below.
If User Login Plant is the top criterion, the Login plant will default into the
Scheduling Plant code.
98
Economic Sourcing will still be run for the user login plant; however, economic
sourcing will not change scheduling plant. You will see the best option based on the
cost when you select the economic sourcing button.
You can change the Scheduling Plant from the Economic Sourcing screen or can
edit manually if you have proper privileges.
If User Login Plant is not selected during log in, the application will consider the
next priority setup.
If Economic Sourcing is the top criterion, the application will default the best
economic possible/available plant into the scheduling plant as standard. More than
Advanced Order & Schedule Tools
•
•
likely, any priorities after economic sourcing will not be valid, because economic
sourcing will most likely suggest anything available.
If Customer/Project is the top criterion, the application defaults the scheduling
plant from the project if the project is available and the scheduling plant for the
product line is not blank. If there is no project, or the Project Scheduling Plant is
blank, the application will check the customer record.
If the project is not available or the scheduling plant in the project is blank, the
application will consider the next priority setup.
If Deliver To is the top criterion, the system will check the Use Deliver To
parameter each time; if it is set as Disable, the system will ignore the priority and
retrieve and use the next priority setup. If it is set to Enable, and the scheduling
plant in the Deliver To is not blank, the system will default the Scheduling Plant in
Order Entry. If the scheduling plant is blank in the Deliver To, the application will
consider the next priority setup.
If user setup is not available, the application will check to see if there is any group for
the user in the User Name table (USNM). If there is, the application will check if there is
a Group set up in the User Scheduling Plant Default table with User name: # and the
Group name. If there is, the application will process priorities as described above.
If there is no Group Name setup available in the User Scheduling Plant Default table,
the application will check to see if there is any set up with User name:# and Group
name: Blank. If found, the system will act based on the flag and priorities as described
above. If not found, no plant will be defaulted into the pricing plant.
Exceptions
Under certain conditions, the default schedule plant logic will not be used:
•
•
•
If the new order is a Cash & Carry order. In that case, as standard, the user login plant
defaults into the scheduling plant and is not editable.
A TQS mix is used.
If the product comes from a project product list and a specified scheduling plant is
available.
Under certain conditions, economic sourcing will default the scheduling plant:
•
•
•
If there is no user setup in User Schedule Plant Default table.
The user may or may not have group name, but no group name set up related with user
in User schedule plant table.
There is no # setup in User Schedule Plant default table.
If the product is not available in the plant and there is no next priority is setup, the
scheduling plant will be left blank.
If the scheduling plant is changed manually, you will be prompted for a reason code.
However if the scheduling plant is changed from one priority to another priority, a reason
code will not be required.
Advanced Order & Schedule Tools
99
If Do Not Default is selected, the scheduling plant will not default in Order Entry.
However, as standard, the order cannot be saved without a scheduling plant; you must
enter/select the scheduling plant during Order Entry.
Defaulting Pricing Plant
• If the Default User Login Plant to Pricing Plant flag on the {Configuration >
•
•
•
Dispatch tab} is selected, the User Login Plant will default as the Pricing Plant on new
orders.
If the User Login Plant is blank, there will be no defaulting. Orders cannot be saved
without a pricing plant, so the pricing plant will have to be entered manually.
If the Overwrite Pricing Plant from Scheduling Plant flag on the {Configuration
> Dispatch tab} is selected, the order’s scheduling plant will be written to the pricing
plant.
If the scheduling plant is changed, the system will overwrite the pricing plant with the
new scheduling plant.
Economic Sourcing
Economic Sourcing lets you select the most economical way to fulfill an order. The system
calculates the plant with the lowest cost to you and lists all other plant possibilities. Plant
selection considers the material cost, distance to the plant (calculated using your map
pages), and the cost of delivering the material.
Economic Sourcing can be accessed through the Projects editor and through Order Entry. If
you use COMMANDquote, it can also be used with Jobs and Quotes. The Projects editor
records a plant that is to be associated with an individual project product. This defaults to
the most economical plant choice, as calculated by Economic Sourcing. When accessing
through the Projects editor, you can override the default plant for a project product. This
will then be used as the default plant on orders associated with that project.
Accessing Economic Sourcing through Order Entry lets you override the default plant on
the order with the plant of your choice.
Economic Sourcing will:
•
•
•
•
Consider all plants in Economic Sourcing rather than those just with Map Page
distance records.
Provide a detailed breakdown of the cost used in Economic Sourcing.
Ensure that items with no haulage or material cost are not incorrectly prioritized in
Economic sourcing.
Ensure that Cartage Pay Overrides are included in the Economic Sourcing Calculation.
Using Economic Sourcing
To use Economic Sourcing, go to the Configuration > Mix Mapping tab and select which
plants will be used in the intial run of Economic Sourcing in the Default Economic
Sourcing Mode field:
100
Advanced Order & Schedule Tools
•
•
•
Map Page Plants
User Plants
All Plants
Using Economic Sourcing:
1.
2.
3.
4.
5.
To open Economic Sourcing for a particular project product (non-TQS mixes only),
open the Products tab of the Projects screen {Files > Customer & Project
Information}. Press the $ button to open the Product Detail Information screen. Go to
the Miscellaneous tab and press the £ Economic Sourcing button. To perform this
process for a TQS mix, please refer to the TQS User Guide.
To open Economic Sourcing while processing an order, press the £ button in the
Scheduling section of the Order Entry screen.
Initially, the screen displays a list of plants on the map page of the project or order.
Choose whether to view only user plants defined for the current user, or all plants.
Press the User Plants button to display results for the plants defined for the current
user. This information is set up in the Plants tab of the Users screen {Files > System
Information > Users > Users > Plants}. If no user plants have been specified, all
plants will display.
Press the All Plants button to open a popup that allows you to select a region. This
displays a list of the companies defined in the Company file {Files > General
Information > Companies}. Selecting one or more of these options includes only
plants for that company /region in the results screen.
Select Region to Show (SELCOMP)
Advanced Order & Schedule Tools
101
6.
7.
Once you have chosen which plants you want to see in the results, the Economic
Sourcing screen lists the costs for each plant (Margin) and the difference in costs
between them and the least expensive plant(s) (Variance). This screen calculates the
margin as Margin = Material Price - (Material Cost + Standard Haulage). It then
displays the results in ascending order of margin, i.e. the most economical choice first.
To select a plant other than the one that was selected for you, double click anywhere on
the line. You will then be prompted to enter a reason code in the Economic Sourcing
Reason Code screen, to justify this choice.
Economic Sourcing Reason Code (EDTESRC)
8.
9.
On the title bar of the screen, you can see, in parentheses, the Item Code and
Description of the mix with which the plant entered will be associated. Enter a reason
code or detail on the field to select one from the Reason Codes file.
If you accessed Economic Sourcing through Projects, the details will be stored and
defaulted into any future order using that project and product. If you accessed
Economic Sourcing through Order Entry, when you accept the screen you will return
to Order Entry, where your plant choice will show in the Plant field. The plant entry
will also have been updated in the Order Lines file.
Notes
•
•
•
The Economic Sourcing editor now displays the Material Cost and Plant Cost
information that is used by the Economic Sourcing routine.
If a Cartage Override Rate exists on the order line, it will be used for the relevant plant
in the Economic Sourcing calculation.
Negative values will not be displayed on the Economic Sourcing form for
combinations that are considered incomplete (e.g., a haulage cost cannot be
determined).
Pricing Authority - Display Percentage Discount
Currently, when an order taker exceeds the pricing discount authorization set in
COMMANDseries, the Pricing Authority form indicates how much the user has exceeded
the discount. Since the user typically also needs to see by what percentage discount has been
102
Advanced Order & Schedule Tools
exceeded, the Pricing Authority form has been updated with two new fields: Extended
Price Percentage and Minimum Allowed Price Percentage.
The Extended Price Percentage displays the amount entered by the user, and the Minimum
Allowed Price will display the minimum price (either [item price - trade
discount] or [item price - user discount], whichever is less, or [item price trade discount - user discount] for users who have the Configuration flag noted
below set to Enable) that can be given to this customer. Percentages will display next to
these numerical values.
•
•
If you have set the Compute User Price Latitude after Discount flag to Enable on
the {Configuration > Projects/Quote tab}, the user discount is computed after the
Trade Discount/Zone Adjustment. The entered discount is calculated against the
Adjusted Price.
If you have set the Compute User Price Latitude after Discount flag to Disable,
the user discount is not computed after the Trade Discount/Zone Adjustment. The
entered discount is calculated against the Item Price.
Email Notifications
The email notification system used in conjunction with Pricing Authority/Discount Levels
uses a Uniface component to send emails. These emails can only be sent within the
company system. Implementing this new system involves the following changes:
•
The \Bin\Message Delivery folder is no longer needed and can be removed.
Advanced Order & Schedule Tools
103
•
•
The EMLG database table will serve as an email log.
Two fields should be completed on the Configuration > Defaults tab:
E-mail Host - Identifies the email host.
Email from Address - Defines the address to be used in the From field on all
notification emails.
The assignment file must be updated so that COMMANDseries can access a required
.NET DLL. The ASN Wizard will automatically add the line ..\bin\uauthlogin.dll to the
[USER_3GL] section. If the system is configured for email notification and this line is not
in place, when COMMANDseries starts, it will prompt you to have your administrator run
the ASN Wizard.
Transport Pricing
In many European countries, it is required by law to record and print the unit price and
total price for any product and service at the product line level on pro forma invoices.
Previously, COMMANDseries was unable to support calculation of transport and other
services rendered when no concrete is produced (such as Pump Relocation) when distance
was a variable in the price. Now, COMMANDseries can define such an item and price it
using a Cartage Rate Table, which will price the item properly in Order Entry when the
order schedule is entered and the distance is defined.
•
•
•
•
•
Discounts on Cash orders will apply to transport line-items just like they do for any
other kind of order line-item. The Item Code, Description, Price, and Extended price
will display on the Proforma invoice.
Prices for distance-based items can be modified until the order is shipped by changing
the distance on the schedule.
Prices are based on the scheduled distance on the order, and will not change if a ticket is
created from an alternative plant that has a different distance.
Cartage Rate Tables are assigned to items based on the location, so an item can have
varying rates if it is priced from different locations.
Cartage Rate Tables should be created specifically for transport items since pricing for
these items is determined differently from regular items. You should not use the
Cartage Rate Tables that may have already been created to add cartage charges.
New Fields
Several new fields have been added to forms in COMMANDseries to accommodate this
enhancement.
Items Editor
The Items > Prices tab contains a new Cartage Rate Table field, which is represented as
CART_CODE in the IPRC (Item Price) table. Enter the Cartage Rate Table code that you
wish to have associated with the transfer item in this field. Only Cartage Rate Tables that
104
Advanced Order & Schedule Tools
have a Rate Type of Quantity/Distance or Plant/Zone can be entered in this field.
The Cartage Type must be either Charge or Both (Payment and Charge).
If you manually enter a price for the item in this field, the Cartage Rate Table field will
become void and you will not be able to assign a Cartage Rate Table to this item.
Order Entry and Ticketing
A new field, BALANCE_ON_LAST_LOAD, has been added to the ORDL (Order Product)
table. This field will display as Collect Balance on Last Load on the Product
Descriptions form in Order Entry and Concrete Ticketing and Shipping. You will only be
prompted for this field when the Load Qty is changed from the Order Qty default.
In Ticketing, when the BALANCE_ON_LAST_LOAD field is Yes, the Undelivered Quantity
that remains when the last load is scheduled is ticketed.
System Logic
Pricing Logic
• When the item’s location Price Cartage Code is populated with the Cartage Rate Type
•
•
of Quantity/Distance, the price will be taken from the Cartage Range table (CTRG).
When the item’s location Price Cartage Code is populated with the Cartage Rate Type
of Plant/Zone the price will be taken from the Cartage Plant Zone table (CTZN).
When the item’ location Price Cartage Code is NOT populated, the price will come
from the Item Location Price table (IPRC).
Order Entry Logic
• When the schedule information has been completely filled out, the system will identify
•
products where the Item Price field CART_CODE is populated for the appropriate
schedule plant location and customer/project price category.
When the Cartage Code field is populated, the order lines will be repriced after the
completion of the schedule, using the procedure in the Pricing section above.
Edit Orders & Tickets and Update Costs & Prices Logic
• If a schedule exists, the system will determine which items are transport items (those
•
that have a Cartage Code for pricing). Items will be repriced using the procedure in the
Pricing section above.
If a schedule does not exist, items will be repriced as usual from the IPRC table, which
will return a zero price.
Journeys
A journey is a feature of COMMANDseries that allows you to schedule a truck to make
one trip with several stops and one product. This typically happens when several customers
require a small quantity of an identical product.
Advanced Order & Schedule Tools
105
Topics in this section:
Creating a New Journey
Editing an Existing Journey
Ticketing a Journey
Creating a New Journey
The Journey screen allows you to create journeys in advance to allow you to plan deliveries
ahead of time. Typically journeys are created the day prior to delivery using multiple orders
placed for that day.
To create a journey:
Open the Journey Editor {Dispatch > Journey Editor}.
Enter the Journey Date. Typically this will be tomorrow’s date.
Enter the Plant Code from which the order will be shipped.
Tab through the Journey Code field to allow the system to auto-assign a value, or
enter a custom journey code.
5. The Truck Code field is optional, but can be completed if necessary.
6. Enter the Order Date of the orders you wish to add to the journey. If you tab through
the field, it will default to the current date.
7. Detail on the Order Code field and select an order to add to the journey. By default,
the list displays orders scheduled from the plant selected in step 3. A different plant can
be manually selected if required.
8. The Journey Status, displayed at the bottom of the screen, now displays as Created.
The journey status messages that you may see here are as follows:
Created - The journey has been created but not ticketed.
Ticketed - The journey has been created and ticketed.
Removed - The journey has been cancelled.
Added during Shipping - The journey was created at the time of ticketing rather
than through the Journey Editor.
9. If there is more than one product on the order, the Item Code field becomes active.
Select the item that you wish to include in the journey. If the order you selected
contained only one item, the order date, order code, and item code fields are greyed out
and read-only. The Load Quantity and Sequence fields then become active.
10. Enter any Sequence information as necessary. The entries must be sequential numbers
between one and the number of stops on the journey. The number represents the order
in which the stops of the journey will take place. Accepting the Journey screen with no
sequence entries causes the sequence to be saved in the order that the stops were added.
1.
2.
3.
4.
106
Advanced Order & Schedule Tools
Journey screen (EDTJOUR)
11. The detail button to the right of the sequence field opens the Journey Detail screen,
which provides additional journey information.
Journey Detail (EDTJOUR0)
12. Notice that the Journey Line Status displayed at the bottom of the screen now
displays as Created. The journey status messages that you may see here are:
Created - A journey stop has been created but not ticketed.
Ticketed - A journey stop has been created and ticketed.
Removed - An existing journey stop was removed at the time of ticketing.
Added and Ticketed - A new journey stop was added at the time of ticketing.
13. To add another order to the journey, tab through or hit <F6> and repeat steps 7-10.
The order that you select from the list must contain an identical product to the first. If
you select an order with a different product, you will receive the following message:
“Can’t add different mix products on the same Journey.” You will then
be able to select a different order. Repeat this process until all the necessary orders have
been added to your journey.
14. Accept the journey.
Advanced Order & Schedule Tools
107
Editing an Existing Journey
Once a journey has been created, it may be necessary to re-order, add or remove orders.
To edit a journey:
1.
2.
3.
Open the Journey Editor {Dispatch > Journey Editor}.
Enter the Journey Date and the Plant Code from which the order is to be shipped.
Detail on the Journey Code field and select a journey.
Journey screen (EDTJOUR) - Edit journey sequence
4.
5.
6.
The screen is populated with journey information. You can now edit the Load
Quantity and Sequence entries as required.
You can also add new stops/orders to the journey by tabbing onto the next line, or
pressing <F6>.
Accept the changes.
Ticketing a Journey
Once you have created a journey, you must ticket each of the orders on that journey.
COMMANDseries provides a convenient way to do this all at once.
To ticket a journey:
1.
2.
3.
4.
5.
108
Open the Concrete Ticketing & Shipping screen {Dispatch > Concrete Ticketing
& Shipping}.
The Order Date defaults to the current date. If necessary you can change this once the
plant code field has been completed.
Enter the Plant Code, Truck Code and Driver Code as necessary.
If a truck code was entered on the Journey Editor, it is not necessary for the truck
code in this screen to match.
Detail on the Journey field and select a journey from the list. By default, the list
contains only journeys planned for the present date.
You will now see each stop in the journey automatically loaded into the ticketing
screen. You can navigate through the tickets using the Next and Previous buttons.
Advanced Order & Schedule Tools
Concrete Ticketing & Shipping (EDTSHIP) - Ticketed journey
6.
7.
To add a stop/order to the journey at this point, press the Add button. This adds an
occurrence to the screen and allows you to select an Order Code to add to the journey.
Tab through the Ticket Code field to create the new ticket. You can also remove any
stops that are not required by navigating it and pressing the Remove button.
Accept the screen. The journey stops are ticketed and the journey is updated with any
changes made to its stops and/or sequence.
Once a journey has been ticketed changes can no longer be made. One ticket instruction is
sent to the batch panel for all individual journey tickets.
If you view the details of a completed journey in the Journey Editor, pressing the detail
button opens the Journey Details screen and lets you view the completed journey
information.
Multi-Drop Concrete Deliveries
Overview
Order Entry has been modified to accommodate multiple drops for Concrete Products.
This enhancement applies only to users who have Concrete Products (CB) in their system
license.
Plants Editor
The following changes have been made to the Plants editor:
•
•
The Plant tab has been renamed Dispatching.
An Assign Truck for Block Ticketing field has been added to the Dispatching tab
with the below options:
Advanced Order & Schedule Tools
109
Any Status - You have the ability to assign a truck, regardless of the truck’s current
status.
At Plant Status - Default. You can only assign trucks that are currently in an At
Plant status.
This field is valid only for Block tickets.
Plants > Dispatching tab (EDTPLNTF)
Order Entry
Below is the process flow for ordering with Concrete Products:
•
•
•
•
•
•
Order lookup is now based on item groups, as opposed to the application module.
The Load Quantity will not display on the Schedule line if the item type is set to
Concrete Products (CB).
If the order is for a Concrete Product, the Loads field will default to 1. All quantities
will then be defaulted to the first load on the Scheduling form. You can change this if
needed.
If the Loads field is updated to an amount other than 1, loads in the Scheduling form
will be modified by dividing the quantities with the number of loads.
When the total load quantity does not match the order quantity, you will receive an
error message with the following options:
Adjust Order Quantity - The order quantity will be adjusted based on the total
scheduled quantity of the product.
Adjust Scheduled Quantity - The scheduled quantity will be adjusted, beginning
with the first load all the way to the last load.
Cancel - Return to the order.
Apply Minimum Load Charges and Zone Charges are not editable on the Order
Entry Pricing screen.
Ticketing
Below is the logic for ticketing with Concrete Products:
110
Advanced Order & Schedule Tools
•
•
•
•
•
The Pre-Quantity and Cube Check fields will not display for Concrete Product
orders.
When a loading ticket is printed, all quantities related to that ticket will be recalculated
since the quantity may have changed after actual loading has been completed. Inventory
files will also be updated with these quantities.
The delivered quantity is subtracted from the order quantity; the next load quantities
are then compared with the remaining quantity.
If the remaining quantity is greater than or equal to the load quantity, the load
quantity defaults to ticketing.
If the remaining quantity is not greater than or equal to the load quantity, and it is
not negative or blank, the subtracted value defaults to the load quantity in ticketing.
When a ticket is created with quantities other than the scheduled quantities (i.e., the
quantity is manually changed), the system will adjust the remaining scheduled
quantities in one of the following ways:
The product’s last schedule will be adjusted if the ticket is not the product’s last
schedule.
When the ticketing process comes to the last schedule, another schedule will be
added with any remaining quantity.
If the quantity delivered is more than the scheduled quantity, the system will adjust
the last schedule to follow the previous schedule’s until the quantity is adjusted
appropriately.
The schedule line will be removed when the schedule does not have any quantity
for the order because of the delivered quantity adjustment.
When a new product is added after the order has been saved, you will be allowed to
update the schedule manually. If you do not schedule the full quantity, you will
receive an error message and will not be allowed to save the screen.
When the ticket quantity is different from the schedule loads quantity, the system will
adjust the schedule loads based on the scheduled quantity for the order line.
Ticket Report
The Ticket Report Selections screen {Dispatch > Dispatching Reports > Ticket Report}
has been updated with a new option, Concrete Products Detail, which you can run to see
information for these deliveries.
Advanced Order & Schedule Tools
111
Ticket Report Selections screen (SELTICK)
112
Advanced Order & Schedule Tools
Advanced Order & Schedule Tools
113
Aggregates Sold Through
Ready-Mix Plant
Several companies sell blended aggregates through a ready-mix plant. These blended
aggregates are set up, ordered, ticketed, batched, and delivered as though they were concrete
mixes. However, since pricing information is often imported from other applications in
tons, not in cubic meters as would normally be required for a concrete mix, these
applications expect ticket price quantities to be returned in tons as well. Presently,
COMMANDseries does not support price quantities in tons for concrete items.
•
•
•
•
•
COMMANDseries can support the import and export of prices in tons for blended
aggregates that have been set up as concrete mixes with an Item Type of Concrete.
Item prices and project product prices are converted to cubic meters for the Data In
routine {Manage > Data Management > Import Data}.
Price quantities are converted to tons when printed or exported during Ticketing and
the Data Out routine {Manage > Data Management > Export Data}.
The “Item Units of Measure” Master File Data In {Files > Master File Data In}
process updates item prices and project product prices for price records that were
imported when no UOMI (Item Units of Measure) record existed.
All conversions from and to cubic meters or tons are based on the conversion factors
stored in the item’s UOMI record.
The following Document Tags have been created:
•
•
•
PPPCNV - Project Product Price Conversion Tag (Document Type: Project Data In/
Out)
TKQCNV - Ticket Quantity Conversion Tag (Document Type: Ticket Print And Data
In/Out)
UOMISO - UOM ISO Code Tag (Document Type: Ticket Print And Data In/Out)
PRPCNV - Previous Price Conversion Tag (Document Type: Item Data In/Out)
•
IMPCNV - Item Master Price Conversion Tag (Document Type: Item Data In/Out)
•
114
Aggregates Sold Through Ready-Mix Plant
Aggregates Sold Through Ready-Mix Plant
115
Sampling & Testing Plan
Sampling and testing plan functionality allows the user to enter basic testing frequency
parameters. Based on those parameters, COMMANDseries will notify the user that the
concrete being produced needs to be sampled and tested.
Note: To use sampling and testing, you must have Concrete Testing Database (CS) in your
system license.
Configuration
Test Methods
A new form, Test Methods (Files > Item Information > Test Methods), is used to store
basic test method information. This data will be stored in the new Testing Methods
(TSME) table.
Test Methods screen
Test Methods
Test Method ID
•
•
•
9004
Description
Consistence Slump
Short Description
Norm/Standard
Constite
EN 12350-5
Test Method ID –This unique identification code will be used on other fields to
assign a given testing method to a mix or concrete family.
Description / Short Description – Standard descriptions.
Norm/Standard – This field identifies fact sheet or publication that specifies the
criteria to be used for this test. It is provided for reference purposes only.
Field-level security can be applied to all fields on this form.
Concrete Testing Families
A Concrete Family is a collection of mixes that are grouped together for testing purposes.
When a testing plan calls for a test of Family A, any mix in Family A is eligible for the test.
You can organize your families however you wish: by strength, by cement, type, etc. This
data is stored in the Testing Families (TSTF) table and its child tables, Testing Families
Location (TSTL) and Testing Families Testing Methods (TSTM). The TSTF table is itself a
child table of the Locations (ILOC) table.
116
Sampling & Testing Plan
Concrete Testing Families screen
•
•
•
•
•
•
Concrete Testing Family – Code used to identify the testing record.
Description / Short Description – Standard descriptions.
Location – Testing parameters are assigned by COMMANDseries location.
Test Method ID – The Test Method ID code to be used for this family/location. Detail
on the field to select from a list.
Sample parameters – These parameters determine the conditions under which a
sample may be requested. If the sample logic executes and the actual number of
samples taken exceeds the maximum for all parameters, the system won’t request a
sample.
Statistics – Statistical information can be hand-entered or uploaded from the Fire-Q
system.
Field-level security can be applied to all fields on this form.
Note: Multi-language support is provided for the Description and Short Description fields
for both testing methods and testing families. If your system is configured to support
multiple languages, those field will be stored in the TSME_LNG and TSTF_LNG
subtables and retrieved as needed.
Item-Testing Methods
A new tab, Test Methods, has been added to the Items editor. This tab will display only for
mix items:
Sampling & Testing Plan
117
Items-Test Methods tab
Technical
Alternative Batch Item Codes
Location
9004
Minimum
Per m3 produced
Per day
Per week
Per month
Per year
1 Production Day equals
1 Production Week equals
Constituents
Automatic P roducts
Quality Codes
Test Methods
S250
Test Method ID
Sample
Batching
consistence slump
Maximum
200
1
2
5
10
10
20
20
40
25
5
Actual Statisitics form Quality System
Target number of samples
Actual number of samples
Start Date
End Date
Cubic meters
Samples recorded since End Date
Days
Total Samples
25
20
01-Jan-2008
31-Dec-2008
4
24
Concrete Family
FS\00053
FS\00053
Betonfamilie (Druckfestigkeit)
Betonfamilie (Druckfestigkeit)
You can assign multiple test methods for multiple locations. In addition, you can also assign
the mix to multiple Concrete Testing Families. If any family is assigned to an item, the test
methods of the family dictate sampling and testing rules; test methods assigned directly to
the item will be ignored.
Users
The Users > Options tab has a new field, Display Test Message in Order Entry. If this
option is enabled, then notification that test samples need to be taken will display during
order entry. Those notifications can then be entered as dispatch memos, if necessary.
Selection Logic
The method for determining whether a test(s) is to be performed will be governed by:
•
•
•
•
The Production Volume since the last test requirement was satisfied.
The Target Volume for the Testing Method.
The Maximum Tests per Calendar Year, Calendar Month, per Calendar/ Production
Week, and per Calendar/ Production Day (if the max per month has been met, no other
lower level checks are necessary; likewise per week and per day.)
Productions Days and Weeks will have to be identified as a day that the Concrete Code
or a member of the Family was, in fact, produced at a certain minimum level of m3.
Definitions
•
•
118
Production Day
If Null or Zero (0), a Production Day is considered to be a Calendar Day.
If Not Null or greater than Zero (0), a Production Day is considered only when the
Actual Production Volume is greater than or equal to the value entered.
Production Week
If Null or Zero (0), a Production Week is considered to be five Calendar Days.
If Not Null or greater than Zero (0), a Production Week is considered to be five
Production Days.
Sampling & Testing Plan
Once the Maximum checks are performed, the Minimum per Day, Per Production Week,
per Calendar Month, and per Calendar Year are checked. Whenever a test is required to
meet a Maximum, or Minimum testing requirement, messages will be generated in Orders
(if applicable) and in Concrete Ticketing.
Operational Logic
When a schedule (not an order) is saved, the system will perform the test sample selection
logic on any mix on the order:
•
Identify the Item Code and Location Code for the order or ticket.
If the Item Code at the Location has ANY Concrete Families assigned, all Testing
Methods for the Concrete Family / Location will be used.
If NO Concrete Families are assigned, all Testing Methods for the Concrete Item
Code at the Location will be used.
For each Testing Method, the Start Date and End Date are supplied by FIRE Q, and define
the date range for the Target Number of Samples and Actual Number of Samples. The
Actual Number of Samples will be those that were ACTUALLY performed and reported
back through the FIRE Q system. All queries to CS Tickets for the Samples recorded in CS
will be back to the End Date supplied by FIRE Q.
•
•
•
•
•
Maximum - Per Year
Retrieve tickets (for the Item or Family) for the calendar year.
Determine number of samples recorded.
If the Maximum Samples Per Year has been met, exit routine - No Sample Needed.
If the Maximum Samples Per Year is Null or Zero, proceed to next step.
Maximum - Per Month
Retrieve tickets (for the Item or Family) for the calendar month.
Determine number of Samples recorded.
If the Maximum Samples Per Month has been met, exit routine - No Sample
Needed.
Maximum - Per Week
Retrieve Tickets (for the Item or Family) for the Week (based on 1 Production Week
Equals x days).
Determine number of Samples recorded.
If the Samples Per Week - Maximum has been met, exit routine - No Sample
Needed.
Maximum - Per Day
Retrieve Tickets (for the Concrete Item or Family) for the Day (based on 1
Production Day Equals x m3).
Determine number of Samples recorded.
If the Maximum Samples Per Day has been met, exit routine - No Sample Needed.
Minimum - Per Day
Retrieve Tickets (for the Concrete Item or Family) for the Day (based on 1
Production Day Equals x m3).
Sampling & Testing Plan
119
Determine Quantity Produced and number of Samples recorded.
If the Minimum Samples Per Day has not been met, request a sample.
If the Minimum Samples Per Day has been met; that is, if (Actual Production
Volume / Number of Samples Taken for the Day) < Sample per m3 Produced,
request a sample.
Minimum - Per Week
Retrieve Tickets (for the Concrete Item or Family) for the Week (based on 1
Production Week Equals x days).
Determine Quantity Produced and number of Samples recorded
If the Minimum Samples Per Week has not been met, request a sample.
If the Minimum Samples Per Week has been met–that is, if (Actual Production
Volume / Number of Samples Taken for the Week) < Sample per m3 Produced,
request a sample.
Minimum - Per Month
Retrieve Tickets (for the Concrete Item or Family) for the Calendar Month.
Determine Quantity Produced and number of Samples recorded.
If the Minimum Samples Per Month has not been met, request a sample.
If the Minimum Samples Per Month has been met; that is, if (Actual Production
Volume / Number of Samples Taken for the Month) < Sample per m3 Produced,
request a sample.
Minimum - Per Year
Retrieve Tickets (for the Concrete Item or Family) for the Calendar Year
Determine Quantity Produced and number of Samples recorded
If the Samples Per Year - Minimum has not been met, request a sample.
If the Samples Per Year - Minimum has been met; that is; if (Actual Production
Volume / Number of Samples Taken for the Year) < Sample per m3 Produced,
request a sample.
•
•
•
Operations
Importing Test Plans
The Master File Data In routine supports the following import types:
•
•
•
•
•
•
•
120
Testing Methods
Testing Methods - Translations
Testing Families
Testing Families - Translations
Testing Families Methods
Item Location Testing Methods
Item Location Testing Families
Sampling & Testing Plan
Document tags for the import process will have to be created manually. Below is a table
listing the fields that will most likely be needed for standard import and export routines:
Standard import fields
Item Code (ILTF)
Location Code (ILTF)
Test Family Code (ILTF)
Actual Samples (ILTS)
End Date (ILTS)
Item Code (ILTS)
Location Code (ILTS)
min sample production volume (ILTS)
min samples per day (ILTS)
min samples per month (ILTS)
min samples per week (ILTS)
min samples per year (ILTS)
max samples per day (ILTS)
max samples per month (ILTS)
max samples per week (ILTS)
max samples per year (ILTS)
production day value (ILTS)
production week value (ILTS)
Start Date (ILTS)
target samples (ILTS)
Test Method Code (ILTS)
description (TSME_LNG)
Language Code (TSME_LNG)
Norm Standard (TSME)
Short Description (TSME_LNG)
Test Method Code (TSME_LNG)
Test Method Short Description (TSME)
Test Method Description (TSME)
Test Method (TSME)
Test Family Description (TSTF_LNG)
Test Family Language Code (TSTF_LNG)
Test Family Short Description (TSTF_LNG
Test Family Ocde (TSTF_LNG)
Test Family Description (TSTF)
Test Family Short Description (TSTF)
Testing Family (TSTF)
Actual Saample (TSTM)
End Date (TSTM)
Location Code (TSTM)
min samples per day (TSTM)
min samples per month (TSTM)
Min Sample prod per vol (TSTM)
min samples per week (TSTM)
min samples per year (TSTM)
max samples per day (TSTM)
max samples per month (TSTM)
max samples per week (TSTM)
max samples per year (TSTM)
production day value (TSTM)
production week value (TSTM)
Start Date (TSTM)
Test Method Code (TSTM)
Target Sample (TSTM)
Test Family Code (TSTM)
Order Entry & Ticketing
Order Entry
When you have the Display Test Message in Order Entry field enabled on the User >
Options tab, the system will display the following message if a sample needs to be taken:
Sampling & Testing Plan
121
Order Entry Sample Notification
Depending on the mix and various defined test plans, it is possible that multiple tests may
be required for a single mix.
An order taker’s response to the message will be based on the company’s business practices.
For example, the order taker may need to add a dispatch memo to the order reminding the
driver and batcher to take the sample.
Ticketing
When a ticket is generated, the system will check to see if testing samples are required. If so,
a confirmation screen will display:
Ticketing Sample Notification screen
Confirm Samples for Testing Methods (Ticket xxxxxxxx)
Family
FS\00053
Testing Methods for the Ticket
Sample Confirmed
9004 Consistence Slump
9005 Testing Method Description
Confirm each required sample buy checking the appropriate box. When a test sample is
confirmed and the screen accepted, test confirmation records will be created in the Ticket
Test Samples (TKTS) table.
The test records will subsequently be exported to the Fire-Q system for result management.
122
Sampling & Testing Plan
Sampling & Testing Plan
123
Rebates and Royalties
Rebates and royalties are often an essential part of the concrete and aggregate business.
COMMANDseries can easily handle all aspects of rebates and royalties. Areas of
COMMANDseries that report prices, costs, and gross margins have been modified to
incorporate rebate and royalty amounts. Rebates and royalties can be tracked from the Job
phase all the way through the distribution and delivery phase.
Note: When a Quote is created from a Job and when a Project is created from a Quote,
rebate and royalty information are automatically carried forward when the new
Quote and Project are created.
•
•
Rebates - An amount that is reclaimed from a supplier upon the sale of items that were
purchased from that supplier. Rebate information that is assigned to items in the Item
editor is applicable for Jobs, Quotes, and Projects.
As rebate-worthy items are ordered and ticketed, rebates are associated with the orders
and tickets as a reduction in the Material Cost of the item sold.
Royalties - An amount paid to a land owner for items that were manufactured or
extracted from the land. Royalty information that is assigned to items in the Items
editor is applicable for Jobs, Quotes, and Projects.
As royalty-worthy items are ordered and ticketed, royalties are associated with the
orders and tickets as an increase in the Material Cost of the item sold.
This document will take you through all steps needed to associate rebates and royalties with
specific items, as well as what to do in the order entry process.
Configuration
The Configuration > System tab has been updated with fields used to determine whether
or not rebates and/or royalties should be applied. If Disable is selected for either the Use
Rebates or Use Royalties field, none of the associated rebate or royalty fields or tabs will
display on any screen. If Enable is selected in these fields, rebate and royalty fields will
display on all associated screens.
124
Rebates and Royalties
Configuration - System Tab (EDTCNFX)
Workflow
When Enabled is selected for Use Rebates and Use Royalties on the Configuration >
System tab, the following information should be entered in COMMANDseries:
Contact Type Codes
Item Editor
Jobs/Quotes/Projects > Products Tab
Ticketing
Update Costs & Prices for Orders & Tickets
Contact Type Codes
To begin setting up rebates/royalties, create some Contact Types that have Rebates and
Royalties selected in the System Type field on the Contact Type Codes editor {Files >
General Information > Contacts > Contact Types}. See the below example:
Contact Type Codes (EDTCTTY)
Rebates and Royalties
125
Item Editor
Next, go to the Items editor {Files > Item Information > Items}. A new Rebates/
Royalties tab has been added to this screen so that rebate/royalty information can be
specified for different items. This tab will only be available for Concrete and Aggregate item
types. If either rebates or royalties is not enabled in the Configuration editor, the Rebates/
Royalties tab will display, but information pertaining to the disabled feature will not display.
Items - Rebates/Royalties Tab (EDTIMST)
Complete all fields for the relevant sections below:
Contact - The contact is the supplier (or other rebate-related entity) for which a
rebate is associated; or, in the case of a royalty, is the landowner (or other royaltyrelated entity) for which a royalty is associated. Detail on the Contact field to select
from a list of contacts. Only those contacts who have a Contact Type of Rebate or
Royalty will display when detailing on this field.
Effective Dates - Effective dates are those dates for which that rebate/royalty, with
its contact and target quantity, is to be used. It is like a contract that is good within
the specified dates. Tickets look for the valid rebate/royalty using this date range.
Any ticket for a date prior to the effective date will use the Previous Amount. All
tickets up to that date will use the Previous Amount, and on or after that date will
use the Current Amount.
Current Amount - Sometimes, the amount of the rebate/royalty can change within
one effective date range. Enter the changed rebate/royalty amount in this field. The
previous Current Amount will then move over to the Previous Amount field
upon changing the former.
Current Amt Effective - The effective date range for the amount entered in the
Current Amount field.
Previous Amount - The last-used Current Amount for the rebate/royalty.
Target Quantity - Used to limit the life of the rebate/royalty within its Effective
Date, causing the rebate/royalty to exist only until the target quantity is reached. For
example, if halfway into the Effective Date range, rebates have been applied to tickets
consuming the entire Target Quantity specified, the rebate would cease to be
effective.
Accept the Items editor to save the rebate and royalty information pertaining to that item.
126
Rebates and Royalties
Jobs/Quotes/Projects > Products Tab
Now a Job, Quote, or Project can be created using the rebate and royalty information just
set up.
Items already on the Products tab on the Jobs, Quotes, and Projects editors will be updated
automatically when rebate and/or royalty information has been updated for those items on
the Items editor. When rebates and royalties are enabled, the Material Cost (found on the
Products tab for Jobs, Quotes, and Projects) will be configured differently:
Material Cost = Item Cost - Rebate Amount + Royalty Amount
Products Tab - Material Margin (EDTPRDL1)
Note: The effect of rebates and royalties will be reflected on each ticket, and will also be
reflected in the Material Cost on the Preliminary Invoice Register. In addition, this
amount will be displayed on the following COMMANDexecutive reports: Gross
Margin, Contribution, and Top Customer.
The Material Cost field on the Products tab (for Jobs, Quotes, and Projects) is now
editable. Detailing on the Material Cost field will bring up a new screen: Project
Product Standard Cost (EDTPRDLB). Typically, costs are maintained for each item at
the location level. When an item is added to a Job, Quote, or Project for a certain location,
that cost is retrieved for the line-item to show margins. Some supply plants, however, do
not maintain item information at the location level because they are not actual, inventorykeeping plants. Therefore, since no cost will be retrieved for the item at that location, the
Project Product Standard Cost screen lets users enter the cost for the item supplied at
this plant so that target margins can be viewed.
Project Product Standard Cost (EDTPRDLB)
Back on the Products tab, select Total Margin from the drop-down list located under
Default Price Type. The Total Cost will display the adjusted Total Cost, including the
effect of rebates and royalties on the Material Cost.
Rebates and Royalties
127
Products Tab - Total Margin (EDTPRDL1)
When a Plant is changed for an item that has a rebate or royalty associated with it on the
Products tab, the Project Product Price Change screen will display with the below new
warning message, letting the user know that if the plant is changed for this item, the
associated rebate/royalty information will not be carried forward:
Project Product Price Change (EDTPRDLA)
Continuing on the Products tab, select the $ button next to an item to bring up the
Product Detail Information screen. A new Rebates/Royalties tab has been added to
this screen, so that you can quickly view rebate/royalty information for the associated item.
This screen will load default rebate/royalty information taken from the Items editor for new
items added to the Job, Quote, or Project.
128
Rebates and Royalties
Product Detail Information - Rebates/Royalties Tab (EDTPDTL5)
Ticketing
The various Edit Ticket Information screens {Invoicing > Edit Orders & Tickets >
Tickets button} have also been enhanced to accommodate rebate and royalty information. A
new R button has been added to these screens for rebate and royalty information.
Edit Ticket Information - Concrete Individual (EDTPREP6)
Edit Ticket Information - Concrete Multiple (EDTPREP7)
Rebates and Royalties
129
Edit Aggregate Ticket Information (EDTPREP8)
Note: On the Edit Aggregate Ticket Information screen, the Haul button has been
changed to display as H.
Click on the R button on any of the above screens to bring up the new Ticket Product
Other Information screen. This screen displays the rebate/royalty amounts that were
calculated and applied to the current ticket, as well as the name of the contact associated
with the rebate/royalty. The information can be modified or entered directly on the screen if
desired.
Ticket Product Other Information (EDTTPOI)
Update Costs & Prices for Orders & Tickets
The Update Costs & Prices for Orders & Tickets process will update rebate and royalty
amounts.
Reporting
A new report (under the Invoicing option in the menu) has been created specifically for
rebates and royalties. This report will list any rebates or royalties that were actually applied
to tickets. This report will be useful to users as it is common practice that rebates cannot be
claimed from their supplier, nor royalties paid to the land owner, until the material is
actually consumed: that is, shipped on a ticket. The Rebates and Royalties Report provides
the basis for companies to file for rebates and pay royalties.
130
Rebates and Royalties
Rebates & Royalties Report Selection (SELRRPT)
To generate the Rebates and Royalties Report:
Go to the Rebates & Royalties Selections screen {Invoicing > Rebates & Royalties
Selections}.
2. Enter a Report Name to save this specific configuration for repeated use. (The Save
Settings on Accept checkbox must be selected for the report criteria to save.) This
step is optional.
3. Select a Report Type from the drop-down list. Options are:
Detail Rebates
Summary Rebates
Detail Royalties
Summary Royalties
4. In the Report Sequence section, highlight the report sequence option to include on
the report in the left-hand box by clicking on it, and then click the Add button to add it
to the report. If the option is successfully added, it will move into the right-hand box.
The report will be broken down by the first option added to the report, and then
further broken down by any other options added.
To remove an option, click on it in the right-hand box, and then click the Remove
button. The option will return to the left-hand box.
5. Enter an Order Date or a range of dates to appear on the report.
6. Enter a Company Code or a range of company codes to appear on the report.
7. Enter a Ship Plant or a range of ship plants to appear on the report.
8. Enter a Project Code or a range of project codes to appear on the report.
9. Enter an Item Code or a range of item codes to appear on the report.
10. Enter a Rebate/Royalty Contact or a range of contacts to appear on the report.
1.
Rebates and Royalties
131
11. Select Zero Amount Rebates/Royalties Only to have the report display only those
rebates and royalties with zero as their amount.
12. Accept the screen to generate the report.
132
Rebates and Royalties
Ticketing
An order in COMMANDconcrete is, essentially, a planned delivery. It has all the
information needed to get the right material to the right customer at the right time. All
orders in COMMANDseries have two components: an order code and an order date. Each
combination of code and date is unique; you may have several orders on the same date; after
the second day, you will have two orders with the same order code, but you will never have
two orders with the same combination of order code and date.
While an order describes what you intend to do, a delivery ticket describes exactly what you
did. When a load is dispatched, a delivery ticket is generated, recording what material was
dispatched and where it went. This information is used to bill customers for their material.
Three things define a ticket: the order code, the order date, and the ticket number.
The Ticketing function lets you generate delivery tickets for previously entered orders
either by dragging and dropping trucks on the Tracking screen, or through the Ticketing
screen. Tickets are printed at the plant seconds after they are printed or typed by the
dispatcher. The dispatcher can generate tickets with as little as two pieces of information:
the order number and truck number. Tickets can also be canceled, reactivated, or retyped.
You can also generate a ticket for a future day’s order.
The following is applicable for users using the tabbed Order Entry screen with enhanced
functionality:
•
•
•
•
When the main product is selected for ticketing, only products from the same schedule
can be added to the ticket. You cannot add main products from other schedules.
Different schedules from the same order are not allowed on the same Journey. When
there is more than one schedule for the same order, two separate tickets will be printed.
Multiple mortar products can be entered on one order that has different schedules;
however, a truck that carries only one mortar product to different customers must have
different orders.
Multiple schedules will not be allowed for block delivery.
Aggregate Ticketing
•
•
•
•
The Aggregate Ticketing editor will remain the same; however, the Delivery Method,
Hauler Code, and Truck Code will be defaulted from the Schedule as opposed to the
Order. If any of these fields are blank, they will be defaulted from the Order.
When the Order Code is selected, the product code and its associated information will
be defaulted from the Item Code; the first schedule’s product will default next to the
Truck Code.
Load Quantity remains the same.
Extra products are shipped with their associated main product and schedule.
Two Ready-Mixes on One Truck
Ticketing
133
•
•
The Ticketing form will check to make sure that multiple ready-mix products come
from the same order and same schedule, as opposed to checking only the order.
When the same Order Code is added for the next ticket, the system will ensure that
the same schedule product is selected, which should be the next ready-mix product for
the next schedule.
COMMANDqc Mixes
Mixes created in COMMANDqc can be viewed in COMMANDseries via the Mix
Revision Number, allowing users to identify the particular recipe of qualified raw
materials. The Mix Revision Number is available in QC on the Test Specimen Details grid
report and is viewable in several places in COMMANDseries:
•
•
Items > Constituent tab; stored in the Item Location (ILOC) table.
Delivery Notes.
The Order Line table (ORDL), saved with the mix code that is selected for the order.
The Ticket table (TICK), saved with the mix code selected for ticketing.
Use the Ticket Print document tag REVNUM to print the Mix Revision Number on the
Delivery Note.
Topics in this section:
Ticketing Screen
Ticketing — Load Size Logic
Reprinting Tickets
Canceling Tickets
Ticketing With Prebatched Material
Maximum Gross Truck Weight
Proof of Delivery
Process Goods Returned
Unscanned Hauler Tickets Report
Print Certification Text on Delivery Notes
Greek Cancelled Ticket Print
HTML Document Format Interface
Post-Production Out of Tolerance Loads
Print/Send Tax & Cement Info to Batching System
Record Sampled Tickets
Future-Day Ticketing
Print User-Defined Fields
134
Ticketing
Ticketing Screen
Use the Concrete Ticketing screen {Dispatch }to generate tickets. If mistakes are
made, you can change the truck, the amount of mix, or the amount of item on a specific
ticket after it has been generated using the screen. Because a delivery ticket is a legal
document, care must be exercised in changing data on an already printed ticket, particularly
if that load has already been batched. A batched load affects inventory, materials used,
general ledger entries, and other data within the system.
To generate a ticket using the Ticketing screen:
1.
Open the Concrete Ticketing & Shipping screen {Dispatch > Concrete Ticketing
& Shipping}. Select the order you want to ticket by entering the Order Date and
Order Code. You can also enter an order date and detail on the order code field to
select from a list of orders with that date.
You can go straight to the Concrete Ticketing & Shipping screen when entering
an order by pressing the Tickets button on the Order Entry screen.
If you access the Ticketing screen for a project order through Order Entry and have
the Allow Project Updates from Orders/Tickets checkbox checked on the
Options tab of the Users editor {Files> System Information > Users > Users},
you will encounter the following popup message: Project Information has
been changed - Update Project?
Selecting Yes will update your project with the following information:
Purchase Order number
Job Number
Delivery Address
Delivery Instructions
Map Page
Zone
Selecting No will leave your project information unchanged.
Selecting either option opens the Concrete Ticketing & Shipping screen.
Ticketing
135
Concrete Ticketing & Shipping (EDTSHIP)
2.
Most of the necessary information is brought in from the order. Enter a Truck Code
to assign a truck to this ticket or press <Enter> to display a list of trucks. The Driver
Code defaults with the truck; edit this information if necessary.
If you change the shipping plant to a plant different from the truck's plant and leave
the Plant Code field or accept the screen without leaving the Plant Code field, the
system will accept the change and print the ticket.
[Optimization Only] If you change the shipping plant to a plant different from the
truck's plant and leave the Plant Code field or accept the screen without leaving the
Plant Code field, the system will request a confirmation:
Truck is currently at plant x,! Do you wish to ticket it?
3.
4.
5.
136
If necessary, select the Other button to edit the order’s batching and pricing
information. This information defaults from the plant file and the order.
If the fields are available, you can adjust both the Plant Tax Code and the Order Tax
Code separately on the Other Ticket Information screen, if necessary. Once the order
ships only the Plant Tax Code may be modified.
User Defined Comments (as opposed to User Defined Fields) are not available for
editing on the ticketing screen, even if they are to print on the ticket.
Tab through the Times button—there are no times to edit when the ticket is initially
created.
Detail on the Delivery field to select a delivery method. You must pick a delivery
method of type F.O.B or Delivered. If you select a delivery method of type
Delivered/F.O.B. you will receive an error message and be forced to choose again.
If the Required Tickets flag is checked and you do not choose a delivery method at
all, the system will not let you print a ticket and you will receive the following error
message: “Delivery Method must be FOB or Delivery for a ticket to be
printed.”
If an order is set to be Delivered, you must also choose a truck that is set to make
deliveries. Trucks set as F.O.B. Only cannot be assigned to delivered tickets. If this does
Ticketing
occur, you will receive the following error message: “Truck is configured for
F.O.B. only, select a different truck or set the delivery method
on the truck”.
6.
7.
8.
The Load Quantity will default from the Truck’s load size file or the remaining
concrete on the order, unless the load size was restricted in order entry.
If the truck has any remaining material from a previous load, that amount will appear in
the Preload Quantity field. Any preloaded material will automatically be subtracted
from the truck’s load size sent to a batching system if they are interfaced. If there is no
interface, you must remember to inform the batchman that there is preloaded material
on the truck.
The Cube Check checkbox is used solely to send a true or false flag to the batch panel
and may or may not be used depending on batch panel settings. It has no effect on the
ticketing process.
Press the Print Ticket button to print the ticket.
A number of things might happen before the ticket is issued, depending on a number
of different factors:
If the scheduled Hold Quantity is exceeded,
If the Load Quantity exceeds the truck’s maximum load size, a warning dialog box
will appear, reading: This truck is overloaded. Do you still wish to
ticket it? Selecting No will return you to the ticketing screen, where you can
adjust the load size. Selecting Yes will continue with the ticketing process.
If the Order Status is Hold Delivery, Will Call, Weather Permitting, or
Review, you will be prompted with appropriate options. Respond appropriately.
If the Load Quantity is small enough to trigger a Minimum Load Charge, a
dialog box will appear, asking: Do you wish to apply a Minimum Load
Charge to this ticket? Select Yes and the system will add a Minimum Load
Charge to the ticket, based on the selected charge table. Select No and no charge will
be added.
If the travel time for the load will put the driver over the limit for overtime, a
warning dialog box will appear.
Driver on truck message (EDT-overtime warning)
9.
Ticketing
Select Yes to continue with the ticketing procedure. Select No to return to the
Ticketing screen; from there you can assign a different driver or truck, or press the
Overtime button to get a summary of the driver’s current hours.
Once any questions concerning the ticket have been resolved, the ticket will print. The
assigned ticket number will appear in the message frame at the bottom of the screen.
137
Ticketing — Load Size Logic
When an order is recalled in a ticketing screen, the ticketing form itself suggests a load size
for the truck/load. This load size is determined in one of two ways:
•
•
Getting the scheduled load size from the load by load schedule (Default).
If the flag in the schedule is set appropriately, get the scheduled load size from the
truck.
In either case, the scheduled load size is set to the remaining quantity on the order line if the
remaining quantity is less than the scheduled load size.
To validate under/over load condition:
1.
2.
The system will always validate that the load size suggested by the system or entered in
ticketing does not exceed the truck's maximum capacity. A truck overloaded message
will display if the validation fails.
If you change the suggested load size in ticketing, the system will validate that the
changed quantity is not less than the truck's minimum load size. A truck under-loaded
message displays if the validation fails.
Reprinting Tickets
This function only reprints existing ticket information; it does not re-calculate or update
any information in the files.
The Reprint Tickets function is available in the Options menu in all ticketing screens as
well as Edit Orders and Tickets. The functionality of the screen depends on the screen from
which it was called.
To reprint a current ticket:
If tickets are printed from the batch computer, this option will restack the ticket.
1.
2.
3.
4.
5.
6.
7.
8.
9.
138
Enter the Order Date, and select the appropriate Order Code.
From Order Entry, press the Ticket button to open the Concrete Ticketing &
Shipping screen. From the Edit Orders & Tickets screen, go to the next step.
From the Options menu, select Reprint Ticket(s) to open the Reprint Tickets screen.
The above graphic lists all form fields. Some fields will not display, depending on your
selections.
If the screen was displaying an order, that order date and code will be passed to the
reprint screen. If the screen was blank, then enter the Order Date and Order Code
associated with the ticket(s) to be reprinted.
Select Print all Tickets on Order or specify a Ticket Code or range of codes.
If the Reprint Tickets screen has been called from Edit Orders and Tickets, you may
only Print to a standard local or network printer.
Enter an appropriate Document Format, or detail on the field to select from a list.
Accept the screen to reprint the ticket(s).
Ticketing
To reprint to a plant printer:
You can only print to a plant printer if the reprint screen is called from .
1.
2.
3.
4.
5.
6.
7.
Enter the Order Date, Order Code, and Ticket Code(s) as above.
Select Plant Printer in the Print to drop-down field. The lower portion of the
screen will activate.
Specify a Plant Code. The reprint ticket will be sent to that plant’s default ticket
printer.
If the specified order is an aggregate order, the Scale Number field will display. Select
the scale from the drop-down list.
Once the plant or plant/scale has been selected, select the plant printer to be used from
the drop-down list.
If the selected plant is configured for plant and/or dispatch copies, corresponding
checkboxes will display (defaulting as checked). Adjust if necessary.
Accept the screen to reprint the ticket(s).
Canceling Tickets
Sometimes, after a ticket has been generated, it becomes necessary to cancel the ticket.
Perhaps the ticket was generated for the wrong truck, or with the wrong material.
The first step in the process is to retrieve the ticket on the Ticketing screen.
To retrieve an ticket:
1.
2.
3.
4.
From the Dispatch menu, select Concrete Ticketing & Shipping.
Enter the Order Date, and select the appropriate Order Code.
Select the appropriate Ticket Code, or detail on the Ticket Code field to select from a
list of all tickets generated for that Order/Date.
The ticket will be retrieved.
With the exception of the Truck and Driver Code fields, all fields are read-only. The
process from this point depends on one important question: was any concrete actually
produced? If no concrete was produced, then canceling the ticket is a simple matter: the
system cancels the ticket and treats it as though it were never generated. If concrete was
produced, simply canceling the ticket would cause your ticketing totals and batching totals
to be different.
To cancel/remove a ticket:
1.
2.
Ticketing
Press the Remove button on the toolbar, go to the File menu and select Remove, or
press <Shift-F5>. The Cancel/Adjust Ticket Quantities screen displays.
Cash tickets with reconciled receipts attached cannot be canceled.
Confirm the ticket information.
139
If no concrete was produced:
1.
2.
3.
4.
Next to Concrete was produced, select No. A Reason Code field appears, and the
Price Quantity field becomes inactive.
Enter a valid Canceled Item Reason Code, or detail on the field to select from a list.
Accept the screen. A confirmation message will display on the message line
The truck’s status will be changed to In Yard.
Canceling the ticket does not delete the ticket record and its associated records from the
database; it simply deactivates the ticket. That ticket number will not be reused, but will be
marked as canceled on reports. The ticket will have no impact on usage reports; adjusted
entries will be sent to COMMANDinventory to update inventory records.
If concrete was produced:
1.
2.
3.
4.
Next to Concrete was produced, select Yes (default). The Price Quantity field will
become active.
Enter a Price Quantity. This value represents the quantity for which the customer will
be billed.
Accept the screen. A confirmation message will display on the message line
The truck’s status will not change, as it still has to dispose of the material.
COMMANDseries stores the username when a ticket is removed. The Ticket Report
includes that name when listing a removed ticket.
Ticketing With Prebatched Material
When a truck returns with material on board and is subsequently ticketed, the system will
continue to prompt as follows:
If the Returned Concrete Options {Configuration > Dispatch tab} is set to Prompt
User, the Adjust Price Qty and Reschedule for Original Order checkbox will be
displayed. Select or deselect the field as needed.
If the Pre-batched Quantity field is left blank and the screen accepted, the system will
prompt you as follows:
140
Ticketing
If you select OK, the material will be treated as dumped and the truck will be ticketed with
no pre-batched quantity. If you select Cancel, the system will open the Pre-batched
Quantity screen.
Maximum Gross Truck Weight
The Maximum Gross Truck Weight feature can be set up to provide you with a warning
when the combined mix weight and tare (truck) weight exceed predefined limits. This
functionality is useful when you are working in areas where there is a legal limit to the
maximum gross weight of a vehicle on a public highway.
This feature ensures that provided the truck weight figures in the system are accurate, a
driver cannot be issued a dispatch note when the load being carried makes the truck exceed
the defined maximum weight.
Truck Types are set up with a Maximum Gross Weight, and in turn, each truck added to
the system has an associated truck type.
When an order is ticketed, the system compares the combined mix and tare weights with
the maximum gross weight for the truck being used. If the maximum gross weight is
exceeded, the system checks to see what action should take place, according to the shipping
plant.
To define system action when the maximum gross weight is exceeded:
1.
2.
Ticketing
Open the Plants screen {Files > Plant & Delivery Information > Plants}, enter a plant
code, and then go to the Scheduling tab.
Go to the Maximum Gross Weight Exceeds drop-down and select one of the
following options:
Continue Without Warning - You will receive no warning and will be able to
ticket a truck that exceeds its maximum gross weight normally.
Warn User and Continue - When ticketing an order, the Maximum Gross
Weight Action screen opens, displaying the Total Mix Weight, Truck Tare
Weight, Truck Gross Weight and Truck Maximum Weight. You have the option
to either Continue and ticket the truck, or Cancel the action.
Warn User and Stop the Process - The Maximum Gross Weight Action
screen opens, displaying the Total Mix Weight, Truck Tare Weight, Truck Gross
Weight and Truck Maximum Weight. You will only have the option to Cancel
the action.
141
The default value for the Maximum Gross Weight Exceeds drop-down list is
defined on the Defaults tab of the Configuration screen.
3.
Press <F2> to accept the screen and save the changes.
Proof of Delivery
Proof of Delivery, located under the Dispatch menu option, allows for input (manually or
via a bar-code scanning device) of a ticket. As the ticket is returned from delivery, with a
signature from the customer, either the driver scans the ticket,or a Dispatch person collects
all tickets and enters them at once. This indicates that the driver completed the task by
turning in the ticket. The Ticket record is updated with a Delivery Verification Date and
User Name. The Plant table has a flag that requires (or does not require, depending on the
setting) the Delivery Verification for Hauler Payment to take place. Therefore, at Plants that
require delivery verification, drivers who do not turn in their tickets (Proof of Delivery) do
not get paid.
Process Goods Returned
Sometimes, when an order or ticket has been delivered, there may be a need for some of the
delivered items to be returned; the customer may not need the items, or they could have
been damaged in transit. In these cases, the existing order/ticket can serve as the basis to
create a "Goods Returned" ticket {Invoicing > Edit Orders and Tickets > Processed Goods
Returned in the File menu}, which is the form a driver uses to pick up items from the
customer site. This form can also be run at retail locations if the customer actually brings
back the material. The Goods Returned ticket then goes through certain phases (Printed,
Verified, or checked in at the plant). At that point, the Goods Returned ticket becomes the
basis for a Credit Memo to be created.
Unscanned Hauler Tickets Report
The Unscanned Hauler Tickets report identifies those tickets that have not yet passed
through the Proof of Delivery steps. You can specify the following ranges for the report:
•
•
•
•
•
Ticket Date
Hauler Code
Truck Code
Company Code
Shipping Plant Code
Select Page Break Between Haulers to have each hauler broken down on separate pages.
Print Certification Text on Delivery Notes
With the introduction of EN 206-1 in Europe for item certification, companies are required
to print certification information on delivery notes, including information about the item
that is plant-specific and mix-specific. This information will inform the customer of a load’s
conformity to EN 206-1.
142
Ticketing
EN 206-1 is a European standard that specifies requirements for various aspects of concrete
creation, including (but not limited to), constituent materials, verification of the properties
of fresh and hardened concrete, and production control procedures.
In addition, anew construction law and technical regulation for concrete production
requiring that legal text be printed on delivery notes and associated with items was
introduced in 2009 in Croatia and is expected to be in power for Germany (2009) and
Switzerland (2010). Instead of associating legal text with the Mix Design Code, the system
will associate it with the SAP item (Quality Concrete Code). Five text fields will be
imported for the SAP Item, Item Location, and Mix Design Code. This text will be printed
on the delivery note and interfaced to the Batch Computer.
The certification Data In text will be maintained at the Item location level. The legal text
will be associated with the Concrete Code and Mix Design at the Production (Location/
Plant) level.
In COMMANDseries, you can:
•
•
Use images in different formats (.gif and .jpg) to represent symbols for national
certification standards and associate one of the images with one or more plants through
a new setup screen.
Enter national standard text (up to 255 characters) on the new setup screen and
associate the text with one or more plants.
When a delivery note is produced, COMMANDseries will check to see if the mix and its
constituents (excluding water) are certified. If so, certification information will be stored on
the delivery note. If not, certification information will not be stored on the delivery note.
Certification
There are two types of items: certified and non-certified.
•
•
Certified - The mix and all constituents (except water) are certified for EN 206-1.
Non-Certified - Either the mix or any of the constituents (excluding water) are not
certified for EN 206-1.
Mix certification is stored only on the delivery note when the item is certified and the
certification expiration date has not passed.
ILOC Table
Certification information for cement, aggregate, admix, additions, and mixes can be
imported from SAP to the Item Location (ILOC) table in COMMANDseries. The
following new columns have been added to the ILOC table to hold the certification
information:
•
•
•
•
•
Ticketing
Certification Number (CERT_NUMBER) - 255 Characters
Certification Body (CERT_BODY) - 255 Characters
Level of Certification (CERT_LEVEL) - 15 Characters
Year of Certification (CERT_YEAR) - 4 Characters
Certification Expiration Date (CERT_EXP_DATE) - 10 Characters
143
Certification information is specific to a mix or a constituent item at a certain location.
Items Editor
The Items > Alternate Items/Batch Codes tab and Technical tabs have been updated with a
new button: Certification/Legal text:
On either tab, press the Certification/Legal Text button to bring up the Certification/
Legal Text screen where you can enter all certification and legal text for the associated item.
144
Ticketing
Certification/Legal Text Screen (EDTCERT)
Configuration
A new drop-down field, Allow Printing of National Standard Logo and Legal Text,
has been added to the Configuration > Distribution tab that will control the printing of the
National Standard Logo, Certification Fields, and Legal Text on the delivery note on the
Concrete Ticketing and Shipping screen.
Below are the options for this field (the logo is set up on the Configuration > National
Standards tab):
•
•
•
Allow, with no Warning (if Certification rules are not met, the logo and legal text
will print with no user warning)
Allow, with Warning (if Certification rules are not met, the logo and legal text will
print with a user warning)
Do Not Allow, with Warning (if Certification rules are not met, the logo and legal
text will NOT print with a user warning)
Configuration > Dispatch Tab (EDTCNFX)
Below is the new logic for determining certification for a Concrete Mix:
Ticketing
145
•
•
First, check the SAP Concrete Code + Location Code + Mix Design Code in the
IMLB table.
Next, check the Mix Design (Alternate Item) + Location Code in the ILOC table.
Finally, check the SAP Concrete Code + Location Code in the ILOC table.
The actual certification text is set up on the Configuration > National Standards tab.
To enter certification information:
1.
Access the National Standards tab {Files > General Information > Configuration}.
2.
Enter a name for this certification in the National Standard Name field. Press
<Enter> while the cursor is within this field to select from previously entered
configurations. You can then update the information for that certification and save it.
If you have an image you wish to print with your certification text, enter the file
location in the Image field.
Enter the certification text in the National Standard Text field. Up to 255 characters
can be entered here.
Press F2 to save the certification.
3.
4.
5.
Information entered above will be saved in the below fields on the NSCF (National
Standards Configuration) table:
Field Name
NSIM_FILE_NAME
Field Description
Configuration name.
Image file name.
NS_TEXT
Free-format text for National Standards text. Char (255)
NS_CONFIG_NAME
146
Type
Char (20)
Char (50)
Ticketing
Selecting a Certification
Once you’ve created a certification in the Configuration editor, you can assign it to a specific
plant. The Communication tab on the Plant editor has been modified so you can select the
proper certification to be printed for the delivery note. The new NS_CONFIG_NAME field
has been added to the PLNT table to accommodate the National Standard
Configuration field on the Plant editor.
Document Tags
The layout of the printed delivery note with certification information will be controlled
through the use of document tags. The following new document tags have been created for
certification information. You should apply these document tags to the ticket print
document formats so they are included in the ticket print.
Document Tag
NSTEXT
CERTNO
CERTBO
CERTTX
CERTYR
CERTEX
NSIMGE
Tag Text/Tag Code
National Standard Text
Certification Number
Certification Body
Certification Text
Certification Year
Certification Expiration Date
National Standard Image
Type (Calc, Lookup, Fixed)
Lookup
Calc
Calc
Calc
Calc
Calc
Image/Calc
Document tags will print when the following is true:
•
Ticketing
The mix is certified and the certification date has not expired.
147
•
The constituent is certified and the certification has not expired. (Water is not a
constituent that needs certification.)
Database Updates
The following fields have been added to the IMLB (Item Location Batch Code) table to
accommodate the shift of certification fields to the SAP Quality Concrete Code:
•
•
•
•
•
•
•
•
•
•
CERT_NUMBER - Certification Number
CERT_BODY - Certification Body
CERT_LEVEL - Certification Level
CERT_YR - Certification Year
CERT_EXP_DATE - Certification Expiration Date
LEGAL_TEXT_1 - Legal Text
LEGAL_TEXT_2 - Legal Text
LEGAL_TEXT_3 - Legal Text
LEGAL_TEXT_4 - Legal Text
LEGAL_TEXT_5 - Legal Text
The following fields have been added to the Item Location (ILOC) table to ensure that
certification is maintained for constituent items:
•
•
•
•
•
LEGAL_TEXT_1 - Legal Text
LEGAL_TEXT_2 - Legal Text
LEGAL_TEXT_3 - Legal Text
LEGAL_TEXT_4 - Legal Text
LEGAL_TEXT_5 - Legal Text
The following field has been added to the Configuration (CNF2) table to provide for
controls when printing the National Standard Logo and Legal Text:
•
ALLOW_PRINT_NATIONAL_STD_LOGO_CODE
In addition to the above database tables, the Generic EU Batch Interface has been
updated with the below fields:
•
•
•
•
•
Interface Field 091 Mix
Interface Field 092 Mix
Interface Field 093 Mix
Interface Field 094 Mix
Interface Field 095 Mix
Legal Text 1 - AN/40
Legal Text 2 - AN/40
Legal Text 3 - AN/40
Legal Text 4 - AN/40
Legal Text 5 - AN/40
HTML Tickets
You can create HTML delivery notes using the new HTMLTICK document format.
148
Ticketing
To create an HTML ticket:
Ticketing
1.
Go to the Document Formats screen {Files > General Information > Documents >
Document Formats} and enter HTMLTICK in the Document Format field and tab.
2.
Press the Preview button to view a preview of what the HTML ticket will look like at
this default stage. You can choose to close the screen or print the layout example.
3.
To change the HTML ticket layout, press the List button on the Document Formats
screen. You can manipulate all elements on the ticket by changing their Line, Begin
At, and End At properties. Press the Detail button next to each item to view more
149
4.
information on the Document Format Field screen. Be sure to add the NTSTTX
document tag in the Name field on the Document Format Field screen.
To change the placement of fields, boxes, lines, and images, look for those words under
the Name column on the Document Fields screen. If you wish, you can add new fields,
boxes, lines, and images by pressing F6.
Press F2 to save once you are satisfied with your changes.
Greek Cancelled Ticket Print
In order to meet legal and fiscal requirements in Greece, COMMANDseries has been
updated so you can print a ticket that references the previous ticket and a unique auditing
number. This document can be printed for all cancelled and removed tickets in
COMMANDseries. This auditing sequence number will be printed on the ticket and
provides an accurate auditing trail for those tickets that have been removed or cancelled.
The removed/cancelled ticket code will be used for external reporting, printing, and
auditing purposes only.
Next Numbers Editor
Enter the auditing sequence code for removed/cancelled tickets as you would a “normal”
ticket sequence number in a new Ticket Sequence field on the Next Numbers editor.
For information on how to set up Next Number sequences, please consult the Setting Up the
System user guide.
Plants Editor
Several new options have been included in the Plants editor so you can determine how each
plant handles removed/cancelled tickets. New fields are located on the Main,
Communication, and Next Numbers tabs.
150
Ticketing
Main Tab
A new checkbox, Allow Removed/Cancelled Ticket Print, has been added to the Plants
> Main tab. Select this option to have the system automatically assign the removal/
cancellation sequence number to the ticket when Ticket Print is performed.
Communication Tab
Print Removed/Cancelled Ticket has been added to the Plants > Communication tab.
When selected, a Setup button will appear.
Ticketing
151
Click on the Setup button to bring up the Plant Communication Setup screen. Complete
this screen as you would any of the other existing Plant Communication Setup screens
associated with the Communications tab to ensure that removed/cancelled tickets are
automatically printed once the ticket has been removed/cancelled during the ticketing
process.
Next Numbers Tab
A new Removed Ticket Code field has been added to the Plants > Next Numbers tab.
Select the Next Numbers sequence code you set up previously on the Next Numbers
editor. The removed/cancelled ticket sequence number cannot be the same as the sequence
number used for “normal” ticket transactions.
Ticketing
When a ticket is removed/cancelled through the Concrete Ticketing & Shipping form, the
system will look to the options you just set up in the Plants editor to determine what to do
152
Ticketing
with the ticket. If Allow Removed/Cancelled Ticket has been selected on the Plants >
Main tab and you remove/cancel a ticket:
•
•
The next sequence number assigned on the Plants > Next Numbers tab will be
assigned to the ticket.
The ticket’s information will be sent to the assigned printer or other device using the
document format code you selected on the Plant Communication Setup screen for
Print Removed/Cancelled Ticket.
If Allow Removed/Cancelled Ticket Print was selected on the Plants > Main tab, you
will have to include a Reason Code when removing/cancelling the ticket on the Cancel/
Adjust Ticket Quantities screen:
•
•
If a ticket is removed and no concrete was produced, provide the usual reason code.
If a ticket is cancelled and concrete was produced, a Cancelled Reason Code will be
required in the new field below:
You cannot reactivate a previously removed ticket that has a removed/cancelled reason code.
If you try to reactivate one of these tickets, you will receive a message stating that the ticket
cannot be activated, along with the removed/cancelled ticket code. You will, however, still
be able to view the removed/cancelled ticket, as some of the information on the ticket (such
as ticket weights) is not available outside of the standard reports.
You CANNOT reactivate a ticket from the Edit Orders & Tickets screen if it has an audit
sequence number on it; however, if the plant was not set at the time of ticket cancellation/
removal, the ticket can still be reactivated.
Updates
COMMANDseries has been updated to use the same rules that apply to removed tickets
(where REMOVE_RSN_CODE.TICK is not null) to cancelled tickets (where
CANCEL_RSN_CODE.TICK is not null) as well.
This modification relates to Greek Cancelled Ticket Print functionality, which allows users
to cancel tickets with a reason code. Cancelled tickets are tickets that have concrete
produced and are identified by populating the CANCEL_RSN_CODE.TICK field. These
reason codes are the same codes that are used for Removing Tickets, which have flags that
mark whether or not sales tickets should be included when:
Ticketing
153
Creating Cartage Tickets
Invoicing Tickets
Creating Inventory Transactions
Generating COMMANDexecutive Reports
COMMANDcartage has been modified as follows:
Update Tickets now looks at the Cartage Flag on the Reason Code when updating
Cancelled Tickets:
If the Reason code is set to NOT create Cartage then Cartage Tickets are not
created.
If the Reason Code is set to Create Cartage then Cartage Tickets are created.
COMMANDinvoicing has been modified as follows:
Preliminary Invoice Register and Invoice Print looks at the Invoicing Flag on the
Reason Code when selecting Cancelled Tickets.
If the Reason code is set to NOT Invoice, the system will ignore the ticket.
If the Reason Codes is set to Invoice, the system will include the ticket.
COMMANDinventory has been modified as follows:
Inventory Usage Update and Automated Usage Update Com looks at the Inventory
Flag on the Reason Code when selecting Cancelled Tickets.
If the Reason code is set to NOT Create Inventory then the system will not create
inventory transactions for the ticket.
If the Reason Codes is set to Create Inventory then the system will create inventory
transactions for the ticket.
COMMANDexecutive has been modified as follows:
Post Sales Data looks at the Flag on the Reason Code when selecting Cancelled
Tickets.
If the Reason code is set to NOT include in Exec Report the system will ignore the
ticket.
If the Reason Codes is set to include in Exec Report, the system will include the
ticket.
HTML Document Format Interface
COMMANDseries now includes a built-in HTML editor to make it easier to incorporate
HTML in document formats. The editor, TinyMCE, is an open source HTML editor, and
is installed in the \BIN\tinymce folder.
The editor has been incorporated into the Document Format editor. If the document
format is
•
•
•
154
Order Print & Data I/O
Ticket Print & Data I/O
Ticket Print
Ticketing
and the Print Method is Standard or Overstrike, a new field, Use HTML, will display:
Document Formats editor
If this field is set to Enable, the Display button will change to Edit. Pressing the Edit
button will load the current document format into the HTML editor.
Documentation for TinyMCE is available at their website (http://tinymce.moxiecode.com/
index.php).
Post-Production Out of Tolerance Loads
COMMANDseries has been updated to increase flexibility to process Out of Tolerance
(OOT) loads after production and to not include them in manual or automatic Ticket Out;
Ticketing
155
as a result, these loads will not be sent to external third-party Quality or ERP systems.
Instead, COMMANDseries will automatically cancel any tickets that have a Weight
Comply Status of OOT. Batch Confirmation logic has been changed to automatically
mark tickets as Canceled when the Weight Comply Status returned from the batch
computer is OOT.
When an OOT load is received from the batch computer, the following actions will take
place:
•
•
The truck will be moved back to an In Yard status.
The Price Quantity for the OOT ticket will be zeroed out.
If there is material still in the truck after an OOT load, the following actions still take place
using standard COMMANDseries functionality:
•
•
You must manually enter the returned material that is in the truck if any or all of the
material will be reused on future loads.
Materials will be considered dumped unless the material is reused.
For delayed ticket prints, it is suggested that OOT load tickets include an indication that
they are not to be shipped (i.e., omit the Customer Name on the ticket print). In other
words, print these tickets using a different format and layout than the standard ticket print if
desired.
Set Up
To accommodate this enhancement, a new Allow Removed/Cancelled Ticket Print
field has been added to the Plants > Main tab. When selected, the Default Cancelled
Ticket Reason Code field will display. Enter the Reason Code you wish to have associated
with all automatically cancelled OOT tickets.
156
Ticketing
Plants > Main tab (EDTPLNT1)
Data In/Out
Automated Data In/Out and Ticket/Weights Data Out have been changed to include an
Exclude Canceled Tickets option.
Ticketing
157
Automated Data In/Out (EDTADIO)
158
Ticketing
Ticket/Weights Data Out (SELTOUT)
•
If Exclude Canceled Tickets is checked, the automated or manual ticket data out
process will skip all tickets that have a Canceled Reason Code.
Print/Send Tax & Cement Info to Batching System
This modification allows the following information to be printed on tickets and passed to
the COMMANDbatch/Generic 2 Way Interface:
•
•
•
•
Max Water/Cement Ratio
Min Cement Content
CST - Customer Sales Tax Number
TIN - Tax information Number
Setup
The goal in configuring this modification is to ensure that the correct field values will
populate the appropriate fields without user intervention.
Ticketing
159
Project-Product Detail Information
The Project-level Product Detail Information screen has two new fields:
•
•
Max Water-Cement Ratio
Min Cement Content
Max Water Cement Ratio and Max Cement Content will be displayed and editable
only if the related product is marked as a "Concrete Product".
Both values will default from the Item Master File (if available).
Customer & Project Accounting tabs
Previously, the Customer Accounting tab had a single Tax ID Code field. A second field
has been added, Tax ID Code 2.
The Project Accounting tab has had both Tax ID Code fields added.
The labels can be changed as needed to more clearly identify a specific tax ID.
Data Out Tags
Support for the following Data Out tags has been added:
•
•
•
•
160
Minimum Cement Content - MINCEM
Maximum Water-Cement Ratio - MAXCEM
Tax ID Code - TAXID
Tax ID Code 2 - TAXID2
Ticketing
Record Sampled Tickets
Plant operators often prepare production samples of concrete mixes for quality control
when a batch is completed or receive results from off-site testing. COMMANDseries has
been enhanced to mark delivery tickets from which samples were taken, and to send this
information electronically to the testing laboratory.
•
•
•
CS will record the User ID of the person flagging the ticket as sampled, as well as the
date/time the ticket was flagged as such on the TKTL (Ticket Line Information) table.
You can update ticket information if needed in Edit Orders & Tickets; if you do so, a
new record will replace the old one that was sent to COMMANDqc. However, once a
ticket has been flagged as sampled and is saved, you cannot unmark the flag unless you
have proper privileges.
The existing interface between CS and COMMANDqc will recognize tickets that were
flagged as sampled in CS. When a ticket is flagged as sampled in CS, the system will
update or insert a new Batchwatcher (BWGT) record for that ticket. This record will be
used to update COMMANDqc.
This feature does not include any information regarding fresh concrete test data (e.g.,
slump, temperature, air content, and the number of specimen prepared). This information
will need to be manually recorded and transferred to the concrete lab where the test data can
then be entered into COMMANDqc.
Set Up
Configuring your system for Sampled Tickets involves changes in the following areas:
•
•
Users editor
Reason Codes editor
Users Editor
The first thing you should do is give any authorized personnel privileges to remove the
Cube Check sampled flag from tickets. Go to the Users editor and select the new Allow
Cube Check Removal in Edit Orders /Tickets flag on the Restrictions tab.
Users > Restrictions tab (EDTUSNMF)
Ticketing
161
If at any point a user removes the Cube Check flag from the ticket before saving, the
recorded information (user name and date/time stamp) will be cleared from the TKTL file.
(What if the ticket is saved and then you clear the cube check field?)
Reason Codes
Next, set up a new Reason Usage specifically used for Sampled Tickets on the Reason
Codes editor. This Reason Code will be used in both Concrete Ticketing & Shipping and
Edit Orders & Tickets when the Cube Check flag has been selected.
Reason Codes screen (EDTRSNC)
The Reason Code will not be interfaced to your third-party system upon export. In
addition, it will not be available for editing after the ticket has been marked as invoiced.
Ticketing
Concrete Ticketing & Shipping
The Concrete Ticketing & Shipping form has been updated with the new Cube Check
flag. Select this checkbox if the ticket contains a mix that is to be sampled.
162
Ticketing
Concrete Ticking & Shipping screen (EDTSHIP)
When you select the Cube Check box, you will prompted for a Reason Code:
Cube Check Reason Code (EDTSHIPB)
•
•
The Reason Code entered on this screen must have a Reason Usage of Sampled
Tickets.
If you close the Cube Check Reason Code screen without entering a valid reason code,
the Cube Check box will be cleared automatically.
Edit Ticket Information
The Cube Check flag has been added to the Other Ticket Information form in EditTicket
Information (which is part of Edit Orders & Tickets). This will allow those users who do
not have access privileges to the Concrete Ticketing & Shipping form due to the Number
of Days Back to Allow Dispatch on the Configuration > Distribution tab to still be able
to flag tickets as sampled.
Ticketing
163
Other Ticket Information screen (EDTPREPG)
The Cube Check flag will not be visible on any ticket that does not contain a Mix Product.
You must enter a Cube Check Reason when you select the Cube Check box.
•
•
•
The Reason Code must have a Type of Sampled Tickets.
If Cube Check is selected on this screen, you cannot save successfully unless you have
entered a Reason Code.
The Reason Code will not be available for editing on existing tickets if the ticket has
already been invoiced. In this case, CS will interface the invoice information to mark
the ticket as invoiced from your third-party system.
Database Fields
The below new fields have been added to the Ticket Line Information record (TKTL) to
accommodate the information being stored and sent to COMMANDqc:
•
•
•
164
CUBE_CHECK_USERNAME
CUBE_CHECK_UPDATE_DATE
CUBE_CHECK_REASON_CODE
Ticketing
The CUBE_CHECK_USERNAME and CUBE_CHECK_UPDATE_DATE fields can be retrieved
through CS Data In/Out routines as well as standard database access tools. These two fields
are not viewable on any form within the system. The CUBE_CHECK_REASON_CODE field is
not retrievable or viewable on any form within the system.
Future-Day Ticketing
Overview
COMMANDseries has been updated to handle next-day concrete loads. Often, a
dispatcher’s working day ends before loads are delivered to customers. Therefore,
dispatchers need the ability to schedule loads for the next day and print tickets so the truck
can pick up its load and be sent for delivery before the dispatcher arrives to the office.
For documentation purposes, “pre-ticketing” refers to ticketing for the same day, while
“future-day ticketing” refers to tickets that are created for a future date that is not the next
day (for instance, an order for Monday morning is created on Friday).
•
•
•
•
•
•
•
•
You can pre-ticket trucks for the current date, while the same truck can be futureticketed for the next day. If the truck is already pre-ticketed for a next-day order, it
cannot be pre-ticketed for another future-day order unless the truck is removed from
the ticket.
Only one future-day ticket is allowed per truck.
You can future-ticket a truck even if the truck is on another non-future-day order.
You can print/store the schedule’s date and time for future-day orders.
When the truck returns to an At Plant status, the next ticket will be loaded to the
truck; the truck will not be punched out.
You cannot punch out a truck when it is on any future-ticket or pre-ticket order. If you
change the date for a future-ticket, you must punch the truck out and in again,
otherwise the truck will not be assigned.
When a truck is not on an order, the next ticket fields will be blank so the truck can be
punched out. When the truck is punched in again, a future-day ticket will be assigned
to the order if the current day matches a future date.
Future-day tickets are delivered to the batch panel at the time the ticket is created. It is
your company’s responsibility to produce the ticket at the correct time.
Configuration
The following will occur in Concrete Ticketing and Shipping if the Configuration >
Dispatch tab’s new Future Day Ticketing Ticket Time field is selected as Use
Schedule Time as Ticket Typed Time:
•
•
Ticketing
The Order Date from the Schedule Load (SCHL) is used for the Ticket Date field
(TKT_DATE.TICK).
The Load Time is calculated from the Scheduled Load time on the SCHL table and
stored in the SCHED_LOAD_TIME.TICK field.
165
The Typed Time is calculated from the SCHED_LOAD_TIME.TICK field and stored in the
TYPED_TIME.TICK field.
Configuration > Dispatch tab (EDTCNFXE)
If you select Let Ticket Typed Time Calculate Normally in this field, the Typed
Time will be calculated when the ticket is actually entered in the system.
Generic 2-Way Batch and Middleware Interfaces
If the Configuration > Dispatch tab’s Future Day Ticket Typed Time is Use Schedule
Time as Ticket Typed Time, the following applies to users with Generic 2-Way Batch
Interfaces and Middleware Batch Interfaces:
•
•
•
The Ticket Date (TKT_DATE.TICK) is the same as the Schedule Date.
The Schedule Load Time is based on the future day’s Schedule
(SCHED_LOAD_TIME.TICK).
The Typed Time (TYPED_TIME.TICK) uses the same calculation as the Schedule Load
Time.
Each time the truck code is removed from a ticket, the ticket will be removed from the
batching system as usual.
166
Ticketing
Concrete Ticketing and Shipping
Concrete Ticketing and Shipping has been modified to display a dialog box when a truck is
ticketed for a future-day order, asking you if you wish to print the ticket now or generate a
future-day order. If Ticket Now is selected, the truck will not be punched back in.
•
If the truck is on another ticket and the truck status is equal or greater than the Earliest
Pre-Ticketing Status specified on the Configuration > Dispatch tab:
If Ticket for Future is selected, the Earliest Pre-Ticketing Status is ignored.
Truck Punch In
The following new fields have been added to the Truck table (TRUC) to accommodate this
enhancement:
•
•
•
Future Ticket Code - FUTURE_TKT_CODE.TRUC
Future Order Date - FUTURE_ORDER_DATE.TRUC
Future Order Code - FUTURE_ORDER_CODE.TRUC
When a truck is punched in (via signaling, ticketing, Tracking & Scheduling Operations,
etc.), the system will check to see if there are any FUTURE fields in the TRUC table. If
information is found in the fields, the system will compare the future order date with the
current date.
•
•
•
If the current date is before the future date, the future fields will be cleared.
If the current date is the same as the future order date, ticket information will be stored
in the NEXT fields on the TRUC table, while the LAST fields on the TRUC table will
display current ticket information.
If the current date is later than the future order date, the future fields will be ignored.
Tracking and Scheduling
After a truck is ticketed for a next-day order, the truck is shown on the current day’s
Scheduling screen with the applicable ticket status for the current ticket, and in the Truck
Tracking First Status (set up on the Configuration > Dispatch tab above) on the next
day’s Scheduling screen.
When the truck punches in, the system will check if a future order date exists. If it does, the
FUTURE fields will be defaulted to the LAST fields on the TRUC table.
•
•
Ticketing
The Future Ticket Code will be stored in the Last Ticket Code field on the TRUC
table.
The Future Order Date will be stored in the Last Order Date field on the TRUC
table.
167
•
•
•
The Future Order Code will be stored in the Last Order Code field on the TRUC
table.
The FUTURE order and ticket fields are cleared from the TRUC table after they are
copied to the LAST fields.
If the Future Order Date is not the same as the current Order Date, Future fields
will not default to the LAST fields on the TRUC table.
The truck will display on the current order, with the pre-ticketed order at the first status.
Future-day orders will also display at the first status. You cannot move a truck from the first
status to the next status on pre-ticketed or future-day orders.
Tracking and Scheduling Operations
Change Truck Info Tab
Future Order Date and Future Order Code have been added to the Change Truck Info
tab. These fields are not editable and are for informational purposes only.
Tracking and Scheduling Operations > Change Truck Info tab (DBATSOPB)
Reset Trucks Tab
Future fields on the TRUC table will not be cleared if you press Reset on the Reset Trucks
tab.
COMMANDfleet
COMMANDfleet has been updated to support future-day ticketing.
•
•
•
168
Trucks display as future orders in Fleet.
If a ticket is removed before the future date has arrived, it will be removed from the
Fleet display as well.
When a truck is punched in, the same fields are checked and processed by Fleet. This
applies to Signaling as well.
Ticketing
Print User-Defined Fields
The following Ticket Print document tags are used for pritnting any user-defined fields on
the customer and project. The customer user-defined tags are used to print information
from the order's shipping customer, as well as the order's billing customer.
•
BCUSDF - Billing Customer User Defined Field. This tag retrieves the user-defined
fields from the customer master table (USER_DEFINED.CUST) where the order's
customer code is the same as the customer record's customer code (CUST_CODE.ORDR
= CUST_CODE.CUST).
•
SCUSDF - Shipping Customer User Defined Field. This tag retrieves the user-defined
fields from the customer master table (USER_DEFINED.CUST) where the order's
customer code is the same as the customer record's shipping customer code
(SHIP_CUST_CODE.ORDR = CUST_CODE.CUST).
The project user-defined tag is used to retrieve the data from the project master record.
•
PRUSDF - Project User Defined Field. This tag retrieves the user-defined fields from
the project master table (USER_DEFINED.PROJ) where the order's customer and
project codes are the same as the project record's customer code and project code
(CUST_CODE.ORDR = CUST_CODE.PROJ and PROJ_CODE.ORDR =
PROJ_CODE.PROJ).
Ticketing
169
Web/PDA Tickets and
Orders for Trowel-Ready
Mortar
Overview
CS08 has been updated to handle a new type of ticket import, Web/PDA tickets, which are
used for Trowel-Ready Mortar (TRM) orders. TRM orders are those that are created when
a driver carries multiple orders for multiple delivery addresses on a single truck. These
orders are typically handled in real-time using a PDA.
Note: These orders differ from Journeys in that they deliver mortar, not concrete,
aggregate, or concrete block. Additionally, in Journeys, order products can be
different, whereas with TRM orders, the only product allowed is mortar.
The below explains how ordering and ticketing works when using a PDA for TRM:
•
TRM orders must have a Truck Code.
Note: Orders that do not have a Truck Code will not be uploaded to your PDA.
•
•
•
•
The Truck Code can be entered in either the Order Header or the Schedule Line based
on the order set up in the Configuration editor.
Once you logged in to COMMANDlog (the PDA ticketing interface) via your PDA,
the mobile application calls the COMMAND Web Services application to retrieve the
following order information: Order Date, Order Code, and the first item on the
Order Line (ORDL) for the order.
At this point, you may activate or void any open tickets on your PDA.
At the end of the day, import your Web/PDA tickets back to COMMANDseries using
Order and Ticket Data In.
Order Types
The Order Types screen has been updated with a new column: Web/PDA. Select this
option for any order type you wish to designate as one that can be used on your PDA.
Additionally, you can create a new order type specifically for Web and PDA orders, as shown
below.
170
Web/PDA Tickets and Orders for Trowel-Ready Mortar
Order Types screen (EDTCFOT)
Configuration
Before you begin to download orders and tickets to your PDA, set a specific remove reason
code for PDA tickets on the Configuration > Defaults tab. This reason code will be used
for all tickets that are removed on your PDA.
Configuration > Defaults tab (EDTCNFXB)
Web/PDA Tickets and Orders for Trowel-Ready Mortar
171
The COMMANDlog Interface
Logging In
Go to the COMMANDlog Logon screen on your PDA and enter your COMMAND Web
Service Username and Password, as well as the URL for the Server you are connecting
to. Once logged in, CS will interface with the COMMAND Web Services application.
Note: The image example above and for all other image examples may not reflect exactly
what you see on your PDA. Icons may be different depending on the PDA you are
currently using.
Toolbar
The toolbar
displays on every tab in COMMANDlog; however, certain icons
display only on specific tabs.
•
•
•
172
Synchronize
- Synchronizes your PDA version of COMMANDseries with the
COMMAND Web Service so that ticketing and order information is updated. Displays
on the Summary, Orders, and Tickets tabs.
Log Out - Prompts you with the message “Do you wish to log out and stop using the
system?” Select Yes to log out or Cancel to return to the prior active tab. Displays on
the Summary, Orders, and Tickets (when not in Create Ticket mode) tabs.
Previous
- Change the focus to the previous order or ticket. Displays on the
Orders, Tickets, and Detail (when not in Create Ticket mode) tabs.
Web/PDA Tickets and Orders for Trowel-Ready Mortar
•
Next
- Change the focus to the next order or ticket. Displays on the Orders,
Tickets, and Detail (when not in Create Ticket mode) tabs.
•
•
Create Ticket
- Begin creating a ticket. Displays on the Orders and Tickets tabs.
Void Ticket - Mark an existing ticket as void. Displays on the Tickets tabs.
Summary Tab
Once you have successfully logged in, you will see the Summary tab, which displays the
number of open orders and tickets in the mobile database, which resides on your PDA.
Web/PDA Tickets and Orders for Trowel-Ready Mortar
173
Order Tab
The Order tab displays a list of all orders (and the associated Customer Name and the first
line of the Ship To Address) that are open in the mobile database. Tap on an order line to
view the Detail tab for that order.
Each PDA is assigned to a specific Hauler. Only orders with the Hauler that has been
assigned to your PDA will be downloaded.
174
Web/PDA Tickets and Orders for Trowel-Ready Mortar
Tickets Tab
The Tickets tab displays a list of tickets that have been created in the mobile database. From
this tab, you can view the Customer Name, the local Ticket Number (tickets are
numbered in order of delivery time, beginning with 1 for the first ticket of the day),
Quantity Delivered, and the Delivery Time. Tap on a ticket line to display the associated
Details tab.
Note: Delivery dockets for days prior to the current date are not available for viewing on
your PDA.
The number of ticket dockets you can create and store at a given time is set on the
Configuration screen within your PDA.
When you create a ticket from an order on your PDA, the system will perform two capacity
checks:
•
•
If the number of stored tickets is equal to or greater than the number set in
Configuration on your PDA, the system will ask you to resynchronize before you can
create another ticket.
If the number of stored tickets is greater than the number set in Configuration minus
20, the system will warn you that you only have a certain number of tickets left for
storage and will request that you resynchronize as soon as possible.
Once you have activated a ticket, you will be presented with a Signature area and Accept/
Cancel buttons. Tap Accept to save the ticket record, update the delivered quantity on the
order, and print a single-part delivery docket. This means that the delivery has been
confirmed. Tap Signature to verify that the customer has accepted the terms of the ticket.
Press Cancel to remove the ticket.
Web/PDA Tickets and Orders for Trowel-Ready Mortar
175
Note: The system will use the Order Code, Order Date, and Truck code, as well as data
elements from tables that reference those fields to calculate auxiliary data such as
Minimum Load Charges, Surcharges, and Cartage Charge/Pay Tables.
Note: A modified copy of the existing ticketing error handling component is created to log
all PDA errors to the import log file.
Details Tab
The Details tab displays details of either an order or a ticket, depending on which option
you have selected.
176
Web/PDA Tickets and Orders for Trowel-Ready Mortar
Controls
Below are a list of fields on the Details screen, depending on whether or not you are
viewing an order or a ticket:
Orders
• Order - Order Number.
• Customer - Company name of the order’s customer.
• Address - Shipping Address and City for the order.
• Product - Product Code and Short Description
• Ord Qty - Quantity ordered, along with the Unit of Measure (UOM).
• Del Qty - The quantity delivered, with the UOM. The sum of the Ticket Quantity for
all saved tickets for the order.
Tickets
• Tkt Qty - Quantity of goods to be ticketed.
• UOM - Unit of Measure for the ticket.
• Ticket # - Ticket number. Maps to the TKT_CODE.TICK field in
•
•
COMMANDseries.
Ticket - Press this button to create a ticket ready for acceptance.
Void - Press this button to mark an existing ticket as voided. Please note that tickets
cannot be edited on your PDA, but they can be voided and re-ticketed.
You also have the following options on both the Order and Ticket tabs:
•
•
•
Signature - The customer’s signature as authentication of acceptance. It is your
responsibility to verify that a legitimate signature has been entered before the ticket is
accepted.
Accept - Press this button to accept the shipment and the ticket, update delivery
quantity, and/or print the delivery docket.
Cancel - Press this button to cancel the proposed ticket.
Importing Tickets at the End of the Day
Order and Ticket Data In
Order and Ticket Data In has been modified to add an Import Type option for Web/PDA
Tickets. Use this option to manually import tickets back to COMMANDseries.
Web/PDA Tickets and Orders for Trowel-Ready Mortar
177
Order and Ticket Data In (SELOTIN)
Ticket records are created when you import your Web/PDA tickets back to
COMMANDseries:
•
•
•
•
•
•
•
Ticket line defaults are retrieved from the Order Line in COMMANDseries, based on
the Order Date and Order Code from the PDA.
Delivery Quantity is defaulted from the PDA.
Ticket and ticket line records, minimum load charges, seasonal charges, surcharges, and
sundry charges are created.
Ticket Weights are created and Order Delivery Quantities are updated.
The Shipping Plant is assigned where the load is completed.
If tickets are voided in the PDA, they will still be created in COMMANDseries.
Pricing for voided tickets is set to zero.
Automated Data In/Out
Automated Data In/Out for orders and tickets has been modified with a new Web/PDA
Tickets option for the Process Type. When selected, only the Replace Duplicates Ticket
option will be available for editing, with all other fields invisible. Use this option to have
tickets import automatically at the end of each day.
178
Web/PDA Tickets and Orders for Trowel-Ready Mortar
Automated Data In/Out (EDTADIO)
Web/PDA Tickets and Orders for Trowel-Ready Mortar
179
Tasks, Conditions, and
Driver Overtime
COMMANDseries contains a tool for managing and tracking a driver’s clock time. This
feature is comprised of a number of separate components that work collectively to bring
together related information.
Topics in this section:
Tasks
Driver Overtime
Conditions
Tracking & Scheduling
Ticketing
Deadheading
Managing Driver Overtime
Time and Task Manager
Tasks
Tasks describe different functions to which a driver or truck can be assigned while on the
clock. They are defined in the Task Codes screen {Files > Plant & Delivery Information >
Task Codes}. The following are the default tasks; while additional tasks can be added, these
default tasks cannot be deleted:
•
•
•
•
•
•
•
On Load
Deadhead
Lunch
Break
Breakdown
Shop
In Service
These tasks are broken down in such a way as to make it easier to track time efficiency,
particularly in tracking on-clock time not spent in delivery.
Driver Overtime
A dispatcher’s job is to keep the trucks moving—even on a relatively calm day, it’s difficult
for a dispatcher to manage an entire fleet and also keep track of drivers who are getting close
to qualifying for overtime. COMMANDseries now employs a Driver Overtime Table to
180
Tasks, Conditions, and Driver Overtime
track a driver’s on road hours, and to provide automatic warnings to dispatchers as the
drivers get close to overtime wages. The task assigned to any given status determines how
the system will classify that time.
The system can track three different types of overtime:
•
•
•
Daily - Based on the hours worked during a single day.
Weekly - Based on the number of hours logged during a calendar week.
Rolling - Based on the number of hours a driver has spent on the road over a specified
number of days. Unlike weekly overtime, rolling overtime looks at a specified number
of days into the past—for example, for the past seven days.
Each driver can be assigned a Driver Overtime Table; the table specifies the allowed number
of hours for the three overtime types. Enter or edit Driver Overtime Codes in the Driver
Overtime editor {Files > General Information > Driver Overtime}. In addition, the table
lets the user define alert hours. In other words, while a driver may hit daily overtime after
eight hours, the system can alert the dispatcher when the driver hits six hours; this option
gives the dispatcher the ability to adjust driver usage without having to look up clock
information.
Conditions
In order to use the overtime information as an early warning system, there has to be a
mechanism by which the dispatcher is notified that a driver is getting close to overtime.
COMMANDseries uses conditions to trigger a number of warning mechanisms through
the Tracking & Scheduling screen. The default conditions are:
•
•
•
•
•
•
•
Daily Warning — The driver is approaching the limit for overtime.
Daily Max — The driver is now drawing overtime.
Weekly Warning
Weekly Max
Rolling Warning
Rolling Max
Deadhead
These default conditions cannot be deleted.
Drivers enter into the overtime-related conditions when the flagged time reaches limits
specified in their assigned Driver Overtime Table. All other conditions—such as deadhead
time—are linked to driver tasks. Enter or edit Condition Codes in the Condition Codes
editor {Files > Plant & Delivery Information > Condition Codes}.
Each condition can be tied to different manners of display on the Tracking screen. A
condition can change the color of a truck token, add a flag at the beginning of that token, or
both.
Tasks, Conditions, and Driver Overtime
181
Tracking & Scheduling
All of these features come together on the Tracking and Scheduling screen to provide the
dispatcher with a clearer picture of fleet operations and status. In the following screen, there
are three truck tokens that do not have the standard token appearance.
Tracking and Scheduling Screen
Here’s how to read the warning colors on this screen (keep in mind that colors and flags are
user-defined):
•
•
•
Truck 267, currently assigned to Order #1, has had its ticket printed, but for some
reason it has not moved to Loading status. Notice that the timer portion of the truck
token has turned red to alert the dispatcher that this load is falling behind schedule.
This feature is part of Tracking & Scheduling functionality, and is not influenced by
tasks or conditions in any way.
The driver of Truck 1 is approaching the limit for weekly overtime. A flag (C) has been
added to the beginning of the token, and the color of the truck number has changed (In
the previous example, the timer portion of the token changed color).
Truck 4 is being deadheaded to plant 2. There is a flag (A), the truck color has changed,
and the timer shows the time until the truck arrives at plant 2.
Ticketing
The ticketing procedure is unchanged. On the Ticketing screen {Dispatch > }, whenever a
truck is ticketed the system retrieves the driver’s clock time to date and compares it to the
information saved in the assigned driver overtime table. If the driver’s current time is under
the specified limit and the projected trip time for the new load does not put the driver into
the warning level, the load will ticket normally.
If the driver’s hours are over the limit for rolling overtime, or the trip will put the driver
over the limit, then a warning displays when the load is ticketed:
182
Tasks, Conditions, and Driver Overtime
Driver on Truck 1 will exceed rolling overtime maximum
before this trip has been completed. Do you want to use this
truck?
If the dispatcher selects Yes, the truck will be ticketed as usual. If the dispatcher selects No,
they will be returned to the Ticketing screen to select another driver.
Overtime button. This button provides the dispatcher a convenient means of checking
the clock status of any driver during the course of the day.
Deadheading
Dispatchers can conveniently deadhead a truck from one plant to another. For a truck to be
eligible to be deadheaded, it must be clocked in and not assigned to another delivery load.
To deadhead a truck:
1.
2.
3.
On the Tracking & Scheduling screen, right-click the truck to be sent to another plant
and choose Change Tasks.
--or--
Open the Tracking & Scheduling Operations screen {Dispatch > Tracking &
Scheduling Operations}, select the Change Task tab, and enter the appropriate Truck
Code.
Select Change Truck Task from the popup menu.
On the screen that appears, select Deadhead from the Change Task drop-down menu.
Tracking & Scheduling Operations – Change Task Tab (DBATSOPK)
4.
5.
6.
The truck’s current plant will default into the From Plant Code field. Enter the plant
to which the truck is being sent in the To Plant Code field.
Enter the Estimated Minutes to travel to the new plant. If the system has map pages
entered, the travel time can default from the appropriate map page.
Map pages are assigned to plants in the Plant file. The map page must contain travel
times from the origination plant to all other plants.
Accept the screen. On the Tracking and Scheduling screen, the truck token will move
to the Trucks returning section. The arrival timer will indicate the entered travel
time. The truck code on the token may change color, or there may be a flag in front of
Tasks, Conditions, and Driver Overtime
183
7.
the truck code, or both—depending on system configuration. The plant code at the end
of the token will reflect the new plant.
When the truck arrives at the new plant, end the deadhead task by dragging and
dropping the truck into the In Yard section of the Truck Tracking screen. The
Deadhead condition color and/or flag will disappear from the token. (Another way to
do this is to access the Tracking and Scheduling Operations screen and select End Task.)
Changing a truck’s assigned plant by deadheading is a temporary change. When trucks are
reset at the end of the day, the truck will be returned to its original plant. If a truck is to be
assigned to a plant for more than a single day, change the truck’s permanent plant
assignment in the Truck file.
Managing Driver Overtime
COMMANDseries uses conditions to alert dispatchers when drivers approach overtime
limits. The system also allows dispatchers to check a driver’s hour status at any time.
To check a driver’s overtime status:
1.
2.
Right-click on the truck token to which the driver is assigned on the main Tracking and
Scheduling screen. Select Driver Overtime from the popup menu.
--or--
Open the Tracking & Scheduling Operations screen {Dispatch > Tracking &
Scheduling Operations}, select the Driver Overtime tab, and enter the Driver Code.
The overtime-related information for the driver will appear on the screen.
Tracking & Scheduling Operations – Driver Overtime Tab (DBATSOPL)
3.
This information is for reference only; it cannot be edited from this screen. To edit
driver or truck task times, use the Time and Task Manager.
Time and Task Manager
The Time and Task Manager provides a practical means of reviewing and editing time
and task information for trucks and drivers. This tool lets you go back and correct
information, or fill in missing information.
184
Tasks, Conditions, and Driver Overtime
Topics in this section:
Editing Ticket Times
Editing Truck Times
Editing Driver Times
Editing Ticket Times
To edit ticket times for a specific order:
1.
2.
3.
4.
5.
Open the Time and Task Manager {Dispatch > Time Analysis > Time & Task
Manager}.
Enter the Order Date.
If you want to retrieve tickets associated with a specific order, enter the Order Code.
If you are interested in a specific driver or ticket, enter the appropriate codes. To view
all tickets for an order, simply tab through the Ticket Code, Truck Code, Shipping
Plant, and Driver fields without entering anything.
The system will retrieve all tickets attached to the order.
Canceled or removed ticket are marked with a small hyphen to the right of the Ticket
Code.
Time and Task Manager (EDTTMGRA)
6.
7.
8.
The large area at the bottom of the screen shows the tickets and ticket status times.
For particularly large orders, you can check the Show Only Tickets With Missing
Times checkbox to restrict the number of tickets displayed.
Press the Tickets button to retrieve tickets. If no plant code has been entered, the
system will use the plant code specified for you in the User > Plants tab.
To edit a specific ticket’s times, click the ticket’s status field and enter the correct time
using one of the COMMANDseries standard formats. Tab to move to the next field.
If the existing data on a ticket is correct, but there are one or two missing fields, select
Calculate all Times on this Ticket/Calculate all Times on all Tickets checkbox.
Based on the existing data and the schedule information, the system will extrapolate the
missing data. (This option can also be performed on all tickets.)
Tasks, Conditions, and Driver Overtime
185
9.
Once the necessary corrections have been made, accept the screen to save the changes.
Editing Truck Times
In most cases, one driver stays with the same truck all day long. Consequently, a truck’s
times match the driver’s times; however, if a driver’s times are edited, it may be necessary to
edit the truck’s times as well.
To edit a truck’s times in the Time and Task Manager:
1.
2.
3.
Select the Truck Times tab.
Enter an Order Date.
Enter a Truck Code, or detail in the field to display a list of trucks. Once these two
values are entered, the times for the truck will be displayed.
Time and Task Manager - Edit Ticket Times (EDTTMGRB)
4.
5.
6.
7.
8.
186
Edit Clock Times as necessary. Use the Add Occurrence button to add In Service
events.
Edit Task Times as necessary.
To delete a task, select the task and press <F5>.
To add a task, select the task you wish to precede the new task, and press <F6>. The
new task field will appear. Select a specific task from the drop down list, and edit the
task times as needed.
The Add Occurrence button (or <F6>) will create a task after the currently selected
task. Insert Occurrence (<Shift+F6>) will create a task before the currently selected
task.
Accept the screen to save the changes, or proceed to another tab.
Tasks, Conditions, and Driver Overtime
Editing Driver Times
Accurate recording of driver times is critical to the proper reporting of driver overtime.
To edit a driver’s times in the Time and Task Manager:
1.
2.
3.
Select the Driver Times tab.
Enter an Order Date.
Enter a Driver Code, or detail in the field to display a list of drivers. Once these two
values are entered, the times for the truck will be displayed.
Time and Task Manager - Edit Ticket Times (EDTTMGRC)
4.
5.
6.
7.
8.
Edit Clock Times as necessary. Use the Add Occurrence button to add In Service
events.
Edit Task Times as necessary.
To delete a task, select the task and press <F5>.
To add a task, select the task you wish to precede the new task, and press <F6>. The
new task field will appear. Select a specific task from the drop down list, and edit the
task times as needed.
Accept the screen to save the changes, or proceed to another tab.
Selecting the Add Occurrence button or <F6> will create a task after the currently
selected task. Insert Occurrence or <Shift+F6> will create a task before the currently
selected task.
Tasks, Conditions, and Driver Overtime
187
Preliminary Invoice
Register
The Preliminary Invoice Register is your primary price reviewing tool. It has a variety of
options that let you generate price information in a way that will best suit your business
practices.
The Preliminary Invoice Register Selection screen actually provides access to two different
reports: the Priced Orders Report and the Preliminary Invoice Register. What’s the
difference between a Priced Orders Report and a Preliminary Invoice Register? When you
physically look at the reports, they look pretty similar.
The answer is the difference between orders and invoices. The Priced Orders Report gives
you pricing information on an order-by-order basis. It does not take into account any
invoice settings a specific customer or project may have. You get one major report division
for each order.
The Preliminary Invoice Register, on the other hand, simulates an invoice run. It takes into
account customer and project-level invoice settings, and gives you one major report division
for each would-be invoice. If a project or customer is set to invoice by Project/Customer, or
Order/PO, or anything other than by orders, you may see multiple orders “invoiced”
together, sometimes in an order that makes pricing review more difficult.
Either report can be used for pricing review. If you invoice everything by order, it doesn’t
matter which report you use. If you do have some variety in your invoicing configurations,
you may want to work with both and see which suits your company’s business practices
best.
The Transfer Orders Register is not directly related to the invoicing process, but is used to
ensure that internal material use is properly tracked.
Topics in this section:
Saving Report Configurations
Printing a Priced Orders Report
Printing an Exceptions Report
Exception Items Only Option
Printing a Preliminary Detail Invoice Register
Transfer Orders Register
Saving Report Configurations
Several of the more complicated reports give you the option to save individual report
configurations. Rather than enter each configuration option every time you need to run a
report, you can save commonly used configurations for repeated use. Once a report
188
Preliminary Invoice Register
configuration has been saved, it can then be recalled, at which point you will only need to
add some additional information, such as data ranges.
To enter/save a report configuration:
1.
2.
3.
4.
5.
Open the report selection screen. If configurations for the report can be saved, the first
field on the selection screen will be Report Name. If that field is not present, then
custom configurations for that report cannot be created.
In the Report Name field, enter a name that will identify the configuration. The name
can be up to 40 characters in length.
When you go back to select a Report Name, you will select from a list of all stored
configurations in the system, not just those you have entered. So make sure you enter a
name that you will easily be able to identify.
Enter the rest of the report options.
Mark the Save Settings on Accept checkbox.
Accept the screen to run the report. The configuration will be stored for future use.
To use a saved report configuration:
1.
2.
3.
4.
5.
Open the report selection screen.
Select the desired report from the Report Name drop-down list.
Press <Tab> to leave the the Report Name field. The configuration for the selected
report name will be loaded into the selection screen.
Make any needed changes to the selection screen.
Accept the screen to generate the report.
To delete a report configuration:
1.
2.
3.
4.
5.
Open the report selection screen.
Select the desired report from the Report Name drop-down list.
Press <Tab> to leave the Report Name field. The configuration for the selected
report name will be loaded into the selection screen.
Press <Shift-F5> or the Delete button on the COMMANDseries toolbar. A
confirmation box will ask if you really want to delete this record.
Select yes to delete the record. The record will be deleted and the selection screen will
close.
Printing a Priced Orders Report
Use the Priced Orders Report to obtain pricing information for orders and tickets being
prepared for invoicing. This report option lists and totals each order separately, whereas the
Preliminary Invoice Register Option groups and totals orders and tickets as they will be
invoiced (based on individual customer settings).
This report includes important prices and pricing-related information, such as zone code,
project pricing plant, and the price source code. It also shows the delivery zone for each
Preliminary Invoice Register
189
order, which can influence the price. Suspended Orders can also be seen on the Priced
Orders Report.
The Priced Orders Report has one option, the Exception Report, that is not available from
the Preliminary Invoice Register.
To print a Priced Orders report (without exceptions):
Go to the Preliminary Invoice Register Selections screen {Invoicing >
Preliminary Invoice Register}.
2. Enter a Report Name to save a new report configuration, or select an existing Report
Name from the drop-down list. This field can be left blank.
3. In the Report Type drop-down list, select Priced Orders.
4. Select an option from the Report Sequence list to indicate the sequence in which
invoice information will appear. These sequences are particularly useful if multiple
people participate in the price review process.
5. Select the Product Line. Options are:
All Orders
Concrete
Aggregate
6. Select the Order Types to be included. This option is helpful if you want to process
credit and debit memos separately from regular sales. The options are:
Regular Sale
Incoming Material Dumped
Credit/Debit Memos
All
7. Select the Payment Method. The options are:
Charge
Cash
Check
Credit Card
All
Many companies prefer to process their COD transactions separately.
8. Enter the Invoicing Status that will be included on the Preliminary Invoice Register.
This field allows to differentiate between released and suspended orders/tickets. The
default is All.
9. Enter the Order Date to specify the date or range of order dates to include on the
Priced Orders Report. This field is required.
10. Enter a Billing Customer or range of billing customers to include on the Priced
Orders Report. If the field is left blank, Billing Customer will not be used for record
selection.
11. Enter a Project Code or range of projects to include on the Priced Orders Report. If
the field is left blank, Project Code will not be used for record selection.
1.
190
Preliminary Invoice Register
12. Enter an Accounting Category or range of accounting categories to include on the
Priced Orders Report. If the field is left blank, Accounting Category will not be used
for record selection.
13. Enter a Company or range of companies to include on the Priced Orders Report. If
the field is left blank, Company will not be used for record selection.
14. Enter a Pricing Plant Code or range of pricing plants to include on the Priced Orders
Report. If the field is left blank, Pricing Plant will not be used for record selection.
15. Enter a Suspend Reason code or range of reason codes to include in the Priced
Orders Report. If the field is left blank, Suspend Reason will not be used for record
selection.
16. Enter a Salesman employee code or range of codes. If the field is left blank, Salesman
will not be used for record selection.
17. Select Exception Items Only to print an Exception Items Only Report. Do not select
this checkbox when printing a Priced Orders Report.
18. Select Release Suspended Order/Tickets to release all suspended orders and tickets
that are included in the report range. Some people use this option when closing a
month to make sure that no suspended orders or tickets have slipped through the
cracks.
19. Select Include Order Specific Prep Customer Notes to include all notes flagged
for invoice prep. This will include all records where the Customer file has a note with
the Invoice Prep flag checked.
20. Select Save Settings on Accept to save the report parameters. All selections for the
report are maintained and the report is saved as the Report Name.
21. Accept the Priced Orders Report Selections screen.
22. Select a print model from the Possible Print Models screen.
23. Select a printer using the scrollable list.
If the priced orders report reveals some discrepancies in orders and tickets, correct them at
this time using Edit Orders and Tickets.
Summary Pages
The last pages of the register are summary pages; they provide various totals from the
report, which are used during balancing. There are four different summaries provided:
•
•
•
•
Sales Totals - Break down sales totals by Transaction Type and Payment Method.
Quantity Totals - Provide a similar breakdown, in addition to breaking out quantities
by measurement system (i.e, US Customary, metric, and total).
Sales Tax Totals - Show taxable sales, non-taxable sales, and tax amounts for all Tax
Authority/Locations.
Suspended Orders/Tickets - Lists all suspended orders/tickets that fall in the
specified report range.
The Suspended Order/Tickets totals page only prints on the Preliminary Invoice Register.
Preliminary Invoice Register
191
Printing an Exceptions Report
The Priced Orders Report with Exceptions is a variant of the Priced Orders Report that
allows you to combine two editing reports into one. By running an Exceptions Report, you
can show all orders as well as create flags to identify the options (shown below) that may
require special attention during the editing process. The symbol is a user-entered symbol
such as #, *, or X that will print in the last column on the report, indicating a line item that
matches the exception indicated.
In addition to the ability to affect order suspension at the time of order entry, a second
means of automatic order suspension lets you run the Priced Orders Report with
Exceptions and automatically suspend orders which meet the exception criteria.
To print a Priced Orders report with exceptions:
1.
2.
3.
4.
Go to the Preliminary Invoice Register Selections screen {Invoicing >
Preliminary Invoice Register}.
Enter a Report Name to save a new report configuration, or select an existing Report
Name from the drop-down list. This field can be left blank if you want to run the
report with your own settings, but do not wish the save those settings.
From the Report Type field, select Priced Orders.
When Priced Orders is selected, the Exceptions button will display. Select this button
to display the screen on which exceptions are specified.
5.
Check the exceptions to be shown on the report. Enter a corresponding symbol for
each exception for identification purposes on the report.
There are no restrictions on what character can be entered in the Symbol field.
However, it is best to use a symbol instead of a letter or number to make the exception
easier to see.
6. If you enter a valid Suspend Reason Code for Exception Orders, all orders that
meet any of the selected exception criteria will be automatically suspended, using the
entered reason code.
7. Fill out the rest of the selection screen as needed.
8. Accept the exceptions screen to return to the main selections screen.
9. Accept the Priced Orders Report Selections screen.
10. Select a print model from the Possible Print Models screen.
11. Select a printer using the scrollable list.
Exception Items Only Option
The Exception Items report can be run in an exclusive fashion. That is, the report can be
configured to display only those orders that meet at least one of the specified exception
criteria. This report is especially useful in the latter stages of order & ticket prep to verify
that there are no zero priced primary or secondary products immediately prior to printing
invoices.
To enable the Exception Items Only option, simply select the Exception Items Only
checkbox on the main Preliminary Invoice Register Selection screen. If exception
192
Preliminary Invoice Register
items are found, they will be displayed in the report as usual. If there are no expectation
items, the system will return a “No records to process” message.
Printing a Preliminary Detail Invoice Register
There are only a few differences between the Priced Orders Report and the Preliminary
Invoice Register, but the differences are important to understand.
The Priced Orders report presents the information by order. The Preliminary Invoice
Register, on the other hand, simulates an invoice run. That means that customer or project
invoice configurations are taken into account. For example, a project can be configured to
print one invoice per order, order/PO, project, etc. In addition, the prelim register calculates
the due date and available discount for any terms discounts assigned to the included orders.
When Preliminary Detail Invoice Register is selected as the Report Type, you will see the
form change in the following ways:
Preliminary Invoice Register
193
Preliminary Invoice Register Selections Screen
•
•
•
•
The Invoicing Status field disappears. The Preliminary Invoice Register only returns
orders that have not been invoiced. Consequently, this report is used at the end of the
month to ensure that all month’s orders have been invoiced.
The Suspend Reason field disappears, as does the Release Suspended Orders/Tickets
field. Orders cannot be suspended or released from the preliminary register.
The Exception Items Only field disappears. Exceptions can only be run in the Priced
Orders Report.
The Invoice Date field appears, along with fields to allow selection of customers by
invoice frequency. Choose from the following options:
Daily
Weekly
Monthly
•
•
194
The option to Include Previous Days Released Orders/Tickets becomes available.
Select Exclude Non-Priced Orders to exclude those orders from the Preliminary
Invoice Register. Non-Priced orders are defined as those orders in which no pricing is
found for the items based on the pricing plant and price set ups for the item.
Preliminary Invoice Register
This field displays only if the Report Type is Preliminary Detail Invoice
Register or Preliminary Summary Invoice. The same flag has been added to
the Print Invoice Selections screen for all Report Type selections.
The layout of the preliminary invoice register is identical to that of the final invoice register,
making balancing easier. The only difference in the preliminary layout is that the Invoice
Code field is blank, since that number is not generated until invoices are actually run.
The end of a Preliminary Detail Invoice Register has the same totals pages as a Priced
Orders Report. In addition, the very last section of the report is a list of all suspended
orders/tickets that fell within the specified report range. These are orders and tickets that
would not have been invoiced in an actual invoice run.
If all orders in the specified range are suspended, the system will return a “No records to
process” message. To run a report specifically for suspended orders or tickets, use the Priced
Orders Report.
Preliminary Summary Invoice Register
The Preliminary Summary Invoice Register is primarily used as a balancing tool. Instead of
providing detailed information on individual orders, the summary report only provides a
single line of information for each order, showing pre-tax amount, tax amount, invoice
total, extended cost, and gross margin.
Two totals pages are provided at the end of the report: Sales Tax and Suspended Orders/
Tickets.
To run the Preliminary Summary Invoice Register follow the steps outlined for ”Printing a
Preliminary Detail Invoice Register” on page 193, but select Preliminary Summary
Invoice Register as the Report Type.
The summary register takes about as long to generate as the detail register. All of the
individual orders must still be processed.
Transfer Orders Register
Transfer orders are not invoiced and therefore do not show up on the Preliminary Invoice
Register. Nevertheless, you will need a report that provides detailed information on transfer
orders to ensure that your records are accurate.
To print a Transfer Orders Register report:
1.
Go to the Transfer Orders Register Selections screen {Invoicing > Transfer Orders
Register}.
Preliminary Invoice Register
195
Transfer Orders Register Selections (SELTROR)
2.
3.
If you want to create a custom report configuration to be used on a regular basis, enter a
Report Name, and mark the Save Settings on Accept checkbox at the bottom of the
screen. Once the report has been configured and accepted, it will be saved under the
Report Name you gave it and will be available from the drop down list.
Select a Report Type from the list to determine the format to use when printing the
Transfer Orders Register Report. Select from the following options:
4.
Select the Report Sequence option to determine the method of sorting to use when
printing the G/L Distribution Report. Select from the following options:
5.
7.
8.
196
Order Code
Order Type
From the Product Line field’s list, select one of the following options:
6.
Detail
Summary
All Orders
Concrete
Aggregate
From the Order Type field, select the type of orders to include on the Transfer Orders
Register Report. The options are:
Job Transfer - Accommodates the shipment of inventoried materials to job sites
for inter-company, construction related activity. A Job Cost Phase code will be
associated with the order to accommodate the needs of the construction job cost
environment. No invoicing will be associated with this order type.
Material Transfer - Used for shipping inventoried materials to an intercompany plant or business. No invoicing will be associated with this order type.
All - To select both Job and Material Transfers.
Enter the Order Date to specify a date or range of order dates to include on the
Transfer Orders Register Report.
Enter the Billing Code to specify a customer or range of customers to include on the
Transfer Orders Register Report.
Preliminary Invoice Register
Enter the Company to specify a company or range of companies to include on the
Transfer Orders Register Report.
10. Enter the Pricing Plant Code to specify a pricing plant or range of pricing plants to
include on the Transfer Orders Register Report.
11. Mark the Save Settings on Accept checkbox to save the report parameters. All
selections for the report are maintained and the report is saved as the Report Name.
12. Accept the Transfer Orders Register Selections screen.
9.
Preliminary Invoice Register
197
198
Preliminary Invoice Register
Suspending Orders and
Tickets
Ideally, when a question concerning the pricing of an order is discovered, it can be resolved
quickly. Sometimes a problem cannot be solved quickly; if the salesman is out of town, for
example, it may not be possible to determine the correct price for an order. This type of
problem presents a serious problem: Do you go ahead and print an invoice for a customer,
knowing that the invoice is incorrect? Or do you place everything on hold until the issues
can be solved?
Some companies choose to go ahead and invoice the order, knowing full well that
corrections may have to be made via a credit/debit memo. Other companies choose to
suspend the disputed order, ticket, or product.
A suspended order/ticket is not the same as a canceled order. When an order/ticket is
canceled, as far as the system is concerned, no material was delivered. When an order/ticket
is suspended, however, the delivery still took place, materials left inventory, and these events
will be reported as such on all dispatching reports. The order/ticket is merely withheld from
invoicing until the dispute can be resolved.
Suspending individual products is slightly more complicated. When a product is suspended,
the system creates a new, suspended order and moves the specified products to the new
order. The suspended products still appear on the original order but the delivered and price
quantities fields are zeroed out and inactive. At that point, the suspension is managed at the
order level.
Once the price has been verified, the suspended order/ticket/product can be released. At
that point, it can be invoiced normally.
COMMANDseries provides manual order suspension of orders, tickets, and products from
the options menu and automatic order suspension for specific customers, projects, or
exception items. The decision on how (or, indeed, if) to use suspension should be made at
the company level.
Topics in this section:
Manual Suspension of Orders, Tickets, or Products
Automatic Customer Suspension of Orders
Exception Suspension
Suspended Orders & Tickets Report
Releasing Suspended Orders & Tickets
Editing Suspended Tickets on Invoiced Orders
Suspending Orders and Tickets
199
Manual Suspension of Orders, Tickets, or Products
Orders and products are suspended from the main Edit Orders and Tickets screen.
Tickets are suspended from the Ticket Information screen.
To suspend an order:
1.
2.
3.
4.
5.
6.
Retrieve the order in the Edit Orders and Tickets screen {Invoicing > Edit Orders
and Tickets}.
Select the Options menu from the toolbar.
Select Suspend Order from the Options menu.
The system will display a confirmation box. Click Yes to suspend the order, or No to
return to the Edit Orders and Tickets screen.
Select a Suspend Reason code on the Reason Code screen.
Accept the Reason Code screen.
To suspend a ticket:
1.
2.
3.
4.
Retrieve the order in Edit Orders and Tickets. Select the Tickets button to display
the order’s tickets.
Locate the ticket you wish to suspend. Click the Status button. The Ticket Status
screen appears.
Click the Suspend button to place the ticket into a suspended status.
Select a Suspend Reason code on the Reason Code screen. When you accept the
screen, you will be returned to the Edit Ticket Information screen. The Status
button will now be highlighted to indicate that the ticket has been either suspended or
canceled.
To suspend a product:
1.
2.
3.
4.
5.
6.
200
Retrieve the order in question in Edit Orders and Tickets.
Select Suspend Product from the Options menu. If you select Suspend Product for
an order with only one product, a dialog box will instruct you to suspend the entire
order.
Enter a Suspend Reason code on the Suspend Products Selections screen. Click on
the detail button for a list of codes.
Enter a Next Order Sequence Code on the Suspend Products Selections screen.
Click on the detail button for a list of codes.
Click the checkbox of the product(s) to suspend.
Accept the Suspend Products Selections screen.
Suspending Orders and Tickets
7.
The system will create a new order for the same order date, move the selected
product(s) to the new order, and suspend the new order. A prompt will display the new
order and the product(s) suspended. Click Ok to accept the suspended product.
Automatic Customer Suspension of Orders
Automatic suspension can be useful for customers with particularly convoluted pricing
structures. It helps ensure that you will be able to review the order thoroughly prior to
invoicing.
Automatic order suspension is initiated through the entry of a code in the Suspend Order
Reason Code field on the Customer Accounting Information { Files > Customer &
Project Information > Customers } and the Project Accounting Information {Files >
Customer & Project Information > Projects} screens.
When this field contains a valid suspend order reason code, all new non-project orders for
that customer should default to a suspended state. When the same field has a valid reason
code in the project file, all new project-based orders for that customer will default to a
suspended state. Suspend Order Reason Code is the label for the field in both cases.
Exception Suspension
Orders can also be suspended through a Priced Orders Exceptions Report.
If a valid reasons code is entered in the Suspend Reason Code for Exception Orders
field, then any order that meets any of the specified selections will be suspended.
Suspended Orders & Tickets Report
If a company is to use suspension effectively, a procedure to manage such tickets must be in
place. Without such a plan, there is a risk that an order or ticket might get left in suspension
limbo, and thus never invoiced.
The Suspended Orders and Tickets Report lists any orders, products, or tickets that have
been suspended from the system. This information also automatically prints at the end of
the Preliminary Invoice Register.
To print a suspended orders/tickets report:
1.
2.
3.
4.
Go to the Preliminary Invoice Register Selections screen {Invoicing >
Preliminary Invoice Register}.
Enter the Report Name. This lets you create a report, give it a unique name, and save
the parameters by marking the Save Settings on Accept checkbox at the bottom of
the screen.
From the Report Type field, select Priced Orders.
Select an option from the Report Sequence list to indicate the sequence in which
invoice information will appear.
Suspending Orders and Tickets
201
5.
6.
7.
8.
9.
10.
11.
12.
13.
14.
15.
16.
17.
18.
19.
20.
21.
From the Order Type field’s list, select the type of orders the report will include. The
options are: Regular Sale, Incoming Material Dumped, Credit/Debit Memos.
Select the Payment Method. The options are: Charge, Cash, Check, Credit Card.
Select Suspended Orders/Tickets for the Invoicing Status on the report.
Enter the Order Date to specify the order date, or range of order dates, to include on
the Priced Orders Report.
Enter the to specify the customer, or range of customers, to include on the Priced
Orders Report.
Enter the Project Code to specify the project, or range of projects, to include on the
Priced Orders Report.
Enter the Accounting Category to specify the accounting category, or range of
accounting categories, to include on the Priced Orders Report.
Enter the Company to specify the company, or range of companies, to include on the
Priced Orders Report.
Enter the Pricing Plant Code to specify the pricing plant, or range of pricing plants,
to include on the Priced Orders Report.
Select a Salesman or range of salesmen to include on the Priced Orders Report.
Mark the Exception Items Only checkbox to include only exception items on the
report.
Mark the Release Suspended Orders/Tickets checkbox to release any suspended
order and tickets upon running the report. See “Releasing Suspended Orders &
Tickets” on page 202. for more information.
Mark the Include Order Specific Prep Customer Notes checkbox to include all
order specific notes to be applied.
Mark the Save Settings on Accept checkbox to save the report parameters. All
selections for the report are maintained and the report is saved as the Report Name.
Accept the screen.
Select a print model from the Possible Print Models screen.
Select a printer using the scrollable list.
Releasing Suspended Orders & Tickets
A method of automatically releasing orders is available on the Preliminary Invoice
Register Priced Orders report. A Release Suspended Orders/Tickets checkbox lets
you invoice immediately after the receipt has run. This functionality also lets you enter a
limited range of suspended order reason codes. This constraint will be relevant for both
reporting and releasing orders.
To release a group of suspended orders/tickets:
1.
2.
3.
202
Go to the Preliminary Invoice Register Selections screen {Invoicing >
Preliminary Invoice Register}.
Set the Report Type to Priced Orders.
Fill out the form to define a range of orders.
Suspending Orders and Tickets
If desired, enter a Suspend Reason Code or range of reason codes to further restrict
the suspended orders affected.
5. Select the Release Suspended Orders/Tickets checkbox (This field only displays
when running the Priced Orders Report).
6. Accept the screen.
7. Select a print model from the Possible Print Models screen.
8. Select a printer using the scrollable list.
9. Once the printing of the report is complete, the Release Suspended Orders/Tickets
screen appears. Mark the appropriate orders for release or click the All button to
release all orders.
10. Accept the screen.
4.
The report will process all uninvoiced reports the meet the selection criteria. In addition,
any suspended orders or tickets within the selection criteria will be released.
Editing Suspended Tickets on Invoiced Orders
COMMANDinvoicing provides an option in the Edit Orders and Tickets function that
allows the user to access suspended tickets once the order has been partially invoiced. These
tickets can be released and edited without modifying the order.
You can only edit the suspended tickets of a partially invoiced order. You cannot edit any
invoiced tickets or the order itself.
To edit suspended tickets on invoiced orders:
1.
2.
3.
4.
5.
Select Edit Suspended Tickets from the Option menu on the Edit Orders and
Tickets screen. The Edit Suspended Ticket screen appears.
Enter the Order Date and Order Code of the order with suspended tickets.
The Order Date and Order Code information automatically default to the Edit
Suspended Tickets screen. However, the Edit Orders and Tickets screen prompts
you that the order has been invoiced and no changes may be made to the order or the
invoiced tickets. Only the suspended tickets remaining on the partially invoiced order
may be changed.
The Edit Ticket Information screen appears and displays all suspended tickets for
the partially invoiced order.
Both the shading of the Status button and the asterisk indicate that the ticket is either
suspended or canceled.
Edit the ticket, if necessary, or leave the information as it is.
Once you have edited the suspended ticket, and are ready to release the suspended
ticket for invoicing, click the Status button.
Suspending Orders and Tickets
203
6.
7.
204
The Ticket Status screen appears. Click Release to release the ticket.
The asterisk (*), which distinguishes a suspended ticket, is removed from the Edit
Ticket Information screen, and the Status button returns to normal. The ticket is
now released. Accept the Edit Ticket Information screen. You can invoice the
previously suspended ticket on the order now.
Suspending Orders and Tickets
Edit Orders and Tickets
The Edit Orders and Tickets function lets you correct discrepancies identified from
preliminary invoice reports or to add to incomplete order and ticket information.
The primary functions of Edit Orders and Tickets include:
•
•
•
General order and ticket preparation
Suspending orders and tickets
Issuing Credit/Debit memos
Topics in this section:
Edit Orders and Tickets Screen
General Order & Ticket Prep
Editing Tickets
Credit & Debit Memos
Options Menu
Edit Orders and Tickets Screen
The basic layout of the main Edit Orders and Tickets screen (EDTPREP) is similar to
that of the standard Order Entry screen:
Edit Order and Tickets (EDTPREP)
Edit Orders and Tickets
205
The Header contains the primary database keys – the fields that define a unique database
record. In the case of orders, the primary keys are the Order Date and the Order Code.
This section also indicates the Item Group of the order currently being displayed.
The Order Information section contains information relating to the order as a whole. In
addition to customer and project information, pricing (including charges), haul and other
information related to the order as a while are accessible under the appropriate buttons. The
layout is virtually identical to the same section in the standard Order Entry screen, with one
notable exception – on this screen, the delivery address is accessed through the Other
button. This is because although the material has already been delivered, the delivery
address isn’t as critical a piece of information as it was before.
The Order Line contains the items/products on the order. Primary and extra products are
on individual order lines, while admixes are under the Assoc Prods button for the relevant
mix. Cartage charges associated with particular order lines can be viewed and edited by
pressing the Haul button in this section of the screen . The Other button lets you add
other information related to a particular order line. The Calculations button displays on
order line items that are project products, and when pressed displays the amount of that
item that has been ordered and delivered so far in the project. See “Forecasted Shipped
Quantity” on page 52. for more information.
The Totals and Tickets section provides totals so that you can confirm your price
corrections. The Tickets button opens the Edit Ticket Information screen, along with
all tickets attached to the current order.
General Order & Ticket Prep
Once pricing reports have been reviewed and edited, the corrected information has to be
entered into the system. Corrections to orders and tickets are made in the Edit Orders and
Tickets screen.
When errors are discovered, be sure to determine how the error came about. If an order is
priced incorrectly because an item is priced incorrectly in a master file, you will need to
correct the error in the master file as well, or else you will be making the same correction
over and over again.
There are multiple screens in the Edit Orders and Tickets system, but all of them fall into
two distinct functions: editing orders and editing tickets. Before editing records, you should
understand how COMMANDseries uses information from the order and ticket record to
generate the Extended Price, which is the amount the customer is charged for any given
item.
Below is a screen shot of a line-item entry on the main Edit Orders and Tickets screen.
This information comes from the Order Line record (ORDL).
•
•
206
The Price Source Information, displayed below the Description of each product,
indicates where the price originated. It can be used to identify correct pricing or pricing
problems.
The Price field indicates the unit price. If all you need to do is change a primary
product’s price, you can do it from this screen. Press the D button to display the entire
Edit Orders and Tickets
•
•
•
price source code description (taken from the PRICE_DERIVED_FROM_CODE field in
the ORLD table), which describes how the price was entered.
The Order Qty field indicates how much material was initially ordered. It is included
on this screen as a reference; the order quantity is not used in any invoicing
calculations. It is provided primarily as reference.
The Price Qty field shows the sum of the item’s Price Quantity values from all tickets
on the order. The field is inactive on the main Edit Orders and Tickets screen. To
change a price quantity, you must edit the individual ticket(s).
The Extended price is the Price times the Price Quantity. It is the total price for the
item on this order.
The important thing to remember is that if you want to change the price of an item, you can
do it from the main Edit Orders and Tickets screen, without editing the tickets. If all you
need to do is adjust the quantities involved, all you have to do is edit the ticket.
Above all, if you are adding an item to the order, you must add it to both the order and
ticket, or the customer will not be charged.
The Edit Orders and Tickets screen is not intended as a Dispatch or Order Entry tool.
Orders for the current date can be edited and created; however, any order information
entered in Edit Orders and Tickets will not be updated on the Tracking & Scheduling
screen. If the current date is entered, warn the user that the tracking system will not be
updated.
To edit orders:
1.
2.
3.
Open the Edit Orders and Tickets screen {Invoicing > Edit Orders & Tickets}.
In the Order Date field, enter the date on which the order was shipped. This can be
the current date or any previous date. The default value is one day prior to the current
day.
Enter the Order Code of the order to edit. If the order code already exists, current
order information is retrieved and displayed.
You may also detail on the field to display a list of orders for the specified date.
If you are creating a new order using this screen, tab through the Order Code field to
generate a code based on Next Numbers, or enter an appropriate order code (the code
will not be generated until the order is saved). An order code can be entered manually,
but it is not recommended; the manually-entered code might conflict with an existing
order code.
When you tab out of the Order Code field, the header will turn gray, indicating that it
is no longer available. The rest of the form will activate.
Steps 4-11 refer to creating a new order, rather than editing an existing one.
Edit Orders and Tickets
207
Edit Orders & Tickets (EDTPREP)
4.
5.
6.
7.
8.
208
Enter a , or detail on the field to access the lookup screen.
Once a is selected, the code and the corresponding Customer Name are populated on
the form. The Customer Name can be only be edited for COD orders.
After the customer is selected, the system checks for the existence of projects for that
customer. If any are found, the cursor moves to the Project Code field. Enter a valid
project code or detail on the field to select from a list of projects for that customer.
When the cursor leaves the Project Code field, the system begins a basic credit check.
If a project is present, the system checks the credit code of the project.
If no project is present, the system checks the credit code of the customer.
If the credit code is invalid, the system notifies you and returns the cursor to the
field so you can enter a valid customer and/or project.
Enter the Lot/Block. This field identifies lot/block information for a project order.
This feature is a key component of COMMANDlien, and is required if
COMMANDlien is licensed. See the COMMANDlien User Guide for more
information. The Order Type can default from the project file; Regular Sale will be
the most frequently used option. Use the drop-down button to select. (See “Order
Types” on page 75. for additional information regarding order types.)
The Order Type field determines how this record will be processed by the AR system.
The Payment Form specifies how the customer will be paying. Available payment
options for a customer are determined by the customer’s assigned credit code.
If the customer has been cleared for charge orders only, the Payment Method field
will display Charge. The field will be grayed out; you cannot change it.
If the customer credit code allows for multiple payment forms, a dialog box will
display asking you to select a Payment Form; Payment Forms are user defined.
Edit Orders and Tickets
Select a radio button and accept the dialog box. The selected option will display in
the Payment Form field. The field will be active—you can press the drop-down
button to change the payment option.
There is a button to the left of the Payment Form field, labeled with a dollar sign
($). This button brings up a screen for additional information about the customer’s
payment.
For checks, enter bank and check information; for credit cards, enter account numbers
expiration dates, authorization codes, etc.
9. Edit any further information on the Edit Orders and Tickets screen or fill in fields that
had been left blank.
The Pricing, Other, Haul (for aggregate orders), and Tickets buttons enable you to
go to those screens and edit the information contained therein.
10. When you’ve finished editing an order, accept the screen.
If you change a Fixed Material Delivered or Fixed Cartage Delivered price, you
will have to change the price breakdown. The Fixed Price Change screen will display
automatically.
Fixed Price Change (EDTPREP9)
Update the Material Price and Cartage Price, and accept the screen to continue.
When editing an existing ticket, if a change will alter its value, the system checks for any
receipts against that order. If the order has a receipt that is not fully allocated, the allocated
amount is updated appropriately.
Order Pricing Information
The Order Pricing Information screen {Invoicing > Edit Orders & Tickets > Pricing} lets
you set various pricing and taxing related information. This information defaults from
either the customer or project Pricing Information screen.
Changes made to an order’s pricing structure from this screen override customer and
project pricing information, but do not change the customer and/or project files. This editor
will only change the current order!
Edit Orders and Tickets
209
To enter order pricing information:
1.
Go to the Order Pricing Information screen {Invoicing > Edit Orders & Tickets >
Pricing button}.
2. Change the Pricing Plant Code if necessary. This field identifies which plant these
products are priced from for this specific order. This code is found in the Plant Code
field in the Plants editor {Files > Plant & Delivery Information > Plants}.
The pricing plant can default from the scheduled delivery plant by selecting Default
Pricing Plant from Scheduled Plant in the configuration of COMMANDseries {File >
General Information > Configuration > Dispatch}.
3. The discount Terms Code for the current customer/project is displayed for reference.
It cannot be edited.
4. Select Apply Zone Charges if necessary. The zone charges are calculated based on the
Zone Code field. In addition, zone charges are also used in conjunction with zonebased destination taxing.
This option is rarely used in the aggregate industry. Check with your CA customer
service representative for further information.
5. To Apply Minimum Load/Haul Charges, select that checkbox. The minimum haul
charges are calculated based on information in the charge/cartage table selected.
6. To Apply Seasonal Charges, select that checkbox. The seasonal charges are calculated
based on the Seasonal Charge Table field. Select the seasonal charge table using the
detail button.
7. To Apply Unloading Charges, select that checkbox. Unloading charges will be
calculated based on the Unloading Charge Table field. Select the unloading charge
table using the detail button.
Unloading charges do not appear in the COD Calculator for a COD order. These
charges are determined once ticket times are completed.
8. To Apply Sundry Charges to an order, select that checkbox. Sundry Charges are extra
charges added to an order, such as after-hours delivery, a weekend delivery,
environmental charges or a minimum ticket charge. Sundry Charges provides you
with a way to charge customers for purchases that exceed normal circumstances.
9. To create a separate invoice for any of the above charges, check the Create Separate
Invoice check box on the appropriate line.
10. Enter the Tax Code for the plant/order. These fields identify the tax code representing
the location where the load ownership changes. This code will be the taxation point for
the order and all of its tickets. Origination-based taxation, destination-based taxation,
all taxable and non-taxable sales, and the tax amount itself, are related to the tax
authority/locations assigned to this tax code. The Order Tax Code can default from
several different locations: Customer, Project, or Zone.
The Tax Code field supports Smart Lookup: if you type in the first few letters of a
tax code description (often a city or municipality name) and detail on the field, the
system retrieves a list of tax codes that match the entered search string. If only one tax
code matches the string, the system automatically retrieved that code into the form.
Because some orders have more than a single taxation point, you can adjust both the
Plant Tax Code and the Order Tax Code separately, if necessary. Once the order
ships, however, only the Plant Tax Code may be modified.
210
Edit Orders and Tickets
11. In the Taxable field, choose whether the order is Taxable or Non-Taxable. If Taxable
is selected, the Non-Taxable Reason is unavailable. If the order is non-taxable, enter a
Non-Taxable Reason Code. This field identifies the reason the order is non-taxable.
This code is found in the Reason Code field in the Reason Codes editor {Files >
General Information > Reason Codes}.
If an order is set to be non-taxable, each order line on the Order Report shows as nontaxable, regardless of how the item is set up.
12. Some allow sales tax reduction for qualified customers. If you have tax reduction
enabled in your system, detail on the Sales Tax Reduction Profile Code field to
select a valid code.
13. Accept the Order Pricing Information screen.
Other Order Information
The Other Order Information screen {Invoicing > Edit Orders & Tickets > Other}
contains additional fields related to the order. Any of these fields can be printed on the order
and/or ticket by including the fields in the appropriate document format.
Other Order Information (EDTPREP3)
To enter other order information:
1.
Enter the Delivery Address for the order. In Order Entry, this field is required and is
located on the primary order screen. When entering an order in prep, the delivery
address is considered secondary information because the material has already been
delivered.
Edit Orders and Tickets
211
The Employee Code of the person entering the order into the system defaults into the
Taken By Employee Code field, but only if the COMMANDseries user code is
linked to the employee’s code.
3. The Taken On Extension field lets you record the extension number on which the
order was taken. Some phone systems record all calls based on extension. Entering the
extension on this screen makes it easier for the user to retrieve the stored call.
4. The Ordered by Name/Ordered by Phone #fields are used to store site-specific
information relating to the order. These values will default from the Customer Contact
and Phone #1 fields, respectively, in the customer/project record.
5. Enter the Salesman who generally works with this customer.
6. Enter a Delivery Method, Hauler Code, and Map Page. As with the delivery
address, these fields are considered secondary information because the material has
already been delivered.
7. Enter a Sales Analysis Code. This field is used by COMMANDexecutive to generate
Sales Reports and usually defaults from the Customer or Project file.
8. Enter a Resale PO number if necessary.
9. For further reference, enter a Shipping Customer and a Reference Customer in the
associated fields.
10. If circumstances surrounding the order’s delivery are such that you need to exclude the
tickets from time analysis, select the Exclude all tickets from Time Analysis check
box. This option is often used when processing debit/credit memos, or order in which
delivery was delayed by unusual circumstances.
11. The User Defined Fields area allows users to append additional information on
orders, payments, customer files, etc. To add a comment, click in the appropriate field
and enter the comment. In some cases, comments will already be completed.
12. Accept this screen to save your changes, if any.
2.
Order Haul Information
Order haul charges are initially established by the customer and/or project files. Most of the
time, you have no need to modify these settings during order entry. In some cases, however,
you may want to modify or review the haul charges for an order.
The haul charge settings are accessible through the Haul button on the Order Entry or
Edit Orders and Tickets screen.
To modify order-level haul charges:
1.
2.
212
On the Edit Orders and Tickets screen, enter a customer code and, if necessary, a
project code. The Haul button will not display until a valid customer code has been
entered.
Select the Haul button. The Order Haul Information screen displays.
Edit Orders and Tickets
Order Haul Information (EDTORDR1)
The existing information is defaulted from the customer or project files or from
manual entries made in Order Entry. Any changes made to this screen will not affect
those master files, but will instead affect only this order.
3. Enter a Cartage Charge Table, or detail on the field to select from a list.
4. If necessary, enter an Override Rate for the cartage charge.
5. Enter a Surcharge Code, or detail on the field to select from a list.
6. If necessary, enter an Override Rate for the surcharge.
7. If necessary, select Apply Surcharge to Hauler Pay.
8. If necessary, select Add Occurrence to add another surcharge.
9. Enter an Override Pay Table, or detail on the field to select from a list.
10. If necessary, enter an Override Rate for the pay table.
11. Accept the screen to save the settings and return to the Order Entry screen.
Editing Tickets
Once order-level information has been entered or modified, tickets can be edited. When
entering or editing tickets, it is important to remember that an item can only be added to a
ticket if it has already been added to the order.
To edit concrete tickets:
1.
2.
3.
4.
Open the Edit Orders and Tickets screen {Invoicing > Edit Orders & Tickets}.
Open the order containing the tickets to be edited.
Edit order information on the main Edit Orders and Tickets screen as needed.
Press the Tickets button in the lower right of the screen. The Edit Ticket Information
screen displays.
Edit Orders and Tickets
213
Edit Ticket Information (EDTPREP7)
The screen title bar shows the Order Date, Order Code, and Customer Name in
parentheses.
The Associated Products and Extra Products buttons will be displayed on all of
an order’s tickets if there are associated or extra products on the order. If, for example,
an associated product has been delivered on a ticket, the Associated Product button
for that ticket will be highlighted.
Similarly, the Charges and Haul buttons will display on all tickets if the order is
subject to charges. If a charge has been added to a ticket, the Charge and/or Haul
buttons for that ticket will be highlighted.
The Times, Other, and Status buttons are present for all tickets. The Times button
will be highlighted if any tickets times are present; however, the times may not be
accurate or complete. The Status button will be highlighted if the ticket has been
canceled or suspended.
Ticket Detail
5.
6.
7.
214
If you are editing an existing ticket, the Ticket field is inactive. Existing ticket codes
cannot be changed.
If you are entering a new ticket, enter a Ticket Code. The system will alert you if you
enter a ticket code that is already in use on another order, but it will not prevent you
from saving the duplicate number. The system will not allow duplicate ticket numbers
within a single order.
If there is only one mix on the order, that mix will default into the Mix Product field.
If there are multiple mixes on the order, enter a Mix Product, or detail on the field to
select from a list of mixes on the order.
You cannot add a product to a ticket unless that product has already been entered at
the order level.
Enter a Delivered Quantity. This value represents the amount of material delivered
to the customer, and controls usage reports and inventory. It has no bearing on what the
customer is charged.
Edit Orders and Tickets
8.
9.
10.
11.
12.
13.
14.
15.
16.
17.
18.
19.
20.
Enter a Price Quantity. This value has no impact on usage or inventory; this value is
multiplied by the price from the order record to determine the Extended Price for the
product.
In most cases, the Delivered Quantity and the Price Quantity will be identical. In
some cases, the price quantity might be reduced to give the customer a special discount.
If, for example, a load was particularly late, or the concrete truck accidentally ran over a
mailbox, the customer might be given a free yard of concrete by reducing the price
quantity by one. As long as the delivered quantity isn’t also reduced, inventory will
remain correct.
Enter the Plant that batched the material.
Enter the Truck that delivered the material. The truck’s assigned Driver will default,
but can be changed if necessary.
The Total Ticket field provides a running total of all charges on the ticket.
If there are associated products on the order, the Associated Products button
displays. Press the button to display the Ticket Associated Products screen.
You may edit information here as necessary. Note that the UOMs for Delivered and
Price Quantity for admixtures are often different.
Accept the screen to save and return to the main prep screen.
If there are extra products on the order, the Extra Products button displays. Press the
button to display the Ticket Products screen.
You may edit information here as necessary.
Press the Charges button to edit ticket level charges.
Press the Times button to review/enter ticket times for the ticket.
The colon does not have to be included when you enter a time: 1123 will be converted
to 11:23. The system looks for military time (0-24). To avoid having to continually add
twelve to something during entry of afternoon and evening times, add P to the end of a
PM time to have the system convert it. For example, 245P would be converted to
14:45.
Accept the screen to save changes and return to the Ticket Information screen.
Press the Other button to display the Other Ticket Information screen.
This information can be edited as necessary, although it is unlikely that you will need to
edit information on this screen on a regular basis.
Accept the screen to return to the Edit Ticket Information screen.
The Status button opens a screen that allows you to set the ticket as Active/
Removed or Suspended/Released.
When the cartage tickets are updated for a dispatch ticket, the Cartage Status field is
updated accordingly:
Cartage update has not been run (default)
Do Not Invoice- Ticket qualifies, but at elast one CTTK was n ot created
OK to Invoice- Ticket qualifies and Cartage Ticket(s) created
OK to Invoice-Does not Qualify for Cartage
Do Not Invoice- User Override
OK to Invoice-User Override
Edit Orders and Tickets
215
The two override options can only be set manually on this screen, or can be set during
a ticket import.
21. Proceed to other areas of the prep screen, or accept the screen to return to the main
Edit Orders and Tickets screen.
To edit aggregate tickets:
1.
2.
3.
4.
Open the Edit Orders and Tickets screen {Invoicing > Edit Orders & Tickets}.
Open the order containing the tickets to be edited.
If necessary, edit order information on the main Edit Orders and Tickets screen.
Press the Tickets button in the lower right of the screen. The Edit Aggregate Ticket
Information screen displays.
5. If you are editing an existing ticket, the Ticket field is inactive. Existing ticket codes
cannot be changed.
If you are entering a new ticket, enter a Ticket Code. The system will alert you if you
enter a ticket code that is already in use, but it will not prevent you from saving the
duplicate number.
6. Enter the Plant that provided the material.
7. Enter the Truck that delivered the material.
8. Enter a Product, or detail on the field to select from a list of products on the order.
You cannot add a product to a ticket unless that product has already been entered in
the order.
9. Enter a Delivered Quantity. This value represents the amount of material delivered
to the customer, and controls usage reports and inventory. Unlike Concrete tickets,
which allow for differences between the delivered Quantity and the Price Quantity, the
Price Quantity for aggregate tickets is automatically set as the delivered quantity.
10. As soon as a delivered quantity is entered, the system will calculate cartage charges for
the ticket. Press the Haul button to review haul charges attached to the ticket.
Product Cartage Charges (EDTPREPR)
If the order is configured to combine haul charges with the material charges, text at the
bottom will display, reading “These charges are included in the delivered price on the
front screen. They will not show separately.”
Accept the screen to return to the ticket editor.
216
Edit Orders and Tickets
11. Press the Times button to review/enter ticket times for the ticket.
12. Press the Other button to display the Other Ticket Information screen.
)
This information can be edited as necessary, although it is unlikely that you will need to
edit information on this screen on a regular basis.
13. The Status button opens a screen that lets you set the ticket as Active/Removed or
Suspended/Released.
14. Proceed to other areas of the prep screen, or accept the screen to return to the main
Edit Orders and Tickets screen.
Removing Items
Occasionally it is necessary to remove an item from an order or ticket; for example, if a pack
of expansion joints gets left accidentally off a delivered load of concrete, but is still included
on the ticket.
To remove a delivered product from an order:
1.
Retrieve the order in Edit Orders and Tickets. Below is a detail from an order:
Let’s say that the expansion joints were not delivered, so we want to remove them from
the order. You cannot simply delete the expansion joints from the order line; if you try,
you will get the following error message:
This restriction is here to protect the integrity of the database.
Edit Orders and Tickets
217
2.
3.
4.
5.
6.
7.
Clearing the Order Quantity field will not accomplish anything, because the
customer is charged based on ticketed quantities; the ticket record must be removed.
Select the Tickets button. The Edit Ticket Information screen displays:
The illuminated Extra Products button indicates tickets that contain extra products. If
the product you are trying to delete was delivered on multiple tickets, you must remove
the product from all of those tickets before you can remove the product from the order.
Select an illuminated Extra Products button. The Ticket Extra Products screen
displays.
Clear the Delivered Quantity field (or change the value to zero) and press <Tab>.
Accept the screen. When you accept the screen, the Price Quantity field will
automatically be cleared as well.
The Price Quantity field will update automatically only if the Delivered Quantity
field is cleared or set to zero. If the Delivered Quantity is increased or reduced to a
value greater than zero, the Price Quantity must be manually updated
If there were no additional extra products on the ticket, when you return to the Edit
Ticket Information screen, the Extra Products button will no longer be
illuminated. If there were additional extra products, the button will still be lit.
A quick way to confirm that change has been made is to check the Total Ticket price;
when you accept the extra product screen, the total amount should be reduced.
Accept the Edit Ticket Information screen to store your changes and return to the
main Edit Orders and Tickets screen.
Confirm that both the Price Quantity and Extended Cost for the product are zero.
If they are not zero, return to the Edit Ticket Information screen and verify the
Delivered Quantity and Price Quantity values.
If they are zero, use the Remove command to remove the product from the order.
Some companies will leave the zeroed-out product on the order so that if a credit/
debit rebill is done, the product will appear on both credit and debit memos.
Accept the screen to save the order.
Removing/Editing Charges
Users have a number of options when it comes to editing or removing charges from orders.
Basic changes, such as removing a charge from the entire order, can be made at the order
level, while finer changes, such as or removing a charge from a single ticket, may need to be
made at the ticket level.
When a charge is removed, it can be removed completely from the order. When this
happens, the charge does not show up on the customer invoice. If the charge is zeroed out,
it will still print on the invoice.
To edit/delete a charge at the order level:
1.
2.
3.
218
Open the order in Edit Orders and Tickets.
Select the Pricing button. The Order Pricing Information screen opens.
From this screen, there are a number of options:
Edit Orders and Tickets
To add a charge, select the appropriate Apply checkbox. For minimum load,
seasonal, unloading charges, select a Charge Table.
To remove a charge from an order, deselect the appropriate Apply checkbox. When
the screen is accepted, the system will display a dialog box stating that charges are
being removed or recalculated.
To change the charge rate on a charge other than a sundry charge, detail on the
Charge Table field and select a different charge table.
To change the charge amount of a sundry charge, enter an override in the Rate field.
Accept the screen. The system will display a dialog box stating that charges on tickets
are being removed and/or recalculated.
If an unloading charge was added or modified, Calculate Unloading Charges must be
rerun to update the order. The routine will replace existing unloading charges with the
updated rates.
4.
•
To edit/delete charges at the ticket level:
1.
2.
3.
4.
Retrieve the order in Edit Orders and Tickets.
Select the Tickets button to open the Edit Ticket Information screen.
If a charge has been entered on a ticket, the Charges button will be illuminated.
Select the Charges button on a ticket with active charges. The Ticket Charges screen
displays.
The sundry charge information is grayed out and cannot be edited from this screen. All
changes to sundry charges must be made on the Order Pricing Information screen.
There are a number of options from this screen:
A charge can be removed from the ticket by selecting the line and using the Remove
command. When the ticket is invoiced, the charge is not printed on the invoice.
A charge can be “zeroed out” by changing the Price to zero. When the ticket is
invoiced, the charge is printed on the invoice, but with an extended price of zero.
Some companies will zero out unloading charges so that the excess time will be
printed on the invoice, letting the customer know of the delay.
Edit Orders and Tickets
219
5.
A charge can be edited in the Delivered Quantity, the Price Quantity, and/or
Price fields.
If a charge is edited at the ticket level, and the charge is subsequently removed and
restored at the order level, the charge will be restored with the calculated values, not the
edited values.
Accept the Ticket Changes screen, accept the Edit Ticket Information screen, and
accept the Edit Orders and Tickets screen.
Credit & Debit Memos
If an error is discovered before an order is invoiced, it can be corrected at the order level (in
Edit Orders and Tickets), but once the order has been invoiced, corrections must be made
either in COMMANDinvoicing or COMMANDreceivables.
Relatively small adjustments are usually made on the Receivables side. It's fairly simple, and
you can make the adjustment at the same time you process the payment for an invoice.
However, one drawback of Receivables adjustments is that you do not get something official
looking to send to the customer documenting the correction. The correction will appear on
the customer's next statement, but it will not have any explanatory information.
Consequently, for larger corrections, most companies rely on credit/debit memos.
There are three basic approaches to performing a correction with Credit/Debit memos:
•
•
•
Credit/Debit Memo with a per unit adjustment
Credit/Debit Memo with a single blanket adjustment
Full Credit and Rebill
You can control whether a Credit Charge (based on Terms Discount) is to be applied to
Credit Memo Invoices and/or Debit Memo Invoices at the point in time when the Memo is
created.
Credit Charges represent an addition to a Customer’s Invoice that can be taken off if the
Customer pays the Invoice by the prescribed date. Otherwise, the Customer pays the
Invoice amount, including the Credit Charge.
Credit Memos
If a customer has been billed incorrectly, you can use a credit or debit memo to correct the
charge and provide the customer with a record of the correction. Once invoiced, an order
can no longer be edited; however, it can be used as a template for the credit/debit memo,
streamlining the entry process.
Credit memos can be used to make small adjustments, or they can be used to credit the
entire order back to the invoice.
To create a credit memo:
1.
220
On the Edit Orders and Tickets screen, enter the Order Date and Order Code of the
order you wish to correct. The rest of the fields automatically fill with previously
entered details of the order.
If the order has already been invoiced, a dialog box will appear:
Edit Orders and Tickets
Invoiced order
2.
3.
4.
5.
Note the invoice number provided; it will be used while creating the credit memo.
If you do not get this message, then you can edit the order directly; a credit memo will
not be necessary.
To continue with the memo, perform the Save As/Copy function (<F9>), to copy the
order.
Enter the Date for the credit memo and an Order Code number or tab through the
field to allow the system to assign the order code. If the date is different from the
original order date, a dialog box displays: Do you want to retain the original ticket dates?
Select Yes or No as needed. You will also be asked if you want to Revalidate prices?;
answer No to that one.
From the Order Type field, select Credit Memo.
Once you select credit or debit memo, the Order Credit/Debit Memo Information
screen displays:
Order Credit / Debit Memo Information (EDTPREPU)
6.
7.
If a Reason Code is configured specifically for credit/debit memos, it will default;
otherwise, detail on the field and select one from the list.
Select a How should all quantities effect inventory and sales analysis? option.
The inventory/sales analysis adjustment options are as follows:
Quantities on hand should be adjusted for all products - All items
appearing on the credit memo will be returned to inventory. Generally used when
doing a credit/rebill, when issuing a credit memo for a delivery that never took place,
or any credit memo that adjusts the amount of material received by the customer
Quantities should be handled as damaged goods for all products Items on the credit memo will not be placed into inventory; they will be tagged as
damaged goods for inventory and reporting purposes.
Edit Orders and Tickets
221
8.
9.
No adjustment to quantities should be made for any products - No
adjustments are made for any item on the credit memo. Only used for adjustment
credit memos, in which you are crediting a customer who has been overcharged.
Prompt for this information with each product code entered Upon accepting the credit memo, you are prompted for inventory/sales analysis
options for all memo items.
If necessary, enter Comments regarding the background/reason for the memo.
Accept the screen to return to the main prep screen.
Customer / Project Code segment (EDTPREP)
10. When the Order Type is Credit Memo or Debit Memo, the Invoice Code field
appears. Enter the Invoice Code on which this order was originally billed. This field
links the new credit memo with the original invoice. If this field is left blank, the
system creates an open credit memo that must be manually assigned to an invoice at a
later date.
11. Remove all products except the one(s) you are crediting. If you are doing a full credit,
don’t change anything.
All items remaining on the credit memo, including associated products and charges,
will be credited back to the customer. If you do not check the credit memo carefully
before accepting, you may inadvertently give a customer material for free. It bears
repeating: check the Total field at the bottom of the screen—that is the amount that
you will be crediting to the customer, and is an easy way to check for errors.
12. Accept the Edit Orders and Tickets screen.
13. Use Invoice Print to print the memo and create a sales batch.
Debit Memos
You can create a debit memo to correct for an omitted product charge or inaccurate pricing.
The memo appears on printed invoices to show this correction to the customer.
A common use is as part of a “Credit and Rebill;” a credit memo is used to credit the full
amount of an order, then a debit memo is used to bill the customer for the correct amount.
To create a debit memo:
1.
222
On the Edit Orders and Tickets screen, enter the Order Date and Order Code of the
order you wish to correct. The rest of the fields automatically fill with previously
entered details of the order.
If the order has already been invoiced, a dialog box will appear:
Edit Orders and Tickets
Invoiced Order
2.
3.
4.
5.
Note the invoice number provided; that will be used while creating the debit memo.
If you do not get this message, then you can edit the order directly; a debit memo will
not be necessary.
To continue with the memo, perform the Save As/Copy function (<F9>), which
copies the order.
Enter the Date for the credit memo and an Order Code number or tab through the
field to allow the system to assign the order code. If the date is different from the
original order date, a dialog box displays: Do you want to retain the original ticket dates?
Select Yes or No as needed. You will also be asked if you want to Revalidate prices?;
answer No to that one.
In the Order Type field, select Debit Memo.
Once you select credit or debit memo, the Order Credit/Debit Memo Information
screen displays:
Order Credit / Debit Memo Information (EDTPREPU)
6.
7.
If a Reason Code is configured specifically for Credit/Debit Memos, it will default;
otherwise, detail on the field and select one from the list.
Select a How should all quantities effect inventory and sales analysis? option.
The inventory/sales analysis adjustment options are as follows:
Quantities on hand should be adjusted for all products - All items
appearing on the credit memo will be returned to inventory. Generally used when
doing a credit/rebill, when issuing a credit memo for a delivery that never took place,
or any credit memo that adjusts the amount of material received by the customer
Quantities should be handled as damaged goods for all products Items on the credit memo will not be placed into inventory; they will be tagged as
damaged goods for inventory and reporting purposes.
Edit Orders and Tickets
223
8.
9.
No adjustment to quantities should be made for any products - No
adjustments are made for any item on the credit memo. Only used for adjustment
credit memos, in which you are crediting a customer who has been overcharged.
Prompt for this information with each product code entered Upon accepting the credit memo, you are prompted for inventory/sales analysis
options for all memo items.
If necessary, enter Comments regarding the background/reason for the memo.
Accept the screen to return to the main prep screen.
Customer / Project Code segment (EDTPREP)
10. When the Order Type is Credit Memo or Debit Memo, the Invoice Code field
appears. Enter the Invoice Code on which this order was originally billed. This field
links the new credit memo with the original invoice. If this field is left blank, the
system creates an open credit memo that must be manually assigned to an invoice at a
later date.
11. Enter the additional pricing information. Check the Total field at the bottom of the
form to verify the additional amount to be charged to the customer.
Be sure to remove all information from the invoice that will not be affected by the
memo.
12. Accept the Edit Orders and Tickets screen.
13. Use Invoice Print to generate the memo and create a sales batch.
Options Menu
The Options menu on the Edit Orders and Tickets screen provides a shortcut to various
functions. The Options drop-down menu includes:
•
•
•
•
•
•
•
•
•
•
•
224
Change Order to Metric
Ticket Times
Reprint Tickets
Display Individual Ticket
Display Taxes
Display Multiple Tickets
Display Haul Charge
Suspend Order
Suspend Product
Edit Suspended Tickets
Addition/Selection of Notes
Edit Orders and Tickets
•
Process Goods Returned
Change Order to Metric/Customary
When an order is retrieved, the system determines if it is a customary or metric order. This
menu command lets the user temporarily convert the current order to the other
measurement system.
This conversion is done strictly for reference purposes—you will not be able to save a
customary order as metric or vice versa.
This functionality is also available on the toolbar.
Ticket Times
When this option is selected, the Time and Task Manager screen displays. The Order Date
and Order Code of the current order will be selected. Tabbing through the remaining fields
will display all of the tickets for the current order, allowing you to edit all those ticket times
at once.
Note: The Time and Task Manager does not display tickets created in prep.
Reprinting Tickets
This function only reprints existing ticket information; it does not re-calculate or update
any information in the files.
The Reprint Tickets function is available in the Options menu in all ticketing screens as
well as Edit Orders and Tickets. The functionality of the screen depends on the screen from
which it was called.
To reprint a current ticket:
If tickets are printed from the batch computer, this option will restack the ticket.
1.
2.
3.
4.
5.
6.
7.
8.
9.
Enter the Order Date, and select the appropriate Order Code.
From Order Entry, press the Ticket button to open the Concrete Ticketing &
Shipping screen. From the Edit Orders & Tickets screen, go to the next step.
From the Options menu, select Reprint Ticket(s) to open the Reprint Tickets screen.
The above graphic lists all form fields. Some fields will not display, depending on your
selections.
If the screen was displaying an order, that order date and code will be passed to the
reprint screen. If the screen was blank, then enter the Order Date and Order Code
associated with the ticket(s) to be reprinted.
Select Print all Tickets on Order or specify a Ticket Code or range of codes.
If the Reprint Tickets screen has been called from Edit Orders and Tickets, you may
only Print to a standard local or network printer.
Enter an appropriate Document Format, or detail on the field to select from a list.
Accept the screen to reprint the ticket(s).
Edit Orders and Tickets
225
To reprint to a plant printer:
You can only print to a plant printer if the reprint screen is called from .
1.
2.
3.
4.
5.
6.
7.
Enter the Order Date, Order Code, and Ticket Code(s) as above.
Select Plant Printer in the Print to drop-down field. The lower portion of the
screen will activate.
Specify a Plant Code. The reprint ticket will be sent to that plant’s default ticket
printer.
If the specified order is an aggregate order, the Scale Number field will display. Select
the scale from the drop-down list.
Once the plant or plant/scale has been selected, select the plant printer to be used from
the drop-down list.
If the selected plant is configured for plant and/or dispatch copies, corresponding
checkboxes will display (defaulting as checked). Adjust if necessary.
Accept the screen to reprint the ticket(s).
Display Individual Ticket
This toggle switch controls how tickets are presented on the Edit Ticket Information
screen. If this option is selected, the Edit Ticket Information screen will display a single
ticket at a time.
Single Ticket Display (EDTPREP6)
All products are displayed on the main form; additional information remains under buttons.
Selecting this option does not result in a permanent display change. If the current order is
closed and reopened, the Edit Ticket Information screen will revert to the multi-ticket
format.
Note: Individual Ticket Display is not available for aggregate orders.
226
Edit Orders and Tickets
Display Taxes
The Display Taxes functions provides a convenient means of reviewing the sales tax charged
on a particular order. Taxes cannot be adjusted on this screen.
To display order tax information:
1.
2.
Retrieve the order in Edit Orders and Tickets.
Select the Display Taxes option {Options > Display Taxes}.
Order Sales Tax Distribution (EDTPREPK)
The screen provides totals by Tax Authority/Location. If changes are made to the tax status
of any part of the order, the effect can be reviewed immediately.
Display Haul Charges
This option displays the Order Haul Charges screen, which provides an easy-to-read
summary and total of all cartage charges and surcharges related to the order.
This information can be useful when working with pricing that combines material and
delivery prices.
Order Haul Charges screen (EDTPREPS)
Suspend Order/ Suspend Product/Edit Suspended Tickets
These three options relating to suspension of orders, products, or tickets are discussed in
”Suspending Orders and Tickets” on page 199.
Edit Orders and Tickets
227
Addition/Selection of Notes
This option calls the Notes editor. Please see the section on Notes for complete
information.
228
Edit Orders and Tickets
Daily Invoicing
In COMMANDseries, a dispatcher creates orders and tickets with the Dispatching
function of COMMANDconcrete and COMMANDaggregate. The next day, that order
and ticket information can be reviewed and edited if necessary, in preparation for invoicing.
The procedure for preparing orders and tickets for invoicing involves printing preliminary
registers, editing orders and tickets, and printing final invoices. Preliminary reports and the
Edit Orders and Tickets function are used to check and correct order and ticket information
before the printing of invoices. In some companies this task falls to invoicing clerks, in
others it falls to dispatchers. It is for the latter group that these tools are included in the
COMMANDconcrete and COMMANDaggregate modules.
The title of this chapter refers to “daily invoicing” because it is most efficient to invoice on a
daily basis. By getting transactions through the system as quickly as possible, you improve
cash flow and quickly identify potential problems with orders and tickets from previous
days.
The same procedures discussed in this section can also be used to invoice on a weekly or
monthly basis. When invoices are printed on a weekly or monthly cycle, the general pattern
is to reconcile, update, and review orders and tickets on a daily basis, so that all orders are
fully prepped when invoicing day arrives.
Topics in this section:
Reconciling Tickets
Price Updates
Update Costs & Prices for Orders & Tickets
Calculate Unloading Charges
Create Orders for Separate Invoices
Price Review
Invoice Print (if licensed)
Post to Receivables (if licensed)
Plant-level Invoices for Cash Sales
Process Overview
This chapter is organized around a typical invoice cycle. The standard invoicing process is as
follows:
Reconciling Tickets
1.
Run a Summary Ticket List to account for all tickets issued.
Price Updates
2.
Daily Invoicing
Update Cost and Prices for Orders and Tickets.
229
3.
4.
Create Unloading Charges (if applicable).
Create Orders for Separate Invoices (if applicable).
Price Review
5.
6.
7.
8.
Review product pricing (Priced Orders Report/Detail Preliminary Invoice Register).
Edit Orders and Tickets (if necessary).
Update tickets for Cartage (if applicable).
Run an “Exception Items Only” report to verify all orders are priced.
Invoice Print (if licensed) (if licensed)
9. Run a Detail Preliminary Invoice Register or Priced Orders Report.
10. Print Invoices and verify they've printed correctly. Update.
11. Run Final Invoice Register (Summary). Balance Final Invoice Register to Priced
Orders Report or Preliminary Invoice Register.
Post to Receivables (if licensed)
12. Run a Detail Sales Transactions Register. Check all entries, especially GL Distribution
Entries.
13. Post Transactions.
This list assumes you use both COMMANDinvoicing and COMMANDreceivables. If
you use a third-party A/R package, you will export the data from COMMANDinvoicing
and import it into your system. This export process will be discussed in a separate section.
Reconciling Tickets
At the end of a business day, you have large stacks of tickets that the drivers have returned
from their deliveries. The first step of the invoicing process is to reconcile these hard copy
tickets to the ticket records within COMMANDseries. The goal of reconciling tickets is to
physically account for all tickets generated by COMMANDseries.
The Ticket Report is not available from COMMANDinvoicing, but is available in the
Dispatching menu for both COMMANDconcrete and COMMANDaggregate. This
report generates a list of tickets for a specified range. It is a single-line report that shows
basic information about each ticket. The report can be sorted by ticket code, order code,
shipping plant code, or a list of other selections (i.e., order date, ticket code, hauler code,
etc.).
The person(s) responsible for reconciling tickets varies from company to company. Some
companies have plant managers reconcile tickets for individual plants, while some
companies have billing clerks reconcile tickets. Regardless of who does it, the goal is the
same: to account for all printed tickets.
The following instructions are for COMMANDconcrete and COMMANDaggregate
users. If you use another dispatching program, you must review the ticket information from
your system to check the order and ticket information for any needed edits.
230
Daily Invoicing
To print a ticket report:
1.
Open the Ticket Report Selections screen in COMMANDconcrete or
COMMANDaggregate {Dispatch > Dispatching Reports > Ticket Report}.
Ticket Report Selections (SELTICK)
2.
3.
4.
5.
Daily Invoicing
Select the Report Options. This field is used to specify what type of ticket report you
wish to generate. The valid options are:
Detail — Prints virtually all information related to each ticket.
Summary — Prints the minimal, vital statistics for each ticket in a single line
format. This option is most appropriate for initial ticket reconciliation, since the
only goal is to account for the tickets.
Missing Tickets — This report identifies gaps in the ticket number sequence. Such
gaps can indicate that someone has tampered with the database.
Select the Report Sequence. This field specifies how to sort the report. You can sort
the report in one of the following ways:
Ticket Code
Order Code
Plant Code,Order Code
Plant Code,Ticket Code
Other
If you select Other, the Other Sequence field will activate. You can then click on the
detail button to display a dialog that contains a scrolling list of other report selection
options. These include such options as sorting by order date, ticket code, hauler code,
etc. The options here are restricted to fields within the ticket record.
Enter the Order Date. This specifies a range of ticket dates to be included on the
report. The order date is the only required selection criterion on this report.
To specify particular tickets, enter a Ticket Code or range of ticket codes.
231
To specify tickets on particular orders, enter an Order Code or a range of order codes.
To specify tickets for a particular truck, enter a Truck Code or range of truck codes.
Enter a Plant Code or range of plant codes. This specifies which tickets you want on
the report based on the ticket's shipping plant.
9. Enter a Company Code or range of company codes. This specifies which tickets you
want on the report based on the companies to which the ticket belongs. This is dictated
by the order's pricing plant, shown in the Price Plant Code field on the Order
Pricing Information screen {Dispatch > Orders > Pricing}.
10. Enter a Driver Code or range of driver codes. This specifies which tickets you want on
the report based on the driver code. This is the driver code shown in the Driver Code
field on the Concrete Ticketing & Shipping screen {Dispatch > Concrete Ticketing
& Shipping}.
11. Select an Order Type(s). This option specifies which tickets you want on the report
based on the order type. This is the order type shown in the Order Type field on the
Order Entry screen {Dispatch > Orders}.
Regular Sale represents all orders for which shipments are made and for which
invoices will be created. This may include both trade and some inter-company
customers.
Incoming Material Dumped represents material dropped off for disposal.
Job Transfer accommodates the shipment of inventoried materials to job sites for
inter-company, construction related activity. A “Job Cost Phase” code {Files >
General Information > Job Cost Phase} will be associated with the order to
accommodate the needs of the construction job cost environment. No invoicing will
be associated with this order type.
Material Transfer is used for shipping inventoried materials to an inter-company
plant or business. No invoicing is involved.
Incoming Material Received represents incoming inventory material.
Credit/Debit memos represent a credit/debit against the customer’s account.
The default value is All:
6.
7.
8.
Order Types (SELORTP)
12. Select Print Weights to print constituent products weights included in mix products
for each ticket.
13. Select Print Associated Products to print the associated products for each ticket.
14. Select Print Extra Products to print the extra products for each ticket.
232
Daily Invoicing
15. Select Use Reporting Units of Measure to indicate that products will be represented
in the Total section of the report only if they have a valid unit of measure code in the
Reporting Unit of Measure field identified on the Items editor {Files > Item
Information > Items}. Otherwise, only ready-mix products are represented in the total
section. Using reporting units of measure acknowledges that other types of products
(aggregate, sand, cement, etc.) may be sold through the COMMANDconcrete
application. The totals for those products can then be represented in the report’s total
section.
16. Select COD only to feature only COD ticket items on the report.
17. Select Print Dumped/Resold Information to print any ticket information regarding
dumped concrete or resold concrete.
18. Accept the Ticket Report Selections screen.
19. Select a print model from the Possible Print Models screen.
20. Select a print destination. If the selected print model has a Print Device setting of
Prompt, a Windows dialog box will appear in which you can specify a printer.
Price Updates
These routines provide for some general price and order updates prior to formal pricing
review. These routines will not eliminate mistakes, but provided that the system is correctly
configured, they will reduce the chance of a mis-priced order.
•
•
•
Update Costs & Prices for Orders & Tickets
Calculate Unloading Charges (if applicable)
Create Orders for Separate Invoices (if applicable)
Update Costs & Prices for Orders & Tickets
Many variables enter into assigning costs and prices to individual items. Because of the
many ways a company can manage cost information in the system, COMMANDseries
ticketing routines do not create ticket-level cost records. This update routine populates the
ticket/order-level cost fields with the most current cost information. That cost information
then becomes available through Invoicing Reports and through Executive Reports.
Customers running COMMANDexecutive should use the update costs option to ensure
that all orders are assigned the correct price.
Prices are attached to an order at the time the order is entered in the system. Because of the
delay that can occur between the time a salesman gives a customer a price and the time that
new price gets entered into the system, it’s possible that an order can get priced based on
out-of-date information. The update price option offers a useful safety net for this
occurrence.
The update routine lets you update costs, prices, or both.
Caution: The update does not revalidate using standard pricing logic, but instead
revalidates using each item’s Price Source Code (PSC) to see if a more current price is
available from that source. So, if an order gets priced from the Item Master list, and then the
next day the salesman enters project-level pricing, the update prices option would not find
an updated price. In that case, you would need to open the order in Edit Orders and
Daily Invoicing
233
Tickets, remove the project from the order, and then add the project back; at that point,
standard pricing rules will be used and the correct price(s) will be pulled from the project
file.
To update costs & prices on orders & tickets:
1.
2.
3.
4.
5.
234
Go to the Update Costs & Prices for Orders & Tickets screen {Invoicing > Update
Costs & Prices for Orders & Tickets}.
Enter selection ranges for Order Date, Order Code, Pricing Plant Code, and/or
Company Code. If a selection is left blank, the system will not filter by that selection.
If no pricing plant codes are specified, for example, the system will update orders from
all pricing plants within the range established by the other parameters.
Select the Cost Update Options. The choices are:
Update all costs
Update zero costs
Do not update costs
Select the Price Update Options. The choices are:
Update all prices
Update zero prices
Do not update prices
If a Price Update Option other than Do Not Update Prices is selected, additional
checkboxes will display in the lower half of the screen. These checkboxes let you
determine if pricing for extra charges is to be updated as well. Options are:
Update the rate for minimum load charges
Update the rate for seasonal charges
Update the rate for unloading charges
Update the rate for haul charges
Daily Invoicing
Update the rate for sundry charges
Update All Override Rates
Note: Update All Override Rates is only available when Update the rate for haul
charges is selected.
Accept the Update Costs & Prices on Orders & Tickets screen to initiate the
updates. The time needed for the update will vary based on your system and the size of
your database. The system will not provide a report of the costs/prices that were
updated.
6.
Calculate Unloading Charges
Unlike charges such as Minimum Load or Sundry charges, Unloading Charges cannot be
created when a load is ticketed. During ticket prep, the Calculate Unloading Charges
function is used to create unloading charges based on the recorded ticket times.
The routine generates a report that lets you review the calculated unloading charges before
applying them.
COMMANDseries can automatically calculate and apply unloading charges. See the
Setting Up the System manual for details on creating Unloading Charge tables and
automated calculation profiles.
To calculate unloading charges:
1.
2.
3.
4.
5.
6.
Daily Invoicing
Go to the Calculate Unloading Charges screen {Invoicing > Calculate Unloading
Charges}.
Define the range of information for which to calculate the unloading charges in the
Order Date, Order Code, Customer Code, Project Code, Pricing Plant Code,
and Company Code fields.
Mark any necessary checkboxes at the bottom of the screen to calculate unloading
charges using the ticket, order, or project calculation method.
When calculating unloading charges by project, a new order must be created for the
unloading charges.
Accept the screen.
Select a print model from the Possible Print Models screen.
The system will generate a report showing all orders that qualify for an unloading
charge.
If the information on the report is correct, answer Yes to the dialog box that follows the
report. The unloading charges will be automatically added. The charges will be added
to individual tickets, as specified in the appropriate charge table.
If the information is incorrect, answer No to the dialog box that follows the report. The
unloading charges calculated on the report will not be written to the database.
However, you may have to do one of the following:
Correct any ticket times that are incorrect.
Verify that the correct unloading charge table is assigned to each order and that the
Apply Unloading Charges flag is selected on the order. The customer or project
information may need to be updated as well, so that future orders are correct.
Verify that the unloading charge table is configured correctly.
235
Accepting the charges is an all or nothing proposition; you cannot accept or remove
individual charges from the list. If you see some charges that you do not want to issue
(for a favored customer, for example) you have two choices:
Cancel all charges, edit the relevant orders so that they are no longer subject to
unloading charges, and re-run the Create Unloading Charges function.
Apply all charges, then edit the relevant orders to remove the charges before
invoicing.
An alternative means of using this feature is as follows:
1.
2.
3.
4.
Configure and print the update report.
Answer No to the update inquiry.
Review the report.
If the report is fine, rerun the report, send the report to the screen, and then answer Yes
to the update prompt. If you find problems, retrieve the order in Edit Orders and
Tickets and correct the issue, then rerun the update.
Create Orders for Separate Invoices
Some customers prefer to have additional charges invoiced apart from the deliveries
themselves. Customer and Project files have flags on the Pricing tabs that enable the
creation of separate orders for different charges. These new orders can then be invoiced
normally. This function lets you create orders for these separate invoices for any given day.
To create orders for separate invoices:
1.
2.
3.
4.
5.
Go to the Create Orders for Separate Invoices screen {Invoicing > Create Orders
for Separate Invoices}.
Enter a range of dates in the Order Date field.
Enter the Order Sequence. Click on the detail button in the field to access the
Choices screen.
Accept the Create Orders for Separate Invoices screen.
The system will create orders, complete with tickets containing nothing but the flagged
charges. Those charges will be removed from the original orders. These new orders
can then be invoiced according to company policy.
Price Review
Once the updates are out of the way, standard pricing review can begin. The specifics of
pricing review will vary from company to company. There may be one person in the billing
office who reviews everything, or various sales representatives who review the pricing for
their customers.
•
•
•
•
•
236
Run a Priced Orders Report/Preliminary Invoice Register
Review product pricing
Edit Orders and Tickets as needed
Run Exception Items Only Report
Update Cartage Tickets
Daily Invoicing
Run a Priced Orders Report/Preliminary Invoice Register
A full discussion of the Preliminary Invoice Register can be found on page 188. Very simply,
you run the report and review the prices.
That basic pattern may vary, depending on the size or structure of the company. If the
company does both concrete and aggregate work, one person may review concrete orders
while another reviews aggregate orders. In that case, use the Product Line field to run two
separate reports.
If pricing is reviewed by the sales reps, then run the report for each Salesman. In a multiple
company situation, the report can be run by Company.
When a pricing error is discovered, attempt to determine the source of the error. The
Preliminary Invoice Register and the Priced Orders Report both include price source codes
(PSC) for all prices, making the search easier. By identifying and correcting the source of a
pricing error, you can prevent the error from occurring in the future.
Edit Orders & Tickets
Using the results from the price review, edit the orders and tickets as needed. Please see the
Edit Orders & Tickets section on page 205 for full details.
Update Cartage Tickets
The Update Tickets function reads delivery ticket data from related COMMANDseries
applications. Charges cannot be applied in cartage without a related ticket. After reading the
tickets, COMMANDcartage uses the necessary information to compute and store pertinent
cartage information. COMMANDcartage creates cartage charges on those same tickets, and
creates appropriate payment information for the relevant haulers.
To update tickets:
1.
2.
3.
4.
5.
6.
7.
8.
Daily Invoicing
Go to the Update Cartage Tickets screen {Cartage > Update Tickets}.
Enter the Order Date, or range of dates, for the tickets you are importing for update.
Enter the Ticket Code, or range of codes, for the tickets you are importing for update.
Enter the Order Code, or range of codes, relevant to the tickets you are importing for
update.
In the Cartage Rate Table field, select the cartage rate table to be used as extra
selection for updating. If the code is entered, only haulers using this rate table will be
posted to the cartage system.
Check the Replace Existing Cartage Information checkbox to remove any existing
tickets and replace them with the current import.
Note: To add new tickets to the existing tickets, leave this checkbox unchecked.
Select the Include Removed Tickets in Cartage Calculations field if necessary.
Accept the Update Cartage Tickets screen.
237
Zero-priced Exception Items Only Report
At this point in the process, every order should have been checked, and every product
should be priced, but before printing invoices, it’s a good idea to make one last check to
make sure that everything at least has a price on it.
Run an Exception Items Only report, configured to look only for zero-priced products, as
shown below. For more information on Exception Reports, see ”Printing an Exceptions
Report” on page 192.
Entering a Suspend Reason Code for Exception Orders suspends all the orders that are
flagged as exceptions.
Preliminary Invoice Register Selections screens for Zero Priced Items Only Report
If all items have a price, then when this report is run the system will return with the
message “No Records to Process!”:
If this message is displayed, all orders in the specified range have a price. If the system does
generate a report, edit the orders listed in the report to ensure that all products are priced.
238
Daily Invoicing
Invoice Print (if licensed)
Preliminary Detail Invoice Register
At this point in the process, this report may have already been run multiple times, but no
matter how many times this report (or its counterpart, the Priced Orders Report) has been
run, it should be run one last time immediately prior to invoicing. This last register will
serve as a balancing benchmark—after invoicing, the results will be compared to the Final
Invoice Register. If the two reports balance, then it is unlikely that any errors occurred
during the invoice run.
For more information see ”Printing a Preliminary Detail Invoice Register” on page 193.
Printing Invoices
The complete discussion of Printing Invoices can be found on page 57 of the
COMMANDinvoicing user guide.
Final Invoice Register
The totals pages of the Final Invoice Register should match those from the Preliminary
Invoice Register printed immediately prior to invoicing.
If problems are discovered, compare the details of the preliminary and final registers until
the discrepancy is found.
Post to Receivables (if licensed)
For a complete discussion of this process, please refer to the COMMANDreceivables User
Guide.
Plant-level Invoices for Cash Sales
Some companies are required to provide a pro forma invoice/receipt for cash sales at the
time of the sale. To accommodate this requirement, COMMANDseries can print a cash
invoice from the Ticketing screen. In addition, the standard invoicing process has been
modified to allow greater flexibility invoicing cash sales.
To use this feature, the system must be licensed for the following options:
•
•
•
•
Order Entry & Ticketing (OE-CC or OE-CA)
Cash Management (CM)
Pricing & Prep (PP)
Invoicing (IG)
Configuration
Special configuration is only needed to enable ticketing cash sales at the time of ticketing.
Configuring a system for this feature involves two things:
•
Daily Invoicing
Creating/selecting a document format group for the cash invoices
239
•
Enabling the printing of cash invoices on a plant-by-plant basis
Document Format Group
The document format group should be created using the standard invoice print document
tags.
Plant Configuration
A new field, Allow Cash Sale Invoice Printing, has been added to the Plant >
Communications tab:
Plant-Communications tab
Selecting that checkbox will display the associated Setup button, which calls the Plant
Communications Setup screen:
240
Daily Invoicing
Plant Communications Setup screen
Configure the invoice printer the same way you would configure any other plant printer.
Operations
The Cash Invoicing feature is designed for two different situations:
•
•
Invoicing cash sales at the time of ticketing
Invoicing cash sales at a later date
Invoicing at Ticketing
The Concrete Ticketing & Shipping form has been updated to display a Print Ticket &
Invoice button under the following conditions:
•
•
The plant is enabled for Cash Sale Invoice Printing.
The current order has a cash-based Payment form.
Concrete ticketing
Daily Invoicing
241
If a ticket is recalled and has not been invoiced, the button will display as Print Invoice. If
a ticket has been recalled and the invoice has been printed, the button will not display.
When the Print Ticket & Invoice (or Print Invoice) button is pressed, the Cash Sale
Invoice Printing Options screen displays:
Cash Sale Invoice Printing Options
Set the options and accept the screen to print the invoices.
Invoicing Cash Sales via Standard Invoicing
This option is only available for plants that are not configured to print invoices at ticketing.
The standard Invoice Print screen has been updated to allow greater flexibility in the
invoicing of cash sales.
Updated Invoice Print Selections screen
242
Daily Invoicing
There have been two key changes to the Print Invoice Selections screen. These options only
display when a single customer is specified and the Report Type is Original Print.
Order Code allows the selection of a single order or range of orders. Detailing on the field
will call a list of uninvoiced orders for the specified customer.
The Select Orders & Tickets button calls the Print Invoice Order/Ticket Selections
screen.
Print Invoice Order/Ticket Selections screen
When the screen opens, it will automatically load any uninvoiced orders/tickets that match
the specified criteria on the selections screen. Because the Print Invoice Selection screen
filters by billing customers, it is possible to get a list that includes multiple customers; if
necessary, you can use the Customer Name Search field to refine the list.
Select the Include on Invoice checkbox for all tickets to be included on the invoice, and
accept the screen. The Cash Sale Invoice Printing Options screen displays:
Cash Sale Invoice Printing Options
Set the options and accept the screen to begin the invoice process. You will be prompted for
a print model and to update records as usual.
Order Discount Form
Detail on the Order Line Price (or Associated Product Price) field for individual item
discounts, or from the Order Product + Charges field for discounts to the entire order,
to display the Order Discount form in Order Entry.
•
Daily Invoicing
When brought forth from the Order Line Price field, the form displays as below:
243
Order Discount Screen
The Item Price represents the list price from the Item Master table.
The Adjusted Price represents the list price, minus any trade discount and/or zone
adjustments per the settings in the Customer or Project record.
When brought forth from the Order Product + Charges field, the form displays as
below:
•
Order Discount Screen
Previously entered discounts will display on the Order Discount form and will show how
the discount was applied against the original sales prices or totals, as well as the resulting
price/total. If a different discount percentage is entered on the Order Discount form, it is
always applied to the original price/total to compute the new After Discount price/total.
When entering a discount on the Order Product + Charges field, each individual item
and charge is discounted. It is at this point (or when a discount is entered on the Order
Line Price field) that the discount is measured against the user’s Discount Levels (which
are set on the Users > Discount Levels tab). The Configuration rule for determining the
User Price Latitude is also taken into account at this time:
•
•
244
If the Compute User Price Latitude After Discount field {Configuration >
Projects/Quotes tab} is set to Disabled:
The user discount will not be computed after the Trade Discount/Zone Adjustment.
The entered discount will be calculated against the Item Price.
If the Compute User Price Latitude After Discount field {Configuration >
Projects/Quotes tab} is set to Enabled:
The user discount will be computed after the Trade Discount/Zone Adjustment.
The entered discount will be calculated against the Adjusted Price.
Daily Invoicing
Daily Invoicing
245
Cash Management
The Cash Management option provides a means for managing COD payments for
COMMANDseries users who do not have the AR modules. It has several key features:
•
•
•
•
•
Quick Customer creation
Payment Entry integrated with both order entry and ticketing
Automatic and manual allocation of payments to tickets
Cash Reconciliation
Reporting
Configuration
Above and beyond standard configuration requirements, there are five areas that must be
configured to implement Cash Management:
•
•
•
•
•
Next Numbers
Bank Codes
Contact Types/Contacts
Plants
Users
Next Numbers
Two next number sequences impact cash management:
Next Numbers editor (EDTNEXT)
The up/down buttons indicate that
multiple sequences have been
entered. Customer sequences are
assigned at the plant level.
246
Cash Management
•
•
Customer Sequence is used to assign customer codes to customers created using the
Quick Customer Entry function in Order Entry. (Quick Customer Entry is used to
facilitate one-time cash customers.)
Receipt Sequence is the sequence used to assign receipt numbers to receipts
generated during order entry.
Both sequences require the same information:
•
•
•
•
•
Number –The sequence number.
Description –The long description of the sequence. You may have separate sequences
for each plant, for example.
Short – The short description
Begin At – Identifies the starting point for the sequence. If you have multiple receipt
sequences, make sure that there is enough separation–based on your business–to
ensure that it will be a long time before one sequence overlaps another. For example,
100 and 200 are probably not good starting points, but 10000 and 20000 probably are.
Next – Indicates the next number in the sequence, and will be incremented
automatically. It should only be changed to reset the sequence.
If additional sequences are needed, use the Add Occurrence button (F6) to add an
additional record.
Bank Codes
The Bank Codes editor lets you define codes that represent the various banks used by your
organization. Banks are assigned to Payment Transaction Batches, indicating the financial
institution to which deposits are made. Bank Codes also define the G/L Booking Code for
the deposit.
To set up bank codes:
1.
Open the Bank Codes screen {Files > General Information > Bank Codes}.
Bank Codes (EDTBKCD)
2.
3.
4.
Enter a Bank Code to identify the bank and account.
Enter a Description for the bank.
Enter a Short description.
Cash Management
247
5.
6.
7.
8.
If a specific company within your organization uses the bank, enter a Company Code
in the Company field. Detail on the field to select from a list of valid companies.
Enter the bank’s Federal Routing Number.
Enter the Bank Account Number.
Accept the screen.
Contact Types/Contacts
The Cash Management system requires that plants be assigned a Bank Agent–the person at
the plant who deals with the bank. The Bank Agent is first entered in the Contact table. The
contact is then assigned to a plant in the Plant editor.
Command Alkon recommends creating a new Contact Type for such contacts {Files >
General Information > Contacts > Contact Types}:
Contact Type editor (EDTCTTY)
Create a new Contact Type for Bank Agents (the screen shot is just a sample), then create
new Contacts for bank agents {Files > General Information > Contacts > Contacts}:
Contact Editor (EDTCTCT)
248
Cash Management
Plants
Three tabs in the Plant file must be updated:
•
•
•
Main Tab
Communication Tab
Next Numbers
Main Tab
Three fields on the Plants-main tab must be set:
•
•
•
Cash Receipting must be set to Enabled. When this field is set, two additional fields
display below.
Bank Code – Enter the bank code for the bank to which this plant will make deposits.
You may detail on the field to select from a list.
Bank Agent Contact – Enter the Bank Agent Contact code for your company’s
primary banking contact at the selected plant.
Communication Tab
There is a new option to configure a receipt printer. Once the Allow Receipt Printing
box is enabled, a Setup button will display.
The receipt printer is configured just like any other printer. Please refer to the Setting up
the System manual for details.
Cash Management
249
Next Numbers Tab
Two sequences need to be set here:
Plants-Next Numbers tab (EDTPLNTZ)
•
•
•
Enter the Receipt Code sequence to be used by the plant. Detail on the field to select
from a list.
Enter the Quick Customer Code sequence to be used by the plant. Detail on the field
to select from a list. (If you do not use Quick Customer Creation, this setting is not
needed).
Enter the Quick Customer code of the customer record to be used as a template for
this plant’s quick customers. (If you do not use Quick Customer Creation, this setting
is not needed)
Note: Make sure that the specified customer template is configured correctly.For example,
if the default customer has the wrong credit code assigned, you will not be able to
create a new COD order for the customer.
Users
User records are configured on two tabs:
•
•
250
Preferences
Order Type Defaults
Cash Management
User Preferences
User-Preferences tab (EDTUSNM1)
•
•
Plant Code – The user must be assigned to a plant that is configured for cash
management.
Receipt Writeoff Limit – This field relates to receipt allocation. Sometimes, the
receipt amount does not match the ticket amount. When this happens, the user has the
option to write off the difference. To do that, the user entered a special reason code.
Once the reason code is entered, the system validates the difference against the Receipt
Writeoff Limit. If the difference is over the limit, the system will not accept the writeoff.
Order Type Defaults
Only one field needs to be changed here.
User-Preferences-Order Type Defaults tab (EDTUSMNO)
•
Default Order Type – This field should be set to a Regular Sale (RS) Order Type.
Cash Management–Order Entry
The cash management functions in COMMANDseries are designed to let you accept
monies received from customers and assign them to specific tickets without having to use
COMMANDreceivables.
Cash management routines may slightly affect how routine tasks are performed.
Entering a COD Order
There are two variables involved here:
•
For new customers, use the Quick Customer Entry form to create the new customer
record.
Cash Management
251
•
If a customer makes full or partial payment at the time of order entry, you will have to
enter the payment and generate a receipt. When a receipt is generated during order
entry, it is automatically allocated to the ticket.
Quick Customer Entry
If the customer has already bought concrete, the customer record should already be in the
system. Do a standard customer search from the order screen. If you cannot locate the
customer, create a new record.
To use the Quick Customer Entry screen:
1.
Make sure that the Customer Code field is clear, then <Tab> out of the field. The
Quick Customer Entry screen will display:
Quick Customer Entry (EDTQCUS)
2.
3.
4.
Enter information for the new customer. The initial values for these fields, as well as
the values for fields not available on this screen, come from the default customer
template as specified on the Plants-Next Numbers tab.
When you have entered the customer information, accept the screen. The system will
save the new customer record, using a numeric customer code from the plant’s
assigned sequence. You will be returned to the main Order Entry screen, where the
new customer will automatically be entered.
From here, continue with standard order entry.
Payment Entry
There are two situations in which you may need to enter a payment:
•
252
A customer is ordering COD, and wants to pay at the time of order entry or ticketing.
Cash Management
•
A customer wants to pay prior to ordering material (pre-payment).
COD Orders
When a COD order is ready to be saved, the order total displays on the screen.
Concrete Order Entry-COD (EDTCORD)
When you accept a COD order, the system will prompt you regarding payment:
payment prompt
•
•
If you select No, the order will be saved. You will process the payment/receipt at a later
time.
If you select Yes, you will initiate the Cash Payment Routine to enter a payment and
automatically allocate it to this order’s tickets.
To enter a cash payment from order entry:
1.
Open the Cash Payment screen, either by responding yes to the above prompt or by
pressing the Payment button on the Order Entry screen.
Cash Management
253
Cash Payments screen (EDTPMTS)
2.
3.
4.
<Tab> through the Receipt Number field. The value will be populated upon
acceptance of the form.
Customer Code, Project Code, Payment Date, and Transaction Type will all
default from the order.
Select a Payment Form from the drop-down list. The available options will depend
on system configuration and customer credit. Enter the information for the selected
payment form.
Note: You can update the customer’s name and address on the Cash Payments form when
a cash-and-carry customer’s Payment Form is changed to a non-cash method.
When anything other than cash is selected, the Customer Information Confirmation
screen will pop up, letting you change the customer’s name and street address.
These two fields, along with the City field, are mandatory. Once information has
been changed and saved here, it will be relfected in Order Entry.
Cash
Check
254
Cash Management
Credit Card
EFTPOS
Direct
5.
6.
7.
The plant’s assigned Bank Agent will default.
If the customer has multiple forms of payment, use the Add button to create a new
payment record. The area in the lower left will maintain a running total of all entered
payments.
Press the Receipt button. The system will print a receipt, providing confirmation on
the COMMANDseries message line:
success!
Open Payments
Open Payments are payments that are not entered during order entry or ticketing, and thus
are not allocated to specific tickets. These payments are often entered prior to order entry,
but can be entered and allocated after the fact as well.
To enter a an open payment:
1.
2.
Open the Cash Payments screen {Dispatch > Payment Options > Cash Payments}
<Tab> through the Receipt Number field.
Cash Management
255
3.
4.
5.
Enter the Customer Code and, if necessary, the Project Code.
If this is a new customer, <Tab> out of the blank Customer Code field to call the
Quick Customer Entry screen.
Enter payment information as described above.
If a single payment is made with multiple Payment Forms (cash and check, for
example), enter the payment information for the first payment form, then press the
Add button to display a new Payment Form. Enter that information, and proceed.
When a single payment is made with multiple Payment Forms, it is treated as a single
payment for allocation purposes, but when the Reconciliation Report is run, the
individual payment forms will be used to break out the cash properly.
Accept the screen or press the Receipt button to process the payment.
Receipt Allocation
During the course of the day, orders are taken and tickets are created. Cash Payments are
made for the variety of cash customers. In the perfect world, all Cash Payments for a single
day would be allocated to the Cash Tickets for that day. In reality, some Cash Payments may
be left unallocated for future day orders, and some tickets may not get an allocation, thus
remaining 'uncollected' at the end of the day.
Cash Payments made at the time of Order Entry, for Customers where the Credit Code
field “Verify Credit Limit” is false, are immediately assigned to the Order and allocated to its
Tickets. Other Cash Payments must be allocated to tickets manually. The Allocate Payments
to Tickets entry form allows for this process to happen.
The Receipt Allocation function lets you take previously-entered payments and allocate
them to a delivered ticket. In this example, we’ll apply the payment taken earlier against
existing tickets.
256
Cash Management
To allocate receipts:
1.
Open the Receipt Allocation screen. {Dispatch > Payment Options > Receipt
Allocation}
Receipt Allocation screen (header) (EDTCODTK1)
2.
Enter values in the Ticket Selection area as needed. Once you <Tab> out of the
Ticket field, the system will retrieve all tickets with an outstanding balance that match
the entered criteria.
Retrieved tickets
3.
4.
Enter a specific Receipt (including date and plant code). The receipt is retrieved.
To apply money from the receipt to a ticket, select the Apply box next to that ticket.
Cash Management
257
note the changes
A single receipt can be applied to multiple orders and tickets for the same customer.
Scenario
A user makes a prepayment for 500.00. He later places a COD order totalling 430.00, and
makes an immediate payment of 200.00.
1.
2.
3.
258
Enter the order. Once the total has been calculated, press the Payment button.
On the payment screen, enter a payment for 200.00. When the payment is accepted, the
system will print a receipt for the customer and apply the payment against the order.
At the end of the day, open the Receipt Allocation screen. Enter the receipt number
and date. The system will retrieve the receipt as well as all tickets for the customer with
outstanding balances.
Cash Management
4.
Press the Apply box. The system will automatically allocate the balance of the ticket
from the earlier payment.
5.
Accept the screen. You’ll see a confirmation in the message bar that reads
6.
If you attempt to retrieve a ticket that has been completely paid off, you will receive the
following message:
Receipt x applied to ticket(s) y
In addition, the ticket will no longer appear on the Uncollected Tickets Report.
Emergency Cash Receipts
To enter emergency cash receipts:
• Create a Next Number sequence for emergency receipts. The emergency receipt
sequence should not have a Next value.
• Assign each plant an emergency receipt sequence.
To enter an emergency receipt, open the Cash Payments screen and enter a receipt number
that falls within the defined range, and then enter receipt information as usual.
Cash Management Tools
The Cash Management system in COMMANDseries provides multiple tools, both
processing and reporting, to review a day’s cash income.
•
•
•
Cash Reconciliation
Cancel Cash Reconciliation
Reconciliation Report
Cash Management
259
•
•
•
Uncollected Tickets Report
Unallocated Receipts Report
Document Formats
Cash Reconciliation
The Cash Reconciliation screen is used to balance the amount of cash, checks, and credit
card slips a plant has in the system to the actual amounts in the cash drawer. The concept is
similar to “cashing out” a cash register in a retail store.
The screen displays the various cash payments that have been collected since the last
reconciliation, breaking them down by Payment Type. The dispatcher or plant manager
totals up the cash on hand, checks, and credit slips and compares them to the screen totals.
When the process is finished, the system makes a record of the balance results and the
reconciliation date, using that as the baseline for the next reconciliation.
In addition, the screen displays unallocated receipts and uncollected tickets, giving you the
opportunity to apply receipts to the tickets as needed.
To reconcile cash:
1.
Open the Cash Reconciliation screen {Dispatch >Payment Options > Cash
Reconciliation}.
Cash Reconciliation screen header (EDTCREC)
2.
3.
4.
5.
6.
260
Your user Plant Code will default.
Enter the Reconciliation Date. The system will only reconcile payments and receipts
with dates that fall between this date and the previous Reconciliation Date.
Select the Payment Types that you wish to reconcile. Options are:
All
Cash and Check Only
Credit/Debit Card Only
Take note of the Less Beginning Balance amount. This represents petty cash, or cash
on hand; cash that is to be kept at the plant and not deposited at the bank from the last
reconciliation.
Once you tab out of the Payment Types field, the system will retrieve the uncollected
tickets and all unallocated receipts.
Cash Management
Cash Reconciliation screen (EDTCREC)
7.
8.
9.
All receipts within the date range are displayed, showing both the payment and
unallocated amount. For Direct Deposit and Preliminary Reconciliation Report
information, please see the corresponding sections in this document.
The Status of all the receipts defaults to Okay. If for some reason you do not wish to
include a given receipt in this reconciliation sequence, change the status to Hold.
Receipts on hold are not included in the Payments Logged totals at the top of the
screen.
To allocate a receipt, identify both a receipt with unallocated funds, and then press the
A button for that receipt. The Allocate Receipt screen will be loaded, displaying the
receipt and all the outstanding tickets that qualify. Allocate as usual, accept the screen,
and close the screen to return to the Cash Reconciliation screen. When you do, the
screen will automatically recalculate based on the newly entered allocations.
Total your cash, checks, and credit card slips, and enter those figures. The totals section
will update accordingly.
The difference for cash reflects the initial $500 in petty cash plus an additional 0.15
shortage.
Cash Management
261
10. Press Next. The Cash Reconciliation Out of Balance screen will display:
You are required to enter a note explaining the difference.
11. Press Next. The Final Step screen displays.
12. You may select two reports to run:
Reconciliation Report
Uncollected Tickets Report
13. The screen will total all the available cash. Specify the amount of Cash to be kept in
Cash Box. This amount will display as the Beginning Balance for the next
reconciliation.
14. Enter the Bank Deposit Reference. The information entered will be determined by
your company.
15. Enter the Credit Card Batch Number, received from your credit card processor.
16. Press Done. If you have selected any reports, you will be prompted for a print model.
17. Select your print model to finish the process.
Cancel Cash Reconciliation
The Cancel Cash Reconciliation function lets you cancel cash reconciliation transactions.
262
Cash Management
The routine validates the Data Out Date field for each payment line being canceled; you
will not be able to cancel a reconciliation that has already been interfaced to a third-party
system.
To cancel a reconciliation entry:
1.
Open the Cancel Cash Reconciliation form. {Dispatch > Payment Options >
Cancel Cash Reconciliation}
Cancel Cash Reconciliation form (DBACNCR)
2.
3.
4.
5.
The Plant Code assigned to the current user will default; if necessary, you can enter a
different plant or detail on the field to select from a list. You must have permission to a
plant in order to select it.
Enter a Reconciliation Date.
Enter a Sequence Number or detail on the field to select from a list.
Accept the screen to cancel the reconciliation.
Reconciliation Report
This report provides details of a given reconciliation sequence.
To run a reconciliation report:
1.
Open the Reconciliation Report Selections screen {Dispatch > Payment Options
> Payment Reports > Reconciliation report}.
Reconciliation Report Selections (SELCREC)
2.
3.
If you wish to create a saved report configuration, enter a Report Name and check the
Save Settings on Accept box.
Select a Report Sequence. Options are:
Receipt Number
Payment Method
Cash Management
263
Bank Agent
Your assigned plant (the plant you selected at login) will default in the Plant Code
field. You may change this value to any other plant to which you have CS privileges.
Select a Reconciliation Date.
Select a Bank Agent, if necessary.
Select Payment Method(s).
The Sequence Number will default based on the available sequences for the entered
date. If 000 appears, then there are no sequences for the selected date.
Accept the screen and select a Print Model.
4.
5.
6.
7.
8.
9.
Uncollected Tickets Report
The this report shows all COD tickets that have not been completely paid.
To run an unallocated tickets report:
1.
Open the Uncollected Tickets Report Selections screen {Dispatch > Payment
Options > Payment Reports > Uncollected Tickets report}.
Uncollected Tickets Report Selections (SELUNTK)
2.
3.
4.
5.
6.
If you want to save a report configuration, enter a Report Name and check the Save
Settings on Accept field.
Select a Report Sequence. Currently, the only option in this field is Ticket Code.
Select a Plant Code, or enter a range of plants.
If necessary, enter Ticket Date, Order Date, and Company Code ranges.
Accept the screen to generate the report.
Unallocated Receipts Report
Just as the Unallocated Tickets report finds COD tickets that have not been paid, the
Unallocated Receipts Report identifies receipts that have not been assigned to any ticket(s).
To run an unallocated receipts report:
1.
264
Open the Uncollected Receipts Report Selections screen {Dispatch > Payment
Options > Payment Reports > Uncollected Receipts report}.
Cash Management
Uncollected Tickets Report Selections (SELUNRC)
2.
3.
4.
5.
6.
7.
8.
9.
If you want to save a report configuration, enter a Report Name and check the Save
Settings on Accept field.
Select a Report Sequence. Currently, the only option in this field is Ticket Code.
Enter a Receipt Date or date range.
Enter a Company Code, or detail on the field for a list of companies.
Select a Plant Code, or enter a range of plants.
Enter a Customer Code or code range.
Select the Payment Method(s) to be included on the report.
Accept the screen to generate the report.
Document Formats
Two new calculation document tags (ORORAM and DSPCAM) have been created for Order
Print and Data In/Out. These new tags will be used to display the original order amount
before any discounts (ORORAM), as well as the discount amount received (DSPCAM). These
tags will only be used to calculate Cash orders.
Purging Quick Customers
While the ability to create Quick Customers prevents order takers from having to wait for a
standard customer account to be created, it can result in a large number of quick customer
records filling up the database. The Purge Customer routine allows you to filter customer
by accounting category and credit code, and will purge records from the following tables:
•
•
•
•
•
•
•
CUST – Customer
CUSO – Customer overflow
CUCO – Customer Credit
CUSG – Customer Sundry Charge
CUIG – Customer Item Groups
CUIU – Customer Item Groups Unloading Charges
CUHS – Customer History
Cash Management
265
Note: Any customer note linked to a customer being purged will have its status set to
“Completed”; the new status will allow the note to be purged using the Purge
Customer Notes routine.
Exceptions
The following customer records will not be purged:
•
•
•
Customers assigned as the configuration quick customer template or default quick
customer
Any customer assigned as the default quick customer template for a plant
Any customer with active orders, standing orders, projects, quotes, or payments
To Purge Customers:
1.
Open the Purge Customers form. {Manage > Application Management > Purge
Customers}
Purge Customers form (DBACUST)
2.
3.
4.
Enter an Accounting Category or detail on the field to select from a list. If the field is
left blank, all accounting categories will be included.
Enter a Credit Code or detail on the field to select from a list. If the field is left blank, all
credit codes will be included.
Accept the screen.
Purge Records
Over time, a large number of cash management records can accumulate within
COMMANDseries. With this modification, you can purge cash management records in
COMMANDseries, freeing up space in the database.
A new screen, Purge Cash Management Records {Manage > Application Management >
Purge Cash Management Records}, has been created to allow for easy purging of cash
management records. The only required field on this screen is the Payment Date As Of
date field. You can chose to include payments that have not been reconciled or interfaced yet
by selecting the associated check box.
266
Cash Management
Purge Cash Management Records (DBAPMTS)
Once you’ve entered a purge date and selected any necessary checkboxes, press F2. The
below message will display:
Select Yes to purge the records. All PMTS (Payment), PMTL (Payment Line Information),
PMTA (Payment Allocation), and PLCR (Plant Reconciliation) records meeting the criteria
selected on the Purge Cash Management Records screen will be deleted.
Note: If PMTA records are removed for at ticket, the ticket will be considered
“Uncollected” on the Uncollected Ticket Report, Cash Reconciliation Report, and
Receipt Allocation report.
Reports
A new report, Receipts Detail {Dispatch > Payment Options > Payment Reports >
Receipts Detail Report}, has been created so that users will have a hardcopy of cash
payment detail information for the records that are being purged. It is a good idea to run
this report before you purge cash management records. Information can be entered on this
screen the way you do for all other reports in COMMANDseries.
Receipts Detail Report (SELPMTS)
Note: Select Show Banking Details to display all information related to banking, such as
account numbers, for each receipt. Show Allocation Detail will display all
allocation information related to each receipt. When Page Break By Sequence is
selected, the report will have a page break for each receipt. To save the report
settings, select Save Settings on Accept before pressing F2.
Cash Management
267
Below is an example of a generated report that shows both banking details and allocation
details:
Direct Deposits
Cash Management has been updated to allow direct deposits. These direct deposits will be
recognized as a cash form of payment but will be handled separately during the Cash
Reconciliation process from cash, checks, and credit cards.
Configuration and Workflow
To accommodate the addition of direct deposits, new fields have been added to the Cash
Reconciliation screen {Dispatch > Payment Options > Cash Reconciliation}. Before you
can use direct deposit, you must set up a payment form for direct deposit.
Note: A new field, DIRECT_DEPOSIT_CODE, has been added to the PMTF (Payment
Form) record to hold the new direct deposit information.
To set up a Direct Deposit payment form:
1.
Go to the Payment Forms screen {Files > Customer & Project Information > Payment
Forms}.
Payment Forms (EDTPMTF)
2.
3.
268
Press F6 to add a new payment form.
Enter the appropriate Code, Description, and Short description for the direct
deposit.
Cash Management
4.
5.
6.
Select Cash for the Payment Method. When Cash is selected, the new Direct
Deposit field will appear. Cash is the only option you can select for direct deposit to
work within COMMANDseries.
Select Yes for Direct Deposit.
Accept the form to save your changes.
Cash Reconciliation
Once you have set up the direct deposit payment form, you can begin applying direct
deposits in Cash Management. The Cash Reconciliation form has been updated to reflect
direct deposits:
Cash Reconciliation (DBACREC)
Note: The Payment Types column header has been renamed Payment Meth (Payment
Methods). Direct Deposits will display in this column as “DD.”
Totals for entries on the Cash Payments screen {Dispatch > Payment Options > Cash
Payments} that have a payment form of Direct Deposit will display in the Direct Deposit
column at the top of the Cash Reconciliation screen. You can total your direct deposits here.
Once all information on the Cash Reconciliation screen has been balanced, press the Next
button to go to the Cash Reconciliation Final Step screen. You will notice a new section
dedicated to direct deposits:
Cash Management
269
Cash Reconciliation Final Step (DBACREC1)
Direct deposit totals will be included in the new direct deposit section of the screen. You can
enter your company’s direct deposit reference number in the Direct Deposit Reference
field. Both the direct deposit totals and the direct deposit reference number will be posted
to new fields on the PLCR (Plant Reconciliation) record: DD_DEPOSIT_AMT and
DD_OVER_UNDER_AMT.
Reporting
The Reconciliation report {Dispatch > Payment Options > Payment Reports >
Reconciliation Report} has been modified to include direct deposit totals at the bottom of
the report.
Preliminary Reconciliation Report
The Preliminary Reconciliation report (Dispatch > Payment Options > Cash
Reconciliation) pulls information from the payment records currently loaded in the Cash
Reconciliation screen, providing a convenient means of reviewing the allocations before
saving them
Click the Preliminary Report button on the Cash Reconciliation screen to bring up the
Preliminary Reconciliation Report selection screen.
270
Cash Management
Cash Reconciliation Screen (DBACREC)
The Preliminary Reconciliation Report Selections screen is identical to the existing
Reconciliation Report selection screen. Enter any relevant information and press F2 to
generate the report.
Preliminary Reconciliation Report Selections (SELPCREC)
Cash Management
271
Customer Notes
As companies grow, it can become harder to communicate between different divisions. The
Customer Notes function provides a flexible and efficient means of passing additional
information to others areas of the company.
Topics in this section:
Types of Notes
Entering Notes
Managing Customer Notes
Notes Listing
Dispatch Memos in Order Entry
Deleting, Managing & Purging Completed Notes
Types of Notes
Notes are classified based on the type of record with which they are associated. A single note
can be associated with multiple record types. Below are examples of the types of notes users
can create:
•
•
•
•
•
•
272
Customer – A note reminding order takers that this customer generally under orders,
and to schedule a cleanup load for all orders, or a note for invoice clerks reminding
them that this customer should never be charged a minimum load charge.
Project – A note that the site entry location varies depending on the time of day, or
perhaps a reminder that this project has special priority. That information can then be
passed on to the drivers when each load is ticketed.
Order – A note to inform accounting that the dispatcher has discounted the order due
to delivery issues. Such notes can be included in the Preliminary Invoice Register.
Order-level notes can only be entered against existing orders. To enter a note during
intial order entry, use dispatch memos.
Product – Notes concerning placement or finishing instructions (most often set
within a project record)
AR Transaction – Reminders to follow up with a customer concerning a late or
promised payment
Dispatch Memo – Dispatch Memos are a specialized variant of customer notes that
can be entered during order entry (standard order-level notes can only be entered
against an existing order. Dispatch Memos will be discussed at the end of this section.
Customer Notes
Entering Notes
Customer Notes can be entered and accessed in a number of ways. The most common
method is from one of the following primary work screens:
Notes can be entered or
accessed by…
Salesmen
Order Takers
Dispatchers/Batchers
Invoicing clerks
A/R clerks
Account Managers
Using the…
Quote screens
Order Entry screens
Ticketing screens
Edit Order and Tickets screen
Transaction Detail screens
Customer/Project edit screens
Notes Button in Order Entry
Since the above screen represents a new (unsaved) order, it is not possible to enter an orderlevel note. Order-level Notes should be entered as Dispatch Memos.
When the Notes button is dark, as shown above, there are no notes associated with the
customer (or project, or order); if the button is lit
there is at least one note present in the
system. Selecting a lit Notes button displays a list of relevant notes. Pressing an unlit button
takes you directly to the Customer Notes editing screen.
Notes can be configured to automatically display in certain situations. For example, if you
enter a note that a customer is not to be charged any minimum load charges, you can
configure the note so that whenever a dispatcher attempts to ticket a load for that customer,
the note automatically displays. Similarly, when an invoicing clerk brings up that order for
review during ticket prep, the note automatically displays as well.
In addition to the on-screen display, the Notes Listing function can provide you with a
printed copy of Customer Notes, filtered according to your selections.
Even though notes can be entered from a number of different modules, the basic procedure
is the same. All fields on the form(s) will be described, even those that do not pertain to an
order-level note.
To enter an order-specific note:
1.
Retrieve a current order.
Customer Notes
273
2.
Select the Notes button to the right of the Order Code. If there are no current notes
for the current order, the Notes editor will display.
Customer Notes (EDTCNOT1)
The header information is already entered – Entered Date/Time and Entered By.
If there are existing notes for the current customer, the Choices screen appears. For
example, if Notes are accessed from the order screen and there is an order-related note
for the customer, the following displays:
Choices
274
Customer Notes
To view an existing note, double-click on the Customer Code or highlight a note and
select the Display button. A viewing window displays, allowing you to view all notes
associated with this order.
Notes Viewer
3.
4.
On this screen, browse through the notes using the arrow buttons at the bottom of the
form. To enter a new note, select the New button. The Notes editor displays. Pressing
the Edit button at the bottom of the form will load the current note into the Notes
editor.
The List button will return you to the list of notes.
The Date/Time the note was entered and the User Name of the person who entered
the note is automatically attached to the note.
The next section of the Notes screen has a number of fields that are used to assign the
note to a particular type of record:
Customer Code
Job ID
Product Code
Order Date
5.
6.
7.
Project Code
Quote Code/Revision
Transaction Code
Order Code
These fields are set according to the screen from which the Notes screen was accessed.
For example, if you are in Order Entry and select the Project Note button, the system
will set the Customer and Project fields for the new note. Similarly, if you select the
note button next to an invoice transaction in COMMANDreceivables, the system will
set the Transaction Code.
Enter the text of your note in the Text area. The viewing area will scroll to
accommodate a longer note.
If you wish to attach a file to the note, select the file path from the URL field.
Select the appropriate flags for the note. There are two types of flags:
Applies to - This flag determines which screens are affected by this note. If you
select Orders, whenever the specified Customer Code is entered on an Order
screen the Notes button will light up to indicate the presence of an order-specific
note. If the same Customer Code is entered on a Transaction Detail screen, the
Notes button will not be lit, unless there is another note flagged for Receivables.
Customer Notes
275
8.
9.
10.
11.
12.
13.
14.
15.
16.
17.
The system will automatically select the Applies to flag that corresponds to the
screen that called the Notes from. For example, if you create a note from the Orders
screen, the Orders and Tickets flags will already be set when the form opens.
Auto Display - This flag indicates that the note should automatically display when
the specified screen is invoked. For example, if an order is given a note with Tickets
is flagged for Auto Display, every time that order is retrieved in the Ticketing screen,
the note will automatically display, ensuring that the batcher and/or dispatcher sees
the note prior to ticking the load.
Enter a Note Reason Code, if necessary.
If necessary, enter a Contact for the note. For example, if a customer has promised that
a given invoice will be paid by a certain date, enter the name of the person who made
that commitment.
Enter the Phone Number and Fax Number of the Contact, if any.
If the customer has promised that a certain amount will be paid on account, enter the
Commitment Amount.
Enter the promised date in the Commitment Date field.
Enter a Follow Up Date. This is the date on which you want to contact the customer
to check on the status of the commitment. This date can be before or after the
Commitment Date.
The Follow Up Completed checkbox allows you to keep track of which follow up
calls have been made.
The Note Completed checkbox allows you to track active notes and purge completed
ones.
To send a message with the note, complete the bottom portion of the screen.
Accept the screen to save the new customer note. The Customer Notes screen will
close, and you will return to the prior screen.
Managing Customer Notes
Accessing Customer Notes using the Notes button on a primary work screen often does
not give you a clear idea of all the notes entered for a customer. The Select Customer Notes
screen gives you additional flexibility in viewing and managing customer notes.
To view customer notes:
1.
276
While viewing a primary work screen (Orders, Edit Orders and Tickets, etc.), select
Addition/Selection of Notes from the Options menu. The Addition/Selection of
Notes screen displays.
Customer Notes
Select Customer Notes (EDTCNOT)
2.
3.
4.
5.
The first seven fields allow you to choose data or groups of data to select which notes to
display. For example, if you want to display notes for Project Codes 10 through 50,
enter those numbers in the Project Code fields.
The filtering is progressive: the screen will initially display all notes, but the list will be
pared down as you add more filter criteria.
Mark the checkbox next to Include Notes Marked “Follow Up Completed” if you
want to see those notes.
Mark the checkbox next to Include Notes Marked “Note Completed” if you want
to see those notes.
Notes matching the specified criteria display at the bottom of the screen. Double-click
on a specific note to display the entire note.
Notes Listing
The Notes Listing function lets you print selected notes. Functionally, Notes Listing is
identical to the procedure for viewing customer notes, explained previously; the only
difference is that the selected notes are printed instead of listed on the screen.
To print customer notes:
1.
Open the Notes Listing screen {Files > General Information > Notes Listing}.
Customer Notes
277
Notes Listing Selections (SELCNOTE)
2.
3.
4.
5.
6.
The fields in the top portion of the screen let you choose data or groups of data to select
which notes display. For example, if you want to display notes for Project Codes 10
through 50, enter those numbers in the Project Code fields.
Mark the checkbox next to Include Notes Marked “Follow Up Completed” if you
want to see those notes. A Receivables clerk, for example, might run a listing once a
week to return a list of notes for which follow up calls are required this week.
Mark the checkbox next to Include Notes Marked “Note Completed” if you want
to see those notes.
Accept the screen. The Print Models screen appears.
Select the appropriate print model to generate and print the Notes Listing.
Dispatch Memos in Order Entry
COMMANDseries provides an easy means to add dispatch-level notes to orders.
•
•
•
Users can enter dispatch memos on the standard/simplified order screens and on the
Concrete Ticketing screen.
Notes can be added while an order is being entered.
Order-specific notes (including dispatch memos) can be printed on several dispatch
reports.
This feature is intended for concrete orders. While dispatch memos can be entered on an
aggregate order from the standard orders screen, they cannot be added from the various
dispatching and ticketing screens.
Configuration
Even though they are entered differently, dispatch memos are stored as order-level
customer notes. Some configuration is needed to streamline the process.
278
Customer Notes
To configure dispatch memos:
1.
2.
Open the Configuration > Distribution tab {Files > General Information >
Configuration > Distribution}.
Select the Notes button. The Notes Configuration screen will display.
Notes Configuration (EDTCNFXT)
3.
4.
5.
Set the Display Notes Line in Forms field to Show. When Show is selected, a
Dispatch Memo field will display on the Orders, Simplified Orders, and Tickets
screens.
Setting Display Notes Line in Forms to Hide will disable the auto-display of all
order-level notes, including those entered prior to this modification.
The remaining fields configure default settings for all order-level notes, not just
dispatch memos.
The Applies to options let you establish whether dispatch memos are to be assigned
to orders, tickets, and/or batch panels. Users will not have access to the standard
Notes editor from a dispatch memo, so these fields establish the system-wide
settings.
The Auto-Display flag enables the customer notes auto-display function for all
dispatch memos.
Accept the Notes Configuration screen and the Configuration screen.
Operations
A dispatch memo field will now display on the Orders, Simplified Orders, and Ticketing
screens.
Customer Notes
279
Concrete Orders
Simplified Orders
Dispatch memos can be entered on a new order without having to save the order and then
retrieve it. Detailing on the field will open a zoom box for longer notes.
When the order is retrieved in order entry or ticketing, the information will display in the
field. If dispatch memos are configured for auto-display, the memo will display in the
standard notes auto-display window. From there the screen can be closed or the full
Customer Notes editor opened.
Because of space restrictions on the Aggregate Orders screen, if dispatch memos are
enabled, job tracking fields (Job Phase and Phase Code) are moved to the Other Order
Information screen.
280
Customer Notes
Dispatch memos can be viewed and entered in the Concrete Tickets screen, but not in
aggregate ticketing and dispatch screens.
Concrete Ticketing
Reports
The following dispatch reports print order-specific customer notes (which includes
dispatch memos):
•
•
•
Order Report
Order Recap Report
Ticket Report
The selection screens for all of these reports have a new checkbox, Include Order
Specific Customer Notes, to control the inclusion of notes on the reports.
Note: Order-specific notes will not print for aggregate orders.
Deleting, Managing & Purging Completed Notes
If a company uses customer notes extensively, old notes can pile up in the database in a
relatively short period of time. That is why it is important to manage and purge the
customer notes in the system on a regular basis.
Deleting Notes
To delete a single note:
1.
2.
Retrieve the note in question.
Select the Remove Record button or press <Shift+F5>.
Customer Notes
281
Managing Notes
All notes have a Note Completed Checkbox in the lower right of the main Notes screen:
The Note Completed box
Managing notes is a matter of making sure that the Note Completed flag is set once the
terms of the note have been addressed.
Purging Notes
Purging Notes lets you delete old notes in bulk. There is only one key consideration: a note
cannot be purged unless it has been flagged as completed.
To purge completed notes:
1.
Open the Purge Customer Notes screen {Manage > Application Management >
Purge Customer Notes}.
Purge Customer Notes screen (DBACNOT)
2.
3.
282
Enter a range of Customer Codes, Project Codes, and/or Completed Dates.
Accept the screen.
Customer Notes
COMMANDconcrete Reports
In the highly competitive construction materials market, decision makers in your
organization need access to various levels of information quickly and easily. With this in
mind, COMMANDconcrete includes a large collection of reports that display relevant
information in a way that it is easily accessed and processed.
Topics in this section:
Generating Reports
Scheduling Reports
Dispatching Reports
Time Analysis
Payment Option Reports
Generating Reports
The COMMANDseries suite of applications provides a common method for generating
reports.
To generate a report:
1.
When you select the Print Report function from a COMMANDseries application, a
Report Selections dialog box displays. This dialog box prompts you for parameters to
customize the information you want displayed on the report. A sample setup screen is
displayed here:
COMMANDconcrete Reports
283
Report Selections (SELSLSS)
2.
3.
4.
284
After you have entered the specific report information, the Possible Print Models
screen displays. This lists the output methods available with which to generate the
report. Print models are defined using the Print Models editor in the System menu.
There are four ways to generate reports from the Possible Print Models screen:
Printer - Lets you choose a specific printer for a hard copy printout of the report.
Report to Screen - Lets you view the report on the screen rather than print a
hardcopy.
Report to File - Automatically saves the report into a WINDOWS/TEMP directory.
Report to WordPad - Lets you create a text file and save in .txt form in WordPad
for editing and other purposes.
Select a printer using the scrollable list. The system knows the formatting and printing
requirements your report, so only appropriate print models will be listed. Check the
Save Report File After Printing checkbox to save the report to disk for later printing
or viewing. Highlight the print model and accept the screen.
COMMANDconcrete Reports
Possible Print Models (FNDUPRT)
5.
After you select an available printer, the standard Windows print dialog box appears.
Press OK to print the report.
Print Setup
COMMANDconcrete Reports
285
Scheduling Reports
Scheduling reports show the commitment of trucks in each plant, plant capacity, and
commitment for the total fleet. They allow dispatchers to look ahead to the next day’s
deliveries. Other reports show order schedules, dispatch truck schedules, and load
suggested driver callout report.
Topics in this section:
Order Schedule Report
Truck Demand Graph
Plant Loading Report
Driver Callout Report
Dispatch Sheet Report
Order Schedule Report
The Order Schedule report provides information about orders to see which customer
orders are on the schedule for a particular day. You can specify the plant(s), order type(s) and
scheduling date on which you want to report. Also, you can sort the reports by schedule
plant or schedule start time.
The Order Schedule report includes plant, schedule, and quantity information generated in
the Order Line Scheduling Information screen. It provides the shipper with
information on start time, travel time, and rate of deliveries. It also shows the quantity of
ordered product, the type of truck designated for the job, and the number of trucks
required. The report supports two Report Options:
Standard Format runs the report using the existing format.
Project Name Format uses a new format that includes the Project Name. To make room
for the Project Name, the Truck Type, Trucks Required, and Zone Code fields have been
removed.
286
COMMANDconcrete Reports
Order Schedule Report Selections - concrete (SELOSCH)
Truck Demand Graph
The Truck Demand Graph generates information on the number of trucks needed at
specific dates and times. It breaks down the number of trucks necessary to meet the delivery
needs for confirmed, weather permitting, and will call orders, and displays these in a
graphical format.
The Truck Demand Graph is used to determine truck requirements and when to take new
orders (if dynamic scheduling is not being used). You can specify the plant(s), order type(s)
and shipment date on which you want to report.
The Tracking and Scheduling screen provides a real-time demand graph. If you have a
license for Tracking and Scheduling, you may not need the Truck Demand Graph.
COMMANDconcrete Reports
287
Truck Demand Graph Selections (SELTRKG)
Plant Loading Report
The Plant Loading report shows plant loading demand in 15-minute intervals. This
information is used to determine if the plant is overloaded. You can specify the plant(s),
order type(s), and shipment date on which you want to report.
The Plant Loading report shows the date and time that each order needs to be loaded, along
with the total load quantity for the specified date and time. It also breaks down each order
by plant, showing the required quantities from each plant for each order.
Plant Loading Report Selections (SELPLTL)
Driver Callout Report
The Driver Callout report uses the booked delivery schedules, along with start up
information from the plant and truck type files, to generate a schedule showing when
drivers need to clock in to be able meet the delivery schedule. You can specify the plant(s),
288
COMMANDconcrete Reports
order type(s), and shipment date on which you want to report. You can sort the reports by
schedule plant or schedule start time.
The Driver Callout report is used by the scheduler in the evening to call drivers for the next
day’s work. The dispatcher can also use this report in the morning to plan the first round of
deliveries. The report shows the required punch-in time to load and deliver the order on
time. It also shows the type of truck needed to deliver the order and leaves a blank for the
dispatcher to write in the driver’s name.
Driver Callout Report Selections (SELDRVC)
Dispatch Sheet Report
The Dispatch Sheet report generates a list of the remaining loads to be delivered. This
information can be used in the event of a critical system malfunction.
The Dispatch Sheet provides basic order information, including required load time, plant,
and order size. Because of its use as a backup, it is generally run several times during the day.
COMMANDconcrete Reports
289
Dispatch Sheet Selections (SELDSPS)
Dispatching Reports
Dispatching Reports provide summarized information from a specific day or days
dispatching business. COMMANDseries provides several dispatch reports. These reports
generate information regarding orders, both delivered and non-delivered, with their ticket
information, total quantities for products, complete plant production data, raw materials
needed for future business, and batch weight comparisons.
Topics in this section:
Order Report
Ticket Report
Enhanced Ticket Report
COD Recap Report
Order Recap Report
Plant Production Report
Customer Sales Recap Report
Inventory Usage Report
Product Sales/Usage Report
Raw Materials Requirements Report
Batching Comparison Report
Batch Info Report
Order Audit Log Report
290
COMMANDconcrete Reports
Order Report
The Order Report provides three report types, each showing various levels of information
about orders. Each level of information builds upon the previous one, as described below:
•
•
•
No detail - Produces a one-line listing of orders, showing order date, order code,
customer and project codes, and delivery address.
Minimum detail - Produces a listing that includes pricing information, taxing
information, and various other information related to the order.
Full detail - Includes all information shown above, plus extra product information for
the order.
The Order report is a one-line scheduling report, showing comprehensive delivery
information for each order for a particular day.
The Order Report Summary option displays item information in the same format as the
Detail option. Select Summary with Product Detail to view information in this
format.
Ticket Report
The Ticket Report produces a listing of tickets generated. It is a single-line report that
shows basic information about each ticket. The report can be sorted by ticket code, order
code, or a list of other selections (e.g., order date, ticket code, hauler code, etc.).
The Ticket Report displays a specific day’s activity relating to a certain customer, plant, or
truck. Canceled tickets are marked with a dash (-), and a plus (+) represents a missing ticket
number. An asterisk (*) beside the product indicates that the value does not effect inventory
quantity. The Ticket Report can also be printed with weights.
COMMANDconcrete Reports
291
Ticket Report Selections (SELTICK)
Enhanced Ticket Report
The Enhanced Ticket Report prints a list of all tickets that are actually produced for the
day or date range you select. This report gives you the ability to produce ticket reports based
on your individual requirements.
292
COMMANDconcrete Reports
Enhanced Ticket Report (SELENTK) - COMMANDconcrete
Enhanced Ticket Report (SELENTK) - COMMANDaggregate
COMMANDconcrete Reports
293
Standard report functionality applies to both the Concrete and Aggregate versions of this
report. In addition, full form and field-level security is available for this report.
•
•
•
•
•
•
•
•
Detail in the Document Format field to choose from a list of all Ticket Print and
Ticket Data In/Out document format types. This field is required.
If the report is run from Aggregate, you can select tickets based on a range of Scale
Numbers; if the report is run from Concrete, you can select tickets based on a range of
Driver Codes.
If you select tickets based on a range of Strength Codes in Concrete, the Strength
Code value will be taken from STRGTH_CODE.ORDL and STRGTH_VALUE.ORDL.
All user-defined order types are available for selection when you detail in the Order
Types field.
Select Include Page Break for Each Ticket to print each ticket record on a separate
page.
The report page header will be the same as the header for the existing Ticket Report.
There is no separator (such as a horizontal line) after each ticket; if you wish to have
one set up, it must be included in the selected Document Format.
The report footer will be the same as the footer for the existing Ticket Report and will
display summary and quantity information for the number of records selected.
Document Tags
The following calculation document tags have been created for Ticket Print and Ticket Data
In/Out to enable printing of batch-related information, similar to what is seem on batch
reports.
•
•
•
•
•
•
•
•
•
•
•
•
•
•
•
•
294
WGTDI0 - Difference of Actual and Target Weights
WTDFP0 - % Difference of Actual and target Weights
THEWA0 - Theoretical Water Content
FRWPT0 - Free Water per Meter
TOTAG0 - Total Water in Aggregate
DOSWA0 - Total Dosed Water
AMRLW0 - Amended Real Water
TOTAW0 - Total Actual Weight Being Batched
ACTPM0 - Total Actual Weight per m3 Being Batched
TOBTW0 - Total Target Weight Being Batched
BUTRP0 - Total Target Weight per m3 Being Batched
TOACE0 - Total Actual Cement
TOTCE0 - Total Theoretical Cement
DIFCE0 - Difference between Target and Actual Cement
VARCE0 - Theoretical and Actual Variance
TOTCE1 - Total Theoretical Cement
COMMANDconcrete Reports
•
•
•
•
•
•
•
•
•
•
TCTCE1 - Total Theoretical Cementitious Material
•
•
•
•
•
•
•
•
•
•
•
•
•
•
•
•
VARCE1 - Variance for above
TETCE1 - Total of Theoretical Cement and Total Theoretical Cementitious Material
TOACE1 - Total Actual Cement
TCACE1 - Total Actual Cementitious Material
TEACE1 - Total Actual Cement and total Actual Cementitious Material
DIFCC1 - Difference in Theoretical and Actual Cement only
VARCC1 - Variance for above
DIFCT1 - Difference in Theoretical and Actual Cementitious Material only
VARCT1 - Variance for above
DIFCE1 - Difference in Theoretical and Actual Total Cement and Cementitious
Material
DOSWDD - Total Theoretical Water.
DIFWDD - Difference in Total Theoretical Water and Actual Water
VARWDD - Variance in Total Theoretical Water and Actual Water
DOSWTT - Total Water only without the Water on Board
DOSWRT - Total Recycling Water only
TARAGG - Total Target Aggregate
ACTAGG - Total Actual Aggregate
DIFAGG - Difference in Actual and Target Aggregate
VARAGG - Variance of Actual from Target Aggregate.
DIFWCR - Difference in Actual and Theoretical Water Cement
VARWCR - Variance for above
IFPM1 - Difference in Total Actual Weight and Theoretical Weight per unit Mix Design
VARPM1 - Variance for above
KVALUE - Total K-Value
TOTWA0 - Total water in aggregates per cycle
COD Recap Report
The COD Recap report provides a means of reconciling cash, checks, and credit slips
collected during the day. The report lists COD sales, sorted by multiple parameters.
The report uses payment forms to differentiate different types of COD entries. Reporting
options will be restricted to whatever payment forms are configured in your system.
To run a COD Recap report:
1.
Open the COD Recap Selections screen {Dispatch > Dispatching Reports > COD
Recap Report}.
COMMANDconcrete Reports
295
COD Recap Report Selections (SELCODR)
2.
3.
4.
5.
6.
7.
8.
9.
Enter a Report Name if you want to save this specific configuration for repeated use.
(You will also need to select the Save Settings on Accept checkbox.)
Select a Report Type. The options are
Summary (by Order)
Detail (by Ticket)
Enter the Report Sequence. You can set primary, secondary, and tertiary sort keys. In
addition, you can force a page break between sort keys by selecting the checkbox.
Select a Product Line.
Enter an Order Date or date range.
Enter a Shipping Plant or Shipping Plant range.
Enter a Customer Code or Customer Code range.
The default selection for Payment Form is All. Should you need to adjust this setting,
select the Detail button, to the left of the field. A selection box appears.
Select any combination of Payment forms.Select the desired payment forms and accept the screen
to return to the main selections screen.
10. If you wish to save the configuration for later use, select the Save Settings on Accept
flag. You must also have entered a Report Name at the top of the screen.
11. Accept the screen to generate the report.
296
COMMANDconcrete Reports
Order Recap Report
The Order Recap report is used to report orders that have been entered in the system. This
report shows which ticket was given to particular customers, as well as who delivered the
order. You can report on orders and sort them by order code, project code, customer code or
plant code. You can also select from an additional list of sort selections, such as order date,
order status, etc.
The Order Recap report is used by the Dispatch Manager and/or Billing Clerk to analyze a
day’s business. This report generates a list of all the orders that have tickets printed on them
for a specific date. Use the sequence function of this report to show relevant information,
such as deleted/non-delivered orders, which indicates prohibitive weather or job-site,
delivery, or availability problems.
To ensure that FOB orders that get ticketed to a truck are still reported as FOB orders, the
Order Recap Report determines whether an order is delivered or FOB Reports using the
following rules:
•
•
•
•
•
•
Delivered: The delivery method is not blank and the delivery type is “delivered.”
FOB: The delivery method is not blank and the delivery type is “FOB.”
FOB: The delivery method is not blank and the delivery type is “delivered/FOB” AND
the truck code is blank .
Delivered: The delivery method is not blank and the delivery type is “delivered/FOB”
AND the truck code is not blank.
FOB: The delivery method is blank and the truck code is blank.
Delivered: The delivery method is blank and the truck code is not blank.
Order Recap Report Selections (SELRCAP)
COMMANDconcrete Reports
297
Plant Production Report
The Plant Production report is used to show the volume of weighed product sold for each
plant. This report can be sorted by plant and hour. A table will be generated, showing the
total weighed product quantities to be produced at each plant, each hour.
Plant Production Report (SELPLTP)
Customer Sales Recap Report
The Customer Sales Recap report retrieves data from daily order and ticket records. It
provides a summary of the total quantity shipped for the selected customers, projects, items,
and shipping plants for the specified date range.
Inventory Usage Report
The Inventory Usage report shows the inventory items used at each location, according to
the selection criteria. It shows how much of the item was used, the ticket code and
inventory levels, and a total for each location. This report is a very useful way of getting an
overview of inventory.
298
COMMANDconcrete Reports
Inventory Usage Report Selections (SELIUSG)
Product Sales/Usage Report
The Product Sales/Usage Report provides information on the volume of weighed product,
associated, and extra products sold and the amount of aggregate used to make the products.
The report includes a Mix Product Sales section, which shows a number of totals. One
useful figure shown in this section of the report is the returned concrete figure. This is a
combination of the dumped and reused concrete.
Product Sales/Usage Report Selections (SELPSLS)
Raw Materials Requirements Report
Use the Raw Materials Requirements Report to determine the raw material needed for
future production. The report shows data on associated products, constituent products, and
extra products for each plant, as well as the average material consumption.
You can generate this report to include a desired range of shipment dates, shipment plants,
and companies. In addition, you can print the report with hourly detail, which illustrates the
amount of each product that must be produced at each plant to fill the orders for the day(s)
on the report.
Raw Materials Requirements Report (SELMATR)
COMMANDconcrete Reports
299
Batching Comparison Report
The Batching Comparison report shows the COMMANDconcrete target batch quantity,
the batching unit’s actual quantity, and if an Eagle unit is being used, the Eagle’s target
quantity. The report also displays the variance of these quantities. The Batching
Comparison report is used for QC purposes as well as for the projection of raw material
requirements.
This report will only provide useful data if you have a two-way batch interface, which
allows individual ticket weights to be uploaded to COMMANDseries. If a two-way
interface is not present, the report will only show target weights based on mix design.
The report includes a summary level at the bottom that lists the constituent materials and
summarizes the actual and target weights used for each product used in the selected time
period. The summary level is generated when the report has been requested with only the
plant code and date ranges selected as input parameters. Deviations in the batched weights
compared to the actual weights are shown in the relevant unit of measure and as a
percentage of the target weight. In addition to this, the average actual material consumption
for the batches selected in the report is also now calculated and displayed.
When the The Include Removed Tickets checkbox is selected, removed tickets will be
displayed on the associated report with a minus sign ( - ) next to them. The Remove Reason
Code and its description will display as well. Additionally, the total volume will display after
each ticket detail under both the Target and Actual columns.
Batching Comparison Report (SELBCMP)
Batch Info Report
The Batch Info Report is used to present data imported from the batching system. This can
be printed at the time of batching to present to the customer with the ticket. It shows the
customer a technical specification for the actual quantities they are receiving. This is a very
helpful tool to ensure consistent quality concrete for the customer.
300
COMMANDconcrete Reports
Batch Report Selections (SELBATR)
When the Batch report is run for multiple, batches/loads, the averages and sum totals of the
Measurement fields will be displayed in the following fields in a new Measurement section:
• Total Mixing Time (average and sum)
• Mixer Time (average and sum)
• Actual Power Consumption (average and sum)
• Concrete Temp (average only)
• Ambient Temp (average only)
In each case, averages will reflect the sum divided by the number of loads. Each average will
be rounded up to the nearest whole number.
When no OLPD record is present, the system will use the ILOC record for Recycled Water.
For solid material spec gravity, the system will use CNF2 if no ILOC or OLPD record is
present.
Order Audit Log Report
The Order Audit Log report is used to view response data from customized prompts set up
on the Configuration screen {Files > General Information > Configuration}. The
prompts appear upon acceptance of an order.
The Order Audit Log report shows user responses to customized order acceptance prompts.
The information can be sorted by order date, order code, customer code and/or shipping
plant.
Time Analysis
The Time Analysis menu {Dispatch > Time Analysis} has a number of options that can be
used to generate reports that give information on the various timings recorded in the
system.
Topics in this section:
Driver Times and Truck Times
COMMANDconcrete Reports
301
Order Snapshot Report
On Time Delivery Report
Time Analysis Reports
Missing Times Report
Overtime Report
Driver Times and Truck Times
The Driver Times and Truck Times screens are used primarily for editing missing Punch In
and Punch Out times for drivers and trucks. A good example of when you might need to
edit a time is when an aggregate tractor trailer with mobile signaling breaks down and the
driver has to switch over to a rental tractor which does not have mobile signaling to pull his
trailer to the job and finish out his day. In this case, the driver would have valid times up to
the point where he broke down, and no times showing after that event. You can then enter
these missing times in COMMANDseries.
Edit Driver Times (EDTDRVT)
Edit Truck Times (EDTTRKT)
Order Snapshot Report
The Order Snapshot report combines the easy to read timeline of the Graphic Analysis
report with the detailed analysis of the Order Analysis report. It is generally run only to
review a specific order or group of orders and can show timings such as the time between
loads. You can use this report to investigate customer complaints.
302
COMMANDconcrete Reports
Order Snapshot Report Selections (SELOSNP)
On Time Delivery Report
The On Time Delivery report can be run for a single day or range of days and shows the
number and percentage of tickets that were on time. Tickets with missing or invalid times
are shown separately so that they don’t skew the results.
The On Time Delivery report analyzes delivery records. You specify acceptable margins for
error on delivery times, and the system calculates the percentage of orders that fall with
those boundaries. Because frequently there are small problems with the first delivery at a
site, the report provides one range for first loads and a second range for all subsequent loads.
When orders involve multiple plants, they appear in printed reports only under the first
relevant plant. The order will not be printed under each of the involved plants.
On Time Delivery Report Selections (SELONTM)
Time Analysis Reports
Time Analysis Reports provide valuable management information on delivery efficiency for
orders, trucks, drivers, customers, and projects {Dispatch > Time Analysis > Time
Analysis Reports}.
COMMANDconcrete Reports
303
Time Analysis Report Selections (SELTIMA)
Time analysis reports are only useful if the recorded ticket times are accurate. Screens for
editing ticket, driver, and truck times are available to allow final editing of the times before
reports are printed {Dispatch > Time Analysis > Ticket/Driver/Truck Times}.
For each checkbox marked on the selection screen, a separate report page is printed.
Order Analysis Report
The Order Analysis report is used to analyze the level of service provided to customers
and to examine the level of performance for filling orders. Print it daily, after status times
have been edited. The report shows a table of ticket times broken down by category, along
with the quantity of delivered product per hour.
Plant Analysis Report
The Plant Analysis report gives information on ticket activity at the plant specified
including delivered quantity and current truck status for each ticket.
Driver Analysis Report
The Driver Analysis report analyzes each driver based on the time they spend in each
delivery status, calculating an efficiency rating based on productive time/clock time. You can
see the total time spent between each delivery status for drivers, their break time, as well as
the total clock time. Analyze every driver who was on the clock by leaving the Driver Code
field blank, or analyze individual drivers’ time by entering that driver’s code into the Driver
Code field.
304
COMMANDconcrete Reports
Select the Driver/Truck Working Past Midnight checkbox to display all drivers and
trucks that are working past midnight on the Missing Times Report. This field will only
display if Driver Analysis is the only report selected.
Select Show Expanded Startup/Shutdown if your system has Optimization and you
wish to get additional KPI data.
Summary Analysis Report
The Summary Analysis report analyzes the delivery activity of one or more plants,
specifying the number of loads, trucks, and loads per truck as well as the delivered quantity,
average load order quantity, and quantity per truck.
Graphic Analysis Report
The Graphic Analysis report presents a timeline of each ticket delivery. Just a quick glance
at an order can reveal whether or not the report was delivered in a timely manner.
Customer Analysis Report
The Customer Analysis report shows customer activity based on specifications defined on
the Time Analysis Report Selections screen. This report can help determine if problems
in delivery are being caused by a driver or a customer.
Truck Analysis Report
The Truck Analysis report is similar to the Driver Analysis Report, save that it measures
the efficiency of individual trucks. Companies that move drivers from truck to truck may
need to use both Driver and Truck Analysis Reports to get an accurate picture of delivery
cycles.
Missing Times Report
Status times for all tickets are stored in the system in most cases; however, if problems arise
and the driver or dispatcher has to manually update the status, errors can be made. The
Missing Times report identifies tickets with missing or unusual times. Unusual times are
defined by the values entered in the Time Tolerance fields on the selection screen.
When the Calculate Missing Times checkbox is checked, the system calculate
approximate missing time values based on existing times and the load schedule. When the
Only Tickets with Missing, Invalid or Out of Tolerance Times checkbox is checked,
only these tickets will appear on the report.
COMMANDconcrete Reports
305
Missing Times Report Selections (SELMIST)
Overtime Report
The Overtime report shows the overtime for each driver for a particular day or range of
days, as well as the total overtime hours. The report can be ordered by the hours left before
overtime or the driver code and include daily, weekly, or rolling time left before overtime
starts.
Overtime Report Selections (SELOVTM)
The report displays Concrete orders when run from COMMANDconcrete, and Aggregate
orders when run from COMMANDaggregate.
When run from COMMANDconcrete, the order of the time statuses is:
•
•
•
•
•
•
•
•
306
Printed
Load
End Load
On Job
Unload
End Unload
Wash
To Plant
COMMANDconcrete Reports
•
At Plant
When run from COMMANDaggregate, the order of the time statuses will be:
•
•
•
•
•
•
•
•
•
Load
End Load
Printed
On Job
Unload
End Unload
Wash
To Plant
At Plant
The following options are available for the Report Sequence:
•
•
•
Source of Status Update
User Name of Status Update
Tickets with Multiple Status Updates for a Single Time Status
You can further limit the report by opting to have only a range of time statuses selected in
the Time Status fields.
Payment Option Reports
The Payment Options menu {Dispatch > Payment Options > Payment Reports} has a
number of options that can be used to generate reports that give information on payments,
tickets and receipts.
Topics in this section:
Reconciliation Report
Uncollected Tickets Report
Missing Times Report
Reconciliation Report
The Reconciliation Report lets users select a range of plants and displays information on
reconciled records. This is closely linked with the Cash Reconciliation {Dispatch >
Payment Options > Cash Reconciliation} screen, where payments can be reconciled.
Information is displayed for each plant, sorted by plant code. The exception to this is when
the Report Sequence is set to Bank Agent. In this case, information is displayed for each
bank agent.
COMMANDconcrete Reports
307
Reconciliation Report Selections (SELCREC)
Uncollected Tickets Report
The Uncollected Tickets Report lets users select a range of plants and displays information
on uncollected tickets. An uncollected ticket is defined as any ticket where the full amount
has not yet been collected. This is determined by comparing the COD Amount in the
Ticket file with the sum of the Payment Allocation files for that ticket.
This is closely linked with the Uncollected COD Tickets {Dispatch > Payment Options
> Uncollected COD Tickets} screen, which displays similar information.
Uncollected Tickets Report Selections (SELUNTK)
Unallocated Receipts Report
The Unallocated Receipts Report lets users select a range of dates, plants, and customers
and displays unallocated receipt information for each plant. Unallocated receipts are defined
as those that are not fully allocated and not removed from the system.
This is closely linked with the Allocate Payments to Tickets {Dispatch > Payment
Options > Allocate Receipts} screen, which allows payments to be allocated to tickets and
receipts.
308
COMMANDconcrete Reports
Unallocated Receipts Report Selections (SELUNRC)
COMMANDconcrete Reports
309
Application Management
Each COMMANDseries module has an Applications Management menu, located in the
Manage menu. This menu contains options that will assist you in maintaining your system.
The Application Management menu provides access to application-specific management
functions used by the COMMANDconcrete and COMMANDaggregate applications.
They are performed on an as needed or possibly periodic basis. The forms accessed from
the Application Management menu include:
•
•
•
•
•
•
•
•
•
•
•
Calculate a Price Change
Mix Design Interface - QA
Initialize TESYS Data
Batch Interface Queued Tickets
Batch Code Generator
Edit Project Expiration Dates
Lien Legacy Invoice Manager
Realign Accounts and Cost Centers
Error Log Report
Update Zone Salesman
Update Inactive Customers
There are multiple purging options in the system, some of which are found in thie menu.
All purging options are discussed in a separate section.
Calculate a Price Change
The Calculate Price Change function lets the user issue a general price increase for all
products and for project specific products, without having to edit individual products and
projects. The price change can be either an increase or decrease in the existing price. An
effective date is registered so that current prices stay in effect until the effective date is
reached. Also, the effective date allows the price change to be entered and verified in
advance of the effective date.
In addition, the price change can be targeted at specific projects. Products affected by the
price change can be selected individually, by product category, or by product type.
The system provides a great deal of flexibility. You can make a change as broad as raising the
price of all concrete mixes by 5%, or as narrow as changing the price of all aggregate items
from a specific plant for a specific project.
All items in the item master file (IMST) are automatically subject to having their prices
changed via this routine. In order for a project item to be subject to this routine, the product
must have the Allow Automatic Price Adjustment checkbox selected. This field is
located on the Products tab in the Project editor. If, for example, the checkbox is not active
310
Application Management
in a given project, then the Calculate Price Change routine will not change the price of any
product on the project, even if that specific project is targeted.
There is also an Allow Automatic Price Adjustment flag on the Pricing tab of the
Customers and Projects screens. This flag establishes the default flag setting for all new
items added to the customer/project – changing it does not affect existing products in the
customer or project record. (Please consult the Setting Up the System manual for
additional information.)
To calculate a price change:
1.
Go to the Calculate Price Change screen {Manage > Application Management >
Calculate Price Change}.
2.
Mark the Change Prices In Items , and/or Master Project Products checkboxes to
indicate where price changes are being calculated.
When Master Project Products is selected, the Type Price (set on the Projects >
Products tab) will always display on the report. The Material Price will display only if
the Type Price on the Projects > Products tab is either Fixed Material Price or Fixed
Cartage Delivered Price, and if the Material Price is not the same as the Delivered
Price.
Enter the Effective Date. For the calendar shortcut, click on the box to the left of the
field. Double-click on the date the price change will be effective.
Select a method to Change Price By in the associated field. Prices can be adjusted by a
set amount or by a percentage.
Enter ranges for Customer Code, Project Code, Location, Plant Code, as needed.
The availability of these fields is dependent upon the Change Prices In selections.
Select what to Change Prices For. The options are:
Specific
Specific
Specific Type
Select the Items button to display a price change selection screen. The screen that
appears reflects the Change Prices For option:
3.
4.
5.
6.
7.
Calculate Price Change for Specific Items (SELPCHG1)
Application Management
311
Calculate Price Change for Specific Item Categories
Calculate Price Change for Specific Item Types (SELPCHG3)
Each screen lets the user enter a price change based on an amount or a percentage,
based on the Change Price By option on the main screen.
All screens except the Specific Type screen allow entry of multiple prices changes
through use of the Add Occurrence command.
8. Enter the percentage or amount by which you want the price changed. Use negative
values to reduce prices.
Caution: If you are entering an amount, do not enter a new price! If you do, that
amount will be added to the current price of the item.
9. Accept the Calculate Price Change screen to calculate the price change
information. You will be prompted for a Print Model.
10. Once the print model is selected, the system will generate a report showing the effect of
the entered price changes. At this point, no prices have been changed. This
functionality allows the user to enter prices changes and review the results before
making a final decision to apply the changes.
11. When the report has finished printing (or, if reviewing the report on screen, when the
report window is closed), a confirmation box will display:
Update applies the price changes.
Cancel does not apply the price changes.
Many users will print the price change report and then cancel the process. They then sit
down and review the report, making sure that the calculated price changes are acceptable. If
they decide to apply the changes, the information can be re-entered and the prices updated.
312
Application Management
Mix Design Interface - QA
The Mix Design Interface screen lets the user send mix product constituent information
to a batching system. After the selection parameters are entered, the user is allowed to edit
the list of products to be downloaded. After the user is satisfied with the products to be
downloaded, accept the screen and the mix product information is downloaded to the
batching system.
To use the Mix Design Interface:
1.
Go to the Mix Design Interface screen {Manage > Application Management > Mix
Design Interface}.
2.
Select a Mix Download Method from the drop-down list. Options are:
Download from Item Master
Download from Order
Upload to Orders
Select an Output to option from the drop-down list. The options are:
Batch Panel Output
File Output
This field will not be available if the selected Mix Download Method is Upload to
Orders.
If File Output is selected, enter an Output File and select a Document Format
Group.
Enter a range of values for Item Code, Plant Code, and Item Category.
In the Mixes with Constituent field, enter a constituent item code to be used when
retrieving mix items. If entered, only mix items that contain the specified constituent
item will be retrieved and sent to the batching system.
If you wish to delete all mixes from the batch panel at one or more plants, mark the
Clear Mix Files checkbox for the specific plants.
WARNING: This function is very dangerous. Selecting this checkbox instructs
the system to delete all mixes from the batching system, and they are NOT
retrievable.
Click Retrieve. This will save the products for downloading.
Accept the Mix Downloads screen to send the mix product constituent information
to the batching system or to an output file.
3.
4.
5.
6.
7.
8.
9.
Initialize TESYS Data
If you are licensed for the Inform Interface, this option will appear on your menu. The
Inform Interface connects your system with a third-party schedule optimizer. Running this
function generates an output file that the Inform Interface then loads into the optimizer.
Application Management
313
To initialize TESYS Data:
1.
Open the Initialize TESYS Data screen {Manage > Application Management >
Initialize TESYS Data}.
Initialize TESYS Date screen (DBAIINF)
2.
3.
4.
Enter the Shipment Date(s) that you want to download.
Select the inclusion checkboxes as necessary.
Accept the screen. The system will generate the download file and close the screen.
For additional information on configuring this option, consult your Inform Interface
manual.
Batch Interface Queued Tickets
If COMMANDseries has a direct interface to the batching system, it sends tickets into the
batch panel’s print queue. As this occurs, the batch panel replies with a success/fail
notification message. The Batch Interface Queued Tickets screen shows you the tickets that
have been sent to the batch panel, along with their current status.
This screen can be useful in troubleshooting batch communication problems, as it provides
direct information as to whether or not a ticket was successfully transmitted,
When weights ar returned fr mo the batch panel, they are immediately updated in
COMMANDseries; however, if a ticket is locked during the update, it is lost and not
retrieved. To resolve this issue, COMMANDseries will store the locked ticket’s weight
information ion the QUBR (Queue Batch Results) table until the weight can be updated.
Once the lock has been removed, the stored ticket weight will be updated as usual.
You can view queued ticket weights on the Batch Interfaced Queued Weights screen via
Application Management.
Batch Code Generator
While COMMANDseries allows for an unlimited number of items and mixes, some batch
panels, particularly older batch panels, have severe restrictions on the number of batch
codes that are supported. The only solution is to reassign batch codes every day, only
assigning batch codes to those mixes that will be shipped that day. In this situation, use the
Batch Code Generator to scan a given day’s deliveries, determine how many unique
mixes are being shipped, and then assign a unique batch code that can then be entered in the
batch computer.
314
Application Management
The routine generates a standard COMMANDseries report. The codes listed on the report
must be entered into the batch computer manually.
To generate batch codes for a day’s deliveries:
1.
2.
3.
4.
Go to the Batch Code Generator screen {Manage > Application Management >
Batch Code Generator}.
Enter the Order Date for which batch codes are to be generated.
Enter an Batch number that reflects the maximum number of batch codes to be
generated.
Accept the screen to generate the report.
Edit Project Expiration Dates
The Purge Expired Projects routine uses the Project Expiration Date to identify outdated
projects. However, in many cases, expiration dates are not entered when a project is created.
The Edit Project Expiration Dates screen lets you edit expiration dates for multiple
projects and specific customers. This function provides quick expiration date changes to
multiple projects, as opposed to using the Project editor, which retrieves one project at a
time.
To edit a project expiration date:
1.
2.
3.
4.
Go to the Edit Project Expiration Dates screen {Manage > Application
Management > Edit Project Expiration Dates}.
In the Customer Code field, enter the code of the customer whose project expiration
date you wish to edit. When you <Tab> out of the field, all projects related to that
customer will display on the screen.
Enter a new Expiration Date for each project as needed. If the field is left blank, the
project has no expiration date and is good indefinitely.
Accept the Edit Project Expiration Dates screen to save the new expiration date(s).
Lien Legacy Invoice Manager
COMMANDlien is often bought or installed after other COMMANDseries applications
have been up and running for some time. These users need a means of assigning existing
invoices to lien locations. The Lien Legacy Invoice Manager provides a flexible means
for doing this.
Based on the system configuration and on your selections, the Lien Legacy Invoice
Manager creates new lien locations and assigns the existing invoices to those locations.
To assign existing invoices to lien locations:
1.
2.
Open the Lien Legacy Invoice Manager {Manage > Application Management >
Lien Legacy Invoice Manager}.
Enter the Transaction Date(s) that you wish to update.
Application Management
315
3.
4.
5.
6.
7.
8.
9.
Select the Invoice Types you are interested in. You may select all invoices, paid
invoices, or open invoices.
Using the Project Types field, you may select all invoices, or only those invoices that
are in a project.
The Project Actions field lets you specify if the lien location should be made a project
default.
Use Lien Location Status to specify the lien status of the newly created locations. If
no status is specified, the status will default to Open.
Use Preliminary Flag to specify whether or not these locations have already gone
through the preliminary notice stage.
If you are specifying that the locations in question have already been filed for a
preliminary notice, then you can use the Prelien Date field to specify when these
notices were issued.
Press Retrieve. A list of all invoices that meet your criteria will be displayed.
Lien Legacy Invoice Manager (DBALNLI)
10. Accept the screen or press <F2> to create the new lien locations.
Realign Accounts and Cost Centers
This option is used to change existing company, cost center, and account codes. Once the
screen containing the new codes is accepted, the system will modify the detail and summary
information to reflect the changes.
The Realign Accounts and Cost Centers function changes data in many files. It must be
run only when no other users are logged in and when all invoicing and G/L postings have
been completed. Before using this screen, all possible batches must be posted. Ideally, it is
316
Application Management
best to make any necessary code changes at the beginning of the fiscal year or at least at the
beginning of a month.
Be aware that any changes to the length of the company codes, cost centers, accounts, and/
or sub-accounts will be reflected in general ledger data across COMMANDseries
applications. If third-party systems are being used, be sure that the appropriate changes are
made to make those systems conform to the new codes. In addition, G/L Data Out
document formats will need to be updated with the new field lengths.
To realign accounts and cost centers:
1.
Go to the Realign Accounts and Cost Centers screen {Manage > Application
Management > Realign Accounts and Cost Centers}.
Realign Accounts and Cost Centers (DBAREAL)
2.
3.
4.
5.
6.
Enter the New Company Code Length for the desired length of the company codes
used in the system. Because the company code is also the first portion of the cost center
code, the New Cost Center Length field will recalculate its value when you tab out
of this field.
If you wish to adjust the length of the cost center codes, enter it in the New Cost
Center Length field for the desired length of the account codes used in the system.
Enter the New Account Code Length and New Sub-Account Code Length for
the length of the account and sub-account codes used in the system.
Enter a New Company Code to replace an existing company code. By default, the
system shows the existing company code.
Enter a New Cost Center Code to replace an existing cost center code. By default, the
system shows the existing cost center code. Use the scroll bar to page through the list.
Application Management
317
7.
8.
Enter a New Account Code to replace an existing account code. By default, the
system shows the existing account code. Use the scroll bar to page through the list.
Accept the Realign Accounts and Cost Centers screen.
Error Log Report
The Error Log Report allows you to create a report that displays the details of the log file
for a particular import.
To generate an error log report:
1.
Go to the Error Log Selections screen {Manage > Application Management > Error
Log Report}.
Error Log Selections (SELLOGT))
2.
3.
4.
5.
6.
7.
Enter a date to Transaction Date.
Select an option from the Process Type drop-down list. This list is populated with the
names of files that have been imported.
Enter the User Name of the person that performed the import. On an Automated
Data In/Out this might be ‘Auto Config’.
Enter the Batch Number of the import that you want to detail in the report.
To Report Exceptions Only, mark the checkbox.
Accept the Error Log Selections screen.
Update Zone Salesman
Under each Item Group set up in Configuration, it is possible to define a Zone Salesman.
The Update Zone Salesman screen lets you quickly update a number of zone salesman
records. A salesman can be assigned to just one or a range of both item groups and zones at
once. It is also possible to assign one salesman to all the zone/item group combinations that
were assigned to another.
This can be useful when a salesman leaves, or the company undergoes a restructure.
To update a zone salesman:
1.
318
Go to the Update Zone Salesman screen {Manage > Application Management >
Update Zone Salesman}.
Application Management
Update Zone Salesman (SELZNSL))
2.
3.
4.
5.
Press the detail button on the Item Group field to select an item group, or select the
All button.
Enter a Zone Code or range of zone codes.
In the To Salesman field, enter the employee code of the salesman that will now be
defined as the salesman for the item group(s) and zone(s) stated.
Once a To Salesman has been entered, the From Salesman field becomes active. It is
not necessary to enter anything in this field. For example, if you want to replace the
salesman entered for all item groups in a range of zones, you do not need to enter
anything. However, if you want to replace a particular salesman with another, enter the
employee code of that salesman in this field.
Update Inactive Customers
This form allows you to batch update your customers to an Inactive or an Active status
based on their associated Accounting Category and the number of Days Since Last
Order/Ticket for each customer. All orders and tickets for those customers will display
once you have tabbed out of the header fields.
Update Inactive Customers (DBAIACU)
Application Management
319
The Mark As Inactive flag is checked by default for all Customers on this screen, but can
be unchecked for any customer who should not be set to an Inactive status. Press the
Update button to save any changes you make on this screen.
320
Application Management
Application Management
321
Materials Manager
The Materials Manager offers a number of features that make it easier for concrete
companies to maintain and manage mix designs. Companies often have mix designs that
number in the hundreds, even thousands–such a large number of mixes can be very
difficult to manage.
The Materials Manager is not intended as a mix design tool. Mix designs will continue to
be developed by engineers and materials specialists. The Materials Manager provides an
efficient means of turning that basic mix design into a salable item within
COMMANDseries.
Key Features
•
•
•
•
Yield Management - Initial mix designs are generally estimates. After field testing, a
mix may need modifications. The Materials Manager will help you convert those ratios
into a mix design while maintaining proper yield.
Constituent Replacement or Blending - Change material sources, blend materials,
or replace a portion of a constituent with another while maintaining a specific yield.
Constituent Quantity Altering - Change the quantity of a constituent up or down
by weight or percentage (volume is not maintained).
Generic Mix Designs - Different plants sometimes have different inventory sources,
but still need to use the same mix design. The Materials Manager allows you to specify
one constituent for one plant, and a different constituent–a different type of sand, for
example–at another plant.
The Materials Manager is comprised of several main screens:
•
•
The Materials Manager screen lets you quickly sort through the Item Master file, using
a number of different search strings.
The Mix Design screen lets you proportion a current mix, ensuring that the target yield
is achieved. This same screen also allows you to make substitutions of constituents,
and to create aggregate blends.
Topics in this section:
Material Manager Setup
Material Manager Screen
Mix Design
Material Manager Setup
There are three major issues to address when setting up the Materials Manager:
322
Materials Manager
•
•
•
•
System License
Lab Location
Sort Codes
Item Setup
System License
The system license must contain Material Manager (MM). If your license does not contain
Material Manager, contact your Command Alkon sales representative.
Lab Location
A System Lab location must be specified on the Material Manager Configuration screen
{Files > General > Configuration > Distribution > Material Manager}. The system lab
can either be a dummy plant created solely for that purpose, or can be an existing plant. Mix
designs are calulated based on the lab’s available constituents; that design then serves as a
baseline to be used at the other plants.
Sort Codes
The primary Material Manager screen provides multiple options for sorting and filtering, it
is always possible that you will have need an additional sort option. Such a situation can
occur when two companies merge, because you will have mixes generated with two sets of
naming conventions.
COMMANDseries allows you to create an additional set of sort codes for your mixes. You
can have as many codes as you need, but they should all be based on a single measurement.
For instance, you might create a set of codes to allows you to sort based on the percentage of
air in the mix. So you might have sort codes of 5%, 5.5%, 6%, etc.
There are two steps in implementing this additional sort code:
•
•
Create the Sort Codes
Assign a Sort Code to each mix
To create a set of Sort Codes:
1.
Open the Sort Code screen. {File > Item Information > Materials Manager > Sort
Codes}
Material Manager Sort Code screen (EDTMMSC)
2.
3.
Enter a Sort Code.
Enter a Description for the Sort Code.
Materials Manager
323
4.
5.
Enter a Short code for the Sort Code. This code will be used for reports.
Press Add Occurrence to enter an additional code, or accept the screen.
Once the sort codes have been entered, they can be assigned to the individual mixes. This is
done by retrieving each mix and entering the sort code on the Items-Mix tab:
324
Materials Manager
Once that is done, you can use the Mix Sort Code as a filtering option on the main Material
Manager screen:
Item Setup
Items, both constituents and mixes, must be properly configured.
Constituents
Constituents must be entered into the system correctly for the Materials Manager to
operate properly. The most important field for constituents is the Specific Gravity field;
the system uses that value to convert the weight of a constituent into an equivalent volume,
and vice versa, so that the yield of the mix may be accurately calculated.
In addition, the Item Type and Item Category fields can be used for sorting.
Mixes
Material Manager-related fields for mixes are located on multiple tabs.
•
•
Main
A mix cannot be loaded into the Material Manager unless the Allow Constituent
Substitution box is set to True (checked).
Items-Mix tab.
Strength Class
Materials Manager
325
Water/Cement Ratio
Aggregate Size
Slump
Sort Code (see below)
These fields can be used as search parameters within the Materials Manager to quickly
find a specific mix or a group of mixes. All of this information needs to be entered
correctly to ensure that the Materials Manager will function properly. For addition
information on entering items into the system, please see the Setting up the System
manual.
Material Manager Screen
The Material Manager screen is used to search for mixes and their constituents. {Files >
Item Information > Materials Manager > Materials Manager}
Material Manager screen (EDTMTMG)
Filtering Items
The fields at the top of the screen act as search filters for the various mixes in the system;
the results of the search are displayed in the list at the bottom. By default, all plants to which
you have permissions default into the Plant Code field. This list can be altered as needed.
326
Materials Manager
Use a dash to indicate a plant range and commas to delineate single plants (for example, 1,
3-6, 8).
Once the search parameters have been entered, press the Get Data button to retrieve the
items that match the criteria.
Mixes
The Mixes tab lists the mixes available according to the filter parameter settings in the fields
at the top of the screen.
Mix tab (EDTMTMG1)
Use this tab to select the appropriate mix for editing. If the list is too long, you can add
additional filters and press the Get Data button again.
The Notes column indicates if the mix has an item-level note attached. A black note
indicates no note. Double-clicking the note will open a text box in which a note can be
viewed (if present), edited, or created.
The Selected flag is used to flag a mix as subject to an Item Replacement. If the box is
unchecked, that mix will not be affected by a replacement.
The Add Occurrence button provides ready access to the Item editor. Double-clicking on
any add occurrence button will open a blank Item editor–the selected item will not be
loaded into the editor.
The list can be sorted by any of the columns, simply by single-clicking on the appropriate
column header. Once you have found the specific mix you want to edit, click on the
associated line number. The selected mix will be loaded into the Mix Design screen
(discussed below).
Constituent Tabs
The other tabs on the Material Manager screen – Aggregates, Cements, Admixes, and
Waters – allow you to access the different constituents in your system. Items are assigned to
these tabs based upon their Item Type (not Item Category). The only search filter available
for the constituent tabs is the Plant code. The rest of the screen works just like the Mixes
tab.
Materials Manager
327
Aggregates tab (EDTMTMG2)
When performing item replacements, the Material Manager uses fine aggregates to make
volume adjustments as needed. The Aggregate tab allows you to specify what sand(s) is to
be used for compensation. If the Yield Adj cell for an aggregate is gray, it is a fine aggregate
(based on the item type) and can be used for volume compensation. The cell is white for a
coarse aggregate. The Yield Adj checkbox is active only for fine aggregates; it cannot be
checked for a coarse aggregate.
You can use the Notes button to record additional information about the constituent, and
you can use Add Occurrence to access the Item editor, where you can edit existing items
or create new ones.
Item Replacement
From time to time it can become necessary to modify mixes, either by adjusting the
amounts of the different constituents, or, in some cases, by completely replacing one
constituent with another. The Materials Manager gives you an efficient means of making
these changes across multiple mixes and locations.
To begin the process, enter the desired selection criteria on the Materials Manager screen,
and press Get Data. The mixes listed on the screen will be the mixes affected by the Item
Replacement routine.
Retrieved Mixes
Now, select the Item Replacement tab. The system will display an error message if you
select the Item Replacement tab before retrieving a list of mixes.
Once the Item Replacement tab is selected, two fields will become active in the top part of
the screen.
328
Materials Manager
Material Manager screen (EDTMTMG6)
•
•
The Addition/Adjustment/Replacement Options drop-down box allows you to
select the specific modification you wish to make. The available options are:
Replace a constituent with a different constituent
Replace part of a constituent by percentage
Adjust a constituent by an amount or percent
Add a constituent by an amount
Replace part of a constituent by an amount
Replace constituent with selected amount of different constituent
Remove a constituent
The basic pattern is the same for all types of replacement–after you configure and
accept the screen, the system generates a report showing the you the affects of your
proposed change. From there, you can either proceed with the substitution, or cancel
the operation.
If a replacement is confirmed and processed, the detail of the replacement are stored in
the database, and can be reviewed at a later date.
The Compensate for Volume Changes checkbox allows the system to adjust
quantities automatically when replacing one constituent with another constituent with
a different specific gravity. The default value for this field is True – It is highly unlikely
that you will ever need to uncheck this box, as doing so can result in improperly
proportioned mixes.
Materials Manager
329
Replace One Constituent with Another Constituent
This is the simplest of replacements, substituting one constituent for another. When a
location changes its supplier of certain constituents, it may be necessary to replace the
constituents.
To replace one constituent with another constituent:
1.
Select Replace a constituent with a different constituent in the Adjustment/
Replacement Option field.
2.
3.
4.
Enter the Item Code for the original constituent.
Enter the Item Code for the replacement constituent.
Accept the screen. Before the system processes the replacement, it will produce a report
for your review. Select a print model at the prompt.
Possible Print Models screen (FNDUPRT)
5.
330
Select a print model and the system will generate a report listing all of the proposed
constituent replacements.
Materials Manager
6.
After generating the report, COMMANDconcrete will prompt you for the disposition
of the proposed replacements.
Update prompt
Press Update or Cancel, as needed.
Replacing a Constituent by Percentage
If you go from stocking a single type of cement to stocking two different types of cement,
you may need to adjust your mixes to use a combination of the two cements.
To replace part of a constituent with a percentage (by volume):
1.
Select Replace part of a constituent by percentage in the Adjustment/
Replacement Options field.
2.
3.
Enter the Item Code of the original constituent.
Enter the amount (by Percent) of that constituent that you want to replace. This
percentage of material (by volume) will be removed and replaced with a like volume of
the replacement constituent. The Materials Manger will compute the quantity of new
material needed from the Gs.
4.
5.
6.
7.
Enter the Item Code for the replacement constituent.
Accept the screen.
Select a print model for the report.
Based on the report, either Update or Cancel the replacement.
Materials Manager
331
Adjust a Constituent
To adjust the amount of a constituent in the mix:
1.
Select Adjust the amount of a constituent in a mix in the Adjustment/
Replacement Options field.
2.
3.
Enter the Item Code of the constituent you want to adjust.
Enter the adjustment quantity in kg or lbs. Adjustments can be either positive or
negative; the system will consider all adjustments positive unless the minus sign is
placed in front of the adjustment amount!
Accept the screen.
Select a print model for the report.
Based on the report, either Update or Cancel the replacement.
4.
5.
6.
Add a Constituent
To add a constituent:
1.
Select Add Constituent in the Adjustment/Replacement Options field.
2.
3.
4.
Enter the Item Code of the constituent you want to add.
Accept the screen.
Select a print model for the report.
Based on the report, either Update or Cancel the replacement.
332
Materials Manager
Replace Part of a Constituent by Amount
To replace part of a constituent by amount:
1.
Select Replace part of a constituent by an amount in the Adjustment/
Replacement Options field.
2.
3.
Enter the Item Code of the original constituent.
Enter the amount (by negative quantity) of that constituent that you want to replace.
quantity of material will be removed and replaced with a like quantity of the
replacement constituent.
Enter the Item Code for the replacement constituent.
Enter the replacement amount for the new constituent (this value should be positive).
Accept the screen.
Select a print model for the report.
Based on the report, either Update or Cancel the replacement.
4.
5.
6.
7.
8.
Replace Constituent with Selected Amount of a Different Constituent
The previous replacement routines operate on a one-for-one basis–that is, a certain
percentage or amount of one material is replaced with the same percentage or amount of
another material. This option allows you to replace one material with another, allowing you
to specify the amount of the new material
To replace a constituent with a selected amount of a different constituent:
1.
Select Replace constituent with selected amount of different constituent in the
Adjustment/Replacement Options field.
Materials Manager
333
2.
3.
4.
5.
6.
7.
Enter the Item Code of the original constituent.
Enter the Item Code for the replacement constituent.
Enter the replacement Amount of the new constituent.
Accept the screen.
Select a print model for the report.
Based on the report, either Update or Cancel the replacement.
Remove a Constituent
To remove a constituent:
334
1.
Select Remove Constituent in the Adjustment/Replacement Options field.
2.
3.
4.
5.
Enter the Item Code of the constituent you want to remove.
Accept the screen.
Select a print model for the report.
Based on the report, either Update or Cancel the replacement.
Materials Manager
Mix Design
The Mix Design screen allows you to modify existing mixes in an environment that lets you
verifying the mix proportions. The screen’s functionality enables you to make sure that a
proper water/cement ratio is maintained, specify the maximum allowable water content,
and ensure that the mix will yield a full cubic yard/meter. {Files > Item Information >
Material Manager > Mix Design}
When the screen is accepted, the values are written to the Item Master files just as if the
changes had been made in the standard Items editor.
In addition, you can convert a mix design from one location to another, taking into account
different constituent availability at the various locations.
To load a mix into the Mix Design Editor:
There are two different ways of loading a mix into the Mix Design Editor:
1.
On the Mixes tab of the Material Manager screen, single click the mix’s line number.
Loading a mix from the Material Manager screen
2.
Open the Mix Design editor directly {Files > Item Information >Material Manager >
Mix Design} and either enter an existing mix or detail on the Mix Code field to select
from a list.
Either method will achieve the same result.
Materials Manager
335
Mix Design Screen Layout
Mix Design screen (EDTMDSN)
The Mix Design screen is broken down into three major areas.
Mix Design screen – Top
Mix Design screen - top (EDTMDSN)
The top area has general information about a mix – mix code, description, location, etc. The
button to the right of the Mix Code field loads the current mix into the Items editor so that
non-design information, such as pricing, can be added.
There is one important difference between the Mix Design screen and the Item Editor –
The Mix Design focuses on individual ICST records instead of the whole IMST record. So
the mix design on the screen represents a specific mix design at a single location. The
Location selector allows you to select any location at which the mix already exists; once a
new location is selected, the appropriate ICST information is displayed.
Pressing the More button calls the Batch Information screen, where batch information can
be added to the design.
336
Materials Manager
Batch Information screen (EDTBINF)
The Convert button allows you to convert a mix from one location to another.
Mix Design Screen – Middle
Mix Design screen (EDTMDSN)
The middle section is where the constituents are added and adjusted. By default,
constituents are sorted by item type–they are also color-coded by item type:
•
•
•
•
•
Blue – Water
Gray – Cement/Cementitious Material
Light Green – Coarse Aggregate
Dark Green – Fine Aggregate
Red – Admixture
If the Sort by Item Type flag at the top of the screen is deselected, the constituents will be
displayed in their order within the ICST table. This order will be used as the batch order for
the mix. Up and down arrow buttons can be used to rearrange the constituent order.
The arrow buttons will not display if the Sort by Item Type flag is enabled.
The detail button on the constituent line brings up the Materials Editor screen. This screen
allows you to edit mix and batch related information about the specific item. This screen
would most commonly be used to provide missing item information, particularly the item’s
specific gravity.
Materials Manager
337
Materials Editor screen (EDTMTLS)
Free Moisture – The moisture available beyond the surface saturated density (SSD)
amount. This moisture does not affect the mix design, but will require adjustments during
batching, either manually or with moisture sensors.
Absorption Factor (%) – This field is not currently used; functionality for this field will
be added in future releases.
If you are using COMMANDinventory, the Receipts button will bring up information
relating to the most recent material receipts for this item. That information may be useful in
determing the specific product, supplier, and/or specific gravity.
Mix Design Screen – Bottom
Mix Design screen - bottom (EDTMDSN)
The fields in the lower part of the screen allow you to check the validity of the mix as well as
provide additional information about the mix for both batchers and drivers. The live fields
are optional, and are for reference purposes only.
Min Cement Content – A value entered here will give a batcher some guidance if manual
adjustments of batch weights are necessary.
Est. Batch Water – The system will automatically calculate the water content of the mix’s
non-water constituents (based on SSD moisture content), and subtract that from the
specified amount of the water constituents. The result is the estimated amount of water that
should be added during batching
W/C Ratio – displays the ratio as calculated from the current mix design. If the initial
design has to be modified, this field can serve as a reference to ensure that changes do not
unduly affect the strength of the mix.
338
Materials Manager
Max Water – The maximum amount of water that can be in the mix without
compromising the mix’s strength. This value does not affect the calculated W/C ratio on
this screen. This value can be entered manually, or it can be calculated when a Job Water
value is entered. Caution: Setting this value greater than the Mix Water value can
compromise the mix design.
Lightweight Volume – If the mix contains an item that is so porous that it is impractical to
calculate a volume from the weight, the volume can be manually entered here. Note: When
the lightweight material is entered into the Item Master list, it will need to be given a
specific gravity of zero.
Mix Water (SSD) – displays the total amount of non-SSD water in the mix. This value is
derived from the Est. Free Moisture content of all constituents and the Est. Batch Water.
Target Yield – Enter the desired yield.
Est. Free Moisture – Enter the estimated amount of free moisture.
Design Slump – The Materials Manager screen can search for mixes based on the slump.
This field can be printed on delivery tickets.
Percent Air Volume– Enter the percentage of air to be incorporated for the mix. The
system will multiply the percentage by the Target Yield (not Yield (SSD)) to determine
the volume of air in the mix. Don’t forget to enter a value for non-air-entrained mixes, as
some air is naturally entrapped during mixing.
Flowability – This is a non-functioning field and is scheduled to be removed frmo the
form.
Job Water – The difference between Max Water and the quantity of water in the mix, used
to show the amount of water to be added on the job site. This value can be entered
manually, or it can be calculated when a Max Water value is entered.
Job Water does not represent an automatic holdback amount. Holdbacks are controlled
directly from the batch computer, and the holdback amount should be subtracted from the
Mix Water value.
In addition to the above fields, totals (by weight and volume) are provided for coarse and
fine aggregates. In addition the percentage of coarse and fine aggregate weights in the
aggregate weight total is also supplied.
Yield (SSD) – displays the yield of the current design, based on SSD (Saturated Surface
Dry) values. This field will be updated as constituents values are changed.
Using a Generic Mix
Many companies face the problem of having plants that acquire their constituent inventory
from different sources. As a result, one plant may have ¾” aggregate with a specific gravity
of 2.68, while another plant might have the same aggregate with a specific gravity of 2.74.
The Materials Manager can accommodate these situations through the use of generic mixes.
A base mix design can be entered, and then adjusted as needed at each plant.
In order to use this feature, you will need to create a dummy location and plant to act as a
lab in which to create the generic mixes. Creating the generic mix in a virtual plant prevents
the generic mix from accidentally being sold or batched. Depending on your circumstances,
Materials Manager
339
you may also need to set up generic items for use in generic mix designs. A generic mix does
not have to contain only generic items; it can be composed of a combination of specific and
generic constituents.
When creating generic constituents, make sure that they are available only at the generic
plant.
To create a generic mix:
1.
2.
3.
4.
5.
In the Mix Design screen, enter a Mix Code. This code will become the Item Code.
Enter a Description of the mix.
As soon as you <Tab> out of the Description field, a box will appear. Select your
Generic plant (in this example, “LAB”) and accept the screen.
Set up the mix design as you normally would.
Accept the screen to save the new mix design.
A generic mix can then be used as a template with which a similar mix can be created at
specific locations. Similarly, any mix that exists at one location can be copied to other
locations. The Materials Manager will adjust the new mix designs to accommodate
differences in the available constituents.
To copy a generic mix to a plant:
1.
2.
3.
In the Mix Design screen, retrieve a mix that exists in the lab plant.
If the mix already exists at multiple locations, make sure that the lab plant location is
selected in the Location scroll box.
Select the Convert button. The Convert Mix screen will display.
Convert Mix screen (EDTCNVT)
4.
5.
340
The screen will show the Convert From Location and the available Convert To
Locations (any location linked to a concrete plant). In addition, the Existing
checkbox indicates locations at which the mix already exists.
Select the locations to which you wish to copy the mix. Use the Copy To All button to
quickly select all available locations.
Accept the screen to initiate the copy. The system will validate the available constituents
at each location.
Materials Manager
If there is a problem with a constituent, such as missing information, the system will
display a warning, giving you the option to skip that location or do a direct copy from
the conversion location, using that locations’ data:
Conversion Warning
The system will also notify you if item substitutions are in place at a target location:
Substitution Warning
6.
When the conversion is complete, you will be returned to the Mix Design screen. You
can confirm that the conversion took place by confirming that all of the target locations
are now included in the Locations scroll box.
Item Substitution
The Item Substitution feature {Files > Item Information > Materials Manager > Item
Substitution} assigns a constituent at a production location as a substitution for a
constituent at the Lab plant.
Once a substitution rule is in place, if a mix design using the lab constituent is converted to
another plant, the system will automatically substitute the constituents (you will be
prompted to confirm the substitution.
It does not alter the batch weights, even if the specific gravities of the two constituents are
different. To maintain volume, use the item conversion feature.
To assign a substitute constituent for a generic one at specific plants:
1.
2.
Open the Item Substitution screen. {File > Item Information > Materials Manager >
Item Substitution}
Enter an Item Code from the lab location or detail on the field to select from a list.
Materials Manager
341
Item Substitution (EDTISUB)
3.
4.
5.
6.
7.
8.
The screen will display the System Lab Location, along with the Specific Gravity
and Moisture Percent values for the selected item at the lab location.
Enter a Location Code for which you want to enter a substitution.
Enter the Item Code that will be substituted for the generic constituent.
The specific gravity and moisture percent for the item/location will be displayed. These
are live fields, and if a value is changed, it will be written back to the Item Master when
the screen is accepted.
Use the Add Occurrence command to enter additional substitution rules.
Accept the screen.
Select a print model for the report.
Based on the report, either Update or Cancel the replacement.
To review or edit the existing substitution rules for a given lab constituent, open the Item
substitution screen and enter the constituent’s Item Code:
342
Materials Manager
existing substitution rules
Substitution rules can be added, removed, or edited using standard screen commands.
Constituent Replacement Log
Whenever a replacement is performed, the system generates a report prior to the actual
change, allowing you to review the impact of the proposed change. If the proposed change
is accepted, the details are stored to the database, providing a change history for future
review.
Log data is stored in the Material Manager Transaction Log Header (MMHD) and Material
Manager Transaction Log Detail (MMDT) tables.
Note: Changes made on the Item Substitution screen are not stored in the log.
To run a Constituent Replacement Log:
1.
Open the Constituent Replacement Log screen. {File > Item Information >
Materials Manager > Constituent Replacement Log}
Constituent Replacement Log screen (SELMTMG)
Materials Manager
343
2.
3.
4.
The Plant Code field will default to all plants to which you have privileges. Enter a
plant (or plants) as needed.
Enter a Create Date (or date range) to restrict the log lookup.
Each replacement transaction is assigned it a Unique Number to serve as a primary
key. This number serves much the same as an order code or transaction batch number.
Detail on the field to get a list of all replacement transactions that occurred during the
specified date (range).
list of replacements (note the unique number)
5.
6.
7.
344
Double-click on the desired log to pull that transaction into the selection screen.
Accepting the screen at this point will run a report listing all replacements made within
the transaction.
If desired, enter a Mix Code or range of codes to narrow the scope of the report.
If desired, enter a Constituent Code or range of codes to narrow the scope of the
report.
Accept the screen to run the report.
Materials Manager
Data Management
COMMANDseries provides a number of tools to allow you to work more efficiently with
the database. While these tools give you greater ability to manipulate the database, they also
give you greater ability to damage the database. Use these tools with extreme care.
Topics in this section:
Initialize/Analyze Files
Import Data
Export Data
Automated Data In/Out
Import Orders & Tickets
Export Orders & Tickets
Data Maintenance
Automatic Database Updates
Manual Database Updates SQL Worksheet
Database Locks
Service Control
Comm Manager Console
Initialize/Analyze Files
COMMANDseries provides a number of database functions that can be used for
troubleshooting purposes. Two of these are found on the Initialize/Analyze Files screen
{Manage > Data Management > Initialize Analyze Files}.
Initialize/Analyze Files screen (DBAINIT)
Data Management
345
Using the screen is simple. Select the table(s) and the desired function(s), and then accept
the screen.
These routines run automatically the first time COMMANDseries is started after an
upgrade; the same routines can also be run manually (see Database Updates). However, the
routines as run from Database Updates run on a pre-determined set of tables. Running the
routine manually allows you to select any table(s) in the database.
Initialize Tables in the Database
This function examines the selected table(s), validating that the structure matches the
structure COMMANDseries expects (the COMMANDseries “schema”)—number of
columns, columns formatted correctly, etc. If a mismatch is discovered, the table will be
restructured to conform to the current version of COMMANDseries.
After the table(s) has been restructured, the routine writes and deletes a dummy record to
test that all fields are working correctly. In some cases, a database error can result in a table
being “stuck” due to an error writing to the table. The writing/deleting of the dummy
record has the effect of resetting the table.
During this process, record locks are initiated on the specified table(s). Because of the
potential risk to object resource allocation, users should not use Database Update
initialization during business hours--there’s a good chance that the resulting record locks
will further disrupt business. If it must be done, however, initializing a single table at a time
will minimize the chance that other work will be disrupted.
Analyze Table Statistics in Database
Note: This routine applies only to Oracle databases.
COMMANDseries maintains a number of database indexes that are used to speed data
retrieval. Similarly, the Oracle database engine maintains f metadata on each database
schema. The metadata is roughly equivalent to a library’s catalog, recording the tables’
organization and number of tables. This information is used by Oracle to optimize all
database access functions.
As the database grows and changes over time, the metadata becomes outdated, which can
have an adverse affect on database performance.
The Analyze Table Statistics function refreshes the Oracle metadata.
The primary worktables are analyzed every time the database is upgraded; however, other
tables, particularly the Master Files, are not included in the automatic process. It is probably
a good idea to perform periodically a full analysis of all tables, particularly for larger
databases, or databases involved in replication.
Nothing will display on screen to indicate the progress of the routine, nor will the updated
statistics display.
Import Data
COMMANDseries lets you import existing COMMANDseries data files. You can restore
your database by importing all files, importing a customer file, etc.
346
Data Management
This function can only import files that were exported from COMMANDseries using the
related Export Data function, or files that have been formatted to conform to
COMMANDseries database standards. This routine cannot be used to import order/ticket
records, or other records exported using a document format.
It is best to use the four-letter table name for the file name, with the extension .TXT
(example: CUST.TXT); otherwise, you will have to specify a file name for each file you are
importing.
When importing files using any Data In process (manual or automated), the system will
truncate any information that is over the maximum field length specified in the database
instead of throwing an error. For example, if a maximum field length in the database is 40
characters and there are 45 characters worth of information in that field, the last 5 characters
will not go through the import process. In addition, the system will eliminate any leading
spaces in fields so more information can go through the import process.
To import files:
1.
2.
Place the import files on the server.
Select {Manage > Data Management > Import Data.}
Import Data screen (DBAIMPR)
3.
Scroll through the table list on the left side of the screen and double-click on the
table(s) you wish to import.
-or Select a table you wish to import and select the Import checkbox.
To select all tables, select the All button.
To select only the standard tables, select the Standard button. The standard are a
group of tables that contain basic system information.
The following are the standard tables:
CWHD
CWLN
DOCT
Data Management
COMMANDwriter data—These two tables contain layout information used in generating reports and file listings.
Document tags
347
UOMS
UOMC
USGE
Standard UOM file
UOM conversions file
Usages
These files are maintained in the \CMDSERIE\IMPORT folder. If any of these files are
corrupted, or if a COMMANDseries service pack updates these files, they can be
quickly imported by selecting the Standard button.
4. If necessary, select the Delete Existing Records Before Import checkbox. If this box
is selected, the existing table will be dropped from the database prior to import and
rebuilt with the imported data. If this box is not selected, the imported table will be
added to the existing table. If duplicate records are encountered, data from the
imported table will overwrite existing data.
5. If the file name is not the standard table name, enter the name in the File field, or detail
on the field to locate the file.
6. If necessary, use the Optional File field to specify another file for importation.
7. Enter the location of the import file(s) in the Input File Location field, or detail on
the field to specify the location.
8. The Import Array Size field determines how many records the system attempts to
load at a single time. This specifies, in effect, how much of the import file the system
bites off at a time.
The default of 1000 lets the system process large files quickly and efficiently. However,
the drawback of the large array size is that if the system encounters an error in
processing an import array, the entire array is discarded and the system moves to the
next chunk of data. If you are consistently encountering errors while importing data,
reduce the size of the array. The reduction will not only ensure that more of the data is
imported, but it will help you identify the record that is causing the problem.
9. Select the Check Date Bounds on Imported Records checkbox if the data being
imported was generated on a pre-Y2K system. The system will check for invalid data
records, and give you the option of correcting the date entries during the import
process.
10. Check the Show Selected Only checkbox to restrict the tables being displayed to the
left to only those tables that have been selected.
11. Accept the screen to begin the import process. A progress bar will indicate the system’s
progress.
Export Data
COMMANDseries lets you export data files. The export files are text files that conform to
COMMANDseries standards. As a general rule, these files are not suitable for importing
into a third-party program.
To export files:
1.
348
Open the Export Data screen {Manage > Data Management > Export Data}.
Data Management
Export Data screen (DBAEXPR)
2.
3.
4.
5.
6.
Scroll through the table list on the left side of the screen and double-click on the
table(s) you wish to import.
-or-
Select a table you wish to import and select the Export checkbox.
If you want to export all tables, select the All button.
Enter a File name if necessary. If this field is left blank, the file name will be the table
name, with the extension .TXT.
The default location of the export file(s) defaults in the Output File Location field;
detail on the field to specify a different location.
Check the Show Selected Only checkbox to restrict the tables being displayed to the
left to only those tables that have been selected.
Accept the screen to begin the export process. A progress bar will indicate the system’s
progress.
Import Orders & Tickets
Use the Import Orders & Tickets function to load orders and tickets taken at a remote site
into the primary system for invoicing. The function loads order/ticket files that have been
created using the COMMANDseries Export Orders & Tickets function.
To import orders & tickets:
1.
Open the Import Orders & Tickets screen {Manage > Data Management > Import
Orders & Tickets}.
Import Orders & Tickets (DBAIMOR)
Data Management
349
2.
3.
4.
The File(s) to Import field will initially default from settings in your Assignment file.
The default file name will be based on the previous day’s date. Enter a file path and
name if necessary, or detail on the field to browse your system for the import file.
Select the Delete Import File When Complete checkbox, if necessary.
Accept the screen. A progress bar will indicate the status of the import process.
Export Orders & Tickets
Use the Export Orders & Tickets function to export orders and tickets. The export file can
be used as an archive file, or can be transferred to another location for invoicing.
You can select orders and tickets by day, order code, ticket code, plant code, or a
combination of the same.
To export orders & tickets:
1.
Open the Export Orders & Tickets screen {Manage > Data Management > Export
Orders & Tickets}.
Export Orders & Tickets (DBAEXOR)
Enter an Order Date or range of dates, or detail on the field to select from the
Calendar.
3. Enter an Order Code or range of codes, or detail on the field to select from a list.
4. Enter a Ticket Code or range of codes, or detail on the field to select from a list.
5. Enter a Shipping Plant Code or range of codes.
6. Enter a Billing Company Code or range of codes.
7. Enter an Output File path and file name. The default filename is ord[mmdd].txt,
based on the date of the exported records.
8. Select Include Orders to include data from the order files.
9. Select Include Tickets to include data from the ticket files.
10. Accept the screen to generate the export file.
2.
350
Data Management
Automated Data In/Out
The Automated Data In/Out function lets you automate a variety of export and import
functions. Sometimes you need to perform exports on a regular basis, but you should do it
when there is no database activity.
Setting up permanent parameters in Automatic Data In/Out functions will cause
COMMANDcomm to automatically perform these functions on a timed basis based on the
/N=<min> for Data In and /O=<min> for Data Out switches in the COMMANDcomm
command line. If these switches are not set, the default time of 10 minutes will be used.
The parameters in the Automatic Data In/Out configuration will control the file names and
formats used in these function.
To prevent collisions between COMMANDseries and the third party system reading/
writing these files, a lock file (*.lck) must be used. A lock file is simply a file that indicates
that a particular table is currently in use. COMMANDseries contains logic to handle the
creation of, or search for this lock file. When COMMANDseries starts a Data In/Out
process, it creates a lock file in the directory specified in the *.txt line in the [files]
section of the cmdseries.asn file. If the third-party system reading or writing these same
files finds a lock file for the file to be read or written, this file must be skipped. If a locked
file is not found, it must create a corresponding lock file to indicate that is currently
processing the file. Third-party systems must also remove the lock file(s) when the process
is finished.
COMMANDseries creates lock files with the naming convention CDIxxyyy.LCK :
•
•
•
•
xx is the function performed.
DI = Data In
DO = Data Out
yyyy is the table being processed (TICK = tickets, CUST = customer, etc)
Third-party systems must be configured to create lock files named EXTxxyyy.LCK where:
•
•
•
•
xx is the COMMANDseries function.
DI = Data In
DO = Data Out
yyyy is the table being processed (TICK = tickets, CUST = customer, etc)
When importing files using any Data In process (manual or automated), the system will
truncate any information that is over the maximum field length specified in the database
instead of throwing an error. For example, if a maximum field length in the database is 40
characters and there are 45 characters worth of information in that field, the last 5 characters
will not go through the import process. In addition, the system will eliminate any leading
spaces in fields so more information can go through the import process.
COMMANDseries Order/Ticket import processes have been updated to allow you to
import multiple order and ticket files within the same directory, without having to have
separate ADIO records for each order and ticket file. Exports can include the plant number
and time in the file name, which will make it easier for you to manage since there will be
only one folder and one ADIO record for all plants.
Data Management
351
To configure an Automated Data In/Out schedule:
1.
Open the Automated Date In/Out screen {Files > Automated Data Transfers >
Automated Data In/Out}.
Automated Data In/Out screen (EDTADIO)
2.
3.
4.
5.
Enter a Configuration code to identify the schedule. The code can be up to three
characters in length. Detail on the field to select an existing configuration record code
from the Automated Data In/Out File. Once selected, this field is unavailable.
Enter a Description of the schedule.
Enter a Short description of the schedule.
Select a Process Type from the drop-down list. Available options are:
6.
7.
8.
This selection determines the availability of the fields on the lower half of this screen.
Enter a Manager Number. This value identifies the COMMANDcomm channel that
will manage the process. A Manager Number can be entered in this field or the spinner
buttons can be used to increase or decrease the number.
Note: Each COMMANDcomm process must have its own manager.
Enter a Start Time and End Time for the process. For all day, leave the values at
00:01 and 23:59.
Select a Log Warnings / Errors & Summary Information option. The available
options are:
9.
352
Master File In
Master File Out
Order Out
Ticket Out
Order/Ticker In
Invoice Out
Order Mix to Lab
Order Mix From Lab
Batch Weights Out
Schedule Sample Report
Log Report
None
Accept the screen to save the configuration.
Data Management
Data Maintenance
The work screens in COMMANDseries provide secondary access to the database. That is,
you enter the information, and then COMMANDseries organizes the data and stores it to
the database. For everyday business operations, this method of operation is optimal: you
enter the information you need to, and the program does the bulk of the work.
Sometimes, though, you need more direct access to the database. You might be trying to
understand how a table works so that you can design a new document tag, or you may be
trying to troubleshoot a problem with a customer’s tickets. The Data Maintenance screen
provides you with direct access to the database, where you can see and edit the data first
hand.
The screen provides a very flexible tool for editing the database. This section will only
document the most commonly-used functions.
WARNING
Because you are accessing your database directly, it is very easy to seriously
damage the integrity of your data with this tool.
Topics in this section:
Retrieve a Specific Record or Set of Records
Global Replace
Special Search Operators
To retrieve a table record:
This procedure shows the basic functioning of the Data Maintenance screen.
1.
Open the Data Maintenance screen {Manage > Data Management > Data
Maintenance}.
The Data Maintenance screen (DBAUFLD)
2.
3.
4.
The display area to the left allows you to select individual database tables and views.
Table - The primary storage area for the database
View - A temporary lookup index, used to speed processing. Because the views are
dependent on the tables, it is highly unlikely that you will need to edit a view.
Select the plus sign next to the Tables icon to expand the list of tables.
Select the table that you wish to view. The table structure will display in the main
section of the screen.
Data Management
353
Ticket Charges Table (DBAUFLD-1)
5.
At this point, you are not looking at the contents of the table, but rather, the structure of
the database itself. Each numbered line represents an individual field within the table.
Selecting Toggle Field Display in the Command field will display the descriptive
names of the fields, (for example, Customer Code) instead of the database field name
(CUST_CODE). Viewing the descriptive names can make it easier to find a specific field.
The default option in the Command field is Retrieve Occurrence(s). Select the Do
button to execute the Command and retrieve the first record in the table.
Ticket Charges record (DBAUFLD-2)
354
Data Management
6.
To retrieve the rest of the records in the table, select Last Occurrence in the
Command field, and select Do.
Data Maintenance screen (DBAUFLD-3) - All Ticket Charge records
7.
8.
9.
Review and edit the data as necessary.
Select Store Modified Occurrence(s) to save the data changes.
Close the screen.
Retrieve a Specific Record or Set of Records
Being able to retrieve a complete table can be useful. When diagnosing a problem with a
report, it can help to see the original data being used by the report. Knowing how to retrieve
a specific record or set of records makes that process a lot easier.
Suppose you wanted to examine the orders for a single customer during the day to see if
certain charges were being applied properly. For this example, we will use Customer Code
ABC and March 19, 2007 as the date.
To retrieve a specific record/set of records:
1.
2.
3.
Select an appropriate table. This example uses the ORDR (Order) table.
Enter a date in the ORDER_DATE field. This example uses 3/19/07. When you
<Tab> out of the field, the date will be reformatted to read 19-Mar-2007.
Enter a customer code in the CUST_CODE field. This example uses [ABC]. The
brackets designate that the data is to be key-formatted, ensuring that the entry will be
formatted to match the database. When you <Tab> out of the field, the brackets will
disappear and the data will be left-justified within the field.
Data Management
355
Ready to begin the search
4.
5.
356
Primary key fields (such those in the ORDR table (Order Date, Order Code,
Customer Code, Item Code, etc.), are often used to reference other records. To ensure
that the linked fields are formatted identically in both tables (if they are not, searches
will fail), they are key formatted so that the system can enforce the correct formatting
during data entry.
In the regular application, the formatting happens automatically. In Data Maintenance,
however, only date fields will automatically format. The square brackets force the
screen to correctly format the data.
Select Retrieve Occurrence(s). The system will search the database, and the first
record matching the parameters will be displayed.
Select Last Occurrence. The system will search the rest of the table. All records
matching the parameters will be retrieved.
Data Management
Search Results
6.
Once the records have been retrieved, you can examine the data.
Global Replace
Over the course of time, your use of the system changes, and, in some cases, the program
itself changed, through upgrades and service packs. If for example, you changed your credit
code structure and needed to modify existing customer records to bring them in line with
the new credit code structure.
In this example, we want to select all customer codes with a credit code of 1 and change that
code to AAA.
To perform a global replace:
1.
2.
3.
Select the CUCO (Customer Credit) table.
Retrieve all customer records with a credit code of 1. Refer to the preceding section for
details.
Right click on the Credit Code field. Select Replace Field Value. A dialog box will
open.
Replace Field Value (DBAUFLD1)
4.
5.
Enter the new value (in this case, AAA) in the With Value field.
Accept the dialog box. The changes will be made in the display screen.
Even though you can see the changes on the screen, the changes have not been saved to
the database yet. You must proceed to the next step to save the changes!
Data Management
357
6.
7.
Select Store Modified Occurrence(s).
Close the Data Maintenance screen.
Using the Data Maintenance screen effectively requires that you have an extensive
knowledge of the COMMANDseries database. In the example above, for instance, you
would have to know that the customer credit code was stored in the CUCO table.
COMMANDseries does provide a quick method of determining where a particular piece of
information is stored. If you open a customer record, go to the Accounting tab, place the
cursor in the Credit Code field, and press <Ctrl+W>, you will see the following in the
message line at the bottom of the screen:
Field Message
This text tells you that the Credit code information is stored in a field named CRED_CODE in
the CUCO table. (EDTCUSTG is the file name of the accounting tab screen.)
In some instances, the file will be XXX[#], such as XXX2. In such a case, the field data comes
from a database index, not directly from a table.
Special Search Operators
The Data Maintenance screen supports wildcards and search parameters. Those
parameters are:
=
>
<
!
*
Equals
Greater than ( => can be used for Equal to or greater than)
Less than ( =< can be used for Equal to or less than)
Single character wildcard
Broad wildcard
A special code must be entered to use these values. Before entering parameter, press
<Ctrl-+> (You must use the <+> key on the numeric keypad). After pressing
<Ctrl-+>, press the parameter. The entered parameter will appear on the screen as
gold text. Because of their appearance, these parameters are usually referred to as “gold
keys.”
Automatic Database Updates
The structure of the CS08 database is significantly different from that of V5. Variable-length
fields, as well as the need for overflow tables, have been eliminated. These and other
database improvements have improved database retrieval by as much as 40%.
The database conversion process has been substantially updated as well. In V5, new database
columns were simply added at the end of the table, eventually resulting in inefficient table
structures. CS now stores the database model within special database tables. When the
program starts, it compares its version with the version of the database. If they do not
match, you will be prompted to run the automatic database updates. These updates will
restructure the database to match the configuration of the current version of
COMMANDseries.
358
Data Management
The system validates each table against the stored model, and generated a SQL script to
restructure the table as needed. The SQL scripts write existing data to temporary files,
restructure and initialize the primary database tables, and then copy the information back
from the temporary tables.
DB Conversion Map
The update process has three steps:
•
•
•
Run automatic database updates in COMMANDseries.
Update your license (if upgrading from an earlier version).
Run any needed manual database updates.
The time needed for the conversion is dependent on several factors: database size, processor
speed, free memory, and available hard drive space. Small databases (under 1GB) have taken
as little as 5-10 minutes to convert. Large databases (~20GB) have generally taken 30
minutes to 2 hours to convert.
It is important to restrict access to the system during the conversion, particularly machines
that run Comm Managers. During beta testing, someone had to restart a workstation right
before the database conversion began. The workstation was not being used for anything
COMMANDseries-related—or so we thought. As it turns out, a Comm Manager was
launched minimized. In addition, the manager was launched with an audit/log switch, so
that it was monitoring database access. The extra load had a massive effect on the conversion
process, so that a process that should have taken at most one hour ended up taking six
hours.
COMMANDperformance Users
The automatic database update process removes the triggers linking the COMMANDseries
database to COMMANDperformance. Please contact your Technical Account Manager
(TAM) for a database script to restore the triggers. This script must be run following every
upgrade that involves database updates.
Data Management
359
Preliminaries
All DBs – To prevent unauthorized users from running database updates,
COMMANDseries will not run the automatic database updates unless the switch
\dbupdate
is in the command line. If the switch is not present, then when the system is started, a
message will display stating that database updates must be run and to contact the system
administrator.
MS SQL – To prevent the transaction log from growing to unwieldy sizes, SQL Server
must be modified prior to running database updates.
•
•
Set the SQL Server recovery model to Simple before starting the update.
Set the recovery model back to Full when the update finishes.
In addition, certain internal processes must be disabled. Open the assignment file, and find
the [DRIVER_SETTINGS] section. That section contains a line that looks like this:
usys$mss_params= . . . procs=on, . . .
Change the procs value to OFF, and save the assignment file.
After the database updates have been run, exit COMMANDseries, change the value back to
ON, and restart COMMANDseries.
To run the automatic database updates:
1.
2.
From any client, select the COMMANDconcrete or COMMANDaggregate shortcut
(depending on the license the customer has). When the application runs, the following
message will appear, indicating that Database Updates needs to run:
The Database Updates function must be run before proceeding
with COMMANDseries. Would you like to run it now
(recommended)?
If this dialog does not appear, contact Command Alkon.
Press Yes. The conversion process will begin. A series of progress bars will track the
process.
In some cases, it may become necessary to run the updates manually. As a general rule, you
will only want to do so at the direction of your Command Alkon service representative. All
Database updates can be manually performed from the Database Updates screen:
360
Data Management
Database Update screen (SELVERS)
•
•
•
•
•
•
Initialize Required Tables – This routine writes and deletes a dummy record to test
that all fields are working correctly. In some cases, a database error can result in a table
being “stuck” due to a error writing to the table. The writing/deleting of the dummy
record has the effect of resetting the table.
Add New Database Columns – This routine analyzes the database, determines if
there are missing fields, and if any are found, generates a SQL script to rebuild to table
to include the new field.
Add Database Indexes – Indexes are collections of related data, presorted to make
retrieval easier. The system uses a number of views to speed retrieval of frequently used
record types. As information in the primary tables changes, the indexes are
automatically updated.
Create Database Views – Database views are built in queries used to quickly retrieve
data. They are often used as temporary workspaces in certain forms that draw from
multiple tables. For example, the Material Manager uses a number of views in building
the data on different tabs.
Create Database Stored Procedures – Databases use stored procedures to handle
data processing routines. Rather than use generic routines, programs can create
customized procedures to match the needs of a particular version and/or database. This
routine will generate the stored procedures for your version/database.
Analyze Required Tables (Oracle only)– COMMANDseries maintains a number of
database indexes that are used to speed data retrieval. Similarly, the Oracle database
Data Management
361
engine maintains metadata on each database schema. The metadata is roughly
equivalent to a library’s catalog, recording the tables organization and number of tables.
This information is used by Oracle to optimize all database access functions.
As the database grows and changes over time, the metadata becomes outdated, which can
have an adverse affect on database performance.To run the automatic updates manually:
1.
2.
3.
Open the Database Updates screen {Manage > Data Management > Database
Updates}.
Select the desired automatic updates.
Accept the screen to begin the updates.
Manual Database Updates
The manual updates fall into two general categories:
Updates
These options modify the database to incorporate new functionality. Unlike the automatic
updates, which update the database structure, these updates modify the contents of the
database. For example, version 5.51 of COMMANDseries introduced Order Types as a
means of recording if an order was a commercial order or an internal transfer. Previously,
Order Type was used to determine if an order was Charge or Cash. A new field, Payment
Method, was created to address that function. Customers upgrading to 5.51 needed a
method to update existing order records. The Database Update function “Update Order
Types” modifies existing orders to be in line with the new functionality.
Tools
Tools allow you to correct data problems. For example, over time it is possible that duplicate
products get entered in project and standing order files. In some cases, the duplicate
products are necessary, but in others, the duplication simply wastes valuable server
resources. The Remove Duplicate Products function will search project and/or standing
order files and delete duplicate records.
Suggesting Updates
A Suggest button is in the manual update section of the Database Updates screen:
Press that button to call the Update Calculator screen. Enter your current version and the
version to which you are upgrading, and it will generate a list of necessary updates.
362
Data Management
The automatic database updates modify the structure of the database. Manual database
updates modify the data itself. The following database update routines fall into two
categories. Some are used to modify data in accordance with a specific change to the
program. Other routines are maintenance utilities designed to address specific issues that
may be encountered during regular use of COMMANDseries.
Topics in this section:
•
•
•
Upgrade Options
List of Manual Updates
Maintenance Routines
Upgrade Options
Following are the current COMMANDseries Manual Database Updates. The table below
can be used to quickly determine what updates are needed for any given upgrade. Find the
customer’s current version on the table. When upgrading to the most recent version of
COMMANDseries, run the updates for the current version as well as any more recent
versions.
Version
V4
5.50 (D14)
5.51
Data Management
Update
Update Roster List
Update PRJO for Upgrade from 4.21 and Earlier
Update Customer’s Minimum Haul Flag from Version 4 Upgrade
Update Customer’s Ticket Charge Tables from Version 4 Upgrade
Update Customer’s Trade Discount Amount UOM form V4
Upgrade
Update Prepayment Adjustments Linkage to Invoices
Load Order Line Delivered Quantity
Update Order Types
Rebuild Current and Future Schedule Loads
Convert Check Numbers in ITRN Table
Update Map Page Travel Time
Convert PRJC for Upgrade from 5.51 and Earlier
Convert Price Type Field for Upgrade from V5.51 and Earlier
363
Version
5.52
5.53.16
5.54
5.57.4
5.57.10
5.57.12
CS06 1.0.B
CS06 1.0.D
CS06 1.0.F
CS08 2.7
CS08 2.15
CS08 2.15
Update
Update Allow Price Change Flag for COD Customers/Projects
Update Blank Default Order Types in Projects
Clear NEXT_* Fields in TRUC Table
Update Payment Forms in Orders/Tickets/Invoices
Update Batch Entry ID for Payments
Correct Zone Price Plant for Wild Card Price Category
Initialize GPS Polling for Orders/Projects from Configuration Settings
Convert Sundry/Misc Charges for Upgrade from 5.57.9 and Earlier
Update Accumulation for Items
Convert SIGU Records
Change all Schedule statuses to Order status
Truncate Credit Card Numbers to Last Four Digits
Convert USCF to FCUS Records
Update GUID Fields for Integration
Update EDX Synchronization Status
There are two additional upgrade-related updates that fall outside of the standard list:
•
•
If upgrading from 5.51, run Update Schedule Load Size Flag.
If upgrading to V5 Tracking and Scheduling (formerly called GIM), run Create
External Translation Table.
List of Manual Updates
Below are descriptions of the database updates. Some updates are sxclusive to V2 or V3.
Convert Check Numbers in ITRN Table
A new feature implemented in V5.52 uses one field in the ITRN (Invoice Transactions)
table to store either the check number or the credit card number used to pay for an invoice.
Because credit card numbers are longer than check numbers, the field must be large enough
to accommodate the longer character string.
The automatic database update converted the database field to the new length. This routine
reformats the existing data for the new field length. No user input is required.
Update Order Types
Until V5.51, Order Type basically meant cash or charge. In V5.51, a new system was
implemented. Order Types now denote the type of sale (regular sale, internal transfer, etc.),
while a new field, Payment Method, stores the record of how the order is to be paid. This
routine updates existing order records to version 5.51.
Once this option is selected, no input is necessary.
364
Data Management
This update should only be run once. Running this update a second time can
corrupt existing COD orders.
Update Map Page Travel Times
In earlier versions of COMMANDseries, one Travel Time was used to schedule time to and
from the site. Effective in V5.52, Map Pages store one time for travel to the site, and another
time for the travel back to the plant. This routine takes the single Travel Time from earlier
Map Pages and copies it to both to and from time fields. Once this option is selected, no
user input is required.
Update Roster List
The structure of the roster table was changed in V5.51 to enable using the roster to dispatch
past midnight. This routine reformats the changed fields. No user input is required.
Update Schedule Load Size Flag
The Schedule Load Size feature was initially implemented in V5.51. In V5.52, we changed
the way the flag was stored. This routine updates the flag to the new format. The
functionality of the feature is not changed in any way. Once this option is selected, no user
input is required.
Update Allow Price Change Flag for COD Customers/Projects
In previous versions of COMMANDseries, the ability to edit item prices for COD
Customers or Projects at the Order level was strictly a function of the Customer/Project
Credit Type: if it was COD, the price fields were available. V5.53 has enabled field-level
security for all pricing fields. As a result of this new functionality, prices on a COD order
will not be available unless the Allow Price Change in O/E flag in the Customer/Project
Pricing tab is selected.
This routine reads through all Customer and Project files, finds all records that have a
Credit Type of Cash Only, and checks the Allow Price Change flag. No user input is
required.
If this update is run, Update Blank Default Order Types in Projects must also be run at
the same time.
Convert PRJC for Upgrade from V5.51 and Earlier
The PRJC table was restructured to enable key indexing. This routine updates the table
structure. No user input is required.
Convert Price Type field for Upgrade from V5.51 and Earlier
This routine adjusts Price Type records to accommodate the new Fixed Material Delivered
Price feature. The routine checks all pricing records in order and project files.
•
•
If the original Delivery Price Type was FOB, the new Price Type will be FOB.
If the original Delivery Price Type was Delivered, the new Price Type will be Fixed
Cartage Delivered.
In addition, the routine will also update existing records as follows:
Data Management
365
•
•
All tickets with a null Material Price field will be updated with the corresponding
value from the associated order file.
The routine will validate the Price Type values for Customer defaults (in the
configuration file) and existing Customer Product records (CPRD). If the value is
blank, it will be set to “1” (FOB pricing).
The routine will run automatically once it is selected. No user input is required.
Rebuild Current and Future Schedule Loads
Version 5 uses two separate tables to store schedule records, while Version 4 used one. In
addition, V5 schedules include two additional fields, Time to Job and Time to Plant.
This routine scans current and future orders. If an order is found with a Travel Time value
but no Time to Job or Time to Plant value, the Travel Time value will be used to populate
both fields. No user input is required.
If this update is not run, any current and future orders imported from V4 will not display on
the Tracking screen.
Update Blank Default Order Types in Projects
This update scans all projects to determine if there is a value in the Default Order Type
field {Projects > Distribution}. If there is no value, the value will be set to the setting for
the Customer default {Files > Configuration > Defaults > Distribution}. Normally, the
default will be Regular Sale. No user input is required.
If this update is run, Update Allow Price Change Flag for COD Customers/Projects
must also be run at the same time.
Update PRJO for upgrade from 4.21 and earlier
Some fields that were stored in the PROJ table in V4 are stored in the PRJO table in V5.
This routine moves the affected fields to the new table. No user input is required.
Update Customer’s Minimum Haul Flag from Version 4 Upgrade
Version 4 stored minimum haul flags in a different field than V5. This update will copy
customer and project-level minimum haul flags stored under V4 to the corresponding fields
in V5. No user input is required.
Update Payment Forms in Orders/Tickets/Invoices
Earlier versions of COMMANDseries used Payment Method to determine how an order
was paid: Charge, Cash, Check, or Credit Card. Payment Methods have been supplanted
with Payment Forms. The advantage of Payment Forms is that you have more flexibility in
creating payment types.
Once Payment Forms have been entered, run this update to populate the Payment Form
field on existing orders, tickets, and invoices. No user input is required.
366
Data Management
Update Customer’s Ticket Charge Tables from Version 4 Upgrade
This updates minimum load, unloading, and seasonal charge settings in customer and
project records. If a given flag is false, the corresponding field is cleared. The update ensures
the database is in line with V5 functionality rather than V4. No user input is required.
Update Customer's Trade Discount Amount UOM from V4 Upgrade
This routine will check all customer and project files. If the Trade Discount Amount
UOM field is blank, it will be set to Yards/Meters (Concrete) or Ton/Tonnes (Aggregate),
based on the measurement system specified in the system configuration or in the project.
No user input is required.
All V4 users who use trade discounts should run this update when upgrading to V5.
Clear NEXT_* fields in TRUC table
COMMANDseries V5.53 stores aggregate truck assignment data differently than in
previous versions. Specifically, the program uses a different method to store a truck’s next
assignment. To prepare existing data for this new functionality, any user upgrading to V5.53
must run this routine to clear existing information from the TRUC file. No user input is
needed.
Update Prepayment Adjustments Linkage to Invoices
V5 uses a different logic in applying adjustments than V4. This routine identifies
prepayment adjustments made in V4 and updates those records to accommodate the new
adjustment logic.
When the update is run, you will be prompted for a date range. The routine will update all
adjustment batches within that range.
Load Order Line Delivered Quantity
The Delivered Quantity field in the ORDL (Order Line Item) table is the sum of the
Delivered Quantity fields on all of the order’s tickets. It is possible that the ORDL table can
lose its integrity, either through system or user error. This routine recalculates the ORDL
Delivered Quantity fields by summing up the associated tickets.
It is recommended that this routine be performed when upgrading from V4 to V5 as a
precautionary measure.
The routine does not have to be run on all orders and tickets, particularly if the user retains
records in the database for more than a year. General guidelines for what date ranges to
update are as follows:
•
•
•
Command Alkon recommends that the previous year’s data be updated.
Any dates that have not been invoiced – that is, the orders were entered and ticketed in
V4 but will be invoiced in V5 – must be updated.
Any dates that have not been posted to COMMANDexecutive – that is, the orders
were entered and ticketed in V4 but will be posted to COMMANDexecutive in V5 –
must be updated.
Data Management
367
Load Order Line Delivered Quantity screen (DBAORDL)
Regardless of the module from which this update is run, the routine will recalculate both
concrete and aggregate orders.
Update Batch Entry ID for Payments
Effective in 5.54, when a payment is entered, a unique ID is assigned to all invoices paid
with that payment, cash, check or credit card. This payment ID is used by various routines,
such as Void Payments and Deposit Registers, when recalling payment information.
This update populates each existing payment with a unique entry ID. No user input is
required.
Correct Zone Plant Price for Wild Card Price Category
This update converts ZNPC entries with wild card (#) price categories to correct ZNPL
entries. If an existing ZNPL record conflicts with a price in ZNPC, the routine generates a
report to notify the user, with instructions to correct the error. No user input is required.
Initialize GPS Polling for Orders/Projects from Configuration Settings
This update should be run only after system-level GPS polling defaults have been set. The
update will then write those defaults to all existing orders and projects. No user input is
required.
This update is intended for users adding GPS functionality, and should not be
used by a customer who already has GPS configured.
Update Accumulation for Items
5.57.12 adds additional options for configuring accumulation of admixes and admix designs.
The new options necessitated modifying the exiting Accumulation Code field from one
character to two characters. This update reformats the existing one character values to a
valid two-character format.
Convert Sundry/Misc Charges for Upgrade from 5.57.9 and Earlier
5.57.10 adds the ability to charge sundry, unloading, seasonal, and minimum load charges at
the Company and/or Plant level. This new functionality involves a restructuring of the
various charge tables. When COMMANDseries is first run after the upgrade, the new
database tables and fields are added to the existing charge records, but all new fields are set
to null.
This update will establish the existing charge schedule for each type of charge as the default
charge—both Company and Plant will be set to All.
Note: This update must be performed prior to attempting any order entry, dispatch, or
invoice activity, or else store errors will occur.
368
Data Management
Maintenance Routines
These routines are not associated with specific version upgrades, but are run to address
specific issues with database integrity. As a general rule, these updates should only be run on
advice from a Command Alkon Service Representative.Correct ARTB/CUCO
Balances
It is possible that the CUCO (Customer Company/Credit) records can become corrupted,
or that they may get miscalculated. This routine will recalculate CUCO records based on
the data from the ARTB (A/R Transaction Balance) table.
When this routine is run, you will be prompted for a specific batch date and number. Once
the information is provided, no additional input is required.
(DBARPCR)
Verify/Correct ARTB/CUCO Balances by Customer
This routine works just like the previous routine, except that instead of correcting by batch,
you correct by customer. Since balance errors are generally discovered at the customer level,
the customer is more likely to use this routine than the previous one.
(DBACBAL)
The drop-down list lets the customer select two options:
•
Verify Customer Balances generates a report that identifies customer balances
•
Recalculate Customer Balances
that do not balance with the associated detail records.
Correct Sales Batch With G/L Out of Balance
When this option is selected, you will be prompted for a date range.
Date range (DBACGLD)
Data Management
369
Enter the date range to correct. You will not be prompted to select a specific batch or
sequence. The routine will examine all sales batches within the specified range. A list of the
corrected sequences can be found in the message log at the bottom of the screen.
If you have been running 5.53.7 or 5.53.8 and are encountering corrupt data in sales
batches, do not use this update.
Remove Duplicate Products
While COMMANDseries does not allow for duplicate item codes in the Item Master file, it
does allow for duplicate codes in project and standing order files. Some users take advantage
of this feature by using multiple entries to better track mix usage.
This routine will clean project and standing order records, eliminating duplicate product
entries. When duplicate entries are found, the first occurrence is retained, while all others
are deleted.
When the menu option is selected, you are prompted to select what records you want to
clean.
(DBADUPL)
Simply select the options you want and accept the screen. You will be prompted for
confirmation.
Confirm the deletion
The selected records will be cleaned.
Move Project Balances
(DBAMVPB)
This update is for a specific customer, and cannot be run by another customer.
370
Data Management
Repost Sales Tax Data
Sometimes, sales tax data does not post properly. When this happens, you can use this
routine to repost just the sales tax portion of a batch. When the routine runs, you will be
prompted for a date range.
(DBARPST)
The routine will repost sales tax data for all batches with batch dates that fall within the
specified range.
Create TKTX record for ticket without any TKTX record
In some cases, Ticket Tax records are not created due to errors in the data. If this should
occur (CA Service will help determine if such is the case), this routine will prompt for a
date range:
(DBACTKX)
Upon acceptance, the form will create TKTX records for any tickets within the date range
that do not have any corresponding records. Existing TKTX records will not be affected.
Convert USCF to FCUS Records
The older (non .NET-based) version of FNDCODE stored configuration settings in the
USCF table. The .NET version stores its settings in the FCUS table. This routine converts
configuration settings from the older version of FNDCODE to the newer.
Update GUID fields for Integration
The Item Master table (IMST) has been updated with a new field, GUID (Global Unique
ID), an ID code used by COMMANDedx when synchronizing data between systems. A
GUID will be generated whenever a new record is created. A new manual database update,
Update GUID fields for Integration, will generate GUIDs for existing records (provided
that the GUID field is null).
Update EDX Synchronization
A new field, EDX Synch Status Code, has been added to the Item Location table (ILOC).
This field replaces the Item Status Code field for useby EDX in identifying records that are
to be synchronixed via EDX. This update will scan each ILOC record, copying the Item
Status Code value to the EDX Synch Status Code field.
Data Management
371
SQL Worksheet
You can use an SQL script to execute commands on a database. Normally, you have to
launch an SQL-script program to execute a script. COMMANDseries provides an internal
interface for running SQL scripts.
Do not run SQL scripts unless you are the system administrator. Improper use of
an SQL script can cause serious damage to the database!
To use the SQL worksheet:
1.
Open the Database SQL Worksheet screen {Manage > Data Management > Database
SQL Worksheet}.
Database SQL Worksheet (DBASQLW)
2.
3.
4.
372
Enter the SQL script command in the SQL Command box.
There are small variations in commands and syntax between Oracle and MS SQL. Be
sure to use syntax appropriate to your database.
Accept the screen to execute the SQL script. The messages from the SQL script will be
displayed in the large message area.
If you need to connect to your SQL server using a login different from your
COMMANDseries username, select the Connect button. You will be able to log in
using a different name.The login screen supports usernames and passwords of up to 32
characters.
Data Management
Database Locks
When a user accesses a particular record in a table, the database locks that record so that no
other user can access that record. This lock prevents the chaos that would occur if two
people attempted to edit the same information at the same time.
Normally, when you are finished with the record, either by accepting a screen or closing a
screen, that record is released so other people can access it.
If COMMANDseries or the server should crash, however, there is a possibility that a record
can get stuck in a locked status, preventing anyone from accessing the data.
The Database Locks screen lets you see what records are locked, and by what user. If
necessary, you can terminate a user session, releasing all records in use by that user. You can
only terminate a session from this screen on an Oracle system; it you are running SQL
Server, this screen can be used to determine what session must be killed in SQL Server
Manager.
Terminating a user session can result in data loss. This function should only be
used in an emergency!
Users must have the database permission View Server State to run this form; if you do not
have the permission, the following message will display:
In addition, Show Blocking User Name on the Configuration-System tab should be
selected.
To use the database locks screen:
1.
Open the Database Locks screen {Manage > Data Management > Database Locks}.
Data Management
373
Database Locks screen (DBALOCK)
2.
3.
4.
The screen will list current locked records.
Select the record that you need to release.
Press <Shift+F5> or the Remove button on the toolbar. A confirmation box will
display.
Select Yes to terminate the user session.
If your system is interfaced with third party applications, either through COMMANDedx
or another interface, it is possible taht you can have database locks originating from a
program other than COMMANDseries. The two buttons at the top of the form allow you
to control what locks are displayed:
•
•
Locks not by COMMANDseries
All DB Locks
Pressing these buttons does not change the display in the current form; rather, it opens up a
new form on top of the current one.
The All DB Locks button shows all database locks that include locks from Comm
Managers and external processes. In addition, you can view the Comm Manager number,
the Client Machine, and the Client Process ID.
Service Control
The Service Control screen is a tool for performance monitoring. It lists the services used in
the application, the number of times they have been used during the current log in, and the
total and average times it took for them to perform their given service.
374
Data Management
Service Control (SYSSVCC)
The screen gives the option of viewing Client and Server services. This option has been
created for future use, as currently all COMMANDseries installations are done on the
client.
Comm Manager Console
The Comm Manager Console allows you to monitor all active comm managers and
prevents multiple identical comm manager processes from executing concurrently.
A new field, Com Manager Threshold, has been added to the Configuration-Defaults
tab. The system uses this value (in seconds) to evaluate a manager’s current status.
A new database table, Comm Manager Console Table (CMCT), has been created to store
information about current comm managers. A CMCT record is created for a comm
manager the first time it is started and is updated every time data from the comm manager is
processed by CMDseries. Every time a comm manager is started, it checks the CMCT
table. If the CMCT indicates that manager is already active, the system will prevent the
duplicate instance from starting.
Console
The Comm Manager Console is located at {Manage > Data Maintenance > Comm
Manager Console}:
Data Management
375
Comm Manager Console (EDTCMGR)
The list is populated by scanning the database for assigned managers – signaling units, order
printers, batch interfaces, etc. Once the list of managers is assembled, additional
information on those managers is drawn from the CMCT table, and is updated every 30
seconds or whenever a manager is polled.
The console displays CMCT records with statuses as follows:
•
•
•
•
•
Blank – Either the manager has never been started, or the last update time in CMCT is
more than 24 hours old.
Running – The last status update time is within the value assigned by the Com
Manager Threshold.
Processing – The comm manager is processing a command.
Stopped – The manager has been stopped.
Not Responding – The last status update is less than 24 hours old, but outside the
Com Manager Threshold.
Prompt Type
The Prompt Type field determines how the comm manager reacts when a user attempts to
start a comm manager when an instance is already running, but the manager is considered
unresponsive based on the established polling interval. These three options replace a /F
command line switch.
•
•
•
No Prompt – The system will restart the comm manager.
Prompt User – The system will notify you that an instance is already running and
prompt you to continue or cancel.
Hard Stop– The system will notify you that an instance is already running and that
you cannot continue. When you press OK to acknowledge, the new instance will close.
Context Menu
If you right-click on a manager, the context menu will contain two key commands:
Stop – Stops the selected comm manager.
Restart – Restarts the selected comm manager. You can start a manager that is not
responding, but if the comm manager instance has closed, it cannot be restarted from the
console.
376
Data Management
Network tab
The Network tab will display the current users, using the CMDnetwork Client list. This
list is for reference purposes only.
This list will only show the users connected to the client’s CMDnetwork server. If your
system has multiple CMDnetwork servers, clients on the other servers will not be included
on this list.
Logging Functions
The system logs information on each comm manager to the CMML table. Adding the
commandline switch /COMMDETAILLOG will have that comm manager log every message it
sends or receives. Log information for a comm manager can be viewed by pressing the
Display Log button.
Log Selection screen (SELCMML)
CMML records can be purged using the Purge Log button. Purging the table has no
impact on production.
Purge COMMANDcomm Log Details (DBACMML)
Please note that the Purge option allows you to purge records for multiple comm managers
at once, while the Log Selections screen will only retrieve records for one comm manager at
a time.
Run Comm Managers as a Windows Service
Comm managers can now be run as Windows services. To effect this change, two new
execurables have been added to the CMDSERIES\BIN directory:
cmdserieService.exe – This is the application that will run to create the service. It will not
be run manually.
cmdserieServiceManage.exe – This program is used to create and configure all
COMMANDseries services on a system, including COMMANDnetwork.
Data Management
377
To configure a new service:
1.
Run the cmdserieServiceManage.exe application. The initial screen will show you
all existing services.
2.
Press the New button to call the New Service screen.
Name – The name for the service: COMMANDnetwork, Mgr #32, etc.
Startup Type – The startup method. Options are
378
Automatic: The service will be started with Windows.
Data Management
Manual: The configuration will be saved, but the service must be manually started.
Disabled: Used for services that are temprarily unneeded.
Interactive – An interactive service can be displayed on the screen. Comm Managers and
COMMANDnetwork cannot effectively unless these values match, which is why this field
is disabled in the individual service editor. The value for all services managed in this
program can be edited from the Files menu.
Executable – In this field, specify the path to the cmdService.exe file or the cmdnetw.exe.
Start In – If configuring a comm manager, specifiy the location of the assignment file. This
field is not required if configuring a COMMANDnetwork service.
Parameters – If configuring a comm manager, specifiy the command line parameters just
as you would on a COMMANDcomm shortcut. This field is not required if configuring a
COMMANDnetwork service.
When you press OK, the program will store the parameters and return to the manager
screen.
You can start services manually from this screen, or restart the computer to start any
automatic services.
Services can also be edited or deleted from this screen.
Auto-Signaling
COMMANDcomm supports a command line switch, /n (time in seconds), for autosignaling. This switch adjusts the truck polling time and is intended for use in a test
environment. If the switch is not present, the default value of 60 seconds will be used.
Data Management
379
Appendix A: Examples
This appendix contains some sample scenarios. These are common tasks that most
dispatchers or order takers will eventually face.
Topics in this section:
Multiple Loads on One TruckTwo Mix Products on One Truck
Scheduling an Order out of Multiple Plants
Batching for Third Parties
Multiple Loads on One Truck
Sometimes a dispatcher needs to send a truck to two different locations on the same trip;
either there’s a site on the way that needs a clean-up load, or there are two small jobs fairly
close together. In this case, there are two jobs that are close to one another: 20 tons of pea
gravel for ABC Construction, and 25 tons of pea gravel for XYZ Construction.
The basic process is simple: “double-ticket” the truck. However, secondary issues need to
be considered, as described below.
Any ticket times from signaling or dispatching are useless, so you must make a decision:
ignore the times for this trip, or ask the driver to manually record his times on a note pad.
Either the dispatcher or invoice prep person enters the times into the system at a later date.
If you charge for excess unloading time, the driver needs to record his times. If you do not
charge for excess unloading times, it may be easier to skip manual recording.
If your company uses minimum load charges, you might want to suspend those charges for
these two loads.
To ticket a truck hauling more than one load:
1.
2.
3.
4.
5.
380
Follow the normal order entry process.
When the truck pulls up to the dispatching/batching station, drag the truck to the first
order (it probably doesn’t matter which). The Ticketing screen appears.
Press the Other button on the Ticketing screen. A dialog box appears, containing a
number of options for this particular ticket. If you wish to disable unloading charges,
de-select the appropriate box, and accept the screen.
Accept to ticket the truck. If you have small loads charges enabled, a dialog box appears
asking if you wish to apply minimum load charges to this ticket. Select No. You may
also receive a dialog box to warn you that Load size is less than the Order Schedule
Load Size by # UOM. Do you wish to ticket it? Select Yes, and the truck is
ticketed and appears on the Tracking and Scheduling screen. Do not load the truck
yet!
At this point, the system has the truck assigned to the first order, and will not allow you
to re-ticket it until the load has been delivered, so to trick the system into thinking that
Appendix A: Examples
6.
7.
the truck has finished (even though it hasn’t even been loaded yet), drag the truck
directly to the To Plant status.
Drag the truck to the second order. When the Ticketing screen appears, you are
prompted with a dialog box that reads Truck is returning from order # to
plant # - do you wish to ticket it now? Click Yes. Double-check the
ticket information and press <F2> to ticket the truck.
The Tracking and Scheduling screen now looks something like this:
Tracking & Scheduling
8.
The black box where the truck number is usually displayed indicates that the truck has
already been ticketed to a second order—so that the dispatcher will not try to ticket the
truck to a third order. But the system thinks that these two orders are two separate trips.
Drag the truck back to the yard. As soon as this is done, the truck will immediately
appear on the second order.
The truck can now be loaded with the total yardage for the two jobs, and go on its way.
9. Using this method, ticket times must be given extra attention. While the system records
times as the truck goes through the delivery cycle, all those times are assigned to the
second ticketed order—remember, as far as the system is concerned, the first order is
already delivered. Similarly, the dispatcher needs the driver to manually alert him as he
gets to the different jobs.
10. If you charge for excessive unloading time, require the driver to manually record the
time he arrived on site, started pouring, and started to wash out. Those times will then
need to be entered manually through Edit Orders and Tickets.
Appendix A: Examples
381
Two Mix Products on One Truck
Sometimes a dispatcher needs to send one truck to a location with two different mixes on
board. This is possible when deliveries are over short distances and the truck doesn’t have to
continue to turn the mixer. Typically, the second product will be a pump-priming mix that
can be unloaded first.
The process used to order, load and deliver two products on one truck is very simple. The
order is set up as usual with two different products, and upon ticketing, two tickets are
created and sent to the batch panel.
To load and ticket two products on one truck:
1.
Follow the usual order entry process, selecting two different mixes and entering a
schedule.
2. Open Concrete Ticketing & Shipping {Dispatch > Concrete Ticketing &
Shipping}.
3. The Order Date defaults to the current date. If necessary, you can change this once a
plant code has been entered.
4. Enter the Plant Code of the order you just created.
5. Select a Truck Code.
6. If a driver was not automatically assigned, detail on the Driver Code field and select a
driver from the list.
7. Enter the Order Code of the order you just created.
8. At this stage you can see details for both products, but only the Load Quantity of the
first product is editable.
9. Press the Add button at the bottom of the screen. This adds a new ticket and places the
cursor in the Order Code field. Detail on the field and select the same order as
previously. Tab through the Ticket Code field.
10. The screen now displays the Load Quantity for the second product on the order. You
can scroll between the first and second products using the Previous/Next buttons.
Concrete Ticketing & Shipping (EDTSHIP) - Second product on one truck
The second product must have a load quantity less than or equal to the truck’s
maximum load, minus the load quantity of the first product.
11. The Journey field is now read-only and displays the Unique Identifier field, which
always reads ‘##’.
12. Press <F2> to accept the screen and save the changes. Two tickets are created and sent
to the batch panel.
13. You may be prompted with messages relating to charges, such as minimum load and
sundry charges. Respond to these prompts appropriately.
382
Appendix A: Examples
Scheduling an Order out of Multiple Plants
Sometimes it is necessary to deliver an order out of two or more plants, either because of
the sheer quantity of material being delivered, or because of prior scheduling commitments.
Multiple-plant scheduling is easy to accomplish in COMMANDseries, although you do
need to work out a couple of details beforehand. Let’s say that we have a 3 M3 order that we
want to split between two plants. The customer wants the first load to arrive at 2 P.M., with
10-minute truck spacing. To make life a little easier, we’ll alternate trucks from the two
plants.
1.
Set up the primary order screen normally.
Order Entry (EDTCORD)
2.
When you get to the schedule screen, enter the plant number and start time. The next
field is the Scheduled Quantity. Normally, the total order amount defaults into this
field; however, we will only be delivering 1.5 M3out of this plant. Enter 1.5 and tab
through.
Appendix A: Examples
383
Order Line Schedule Information(EDTORDR4)
At the bottom of the schedule screen, the Total Quantity field will indicate that you
currently have only half of the order scheduled for delivery. COMMANDseries will
not accept any order until the total ordered quantity has been scheduled for delivery.
4. Select a Truck Type. Enter distance and travel time as necessary.
5. This brings us to the Truck Spacing field. They want 10-minute spacing, but we want
to alternate trucks between the two plants. That means that for the plant 1 schedule, we
need a truck spacing of 20 minutes. Enter the truck spacing.
6. Press the Add Occurrence button or <F6>. It will look as though the schedule form
has cleared, but if you look at the upper left corner you will see that it now reads
Schedule 2. Now, enter the delivery schedule for the second plant. (If you need to
refer to Schedule 1, use the scroll bar on the right side of the form to move back and
forth between the two schedules).
7. Enter Plant 2 for the plant. Next is the start time. The first load (which we
scheduled out of plant 1), arrives at 2 P.A.M., and they want 10-minute spacing. So,
we’ll schedule first load out of the second plant for ten minutes later, 14:10.
8. The Scheduled Quantity will default to the remaining unscheduled order quantity, in
this case, 1.5 M3. At the bottom of the form, the ordered quantity now matches the
scheduled quantity.
9. Enter the Distance and Travel Time. In most cases, these values will not be the same
as for Plant 1. If these values are not accurate, the 10-minute truck spacing will not be
maintained.
10. Press <F2> to save the schedule and return to the main order screen. Note that the
schedule summary only displays information for the first schedule.
3.
384
Appendix A: Examples
Order Entry - Schedule section (EDTCORD)
11. Press <F2> again to save the order.
OK, the Order’s in the System. Now What?
Now that the order has been scheduled, let’s talk about what the dispatcher will see and do
on the Tracking and Scheduling screen.
Here’s what the Tracking and Scheduling screen will initially look like. Both the plant
and order summary lines show the amount scheduled out of that plant. Note that because
of the difference in travel times, the first truck from plant 43 is scheduled to be loaded
before the first one from plant 48, even though the truck from plant 48 will be the first to
arrive on site.
Appendix A: Examples
385
Tracking & Scheduling - Multiple Shipping Plant
Display separates
loads by plant.
386
The order appears under both
scheduled plants.
Appendix A: Examples
Batching for Third Parties
It is often the case in the concrete industry that the customer that places an order with you the concrete provider - is not always the customer that receives the order.
By setting up third party companies it is possible for your customers to order from you on
behalf of one of their customers, so in effect, a third party customer is defined as a customer
of your customer.
COMMANDseries also allows you to set up different document formats to print tickets
with your customer’s logo, to give to the third party customer. A different ticket sequence
can also be set up to differentiate between normal and third party tickets.
Appendix A: Examples
387
Third Party Batching Process
The diagram illustrates the third party batching process. In COMMANDseries, third party
batching is managed through customers and projects.
The Ticket/Weights Data Out screen {Invoicing > Ticket/Weights Data Out} has also
been modified to provide the ability to export tickets for specific customers or customer
ranges, where before it allowed only date and ticket code ranges.
Topics in this section:
Third Party Customers
Third Party Customer Projects
Third Party Company Document Formats
Third Party Customers
A third party customer must be set up as a valid customer in COMMANDseries and then
flagged as a third party company. You then reference that customer within a project set up
for the billing customer.
388
Appendix A: Examples
To set up a third party customer:
1.
1.
2.
3.
In order to use third party batching, the Use Multiple Customer Codes checkbox on
the System tab of the Configuration screen {Files > General Information >
Configuration} must be checked.
Open the Customer screen. {Files > Customer & Project Information > Customers}
Detail on the Customer Code field to select an existing customer. To add a new
customer enter an appropriate customer code and create a customer in the usual way.
Check the Third Party Company check box at the bottom of the Main tab.
Customers screen (EDTCUST)- Main tab - Third Party Company
4.
Press <F2> to accept the screen to save the changes.
Third Party Customer Projects
In order to achieve third party business, you must set up a project for the billing customer,
that references the billing customer.
To set up a project for a third party customer:
1.
2.
3.
4.
5.
6.
Open the Projects screen. {Files > Customer & Project Information > Customers}
Detail on the Customer Code field and select your customer - the billing customer from the list.
Tab through the Project Code field or enter a unique project code.
Continue to enter project details in the usual way.
Detail on the Shipping Customer field and select a third party company from the list.
The Reference Customer will typically be the same as the billing customer. Detail on
the field to select from the list, or enter the customer code.
Appendix A: Examples
389
Projects screen - (EDTPROJ) - Main tab - Third Party Project
7.
Press <F2> to accept the screen and save the changes.
For a normal order, when you detail on the Project field in Order Entry the list
shows projects for the billing customer, since the shipping customer and the billing
customer are the same person. When the Use Multiple Customer Codes checkbox
on the System tab of the Configuration screen {Files > General Information >
Configuration} is checked, detailing on the Project field in Order Entry lists the
projects for the shipping customer. This means that when creating a third party order,
you should enter the shipping customer in the Customer Code field.
Third Party Company Document Formats
COMMANDseries also allows you to specify additional document formats to use for
tickets provided to third party customers. This means that the ticket delivered to the third
party customer can display the logo of your customer. This enables you to use the billing
customer’s own ticket formats.
To set up a third party company document format:
1.
2.
3.
4.
390
Go to the Plants screen. {Files > Plant & Delivery Information > Plants}.
Enter the Plant Code of the plant you wish to define the document format for, or
detail on the field to select one from the list.
Go to the Communications Tab and ensure the Print Dispatch Copy checkbox is
checked.
Press the Setup button on this line to open the Plant Communication Setup
screen. The plant code is displayed in the title bar of the screen in parenthesis.
Appendix A: Examples
Plant Communication Setup (EDTPLNTA)
5.
6.
7.
Ensure that a Document Format and Non-Mix Document Format Group are
defined, as these are mandatory fields and are specific to your document formats.
Enter the third-party document format into the Third Party Company Document
Format field, or detail to select one from the list.
Press <F2> to accept the screen and save the changes. Press <F2> again to accept the
Plants screen. This document format will now be used for third party tickets from the
specified plant.
Appendix A: Examples
391
Appendix B: Credit
Checking
Topics in this section:
Credit Checking Overview
Credit Checking Configuration
Using the Credit Checking Function
Credit Checking Overview
Credit Checking is a comprehensive component of the accounting system that helps keep
Accounts Receivable at a manageable level. Credit Checking helps prevent shipment of
orders to customers who have overdue balances or some other kind of limit on their
account. COMMANDseries supports two levels of credit checking:
Standard (no license needed)
Each customer is assigned a credit code. Each credit code can be set to one of four Credit
Types:
•
•
•
•
Cash Only
Charge Only
Charge or Cash
No Sale
Once a customer or customer/project has been entered, the system retrieves the appropriate
credit code, and the order screen will respond accordingly:
Cash Only – The Payment Form Selection screen will display, allowing selection of
payment method. If the credit code is flagged to Display Credit Code Description, the
description will appear in the top of the Payment Form Selection screen.
392
Appendix B: Credit Checking
Payment Form Selection (EDTSLPF)
Charge Only – The system will simply proceed with the standard order entry process. The
order will be invoiced under regular business practices. If the credit code is flagged to
Display Credit Code Description, the description will appear in a dialog box.
Cash or Charge – The Payment Form Selection screen will display, allowing selection
of payment method.
No Sale – The Credit Code Description will be displayed in a dialog box. No orders can
be entered for a customer with such a credit code.
Warning screens pop up when specific situations occur in order entry. Depending on how
credit is set up for individual customers, different types of warning screens appear.
Remember, whether or not warning screens appear depends on how the customer’s credit
code and credit type is set up in the customer file.
You may want to create multiple No Sale credit codes to cover different situations. For
example:
Appendix B: Credit Checking
393
•
•
No Sale - Contact Credit Manager
No Sale - Customer Account is Retired
When using this credit method, it’s important to understand that the system doesn’t pay any
attention to the customer balance; all that matters is the credit type of the customer’s
assigned credit code.
Credit Checking (licensed feature)
Full Credit Checking is a licensed option in COMMANDseries. This feature will actively
review a customer’s full balance whenever an order is entered or a ticket is printed, and will
approve or hold the order based on the credit limit established in the customer’s assigned
credit code.
Credit Checking Configuration
To use Credit Checking, credit codes and reason codes must be set up in
COMMANDseries. Do not assume that relevant credit codes and reason codes were set up
when the system was initially configured.
Topics in this section:
Credit Codes
Reason Codes
Assigning Customer Credit Codes
Credit Codes
You can build credit codes that are relevant to Credit Checking using the credit codes screen
{Files > Customer and Project Information > Credit Codes}. You can then verify credit
limits on codes that require credit supervision; you needn’t verify the credit limits on
customers whose credit code reads AAA OK To Sell, for example. Customers assigned
that credit code generally do not need credit supervision.
Credit Codes (EDTCRED)
394
Appendix B: Credit Checking
To build a credit code:
1.
2.
3.
4.
Enter a new Credit Code. Choose a number or letter combination that is not already
in use in the credit codes file.
Enter the Description of the new credit code. This field fully describes, or names the
credit code. The code should have a clear and direct relationship to Credit Checking.
Enter a Short description of the new credit code. The short description appears on
screens and reports where the Description will not fit.
Enter the Credit Type. This field identifies the credit type assigned to the credit code.
Following is a list of credit types.
Cash only – Only cash may be received from this customer
Charge only – Only charge orders are allowed for this customer
Charge or cash – C.O.D. or charge orders may be taken for this customer
No sale – No orders of any kind can be taken for this customer. Tickets on orders
already established will not be generated
Enter the Exceed Limit Authorization Code. This code releases a flagged order
authorized by the credit department. Privileged users should change this code each
time it is used.
6. Check the Verify Credit Limits checkbox if this particular credit code needs
authorization from the credit department to proceed with the order.
7. To make the new credit code available to projects, mark the Allow Assignment To
Projects checkbox.
8. To specify that when using this credit code Orders Require Authorization, mark the
checkbox.
9. The product line field coordinates with the following Do not exceed and Require
Project checkboxes. The field defaults to Concrete; set the product line as necessary,
then proceed to the following checkboxes.
10. Check the Do not exceed ordered quantity in ticketing checkbox to ensure the
delivered quantity of product does not exceed the ordered/ticketed quantity of product.
11. Check the Require Project for all Orders checkbox, if necessary.
12. To modify other product lines, change the product line field to the appropriate product
and repeat Steps 9 and 10 above.
5.
Reason Codes
You can build Reason Codes that are relevant to Credit Checking using the Reason Codes
seditor {Files> General Information > Reason Codes}. The Reason Codes editor lets you
access reason codes that explain the reasoning behind setting another field to a particular
value. For instance, a non-taxable reason code is used in the Customers function to tell why
a particular customer is set to a non-taxable status. The non-taxable flag field indicates
whether customers are non-taxable. If they are non-taxable, the reason code tells why.
Following is a list of reason types relevant to credit checking; Credit Checking is most likely
related to A/R Balance Remaining.
Removed Item - Order or ticket has been removed or canceled
Suspended Item - Order or ticket has been suspended from invoicing
Appendix B: Credit Checking
395
Non-taxable Item - Customer/project/order is set to non-taxable status
A/R Balance Remaining - A balance remains for an invoice that has some A/R
transaction applied to it.
Reason Codes (EDTRSNC)
To build a reason code:
1.
2.
3.
4.
5.
6.
Select a Reason Usage from the drop-down list.
Enter the Reason Code. Use a number that is not already assigned to another reason.
Enter a Description.
Enter a Short description.
Select which COMMANDseries module the reason code should apply to.
Click on the Add Occurrence button to make another entry.
Assigning Customer Credit Codes
Customers who require constant credit supervision need their customer file updated to
indicate their credit needs before Credit Checking can run effectively. Several fields in the
Customer File require data to initiate Credit Checking: Credit Code, Credit Limit,
High Balance, Salesman, Pricing Plant, and Credit Person.
Customer Accounting tab (EDTCUSTG)
396
Appendix B: Credit Checking
To assign customer credit codes:
1.
2.
3.
4.
5.
6.
Access the Accounting tab on the Customers editor {Files > Customer & Project
Information > Customers > Accounting}.
Enter the appropriate Credit Checking Credit Code. Detail on the field if necessary.
Enter the customer’s credit limit. Any new order exceeding that balance will be flagged
with a warning screen if Verify Credit Checking is selected on the Credit Codes
screen.
Enter the customer’s High Balance. This is the highest balance a customer has
accumulated. It is updated by the COMMANDreceivables application when an invoice
is posted to the customer's account and a new high balance is reached.
If you maintain credit by company, i.e., your system is set up so that different
companies have different credit codes, a Salesman and Pricing Plant can also be
defined. This is also useful if two different companies use the same credit code, but a
different salesman and pricing plant. Detail on the fields to select appropriate entries.
This information will then be used when creating orders. If these fields are left blank
you will be forced to enter them when entering an order. If you do not maintain credit
by company, i.e., the company code is entered as # the salesman and pricing plant fields
can be left blank.
It is only possible to maintain credit by company if the Maintain Credit by
Company flag on the Receivables tab of the Configuration screen {Files > General
Information > Configuration} is checked, and this must be done at the time of set up.
Enter the Credit Person. Assign this number to the employee who is responsible for
credit matters with customers. The selected employee must be contacted by Dispatch
for credit authorization and the Exceed Limit Authorization Code.
Using the Credit Checking Function
Once the credit codes and the customer files are updated, Credit Checking begins to
function.
Credit Alert
When dispatch enters an order that exceeds the credit limit of a particular customer, the
Credit Inquiry screen will appear before the system will accept the order. The dispatch
person can display shipped orders, booked orders, invoices and/or receipts using the
buttons, but ultimately has three options, Cancel, Suspend, or Override.
Appendix B: Credit Checking
397
Credit Inquiry (SYSCREX)
Select one of the following options:
•
•
Click the Cancel button to cancel the order.
Click the Override button to enter the Credit Override Authorization code. Dispatch
then calls the credit person responsible for supervising this customer’s credit needs to
get the password or phrase.
Credit Override Authorization (SYSCREX1)
•
Click Suspend Order if the credit department is unreachable and it becomes
necessary to suspend the order until authorization is provided. Enter the Suspend
Order Reason Code. Dispatch can return to that order at a later time without having
to re-enter the order.
Warning Screens
Warning screens pop up when specific situations occur in order entry. Depending on how
credit is set up for individual customers, different types of warning screens appear.
Remember, whether or not warning screens appear depends on how the customer’s credit
code and credit type is set up in the customer file.
398
Appendix B: Credit Checking
If the customer’s account is in dispute for any reason, such as the customer disputes the
price or requires payment before new delivery, the following message appears:
Do not sell
If the customer’s account is C.O.D. only, the following message appears:
COD only!
If the customer code is retired, the message below appears. It may be necessary to assign the
customer a new code, or perhaps an incorrect customer number was entered initially.
Customer code has been retired!
Message
Cash only
Call Credit
Department
COD Only
Do Not Sell
Customer Code
has been retired!
Appendix B: Credit Checking
Meaning
The customer is a cash only customer. Only cash-related payment methods (Cash, Check, Credit Card) will be allowed.
The customer’s account requires constant supervision by the
Accounting Department.
Note: This message is a variation on the Cash Only code. It
does not prevent an order from being placed, nor does it
force the order taker to call the credit department before
proceeding.
Another Cash-Only variant
If a customer has a Do Not Sell credit code, the system will not
accept an order for the customer.
A Do Not Sell variant. Provides the order taker with additional
information.
399
Appendix C: Order-Level
Mix Design
Order-level mix design lets you modify a mix design at the order level, without changing
the base mix design stored in the item file. To use this feature, users must have the necessary
flags set in the User editor. Additional settings for the feature are located on the
Configuration editor’s Distribution tab. Please refer to the Setting up the System manual for
additional information on these screens.
The basic functioning of this feature is controlled by settings in the Configuration and User
files. The Configurations setting specifies if the feature is to be used at all, while the Userlevel options {Files > System > Users > Options} determine what specific privileges any
given user has with regard to this feature. The two User-level options are:
Allow Access to Order-level Mix Design - This flag lets a user enter a mix design
at the order level.
Allow Override of Unapproved Mix Designs in Tickets - This flag gives a user
the ability to ticket loads with unapproved mix designs.
Note: Dispatch can only ship approved mixes. The ticket screen will reject unapproved
mixes, unless the user is flagged to allow override of non-approved mixes.
Please Consult the Setting Up the System manual for additional information.
The business process for using Order-level Mix design will vary based on companies’ needs
and hardware. Of particular importance to the process is whether the company has either a
batch interface or a third-party QC program.
Regardless of your specific business practices, it is important to determine how many days
the QC process will take, and make sure that orders are taken far enough in advance that the
mixes can be approved by QC.
The following are some possible scenarios:
No Batch Interface, No 3rd Party QC
1.
2.
3.
4.
Orders are entered with mixes attached.
QC runs the Order Mix Design report for approved and non-approved mixes.
QC reviews, edits, and approves the mixes on the order. If a mix cannot be approved,
the customer is notified, and an alternate mix design is worked out.
The approved mix is dispatched normally.
Batch Interface & 3rd Party QC
1.
2.
3.
400
Export the mixes to a mix design output file.
Import that file into the 3rd party QC program.
Edit as necessary.
Appendix C: Order-Level Mix Design
4.
5.
Import corrected mix design file back into COMMANDseries.
Download mixes to batch panel. The mixes are now ready to be dispatched.
Batch Interface, No 3rd Party QC Program
1.
2.
Orders are entered with mixes attached.
QC runs the Order Mix Design report for approved and non-approved mixes.
Note: The Order Mix Design Report is available under the Dispatch option in
COMMANDconcrete. It shows what Order Level Mix Designs have been
approved or not approved.
3.
4.
QC reviews, edits, and approves the mixes on the order. If a mix cannot be approved,
the customer is notified, and an alternate mix design is worked out.
Download mixes to batch panel. The mixes are now ready to be dispatched.
Topics in this section:
Order-Level Mix Design
Mix Design Interface - QA
Ticketing
Order-Level Mix Design
The Order-level Mix Design feature lets users with appropriate access design a mix from
the Order Entry screen. This mix design will be available only for the current order. This
functionality is useful when it is necessary to work around specific restraints, such as
weather conditions and loading times.
To set up Order-Level Mix Design:
In order for a user to be able to use order-level mix design, two system flags must be set:
1.
2.
Open the Distribution tab of the Configuration screen {Files > General Information
> Configuration}. Select Allow Order Level Mix Design to activate the feature at a
system level.
The Default Mix Design Approval Status flag determines the operational
requirements of the feature. Select one of the following options:
Mix Not Approved (the most common selection) - The system will not ship the
mix until someone with appropriate system privileges retrieves the order, opens the
Order Line Mix Design screen, and checks the Mix Design Approved by Quality
Control box.
Mix Design Approved - Modified mix design can be shipped immediately.
Configuring Order-level Mix Design
Appendix C: Order-Level Mix Design
401
3.
4.
5.
Accept the configuration settings
Open the Options tab on the Users editor {Files > System Information > Users >
Users}.
Select Allow Access to Order Level Mix Design to let a given user use the feature.
Warning!
If you use Order-level Mix Design, you must ensure that anyone authorized to
enter order-level mix designs is qualified to do so as the design might not be
reviewed prior to shipment!
Please refer to the Setting up the System manual for additional information on configuring
these two flags.
Once the system has been set up for order-level mix design, you are ready to edit a mix from
the Order Entry screen.
To perform order-level mix design:
1.
2.
Open the Order Entry screen and create an order as normal.
When the system is set up for order-level mix design, the Associated Products button
on the main Order Entry screen becomes the Mix Design button.
Order Level Mix Design-Order screen
3.
4.
After entering a mix and an Order Quantity, press the Mix Design button.
The Order Line Mix Design screen displays. The screen title bar will also show the
selected mix.
If you are licensed for the Technical Quotation System (TQS) and use it to create a
mix, opening the Order Line Mix Design screen will only let you view the mix
details; you cannot edit them.
Order Line Mix Design screen (EDTORDRP)
402
Appendix C: Order-Level Mix Design
Order-Line Mix Design screen (EDTORDRP)
5.
6.
7.
8.
9.
10.
11.
12.
13.
Enter the Scheduled Plant.
If you want to begin with the standard mix design, press the Defaults button. The
mix design for the mix at the selected plant will display.
The Sort Order number automatically displays in this field. If changes are necessary,
detail on the field to adjust.
For each item in the mix, enter a Sort Order, the Item Code for the Constituent
Product, and the Quantity. Use the Add Occurrence button to add additional
constituents.
All constituents included in this section of the screen will be included in the base mix
price. To add an item for which the customer will be charged extra, use the Item Code
field below.
If the order is to be shipped out of multiple plants, you have two options:
Select the Copy to All checkbox to make the design available at all plants.
Select the Add Occurrence button to the right of the Copy to All button. A
new design form will appear, allowing you to enter a separate mix design. You can
scroll between these mix designs using the scroll bar on the right of the screen. This
feature may be useful if plants have different constituents on hand.
If you want to add an associated product, one for which the customer will be charged
extra, enter the product’s Item Code, Order Quantity, and Trim Percent.
The Mix Design Approved by Quality Control checkbox determines if the mix can
actually be shipped. Use field-level security to restrict access to this field to QC
engineers.
Accept the screen to save the mix design and return to the Order Entry screen. The
Mix Design button will be highlighted to indicate that a mix design is present.
Schedule and save the order as usual.
Appendix C: Order-Level Mix Design
403
The modified mix is stored at the user level, and has no effect on the mix design in the Item
Master File. Once the order has been created, the sequence of events is dependent on how
your system is configured.
Mix Design Interface - QA
The Mix Design Interface screen lets the user send mix product constituent information
to a batching system. After the selection parameters are entered, the user is allowed to edit
the list of products to be downloaded. After the user is satisfied with the products to be
downloaded, accept the screen and the mix product information is downloaded to the
batching system.
To use the Mix Design Interface:
1.
Go to the Mix Design Interface screen {Manage > Application Management > Mix
Design Interface}.
2.
Select a Mix Download Method from the drop-down list. Options are:
Download from Item Master
Download from Order
Upload to Orders
Select an Output to option from the drop-down list. The options are:
Batch Panel Output
File Output
This field will not be available if the selected Mix Download Method is Upload to
Orders.
If File Output is selected, enter an Output File and select a Document Format
Group.
Enter a range of values for Item Code, Plant Code, and Item Category.
In the Mixes with Constituent field, enter a constituent item code to be used when
retrieving mix items. If entered, only mix items that contain the specified constituent
item will be retrieved and sent to the batching system.
If you wish to delete all mixes from the batch panel at one or more plants, mark the
Clear Mix Files checkbox for the specific plants.
WARNING: This function is very dangerous. Selecting this checkbox instructs
the system to delete all mixes from the batching system, and they are NOT
retrievable.
Click Retrieve. This will save the products for downloading.
Accept the Mix Downloads screen to send the mix product constituent information
to the batching system or to an output file.
3.
4.
5.
6.
7.
8.
9.
404
Appendix C: Order-Level Mix Design
Ticketing
Once the order-level mix design is approved, ticketing is just like standard concrete
ticketing. The only time the process differs is when the dispatcher attempts to ticket a load
with an unapproved mix design. What happens when a user attempts to ticket an
unapproved mix depends on the setting of Allow Override of Unapproved Mix
Designs in Tickets.
If the Allow Override flag is not checked:
The user will receive a message that the ticket has an unapproved mix design, and cannot be
ticketed. The ticketing screen will clear.
If the Allow Override flag is checked
The user will receive a message that the mix design is not approved, and will be given a Yes/
No option to override. If the user selects yes, the load will be ticketed. The mix design will
still be recorded as unapproved.
If the user selects no, the ticket process will be cancelled.
Appendix C: Order-Level Mix Design
405
406
Appendix C: Order-Level Mix Design
Automatic Caller ID
The Automatic Caller Identification feature is designed to streamline the process
dispatchers use when entering orders from phone calls in COMMANDseries.
Previously, when a dispatcher received phone calls, callers had to identify themselves, and
then the dispatcher had to manually search for the caller in COMMANDseries. Now, when
dispatchers receive a call from a contact with information already entered in the system, the
caller’s name and orders can be displayed on the screen by the time the dispatcher picks up
the phone, without any manual lookup.
This new feature operates via an interface with VoiceGate’s call-processing technology.
COMMANDseries will receive Caller ID information from VoiceGate and attempt to
match the incoming telephone number to a number in the new database table, Contact
Phone Number (CTTN). If the incoming telephone number matches a number in the
table, a list of matching contacts will be displayed on the updated Order Prefix (CPOL)
screen.
Although the updated Order Prefix screen will be available to all users (including those
without VoiceGate), the Automatic Caller ID license code (ID) must be added to the
License manager {Files > System Information > Licenses) to support the interaction
between VoiceGate and COMMANDseries.
Topics in this section:
Configuration
Workflow
Manual Lookup
Contact-Deliver To-Customer Order Lookup Form
Configuration
For those users who have VoiceGate already licensed and installed on their systems, setting
up Automatic Caller ID is a simple process.
To enable Caller Lookup:
Select the Caller ID Enabled drop-down box on the User tab in Preferences. When
selected, you can manually look up contacts by phone number on the Order Prefix screen.
•
•
Select Yes to enable the caller lookup feature.
Select No to disable the caller lookup feature.
Automatic Caller ID
407
CommandAlkon does not support VoiceGate in any way. For troubleshooting VoiceGate,
refer to your VoiceGate user manual.
Workflow
Once the Automatic Caller Identification license feature has been added to the License
editor, a prompt similar to the following will display on your desktop whenever an
incoming call is received:
You have three choices when presented with this prompt:
1.
2.
3.
408
Click the gray X to close the prompt and take no further action.
Do nothing; the prompt will fade within 30 seconds.
Click directly on the prompt to display the Order Prefix screen.
Automatic Caller ID
The following information displays for each contact on the expanded Order Prefix screen:
•
•
•
•
•
Contact Code
Contact Name
Contact Address
Contact City
Telephone Number
If the contact is linked to a specific Customer Code, the Order Prefix screen will also
display the last ten orders in the customer’s order history. In addition, the detail button to
the left of the Contact Name will open a new Order with the linked Customer Code
already entered. If the contact is not linked to a Customer Code, the button will not display.
Automatic Caller ID
409
If a caller does not already have information in COMMANDseries, the Contact Editor
displays so you can enter information about the caller while on the phone. The new
Contact screen will be prepopulated with the incoming caller’s phone number.
To edit a contact, click the Edit Contact Information button on the far right of the
contact line to open the Contact Editor for that contact.
Manual Lookup
There are now two ways to manually look up a contact: by phone number and by name. A
new search field has been added to the Order Prefix screen to allow for this functionality.
See the Configuration section for more information on how to set up this feature.
To search manually by phone number:
1.
2.
3.
Select Phone Number from the Search drop-down list.
<Tab> to the Phone Number field, and then enter the phone number.
<Tab> again to display information for the contact associated with the phone number
entered.
Once you have successfully searched for a contact (using either the Name or Phone
Number option), select the detail button next to a contact in the new Contacts section to
display all customers, projects, and orders associated with the selected contact.
Contact-Deliver To-Customer Order Lookup Form
A new form, similar to the existing Customer/Contact/Project (CCPOL) form, has been
created for the Caller ID module. This form, called the Contact-Deliver To- CustomerOrder Lookup form (or CDCOL for short), will display Deliver To information in addition
to Order, Customer, and Contact information, for incoming callers.
Note: Only users with Contract Integration in their license will be able to use this form.
410
Automatic Caller ID
CDCOL (Contact-Deliver To-Customer-Order Lookup) Screen - EDTORDRY
•
Search - Select either Phone Number, Contact Name, Deliver To Code, Deliver To
Name, or Customer Code to view those associated records. The field next to the
Search drop-down will change according to what you’ve selected. Enter your search
criteria in this field to bring up related records that start with or match your search
criteria.
•
Customer/Project Sequence - Select this button to switch to the CCPOL form.
When you are on the CCPOL form, the button will be renamed Deliver-To/
Customer Sequence, and will take you back to the CDCOL form when pressed.
The process flow for the Caller ID module remains mostly the same as before, the
exception being that the new CDCOL form will display if there are any Deliver To
addresses for the customer. As each Deliver To is selected, the form will then display the
associated customer information for that Deliver To.
If the caller’s (contact) telephone number is not found for any Deliver To addresses, you
will be prompted to create a new contact. You can then select whether or not the contact is
going to be a Customer contact or a Deliver To contact. If you select Customer contact, the
Customer/Contact/Project (CCPOL) form will be displayed; otherwise the Deliver-To
form (CDCOL) form will be displayed.
Automatic Caller ID
411
•
Contacts will be linked to a DCON (Deliver To Contact) record. If any DCON
records already exist for a Contact, the CDCOL form will display.
If you access the screen manually {Dispatch > Orders > Options > Prefix Screen}, the
system will check to see if the contact you entered has any associated Deliver To entries. If
so, the CDCOL screen will display; if not, the CCPOL screen displays instead.
412
Automatic Caller ID
Automatic Caller ID
413
Truck Ahead-Truck Behind
Producers are requesting COMMANDseries provide automated delivery-related
communications capability to reduce the amount of delivery-related voice communications
between drivers and Dispatch. In a typical dispatch office, there is a steady stream of phones
ringing and chatter. One of most common types of chatter is the communication between
the drivers and dispatch. While this communication is a necessity, minimizing this chatter
results in more efficient dispatch operations.
To reduce communications traffic, COMMANDseries provides the ability to establish
automated messaging via signaling units. When a load is ticketed, this system will send
messages to the ticketed truck as well as the truck(s) ahead of and/or behind the ticketed
truck in the order’s schedule. The messages will notify each truck of the trucks immediately
ahead of/behind them. The overall result will be that each truck will have more accurate
dispatching information, reducing the number of calls to the dispatcher.
Example
TRUCK 1 - First ticket
TRUCK 2 - Second ticket
TRUCK 3 - Third ticket
TRUCK 4 - Fourth ticket, etc.
•
When the first ticket prints:
Truck 1 receives a message similar to:
Truck Ahead: [blank] Truck Behind: [blank]
•
When the second ticket prints:
Truck 1 (if active and not 'At Plant') receives a message similar to:
Truck Ahead: [blank] Truck Behind: TRUCK2
Truck 2 receives a message similar to:
Truck Ahead: TRUCK1
•
Truck Behind: [blank]
When the third ticket prints:
Truck 1 does not receive any message.
Truck 2 (if active and not 'At Plant') receives a message similar to:
Truck Ahead: TRUCK1 Truck Behind: TRUCK3
Truck 3 receives a message similar to:
Truck Ahead: TRUCK2
•
414
Truck Behind: [blank]
When the fourth ticket prints:
Truck 1 does not receive any message.
Truck 2 does not receive any message.
Truck 3 (if active and not 'At Plant') receives a message similar to:
Truck Ahead-Truck Behind
Truck Ahead: TRUCK2
Truck Behind: TRUCK4
Truck 4 receives a message similar to:
Truck Ahead: TRUCK3
Truck Behind: [blank]
Cancelled Tickets
When a ticket is canceled during ticketing, the remaining ahead/behind vehicle(s) (if any)
no longer have the correct 'ahead' and 'behind' information. Corrected information will be
sent to the remaining active ahead/behind vehicles (if any) in the delivery cycle for that
order.
Configuration
There are two elements to configuring this feature:
•
•
Document Tags/Formats
Signaling Units
Document Tags/Formats
Two documents must be created for document type Mobile Signal Message:
Tag Code
Tag Description
Tag Type
TRKSAH
Truck Ahead
Calculate
TRKSBH
Truck Behind
Calculate
Once the tags have been created, a new document format, TRKAHD, should be created
using the following parameters:
•
•
•
•
Line 1, Literal, Begin at: 1, End at: 12, Literal Text: "Truck Ahead:"
Line 1, Field, Name: Trucks Ahead (TRKSAH), Begin at: 14, End at: 26
Line 1, Literal, Begin at: 30, End at: 42, Literal Text: "Truck Behind:"
Line 1, Field, Name: Trucks Behind (TRKSBH), Begin at: 44, End at: 56
The document layout should look like this:
"Truck Ahead: <TRKSAH> Truck Behind: <TRKSBH>"
Signaling Units
Each signaling unit must be configured for the feature. Configuration is done on two
different tabs within the Signaling Unit Editor.
Signaling-Options Tab
Enable the feature using the Send Truck Ahead/Behind Msg drop-down field.
Truck Ahead-Truck Behind
415
Turn on the feature here.
Signaling-Outgoing Tab
In addition, the signaling unit must be configured to send the update message on the
Outgoing tab.
To configure the outgoing message:
1.
2.
3.
4.
5.
6.
416
Enter a new Message Code.
Enter the Outbound Message Text.
This message will not be displayed; the message will be based on the document format,
as described earlier.
Select Send Ahead/Behind Msg as the Event.
When this event is selected, the Return Plant, Color, and Flag fields will disappear
for that occurrence.
Enter TRKAHD as the format name.
Press Add Occurrence and repeat the process to create the second entry.
Accept the screen.
Truck Ahead-Truck Behind
Truck Ahead-Truck Behind
417
Appendix F: SAP On-line
Ticket Interface
COMMANDseries can export ticket information via XML to SAP and subsequently
receive a Control Number from SAP. The Control Number is stored against the Ticket
Record. The XML transmission is triggered by Ticketing events (Ticket Creation and
Ticket Removal).
Note: The customer is responsible for providing an appropriate interface program.
Plant Configuration
On the Plant > Communications tab, a new checkbox, Print Tickets to SAP, has been
added. When this field is selected, a Setup button displays. Press this button to open the
SAP Communication Setup screen.
SAP Communication Setup screen (EDTPLNTO)
To enable the interface, enter the appropriate SAP Webservice URL.
Operations
Ticket Creation
1.
2.
3.
4.
418
A ticket is created in COMMANDseries
Ticket information is sent via XML to SAP Webservice
Ticket send will be acknowledged.
Ticket will receive an SAP-generated control number. This field will be stored against
the Ticket record in COMMANDseries
Appendix F: SAP On-line Ticket Interface
Ticket Removal
1.
2.
3.
4.
A Ticket is removed in COMMANDseries.
Ticket information is sent via XML to SAP Webservice.
Ticket removal will be acknowledged by SAP.
Ticket will keep the SAP-generated control number.
Ticket Reactivation
1.
2.
3.
4.
A Ticket is reactivated in COMMANDseries.
Ticket information is sent via XML to SAP Webservice.
Ticket reactivation will be acknowledged by SAP.
Ticket will keep the previously received SAP-generated control number.
The control number is stored in the control_num.TICK field. A new Ticket Print/Data
Out document tag has been created to the field:
•
•
•
SAPCTL (Description: SAP Control Number)
Type: Ticket print and Data in/out
Field: control_num.TICK
XML Formats
COMMANDseries
This is the post that CMDseries will send at the time of ticketing to your ERP server. The
function this post is sent to will need to parse and send all pertinent information to your
ERP server in order for the ticket to be printed. All available fields are listed below and will
be sent regardless of whether there is a value contained within the tag or not.
<?xml version="1.0" encoding="utf-8"?>
<soap:Envelope xmlns:soap="http://schemas.xmlsoap.org/soap/
envelope/" xmlns:xsi="http://www.w3.org/2001/XMLSchema-instance"
xmlns:xsd="http://www.w3.org/2001/XMLSchema">
<soap:Body>
<DTDSAPTKT>
<TICK.CMDSERIES>
<TKTL.CMDSERIES>
<TLAP.CMDSERIES>
<DELV_QTY.TLAP.CMDSERIES />
<CSTMRY_DELV_QTY.TLAP.CMDSERIES />
<METRIC_DELV_QTY.TLAP.CMDSERIES />
<DELV_QTY_UOM.TLAP.CMDSERIES />
<CSTMRY_DELV_QTY_UOM.TLAP.CMDSERIES />
<METRIC_DELV_QTY_UOM.TLAP.CMDSERIES />
<PROD_CODE.TLAP.CMDSERIES />
<INTRNL_LINE_NUM.TLAP.CMDSERIES />
</TLAP.CMDSERIES>
<DELV_QTY.TKTL.CMDSERIES />
<CSTMRY_DELV_QTY.TKTL.CMDSERIES />
Appendix F: SAP On-line Ticket Interface
419
<METRIC_DELV_QTY.TKTL.CMDSERIES />
<DELV_QTY_UOM.TKTL.CMDSERIES />
<CSTMRY_DELV_QTY_UOM.TKTL.CMDSERIES />
<METRIC_DELV_QTY_UOM.TKTL.CMDSERIES />
<PROD_CODE.TKTL.CMDSERIES />
<INTRNL_LINE_NUM.TKTL.CMDSERIES />
</TKTL.CMDSERIES>
<ORDER_DATE.TICK.CMDSERIES />
<ORDER_CODE.TICK.CMDSERIES />
<TKT_CODE.TICK.CMDSERIES />
<TKT_DATE.TICK.CMDSERIES />
<DRIV_EMPL_CODE.TICK.CMDSERIES />
<HLER_CODE.TICK.CMDSERIES />
<LOT_BLOCK.TICK.CMDSERIES />
<PO.TICK.CMDSERIES />
<SHIP_PLANT_CODE.TICK.CMDSERIES />
<SHIP_PLANT_LOC_CODE.TICK.CMDSERIES />
<SCALE_CODE.TICK.CMDSERIES />
<TRUCK_CODE.TICK.CMDSERIES />
<TRUCK_TYPE.TICK.CMDSERIES />
<TYPED_TIME.TICK.CMDSERIES />
<LOAD_TIME.TICK.CMDSERIES />
<LOADED_TIME.TICK.CMDSERIES />
<TO_JOB_TIME.TICK.CMDSERIES />
<ON_JOB_TIME.TICK.CMDSERIES />
<BEGIN_UNLD_TIME.TICK.CMDSERIES />
<BEGIN_UNLD_TIME_PRINT.TICK.CMDSERIES />
<END_UNLD_TIME.TICK.CMDSERIES />
<WASH_TIME.TICK.CMDSERIES />
<TO_PLANT_TIME.TICK.CMDSERIES />
<AT_PLANT_TIME.TICK.CMDSERIES />
<DELV_ADDR.TICK.CMDSERIES />
<INSTR.TICK.CMDSERIES />
<USER_DEFINED.TICK.CMDSERIES />
<CUST_CODE.TICK.CMDSERIES />
<PROJ_CODE.TICK.CMDSERIES />
<SAP_TKT_ACTION.TICK.CMDSERIES />
<CUST_JOB_NUM.TICK.CMDSERIES />
</TICK.CMDSERIES>
</DTDSAPTKT>
</soap:Body>
</soap:Envelope>
The SAP_TKT_ACTION.TICK.CMDSERIES field will tell whether the ticket is new, deleted,
or reactivated. The corresponding values sent in this field are CREATE, REMOVE, and
REACTIVATE.
ERP Server Output
Your function name and URL will be different than illustrated below. The error code is a
numeric value that corresponds to the particular error that happened. Anything other than 0
420
Appendix F: SAP On-line Ticket Interface
is considered an unsuccessful transaction in your ERP server. The control number is a field
used by some South American customers for governmental regulation purposes. Other
fields will be included in future releases depending on the need for them.
<?xml version="1.0" encoding="UTF-8" ?>
<ns1:ERPTicketResponse xmlns:ns1="http://commandalkon.com/">
<error_code>0</error_code>
<control_number>123456789</control_number>
</ns1:ERPTicketResponse>
Appendix F: SAP On-line Ticket Interface
421
Appendix G: Batch
Confirmation and EU Link
Enhancements
COMMANDseries has been updated so that the following occurs when the Generic EU
Link is used for salable products, salable products with constituents, and alternative mix
batch codes:
•
•
•
•
•
•
•
•
•
•
•
•
422
New Tolerance and Sequence Codes will be set up in COMMANDqc and interfaced
to COMMANDseries as part of the mix interface.
Tolerance and Sequence Codes will be sent in addition to Water on Board quantities to
the batch control system.
The batch control system will look up the Tolerance values and Batching Sequence to
determine the batching operations.
Hydraulic Pressure from the truck mixer will be measured electronically or manually,
and then entered into the batch control system.
The batch control system will control the number of cycles and determine if an
additional manual Adjusting Cycle is required and what weights can be batched in that
cycle.
The batch control system will determine if the load is in tolerance.
The batch control system will send the tolerance information, hydraulic details, etc., to
COMMANDseries, where they will be stored at the appropriate level.
COMMANDseries will interface Ticket Weight information with COMMANDqc,
but will not interface cycle-level information. Reporting on cycle-level information will
be done directly from COMMANDseries.
COMMANDseries will automatically print the ticket if the load is marked as being in
total tolerance or acceptably out of tolerance. Any component that is outside the
acceptable tolerance range be noted with a flag on the ticket print.
Tickets that are outside the overall tolerance level, but are still acceptable, will be
automatically suspended and reviewed by the quality department who will instruct the
batcher as to the allowed course of action: i.e., dump the material, use it on a different
order, etc.
The batcher will add a Reason Code to all non-complying loads prior to printing the
physical ticket.
The quality department will follow the factory production control process to record the
corrective action and make a suitable note against the ticket record in
COMMANDseries.
Appendix G: Batch Confirmation and EU Link Enhancements
Logic
The following is the system logic used when weights are returned from the batch control
system:
•
•
•
•
•
•
If the ticket IS in tolerance and the plant’s Batch Confirm Option (on the Plants >
TQS tab) is set to Auto Print, Yes, the ticket will be automatically printed using
the Print Delayed Ticket Weights {Plants > Communication} option.
If the ticket IS NOT in tolerance and is unacceptable (and the Batch Confirm
Option) is set to Auto Print, Yes, the ticket will be automatically printed using the
Print Delayed Ticket Weights option. The Batch Confirmation form with the
Ticket Weight’s comply status set to No will be automatically displayed as well.
A new Reason Code field on the Batch Weight Confirmation screen must be
completed with the new Mix Non Compliance reason code before the user can save
the screen when the system-level batch confirmation action is set to Warn the User.
When the Batch Weights Confirmation screen has been successfully saved, the system
will automatically print the ticket using the Print Delayed Ticket Weights {Plants >
Communication} option.
When the tolerance-checking logic is not performed n the batch control system, the
status and reason code functionality above will be available for manual entry.
The COMMANDseries ticket print functionality will accommodate the following:
A suitable water/cement ratio considering the K factor of the components and the
admix water threshold in the configuration.
A Ticket Print attribute that considers if the actual weight of a component is batched
outside the acceptable tolerance values.
Setup
Add New Reason Code
First, go to the Reason Codes editor {Files > General Information > Reason Codes} and
create a new Mix Non Compliance Reason Code from the Reason Usage drop-down
box. Save the screen.
Reason Codes Screen (EDTRSNC)
Appendix G: Batch Confirmation and EU Link Enhancements
423
Set Configuration
Next, go to the Configuration > TQS tab. New fields have been added to specify how the
Generic EU link will send information.
Configuration > TQS tab (EDTCNFXZ)
•
Non-Compliance Action - Select Warn (to receive a message indicating that the
ticket is not intolerance and is unacceptable; you can accept the message and proceed,
or cancel and start over) or Stop (to receive a message indicating that the ticket is not
intolerance and is unacceptable; you can only cancel and start over. You will not be
allowed to continue).
•
Batch Control Tolerance - Specifies how the batch confirmation will be set: Manual
or Batch Control. Stored in the database as BATCH_CONFIRMATION_SOURCE.CNFB
Suspend Reason Code - Enter a reason code in this field that has a Reason Code
Usage of Suspend Item. Stored in the database as
•
NON_COMPL_SUSP_RSN_CODE.CNFB
•
Require Reason Code - Select Yes to indicate if a Mix Non Compliance Reason
Code is required for loads that are out of tolerance on the Ticket Weights
Confirmation screen. Stored in the database as
REQUIRE_NON_COMPL_RSN_CODE.CNFB.
Plants Editor
Now go to the Plants > TQS tab. A new Batch Confirm Options field has been added to
this tab. Select from one of the following options, which will determine whether or not the
Ticket Weights Confirmation screen displays, as well as if the ticket is automatically printed.
424
Appendix G: Batch Confirmation and EU Link Enhancements
Plants > TQS tab (EDTPLNTL)
•
•
Disabled - Ticket Weights Confirmation screen will not display.
•
•
•
Allow Pending
•
Yes/No Only - You will receive a message asking if you wish to have the Ticket
Weights Confirmation screen display.
Allow Pending Status
Auto Print, No Confirm - The ticket will be printed automatically without your
needing to confirm the auto print.
Auto Print, Yes - The ticket will be printed automatically. Cannot be set if the
Configuration’s Batch Control Tolerance is set to Manual.
Items Editor
The Items > Batching tab has been updated to include new fields for the Tolerance Code
(TOLERANCE_CODE.ILOC) and the Sequence Code (SEQUENCE_CODE.ILOC). The
information you enter in these fields will be interfaced with COMMANDqc at the mix/
plant level.
Appendix G: Batch Confirmation and EU Link Enhancements
425
Items > Batching tab (EDTIMSTD)
Concrete Ticketing & Shipping Screen
The Concrete Ticketing & Shipping screen has been updated with the new Water on
Board field (WATER_ON_BOARD.TKTL), which is used to store the amount of water that is
on board the truck prior to batching.
Concrete Ticketing & Shipping Screen (EDTSHIP)
In addition, a WATER_ON_BOARD_UOM field has been added to the TKTL table to record the
UOM. Double-click on the Water on Board field to display the Units of Measurement
screen and select the desired UOM.
•
•
When the system-level measurement system is set to Metric, the default value will be
50011 Litres.
When the system-level measurement system is set to Imperial, the default value will be
50004 Gallons.
EU Generic Link Field Updates
The following fields have been added to the T007 Batching Related Fields section.
Information stored in these fields comes from the information you entered on the above
screens:
426
Appendix G: Batch Confirmation and EU Link Enhancements
•
•
•
•
The value of the new SEQUENCE_CODE.ILOC in field number 435
The value of the new TOLERANCE_CODE.ILOC in field number 436
The value of the new WATER_ON_BOARD.TKTL in field number 437
The value of the new WATER_ON_BOARD_UOM.TKTL in field number 438
The following fields have been added to the T007 TQS Related Fields Section:
•
•
The value of MAX_WATER_CEM_RATIO.IMST relating to the saleable product.
The value of MIN_CEM_CONT RATIO.IMST relating to the saleable product.
The following field has been added to the Transfer of Purchase Order and Raw Material
Receipts section:
•
The value of MATL_VEN_CODE.IDTL, if field 010
Generic EU Link Enhancements
The Generic EU Link has been updated to send the below new fields from the batch
control system to COMMANDseries. Information contained in these fields will then be to
COMMANDqc using the standard interface tables. This information is viewable on the
Ticket Weights Confirmation screen, which is discussed in the next section.
•
•
•
•
•
•
WEIGHT_COMPLY_STATUS.TICK - Used to indicate if a Load that has been batched is
in tolerance. These values will be sent in the new 015 Load Tolerance field in the
Ticket Results Section.
Serious Out of Tolerance - 00
In Tolerance - 01
Slightly Out of Tolerance - 02
Compensated Out of Tolerance - 03
WEIGHT_COMPLY_REASON_CODE.TICK - The Reason Code indicating why the mix
was out of tolerance. This information will be sent in the new 016 Load Tolerance
Reason Code field in the Ticket Results Section.
COMPENSATED_CONSTITUENT.TWGT - Indicates if the component item was included
in the adjusting batch to compensate for tolerance. Sent as a T value in fields 260
through 275 in the Ticket Results Section.
MANUAL_ADJUSTING_CYCLE.TWGB - Indicates if the cycle (batch) is a manual
adjusting cycle. Sent as a T value in field 023 of the T015 Batch Results section.
MIXER_LINE_NUMBER.TICK - Indicates the Mixer or Line Number that was used to
mix the load. Sent in field 017 of the T014 Ticket Results section.
TRUCK_HYDRAULIC_PRESSURE.TICK - Indicates the actual truck hydraulic pressure
measured by the batch control system while loading. Sent in field 018 of the T014
Ticket Results section.
Appendix G: Batch Confirmation and EU Link Enhancements
427
Ticket Weights Confirmation
The Ticket Weights Confirmation screen has been updated with a field that records the Mix
Non Compliance Reason Code.
Ticket Weights Confirmation Screen (EDTBWGT)
When the form is loaded with Ticket Weight results, the Non Compliance Reason Code
field will be populated if the value of the Weight Comply Status in the TICK table is not
In Tolerance. The Reason Code field can also be blank upon opening the Ticket Weights
Confirmation screen. It will be mandatory for entry if the Require Reason Code field on
the Configuration > TQS tab has been set to Yes.
Ticket Print
The following information will be printed automatically:
•
428
For individual Components:
Product Short Name
Batching Unit of Measure
Design Weight
Extended Design Weight (a)
Moisture % Measured by the Batch Control System (b)
Theoretical Absorbed moisture (c)
Theoretical Wet Weight (d)
a*((1+(b/100))/(1+c/100)))
Actual batched weights
Appendix G: Batch Confirmation and EU Link Enhancements
Actual Variance to Theoretical Wet Weights
% Variance to Theoretical Wet Weights
Theoretical Water Content (d-a)
Theoretical Free Water Content (b-c)
•
For the total load
Total sum of Extended Design Weight
Total sum of Theoretical Wet Weight
Total sum of Actual Batched Weights
Total Theoretical Free Water Content
Per m3 Extended Design weight
Per m3 of Theoretical Wet Weight
Per m3 of Actual Batched Weights
Actual Water/Cement Ratio
Appendix G: Batch Confirmation and EU Link Enhancements
429
Appendix H: Counter Sales
(Cash and Carry)
This modification begins the process of migrating Cash and Carry functionality from V6.00
to CS08 V3, enabling Point of Sale (POS) purchases through standard COMMANDseries
functionality. With this functionality, someone can order material, receive it, and pay for it at
the same time.
This modification addresses five major forms:
•
•
•
•
•
Credit Codes
Customers
Concrete Ticketing & Shipping
Edit Orders & Ticketing
Aggregate Ticketing
Cash & Carry Orders
A Cash and Carry order is an order in which the customer comes to you, orders
merchandise, pays for it, and takes it away himself.
An order is defined as as Cash and Carry if the customer is assigned a Cash and Carry credit
code.
Cash and Carry orders have the following constraints:
•
•
•
•
They must be paid in full and ticketed when the order is saved.
Only one ticket is allowed; the delivered quantity must equal the ordered quantity.
Once payment has been entered, a Cash and Carry order cannot be changed or copied.
Canceling a Cash and Carry order will automatically cancel the associated ticket and
payment.
Cash and Not Carry
A Cash and Not Carry order is a standard cash order.
Cash & Carry Configuration
Credit Codes
The Credit Code editor has been updated so that if the Credit Type is set to Cash only, a
new checkbox, Apply Cash and Carry Rules, will display.
430
Appendix H: Counter Sales (Cash and Carry)
You will need to create at least one Cash and Carry credit code, and assign it to your cash
and carry customers.
Cash & Carry – Order Entry
When a customer with a Cash and Carry credit code is entered in Order Entry (whether it is
the standard Order Entry, Concrete Ticketing & Shipping, or Aggregate Ticketing), two
things will happen:
Your Login Plant will default as the Schedule Plant. The Schedule Plant field is not
editable for Cash & Carry Orders.
A Ticket button and a Payment button will appear in the lower right corner; that
indicates that the Cash and Carry logic has been invoked.
When the order is completed, press the Payment button. If you attempt to save the order
before entering a payment, the system will inform you of the error:
When the Payment button is pressed, or when the preceding error message is
acknowledged, the Cash Payments screen will display.
Appendix H: Counter Sales (Cash and Carry)
431
The full payment amount will default into the Amount field. The screen cannot be
accepted if the Balance Due is anything other than zero.
When the payment is accepted, you will be prompted to select a receipt printer. Once the
receipt has been sent to the printer, you will be returned to the Orders screen. From there,
press the Tickets button to open the ticketing screen.
Note: For Cash and Carry orders, the Payments screen must be accessed through the
Orders screen. It cannot be accessed from the main menu.
432
Appendix H: Counter Sales (Cash and Carry)
•
•
•
The Load Quantity is automatically set at the Ordered Quantity, with no option to edit
the amount. Enter an FOB truck and ticket normally.
Trucks configured as Delivered cannot be used for Cash & Carry tickets.
If you exit the ticketing screen without generating a ticket, the system will automatically
cancel both the order and payment. You will be prompted for a reason code.
Cancelling an Order
Cash & Carry orders can only be cancelled from one of two screens:
•
•
Order Entry
Edit Orders & Tickets
When you attempt to cancel a Cash & Carry order, you will be prompted for a reason code,
as usual. After you have entered a reason code, the following screen will display:
If you reply yes, then the order, payment, and ticket will all be removed with the entered
reason code.
Appendix H: Counter Sales (Cash and Carry)
433
Appendix I: Assigning
Mixes to Technical
Products
COMMANDseries has been modified to allow certain concrete classes and specifications to
be associated with concrete technical products. When QC staff subsequently attempt to link
specific mix designs with a technical product at a location, the system will validate the mix
design against the classes and specifications.
Concrete Classes & Specifications
Previously, concrete class and specification data were restricted to users with TQS in the
system license. With this modification, four types of specification information are now
accessible through the Files > TQS Information menu:
•
•
•
•
DC Classes - Specifies Max Aggregate Size, Minimum Cement Content, and
Maximum Water/Cement Ratio
Strength Codes - Specifies the minimum allowed Strength
Batch Book Types
Material Classes
These records are edited in accordance with the required specifications. For each mix, the
same fields are available on the TQS tab:
434
Appendix I: Assigning Mixes to Technical Products
Configuration
A new field, Look Up Alt. Item By Class Option, has been added to the
Configuration-Mix Mapping tab. This option will force validation of the TQS item options
in the lookup query for an alternative item.
A new button, Alternative Item Control, has also been added. Pressing this button
calls the Alternative Item Control Options screen. This screen allows you to set the
criteria for mixes assigned to technical products.
Item Lookup
If the Lookup Alternate Item by Class Option box is selected, then when a lookup is
performed for an alternative item, the system will automatically filter the results using the
criteria entered in the Alternative Item Control Options screen (see next).
Select a criterion from the drop-down list on the left. When you <Tab> out of that field, a
new field will appear.
The options to the right of the screen apply to all selected criteria:
Assign Mix Design Action – This field determines what happens if a user attempts to link
an invalid mix design to a product.
•
•
•
Warn User and Continue
Warn User and Stop Process
Continue Without Warning (default)
Appendix I: Assigning Mixes to Technical Products
435
Require Field in Item – If set to Yes, then all of the selected fields will be considered as
required fields in the Items editor.
Reason Codes
Because the assigning of alternate items means that in some cases the rules will be
overridden, reason codes will be needed to track them. A new Reason Usage,
Alternative Item Override, has been added to the Reason Code editor. Create new
codes as needed.
When the override is used, the reason code will be stored in a new field in the Alternate
Item Batch Code table, alternative_item_rsn_code.IMLB.
Material Classes
The Material Classes editor has been updated so that there are two new fields available for
the Material Class Type Coarse Aggregate:
Items Editor
The Items editor has been updated so that values selected in the configuration option
Alternative Item Control are validated when entering an alternative item. Null values for
the parent item options will not be validated.
For example, if the alternative item control option Strength Code is selected, a
comparison will be made between the parent item's strength code and the alternative item's
strength code only if the parent item's strength code is populated. If the parent item's
strength code is null, no comparison will be made for that value.
436
Appendix I: Assigning Mixes to Technical Products
Appendix I: Assigning Mixes to Technical Products
437
Appendix J: Validate
Reused Concrete
When a truck returns with concrete on board, that mix can be reused on the truck’s next
load. This modification enables COMMANDseries to validate the reused concrete against
several parameters to ensure that it can be safely used with the newly batched mix.
The three criteria available are:
•
•
•
Strength
Maximum Aggregate Size
Difference in Load Times
Setup
Reason Codes
A new Reason Usage, Returned Concrete Override, has been created. If you intend
to give users the ability to override a warning, you must create some reason codes with this
new usage:
Configuration
A new button, Returned Concrete Options, has been added to the {Configuration >
Dispatch tab}. This button calls the new Returned Concrete Options screen.
Returned Concrete Options (EDTROPT)
438
Appendix J: Validate Reused Concrete
You can enable or disable validation of Strength, Max Agg Size, and Load Time Difference.
If enabling the Load Time Difference, you will need to enter an Excessive Time value. This
value represents (in hours:minutes), the maximum allowed difference between the batch
time of the reused material and the load time of the new material.
The validations will occur at ticketing. If the reused material fails any of the enabled
validations, the Ticketing Action field determines the available options:
•
•
Warn User and Continue – The system will warn the user and the user must decide
whether to continue with ticketing.
Warn User and Stop Process – Hard stop. The reused material cannot be ticketed
on the current load; the dispatcher can attempt to use the pre-batched material on
another load.
The system will inform the user of the specific reason for the validation failure. If the
Ticketing Action field is set to Allow with Warning, a Reason Code field will display
in the warning window.
Enter a valid reason code or detail on the field to select from a list, then press OK to proceed
with ticketing.
Appendix J: Validate Reused Concrete
439
Appendix K: Lime Spreader
Functionality
Overview
Lime Spreader functionality is now available and configurable in CS08. You will be able to
identify any additional hauler services and pay the hauler for those services as they relate to
lime spreading. In addition, you can separate cartage payments for additional hauler
activities, such as spreading lime. Previously, Lime business was limited to customers who
had Terms Codes that allowed for Lime activities and all Lime functionality was limited to
certain hardcoded user data.
•
•
•
•
•
Lime business is now available for all companies.
Lime can be made available for any customer and project.
You can restrict customers and projects to Lime products only.
SpreaderMan (or any other type of secondary hauler) can be paid separately from the
main hauler. If the secondary hauler code is entered in Order Entry, a separate cartage
payment for the secondary hauler will be created during the Update Cartage Ticket
Process.
Any changes in Prep that affect cartage will display on the SpreaderMan cartage ticket as
well.
All hardcoded user data that was used previously for Lime has been eliminated; Lime
functionality is now configurable:
•
•
•
You no longer need to define a Lime Customer within the Terms Code editor. Item
Groups within Customer/Projects and Items now provide this functionality.
If you wish, you can set up a Item Category for Lime (such as 2610), but if you do so,
service products can only be assigned to products beginning with the Item Category
code (2610 in this case).
In addition to SpreaderMan, any service addition can be added to any ticket.
Background
Lime is a product that is treated like aggregate in COMMANDseries. When specific Lime
products are purchased, you must deliver another service: the actual Lime spreading. There
are two terms you may wish to familiarize yourself with:
•
•
1
Delivery Hauler - The truck actually used to deliver the Lime.
Spreaderman - The entity/person actually spreading the Lime product. The
Spreaderman will typically be paid cartage separately from the Hauler. With this
enhancement, you can create two cartage charges (one for the Hauler and one for the
Spreaderman) on one ticket.
Appendix K: Lime Spreader Functionality
General Notes
•
•
•
•
•
Auto products (also known as service products, including Lime) that are set up for
Lime items must also be entered on Projects for any location that might be used when
Restricted Project Products is turned on for a Project. If there is any Item Code/
Location change to the auto product of an item, the same change must be made for any
additional project that has with Restricted Project Products selected.
Once the auto product is defaulted with the Lime item into Order Entry, from that
point on the auto product will be considered an extra product. Therefore, if you
remove the main product, the auto product can still be kept on the order line and the
order can be created with the Lime product only. In addition, you can still remove the
auto product after it has been defaulted to the order line.
The auto product’s quantity and price can be changed by the dispatcher who created
the order. This information will appear on the ticket as well as the invoice.
If the order is an FOB order and the auto product is added as an extra product, the
system will not create a service cartage ticket. If one is needed, you will need to create a
new order with only the auto product and set the Delivery Type as Delivered.
Prep does not support the automatic addition of auto products at this time. You will
need to manually add auto products to Prep that are related to Lime.
Items Set Up
Item Groups
The first thing you need to do is set up an Item Group {Files > Item Information > Item
Groups} for Lime products. Lime is typically considered to be an aggregate product, so you
should set the Associated Module to Aggregate.
Item Groups (EDTCNFXS)
Item Category
Now you can set up an Item Category {Files > Item Information > Item Categories} for
Lime products. You will need two Item Categories for Lime products: the Lime product
itself and a Lime delivery/service charge. To create the Lime delivery/service, set the Item
Group to Lime, the Item Type to Service, and the Item Sub Type to Spreaderman.
Appendix K: Lime Spreader Functionality
2
Item Categories (EDTICAT)
Now, set up a Lime category that is not a service. Set the Item Group to Lime and the
Item Type to Aggregate (Fine). Now you will have two Item Categories for your Lime
products: one that is a Service (such as spreading Lime) and one that is not (the actual Lime
product).
Item Categories (EDTICAT)
Items Editor
Service Lime items will be entered in the Item Master file as an item. If the Item Category is
Service, the Keep in Inventory, Saleable Item, Do not allow ticketing, and
Constituent Item flags will be available. You will not always need to use the Keep in
3
Appendix K: Lime Spreader Functionality
Inventory flag in the case of a Service Lime item, but it is there in case you have only a
certain number of Lime spreaders available.
Items > Main tab (EDTIMST1)
Set up your service items first. Then, when you create the Lime product itself, you can add
the spreader service as an automatic product. The Automatic Products tab displays for all
Item Types except for Service and Extra Charge. This will apply to items in the Item
Category you set up earlier for non-Service Lime items.
Items > Automatic Products tab (EDTIMSTH)
Reminders:
•
•
•
•
Automatic Products are set up by location for available plants.
Only non-mix products can be entered as auto products. If a mix product is entered,
you will receive an error message.
Only products that match the measurement system of the main product can be entered.
If the quantity is anything other than blank, that quantity will be defaulted into Order
Entry.
Appendix K: Lime Spreader Functionality
4
Assigning Item Groups to Customers and Projects
Finally, assign that Item Group to any Customer or Project that will have Lime delivery. You
will also need to set up pricing information for the Lime here.
Customers > Pricing tab (EDTPRICE)
5
Appendix K: Lime Spreader Functionality
Project > Pricing tab (EDTPRICE)
You can set up Customers and Projects to restrict or allow Lime products from being
associated with anything other than specific projects as you would any other Item Category:
select Restrict Orders to Project Products on the Customers and Projects Pricing tab.
Note: Auto products will be restricted as well if you select this option.
If you want to restrict a Project to Lime products only, select only Lime for the Item Group.
Order Entry will automatically validate Lime products against Customers and Projects to
ensure that the appropriate Item Type is entered for each Customer and Project on the
current order. For instance, you will receive the below error message if the Item group does
not match what is allowed for the Customer:
Projects Editor
Now you can begin to add your Lime products to Projects. The Allow Auto flag will be
available for all Item Types except for Service and Extra Charge on the Projects >
Products tab.
If the product has any auto product for any location, the Allow Auto flag will be checked.
Appendix K: Lime Spreader Functionality
6
Projects > Products tab (EDTPRDL1)
Hauler Editor
A Hauler Type drop-down field has been added to the Hauler editor {Files > Plant &
Delivery Information > Haulers}. Select either Delivery Hauler or Spreaderman.
Haulers (EDTHLER)
Order Entry
If a product that has Auto Allow set in the Projects > Products tab is entered on the order
line, the auto product will be automatically added as an extra product, as in standard
functionality.
7
Appendix K: Lime Spreader Functionality
Order Entry (EDTCORD)
•
•
•
•
If multiple products in multiple tabs have the same service product, each should be
entered in the related tab even though they are the same product.
If one tab has a mix product and an extra product, they will both have the auto product
as the same service product. One auto product will be defaulted.
If the service product’s item Sub Type is Spreaderman, the Hauler field on the
Order Header or Order Detail will be relabled Spreaderman.
If the Hauler Code Spreaderman is in the Order Information line, one
Spreaderman product will be enough for the entire order to turn the Hauler label to
Spreaderman.
If the Hauler Code Spreaderman is at the schedule line, turning the Hauler
Code label to Spreaderman will depend on whether or not the individual tab
contains a Spreaderman service.
If the Hauler Code is changed to Spreaderman, only Spreaderman haulers will
display if you detail on the field.
The Spreaderman field in Order Entry is required for entry.
If there is a service type of a Spreaderman item on the Order Line, the Hauler Code
must be entered as Spreaderman in either the Order Header or the Order Schedule,
based on the order’s set up. If you select a Hauler that does not have a Type of
Spreaderman, you will receive an error message: Schedule has Service/Spreaderman item;
you must select Spreaderman Hauler Type.
Cartage Changes
Cartage Sequence Code
Cartage Sequence Code has been added to the Cartage Ticket table (CTTK) as well as all
associated child tables. This sequence code allows you to have multiple cartage charges on
one ticket. If you enter an existing Sequence Code on the Cartage Ticket Edit screen, the
Appendix K: Lime Spreader Functionality
8
application will retrieve the existing cartage charges. If the Sequence Code does not exist,
you will receive an error message. To add a new Sequence Code, you must tab out of the
cartage Sequence Code field; the application will assign the next Sequence Code.
Note: All cartage tickets created on this screen will begin with the number 1. If you enter a
number in the Sequence Code field that does not exist, a blank editor will display
so you can manually create a Cartage Ticket.
Removing an Original Cartage Ticket
If a ticket is removed and an additional Cartage ticket exists for the same order with a
different sequence code, you will receive a message: There are multiple cartage tickets for this
original ticket. Would you like to remove these also?
•
•
•
Select Yes to remove all cartage tickets that match the Order Date, Order Code, and
Ticket Code.
Select No to remove only the active ticket.
Select Cancel to return to the original editor with the ticket loaded.
Update Cartage Ticket Changes
The Update Cartage Ticket process creates an additional cartage ticket for Service products.
If the cartage ticket is created from Update Cartage Ticket, the ticket information will be
stored internally; if the ticket is created manually, the information will not be stored.
Note: New fields for the Order Date, Order Code, Ticket Code, and Internal Order
Line Number (for the cartage ticket) have been added to the CTTK table.
•
•
•
•
Another cartage ticket will be created for a second product that has a Spreaderman
Hauler Code and will overwrite the Hauler Code of the ticket that comes from the
truck.
TLAC records will be created with the selected cartage Item Codes for the order lines.
The Cartage Update error list will display tickets for Service products, even if the main
ticket has an FOB truck.
Sequence Codes are assigned to each cartage ticket by application; therefore, the Order
Date, order Code, and Ticket Code will remain the same.
Example
2610002 is a Lime product; 2610999 is a service product.
A user creates an order for 2610002; 2610999 is an auto product and defaults to the order
line once the main product (2610002) is entered.
Since 2610999 is a Service/Hauler product, the Hauler Code is required on the order line.
A ticket is created with the service product.
The system will check to see if all cartages are available for the ticket lines by comparing
ticket information to the cartage ticket table (CTTK) for each record. If no matches are
found, the Update Cartage Status will be left alone.
9
Appendix K: Lime Spreader Functionality
Cartage Ticket Update is run. One ticket will be created for product 2610002 for the truck
that is used in ticketing along with its Hauler.
Sequence Code
01
Another cartage ticket will be created for the service product. The Hauler and truck will be
taken from the Spreaderman preferred hauler.
Sequ en ce Cod e
02
In the above examples, cartage rates have Item Codes for 221 and L01. TLAC records for
these cartage tickets will be created from those Item Codes.
Appendix K: Lime Spreader Functionality
10
11
Appendix K: Lime Spreader Functionality
Terms Code Modifications
To allow for discounts, Item Groups can be selected in the Terms Codes editor.
Terms Codes editor (EDTTRMS)
Click on the Item Group selector button at the bottom of the Terms Codes screen to bring
up the Items Group screen which displays all available Item Groups. You can add as many
Appendix K: Lime Spreader Functionality
12
active Item Groups to the associated Terms Code. Select Lime for any Terms Codes you
wish to be associated with the Lime Item Group you set up earlier.
Edit Orders and Tickets
The following standard functionality rules apply when an auto product record is manually
added to an order in Edit Orders and Tickets:
•
•
•
You can remove the auto product from the Order Line if necessary.
If the default quantity of the auto product in the IMST file is NOT zero or blank, the
quantity will be defaulted in the Order Line (DFLT_LOAD_QTY.ORDL) and the UOM
will be defaulted to the Order Line (DFLT_LOAD_QTY_UOM.ORDL) as well.
If the default quantity of the auto product in the IMST file is zero or blank, the main
product’s load size quantity will be defaulted if the UOM is the same as the auto
product; otherwise, you can enter the quantity yourself.
If the customer needs to have the Hauler Code at the schedule line, the Hauler Code
will be updated in Prep as well and will be saved in the order table.
Cartage Update will look at the schedule line; if it is blank, the system will retrieve
the Hauler Code (which in this case will also be the Spreaderman) from the order
table.
If you change the Hauler Code on an existing order, the Hauler Code will be set
in the order header. In addition you will receive the following message:
Hauler Code setup is in the schedule line. Changing the Hauler Code will not affect the Hauler
Code in the schedule line. User will need to edit Hauler Code in Order Entry to put the new
Hauler Code in effect. OK.
The system will then only update the Hauler Code in the order table.
•
13
When an existing order is retrieved in Order Entry, the Hauler Code setup is located
in the Schedule Line, and the Hauler Code in the Schedule line is null (with the
Hauler Code in the Order Header not null), the Hauler Code will be defaulted from
the order table for all schedules. You can edit based on your user privileges.
Appendix K: Lime Spreader Functionality
Appendix K: Lime Spreader Functionality
14
Appendix L: Quantity
Discounts
Overview
COMMANDseries now supports quantity discounts. The discounts are established at the
price category level, and are based on ordered or projected quantities.
Configuration
Configuration involves two main editors:
•
•
Price Category
Items
Once configured, discounts are applied automatically in Projects, Order Entry, and
Aggregate Ticketing.
Price Categories
A new checkbox, Allow Quantity Discounts, has been added to the Price Categories
editor.
Price Categories (EDTPCAT)
Enable the field for all price categories for which you may want to use quantity discounts.
Items
When price categories are assigned to an item, the system will validate the Allow Quantity
Discount field. If it is enabled, a Qty Discounts button will display.
1
Appendix L: Quantity Discounts
Pressing this button will open the Items Prices Quantity Discounts screen.
Item Prices Quantity Discounts (EDTIMSTI)
To establish a quantity discount:
1.
2.
3.
Enter a Break Point. An ordered quantity greater than this amount will trigger the
discount.
Enter the Discount and Discount Type. The discount can be either a percentage off
the standard unit price for that price category, or a new unit price. The current date will
default as the Effective date; change the value if necessary.
If you change an existing discount, the replaced Discount and Discount Type values are
automatically moved to the Previous section.
Press F6 (Add Occurrence) to add an additional discount, or accept the screen to return
to the Item-Prices tab.
In the above screen shots, the default price is 100. If the Ordered Quantity is greater than 10
and less than or equal to 15, the material price will be discounted by 5%, to 95. If the
Ordered Quantity is greater than 15, the material price will be changed to 90.
Workflow
Projects
Quantity discounts are validated when entering products on the Projects-Retail tab. No
user intervention is required.
Order Entry
Quantity discounts are validated during order entry, whether in Concrete Order Entry or
Aggregate Ticketing. No user intervention is required.
Appendix L: Quantity Discounts
2
Invoice Prep
Quantity discounts are based solely on order-level ordered quantities. If a customer gets a
quantity discount, but ends up receiving an amount less than the break point, the
discounted price will remain on the order unless the ordered quantity is updated.
3
Appendix L: Quantity Discounts
Index
A
Associated Products 51
Auto Caller ID 407
Configuration 407
Contact-Deliver To Customer Order Lookup 410
Manual Lookup 410
Workflow 408
Automated Data In/Out 351
B
Bank Codes 247
Batch Code Generator 314
Batch Interface Queued Tickets 314
Batching for Third Parties 387
Third Party Company Document Formats 390
Third Party Customer Projects 389
Third Party Customers 388
C
Calculate a Price Change 310
Cartage Operations
Update Cartage Tickets 237
Cash Management
Order Entry 251
COD Calculator 71
COD Recap Report 295
Comm Manager Console 375
COMMANDconcrete Reports 283
COMMANDseries
.NET FNDCODE 24
Accepting or Saving a Screen 20
Accessing Help 18
Add or Insert Occurrence 20
Calendar Function 31
Detailing on a Field 21
Entering Master File Information 17
Exiting COMMANDseries 17
Logging into COMMANDseries 17
Setting Up the System 16
SmartLookup Screens 22
Starting COMMANDseries 16
Using the Tab Key 19
Constituent Replacement Log 343
Credit Checking 392
Assigning Customer Credit Codes 396
Configuration 394
Credit Codes 394
Reason Codes 395
Using the Credit Checking Function 397
Customer Notes 272
Index
4
Deleting, Managing & Purging Completed Notes 281
Entering Notes 273
Managing Customer Notes 276
Notes Listing 277
Types of Notes 272
Customer-Project-Order Lookup 70
Customers
Update Unctive Customers 319
D
Data Maintenance 353
Global Replace 357
Retrieving Records 355
Special Search Operators 358
Data Management 345
Automatic Database Updates 358
Database Locks 373
Export Data 348
Export Orders and Tickets 350
Import Data 346
Import Orders and Tickets 349
Initialize/Analyze Files 345
Manual Database Updates 362
Service Control 374
SQL Worksheet 372
Dispatch Memos in Order Entry 278
Dispatching Examples
Multiple Loads on One Truck 380
Scheduling an Order out of Multiple Plants 383
Two Products on One Truck 382
Dispatching Reports 290
Batch Info Report 300
Batching Comparison Report 300
COD Recap Report 295
Customer Sales Recap Report 298
Dispatch Sheet 289
Driver Callout Report 288
Inventory Usage Report 298
Order Audit Log Report 301
Order Recap Report 297
Order Report 291
Plant Loading Report 288
Plant Production Report 298
Product Sales/Usage Report 299
Raw Materials Requirements Report 299
Ticket Reports 291
Truck Demand Graph 287
E
Edit Orders and Tickets 205
Credit & Debit Memos 220
Display Taxes 227
Edit Orders & Tickets Screen 205
General Order and Ticket Prep 206
Options Menu 224
Edit Project Expiration Dates 315
5
Index
Entering Dates 19
Error Log Report 318
I
Initialize TESYS Data 313
Invoicing 229
Calculate Unloading Charges 235
Create Orders for Separate Invoices 236
Reconciling Tickets 230
Update Costs & Prices for Orders & Tickets 233
J
Journeys
Creating a New Journey 79, 106
Editing an Existing Journey 81, 108
Ticketing a Journey 81, 108
L
Lien Legacy Invoice Manager 315
M
Manual Database Updates 362
Maintenance Routines 369
Upgrade Options 363
Material Manager 322
Generic Mix 339
Item Substitution 341
Mix Design 335
Screen 326
Setup 322
Mix Design 335
Interface 313, 404
Order-Level 87, 400, 401
Order-Level Ticketing 405
O
Order Entry 32
Adding or Entering Products on an Order 43
Associated Products 51
Copying and Moving Orders 74
Creating Standing Orders from Projects 67
Customer-Project-Order Lookup 70
Economic Sourcing 100
Entering a Standing Order 65
Entering Other Order Information 41, 211
Forecasted Shipped Quantity 52
Options Menu 95
Order Haul Information 38, 212
Order Hold Functions 84
Order Pricing Information 39, 209
Order Types 75
Other Order Line Information 50
Product Sales Option 90
Removing or Reactivating Orders 73
Round Trip Trucking 77
Schedule Standing Orders 67
Scheduling an FOB Order 61
Scheduling an Order 54
Index
6
Simplified Order Entry 61
Standard Order Entry 34
Standing Order Entry 64
Suggested Shipping Plants 76
Switching Order Files for Order Lookup 66
Units of Measure 73
Updating Projects from Order Entry 73
Using the COD Calculator 71
Order Tree 92
Order Types 75
P
Payment Option Reports
Unallocated Receipts Report 308
Uncollected Tickets Report 308
Preliminary Invoice Register 188
Printing a Detail Preliminary Invoice Register 193
Printing a Priced Orders Report 189
Printing an Exceptions Report 192
Product Sales Option 90
R
Realign Accounts and Cost Centers 316
Rebates & Royalties
Reporting 130
Reports
Generating Reports 283
Scheduling Reports 286
Time Analysis Reports 301, 303, 307
Round Trip Trucking 77
S
Saving Report Configurations 188
Scheduling
Journeys 79, 105
Optimization 58
Scheduling Reports
Order Schedule Report 286
Simplified Orders 61
Standing Orders
Scheduling 67
Standing Order Entry 64
Suggested Shipping Plants 76
Suspended Orders & Tickets Report 201
Suspending Orders and Tickets 199
Automatic Customer Suspension 201
Editing Suspended Tickets on Invoiced Orders 203
Exception Suspension 201
Manual Suspension 200
Releasing Suspended 202
T
Tasks, Conditions, & Driver Overtime 180
Conditions 181
Deadheading 183
Driver Overtime 180
Managing Driver Overtime 184
7
Index
Tasks 180
Ticketing 182
Tracking & Scheduling 182
Ticketing 133
Canceling Tickets 139
Load Size Logic 138
Maximum Gross Truck Weight 141
Reprinting Tickets 138, 225
Ticketing Screen 135
Ticketing, Prebatched Material 140
Time Analysis
Missing Times Report 305
On Time Delivery Report 303
Order Snapshot Report 302, 307
Overtime Report 306
Time and Task Manager 184
Driver Times 187
Ticket Times 185
Truck Times 186
Transfer Orders Register 195
Truck Ahead-Behind 414
Configuration 415
Truck Counts Screen 82
Truck Unavailability 78
U
Update Costs & Prices for Orders & Tickets 233
Update Zone Salesman 318
V
Volume Calculator 72
Index
8