1
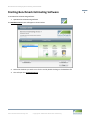
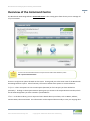
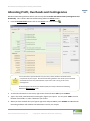
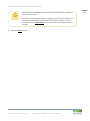
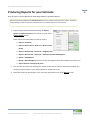
Getting Started with Benchmark Estimating Software A guide for online evaluations ©Benchmark Estimating 2011-2012 Benchmark Estimating Software Getting Started Guide Contents 2 Introduction ..........................................................................................................................................................3 Disclaimer .............................................................................................................................................................3 Starting Benchmark Estimating Software.............................................................................................................4 Overview of the Command Centre .......................................................................................................................5 General tips for using our Software .....................................................................................................................7 Button Locations and Functions .......................................................................................................................7 Saving your data ...............................................................................................................................................7 Overview of an estimate ......................................................................................................................................8 Opening your estimate .........................................................................................................................................9 Setting up the Sections in your Project ............................................................................................................. 11 Adding Items from the Item Library .................................................................................................................. 12 Where does the Item Rate come from? ........................................................................................................ 14 Creating an Item from First Principles ............................................................................................................... 16 Running a Routine in your Project ..................................................................................................................... 20 Making Project Specific Price Changes .............................................................................................................. 22 Allocating Profit, Overheads and Contingencies ............................................................................................... 24 Producing Reports for your Estimate ................................................................................................................ 26 Appendix A – Additional Benchmark Estimating Software Features ................................................................ 27 Appendix B – Edition Comparison: Lite, Professional & Corporate................................................................... 29 www.benchmarkestimating.com Copyright © 1996-2012 Benchmark Estimating Benchmark Estimating Software Getting Started Guide Introduction 3 Thank you for your interest in Benchmark Estimating Software. This Getting Started Guide is designed to guide you through the process of making changes to an existing estimate, producing estimate reports and quotes using Benchmark Estimating Software. Please note: The version of Benchmark Estimating Software used for the free online trial is a restricted version of the software and is designed to offer users an introductory view of our estimating software. If you would like to evaluate the full features of our software, you can request a guided demonstration with one of our staff members. The screenshots used throughout this document are intended to act as a guide only. The screen you see will vary depending on the database file you choose to use during the trial and the details you enter into your Project. Benchmark Estimating Software contains many other features not covered in this document that truly make it an essential business system for your business. See Appendix A for more information on these features. Benchmark Estimating Software is available in three editions, Lite, Professional and Corporate. To see a full comparison of editions, go to Appendix B. Disclaimer Information in this document is subject to change without notice. Companies, names and data used in examples and tutorials herein are fictitious unless otherwise noted. No part of this document may be reproduced or transmitted in any form or by any means, electronic or mechanical, for any purpose, without the express written permission of Benchmark Estimating. The Software described in this document is furnished under a license agreement or non-disclosure agreement. The Software may be used only in accordance with the terms of the agreement. Whilst every effort has been made to ensure that this Getting Started Guide and the software are in accordance with current practice, they are not intended as exhaustive statements on estimating and the methods used for estimating. ©1996 - 2012 – MacDonald Benest Pty Ltd. All rights reserved. If you have any questions at any time during your evaluation period, please contact your Benchmark Estimating Team at one of the following offices: Australia United Kingdom Tel: +61 2 4422 3444 Email: [email protected] Web: www.benchmarkestimating.com Tel: +44 161 237 1155 Email: [email protected] Web: www.benchmarkestimating.co.uk www.benchmarkestimating.com Copyright © 1996-2012 Benchmark Estimating Benchmark Estimating Software Getting Started Guide Starting Benchmark Estimating Software To start Benchmark Estimating Software: 1. Open Benchmark Estimating Software The Database Centre screen will appear as shown below. 2. Select the database you wish to use for the trial by double clicking on the database file. 3. This will open the Command Centre. www.benchmarkestimating.com Copyright © 1996-2012 Benchmark Estimating 4 Benchmark Estimating Software Getting Started Guide Overview of the Command Centre The Benchmark Estimating Software Command Centre is the starting point from where you can manage all of your estimates. To return to the Command Centre at any time from within the software, select File > Open Command Centre. There are six (6) menu options located on this screen. These guide you to the main areas of the Benchmark Estimating Software system. A brief summary of functions within these options is contained below. Projects: There are options to start a new Project (Estimate) or find a Project you have worked on previously*. Clicking on the Project Browser option gives you access to the Project Browser window, which lists all estimates/quotes you have created in your database*. Client: In the Client Library you can input and store details about your Clients, such as Name, Address, Contact Name, Phone and Email. This information can be imported electronically to save you retyping data. www.benchmarkestimating.com Copyright © 1996-2012 Benchmark Estimating 5 Benchmark Estimating Software Getting Started Guide Libraries: The following options are contained within the Libraries menu: Section: In the Section Library you can store the standard headings (Sections) that you would normally use as the breakdown structure for your estimates (e.g. headings such as Preliminaries, Paving, Soft works, Drainage, Planting etc.) Item: The Item Library stores the standard Items (or Activities) of work that your business undertakes. These Items can be used over and over again to save reinventing the wheel. An Item is a collection of Resources and these Resources are all linked to the Resource Library. Double click any Item in this Library to see how your Items can be set up. Resource: The Resource Library enables you to store information about your Plant, Labour, Material and Subcontract Resources. This Library is the central location from which you update your Resource costs. Go to the Resource Library to see how Resources are established in Benchmark Estimating Software. Routine#: This takes you to the Routine Library. Here you can create Routines. These are operations that enable you to produce Sections, Items and Resources in an Estimate automatically. Routines are very powerful, can save you many hours of work and are ideal for repetitive tasks with many variables. Subcontractor/Supplier, Estimator# and Client information can also be found in the Libraries section along with Conditions, Takeoff Sheets and Variables#. Marketing#: The options within the Marketing menu allow you to analyse and track your market share by many variables. This is a useful tool to help improve your business. Admin: The Admin button allows you to control the features and default settings for your business. For example, you can establish default profit and overhead percentages and insert your company logo so it appears in reports. *This online trial Version of Benchmark Estimating Software does not allow you to save Project data. Each time you log off from your session, your data will be erased. # These features are unavailable in the online trial Version of Benchmark Estimating Software. To evaluate these features, please contact us to organise a staff led demonstration. www.benchmarkestimating.com Copyright © 1996-2012 Benchmark Estimating 6 Benchmark Estimating Software Getting Started Guide General tips for using our Software Button Locations and Functions When you right mouse click from within the Software’s screens, a list of available functions will appear. An example of this is shown to the left. The functions that appear are customised to the screen you are in at the time. You can perform a function by either: Right mouse clicking, then selecting the function; or Using the toolbar icon for that function; or Using a keyboard shortcut if there is one associated with that function. ….. Whichever method you find easiest. Saving your data After you enter or edit some data, or perform a function, you will need to select OK to save the data, or complete the function. You can select Cancel instead of OK if you are in the process of entering or editing data but no longer wish to make the change. In most fields: pressing <ENTER> will perform the same function as OK pressing <ESC> will perform the same function as Cancel When you select OK or press <ENTER> your data is automatically saved to your central database. Edit Function: If fields within Benchmark Estimating Software appear grey and you are unable to click into them, right click and select Edit or press <CTRL E> to enter edit mode. www.benchmarkestimating.com Copyright © 1996-2012 Benchmark Estimating 7 Benchmark Estimating Software Getting Started Guide Overview of an estimate Prior to proceeding with the Tutorial, the schematic diagram below provides you with a generic overview of the structure of an estimate in Benchmark Estimating Software. The below estimate is an example of a Landscaping Project and is only indicative of the overall structure of an estimate created within Benchmark Estimating Software. Additional levels in your estimate: Benchmark Estimating Software includes a Sub Items feature which allows you to have an additional level of detail in your Project. www.benchmarkestimating.com Copyright © 1996-2012 Benchmark Estimating 8 Benchmark Estimating Software Getting Started Guide Opening your estimate 1. From the Command Centre, click on the Projects tab. 2. Select My Recent Projects and select the Sample Project. The Project Details window will now be displayed. This screenshot is from a Civil sample database. The Project in the database you open may be different to this example www.benchmarkestimating.com Copyright © 1996-2012 Benchmark Estimating 9 Benchmark Estimating Software Getting Started Guide In this screen, you can enter information about your Project, including the Closing Date, Location and Suburb for the job as well as any general comments. Benchmark Estimating Software also adds your Standard Conditions automatically and gives you the ability to add in Project Specific Conditions for your job. These conditions automatically appear on the Quotation reports that Benchmark Estimating Software can produce. 3. The Project has already been named; however, you can edit the Project Details by right clicking and select Edit or by pressing <CTRL E>. 4. Once you have made any changes press <ENTER> or right click and select OK. www.benchmarkestimating.com Copyright © 1996-2012 Benchmark Estimating 10 Benchmark Estimating Software Getting Started Guide Setting up the Sections in your Project 1. From the Project Details screen, right click and select Section or press <CTRL 1>. The Project Sections window will appear. This screenshot is from a Civil Estimating Database. The Project Sections in the database you are using may be different to this example. Sections divide the Project into the main areas of work. Project Sections also act as headings in your Quote and in your construction program which can be generated by Benchmark Estimating Software. In the Project Sections screen you have a lot of flexibility as to how you create your Sections. You can: Import Sections from your Section Library to save retyping (this is done when you add a new Project). Add new Sections to suit your Project. Or if you are bidding a Schedule of Items (Bill of Quantities) defined by your Client, this can be imported from a Spreadsheet using our Load Spreadsheet feature. www.benchmarkestimating.com Copyright © 1996-2012 Benchmark Estimating 11 Benchmark Estimating Software Getting Started Guide Adding Items from the Item Library An Item is an activity of work, and is made up of Materials, Labour, Plant and/or Subcontract Resources. Using the standard Items in your Item Library saves you re-inventing the wheel every time you prepare a new estimate, and gives you improved accuracy and consistency. After you add an Item from the Library to a Project, you can modify it to suit the Project of required and this will not affect the Item in you Library To add an Item in you Sample Project 1. From the Project Sections screen, double click on a Project Section. This will take you to the Project Items window. 2. Right mouse click and select Add Item from Library. The Select Library Items window opens. Here all the Items in your Item Library are displayed. This example of an Item Library is from a Civil Database. The Item library of your trial database may vary www.benchmarkestimating.com Copyright © 1996-2012 Benchmark Estimating 12 Benchmark Estimating Software Getting Started Guide 3. Adding Items to your Project is easy, simply: a. Find the Item(s) you would like to add. You can find Items in various ways: i. From the Group column on the left hand side of this screen select an Item Group. This will then display all Items in that Group, OR ii. Enter some text in the Description field on the Find feature window and then click Find, OR at the top of this iii. Press <CTRL F> to open the Advanced Find window to do a more detailed search b. Double click on the Item(s) you want to select. Double clicking on the Items you wish to add will make them appear in the bottom section of the screen. c. Enter the quantities. Enter the Quantity of each Item required in the Quantity column in the lower section of the screen, pressing <TAB> to move from one Item to the next. d. Add the Items to your Project. Once you have entered the Quantities for your Item, right click and select OK, or simply press <ENTER>. Benchmark Estimating Software will now add the Item(s) you selected to your Project, calculating the quantities and costs of the Labour, Plant, Materials and/or Subcontractors for each Item automatically and automatically updating your estimated Project cost. In the Project Item window you can use the Quantity Calculator to calculate your Item Quantity simply by clicking the calculator icon directly to the right of the Quantity field. www.benchmarkestimating.com Copyright © 1996-2012 Benchmark Estimating 13 Benchmark Estimating Software Getting Started Guide Where does the Item Rate come from? The answer is that the Item Rate is the sum of the Resources required to complete the Item, divided by the quantity of the Item. From the Project Items window, double click on an Item in your Project to take you to the Project Resources window. This example of Project Resources is from a Civil Database. The example in your trial database may vary. All of the details in the above screen can be adjusted to suit each project. You can make project specific changes to the Rate for example, or adjust the hours if you think you need to allow more time on this project for more difficult site conditions. Any changes you make remain in the Project; they do not change any data in your Libraries. In the third column you will see that the Description of the Resources is shown. The fourth and fifth columns, titled Qty and Unit respectively, give the Quantity and Unit of each Resource required in this Item. The sixth column is the Rate column. This gives you the cost per unit of the Resource. www.benchmarkestimating.com Copyright © 1996-2012 Benchmark Estimating 14 Benchmark Estimating Software Getting Started Guide The next column, Cost, shows the total cost of each Resource in this Item. If you add all of the numbers in the Cost column, you get the total Item cost. This figure is shown just above the Resource Description column, in the Item field. The quantity, unit and rate for the Item are displayed to the right of this total Item cost. You can now see where the rate for this Item comes from. It is the total Item cost divided by the Item Quantity. The next column is the Crew Size information. Here you specify the number of people or Items of equipment allowed. So, if your Crew was to include two Labourers, then you would show the number 2 in this column. If no number is specified then the program assumes a crew size of 1. This information is used by Benchmark Estimating Software when calculating the duration for Items for the export to construction programming software such as Microsoft Project®. The duration for an Item that has a total of 50 hours of labour could be 50 hours for one person, 25 hours for 2 persons, and so on. The next column gives the Category of the Resource. Every Resource is classified as being either: PLANT, LABOUR, MATERIALS or SUBCONTRACT. There is also a Category called PRODUCTION which is used for our powerful Resource Production Rate feature* and SUBITEMS* which is an advanced feature for those companies that use Crews or Gangs in their projects. *Not available in the online trial Version www.benchmarkestimating.com Copyright © 1996-2012 Benchmark Estimating 15 Benchmark Estimating Software Getting Started Guide Creating an Item from First Principles Sometimes you may want to create a new Item in your Project from first principles; that is, build it up from scratch. Benchmark Estimating Software allows you to do this quickly and easily. When you have finished creating an Item in your Project, you can even copy it to your Item Library, to share with other users and reuse in other projects. There are two phases to creating a new Item: 1. Add the Item 2. Add the Resources to the Item Firstly, this is how you add an Item to your Project: 1. Ensure that you are at the Project Section level of your Project. 2. Double click on a Section to open it. 3. Right click and select Add New Item or press <CTRL A>. 4. Press <TAB> to move through to the Description. Type in a Description for your Item. The Description should clearly define the scope of the activity. This Description can also be printed on your Quote Reports. 5. Press <TAB> and type in the Quantity for your Item. 6. Press <TAB> and select the Unit from the drop down box. If the Unit you are looking for is not listed you can add more Units. This tutorial does not take you through this process, however, this is done in the Admin > Codes window for those users who wish to explore this in more detail 7. If necessary for your Item, click in the Production Rate field, and add a Production Rate for your Item 8. Press <TAB> and select the Unit for your Production Rate from the drop down box 9. Press <ENTER> or right click and select OK. You have now successfully added a new Item to your Project. www.benchmarkestimating.com Copyright © 1996-2012 Benchmark Estimating 16 Benchmark Estimating Software Getting Started Guide 17 This screenshot shows an Item ‘Clear Light Vegetation’ added to a Civil database. This Item does not have a cost associated with it yet. Now we need to add the Resources required to perform this Item of work. To add Resources from your Resource Library to your Item: 1. Double click on your Item to open the Project Resources window. 2. Right click and select Add from Resource Library or press <CTRL R>. The Resource Selection List window will be displayed. 3. Selecting Resources from your Library is easy, simply: a. Find the Resource(s) you would like to add. You can find Resources in various ways: i. From the Group column on the left hand side of this screen select a Resource Group. This will display all Resources in that Group OR ii. Enter some text in the Description field in the Find Feature at the top of this window and then click Find OR iii. Press <CTRL F> to open the Advanced Find window to do a more detailed search. b. Double click the Resources you want to select. Double clicking on the Resources you wish to add will make them appear in the bottom section of the screen. c. As an example, say you want to add a LEADING HAND Resource to your Item. To do this, you would select the Labour Resource Group and then double click on the LEADING HAND Resource to add it to your Item. Once you have double clicked on the LEADING HAND Resource, you will see that it now appears in the lower part of this window. 4. Right click and select OK or press <ENTER> to add the Resources www.benchmarkestimating.com Copyright © 1996-2012 Benchmark Estimating Benchmark Estimating Software Getting Started Guide Now we need to enter or calculate the Quantity of each Resource required. Here’s the quickest way to enter Quantities: 1. 2. 3. 4. Double click in the Quantity column Type the Quantity your require for this Resources in this field Press <TAB> to move from one Resource to the next and enter the Quantities required Pressing <ENTER> when finished to accept the changes. Quickly enter the Quantities for Project Resources by double clicking in the Quantity column You can also calculate the Quantity of each Resource using our Quantity Calculator. Just follow the steps below to do this: 1. Highlight a Resource and click on the Calculator icon which is on the right of the Quantity a. There are a number of simple and advanced formulas that can be entered here but as an example, let’s say you have to calculate the quantity of Bedding Sand in TONNES for a simple trench. In such an example, the logic of the calculation will depend on the trench and characteristics of the Item you are pricing. However, a basic calculation could be: Length * Depth * Width * Wastage * Density To do this in our Calculator feature you could type a calculation like iq() * 0.15 M DEEP * 0.6 M WIDE * 1.05 WASTE * 2.4 TONNES PER CUBM (Note: Inserting iq() will insert the value of the Quantity of the Item that this Resource is in. In the above example the Item Quantity is assumed to be a length in metres) b. Your Calculator screen would read similar to the below (depending on the Item Quantity for your chosen Item): www.benchmarkestimating.com Copyright © 1996-2012 Benchmark Estimating 18 Benchmark Estimating Software Getting Started Guide 19 c. Click on the tick icon (in the top left corner of the calculator) or press <ENTER> to confirm the calculation. d. In the Project Resources screen right click and press OK or press <ENTER> to save the quantity. 10. Continue to enter the Quantities for the rest of your Resources in this Item. 11. Once you have finished entering the Quantities for each Item right click and select Item or press <CTRL 2> to return to the Item level. 12. You have now created an Item from first principles and you can see that your Item now has an Item Cost and Rate based on your Labour, Plant and Materials required in completing the task. www.benchmarkestimating.com Copyright © 1996-2012 Benchmark Estimating Benchmark Estimating Software Getting Started Guide Running a Routine in your Project Routines are expressions that allow you to input Quantities relevant to your particular bid, and the Routine can generate Sections, Items and/or Resources. Routines are configurable for your business and can capture your corporate knowledge, as well as repetitive calculations that all estimators do many times over. For this example, we will run a Project Routine. To run a Project Routine, follow these steps: 1. From the Project Details window, right click and select Routine or select the Routine icon from the top menu 2. The Routine Library Selection will be shown. 3. Double click on the Routine you wish to run and the Routine Input window will be displayed. This is an example of a Civil Routine for 'CONTROL OF TRAFFIC' 4. Type in the answer to the first questions and press <TAB> or click the Next button to move to the next question 5. Enter in the answers for all of the questions in the Routine and then right click and select OK or press <ENTER>. 6. Press Build 7. Benchmark Estimating Software will now add Sections, Items and/or Resources to your Project. From the Project Details window, right click and select Section or press <CTRL 1> to go to the Section level and see what Sections the Routine has added to your Project. (This example may have only created one Section, however, a Routine can generate many Sections and many Items in each section if you require it to). If you progress down the levels you will also see the Items and Resources that the Routine has added to your Project. www.benchmarkestimating.com Copyright © 1996-2012 Benchmark Estimating 20 Benchmark Estimating Software Getting Started Guide There are three different levels of Routines – Project, Section and Item Routines. Project Routines create Sections, Items and Resources. To run a Project Routine you must first create a Project. Project Routines can only be run from the Project Details window. Section Routines create Items and Resources. To run a Section Routine you must first create a Section in a Project. Section Routines can only be run from the Project Sections window Item Routines create Resources. To run an Item Routine you must first create an Item in a Section of a Project. Item Routines can only be run from the Project Items window. www.benchmarkestimating.com Copyright © 1996-2012 Benchmark Estimating 21 Benchmark Estimating Software Getting Started Guide Making Project Specific Price Changes You can alter the price of your Resources from one central location and have this change flow throughout your project. Changes to Resource Rates using the Resource Rate Change are project specific; meaning any changes you make will apply to the project only and will not affect your Resource Library rates. Resources Rate Change will save you time, allow you to make your bid more competitive and will help to ensure consistency in Resource prices across your project. To make Project Specific Price Changes follow these steps: 1. Right click and select Project to return to the Project Details window. 2. To display the Resource Rate Change window click on its toolbar icon. You will be presented with something similar to the following: This image is from a Civil Project. The window you see will be different depending on the Database used and the Resources you have added to your Project. Resource Rate Change lists all of the Resources that are used in your Project. If the same Resource has been used many times throughout the project, it will only appear in this window once. www.benchmarkestimating.com Copyright © 1996-2012 Benchmark Estimating 22 Benchmark Estimating Software Getting Started Guide To change the rate for a Resource: 1. Click in the New Rate column corresponding to the Resource you wish to alter. 2. Type in the new rate. 3. If you wish to change more than one Resource Rate press <TAB> to move through the lines of Resources. 4. Once you have made your changes right click and press OK or press <ENTER>. Note that the Discount % column is automatically filled in when you enter a new rate. If you receive a discount by percentage, simply type the percentage figure into this column and your rates will automatically calculate. You can hide the Discount % column if you wish; to do this, simply right mouse click and select Hide Discount Column. 5. To save your new Resources Rates, right click and select OK or press <ENTER>. 6. Select Yes when the above dialogue box appears. www.benchmarkestimating.com Copyright © 1996-2012 Benchmark Estimating 23 Benchmark Estimating Software Getting Started Guide Allocating Profit, Overheads and Contingencies Benchmark Estimating Software allows you to easily allocate Profit and Indirect Costs (Contingencies and Overheads). This is done in Benchmark Estimating Software’s Extras screen. 1. From the Project Details Screen click on the Extras icon in the toolbar. You can allocate a separate Profit % for your Plant, Labour, Material and Subcontract components of your Project. Benchmark Estimating Software also allows you to allocate % overheads for Small Tools, Wet Weather, Supervision and Training, and % and $ Contingencies. All of these figures can be set up as defaults quickly and easily in Benchmark Estimating Software’s Administration screen. 2. To edit the information in this screen, right mouse click and select Edit or press <CTRL E>. 3. Type in the Profit, Overhead and/or Contingency figures you require. You can press <TAB> to move between these fields, or select a field with your mouse. 4. When you have entered all of your figures right click and press OK or press <ENTER> and Benchmark Estimating Software will calculate the Submission Price for your Project. www.benchmarkestimating.com Copyright © 1996-2012 Benchmark Estimating 24 Benchmark Estimating Software Getting Started Guide Benchmark Estimating Software has the power to generate Overheads in as detailed a form as you may require. If you wish to use this detailed method, you simply set up Sections for Overheads, and allocate your Overhead Items and Resources to these Sections. You then nominate these Sections in the Project Sections screen as Overheads by selecting the Overhead checkbox. 5. Close the Extras screen. www.benchmarkestimating.com Copyright © 1996-2012 Benchmark Estimating 25 Benchmark Estimating Software Getting Started Guide Producing Reports for your Estimate Here we look at some of Benchmark Estimating Software’s powerful Reports. Benchmark Estimating Software has over 60 reports that you can produce instantly for every Project. Estimators, Project Managers, Company Directors and Supervisors can use these reports for many purposes. 1. Project reports are accessed by selecting the Report, Quote and Export to Excel menu’s at the very top of the Project Details screen. Some reports we recommend you look at are the: Report > Summary Report > Direct Costs > Resource > Resources by Group Report > Direct Costs > Resource > Usage by Cost Report > Direct Costs > Resource > Resources by Item with Options… Quote > with Options Quote > Word Template and from the list that appears select the template you wish to run Export to Excel > Resources by Item 2. You can view the reports by selecting the Screen option from the Report Destination window; you can then save the report in your desired format or simply print it out. 3. Close each report by selecting the cross in the top right hand corner of the Report screen. www.benchmarkestimating.com Copyright © 1996-2012 Benchmark Estimating 26 Benchmark Estimating Software Getting Started Guide 27 Appendix A – Additional Benchmark Estimating Software Features As mentioned at the beginning of this document, this Getting Started Guide is designed to take you through the basics of estimating in Benchmark Estimating Software. However, there are many other features in the Benchmark Estimating Software system that make it a truly comprehensive system that will streamline your takeoffs, estimating, quoting, client relations, integration with your business systems and handover to construction teams. Such features include the ones listed below. To get more information on these features or to see them working live, contact Benchmark Estimating to arrange a guided online demonstration. You can also visit our website www.benchmarkestimating.com for more information. Regionalisation is ideal for organisations that operate across a wide geographical area, and where costs vary across this area. Regionalisation allows you to have different prices for the same Resource in your Resource Library. When estimating, the price used for a Project is automatically based on where the Project is being constructed. Quantity Takeoff Sheets capture and share your knowledge, and improve consistency and accuracy of your quantity takeoff calculations. Variables can be used in your Item and Resource quantity calculations to save time and eliminate errors. Change a Variable (such as depth, width, density) in one spot, and any calculation using that Variable will instantly update. Load Spreadsheet eliminates retyping and saves time by electronically importing your clients Schedule. Allocate quickly and accurately assigns the Resources used in a Library Item to an Item in your project. Auto Allocate can bid an entire estimate in minutes, by automatically pricing the Items in your estimate using the same (or similar) Items from your Item Library. Sub Items are ideal for crews, assemblies or breaking down your items of Plant/Equipment into more detail. These are a great time saver for power-users and enable you to produce more detailed estimates. www.benchmarkestimating.com Copyright © 1996-2012 Benchmark Estimating Benchmark Estimating Software Getting Started Guide Power Routines for larger, multi-site maintenance contracts to give you time savings of up to 80%. Cartage calculator automatically calculates the cost of cartage based on the cartage distance for the Project. This Benchmark Estimating Software feature can take into account a flag fall and distance included for each cartage-based Resource. Duplicate an estimate is used if the Project scope changes or your Client asks for different options. This feature allows you to duplicate your original Project so that you can make changes quickly and retain your original estimate. Subcontractor Manager electronically handles your subcontractor quotes to save time and increase accuracy. Spread allows you to manipulate your submission price on an Item by Item basis. You can effectively override the Submission Rate or Amount for any Item in your estimate. Resource-based Export to Microsoft Project® will streamline the handover to your project manager. Follow-Up feature to build strong client relationships and boost client confidence so you win more work. Reports for Job Costing analysis to streamline the integration with your construction teams and accounting systems. Marketing Reports give you instant data to analyse and drive your business. Progress Claims save time and eliminate errors in transferring data into other systems, and help ensure you get paid on time! www.benchmarkestimating.com Copyright © 1996-2012 Benchmark Estimating 28 Benchmark Estimating Software Getting Started Guide 29 Appendix B – Edition Comparison: Lite, Professional & Corporate Benchmark Estimating Software is available in three editions to suit your budget as well as the needs of your company. The below list gives a full comparison of features available in each edition: General Features Lite Professional Corporate Lite Professional Corporate Add-on Add-on Command Centre User based security & permissions Customisable system options Customisable drop down fields Mandatory fields Central register of estimates Document hyperlinks Estimate Notes Reports User manual & online help Built on the Microsoft .NET Framework Microsoft SQL Database Multiple Database Support Flexible Installation Microsoft SQL Server 2008 Express Compatibility with other Software Libraries Three Point Estimating Libraries Variable Library Quantity Takeoff Sheet Library www.benchmarkestimating.com Copyright © 1996-2012 Benchmark Estimating Benchmark Estimating Software Getting Started Guide Resource Library 30 Item Library Routine Library Section Library Conditions Library Client and Subcontractor/Supplier Libraries Library Security Library Import/Export Estimating the Cost of your Project Lite Three Point Estimating Regionalisation Auto Allocate Quantity Takeoff Sheets Takeoff Integrator Variables Sub Items Subcontractor Manager Project Specific Price Adjustments Power Routines Add Items from a Library Import/export a schedule of Items Routines Allocate Resources from the Item Library Production Rates Quantity Calculator Rate Only and Provisional Sum Items Cartage calculator Cost Check Duplicate an estimate Project Variations www.benchmarkestimating.com Copyright © 1996-2012 Benchmark Estimating Professional Corporate Add-on Add-on Benchmark Estimating Software Getting Started Guide Profit, Overheads & Contingencies 31 Lite Professional Corporate Lite Professional Corporate Lite Professional Corporate Lite Professional Corporate Lite Professional Corporate Add Profit Add Indirect Costs (Contingencies and Overheads) Spread Authorising, Producing & Following Up Quotations Microsoft Word Quote Templates Authorisation of Quotes Quotation Reports Company Logo on Quotes Standard & Project Specific Conditions on Quotes Progress Claims Progress Claims Progress Claim Reports Claim Variations Exporting to Other Systems Resource-based Export to Microsoft Project Export to Microsoft Word Export to Microsoft Outlook Export to Microsoft Excel Job Costing Export to Microsoft Excel Exports to Accounting/ERP Systems Sales & Marketing Analysis Marketing Reports & Graphs Business Reporting www.benchmarkestimating.com Copyright © 1996-2012 Benchmark Estimating