1
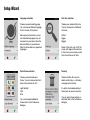
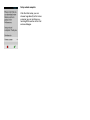
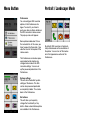
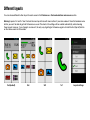
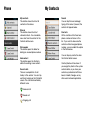
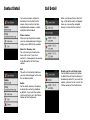
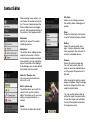
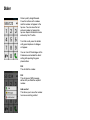
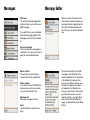
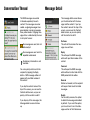
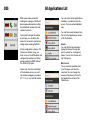
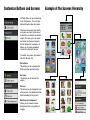
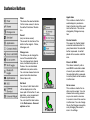
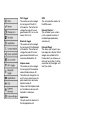
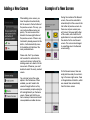
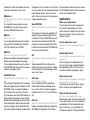
Version 2.5 User Manual
Setup Wizard
Language selection
Text size selection
Choose your preferred language.
You can choose different language
than in the rest of the phone.
Choose your preferred text size.
You can choose from 3 different
text sizes:
Some special characters or more
non-standard languages may not
be present in your device. See the
documentation of your phone or
tablet for information on supported
languages.
Default
Bigger
Biggest
Color theme selection
Security
Choose your preferred color
theme. You can choose from the 3
basic color schemes at first:
Choose whether the user can
delete certain items - call history,
messages and contacts.
Light (default)
Dark
Blue
It is better to disable deleting of
these items for security reasons.
You can download additional
themes later in the Preferences
dialogue.
Some of the texts may not fit the
screen with larger fonts selected.
In that case you can always scroll
them to see the rest of them.
You can setup these settings individually later in the Preferences
dialogue.
Setup wizard complete
After the initial setup, you can
choose to go directly to the Home
screen or you can continue customizing BIG Launcher in the Preferences dialogue.
Home Screen
Date & time
This area shows the actual date
and time. It can also show enlarged battery and mobile network
strength. These options must be
enabled under Appearance in the
Preferences.
When tapped, the common alarm
application is launched and you
can set the alarm. You can change
the alarm application under the
Home screen setup in the Preferences.
Phone
This button enters the telephony
section of the BIG Launcher. The
icon blinks when there is a missed
call.
Camera
This button runs the default camera
app. You can change this under
the Home screen setup in the Preferences.
When the alarm is active, the
alarm icon is displayed next
to the clock.
Messages
This button enters the messaging
section of the BIG Launcher. The
icon blinks when there is an unread
.
SOS
This button enters the SOS screen.
Gallery
This button runs the default gallery
app. You can change this under
the Home screen setup in the Preferences.
In order to use the SOS function,
numbers for SOS call and SOS
SMS must be configured in the
preferences.
All applications list
This button shows the list of all applications installed in the phone.
Menu Button
Portrait / Landscape Mode
Preferences
You can configure BIG Launcher
options in the Preferences dialogue. To reach it, you have to
push your device’s Menu button on
the BIG Launcher’s Home screen.
The pop-up menu will appear.
Some phone models don’t have
the menu button. In this case, you
have to press the three dots (⋮) beside the clock in the top bar of the
Home screen.
The Preferences can be also password protected to disallow any
changes to be made to the BIG
Launcher settings. You can set
up the password protection in the
Preferences.
System settings
This will show the default system
settings of the device. This item
can be also password protected
or completely hidden. This can be
done in the Preferences.
Set buttons
This will allow you to quickly
change the functionality of any
button. More customization options
are available in the Preferences.
By default, BIG Launcher will automatically rotate based on the orientation of
the phone. You can turn off this behavior in the Appearance section of the
Preferences.
Different layouts
You can choose different button layout for each screen in the Preferences - Customize buttons and screens section.
Warning! Layouts 2x2 and 1x1 don’t include the menu top info bar with menu button. If your device doesn’t have the hardware menu
button, you won’t be able to get into Preferences as usual. The shortcut for settings will be created automatically when choosing
these layouts. However, if you change it or remove it, the only way of getting to Preferences again is to hold the first (top-left) button
on the Home screen for 30 seconds.
2x4 (default)
3x4
2x2
1x1
Layout settings
Phone
My Contacts
My contacts
This button shows the list of all
contacts in the device.
Starred
This button shows the list of
starred contacts. You can add/remove star from the contact in the
Contact detail screen.
Dial number
This button opens the dialer for
dialing an unsaved phone number.
Add contact
This button opens the Contacts
editor for creating a new contact.
Recent calls
There is a complete list of call
history in this section. You can tap
each item to bring up the Call detail
screen. The calls are classified by
different icons:
Received call
Missed call
Outgoing call
Search
You can tap this box and begin
typing of the name. If present, the
contact will appear below.
Contacts
All the contacts with at least one
phone number will show in this
list. If you want to show also the
contacts without assigned phone
number, you can enable this option
in the Preferences.
You can tap any contact to show
the Contact detail screen.
Contact photos will be shown if
you assign the photo in the system
contact editor, or you have your
contacts synchronized with Facebook, LinkedIn, Google+ or any
other social network application.
Contact Detail
Call Detail
You can see various contact information in the Contact Detail
screen. Every contact can have
multiple phone numbers, e-mails
and other data included.
When you tap any item in the Call
log, a Call detail screen will appear.
Here you can see the complete
history of calls with this contact.
Phone number
When you tap the phone number,
you can choose between calling or
writing a new SMS to this number.
Add star / Remove star
You can mark your favorite contacts with a star. If you star a
contact, it can be quickly accessed
in the Starred list of the Phone
section.
Edit
This will run the Contact editor so
you can make changes to this contact or add new data.
Delete
For the safety reasons, the option
to delete the contact is disabled
by default. If you want this option,
you have to turn it on in the Phone
section of the Preferences.
Deleting of the call history item
For the safety reasons, the option
to delete the call from the history is
disabled by default. If you want this
option, you have to turn it on in the
Phone section of the Preferences.
Contact Editor
When creating a new contact, you
can choose the location of the contact. You can choose between the
Phone callbook and your Google
account. We recommend storing all
the contact in the Google account.
Add name
Add the full name of the contact
including surname.
Add phone
This button allows adding a phone
number to the contact. Contact
can have more numbers assigned.
Once entered, you can change the
type of the number after tapping it.
In this dialogue you can also Delete
the number from the contact.
Add star / Remove star
You can mark your favorite contacts with a star.
Edit in system app
This button allows you to edit the
contact in the system contacts
editor. This allows you to use more
options or assign a photo to a
contact.
Delete
This button will delete the contact.
Set photo
Allows you to change or remove
the contact photo. A dialogue will
appear.
Clear
Clears the photo (only visible when
a contact already includes a photo)
Gallery
Opens the system gallery of images. You can choose any image
from your phone. May not work on
some non-standard devices.
Camera
Opens the system camera app.
You can take a photo. May not
work on some non-standard devices. May require the presence of a
SD card.
After choosing the photo a crop dialogue will appear. Drag the orange
arrows to change size of the area
used for contact photo.
You can use the yellow button to
rotate the image. Use green button
to save the image. Use red button
to cancel the operation and return
to the previous menu.
Dialer
Dialer is pretty straightforward.
Press the buttons with numbers
and the number will appear in the
top row. You can erase the last
entered number by tapping the
top row. Special characters can be
entered by the #* button.
To initiate a call, press the button
with green telephone. A dialogue
will appear.
You can turn off this dialogue in the
Preferences and enable the direct
calling after pushing the green
phone button.
Call
This will dial the number.
Call
This will open a SMS message
editor with pre-filled the recipient
number.
Add contact
This allows you to save the number
to a new or existing contact.
Messages
Message Editor
Write new
This will show the Message editor
which will allow you to write a new
SMS message.
If you don’t like it, you can disable
the internal message editor in the
Messages section of the Preferences.
When you select the contact with
more than one phone number, you
can swap them by tapping the button with the selected phone number. Then you can select a different
one.
Recent messages:
This is a history of a message conversations. You can tap any item to
open the Conversation thread.
Select contact
This will allow you to choose a
contact from the My contacts list.
Phone number
If you want to send the SMS to the
number not saved in your contact,
you can write it directly here.
Message text
Enter you message text here.
Send
Tap this button to send the message.
The maximum length of the SMS
message is 160 characters with
common alphabet or 70 characters
if an alphabet with special character is used. When you’ll be near
this limit, a character countdown
will appear on the Send button.
Once you reach zero in the remaining characters counter, you can
continue writing - your text will be
split into two or more SMS messages, as showed also on the Send
button.
Conversation Thread
The SMS messages are sorted
in threads separately for each
contact. The messages are color
coded - outgoing messages have
green border, incoming messages
have yellow border. Outgoing message status is indicated by the icon
in its top left corner:
the message was sent, but not
delivered yet
the message was sent and it is
reported as delivered
the delivery information is not
available
You can quickly write back to the
recipient by tapping the Reply
button - SMS message editor will
appear with pre-filled number of
the contact.
If you tap the contact name at the
top of this screen, you can see the
Contact detail screen, so you can
quickly call the contact or edit it.
If you tap any of the messages, the
Message detail screen will show
up.
Message Detail
The message detail screen allows
you the interaction with the message and the contact. If you tap
the contact name at the top of this
screen, you can see the Contact
detail screen, so you can quickly
call the contact or edit it.
Call now
This will call the number the message was sent from.
Reply
This will open the SMS message
editor with pre-filled number of the
contact.
Forward
This will open the SMS message
editor without contact and with the
SMS pasted into the editor.
Resend
Similar as forward, but the recipient
will be pre-filled. Useful for failed
messages.
Delete
For the safety reasons, the option
to delete the message is disabled
by default. If you want this option,
you have to turn it on in the Messages section of the Preferences.
SOS
All Applications List
SOS screen allows automatic
sending the emergency SMS with
device geolocation and/or calling
the predefined number with loudspeaker turned on.
To avoid activating of this option
by mistake, you can define the
amount of seconds to wait before
calling and/or sending the SMS.
All the configuration is done in the
Preferences. Before using, you
have to turn on the SOS option and
configure the numbers for calling
and/or sending the SMS. Without
this, SOS will not work.
Please note, that due to limitation
of the Android system, you can’t
set common emergency numbers
(911, 112, etc.) as an SOS number.
You can launch all the applications
installed in your device from this
screen. They are sorted alphabetically.
You can hide unwanted apps from
this list in the Applications section
of the Preferences.
Search
You can tap this box and begin
typing the name of the app you
want to search for, it will appear
below. You can turn this box of in
the Preferences.
Most recent
This is constantly updated shortlist of the apps most recently
launched. You can change the
number of the items in this list in
the Applications section of the
Preferences.
Customize Buttons and Screens
All the buttons can be customized
in the Preferences. You can also
add unlimited number of screens.
To access the screen from another screen, you have to link one of
its button as a shortcut to another
screen. This way, you can create
non-linear structures of screens,
like the folders on a computer. It
allows you to make completely
custom UI suited just for you.
To modify any screen, just select it
from the Screens list.
Set buttons
This allows you to customize the
buttons on the selected screen.
Set name
This allows you to rename the
screen.
Set icon
This allows you to change the icon
of the screen. It is displayed on the
buttons leading to this screen.
Set/Remove background
Allows you to choose custom
background from your gallery of
images.
Example of the Screens Hierarchy
Customize Buttons
Clear
This clears the selected button.
On the Home screen, it returns
the default function of the button.
Revert
(only on Home screen)
This reverts the function of the
button to the original - Phone,
Messages, etc.
Change icon
This allows you to change the
icon of the selected button.
You can choose from internal
icons, installed icon packs or
themes. You can download
additional icon packs online.
You can also choose from icon
packs from other launchers
(Nova, Apex, etc.)
Set label
You can set a text label which
will be displayed on in the
lower part of the button. It uses
big letters, so we recommend
to use only short words.
You can invert the label colors
in the Preferences - Screens’
options section.
Application
This creates a shortcut to the
selected app in your device.
App’s internal icon will be used
as a button icon. This can be
changed by Change icon option.
Contact details
This opens the Contact detail
screen of selected contact in
your phone when the selected
button is pressed. A contact
photo will be used as a button
icon.
Direct call/SMS
This allows to directly call or
send SMS to selected number
of one of your contacts when
the selected button is pressed.
A contact photo will be used as
a button icon.
Go to screen
This creates a shortcut to another custom screen. You can
choose from existing screens
or you can create a new one.
A screen’s icon will be used as
a button icon. You can change
this by the Change icon option,
or by changing the screen’s
icon in its settings.
Wi-Fi toggle
This creates an active widget
for turning on/off the Wi-Fi
of the device. The button will
change the color of its icon:
green means Wi-Fi is on, red
means Wi-Fi is off.
Bluetooth toggle
This creates an active widget
for turning on/off the Bluetooth
of the device. The button will
change the color of its icon:
green means Bluetooth is on,
red means Bluetooth is off.
Airplane mode
This creates an active widget
for turning on/off the Airplane
mode (all radio devices off).
The button will change the color of its icon: green means Airplane mode is on, red means
Airplane mode off.
Please note that Airplane mode
isn’t available on devices with
Android 4.3 and newer.
Applications
This will create the shortcut to
the All applications list.
SOS
This will create the shortcut to
the SOS screen.
External Shortcut
This will allow to use a shortcut to a special functions of
installed Apps (bookmarks,
switches etc.)
External Widget
This allows you to insert a system widget on a button. Not all
widgets are suitable for this.
Please note if you choose custom icon for a button, it will be
overwritten by the widget, so it
won’t be visible.
Adding a New Screen
When adding a new screen, you
have the option to automatically
link the screen to the last button of
the previous screen. This way, you
can create multiple screens very
quickly. The new screen will be
linked to the lower right button of
the previous screen. If there is any
functionality already present on this
button, it will automatically move
to the bottom right button of the
newly created screen.
Please note, that if you choose
not to create this automatic link,
you have to link any button of the
existing screen as a shortcut to the
new screen. Otherwise, you won’t
be able to reach this newly created
screen.
You can also turn on the swipe
option in the Preferences. When
enabled, you don’t need to link
screens through buttons as they
are accessible by simple swiping to
left and right directly on the home
screen. Please note that this option is memory intensive and could
cause problems on older devices.
Example of a New Screen
During the creation of the Second
screen, the user has selected to
automatically link this screen to the
last button of previous screen. As
there was only one screen present (Home), the lower right button
of this screen, which was the All
applications list, was replaced with
the shortcut to the new Second
screen. The icon can be changed
to something else in the Second
screen config.
On the Second screen, there are
empty buttons ready for customizing. In the lower right corner, there
is All applications list button, which
was moved there automatically
from the Home screen.
Preferences
Run setup wizard
This will run the setup wizard to setup the
basic options of BIG Launcher.
Select language
This allows you to select the language
used in BIG Launcher. Some special characters or more non-standard languages
may not be present in your device. See the
documentation of your phone or tablet for
information on supported languages.
Appearance >>
This section allows you to configure the
look and feel of BIG Launcher.
Accessibility >>
This section allows you to set the options
related to accessibility.
Preferences menu >>
This section allows you to setup the Preferences menu options
Customize buttons and screens
This section allows you to add, modify
and delete the screens and buttons of BIG
Launcher. Please see the Customize Buttons and Screens section of this manual
for detailed info.
Screens’ options >>
This section allows you to configure the
settings related to the multiple screens
with buttons.
Phone >>
This section allows you to configure options related to the telephony features of
BIG Launcher.
Launcher as a default launcher. After selecting this option and pressing the Home
button on your device, a menu with all the
installed launchers will appear and you can
choose a different one.
Messages >>
This section allows you to configure options related to the messaging features of
BIG Launcher.
Check for updates
This will take you to the BIG Launcher
page on the Google Play Store (or other
app store you’ve purchased BIG Launcher from) to check for new updates. Online
connectivity is required for this.
SOS >>
This section allows you to configure options related to the SOS features of BIG
Launcher.
Appearance
Applications >>
This section allows you to configure options related to the application list of BIG
Launcher.
Compatibility Fixes >>
If your device has some issues, try to fix
them here.
This section allows you to solve the problems related to incompatibility of some
devices.
Clear BIG Launcher as a default launcher
Next time you press home button you can
select another default launcher.
This allows the quick unregistering of BIG
Select theme
Light (default), Dark, Blue, Download more
This allows you to select different color
theme. You can choose from 3 basic internal themes, or you can download more
themes from the Internet. Online connectivity is required for this.
Text size
Default, Bigger, Biggest
You can choose between 3 different text
sizes. Some of the texts may not fit the
screen with larger fonts selected. In that
case you can always scroll them to see the
rest of them.
Select screen orientation
Automatic (default), Horizontal, Vertical
This allows you to force the orientation of
the launcher so it doesn’t automatically rotate when changing the phone orientation.
This is useful to keep the interface more
constant.
Apply text size for preferences
Show preferences also in selected text size
This is useful when you have selected Biggest font size, but you need smaller texts
in the Preferences.
Full screen
Hide Android notification bar at the top of
the screen.
This is useful to avoid accidental dragging
of the top status bar. As this hides the battery and signal indicator, it is good practice to use this feature in combination of
options below. Please note that full screen
mode applies only for BIG Launcher - other
apps won’t go full screen if you turn on this
option. If you have device without physical
buttons and Android 3.2 or higher, there
will always be a bottom black bar with soft
keys, even if you enable this option.
Show big signal indicator
Useful when using full screen option.
Doesn’t work on most of the Samsung
phones.
Show big battery indicator
Useful when using full screen option.
Safe borders size
Solves accidental touches at the edges of
the screen.
This option will add the black bars to the
sides of the screen and render the interface of BIG Launcher more narrow. This
is useful on devices with large displays
and small borders around them. The user
may have the problem with holding such a
device and may need more grip and more
space for his fingers.
Accessibility
Enable haptic feedback
Vibrate when touching the menu buttons
This gives you better feeling when using
the BIG Launcher interface, as you can feel
the vibration on each touch.
Speak on long press
Read the item description on long press.
(TalkBack must be installed)
When enabled, you can long press any
item of the interface and the phone will
read aloud the item or its description. This
allows blind people with older phones
without ‘Touch to explore’ feature to use
the whole interface only by touchscreen.
It is also useful for reading SMS messages while driving a car. Or you can use this
feature if you can’t remember the meaning
of every icon on the BIG Launcher screens.
Pop-up on long press
Show the item description on long press.
When enabled, you can long press any
item of the interface to show a pop-up box
with the item description. This is useful if
you can’t remember the meaning of every
icon on the BIG Launcher screens.
Talkback: don’t read launcher name
Speed up reading the title of every screen.
When TalkBack is enabled, the Android
system will read the hidden title of every
screen entered. By default, every screen
has its name and BIG Launcher name also
included, so blind person can’t get lost and
knows that he’s still in the launcher and
not anywhere else. If you enable this option, only plain screen title is read on entry,
without the BIG Launcher name.
Preferences menu
Buttons edit in menu
Add quick access to screen editor to menu
When enabled, you can quickly edit the
functions of buttons of the current screen.
System settings in menu
Add quick access to system settings to
menu
When enabled, you can quickly get to
the System settings from the Preferences
menu. When disabled, only the Preferences option will be shown.
Protect menu
Protect preferences menu to avoid unwanted changes.
When enabled, if the user wants to go to
the Preferences, he is asked for a password. You can setup the password with
the option below.
Protect system settings
Protect system settings menu to avoid un-
wanted changes.
When enabled, if the user wants to go
to the System settings, he is asked for a
password. You can setup the password
with the option below.
Password
This allows you to setup the password.
Password can be also blank - in that case,
user is still asked for password, but pressing OK is enough as the password is blank.
Warning: if you enable Protect menu and
forget your password, there is no way you
can clear it. In this case you have to reinstall BIG Launcher or clear all the settings
via the Applications setup in System preferences.
Screens’ options
Use swipe to navigate screens
Caution - memory intensive! When active,
buttons are not accessible by keyboard.
This allows you to turn on the alternative
navigation between the screens, know as
swiping. When enabled, you don’t need
to assign the ‘Go to screen’ action to the
buttons.
When enabled, a new item ‘Remove from
swipe’ in each screen’s preferences shows
up, which allows you to remove that
screen from the swipe:
This way, you can create function related
screens which can act as sub-menu and
aren’t included in the main swipe set.
Once removed, you can include screen
again in swipe by selecting ‘Add to swipe’:
option doesn’t mean that the widget will
support the hardware keyboard control.
Please note that swiping is really memory
intensive and the requirements grow with
every screen, widget, icon and background
used. If BIG Launcher becomes unstable,
try to remove some screens from swipe.
Invert text label colors
Enable white text with black outline.
Swipe type
from home to right, loop
Allows you to enable the infinite loop of all
screens in swipe. Please note that loop option requires more memory and is slower.
Use menu button on all screens
The preferences menu can be accessible
on all screens instead of home screen only.
This doesn’t apply to devices without the
hardware menu button.
Activate button around widgets
Usable for keyboard control only. When enabled, pressing a button will give focus on
the widget.
This option makes sense only if you use
hardware keyboard to control BIG Launcher and you also use some External Widgets
on buttons. When disabled, you aren’t
able to interact with widgets. Enabling this
Enable automatic text labels
Automatically add text labels to newly created buttons.
If you assign a new function to a button,
a text label will be automatically created
based on the function you’ve chosen.
Phone
Set ‘My contacts’ button
This allows you to select a custom app
from your installed apps. This app will be
used instead of internal list of contacts.
Set ‘Dialer’ button
This allows you to select a custom app
from your installed apps. This app will be
used as a dialer instead of the BIG dialer.
Set phone ring tone sound
This allows you to choose a phone ring
tone.
Show contacts with phone only
Show only contacts which have phone
number included
This option is useful, when you want to
have quick access to all your contacts
and not only the ones with phone number.
Then you can quickly send them e-mail
simply by clicking their e-mail address in
their Contact detail.
Sort by surname
This alternative sorting may not work on all
phones.
This option enables you to sort your contacts by surname instead of the first name.
Please note that you can always use the
quick search function to search in all parts
of the contact name.
Show Add contact button
When disabled, you won’t be able to ass
new contact.
This controls the visibility of the Add contact item in the phone section.
Use system contact detail
If you want system contact detail because
of its special functions
This option disables the internal Contact
detail screen. When you click any contact a default system contact app will be
launched.
Add system contact detail
Add access to system contact detail to the
end of contact detail
This is useful if you want to use the internal
Contact detail screen, but sometimes you
need the functionality of the system contact app. When enabled, you can quickly
open the system contact details of the
contact you’re currently viewing.
Add edit
Add access to BIG Launcher contact editor.
If you disable this, you won’t be able to
edit contacts.
option you can remove the messaging option from this dialogue to allow calling only.
Add system edit
Add access to the system contact editor
This will add an option to edit the contact
also in the system editor instead of the BIG
Launcher editor.
Call with speaker phone on
Set speaker on during outgoing call
Due to Android updated security features,
this option enables the speaker phone for
outgoing calls only. If you want to use this
feature also for incoming calls, your phone
has to support this and you have to do this
in the system preferences.
Add contact delete option
Add ‘Delete contact’ to the end of contact
detail
This allows the deleting of the contact from
the Contact detail screen.
Show add/remove star
Add the ability to set the contact as starred
in contact details
This allows to remove the option to set
or unset the contact as starred. Starred
contacts can be accessed quickly from the
Phone section.
No menu when calling the contact
Directly dial the number instead of showing
the options
When enabled, you can choose whether
you want to call a contact or send him a
message.
Show message option in call dialog
You can hide the ‘Send message’ option
in the dialog after tapping contact’s phone
number.
Normally, after tapping the contact in the
Phone section, you can choose between
calling and sending a message. With this
Allow deleting call log items
Add new screen to call log with delete
option
When enabled, you can tap any item in the
call log and delete that entry.
No menu in the dialer
Directly dial the number instead of showing
the options
When enabled, the number will be dialed
directly after pushing the phone button in
the dialer.
Messages
Use system message editor
Disables internal message editor. Use
when you need special functions or MMS
editing.
Copy text to system message application
Instead of sending, SMS text is transfered
to system message application. This is
useful when you write a lot of MMS or have
any SMS problem.
When activated, you can normally create
new SMS message in the internal SMS
editor. When pressed the ‘Send’ button, a
default system messaging app is launched
and the text you’ve created in BIG Launcher is pasted into the edit window, so you
just send, or attach some multimedia data
to create MMS.
Sticky layout
Send button stays at the bottom of the
screen. It is more useful on large screen
devices.
sage as read and you will return to your
previous activity.
Reply opens the Message editor so you
can quickly reply to the message.
Call now allows you to quickly call the
sender of the message.
Delete will delete this message.
If you press Back button on your device,
the message will be kept unread and you
will return to your previous activity.
Vibration duration
none, 0.5s, 1s, 2s
This affects the length of the vibration
when a new SMS is received.
Request delivery notification
Request information about SMS delivery.
May be taxed by some operators.
When the delivery notification is disabled,
you can’t track whether the recipient have
received the message or not.
Repeat notification
never, every 5, 15, 30, 60 minutes
When you receive a new SMS message,
it is possible that you haven’t heard the notification sound. With this option enabled,
the notification sound will play again after a
period of time, until you read the message.
Show delete button
Allow deletion of any message
This option adds the delete button to the
Message detail screen.
Internal SMS notification
Show message detail upon receiving. May
not work on all phones.
When enabled, BIG Launcher will show
the message detail when a message is
received. The message detail will pop-up
even when you’re in another app. However
on some low-end devices with low amount
of memory, it is not 100% reliable.
OK closes the window, marks the mes-
Notification sound
Select custom SMS notification sound.
The sound will be played when a message
is received. Please note that if you don’t
turn the system notifications off, both
sounds will be played - the system notification sound along with BIG Launcher
notification sound. The solution is either
disabling the system notifications or selecting None as a notification sound.
When notifications are active, you may
want to turn the system notifications off.
You have to do this manually in the system
SMS messaging app. It is different on every device, but mostly this can be done by
launching it, pressing Menu button, going
to Settings and finding the option related
to notifications.
Default messaging app dialogue
Ask to be the default messaging app upon
entering the messages
Applicable only on devices with Android
4.4 or newer.
SOS
Send SMS
Automatically send SMS after pressing
SOS button
When enabled, SOS SMS sending will be
active. Please note you have to enter the
number of at least one recipient to the option below, otherwise it won’t work.
SMS phone
Phone numbers to send SOS to (separated
by comma ,)
You can define more numbers to send
SOS SMS to. If you don’t enter correct
number, SOS SMS will not work.
SMS text
SMS text to send
It is recommended to keep this text short.
Along with GPS coordinates it should fit
into 160 characters limit of SMS.
SMS wait
Seconds to wait before sending SMS
Enables countdown between entering the
SOS screen and sending the message.
This countdown allows the user to cancel
the SOS SMS and return back to previous
screen to avoid false alarm.
Add GPS location
Add GPS location to end of SMS if available
This option will add a direct link to Google
Maps with geolocation of the device to the
SOS SMS. There are several conditions,
that can affect the accuracy of the location: the phone must have GPS enabled, in
ideal situation the phone must be located
outside and there should be some time between entering the SOS screen and sending the message to locate the GPS satellites. When used in buildings, it helps when
the phone’s Wi-Fi is turned on. In the worst
case, the phone will use the location based
on the mobile network, which can work
well in cities but may be not very precise in
the low population areas.
Send GPS SMS
Send another SMS when sure about location
This option will increase the probability of
sending a more accurate position once it
is acquired. If the first SOS SMS was sent
only with coarse location and the GPS
will get more accurate position later, BIG
Launcher will send another SOS SMS with
this more accurate position.
Call
Automatically call after pressing SOS button
When enabled, SOS call will be active.
Please note you have to enter the number
of the recipient to the option below, otherwise it won’t work.
Call phone
Phone number to call to
You can define the SOS number here.
Please note that due to Android security you can’t set the common emergency
numbers (like 911 or 112) as an SOS number.
Call wait
Seconds to wait before call after SMS sent
Enables countdown between sending the
SOS SMS and calling the SOS number.
This countdown allows the user to cancel
the SOS SMS and return back to previous
screen to avoid false alarm.
Applications
Show recent applications
This will show the recently used apps at
the top of the Applications list. This is
useful when you constantly use the same
apps, but you don’t want to create extra
screens for them.
Recent applications count
Number of recently used applications displayed
Allowed applications
You can disable some applications on application list
This will bring you the Applications list.
You can tap any app to enable/disable it
from appearing in this list. This way you
can hide unwanted or dangerous apps.
Show search on top
Show/hide can be toggled by pressing the
search button on your device
This allows you to hide the quick search
box at the top of the Applications list.
Show the Preferences item
don’t show, above apps, below apps
Some devices don’t have the menu button
or you don’t want to use it (for example in
combination with Tecla wheelchair interface). In that case, you can display the
Preferences shortcut at the top or bottom
of the Apps list. Note that you can also use
BIG Launcher Preferences standalone app
listed in the apps list.
Better app search
Search for the app name also in the middle
of it.
When you start typing in the apps search
field, normally apps which are starting
with these characters are selected. With
this option turned on, also apps which
has these characters in the middle of their
names will also be shown.
Remove talkback text “image button” from
big buttons. This is not needed for ICS.
Only useful when you use TalkBack on a
device with Android 2.x
Clear cache upon pressing the Home
key
Memory intensive. Can help when you have
problems with external themes.
General advice: don’t install BIG Launcher’s external themes or icon packs on a SD
card. Then you won’t need this option at
all.
Compatibility Fixes
DPI of icons
This will force BIG Launcher to load higher quality app icons. Can help with blurry
icons on tablets and low-dpi devices, but
use with caution. May not work on some
devices.
Fix: limit total number of messages
How many messages will be read to create messaging threads. Lower number
will make reading faster but will show less
messages.
This option can help when you have too
many messages.
Restart application
Restart BIG Launcher and clear cache. Use
only if everything other fails.
If this option doesn’t work and BIG
Launcher is acting strange, try restarting
your phone. If it still doesn’t help, try uninstalling and installing it again. If this also
fails, let write us an email at
[email protected]
Fix: show missing messages
Enable this when you can’t see all the message threads. May be slower.
This happens mostly on older phones with
broken indexing of the messages.
Fix: missing icons in menus
When you see empty squares instead of
icons in lists. This makes scrolling slower.
This happens on some of the Sony Ericsson phones from 2011 after updating to
ICS (Android 4.0)
Talkback: image buttons
BIGLauncher.com
facebook.com/BIGLauncher
twitter.com/BIGLaunch