1
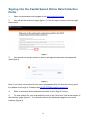
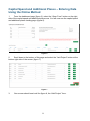
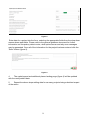
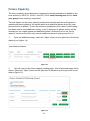
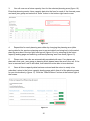
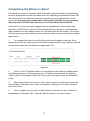
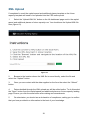
School capacity
(SCAP) survey
Capital Spend Online Data Collection
User Manual
May 2015
Contents
Introduction
3
Signing into the Capital Spend Online Data Collection Portal
4
Capital Spend and Additional Places - Introduction
6
Capital Spend and Additional Places – Generating Local Authority Reports
7
Capital Spend and Additional Places – Entering Data Using the Online Method
8
Capital Spend and Additional Places – Editing Data
10
Pre-Populated Data from 2014
10
Editing Data
10
Capital Spend and Additional Places – Deleting Project Data
12
Capital Spend and Additional Places – Submitting Project Data
13
Future Capacity
14
Completing the Return in Excel
17
XML Upload
18
2
Introduction
The aim of the Capital Spend Data (CSD) collection is to help us understand how
additional school places are being provided and funded.
For the first time, the 2015 capital spend data will be collected via an online portal. Data
is collected via two strands:
1. Capital spend and additional places (previously called places provided and
pipeline)
2. Future capacity
Local authorities should complete both strands. Guidance on how to access and use the
online portal is given in the sections below. This technical guidance should be read in
conjunction with the Guidance for Local Authorities – School Capacity, Forecasts and
Capital Spend Data Collection 2015 which provides advice on the intended contents for
each data item.
Local authorities will have the option to complete each strand within the online portal, or
to download an excel spreadsheet to enter information and then upload the spreadsheet
back into the online portal. The online portal is pre-populated with the data submitted in
the 2014 collection which can then be amended (if necessary) and added to. The excel
spreadsheets will not be pre-populated with the 2014 data, therefore local authorities
choosing this option to enter information will need to copy or re-enter previously provided
data into that spreadsheet.
All data must be submitted using the online portal. Email copies of the downloaded
spreadsheets will not be accepted.
3
Signing into the Capital Spend Online Data Collection
Portal
1.
Open a web browser and navigate to the data collection portal.
2.
You will see the welcome page (figure 1). Click the sign in button in the top right
hand corner.
Figure 1
3.
You should see a login screen to enter a pre agreed username and password.
(see figure 2)
Figure 2
Note: If you have not received a user name and password by the time the survey goes
live please do not sign in. Please email [email protected].
4.
Enter a username and a password and click on the “Sign In” button.
5.
To view options for your local authority click on the “click here” link at the bottom of
the welcome page (figure 1). You should now see the dashboard page for your local
authority (figure 3).
4
Figure 3
6.
Please note, the first time you see the dashboard page for your local authority the
return status will say “no data”. Once you have pressed “open form” the return status will
change to “saved”.
5
Capital Spend and Additional Places - Introduction
The capital spend and addition places strand should be completed for projects that use
2011-12 to 2017-18 basic need funding allocations and/or create additional mainstream
places from the 2010/11 academic year onwards, where funding is committed.
The online portal will be pre-populated with the data submitted by each local authority in
their 2014 CSD return. Therefore you will not need to re-submit previous data unless you
need to make changes, for example if some information has changed or the original
submission contained errors.
Local authorities will have the option to complete each strand within the online portal, or
to download an excel spreadsheet to enter information and then upload the spreadsheet
back into the online portal. LAs should be aware that uploading an excel spreadsheet into
the system will over write any existing data in the system including the pre-populated
data from the 2014 CSD return, any errors in this data corrected online and any new data
entered online. LAs should therefore give careful thought to how they wish to
complete the capital spend and additional places strand before starting their
return. We would suggest:
Either
•
Any errors in data submitted in CSD 2014 are corrected in the online portal and
new data is added in the online portal. This is more suitable if you have small
numbers of additional projects. Details of how to add projects this way are given
in the Capital Spend and Additional Places - Entering Data Using the Online
Method and Future Capacity sections of the Capital Spend Online Data Collection
User Manual document.
•
The spreadsheet is downloaded, data submitted in CSD 2014 is copied into the
spreadsheet from last year’s return (which can also be downloaded from the
online portal) and new data is added to the spreadsheet before it is uploaded back
into the system. The system will then flag up any errors which must be corrected
online in order to submit your capital spend return. This is more suitable if you
have large numbers of additional projects. Details of how to add projects this way
are given in the Completing the Return in Excel section of the Capital Spend
Online Data Collection User Manual document.
Or
6
Capital Spend and Additional Places – Generating
Local Authority Reports
Local authorities can generate a capital spend and additional places report. This report
will download all of the capital spend and additional places data currently in the online
portal. This will include any pre-populated data from 2014 CSD and any data inputted as
part of 2015 CSD. Unfortunately this function is not presently available for the future
capacity strand.
1.
From the dashboard page for your local authority click on the “reports” button on
the right hand side of the capital spend and additional places line. (figure 4).
Figure 4
2.
After a short wait all capital spend and additional places data currently in the
online portal will be displayed in a spreadsheet form. The data can either be viewed on
line or downloaded into excel by clicking on “Actions” in the top left corner and then
choosing “export” followed by “excel”. The number of errors currently in the system for
each project line can be viewed in the final right hand column. Any missing data in the
excel download will be displayed as “-1” and will need correcting online before your final
submission can be made. (figure 5).
Figure 5
7
Capital Spend and Additional Places – Entering Data
Using the Online Method
1.
From the dashboard page (figure 3), select the “Open Form” button on the right
side of the capital spend and additional places row. You will now see the capital spend
and additional places landing page (figure 6).
Figure 6
2.
Scroll down to the bottom of this page and select the “Add Project” button at the
bottom right side of the screen (figure 7).
Figure 7
3.
Your screen should now look like figure 8, the “Add Project” form.
8
Figure 8
Enter data for a project into the form, selecting the appropriate fields from the drop down
menus where applicable. Please refer to the general guidance document for further
information on compulsory data to enter, what options mean and why error messages
may be generated. Once all of the information for the project has been entered click the
“Save” button (figure 9).
Figure 9
4.
The capital spend and additional places landing page (figure 6) will be updated
with the newly added data.
5.
Repeat the above steps adding data for as many projects being submitted as part
of the return.
9
Capital Spend and Additional Places – Editing Data
The online portal will not allow CSD returns that contain errors to be submitted.
Therefore all errors will need to be corrected before your final CSD return can be
submitted.
Pre-Populated Data from 2014
Projects submitted in CSD 2014 may have errors flagged against them, for example if an
invalid option was entered or an explanation was not provided when one was required.
We require you to correct all flagged errors in your previously submitted data as well as
making sure that new data is error-free.
For projects submitted as part of CSD 2014 but providing places prior to the 2014/15
academic year, many of the validations in the system have been switched off. This is
because during data cleaning last year, many LAs said they were unable to provide the
information requested for older projects. However we would encourage LAs to review
these projects to see if information could be updated or added to.
For projects submitted as part of CSD 2014 but providing places from the 2014/15
academic year onwards, all validations in the system will be switched on. Therefore all
flagged errors will need to be corrected before your final CSD return can be submitted.
Please be aware that a number of errors in the system require an explanation to be
entered in the additional information box at the end of the capital spend and additional
places project form. The system will register any text in here as having corrected the
error. Please read through all of the guidance documents to ensure that you have
addressed all errors requiring an explanation in the additional comments box. Once your
data has been submitted the Pupil Place Planning Team will review the text in the
additional information box to ensure that all errors are addressed. If we think there are
omissions we will contact LAs for further information.
Editing Data
1.
The capital spend and additional places landing page shows the number of errors
each project submitted in CSD 2014 has against it so that you can easily see which
projects need errors correcting. To edit a project for whatever reason, select the “Edit”
button on the right side of the project you would like to edit (figure 10).
2.
If you wish to sort projects by the number of errors they contain, click on “errors”
on the column headings. If you wish to search for a particular project, enter the ESTAB
number into the estab no/school name box and press “Go”.
10
Figure 10
3.
Your screen should now look like figure 11 the “Add Project” form where you can
edit previously entered data. Any errors in previously submitted or newly entered data will
be flagged up in red text. These errors will need to be amended before the project can be
saved.
Figure 11
4.
After editing/correcting project data select the “Save” button in the bottom right
hand corner to save the record. Upon saving, a message is displayed informing you that
the record has been saved successfully if it is error free. If errors are still present in the
form, the number of errors will be displayed. It is possible to save the record with errors,
for correction at a later date, but these must be corrected prior to submission.
Note: As validations are applied in the online portal, you may find that the “working on it”
message appears once a project has been saved. If you have a lot of edits to do, you
may find it easier you make the changes in the downloadable excel spreadsheet and
uploading the spreadsheet back into the online portal.
11
Capital Spend and Additional Places – Deleting Project
Data
There may be the need to delete a project when completing the capital spend and
additional places form, for example if a previously submitted project did not go ahead or a
new project is added as a duplicate.
1.
From the dashboard page (figure 3), select the “Open” button on the right side of
the capital spend and additional places form from the dashboard.
2.
You will now see the capital spend and additional places landing page (figure 6).
3.
Browse to the project you are looking for. The list may be long depending on how
many projects have already been entered. To the bottom left of the form the pages are
listed. You can switch between pages until the project you want to delete appears.
Alternately, if you wish to search for a particular project, enter the ESTAB number into the
estab no/school name box and press “Go”. (figure 12).
Figure 12
4.
Once you find the project you want to delete, click the “Delete” button on the right
side of the project (figure 12). You will be asked to confirm that you wish to delete this
project.
12
Capital Spend and Additional Places – Submitting
Project Data
1.
Once all project data has been entered and amended and the capital spend and
additional places strand of the CSD return is ready to be submitted, click the “Submit”
button at the bottom right of the capital spend and additional places landing page (figure
13).
Figure 13
2.
On submission you will see a declaration of compliance, asking you to confirm that
you have provided true information to the best of your knowledge.
13
Future Capacity
The future capacity strand should be completed for places planned to be added by the
local authority in 2015/16, 2016/17 and 2017/18 for each planning area and for each
year group where funding is committed.
The total figures on the future capacity template should tally with the total figures for
mainstream places added in the capital spend and additional places strand (by year
places are first available). There may be some exceptions to this if basic need funding
has been used to fund additional nursery, year 12 and year 13 places as they will be
recorded on the “capital spend and additional places” strand but not on the “future
capacity” strand as the latter only records additional places in year groups R to 11.
1.
From the dashboard page, select the “Open” button on the right side of the future
capacity row (figure 14).
Figure 14
2.
You will now see the future capacity landing page. A list of planning areas will be
shown. Select the “Open” button on the right side of the planning area you wish to add
data to (figure 15).
Figure 15
14
3.
You will now see a future capacity form for the selected planning area (figure 16).
Enter that planning area’s future capacity data into the form for each of the forecast years
and each year group and select the “Save” button in the bottom right hand corner.
Figure 16
4.
Repeat this for each planning area either by changing the planning area (after
saving data for the previous planning area to prevent data from being lost) via the select
planning area box in the top right hand corner (figure 16) or by returning to the future
capacity landing page and selecting a different planning area from there (figure 15).
5.
Please note, the cells are automatically populated with zero. If no places are
planned in that year, year group or planning area, please leave the zero in the cell. If the
zero is removed and a cell is left blank, then data will not be able to be submitted.
6.
Once all future capacity data has been entered and the return is ready to be
submitted, return to the future capacity landing page which lists all of the planning areas
for your local authority (figure 17). Click the “Submit Return” button at the bottom right of
the screen.
Figure 17
15
7.
On submission you will see a declaration of compliance, asking you to confirm that
you have provided true information to the best of your knowledge.
16
Completing the Return in Excel
If the decision is made to complete either of the data collection strands by downloading
an excel spreadsheet to enter information and then uploading the spreadsheet back into
the online portal, LAs should be aware that uploading an excel spreadsheet into the
system will over write any existing data in the system including the pre-populated
data from the 2014 CSD return and any errors in this data corrected online.
If this option is chosen we would suggest that the spreadsheet is downloaded, data
submitted in CSD 2014 is copied into the spreadsheet from last year’s return and new
data is added to the spreadsheet before it is uploaded back into the system. The system
will then flag up any errors which must be corrected online in order to submit your capital
spend return.
1.
To complete the return in excel the Microsoft excel template is required. Excel
templates for both the capital spend and additional places and the future capacity strands
can be downloaded from the dashboard page (figure 18).
Figure 18
2.
Click on “Excel Template” button on the right side of the either the capital spend
and additional places or future capacity row. You will be presented with the option to
“Open or Save” the template. Select the “Save” option and open up the excel template
locally.
3.
Enter project data for a school or future capacity data for a planning area into the
excel template. Repeat as many times as necessary making sure you save your work
from time to time.
4.
Once complete save the excel template locally and select the option within the
spreadsheet to “Generate XML”. Save the XML file locally in a known location
17
XML Upload
If completed in excel the capital spend and additional places template or the future
capacity template will need to be uploaded into the CSD online portal.
1.
Select the “Upload XML file” button on the LA dashboard page next to the capital
spend and additional places or future capacity row. You should see the Upload XML file
form (figure 19).
Figure 19
2.
Browse to the location where the XML file is saved locally, select the file and
select the “Upload” button.
3.
Once you are content with the data supplied on the form the select the “Submit”
button.
4.
Data submitted through the XML upload can still be edited online. To do this select
the “Open” button from the capital spend and additional places or future capacity landing
page. Ensure you click the save button after making and amendments.
5.
On submission you should see a declaration of compliance, asking you to confirm
that you have provided true information to the best of your knowledge.
18
© Crown copyright 2015
This publication (not including logos) is licensed under the terms of the Open
Government Licence v3.0 except where otherwise stated. Where we have identified any
third party copyright information you will need to obtain permission from the copyright
holders concerned.
To view this licence:
visit
www.nationalarchives.gov.uk/doc/open-government-licence/version/3
email
[email protected]
write to Information Policy Team, The National Archives, Kew, London, TW9 4DU
About this publication:
enquiries www.education.gov.uk/contactus
download www.gov.uk/government/publications
Reference:
DFE-00158-2015
Follow us on
Twitter: @educationgovuk
Like us on Facebook:
facebook.com/educationgovuk
19