1
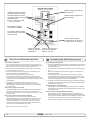
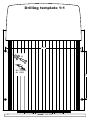
SIDE-POWER Thruster Systems Installation and user's manual v 1.0.2 is rd th a p bo ee n K al o u an m ! SLEIPNER MOTOR AS P.O. Box 519 N-1612 Fredrikstad Norway Tel: +47 69 30 00 60 Fax: +47 69 30 00 70 w w w. s i d e - p o w e r. c o m s i d e p o w e r @ s l e i p n e r. n o Made in Norway GB PPC 800 © Sleipner Motor AS 2012 Planning and important precautions GB Prior to installation, it is important that the installer reads this guide to ensure necessary acquaintance with this product. The thruster must NOT be installed in compartments that require ignition proof electric equipment. If necessary, make a separate compartment. The electromotor will generate some carbon dust so that any storage compartment must be separated from the thruster to prevent the stored items from becoming dusty/dirty. If you are installing the Side-Power in a small room /compartment, it should be ventilated to ensure cooling of the electromotor. If the height in the room you are installing the Side-Power is limited, the Side-Power can be installed horizontally or at any angle in between. - If the electro motor is positioned more than 30° off vertical, it must be supported separately. - The electromotor must be handled carefully. Do not lift it by the internal connections/main terminals or put it down on the driveshaft. - Beware to keep installation within advised measurements. No part of the propeller or gearhouse must be outside the tunnel. The electromotor, its components, contacts / plugs or other joints in the control cables must be mounted so that they will keep dry at all times. We advice to paint the gearhouse and propellers with antifouling. PS! Do not paint the zinc anodes, sealings or propellershafts. Do not finish the inside of the tunnel with a layer of gelcoat / topcoat or similar. It is only room for a thin layer of primer and two layers of anti-fouling between the tunnel and the props. With the boat on land, only run the thruster for a fraction of a second, as without resistance it will accelerate very fast to a damaging rpm. Also, while the thruster is in air, make sure that the propellers have come to a complete stop before performing a directions change of the thruster, as it might cause damage to the thruster. The PPC Power control unit should beinstalled in a dry, ventilated place - cable connections facing down. Mount unit with battery positive cable branching out at unit terminal, not at thruster motor. Allow free space at min 200mm over, 150mm under and min. 100mm in front and at sides. Take into consideration that a 5 m multicable shall be plugged in between thruster motor and PPC unit. This manual is intended to support educated/experienced staff and is therefore not sufficient in all details for the correct installation. Don’t install the electromotor at close range to easily flammable objects as it will reach over 100°C before the temperature switch is activated. Do not store items close to the thruster motor as it gets hot as well as any loose items near the thruster motor can cause problems with electrical wiring coming loose and short-circuiting. When installed in boats approved or classified according to international or special national rules, the installer is responsible for following the demands in accordance with these regulations / classification rules. The instructions in this guide can not be guaranteed to comply with all different regulations/classification rules. These instructions are only general instruction. If you are not skilled to do this work, please contact professional installers for assistance. NB! Faulty installation of the tunnel, thruster, PPC Power Control unit or panel will render all warranty given by Sleipner Motor AS void. Viktige forholdsregler og planlegning N Før installasjon må instruksjonsmanualen leses gjennom, og bruker må gjøre seg kjent med produktet. Thrusteren må ikke installeres i rom hvor gnister og høy varme medfører brannfare. Elektromotoren vil produsere karbonstøv fra børstene under drift slik at en lagringsplass må fysisk avskilles fra thrusteren for å unngå at det man lagrer blir støvete / møkkete. Elektromotoren er avhengig av god kjøling, sørg derfor for ventilasjon eller god plass rundt motoren ved montering. Elektromotoren kan monteres i alle vinkeler i fra vertikalt til horisontalt der hvor plassutnyttelsen krever det. o Hvis elektromotoren monteres i en vinkel på mer en 30 , må den støttes opp separat. Elektromotoren må håndteres forsiktig. Den må ikke bæres etter kontaktpunktene, og motoren må ikke settes ned på drivakselen. Følg de anbefalte målene som er oppgitt i manualen, propell eller girhus må ikke stikke ut av tunnelen. Elektromotoren, tilhørende komponenter, kontakter eller åpne ledd i strømkabler må monteres så de ikke utsettes for vann. Vi anbefaler å male girhuset med bunnstoff. PS sinkanoder, pakninger og propellaksel skal ikke påføres bunnstoff. Ikke påfør gelcoat / topcoat eller lignende inne i tunellen. Det er bare plass til ett lag primer og to lag bunnstoff mellom tunellen og propellene. Når båten ligger på land har ikke elektromotoren den motstanden den har i vann. Motoren bruker derfor ekstremt kort tid før den oppnår ødeleggende høyt turtall. Med båten på land, unngå hurtig bytte av driftsretning da det kan forårsake skade på truster. Effektregulatoren PPC skal monteres vertikalt på et tørt og ventilert sted med kabeltilkoblingen nederst. Den skal monteres slik at batteri pluss-kabel blir forgrenet på PPC, ikke på motoren.Det må være fritt rom rundt enheten ,min 200mm over, 150mm under og min 100mm foran og på sidene.Ta hensyn til at en 5m multikabelskal plugges inn mellom PPC og thrustermotor. Denne manualen er beregnet som støttemateriell for montører med erfaring / utdanning, og har derfor ikke all informasjon nødvendig for å oppnå en korrekt installasjon. o Installer ikke elektromotoren i nærheten av lett brennbart materiale, da motoren oppnår temperaturer over 100 C før den stopper automatisk. Området inntil thrusteren må ikke benyttes som lagringsplass da motoren vil bli varm samt at dette vil medføre en fare for at elektriske koblinger blir løse eller kortslutter I de tilfeller båter skal godkjennes eller klassifiseres i henhold til internasjonal, eller spesielle standarder, er montør ansvarlig for at de gjeldende lover og regelverk følges. Sleipner Motor AS kan ikke garantere at instruksjonene i denne manualen er i henhold til alle gjeldende regelverk og standarder. NB ! Ved feilaktig installasjon av panel, thruster, PPC effektregulator eller tunnel frafaller all garanti stilt av Sleipner Motor AS. 2 PPC800 1.0.2 - 2012 Fig. 1 NB: The Proportional Power Controller is a bulkhead (wall) mounted unit and must be installed in a dry and well ventilated compartment. The unit also requires a 200 mm minimum head clearance, 150mm minimum bottom clearence and a 100 mm minimum clearance surrounding its remaining outer casing. Fig. 2 A Refer to the manual for the specific thruster used for correct sizing of battery capacity and cable dimensions. DO NOT connect any other control equipment to the S-link controlled products except Side-Power original S-link products or via a Side-Power supplied interface product made for interfacing with other controls. Any attempt to directly control or at all connect into the S-link control system without the designated and approved interface, will render all warranties and responsibilities for the complete line of Side-Power products connected void and null. If you are interfacing by agreement with Sleipner and through a designated Side-Power supplied interface, you are still required to also install at least one original Side-Power control panel to enable efficient troubleshooting if necessary. GB Electrical installation N • Cable size - Cable lengths to be used for calculation is the total of A+B+C+D+E in Fig. 1. • It is important that you use a good cable size and batteries with a high cranking capacity to feed the thruster, because it is the actual voltage at the motor while running the thruster that decides the output rpm of the motor and thereby the actual thrust. Please see the list below for advised min. sizes of cables and batteries. You can of course use larger cables for even better results. • A main switch that can take the load without noticeable voltage drop must be installed in the main positive lead so the power for the thruster can be turned off independent of the rest when not on board or in emergencies. This should be placed in an easy accessible place and the boats instructions should inform that this should be turned off like the boat’s other main switches. • We also advice to install a fuse in the positive lead for protection against short circuiting of the main cables. This fuse should be of a adequate quality which normally means that it is physically large as these have less voltage drop than the simple / small ones. It should be of the slow type and sized to take the amperage draw for at least 5 minutes. • It is highly recommended to install a Side-Power Automatic Main Switch 897712 (12V) eller 897724 (24V). The AMS will be activated when the panel is turned on, contains an automatic short circuit fuse and a manual emergency stop. The AMS will also provide feedback to the panel regarding evt. faults. • The cable ends must be fitted with terminals and these must be well isolated against contact with anything but the proper connection point. • Terminals must be properly tightened. Secure/hold inner nut when tightening (Fig. 2). Tighten ø10mm / 3/8" bolt with 15 Nm/11lb/ft. PPC800 Elektrisk installasjon • Kabeldimensjon - Kabellengden som skal brukes i utregningen tilsvarer totallengden (A+B+C+D+E, Fig. 1). • Det er viktig å bruke kabler som er store nok, og et batteri med god kaldstartkapasitet for å drive thrusteren. Det er spenninngen ( i volt) som kommer frem til motoren under kjøring som bestemmer turtallet til motoren og dermed også skyvekraften. Vær vennlig og jamfør listen over for minimum anbefalte kabel, og batteristørrelse. • En hovedstrømbryter som ikke medfører stor spenningsfall må installeres på thrusterens plusskabel. Det bør være mulig å skru av strømmen til thruster uavhengig av resten av det elektriske systemet, når man ikke er om bord, eller i et nødstilfelle. Bryteren bør plasseres på et tilgjengelig sted, og båtens instruksmanual må ta for seg at denne skal skrus av slik som de andre hovedbrytere. • Det må installeres sikring på pluss strømkabelen for å beskytte mot kortslutning av hovedstrømkablene. Sikringen bør være av høy kvalitet, noe som vanligvis betyr at de er fysisk store, for å unngå spenningsfall som ofte er resultatet av å bruke mindre, enklere sikringer. Sikringen skal være en treg type som tåler amper trekket til elektromotoren i minimum 5 min. • Det anbefales å bruke Side-Power automatisk hovedstrømbryter 897712 (12V) eller 897724 (24V).Denne aktiveres når panel slås på, og har også innebygget kortslutningsikring, samt en manuell nødstopp.Den gir også melding til panel ved evt. feil. • Kabelendene kan må påmonteres terminaler og disse må isoleres mot alt som ikke er riktig kontaktpunkt. • Det er viktig att kabelsko trekkes korrekt fast på koblingsbolt. Kontra mutter på koblingsbolt må holdes fast ved tiltrekking (Fig. 2). ø10mm / 3/8’’på motoren dras til med 15 Nm. 1.0.2 - 2012 3 4 Bow thruster (SEP model) Proportional Power Controller End terminator S-link external switch interface and remote (optional) PPC 8730 PPC800 1.0.2 - 2012 + red Bow thruster battery 12/24V - S-link supply +12/24V 5A Stern thruster battery 12/24V - 5A +12/24 black Automatic Main Switch 8977 12 / 8977 24 or Manual main switch w/ANL fuse + red B+ PPC Station 2 Proportional joystick control panel Bow and stern Stern thruster (SEP model) Fixed multicable 5m Proportional Power Controller End terminator PJC 212 N +12/24 5A - black B+ red S-link on/off switch Observe PPC battery terminal polarity ! S-link control system Station 1 Proportional joystick control panel Bow and stern Wiring diagram Automatic Main Switch 8977 12 / 8977 24 or Manual main switch w/ANL fuse Fixed multicable 5m S-link external switch interface and remote (optional) 8730 PJC 212 yellow black GB Koblingsskjema elektrisk GB Control panel and control-leads N Kontrollpanel og kontrollkabler Control panel installation: Kontrollpanel installasjon: • You can install as many panels as you wish by using optional Side-Power S-link T-connectors • Det er mulig å installere så mange kontrollpanel som ønskelig ved å bruke Side-Power S-link T-stykker. If two or more panels are operated at the same time in opposite directions, the thruster will stop. When two or more panels is operated in the same direction, the thruster output will be determined by the panel giving the largest signal. Hvis trusteren skulle motta signaler fra flere paneler samtidig, så kutter den dersom signalene er til ulike retninger.Ved betjening til samme retning vil det panel med størst stikke- pådrag bestemme trusterturtall. • Ved bruk av Side-Power originalutstyr er alle elektriske kontakter klare til å plugges sammen. • When using original Side-Power equipment it is all “plug & go”. • If the drive direction of the thruster is the opposite of what expected, the blue and grey wire must be changed on the thruster solenoid or drive direction can be altered in the control panel SETUP (refer to control panel manual). • Hvis kjøreretningen ikke stemmer overens med forventningene må blå og grå ledning på thruster-releet byttes om, eller så kan dette endres i SEUP på panelet (se panel-manual). • Monteringsveiledning for panelet følger panelet. • The mechanical installation of the panel is described in the manual following the panel. • Thrusterpanelet bør monteres et sted det er lett å bruke. Siden gass og gir ofte brukes samtidigt som thrusteren, er det ofte en god løsning å ha muligheten å operere disse med hver sin hånd. • The thruster control should be placed in a position were it is easy to use, and it is very common to use the thruster at the same time as your gear/throttle lever so it is normally a user friendly solution to be able to access these with one hand for each control. GB Important user precautions N • Ensure that you know the location of the main battery switch that disconnects the thruster from all power sources (batteries) so that the thruster can be turned off in case of a malfunction. • Always turn the main power switch off before touching any part of the thruster, as an incidental start while touching moving parts can cause serious injuries. • Always turn the control device off when the thruster is not in use. • The maximum continues usage time of the electrical thruster is approximately 3 minutes. The electromotor has a built in thermal cut-off switch that will shut off the electromotor if it is overheating and re-engage it when it has cooled down some. This should be considered when planning your maneuvering. • This also means that the thruster will limit its total running time per time period so that you can not count on the thruster to hold you in a current and side wind for extensive time periods. Depending on the surrounding temperatures etc. the thruster will be able to run approximately 10 % of the time. • Never use a thruster close to somebody in the water, as the thruster will draw objects close by into the tunnel and contact with the rotating propellers will cause serious injuries. • With the boat on land, only run the thruster for a fraction of a second, as without resistance it will accelerate very fast to a damaging rpm. Also, while the thruster is in air, make sure that the propellers have come to a complete stop before performing a directions change of the thruster, as it might cause damage to the thruster. • If the thruster stops giving thrust while the electromotor is running, chances are that there is a problem in the drive-system. You must then immediately stop trying to run it, and turn it off, as running the electromotor for more than a few seconds without resistance from the propeller, can cause serious damage to the electromotor. • When leaving the boat always turn off the main power switch for the thruster. • We advice to always keep the main engine(s) running while using a thruster. This will keep the batteries in a good charge condition. This will also give better performance to the thruster, as a higher voltage at the thruster results in a higher torque (power) in the electromotor. • Please note that the performance of a thruster strongly depends on the voltage available at the electromotor. This voltage will decrease by time because aging batteries have a reduction of capacity. By installing new batteries the effect of the thruster should be back at the original level. • Make sure that only one control is used at the same time, if two panels are operated in opposite directions at the same time the thruster will not run at all. If they are operated in the same direction the thruster will run in this direction. • If the thruster is not performing or functioning as usual, the cause for this must be found and corrected as soon as possible so to avoid causing any other or further damage to the equipment. You must also turn off the main battery switch immediately in case the problem is of electric origin. • Never store anything (e.g. equipment, sails, ropes etc.) in the same compartment as the thruster. When the thruster runs for a longer period it will get hot and will cause damage. PPC800 • • • • • • • • • • • • • Viktige brukerforebehold Forviss deg om at du kjenner plasseringen av hovedstrømsbryteren som kutter all strøm til thrusteren, så thrusteren kan skrus av i nødstilfelle. Før berøring av noen del av thrusteren må alltid strømmen skrus av. En tilfeldig start kan volde stor fysisk skade. Skru alltid av kontrollpanelet etter bruk. Den maksimale sammenhengende kjøretiden for en elektrisk thruster er ca. 3 min. da vil en føler automatisk skru av motoren når den når en viss varme. Dette må tas i betraktning når en manøver planlegges. Dette betyr at ved manøvere som tar lang tid vil ikke thrusteren kunne brukes kontinuerlig. Ved manøvere som tar lang tid kan man bruke thrusteren i ca 10 % av tiden, avhengig av temperaturen i vannet. Bruk aldri thrusteren når noen er i vannet, thrusteren vil trekke gjenstander til seg og kontakt med propellen vil volde alvorlig skade. Kjør aldri thrusteren i mer enn 1 sek. når båten er på land. Uten motstand fra vannet vil thrusteren nå ødeleggende turtall svært fort. Hvis thrusterne stopper å gi skyvekraft mens motoren er i gang, er det trolig oppstått problemer i girsystemet. Stopp umiddelbart å kjøre motoren,og skru den av. Uten motstand fra vannet vil thrusteren nå ødeleggende turtall svært fort. Når man forlater båten skal alltid hovedstrømsbryteren slås av. Vi anbefaler å ha motoren i gang når thrusteren kjøres. Da vil batteriene vedlikeholdes, og det vil være høyere spenning til elektromotoren. Høyere spenning gir høyere turtall og bedre ytelse. Ytelsen til en baugthruster avhenger av hvilken spenning motoren mottar under kjøring. Kapasiteten til batterier avtar etter hvert som de blir eldre, og dermed også ytelsen til thrusteren. Ved å installere nye batterier vil thrusteren yte maksimalt igjen. Kun en kontroll skal brukes av gangen, hvis to kontroller brukes motsatt vei vil thrusteren stoppe automatisk. Hvis to paneler opereres samme vei vil ikke dette skje. Hvis thrusteren ikke fungerer tilfredsstillende må feilen lokaliseres og rettes så snart som mulig for at ikke thrusteren skal ta ytterligere skade. Skru av hovestrømsbryteren hvis feilen er av elektrisk art. 1.0.2 - 2012 5 • Connectorforexternal“buzzer”/loudaudiblealarms Speedcontroljoystickfor bowthuster Holdingfunctionforautorunningofbowandstern thrusterstogetherinthe directionofthearrowsat selectedpower Press“+”formoreand “-”forlesspower. Speedcontroljoystickfor sternthuster Informationdisplay,see nextpagefordetails. Pressboth“ON”buttons simultanouslytoactivate controlpanel. Presstode-activate controlpanelorcancelor gobackinmenusystem MENU Presstochange Presstoaccessmenu betweendayand systemandchoose nightlight itemsinmenus SIDE-POWER THRUSTER SYSTEMS CONFIDENCE BY CONTROL How to use Side-Power thrusters GB N User info, PJC-212 - 1/ Hvordan bruke Side-Power trustere How to use a bowthruster Hvordan bruke en baugtruster 1. Turn main power switch for the bow thruster on. (Always turn off the main power switch when not on board.) A Side-Power Automatic Main Switch will turn on/off when the panel is turned on/off. 1. Skru på hovedstrømmen (skru alltid av hovedstrømmen når du ikke er om bord i båten). En Side-Power Automatic Main Switch slås på / av når panelet slå på / av. 2. Please take some time to exercise thruster usage in open water to avoid damages to your boat. 2. Det er fordel om baugtrusteren prøves på åpent vann den første gangen. 3. Turn the control panel on by pushing both “ON” buttons on the original Side-Power panel simultaneously. 3. Skru på kontrollpanelet ved å trykke inn begge ”on” knappene på Side-Power panelet. 4. Move the joystick in the direction you wish the bow to move. Other controls like foot switches or toggle-switches on the throttle can be used. These are connected to the S-link control system by a S-link interface (Refer to schematics in interface manual for installation) 4. Kjør baugen i samme ønsket retning som du beveger joysticken. Andre kontrollenheter som fotbrytere, eller brytere på gass hendel kan også brukes. Disse tilkobles S-link kontrollsystem via en spesiell interface-boks.(Se skjema i manual for interfaceboks). 5. Depending on the sideways speed of the bow, you must disengage the control device shortly before the bow is in the desired direction, as the boat will continue to move after stopping the bow thruster. How to use a single stern thruster Some boats might however have installed a single stern thruster because of space limitation in the bow. In this case the stern thruster is used in the same way as a single bow thruster or moving the boat’s stern. How to use a bow and stern thruster combined The combination of a bow and stern thruster offers total manoeuvrability to the boat and the opportunity to move the bow and the stern separately from each other. This enables you to move the boat sideways in both directions and to turn the boat around its own axis staying at the same place. Refer to the PCJ control panel manual for detailed instructions. 5. Avhengig av hvor stor fart baugen får sideveis må trusteren stoppes før baugen er i riktig posisjon, dette fordi baugen vil fortsette sideveis litt etter trusteren skrues av. Hvordan bruke en enkel hekktruster Enkelte båter vil av plassmessige, eller andre hensyn bare installere en hekktruster. I disse tilfeller brukes hekktrusteren på samme måte som baugtrusteren. Hvordan bruke hekk og baugtruster kombinert Kombinasjonen av baug og hekktruster gir en total kontroll over båtens bevegelser p.g.a. muligheten til å bevege hakken og baugen uavhengig av hverandre. Båten kan skyves sidelengs og dreies rundt sin egen akse. Se egen brukermanual for PJC betjeningspanel. • Det er også her en fordel å prøve ut systemet på åpent vann. • Again, if in doubt, try in open water first! 6 PPC800 1.0.2 - 2012 Trouble shooting GB Before seeking assistance at the help desk of your Side-Power dealer/distributor please perform these tests and make notes of all measurements to ensure that they have as much information as possible to work on. NB! All check points and solutions must be carried out after consulting the relevant information elsewhere in this manual to understand how the system is intended to work. If you are unable to understand what to check, you must consult a professional. Solution Check » » The electromotor runs, but there is no thrust. If the flexible coupling between the motor and driveshaft is not fitted correct inside the boat. Check the flexible coupling/shear pin and the motor installation to ensure correct connection of the flexible coupling before re-fitting the electromotor. Are the propellers in the tunnel fastened correctly on the prop-shaft (key/drive pin present) Re-fasten or replace the propeller and/or key/drive pin. With the motor removed, turn the driveshaft from inside the boat to feel if the gears are engaging and turning the prop-shaft. In case of a failure inside the gearhouse, we advice to get a replacement gear-house instead of attempting to repear the internal gear and bearing system. The thruster does not start at all or works only in one direction. Refer to the PCJ Control Panel manual for detailed explanations of fault codes shown in panel display. » Check that a SCAN SYSTEM procedure have been completed according to description in the panel manual. The thruster has an unexpected low performance. Check voltage at thruster when running. If less than 10,5 V / 21V the thruster will not perform at specified effect. Check that all the brush-springs sits correctly on the brushes in the electromotor. If one or more brushes are loose/has no tension from the brush-spring, the performance will be low. Check that the propeller, gearhouse and tunnel is free from growth/barnacles etc. If there is growth in the tunnel, this will disturb/block the waterflow and especially barnacles on the propeller will greatly reduce performance. Problemer og løsninger Før du søker hjelp hos din forhandler kan du foreta noen tester, og notere ned resultatet for at forhandleren skal ha mest mulig informasjon til rådighet. NB ! Alle sjekkpunktene på listen må sammenlignes med informasjon gitt tidligere i manualen for å forstå hvordan systemet skal fungere. Hvis du ikke forstår sjekklisten eller de relevante opplysningene gitt i manualen så må du ta kontakt med profesjonell hjelp. Løsning Kontroller » Elektromotoren går, men det er ingen skyvekraft. Den fleksible koblingen mellom motoren og drivakselen kan være ha blitt brutt av. Sett i ny fleksibel kobling og sjekk motorinstallasjonen. Er propellen festet til propellakselen, og er drivpinne på plass. Fest eller erstatt propellen og drivpinnen. Med elektromotoren avmontert, kan drivakselen vris for hånd for å sjekke om gir, og lager er i orden. I tilfelle girhuset er skadet anbefaler vi skifte girhus, fremfor å prøve å reparere innvendige gir og lagre. » Trusteren går bare i en retning eller ikke i det hele tatt. » Thrusteren yter mindre enn ventet. Sjekk manualen for ditt PJC panel for beskrivelser av feilmeldinger vist i panelets display Kontroller at det har blitt gjennomført en SCAN SYSTEM prosedyre i henhold til panelmanualen. Mål spenningen på motoren under kjøring. Er spenningen lavere enn 10,5V / 21V vil thrusteren synke i turtall og skyvekraften senkes. Sjekk at alle børstefjærene ligger riktig an mot børstene. Thrusteren vil ha lav skyvekraft hvis en eller flere børster ikke får trykk fra fjærene. Kontroller propell, girhus og tunnel, og fjern eventuell algevekst og lignende. Algevekst i tunnelen vil redusere vannstrømmen, algevekst på propellen kan redusere ytelsen betydelig. PPC800 1.0.2 - 2012 7 Warranty statement GB 1.The equipment manufactured by Sleipner Motor AS (The “Warrantor”) is warranted to be free from defects in workmanship and materials under normal use and service. 2.This Warranty is in effect for of two years from the date of purchase by the user. Proof of purchase must be included, to establish that it is inside the warranty period. 3.This Warranty is transferable and covers the product for the specified time period. 4.In case any part of the equipment proves to be defective, other than those parts excluded in paragraph 5 below, the owner should do the following: (a) Prepare a detailed written statement of the nature and circumstances of the defect, to the best of the Owner’s knowledge, including the date of purchase, the place of purchase, the name and address of the installer, and the Purchaser’s name, address and telephone number; (b) The Owner should return the defective part or unit along with the statement referenced in the preceding paragraph to the warrantor, Sleipner Motor AS or an authorized Service Centre, postage/shipping prepaid and at the expense of the Purchaser; (c) If upon the Warrantor’s or Authorized Service Centre’s examination, the defect is determined to result from defective material or workmanship, the equipment will be repaired or replaced at the Warrantor’s option without charge, and returned to the Purchaser at the Warrantor’s expense; (d) no refund of the purchase price will be granted to the Purchaser, unless the Warrantor is unable to remedy the defect after having a reasonable number of opportunities to do so. Prior to refund of the purchase price, Purchaser must submit a statement in writing from a professional boating equipment supplier that the installation instructions of the Installation and Operation Manual have been complied with and that the defect remains; (e) warranty service shall be performed only by the Warrantor, or an authorized Service Centre, and any attempt to remedy the defect by anyone else shall render this warranty void. 5.There shall be no warranty for defects or damages caused by faulty installation or hook-up, abuse or misuse of the equipment including exposure to excessive heat, salt or fresh water spray, or water immersion except for equipment specifically designed as waterproof. 6.No other express warranty is hereby given and there are no warranties which extend beyond those described in section 4 above. This Warranty is expressly in lieu of any other expressed or implied warranties, including any implied warranty of merchantability, fitness for the ordinary purposes for which such goods are used, or fitness for a particular purpose, and any other obligations on the part of the Warrantor or its employees and representatives. 7.There shall be no responsibility or liability whatsoever on the part of the Warrantor or its employees and representatives for injury to any person or persons, or damage to property, loss of income or profit, or any other consequential or resulting damage or cost which may be claimed to have been incurred through the use or sale of the equipment, including any possible failure or malfunction of the equipment, or part thereof. 8.The Warrantor assumes no liability for incidental or consequential damages of any kind including damages arising from collision with other vessels or objects. 9.This warranty gives you specific legal rights, and you may also have other rights which vary from country to country. 8 PPC800 1.0.2 - 2012 Dimensions NB: Drawing NOT to scale! (1:1 drilling template on next page) 178,6 4X 120 Ø3,5 (wood) Ø4 (GRP) B+ M- PPC800 B1.0.2 - 2012 9 Drilling template 1:1 178,6 4X 10 120 Ø3,5 (wood) Ø4 (GRP) PPC800 1.0.2 - 2012 SERVICE PPC800 1.0.2 - 2012 11 Service Centres Argentina Trimer SA Buenos Aires Tel: +54 11 4580 0444 Fax: +54 11 4580 0440 www.trimer.com.ar [email protected] Denmark Gertsen & Olufsen AS Hørsholm Tel: +45 4576 3600 Fax: +45 4576 1772 www.gertsen-olufsen.dk [email protected] Australia AMI Sales Freemantle, WA Tel: +61 89 331 0000 Fax: +61 89 314 2929 [email protected] Finland Nautikulma OY Turku Tel: +358 2 2503 444 Fax: +358 2 2518 470 www.nautikulma.fi [email protected] Austria G. Ascherl GmbH Hard, Bregenz Tel: +43 5574 899000 Fax: +43 5574 89900-10 www.ascherl.at [email protected] France Kent Marine Equipment Nantes Tel: +33 240 921 584 Fax: +33 240 921 316 www.kent-marine.com [email protected] Benelux ASA Boot Electro Watergang Tel: +31 20 436 9100 Fax: +31 20 436 9109 www.asabootelectro.nl [email protected] Germany Jabsco GmbH Norderstedt Tel: +49 40 535 373-0 Fax: +49 40 535 373-11 Brazil Electra Service Ltda. Guaruja Tel: +55 13 3354 3599 Fax: +55 13 3354 3471 www.electraservice.br.com [email protected] Bulgaria Yachting BG Burgas tel: +359 56 919090 fax: +359 56 919091 www.yachting.bg [email protected] Greece Amaltheia Marine Athens Tel: +30 210 2588 985 Fax: +30 210 2588 986 www.amaltheiamarine.com [email protected] Iceland Maras EHF Reykjavik Tel: +354 555 6444 Fax: +354 565 7230 www.maras.is [email protected] India Indo Marine Engineering Co. Pvt. Ltd Pune, Maharashtra Tel: +91 20 2712 3003 Fax: +91 20 2712 2295 [email protected] Canada Imtra Corporation New Bedford, MA Tel: +1 508 995 7000 Fax: +1 508 998 5359 www.imtra.com [email protected] China/Hong Kong Storm Force Marine Ltd. Wanchai, Hong Kong Tel: +852 2866 0114 Fax: +852 2866 9260 www.stormforcemarine.com [email protected] Croatia AC Yacht & nautical support Icici Tel: +385 51 704 500 Fax: +385 51 704 600 [email protected] Ireland Sleipner Motor Ltd. South Brent Tel: +44 1364 649 400 Fax: +44 1364 649 399 [email protected] Israel Atlantis Marine Ltd. Tel Aviv Tel: +972 3 522 7978 Fax: +972 3 523 5150 www.atlantis-marine.com [email protected] Italy Saim S.P.A. Assago-Milan Tel: +39 02 488 531 Fax: +39 02 488 254 5 www.saim-group.com Sweden Sleipner AB Strömstad Tel: +46 526 629 50 Fax: +46 526 152 95 www.sleipnerab.se Japan Turtle Marine Inc. Nagasaki Tel: +81 95 840 7977 Fax: +81 95 840 7978 www.turtle-marine.com [email protected] Switzerland Marine Parts Technics AG Volketswil Tel: +41 1 997 40 90 Fax: +41 1 997 40 94 www.marineparts.ch [email protected] Malta S & D Yachts Ltd. Cali Tel: +356 21 339 908 Fax: +356 21 332 259 www.sdyachts.com [email protected] Singapore Alquest Marketing Singapore Tel: +65 6749 9359 Fax: +65 6749 9360 www.alquest.com.sg [email protected] New Zealand Advance Trident Ltd. Auckland Tel: +64 9 845 5347 Fax: +64 9 415 5348 www.advancetrident.com [email protected] Norway Sleipner Motor AS Fredrikstad Tel: +47 69 30 00 60 Fax: +47 69 30 00 70 www.side-power.com [email protected] Poland Taurus Sea Power SP. Z.O.O Gdansk Tel: +48 58 344 30 50 Fax: +48 58 341 67 62 Portugal Krautli Portugal Lda. Lisboa Tel: +351 21 953 56 00 Fax: +351 21 953 56 01 www.krautli.com [email protected] Russia Standarte Starbeyevo Tel: +7 495 575 67 23 Fax: +7 495 575 39 77 www.standarte.ru [email protected] Spain Imnasa Marine Products Girona Tel: +34 902 300214 Fax: +34 902 300215 www.imnasa.com [email protected] Singapore/Malaysia/ Indonesia/Vietnam/Phillipines OK-Maritime Pte Ltd Singapore Tel: +65 9669 8051 Fax: +65 6769 0507 www.ok-maritime.com [email protected] Taiwan Mercury Marine Supply Kaohsiung Tel: +886 7 3317 293 Fax: +886 7 3314 232 Turkey Denpar Ltd. Istanbul Tel: +90 212 285 0334 Fax: +90 212 285 0311 [email protected] UK Sleipner Motor Ltd. South Brent Tel: +44 1364 649 400 Fax: +44 1364 649 399 [email protected] United Arab Emirates Teignbridge Propellers & Marine Equipment Co. Ltd. Dubai Tel: +971 4 324 0084 Fax: +971 4 324 0153 [email protected] USA Imtra Corporation New Bedford, MA Tel: +1 508 995 7000 Fax: +1 508 998 5359 www.imtra.com [email protected] All other: Sleipner Motor AS Sleipner Motor AS • P. O. Box 519, N-1612 Fredrikstad • Norway Tel: +47 69 30 00 60 • Fax: +47 69 30 00 70 • [email protected] • www.side-power.com