1
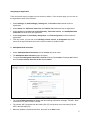
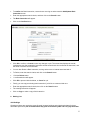
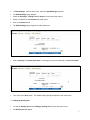
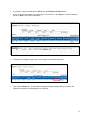
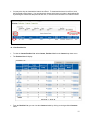
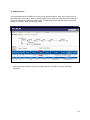
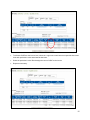
Financial Deliveries CBOT and NYMEXUser Manual May 2012 Global Operations Education Table of Contents Introduction ................................................................................................................................ 3 Navigating the Application ...................................................................................................... 5 Add/Update Bank Instruction .................................................................................................. 5 Holding List ................................................................................................................................ 6 Add Holdings .......................................................................................................................... 6 Intents ........................................................................................................................................ 9 Intent List...............................................................................................................................10 View Position List ..................................................................................................................11 Invoice ......................................................................................................................................12 Overview ...............................................................................................................................12 Invoice List ............................................................................................................................13 Invoice Summary ...................................................................................................................17 Theoretical Invoice ................................................................................................................19 Assignment ...............................................................................................................................20 Preliminary Assignment .........................................................................................................20 Final Assignment ...................................................................................................................21 Reports .....................................................................................................................................23 Contact Information ...................................................................................................................23 The information within this user guide has been compiled by CME Group for general information purposes only. Although every attempt has been made to ensure the accuracy of the information within this user guide, CME Group assumes no responsibility for any errors or omissions. While CME Group may use valid firm numbers or names to display examples in computer based training and user guides, the data in all examples is fictitious and is provided for general information purposes only. Additionally, all examples in this guide are hypothetical, used for explanation purposes only, and should not be considered investment advice or the results of actual market experience. All matters pertaining to rules and specifications herein are made subject to and are superseded by official CME, CBOT, NYMEX, and CME Group rules. Current rules should be consulted in all cases. © 2013 CME Group Inc. All rights reserved. Global Operations Education 1. Introduction The Deliveries Plus System is a web-based application that is used to manage inventory and delivery of all CME Group contracts. Deliveries Plus gives users the ability to enter intents and manage their delivery schedules. Deliveries Plus component offers the following features: Web based delivery processing available through CME Connect Ability to manage your firm’s contact information Ability to manage your firm’s customer information Delivery intent management Ability to view assignment details Ability to manage delivery schedules and automatically receive notifications throughout the delivery process Ability to download data using Excel in a CSV format 2. Requesting Access If you are new to the Deliveries Plus System, please request access by completing the Customer OnLine Access Request Form available at http://www.cmegroup.com/clearing/files/onlineaccess.pdf. Please fax the completed form to CME Customer Support Group at 312-338-2626. Existing users can log into Deliveries Plus using their Clearing Single Sign-on. 3. Accessing Deliveries Plus To access Deliveries Plus in Production, open your Internet browser: Go to http://connect.cme.com Enter your Connect Username and Password. Ensure the product selection list is set to CME Portal. Click the Login button and the Connect menu will appear. Click the Deliveries Plus icon. Enter your Clearing Single Sign-on using your Deliveries Plus Username and Password. Select Deliveries from the dropdown list and click Go. Firms should use the CME Group Certification Environment for testing purposes. To access Deliveries Plus in Certification, open your Internet browser: Go to http://connectcert.cme.com Enter your Connect Username and Password. Ensure the product selection list is set to CME Portal. Click the Login button and the Connect menu will appear. Click the Deliveries Plus New Release icon. Enter your Clearing Single Sign-on Username and Password. Select Deliveries from the dropdown list and click Go. 3 4. Deliveries Dashboard The Deliveries Dashboard is a screen that allows users to be notified of items that require action. It also allows users to view delivery information for deliverable products. To navigate between screens on the dashboard, hover the mouse over the menu titles to display the sub-menus. On the dashboard, you can select the Administration, Facility or Intent Options. The Holdings, Inventory, and Invoice tabs are not used for the financial option. To view the Items Requiring Action, Issues and Stops, Current Inventory, Earliest Long Dates, and Delivery Events select the Clearing Firm, Exchange, Trading Firm, Origin, and Product. Click the Search button. Displays items requiring action based on the Exchange selected. 4 Navigating the Application There are several ways to navigate from one screen to another. From the home page, you can click on the hyperlinked names of the functions: Under Holdings, the Add Holding(s), Holding List, and Position List functional areas are hyperlinked. Under Intents, the Add Intent, Intent List, and Position List functional areas are hyperlinked. Under Invoice, the Invoice List, Invoice Summary, Theoretical Invoice, and Add/Update Bank Instruction functional areas are hyperlinked. Under Assignment, the Preliminary Assignment, and Final Assignment functional areas are hyperlinked. From any screen, you can click on the Holdings, Intents, Invoice, or Assignment drop-down menus in the upper left-hand corner of the screen to switch to another function. 5. Add/Update Bank Instruction Select Add/Update Bank Instruction from the Invoice drop-down menu. The Add/Update Bank Instruction page will appear. To update an existing bank instruction, enter the Clearing Firm number, Exchange and Position Account search criteria, then click on the Search button. The existing Bank Instruction will appear with the following confirmation message: “FOUND – Bank Instruction for CF=995, Ex=CBT, PA=995” The number “995” represents both the clearing firm (CF) and position account numbers (PA) and CBT is the Exchange (EX). Make any updates to the Bank Instruction, then click on the Save button. 5 To confirm the Bank Instruction, a second user must log on and access this Add/Update Bank Instruction screen. Enter the appropriate search criteria, and then click on the Search button. The Bank Instruction will appear. Click on the Confirm button. Click OK to confirm, or Cancel to save any changes or quit. The screenshot displays the results, including the user that created the instruction and the second user who confirmed the instruction, and the times of creation and confirmation. You can also Delete a Bank Instruction, as long as there are no Intents associated with it. To Delete, enter the search criteria, and click on the Search button. Click the Delete button. A confirmation box will appear. Click OK to proceed with the delete, or Cancel to quit. Finally, you can copy an existing bank instruction if you’d like to create a similar one. Enter the appropriate search criteria, then click on the Search button. The existing instruction will appear. Click on Copy to make a copy of this instruction. 6. Holding List Add Holdings Clearing members are required to report financial contract holdings and original trade dates for these deliverable positions by the second business day prior to the delivery date and every day thereafter. 6 To Add Holdings, from the main menu, select the Add Holding(s) hyperlink. The Add Holding(s) page appears. Select the Exchange, Trading Firm and Origin from the drop-down menus. Select a contract from the Contract drop-down menu. Click on the Select button. The Add Holding(s) page expands to enable data entry. Enter a quantity, the original trade date in mm/dd/yyyy format, and optionally, an account number. Then click on the Save button. The Added Holding will appear below the text entry boxes. 7. Viewing the Holding List To view the Holding List, select Holdings, Holding List from the drop-down menu. The Holding List will appear. 7 If you wish to export the holding list to Excel, click the Download to Excel button. A pop-up box will ask whether you want to open or save the file. Click Open to view the contents of the file, or Save to save the file elsewhere. To adjust your holdings, simply enter a new quantity in the New Quantity field. Then press the Enter key. A confirmation message will appear, stating that your quantity was updated successfully, and displaying the new quantity. 8 8. Intents To Add an Intent, Select Intent, Add Intent from the Intent drop-down list. The Add Intent screen will display. Select a Contract from the drop-down list for which you would like to add an intent, and click on the Select button. Enter a Quantity. Optionally, an Account Number can be entered in the appropriate text boxes, then click on the Save button. You will be asked to confirm the Save. Click Ok to Save or Cancel to Quit. * Note: The Quantity field in the Intent Detail screen exists to allow entry of an intent for certificates which the user does not currently have listed in his/her inventory. If your short positions are less than your intent quantities, you will receive an error that can be overridden or accepted. This is a warning to check your intent quantity to confirm it is correct. Click OK to save your entry. The Add Intent screen will display, along with a message that the addition was successfully saved. Note the Intent Number that is assigned to the newly added intent. 9 9. Intent List To view the Intent List from the Intent drop-down menu, select Intent List. The Intent List page will display. From the Intent List, you can view the details of an intent by clicking on the hyperlinked Intent ID. In order to edit an existing Intent, click on the Intent ID to go back to the Add Intent screen. The Intent Details will display. 10 You may also elect to download the Intent List to Excel. To download the Intent List to Excel, click the Download to Excel button. You can selectively choose which items to include in the download file by selecting the checkboxes that precede each line, or click the Select All button to include all intents. 10. View Position List To view the Intents Position List: select Intents, Position List from the Intents drop-down menu. The Position List will display. From the Position List, you can view the Contract details by clicking on the hyperlinked Contract name. 11 The Position Detail will display. You may Download the position detail to Excel. To do this, click on the Download to Excel button. A pop-up box will ask if you want to open the file or save it elsewhere. Click the Open button to display the contents of the file. 11. Invoice Overview Day 1 of the delivery process, also known as Initial Inventory Day, is the first day firms with long positions/dates (holdings) are responsible for reporting their original trade dates in the delivery system. Simultaneously, firms that are holders of short positions can enter intents to deliver in the delivery system. At 8:00 p.m. Central Standard Time (CST), Clearing runs the Final Assignment process. On Day 2 of the delivery process, the seller (the short firm who entered the Intent) must update/confirm their financial invoice by 2:00 p.m. CST/3:00 p.m. CST on the last invoicing date, include the correct bank account information and choose the CUSIP which they plan to deliver to the buyer. 12 Also on Day 2, the buyer has to verify the correct bank account information that has been applied to the delivery in which they were assigned. The buyer will not be able to see the invoice from the seller until the seller has confirmed it. Invoices are processed by Clearing at 4:00 p.m., once all invoices have been confirmed in the delivery system. Invoice List On Day 2, the seller must make any necessary updates to their financial invoices by 3:00 p.m. To confirm the Invoice, select the Invoice drop-down menu, Invoice List. The Invoice List Search Criteria screen will appear. Enter the following Search Criteria in the appropriate text boxes: o Select your Clearing Firm; o Select the Exchange; o Select your Trading Firm; o Select the Origin; o Select the Contract; o Select the Intent Date; o Select Sell Side; o Select Invoice Status of Unconfirmed; o Then click on the Search button. o The unconfirmed invoice will display. 13 12. CUSIP Selection You can allocate particular CUSIPs to invoices in two different manners, either at the intent level or at each particular invoice level. In order to allocate CUSIPs at the intent level, select the intent ID from the invoice list and enter the quantity of each CUSIP. The deliveries system will then allocate the correct number of CUSIPS to each firm within the intent. After selecting the Intent ID, the screen enables selection of CUSIPs and entry of Quantity allocations. 14 To allocate CUSIPs at the invoice level, select the + sign next to each intent to expand the intent and view each particular invoice associated to that intent. Select the particular invoice ID and assign the correct CUSIP to the invoice Repeat as necessary. 15 The CUSIP breakdown will appear in the Quantity field, as circled above. Prior to confirming the invoice, you must ensure that bank instructions exist for the eligible securities you intend to deliver. If the “no bank instructions” message appears, you must enter bank instructions. To enter bank instructions, click on the ***NO BANK INSTRUCTION*** hyperlink. The Bank Instructions pop-up box will appear. Complete the bank instructions, then click the Save button. Please note that by entering instructions on this screen, they will only apply to this particular invoice. If you have standard banking instructions you would like used on all following invoices, please enter them using the Add/Update Bank Instructions on page 8 of this manual. Next, ensure that all quantities have been allocated to CUSIPs. Click on the Intent ID number. The Update Invoice screen appears. Enter any unallocated quantities to the CUSIPs you wish, then click on the Save button. The Invoice List will reappear, displaying the allocated security amounts. The intent is now ready to be confirmed. To confirm the intent, click the Confirm radio button Select the intent you want to confirm by clicking in the checkbox that precedes it. If you wish to confirm all unconfirmed invoices, click on the Select All button. To clear all selected intents, select the Clear All button. Click on the Confirm button. 16 Click OK to Confirm, or Cancel to quit. The Invoice List will reappear, with the status of the selected intent changed to “Confirmed”. 13. Invoice Summary To view the Invoice Summary: select Invoice, Invoice Summary from the drop-down list. The Invoice Summary page will display. 17 To view the invoice we just created, select the following search criteria: o Clearing Firm: 995 o Exchange: CBT o Trading firm: 990 o Origin: House o Contract: 17 200712 – T-BONDS o Intent Date: 12/05/2007 o Side: Sell o Invoice Status: Confirmed o Group by: Firm to display firm total, or deliverable, broken down by CUSIP allocation. o Then click on the Search button. The Invoice Details will appear. 18 14. Theoretical Invoice The Theoretical Invoice option allows the user to compute the total invoice amount based on the particular CUSIP chosen, but before the actual final invoice is created. This is an estimate that is based on actual market data that shows the costs of delivery. The CUSIP list updates after 4:15 PM CST daily. If the list hasn’t yet been updated, you will not be able to see the current intent date. To compute a theoretical invoice, select Invoice, Theoretical Invoice, from the drop-down list. The Theoretical Invoice page will appear.(See Next Page) To compute a theoretical invoice, select Exchange, Contract and Intent Date, and enter a quantity in the quantity field of the CUSIP from which you wish to compute an invoice. You can only select from the current Intent Date or the previous Intent Date. Then click on the Update button. 19 The Updated Theoretical Invoice values and Totals will appear. 15. Assignment Preliminary Assignment The preliminary assignment allows buyers (holders of long positions) to determine what they may be in line to receive from the deliveries process. Preliminary assignments are continually updated every 5 minutes during 4:00 and 5:00 PM CST on Day 1 of the delivery cycle. 20 To view a preliminary assignment, select Assignment, Preliminary Assignment from the drop-down list. The Preliminary Assignment screen appears. In the Search Criteria entry area, enter your Clearing Firm, Exchange, Trading Firm, Origin and Contract and click on the Search button. The Search results appear, displaying any potential assignments at this time. 16. Final Assignment To obtain Final Assignment information, select Assignment, Final Assignment from the drop-down list. Final Assignment occurs at 8:00 PM CST on Day1. The Final Assignment screen will appear. Select the Clearing firm, Exchange, Trading Firm, Origin, Contract, Intent Date and Side (Buy/Sell) from the drop-down lists in Search Criteria. Then click on the Search button. The Final Assignment information for the selected contract and intent date will display. 21 If you wish, this information can be downloaded to Excel. Click on the Download to Excel button. Click on the Open button to view the data in Excel, or click the Save button to save the file. Here are the results after clicking the Open button: 22 Reports All delivery reports are available through the EREP (Enterprise Reporting Portal) system. The list of financial reports includes the following reports: DLV200 INTENT AUDIT TRAIL REPORT DLV300 ASSIGNMENT NOTICE REPORT DLV400 FINANCIAL PRODUCTS INVOICE REPORT DLV401 FINANCIAL INVOICE SUMMARY REPORT DLV500 HOLDING LIST REPORT DLV501 HOLDING SUMMARY BY FIRM REPORT DlV502 HOLDING SUMMARY BY DATE REPORT DLV503 HOLDING AUDIT TRAIL REPORT DLV600 DAILY ISSUES AND STOPS REPORT DLV610 ISSUES AND STOPS FACILITY DETAIL REPORT DLV620 ISSUES AND STOPS LOCATION DETAIL REPORT DLV630 MONTH TO DATE ISSUES AND STOPS REPORT DLV660 YEAR TO DATE ISSUES AND STOPS REPORT Contact Information If you have any questions concerning the Financial Delivery System, please contact the CME Clearing Delivery Unit at 312-930-3172. 23 24