1
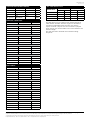
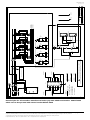
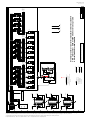
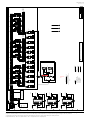
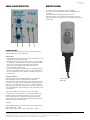
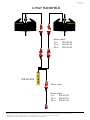
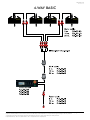
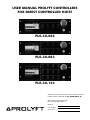
USER MANUAL PROLYFT CONTROLLERS
FOR Direct controlled HOIST
PLE-30-044
PLE-30-083
PLE-30-123
Should you have any questions or have problems with this
product, please call Prolyft at +31 (0)594 85 15 15
Before using the controller hoist,
fill in the information below:
Model No.
Purchase Date
Service point
CONTENT
SYSTEM DESCRIPTION
3
LIMITATIONS OF USE
3
INDENTIFICATION
3
ELECTRICAL CONNECTIONS
3
DO’S AND DON’TS
5
PLE-30-044 4-WAY FOR Direct controlled HOIST
•
PICTURE
•
FUNCTIONAL DESCRIPTION
•
WIRING DIAGRAM
6
6
6
7
PLE-30-083 8-WAY FOR Direct controlled HOIST
•
PICTURE
•
FUNCTIONAL DESCRIPTION
•
WIRING DIAGRAM
9
9
9
10
PLE-30-123 12-WAY FOR Direct controlled HOIST
•
PICTURE
•
FUNCTIONAL DESCRIPTION
•
WIRING DIAGRAM
12
12
12
13
PHASE FAILURE PROTECTOR
15
REMOTE CONTROL
15
GUARANTEE
16
TROUBLE SHOOTING
16
1-WAY HANDHELD DIAGRAM
2-WAY HANDHELD DIAGRAM
4-WAY BASIC DIAGRAM
8-WAY BASIC DIAGRAM
12-WAY BASIC DIAGRAM
17
18
19
20
21
USER MANUAL PLE-30
DIRECT CONTROLLED HOIST
SYSTEM DESCRIPTION
Prolyte has designed a range of controllers that can be used in
conjunction with the Prolyft chain hoist, but also with most other
types of Direct controlled chain hoists, provided they will fit the
electrical limits of this equipment.
To be able to control your chain hoist on low voltage control,
please contact your nearest Prolyft Service Point. They can supply
you with adequate controllers and manuals.
All controllers have a custom-build, sturdy steel 19” rack housing. The housing is 3HE OR 4HE (12-WAY) high and has a black
powder coated finish.
All selected electrical components meet the needs for industrial use
and requirements stated in the EC machine directive, EN standards
and IEC and FEM regulations.
All controllers can be daisy linked to create a multi channel controller. By means of cable, article code: PLA-35-001
LIMITATION OF USE
All controllers are designed work in conjunction with the Prolyft
chain hoist. It is also allowed to use them with other brands of
Direct controlled chain hoists, if provided they fit within the
electrical limits of this equipment.
Controllers may only be used in areas, which are secured against
environmental influences and with operating temperatures from
-20 degree Celsius till +40 degree Celsius.
IP factor 40.
Voltages
Models PLE-30-044 / PLE 30-083 / PLE 30-123
IDENTIFICATION
Prolyft controllers can be identified by the model number on the
front side. These numbers refer to the information in the user
manual and the CE declaration of conformity.
CODE
DESCRIPION
DIMENSION
WEIGHT
PLE-30-044
4-way controller basic 19” version
Width 483mm
Height 134mm
Depth 440mm
 15,5 Kg
PLE-30-083
8-way controller basic 19” version
Width 483mm
Height 134mm
Depth 440mm
17,5 Kg
PLE-30-123
12-way controller basic 19”
version with thermal motor
protectors
Width 483mm
Height 178mm
Depth 440mm
20,5 Kg
ELECTRICAL CONNECTIONS
Prolyft can supply a full range of cabling to make your system
work. Cabling should comply with the applicable standards.
Decent plugs should be used. All cabling should be tested on
functionality and resistance in Ohms. Failures in cabling and plugs
could cause mall function of the hoist and controllers.
Connection data of C-form plugs and
Multi plugs
Warning:
Wiring tables should be respected at any time to avoid damage to
the hoist and controllers
MAINS POWER CABLE
Wire
Colour / EU
Colour / US
Pin
• Operating voltage = 400V 3p+N+G at 50Hz
• Max. voltage drop is -20% and + 10%
• Maximum switching capacity 3.3 amps / 1,5kw at 400V
4.6 amps / 1,1kw at 230V
L1 / U1
Brown
Brown
1
L2 / V1
Black
Black
2
L3 / W1
Grey/Black
Black
3
PE / ground
Yellow/Green
Yellow/Green
GND
To operate controllers on 208/230v 3P + N +G at 60Hz
Zero
Blue
Blue
N
Please reconnect wires as per the electrical scheme on page 7,
drawing 4-1.
NB! Inside the controllers these wires are marked.
MOTOR CABLE
©Prolyte Products Group 2009
Wire
Colour / EU
Colour / US
Pin
L1 / U1
Brown
white
1
L2 / V1
Blue
Blue
2
L3 / W1
Grey/Black
Red
3
PE / ground
Yellow/Green
Green
GND
Prolyte has made every effort to ensure the accuracy of this manual. No liability will be accepted for errors. Prolyte reserves the right to change or alter their products or
manuals without prior notice. No part of this manual may be reproduced in any form or by any means without prior written permission.
Prolyte Products Group – Phone +31 (0)594 85 15 15 Fax: + 31 (0)594 85 15 16 www.prolyte.com
pages 3 of 18
USER MANUAL PLE-30
DIRECT CONTROLLED HOIST
PICKLE FOR LOW VOLTAGE CONTROL
Wire
L1
Colour / EU
Brown
MAX. CABLE LENGTH in Meters
Function
Pin
110Vac
1
LIFTING CAPACITY
PROLYFT HOIST
1,5mm2 cords
2,5mm2 cords
400V/50hz
230v/60hz
400V/50hz
230v/60hz
230
75
255
80
L2
Grey
Up
2
250KG
L3
Black
Down
3
500 KG
100
40
110
45
1000KG
65
25
75
25
2000KG
65
25
75
25
PE / ground
Yellow/Green
GND
BRAKE INS / BRAKE OUTS
Wire
Colour / EU
Pin
Brown
1
MOTOR 1
L1
L2
Black
2
L3
Black
3
GND
Yellow/Green
4
Brown
5
The table above gives an indication of the maximum length of
cables between controller and hoist. Lengths are calculated in
accordance to EN 60204 and for the worst case situation.
If power cords with 1,5q/mm wires are connected to 2,5q/mm
wired cords the one with the smallest cross section determines the
maximum length.
The charts have been calculated with a maximum voltage
drop of 5%.
MOTOR 2
L1
L2
Black
6
L3
Black
7
GND
Yellow/Green
8
MOTOR 3
L1
Brown
9
L2
Black
10
L3
Black
11
GND
Yellow/Green
12
Brown
13
MOTOR 4
L1
L2
Black
14
L3
Black
15
GND
Yellow/Green
16+pe
Wire
Colour / EU
Pin
L1
1
1
MULTI CABLES
L2
2
2
L3
3
3
GND
4
4
L1
5
5
L2
6
6
L3
7
7
GND
8
8
L1
9
9
L2
10
10
L3
11
11
GND
12
12
L1
13
13
L2
14
14
L3
15
15
GND
16
16+pe
©Prolyte Products Group 2009
Prolyte has made every effort to ensure the accuracy of this manual. No liability will be accepted for errors. Prolyte reserves the right to change or alter their products or
manuals without prior notice. No part of this manual may be reproduced in any form or by any means without prior written permission.
Prolyte Products Group – Phone +31 (0)594 85 15 15 Fax: + 31 (0)594 85 15 16 www.prolyte.com
pages 4 of 18
USER MANUAL PLE-30
DIRECT CONTROLLED HOIST
DO’S AND DON’TS
Do’s
• Use the controller within the technical scope of the FEM class of
the Prolyft hoist. Longer operating time could severely damage
controller and hoist.
• Mount the controller in a protective casing
• Handle the controller only by the grips of the case
• Store the controller in its normal operating position away from
aggressive atmospheres (dust, humidity…).
• Make sure that the controller is always clean and protected from
corrosion.
• Only a competent person may install and operate the controller
• Make sure that connecting cables are in good condition and
connectors are fitted properly.
• Make sure that connecting cables are always symmetrical fitted.
• If the hoist direction is different from the Up /down indicators on
the controller, check intermediary cabling and change phases
by means of phase reverse facility in the CEE plug at the main
power cord
• Use only original parts in case of repair or replacements.
• During operation of the control, always remain alert. In case of
emergency, press the emergency stop button, this will inactivate
all functions of the control.
• Before operation, check if the load is correctly fastened and attached to the hook. Do make sure the hook latches, if used, are
closed and not supporting any part of the load.
• Make sure you have an unobstructed view on the full travel path
of the load.
• Make sure that the load is in the correct position before moving
it.
• Make sure that each hoist is an exact vertical position to the load
and that the load chain is unobstructed, before operating the
controller.
• If used out doors, use sufficient protection against bad weather
conditions.
• Use the material under normal working conditions (ambient
temperature, atmosphere….)
• Moving a single load or truss system requires experienced and
competent operators.
• All the necessary precautions should be taken to ensure a correct
distribution of the load and to avoid overloading of a single hoist
when multiple hoists are used on one grid. The hoists should be
checked individually before they will be moved.
• Notify the responsible and competent person after a dangerous
operation or if the hoist seems no to function properly.
• Clear the area from obstacles and people and switch working
lights on before operating the controls.
• No people are being allowed under the load.
Don’ts
• Never connect a Prolyft controller to a power source other than
specified on the unit.
• Never modify the controller unless the manufacturer has
authorised the modification.
• Never modify the values and adjustments of the safety
components outside the limits provided in the manual, or without
the approval of the manufacturer
• Never try to repair or intervene on the controller without the
authorisation of the manufacturer or a qualified electrician.
• No unqualified personnel should operate the controller
• Never connect more hoists then the available number of outlets
(channels) or number of selector switches available.
• Do not use additional splitters to connect more than one hoist
per channel.
• Avoid shocks or accidental collision with other objects.
• Never open the controller as long as the system is under power.
• Never block, or lock the RUN button in order to continue a
movement without manual interference.
• Do not operate the controller if your physical condition does not
allow it.
• Never use the controller if it is in bad condition.
• Never use suspected spare parts or parts whose origin is not
known.
• Do not subject the controller to brutal shocks.
• Never distract the operator’s attention while he is operating the
system.
• Do not use the controller for a purpose or in an area for which it
is not intended.
• Do not expose the controller to an aggressive atmosphere
(temperature, acidity…)
• Do not use the safety components as operation components
(emergency button, main fuse switch. etc…)
• Do not use the controls needlessly (avoid inching – stop-start
operation of the buttons). This can cause overheating and even
damage to the hoist.
• Do not change the operating direction whilst the RUN button is
pressed (hoist under power).
• If the hoist direction doesn’t match with the indications on the
controller, don’t change phases inside the controller but check
the interconnecting cables or the individual hoist, after having
disconnected all power cables.
• Never use hoists who are running in the opposite direction of the
selected direction.
• Do not connect the controller to an unknown power supply;
check if the power source matches the specifications of the
controller and the hoists. (under voltage or over voltage =/- 5%,
absence of phase etc….)
THIS SYMBOL POINTS OUT IMPORTANT SAFETY INSTRUCTIONS WHICH IF NOT
FOLLOWED COULD ENDANGER THE PERSONAL SAFETY AND/OR PROPERTY
OF YOURSELF AND OTHERS. READ AND FOLLOW ALL INSTRUCTIONS IN THIS
MANUAL AND ANY PROVIDED WITH THE EQUIPMENT BEFORE ATTEMPTING TO
OPERATE YOUR PROLYFT HOIST.
©Prolyte Products Group 2009
Prolyte has made every effort to ensure the accuracy of this manual. No liability will be accepted for errors. Prolyte reserves the right to change or alter their products or
manuals without prior notice. No part of this manual may be reproduced in any form or by any means without prior written permission.
Prolyte Products Group – Phone +31 (0)594 85 15 15 Fax: + 31 (0)594 85 15 16 www.prolyte.com
pages 5 of 18
USER MANUAL PLE-30
DIRECT CONTROLLED HOIST
PLE-30-044
4-WAY FOR Direct controlled HOIST
3
4
8
5
FUNCTIONAL DESCRIPTION:
6
1
Front side
7
2
1. 2. 3. 4. 5. 19” 3U rack housing
Front plate release bolts
Mains switch 3 phase short circuit breaker
Short circuit protection for power and control
Up-0-Down switch for pre-selecting the individual hoist
direction
6. Emergency button
7. Run button
8. Phase failure protection
11
10
Backside
9
9. Power cable of 150cm with 32A-5p CEE plug with phase
reverse plug
10. Output HARTING 16p connector
11. Link option to daisy link multiple controllers for operating
lager quantity of hoist with Hirschmann CA3LS connector
1. 2. 3. 4. 5. 6. 7. 8. 9. 10. 11. 12. 13. 14. 15. 16. 17. 18. 19. Measure the main power supply to be sure the operating
voltage is correct and all the phases are present
Release the emergency button by turning it anti-clockwise
Connect the controller to the power supply and switch it on using the main switch
Connect power cords to each of the hoists to be operated.
4 single cords can be connected to one multi cord.
Connect the power cords to the controller by using a
break-out (HARTING 16p > 4 x 16A 4p) or connect the multi cord to the controller.
Link the controllers if you want to operate more than
4-channels using one “run-button”.
Check if the pre-selection switches for all hoist are in the
“0 “ position
Select a hoist and switch it in the up or down direction.
Press the run button for 2 seconds to make sure the hoist
has power and if the running direction of the hoist matches the selected direction on the controller.
Up is green LED, down is red LED.
If the direction of the hoist is not correct, change phases using the phase change plug on the power cable.
If individual hoist run in the wrong direction, check
intermediate cabling or check the hoist.
Make sure that the load to be lifted is in the correct
position
Clear the area from obstacles
No people are allowed under or on the load. Make sure all
people have left the operating area before you start to move any load.
Make sure you have an unobstructed view on the full travel path of the load.
Pre-Select all hoist needed in the up or down direction
Press the run button to activate all hoists and hold it till the load has reached the desired height. It may be necessary to level the rig at certain stages.
Never press the run button staccato. This can severely damage controller and hoist.
If the desired height is reached release the run button, and switch of the mains power switch.
In case more hoist need to be operated than the controller
allows, you can daisy link two or more controllers by means of the link cable. The emergency breaker only works for the controller from which the breaker is pushed!
Note! NEVER change the running direction of a hoist when the run
button is pushed
- Use only cable and connectors, which are in good condition
- Never connect more than one hoist per
channel
- Not respecting this manual can cause severe
injury or even death
©Prolyte Products Group 2009
Prolyte has made every effort to ensure the accuracy of this manual. No liability will be accepted for errors. Prolyte reserves the right to change or alter their products or
manuals without prior notice. No part of this manual may be reproduced in any form or by any means without prior written permission.
Prolyte Products Group – Phone +31 (0)594 85 15 15 Fax: + 31 (0)594 85 15 16 www.prolyte.com
pages 6 of 18
©Prolyte Products Group 2009
Prolyte has made every effort to ensure the accuracy of this manual. No liability will be accepted for errors. Prolyte reserves the right to change or alter their products or
manuals without prior notice. No part of this manual may be reproduced in any form or by any means without prior written permission.
Prolyte Products Group – Phone +31 (0)594 85 15 15 Fax: + 31 (0)594 85 15 16 www.prolyte.com
9
8
7
6
5
4
3
2
A
2
L2
3
L3
W1/2
V1/2
U1/2
W1/1
K1 - CONTACTOR
F2 - CICUIT BREAKER
F1 - CICUIT BREAKER
MOTOR 4
Brown
230VAC
400VAC
R1
8
7
A2
A1
R1
S3
4
E
6
R1.1
A2
A1
R1.1
R1.1
8
7
T3
L3
R1
T2
L2
K1
T1
L1
To make Controler suitable to operate on 208V 3 Phase
Current Tax
Main Stream
Black
Operation Current 230VAC
Brown
Black
Blue
W1/4
V1/4
U1/4
W1/3
V1/3
U1/3
MOTOR 3
controler have to be cross the L2 and L3 by the K1
When is using the MKC-06 Relai in the
D
Disconnect wire N and connect wire N to Number 6.Do not Link N and wire 6
16
15
7
8
14
13
12
11
6
5
4
3
9
10
2
PE
Q1
C
1
F1
S2 - PUSH BUTTON START
S1- EMERGENCY STOP
LEGENDA
MOTOR 2
V1/1
U1/1
Phasen kontroler
1
L1
MOTOR 1
PE
N
F3
F2
F1
Wire for 208 V Operation
B
1
3
5
N
2
4
6
N
1
R2
8
7
A2
A1
R2
S4
4
1 3 5
2 4 6
1 3 5
2 4 6
F
A1
R5
8
7
A2
A2
R5
A1
R2.2
8
7
R2.2
6
R2.2
R2
2 4 6
22
21
S2
A2
A1
14
13
3
2
K1
2
1
A2
A1
R3
PH1
S1
F2
R3
8
7
S5
4
1 3 5
2 4 6
1 3 5
N
N
A2
A1
13
14
R3.3
8
7
2 4 6
2 4 6
1 3 5
R4
8
7
A2
A1
R4
S6
4
1 3 5
R3
R3.3
R3.3
6
G
A2
A1
3
2
1
Master Conector 1
3
2
1
Master Conector 2
2 46
R4.4
1 3 5
R4.4
8
7
R4.4
6
2 4 6
R4
1 3 5
H
MOTOR 1
MOTOR 2
MOTOR 3
MOTOR 4
I
Version 8
Seite : 1
CONTROL BOX 4 KANNAL
COVER
K
TYP: PLE 30-044
Datum : 23.07.2010 GEZ: M.ASLANIDIS
PROLYFT
DIN RAIL
J
USER MANUAL PLE-30
DIRECT CONTROLLED HOIST
Electrical plan for all controllers manufactured before july 2010 whith serial number 0000 til 0034
which need to be operated with remote handset PLE-30-043U
pages 7 of 18
©Prolyte Products Group 2009
Prolyte has made every effort to ensure the accuracy of this manual. No liability will be accepted for errors. Prolyte reserves the right to change or alter their products or
manuals without prior notice. No part of this manual may be reproduced in any form or by any means without prior written permission.
Prolyte Products Group – Phone +31 (0)594 85 15 15 Fax: + 31 (0)594 85 15 16 www.prolyte.com
9
8
7
6
5
4
3
2
A
1
L1
2
L2
3
L3
PE
Hand Remote Controler Info:
MOTOR 4
A2
A1
R1
6
R1.1
A2
A1
R1.1
R1.1
8
7
T3
L3
R1
T2
L2
K1
T1
L1
R2
8
7
A2
A1
R2
S4
4
1 3 5
2 4 6
1 3 5
2 4 6
F
7
A2
A1
R5
A1
R2.2
8
7
R2.2
6
R2.2
R2
2 4 6
22
21
2
1
A2
A1
R3
PH1
S1
F2
R3
8
7
S5
4
1 3 5
2 4 6
1 3 5
2
B
N
N
A2
A1
13
14
R3.3
8
7
2 4 6
2 4 6
1 3 5
R4
8
7
A2
A1
R4
S6
4
1 3 5
R3
R3.3
R3.3
6
G
A2
A1
1
Master Conector 2
R4.4
8
2 46
R4.4
1 3 5
7
R4.4
6
2 4 6
R4
1 3 5
H
Brown
Current Tax
Main Stream
Black
230VAC
400VAC
Operation Current 230VAC
Brown
Black
Blue
K1 - CONTACTOR
F2 - CICUIT BREAKER
F1 - CICUIT BREAKER
Disconnect wire N and connect wire N to Number 6.Do not Link N and wire 6
To make Controler suitable to operate on 208V 3 Phase
PLE_30_043
the controller suitable to operate with a Hand remote controller
to connect this by the B position to make
Is to disconnect the wire from the A position and
By the Main Controllers with the Serial Number 0000-0034
R5
8
A2
S2
A2
A1
K1
14
13
A
3
3
2
1
Master Conector 1
3
W1/4
V1/4
U1/4
W1/3
V1/3
U1/3
R1
8
7
S3
4
E
2
16
15
7
8
14
13
12
6
5
4
11
10
2
3
9
MOTOR 3
controler have to be cross the L2 and L3 by the K1
When is using the MKC-06 Relai in the
D
S2 - PUSH BUTTON START
W1/2
V1/2
U1/2
Q1
C
1
F1
S1- EMERGENCY STOP
LEGENDA
MOTOR 2
W1/1
V1/1
U1/1
Phasen kontroler
MOTOR 1
PE
N
F3
F2
F1
Wire for 208 V Operation
B
1
3
5
N
2
4
6
N
1
MOTOR 1
MOTOR 2
MOTOR 3
MOTOR 4
I
Version 8
Seite : 1
CONTROL BOX 4 KANNAL
COVER
K
TYP: PLE 30-044
Datum : 23.07.2010 GEZ: M.ASLANIDIS
PROLYFT
DIN RAIL
J
USER MANUAL PLE-30
DIRECT CONTROLLED HOIST
pages 8 of 18
USER MANUAL PLE-30
DIRECT CONTROLLED HOIST
PLE-30-083
8-WAY FOR Direct controlled HOIST
3
4
8
Front side
1.
2.
3.
4.
5.
6.
7.
8.
5
FUNCTIONAL DESCRIPTION:
6
1
7
2
19” 3U rack housing
Front plate release bolts
Mains switch 3 phase short circuit breaker
Short circuit protection for power and control
Up-0-Down switch for pre-selecting the individual hoist
direction
Emergency button
Run button
Phase failure protection
10
Backside
11
9
9. Power cable of 100cm with 32A-5p CEE plug with phase reverse plug
10. 2 x Output HARTING 16p connector
11.Link option to daisy link multiple controllers for operating
lager quantity of hoist with Hirschmann CA3LS connector
1. 2.
3.
4.
5.
6.
7.
8.
9.
10.
11.
12.
13.
14.
15.
16.
17.
18.
19.
Measure the main power supply to be sure the operating voltage is correct and all the phases are present
Release the emergency button by turning it anti-clockwise
Connect the controller to the power supply and switch it on using the main switch
Connect power cords to each of the hoists to be operated. 4 single cords can be connected to one multi cord.
Connect the power cords to the controller by using a
break-out (HARTING 16p > 4 x 16A 4p) or connect the multi cord to the controller.
Link the controllers if you want to operate more than
4-channels using one “run-button”.
Check if the pre-selection switches for all hoist are in the
“0 “ position
Select a hoist and switch it in the up or down direction. Press the run button for 2 seconds to make sure the hoist has power and if the running direction of the hoist matches the selected direction on the controller.
Up is green LED, down is red LED
If the direction of the hoist is not correct, change phases using the phase change plug on the power cable.
If individual hoist run in the wrong direction, check
intermediate cabling or check the hoist.
Make sure that the load to be lifted is in the correct position
Clear the area from obstacles
No people are allowed under the load. Make sure all
people have left the operating area before you start to move any load.
Make sure you have an unobstructed view on the full travel path of the load.
Pre-Select all hoist needed in the up or down direction
Press the run button to activate all hoists and hold it till the load has reached the desired height. It may be necessary to level the rig at certain stages.
Never press the run button staccato. This can severely
damage controller and hoist.
If the desired height is reached release the run button, and switch of the mains power switch.
In case more hoist need to be operated than the controller allows, you can daisy link two or more controllers by means of the link cable. The emergency breaker only works for the controller from which the breaker is pushed!
Note! NEVER change the running direction of a hoist when the run
button is pushed
- Use only cable and connectors, which are in good condition
- Never connect more than one hoist per
channel
- Not respecting this manual can cause severe
injury or even death
©Prolyte Products Group 2009
Prolyte has made every effort to ensure the accuracy of this manual. No liability will be accepted for errors. Prolyte reserves the right to change or alter their products or
manuals without prior notice. No part of this manual may be reproduced in any form or by any means without prior written permission.
Prolyte Products Group – Phone +31 (0)594 85 15 15 Fax: + 31 (0)594 85 15 16 www.prolyte.com
pages 9 of 18
©Prolyte Products Group 2009
Prolyte has made every effort to ensure the accuracy of this manual. No liability will be accepted for errors. Prolyte reserves the right to change or alter their products or
manuals without prior notice. No part of this manual may be reproduced in any form or by any means without prior written permission.
Prolyte Products Group – Phone +31 (0)594 85 15 15 Fax: + 31 (0)594 85 15 16 www.prolyte.com
10
9
8
7
6
5
4
3
2
A
B
2
L2
3
L3
W1/6
V1/6
U1/6
W1/5
V1/5
U1/5
W1/2
V1/2
U1/2
W1/1
V1/1
K1 - CONTACTOR
F2 - CICUIT BREAKER
F1 - CICUIT BREAKER
S2 - PUSH BUTTON START
16
15
7
8
14
13
12
6
5
4
11
10
2
3
9
1
PE
Q2
16
15
7
8
14
13
12
6
5
4
11
10
2
3
9
PE
Q1
C
1
F1
S1- EMERGENCY STOP
LEGENDA
MOTOR 6
MOTOR 5
MOTOR 2
U1/1
Phasen kontroler
1
L1
MOTOR 1
PE
N
F6
F5
F4
2
4
Wire for 208 V Operation
1
3
5
N
6
N
1
MOTOR 8
MOTOR 7
MOTOR 4
Current Tax
Brown
Main Stream
Black
230VAC
230VAC
400VAC
Operation Current
Brown
Black
Blue
W1/8
V1/8
U1/8
W1/7
V1/7
U1/7
W1/4
V1/4
U1/4
W1/3
V1/3
U1/3
MOTOR 3
controler have to be cross the L2 and L3 by the K1
When is using the MKC-06 Relai in the
D
R1
8
7
6
A1
A2
R1.1
A2
R2
8
7
A2
A1
R2
S4
4
1 3 5
2 4 6
1 3 5
2 4 6
F
A1
A2
R9
2 4 6
22
21
S2
A2
A1
14
A
13
3
2
K1
2
1
A2
A1
R3
PH1
S1
F2
R3
8
7
S5
4
1 3 5
2 4 6
1 3 5
B
N
R3
A2
A1
R3.3
8
7
R3.3
13
14
R3.3
6
N
Hand Remote Controler Info:
R9
8
7
A2
A1
R2.2
8
7
R2.2
6
R2.2
R2
G
2 4 6
R4
PLE_30_043
A2
A1
R4
the controller suitable to operate with a Hand remote controller
to connect this by the B position to make
Is to disconnect the wire from the A position and
8
7
S6
4
1 3 5
2 4 6
1 3 5
By the Main Controllers with the Serial Number 0000-0034
R1.1
R1.1
8
7
T3
L3
R1
T2
L2
K1
T1
L1
A1
R1
S3
4
E
A2
A1
R5
8
7
A2
A1
R5
3
2
1
Master Conector 1
3
2
1
A2
A1
R5.5
8
7
R5.5
6
Master Conector 2
R4.4
8
7
S7
4
2 4 6
R4.4
1 3 5
R4.4
6
2 4 6
R4
1 3 5
H
A2
A1
R6
A1
R6.6
8
7
R7
8
7
A2
A1
R7
S9
4
1 3 5
2 4 6
1 3 5
2 4 6
A2
A1
R7.7
8
7
R7.7
6
2 4 6
1 3 5
2 4 6
1 3 5
R8
8
7
A2
A1
R8.8
8
7
R8.8
6
DIN RAIL
A2
A1
R8
S10
4
R6.6
R6
K
To make Controler suitable to operate on 208V 3 Phase
A2
R6.6
6
R5.5
R5
J
2 4 6
1 3 5
2 4 6
1 3 5
COVER
R7.7
R7
Disconnect wire N and connect wire N to Number 6.Do not Link N and wire 6
R6
8
7
S8
4
MOTOR 1
MOTOR 2
MOTOR 3
MOTOR 4
I
2 4 6
PROLYFT
2 4 6
R8.8
1 3 5
R8
1 3 5
TYP:
PLE 30-083
Datum : 23.07.2010
L
GEZ:
Version 8
M.ASLANIDIS
Seite : 1
CONTROL BOX 8 KANNAL
MOTOR 5
MOTOR 6
MOTOR 7
MOTOR 8
M
USER MANUAL PLE-30
DIRECT CONTROLLED HOIST
Electrical plan for all controllers manufactured before july 2010 whith serial number 0000 til 0034
which need to be operated with remote handset PLE-30-043U
pages 10 of 18
©Prolyte Products Group 2009
Prolyte has made every effort to ensure the accuracy of this manual. No liability will be accepted for errors. Prolyte reserves the right to change or alter their products or
manuals without prior notice. No part of this manual may be reproduced in any form or by any means without prior written permission.
Prolyte Products Group – Phone +31 (0)594 85 15 15 Fax: + 31 (0)594 85 15 16 www.prolyte.com
10
9
8
7
6
5
4
3
2
A
B
2
L2
3
L3
W1/6
V1/6
U1/6
W1/5
V1/5
U1/5
W1/2
V1/2
U1/2
W1/1
V1/1
K1 - CONTACTOR
F2 - CICUIT BREAKER
F1 - CICUIT BREAKER
S2 - PUSH BUTTON START
16
15
7
8
14
13
12
6
5
4
11
10
2
3
9
1
PE
Q2
16
15
7
8
14
13
12
6
5
4
11
10
2
3
9
PE
Q1
C
1
F1
S1- EMERGENCY STOP
LEGENDA
MOTOR 6
MOTOR 5
MOTOR 2
U1/1
Phasen kontroler
1
L1
MOTOR 1
PE
N
F6
F5
F4
2
4
Wire for 208 V Operation
1
3
5
N
6
N
1
MOTOR 8
MOTOR 7
MOTOR 4
Current Tax
Brown
Main Stream
Black
230VAC
230VAC
400VAC
Operation Current
Brown
Black
Blue
W1/8
V1/8
U1/8
W1/7
V1/7
U1/7
W1/4
V1/4
U1/4
W1/3
V1/3
U1/3
MOTOR 3
controler have to be cross the L2 and L3 by the K1
When is using the MKC-06 Relai in the
D
R1
8
7
6
A1
A2
R1.1
A2
R2
8
7
A2
A1
R2
S4
4
1 3 5
2 4 6
1 3 5
2 4 6
F
A1
A2
R9
2 4 6
22
21
S2
A2
A1
14
A
13
3
2
K1
2
1
A2
A1
R3
PH1
S1
F2
R3
8
7
S5
4
1 3 5
2 4 6
1 3 5
B
N
R3
A2
A1
R3.3
8
7
R3.3
13
14
R3.3
6
N
Hand Remote Controler Info:
R9
8
7
A2
A1
R2.2
8
7
R2.2
6
R2.2
R2
G
2 4 6
R4
PLE_30_043
A2
A1
R4
the controller suitable to operate with a Hand remote controller
to connect this by the B position to make
Is to disconnect the wire from the A position and
8
7
S6
4
1 3 5
2 4 6
1 3 5
By the Main Controllers with the Serial Number 0000-0034
R1.1
R1.1
8
7
T3
L3
R1
T2
L2
K1
T1
L1
A1
R1
S3
4
E
A2
A1
R5
8
7
A2
A1
R5
3
2
1
Master Conector 1
3
2
1
A2
A1
R5.5
8
7
R5.5
6
Master Conector 2
R4.4
8
7
S7
4
2 4 6
R4.4
1 3 5
R4.4
6
2 4 6
R4
1 3 5
H
A2
A1
R6
A1
R6.6
8
7
R7
8
7
A2
A1
R7
S9
4
1 3 5
2 4 6
1 3 5
2 4 6
A2
A1
R7.7
8
7
R7.7
6
2 4 6
1 3 5
2 4 6
1 3 5
R8
8
7
A2
A1
R8.8
8
7
R8.8
6
DIN RAIL
A2
A1
R8
S10
4
R6.6
R6
K
To make Controler suitable to operate on 208V 3 Phase
A2
R6.6
6
R5.5
R5
J
2 4 6
1 3 5
2 4 6
1 3 5
COVER
R7.7
R7
Disconnect wire N and connect wire N to Number 6.Do not Link N and wire 6
R6
8
7
S8
4
MOTOR 1
MOTOR 2
MOTOR 3
MOTOR 4
I
2 4 6
PROLYFT
2 4 6
R8.8
1 3 5
R8
1 3 5
TYP:
PLE 30-044
Datum : 23.07.2010
L
GEZ:
Version 8
M.ASLANIDIS
Seite : 1
CONTROL BOX 8 KANNAL
MOTOR 5
MOTOR 6
MOTOR 7
MOTOR 8
M
USER MANUAL PLE-30
DIRECT CONTROLLED HOIST
pages 11 of 18
USER MANUAL PLE-30
DIRECT CONTROLLED HOIST
PLE-30-123
12-WAY FOR Direct controlled HOIST
3
4
8
Front side Master
1.
2.
3.
4.
5.
6.
7.
8.
5
FUNCTIONAL DESCRIPTION:
6
1
7
2
19” 4U rack housing
Front plate release bolts
Mains switch 3 phase short circuit breaker
Short circuit protection for power and control
Up-0-Down switch for pre-selecting the individual hoist
direction
Emergency button
Run button
Phase failure protection
11
10
Backside MASTER
9
Power cable of 100cm with 32A-5p CEE plug with phase
reverse plug
10. 3 x Output HARTING 16p connector
11. Link option to daisy link multiple controllers for operating
lager quantity of hoist with Hirschmann CA3LS connector
1. 2.
3.
4.
5.
6.
7.
8.
9.
10.
11.
12.
13.
14.
15.
16.
17.
18.
19.
Measure the main power supply to be sure the operating voltage is correct and all the phases are present
Release the emergency button by turning it anti-clockwise
Connect the controller to the power supply and switch it on using the main switch
Connect power cords to each of the hoists to be operated. 4 single cords can be connected to one multi cord.
Connect the power cords to the controller by using a
break-out (HARTING 16p > 4 x 16A 4p) or connect the multi cord to the controller.
Link the controllers if you want to operate more than
4-channels using one “run-button”.
Check if the pre-selection switches for all hoist are in the
“0 “ position
Select a hoist and switch it in the up or down direction. Press the run button for 2 seconds to make sure the hoist has power and if the running direction of the hoist matches the selected direction on the controller.
Up is green LED, down is red LED.
If the direction of the hoist is not correct, change phases using the phase change plug on the power cable.
If individual hoist run in the wrong direction, check
intermediate cabling or check the hoist.
Make sure that the load to be lifted is in the correct position
Clear the area from obstacles
No people are allowed under the load. Make sure all
people have left the operating area before you start to move any load.
Make sure you have an unobstructed view on the full travel path of the load.
Pre-Select all hoist needed in the up or down direction
Press the run button to activate all hoists and hold it till the load has reached the desired height. It may be necessary to level the rig at certain stages.
Never press the run button staccato. This can severely
damage controller and hoist.
If the desired height is reached release the run button, and switch of the mains power switch.
In case more hoist need to be operated than the controller allows, you can daisy link two or more controllers by means of the link cable. The emergency breaker only works for the controller from which the breaker is pushed!
Note! NEVER change the running direction of a hoist when the run
button is pushed
9.
- Use only cable and connectors, which are in good condition
- Never connect more than one hoist per
channel
- Not respecting this manual can cause severe
injury or even death
©Prolyte Products Group 2009
Prolyte has made every effort to ensure the accuracy of this manual. No liability will be accepted for errors. Prolyte reserves the right to change or alter their products or
manuals without prior notice. No part of this manual may be reproduced in any form or by any means without prior written permission.
Prolyte Products Group – Phone +31 (0)594 85 15 15 Fax: + 31 (0)594 85 15 16 www.prolyte.com
pages 12 of 18
©Prolyte Products Group 2009
Prolyte has made every effort to ensure the accuracy of this manual. No liability will be accepted for errors. Prolyte reserves the right to change or alter their products or
manuals without prior notice. No part of this manual may be reproduced in any form or by any means without prior written permission.
Prolyte Products Group – Phone +31 (0)594 85 15 15 Fax: + 31 (0)594 85 15 16 www.prolyte.com
13
12
11
10
9
8
7
6
5
4
3
2
A
B
MOTOR 6
MOTOR 5
MOTOR 2
MOTOR 10
MOTOR 9
2
L2
3
L3
W1/10
V1/10
U1/10
W1/9
V1/9
U1/9
W1/6
V1/6
U1/6
W1/5
V1/5
U1/5
W1/2
V1/2
U1/2
W1/1
V1/1
U1/1
Phasen kontroler
1
L1
MOTOR 1
PE
N
F9
F8
F7
2
4
Wire for 208 V Operation
1
3
5
N
6
16
15
8
14
7
13
12
11
6
5
4
3
9
10
2
PE
Q3
1
16
15
8
14
7
13
12
6
5
4
11
2
3
9
10
1
PE
Q2
16
15
8
14
7
13
12
6
5
4
11
10
3
2
PE
Q1
C
9
F1
1
N
1
W1/12
V1/12
U1/12
W1/11
V1/11
U1/11
W1/8
V1/8
U1/8
W1/7
V1/7
U1/7
W1/4
V1/4
U1/4
W1/3
V1/3
U1/3
MOTOR 12
MOTOR 11
MOTOR 8
MOTOR 7
MOTOR 4
MOTOR 3
controler have to be cross the L2 and L3 by the K1
When is using the MKC-06 Relai in the
D
R1
8
7
6
R1.1
A2
A1
A2
R2
4
A1
R13
8
7
A2
R13
A2
A1
R2.2
8
7
R2.2
6
R2.2
R2
2 4 6
22
21
S2
2
1
A
14
A2
A1
N
A2
A1
13
14
R3.3
8
7
K1 - CONTACTOR
F2 - CICUIT BREAKER
F1 - CICUIT BREAKER
S2 - PUSH BUTTON START
S1- EMERGENCY STOP
LEGENDA
PLE_30_043
the controller suitable to operate with a Hand remote controller
to connect this by the B position to make
Is to disconnect the wire from the A position and
R3
R3.3
R3.3
6
G
N
B
13
3
2
K1
A2
A1
R3
4
PH1
S1
F2
R3
8
7
S5
1 3 5
2 4 6
1 3 5
Hand Remote Controler Info:
R2
8
7
S4
1 3 5
2 4 6
1 3 5
2 4 6
F
By the Main Controllers with the Serial Number 0000-0034
A1
A2
R1.1
R1.1
8
7
T3
L3
R1
T2
L2
K1
T1
L1
A1
R1
S3
4
E
2 4 6
R4
8
7
S6
1 3 5
2 4 6
1 3 5
A2
A1
2 46
R5
8
7
A2
A1
4
R5
S7
1 3 5
3
2
1
Master Conector 1
3
2
1
Current Tax
Brown
Main Stream
Black
230VAC
400VAC
A2
A1
R5.5
8
7
R5.5
6
Master Conector 2
R4.4
8
7
R4.4
6
R4.4
Operation Current230VAC
Brown
Black
Blue
A2
A1
R4
4
2 4 6
R4
1 3 5
H
R6
8
7
A2
A1
R6
S8
4
MOTOR 1
MOTOR 2
MOTOR 3
MOTOR 4
I
R7
8
7
S9
A2
A1
R7
4
1 3 5
2 4 6
1 3 5
2 4 6
A2
A1
R7.7
8
7
R7.7
6
2 4 6
1 3 5
2 4 6
1 3 5
R8
8
7
A2
A1
R8
S10
4
R6.6
R6
K
A2
A1
R8.8
8
7
R8.8
6
2 4 6
R9
8
7
R9
A2
A1
1 3 5
2 4 6
1 3 5
S11
4
R7.7
R7
A2
A1
R9.9
8
7
R9.9
6
2 4 6
7
2 46
A2
A1
4
1 3 5
R10
S12
R8.8
R8
1 3 5
R10
8
L
A2
A1
R10.10
8
7
R10.10
6
R11
8
7
A2
A1
R11
S13
4
A1
R11.11
8
7
A2
R11.11
6
MOTOR 5
MOTOR 6
MOTOR 7
MOTOR 8
M
R12
8
7
A1
A2
R12
S14
4
7
A2
A1
R12.12
8
R12.12
6
1 3 5
2 4 6
1 3 5
2 4 6
DIN RAIL
R9.9
R9
N
COVER
R10.10
R10
2 4 6
Relai Plate
1 3 5
2 4 6
1 3 5
2 4 6
3 5
2 4 6
1 3 5
1
R11
R11.11
O
R12.12
R12
2 4 6
To make Controler suitable to operate on 208V 3 Phase
Disconnect wire N and connect wire N to Number 6.Do not Link N and wire 6
P
1 3 5
2 4 6
1 3 5
TYP:
PLE 30-123
Datum : 23.07.2010
PROLYFT
Electrical plan for all controllers manufactured before july 2010
whith serial number 0000 til 0034 which need to be operated
with remote handset PLE-30-043U
A2
A1
R6.6
8
7
R6.6
6
R5.5
R5
J
GEZ:
Version 8
M.ASLANIDIS
Seite : 1
CONTROL BOX 12 KANNAL
MOTOR 9
MOTOR 10
MOTOR 11
MOTOR 12
Q
USER MANUAL PLE-30
DIRECT CONTROLLED HOIST
pages 13 of 18
©Prolyte Products Group 2009
Prolyte has made every effort to ensure the accuracy of this manual. No liability will be accepted for errors. Prolyte reserves the right to change or alter their products or
manuals without prior notice. No part of this manual may be reproduced in any form or by any means without prior written permission.
Prolyte Products Group – Phone +31 (0)594 85 15 15 Fax: + 31 (0)594 85 15 16 www.prolyte.com
13
12
11
10
9
8
7
6
5
4
3
2
A
B
MOTOR 6
MOTOR 5
MOTOR 2
MOTOR 10
MOTOR 9
2
L2
3
L3
W1/10
V1/10
U1/10
W1/9
V1/9
U1/9
W1/6
V1/6
U1/6
W1/5
V1/5
U1/5
W1/2
V1/2
U1/2
W1/1
V1/1
U1/1
Phasen kontroler
1
L1
MOTOR 1
PE
N
F9
F8
F7
2
4
Wire for 208 V Operation
1
3
5
N
6
16
15
8
14
7
13
12
6
5
4
11
2
3
9
10
1
PE
Q3
16
15
8
14
7
13
12
6
5
4
11
2
3
9
10
1
PE
Q2
16
15
8
14
7
13
12
6
5
4
11
10
3
2
PE
Q1
C
9
F1
1
N
1
W1/12
V1/12
U1/12
W1/11
V1/11
U1/11
W1/8
V1/8
U1/8
W1/7
V1/7
U1/7
W1/4
V1/4
U1/4
W1/3
V1/3
U1/3
MOTOR 12
MOTOR 11
MOTOR 8
MOTOR 7
MOTOR 4
MOTOR 3
controler have to be cross the L2 and L3 by the K1
When is using the MKC-06 Relai in the
D
R1
8
7
6
R1.1
A2
A1
A2
R2
4
A1
R13
8
7
A2
R13
A2
A1
R2.2
8
7
R2.2
6
R2.2
R2
2 4 6
22
21
S2
2
1
A
14
A2
A1
N
A2
A1
13
14
R3.3
8
7
K1 - CONTACTOR
F2 - CICUIT BREAKER
F1 - CICUIT BREAKER
S2 - PUSH BUTTON START
S1- EMERGENCY STOP
LEGENDA
PLE_30_043
the controller suitable to operate with a Hand remote controller
to connect this by the B position to make
Is to disconnect the wire from the A position and
R3
R3.3
R3.3
6
G
N
B
13
3
2
K1
A2
A1
R3
4
PH1
S1
F2
R3
8
7
S5
1 3 5
2 4 6
1 3 5
Hand Remote Controler Info:
R2
8
7
S4
1 3 5
2 4 6
1 3 5
2 4 6
F
By the Main Controllers with the Serial Number 0000-0034
A1
A2
R1.1
R1.1
8
7
T3
L3
R1
T2
L2
K1
T1
L1
A1
R1
S3
4
E
2 4 6
R4
8
7
S6
1 3 5
2 4 6
1 3 5
A2
A1
2 46
R5
8
7
A2
A1
4
R5
S7
1 3 5
3
2
1
Master Conector 1
3
2
1
Current Tax
Brown
Main Stream
Black
400VAC
230VAC
A2
A1
R5.5
8
7
R5.5
6
Master Conector 2
R4.4
8
7
R4.4
6
R4.4
Operation Current230VAC
Brown
Black
Blue
A2
A1
R4
4
2 4 6
R4
1 3 5
H
R6
8
7
A2
A1
R6
S8
4
MOTOR 1
MOTOR 2
MOTOR 3
MOTOR 4
I
A2
A1
R7
4
A2
A1
R7.7
8
7
R7.7
6
2 4 6
1 3 5
2 4 6
1 3 5
R8
8
7
A2
A1
R8
S10
4
R6.6
R6
A2
A1
R8.8
8
7
R8.8
6
2 4 6
R9
8
7
R9
A2
A1
1 3 5
2 4 6
1 3 5
S11
4
R7.7
R7
A2
A1
R9.9
8
7
R9.9
6
To make Controler suitable to operate on 208V 3 Phase
R7
8
7
S9
1 3 5
2 4 6
1 3 5
2 4 6
K
Disconnect wire N and connect wire N to Number 6.Do not Link N and wire 6
A2
A1
R6.6
8
7
R6.6
6
R5.5
R5
J
2 4 6
7
2 46
A2
A1
4
1 3 5
R10
S12
R8.8
R8
1 3 5
R10
8
L
A2
A1
R10.10
8
7
R10.10
6
R11
8
7
A2
A1
R11
S13
4
A1
R11.11
8
7
A2
R11.11
6
MOTOR 5
MOTOR 6
MOTOR 7
MOTOR 8
M
R12
8
7
A1
A2
R12
S14
4
7
A2
A1
R12.12
8
R12.12
6
1 3 5
2 4 6
1 3 5
2 4 6
DIN RAIL
R9.9
R9
N
COVER
R10.10
R10
2 4 6
Relai Plate
1 3 5
2 4 6
1 3 5
2 4 6
3 5
2 4 6
1 3 5
1
R11
R11.11
O
2 4 6
1 3 5
2 4 6
1 3 5
TYP:
PLE 30-044
Datum : 23.07.2010
PROLYFT
R12.12
R12
P
GEZ:
Version 8
M.ASLANIDIS
Seite : 1
CONTROL BOX 12 KANNAL
MOTOR 9
MOTOR 10
MOTOR 11
MOTOR 12
Q
USER MANUAL PLE-30
DIRECT CONTROLLED HOIST
pages 14 of 18
USER MANUAL PLE-30
DIRECT CONTROLLED HOIST
phase failure protector
Remote control
A remote control for the PLE-030 series is available.
The master and connected slaves can be controlled with this
remote unit.
The remote should be plugged into link connector.
The remote works as a run button and emergency stop only.
Individual presets for each hoist have to be made with the pre-set
switches first.
3
4
1
2
Phase Failure
This document describes the phase failure protector inside the
Prolyft PLE 30 and 40 series controllers
Phase Failure
- When all phases are present and in correct order LED no: 1 (On)
and LED no: 2 (Out) are lighten ON
- When phases are not in correct order LED no: 1 (On) and LED
no: 3 (Phs Seq.) are lighten ON. In this case the phases shall be
turned. This can be done by disconnecting the controller.
The power cord is equipped with a phase reverse plug.
Use a screwdriver to turn phases.
- In case of missing phases or when there is a voltage unbalance
of 15% or more between phases, LED no: 1 (On) and LED no: 4
(Asm.) are lighten ON. In this case the controllers main relay is
not activated.
Voltage Unbalance:
When the phase to phase voltage unbalance is less than the
adjusted value by the user, the output relay is activated.
If the unbalance value exceeds the limit value (5%-15%) (to be set
by the user), the output relay is switched OFF at the end of delay
time (0,1....10s) ( also to be set by the user ). LED No: 2 (Out) is
lighten OFF, and Asymmetry error LED no: 4 (Asm.) is lighten ON.
If the fault disappears within the delay time, the output relay is not
switched OFF.
Remote control
PLE-30-043
The voltage unbalance occurs if the L1,L2,L3 are loaded
unequally. This can be caused by a non-uniform distribution of
loads on the lines. The voltage asymmetry causes a rise of the
motor temperature and a reduction of the rated motor power.
Voltage asymmetry limit values can be adjusted between 5% and
15%. The Hysteresis is fixed at 20%
Example:
Given 3x380V supply with 10% asymmetry, relay switches OFF at:
380 - (380 x 10%) = 342V
Relay switches ON at: 342 + (342 x 10% x 20%) = 348V
©Prolyte Products Group 2009
Prolyte has made every effort to ensure the accuracy of this manual. No liability will be accepted for errors. Prolyte reserves the right to change or alter their products or
manuals without prior notice. No part of this manual may be reproduced in any form or by any means without prior written permission.
Prolyte Products Group – Phone +31 (0)594 85 15 15 Fax: + 31 (0)594 85 15 16 www.prolyte.com
pages 15 of 18
USER MANUAL PLE-30
DIRECT CONTROLLED HOIST
GUARANTEE
1) Prolyft controllers are delivered with a one-year guarantee.
2) If for a reason outside the control of the vendor, the delivery is
delayed, the time lag cannot exceed three months.
3) If the use (installation) of the controller is delayed, the
corresponding extension of the guarantee (a single extension
limited to three months) must be requested, and written
confirmation obtained.
4) The vendor undertakes to eliminate all operating errors
originating from the concept, the execution, the components or
the materials themselves.
5) The guarantee does not cover normal wear, or the failures
resulting from abnormal use. It does not cover damage due to
a lack of supervision, to false operation or to a bad utilisation
of the controller, particularly due to overload, inching, under
voltage or over voltage or connecting errors.
6) The guarantee does not apply when there is disassembly,
modification or replacement of parts (mechanical or electrical)
by an unauthorised party or without our prior agreement.
7) The guarantee only applies for original, factory-installed spare
parts. For the duration of the guarantee, the vendor undertakes
to replace or repair, free of charge, the parts, in his workshop,
that are acknowledged to be damaged following examination
by a qualified and authorised service.
8) The guarantee excludes any other services or indemnities.
The repairs covered by the guarantee are carried out, as a rule,
in the workshops of the vendor or authorised agent.
When servicing of the equipment is done outside these
workshops, the labour costs for disassembly or assembly of
these parts are borne by the vendor when these are done
exclusively by his staff or by an authorised agent.
9) The replaced parts become the property of the vendor and
must be returned to the vendor at his expense.
10)For components of a relative particular importance that are not
manufactured by the vendor and which carry the brand name
of specialised manufacturers, the manufacturer’s guarantee
(which can vary according to the manufacturer) is applicable.
*The guarantee does not apply for expendable parts defined by the
manufacturer:
- Fuses
- Contactor contacts
TROUBLE SHOOTING
Hoists do not respond to the “run” signal
Solution
1) Check cabling and connections
Connect properly / measure
2) Corresponding switch is pre-selected in the “0” position
Select “up” or “down”
3) Thermal motor protector is switched off
This can be any of the switches from the connected masters / slaves
4) The thermal motor protector has the wrong setting
Set to 1.9amp for Prolyft hoist
5) Mains switch is switched of
Switch “on”
6) Emergency button is activated
Turn button clockwise to release
7) There is to much resistance in one of the connectors
Measure the resistance in Ohm’s of the connectors
The controller doesn’t respond
Solution
8) Check the power cable
Connect properly / measure
9) Phase failure indicator shows red
Change phases, measure power supply
9) Power supply is switched off
Switch “on”
10) Control circuit breaker is switched off
Switch “on “
11) Mains switch is switched of
Switch “on”
12) Emergency button is activated
Turn button clockwise to release
13) Environmental temperatures are to high
Place the controller in a cooler/warmer surrounding
14) There is to much resistance in one of the connectors
Measure the resistance in Ohm’s of the connectors
©Prolyte Products Group 2009
Prolyte has made every effort to ensure the accuracy of this manual. No liability will be accepted for errors. Prolyte reserves the right to change or alter their products or
manuals without prior notice. No part of this manual may be reproduced in any form or by any means without prior written permission.
Prolyte Products Group – Phone +31 (0)594 85 15 15 Fax: + 31 (0)594 85 15 16 www.prolyte.com
pages 16 of 18
USER MANUAL PLE-30
DIRECT CONTROLLED HOIST
1-WAY HANDHELD
Motor cable:
5 m.
PLA-30-05
10 m. PLA-30-10
20 m. PLA-30-20
Power input
Power cable:
5 m.
PLA-32-05
10 m. PLA-32-10
20 m. PLA-32-20
©Prolyte Products Group 2009
Prolyte has made every effort to ensure the accuracy of this manual. No liability will be accepted for errors. Prolyte reserves the right to change or alter their products or
manuals without prior notice. No part of this manual may be reproduced in any form or by any means without prior written permission.
Prolyte Products Group – Phone +31 (0)594 85 15 15 Fax: + 31 (0)594 85 15 16 www.prolyte.com
pages 17 of 18
USER MANUAL PLE-30
DIRECT CONTROLLED HOIST
2-WAY HANDHELD
Motor cable:
5 m.
PLA-30-05
10 m. PLA-30-10
20 m. PLA-30-20
PLE-30-020
Power input
Power cable:
5 m.
PLA-32-05
10 m. PLA-32-10
20 m. PLA-32-20
©Prolyte Products Group 2009
Prolyte has made every effort to ensure the accuracy of this manual. No liability will be accepted for errors. Prolyte reserves the right to change or alter their products or
manuals without prior notice. No part of this manual may be reproduced in any form or by any means without prior written permission.
Prolyte Products Group – Phone +31 (0)594 85 15 15 Fax: + 31 (0)594 85 15 16 www.prolyte.com
pages 18 of 18
USER MANUAL PLE-30
DIRECT CONTROLLED HOIST
4-WAY BASIC
©Prolyte Products Group 2009
Prolyte has made every effort to ensure the accuracy of this manual. No liability will be accepted for errors. Prolyte reserves the right to change or alter their products or
manuals without prior notice. No part of this manual may be reproduced in any form or by any means without prior written permission.
Prolyte Products Group – Phone +31 (0)594 85 15 15 Fax: + 31 (0)594 85 15 16 www.prolyte.com
pages 19 of 18
USER MANUAL PLE-30
©Prolyte Products Group 2009
BREAK-OUT: PLA-34-02
8-WAY BASIC
PLE-30-083
Power cable:
5 m.
PLA-32-05
10 m. PLA-32-10
20 m. PLA-32-20
Multi cable:
5 m.
PLA-33-05
10 m. PLA-33-10
20 m. PLA-33-20
Motor cable:
5 m.
PLA-30-05
10 m. PLA-30-10
20 m. PLA-30-20
DIRECT CONTROLLED HOIST
Prolyte has made every effort to ensure the accuracy of this manual. No liability will be accepted for errors. Prolyte reserves the right to change or alter their products or
manuals without prior notice. No part of this manual may be reproduced in any form or by any means without prior written permission.
Prolyte Products Group – Phone +31 (0)594 85 15 15 Fax: + 31 (0)594 85 15 16 www.prolyte.com
pages 20 of 18
USER MANUAL PLE-30
©Prolyte Products Group 2009
BREAK-OUT: PLA-34-02
12-WAY BASIC
PLE-30-123
Power cable:
5 m.
PLA-32-05
10 m. PLA-32-10
20 m. PLA-32-20
Multi cable:
5 m.
PLA-33-05
10 m. PLA-33-10
20 m. PLA-33-20
Motor cable:
5 m.
PLA-30-05
10 m. PLA-30-10
20 m. PLA-30-20
Motor cable:
5 m.
PLA-30-05
10 m. PLA-30-10
20 m. PLA-30-20
DIRECT CONTROLLED HOIST
Prolyte has made every effort to ensure the accuracy of this manual. No liability will be accepted for errors. Prolyte reserves the right to change or alter their products or
manuals without prior notice. No part of this manual may be reproduced in any form or by any means without prior written permission.
Prolyte Products Group – Phone +31 (0)594 85 15 15 Fax: + 31 (0)594 85 15 16 www.prolyte.com
pages 21 of 18