1
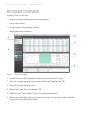
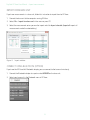
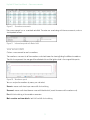
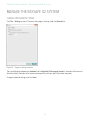
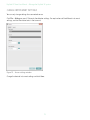
USER MANUAL
RaySafe X2 View
© 2014.01 Unfors RaySafe 5001089-2
All rights are reserved. Reproduction or transmission in whole or in part, in any form or by any means,
electronic, mechanical or otherwise, is prohibited without the prior written consent of the copyright owner.
2
RaySafe X2 View User Manual – Contents
CONTENTS
PROGRAM OVERVIEW.............................................................................................4
IMPORT MEASUREMENTS..................................................................................... 5
Import as you measure.................................................................................... 5
Import from base unit...................................................................................... 6
Connect using Bluetooth (Option)................................................................... 6
VIEW MEASUREMENTS...........................................................................................8
View measured values.....................................................................................8
View waveforms.............................................................................................. 9
EXPORT MEASUREMENTS..................................................................................... 11
Export to Excel................................................................................................. 11
Export waveform image................................................................................. 13
Save file........................................................................................................... 13
MANAGE THE RAYSAFE X2 SYSTEM.................................................................... 14
Change program settings............................................................................... 14
Change instrument settings........................................................................... 15
Update the RaySafe X2 system...................................................................... 16
HINTS.................................................................................................................... 17
Troubleshooting.............................................................................................. 17
Shortcuts......................................................................................................... 17
Technical support............................................................................................ 18
3
RaySafe X2 View User Manual – Program overview
PROGRAM OVERVIEW
RaySafe X2 View is suitable for
• viewing and analyzing measurement data and waveforms
• storing measurements
• transferring data to Excel or other software
• updating the base unit software.
3
1
4
2
5
6
Figure 1. The main window
1. RaySafe X2 status, shows connections to other parts of the RaySafe X2 system.
2. Excel area, manages export of measurements to Excel (see “Export to Excel” (11)).
3. Arrows, for hiding/showing the panels.
4. Measurements (see “View measurements” (8)).
5. Waveforms (see “View waveforms” (9)), for the selected measurement.
6. Measurement information, calibration dates for the sensors, settings used during the selected
measurement and a field for taking notes.
4
RaySafe X2 View User Manual – Import measurements
IMPORT MEASUREMENTS
IMPORT AS YOU MEASURE
Connect the base unit to X2 View with a USB cable.
Figure 2. Connect base unit with X2 View
X2 View will show the status of the connected instrument in the setup panel to the left.
Figure 3. X2 setup panel
All new measurements will now be added to the measurement list in X2 View.
5
RaySafe X2 View User Manual – Import measurements
IMPORT FROM BASE UNIT
If you have measurements in a base unit, follow this instruction to import them to X2 View:
1. Connect the base unit to the computer running X2 View.
2. Select File – Import from base unit in the menu or press F8.
3. Select the measurement series you want to import and click Import selected. (Import all imports all
measurements made the selected day.)
Figure 4. Import window
CONNECT USING BLUETOOTH (OPTION)
If you have the X2 Base Unit Bluetooth adapter, you can connect to the base unit wirelessly.
1. Connect the Bluetooth adapter to a port marked SENSOR on the base unit.
2. Select your base unit in the Bluetooth menu in X2 View.
6
RaySafe X2 View User Manual – Import measurements
If no base units are found, try searching by selecting Search in the Bluetooth menu.
NOTE!
If Bluetooth does not appear in the Connections area, your Bluetooth solution is not
compatible with RaySafe X2. Try using a different Bluetooth adapter on your computer.
7
RaySafe X2 View User Manual – View measurements
VIEW MEASUREMENTS
VIEW MEASURED VALUES
You can view all measurements in a list overview, or focus on one measurement at a time. Toggle between the
views using the buttons in the measurement panel:
Figure 5. List view of measurements
Figure 6. Single measurement view
You can also enlarge one parameter to be able to see the value from a longer distance. Click on a parameter to
enlarge, click again to see all parameters.
Figure 7. Single parameter view
In the parameter list, you can also add a star to measurements of your choice. You can export starred
measurements to Excel. (See “Export to Excel” (11).)
8
RaySafe X2 View User Manual – View measurements
Figure 8. Starred measurements
Every measurement has an associated note field. The notes are saved along with the measurements, and are
also exported to Excel.
Figure 9. Information panel with Notes field
VIEW WAVEFORMS
Click on a measurement to see its waveforms.
The waveforms area consists of the waveforms and check boxes for showing/hiding the different waveforms.
The dark line represents the average of the collected data and the lighter cloud is the range of data points.
Figure 10. Waveforms panel
You can analyze the waveform by zoom, pan and select:
Zoom in: mouse scroll wheel up or mouse left click and drag
Zoom out: mouse scroll wheel down or mouse left double click (resets the zoom and the section mark)
Pan: left click and drag in the waveforms overview
Mark a section and view details: hold shift and left click and drag
9
RaySafe X2 View User Manual – View measurements
Figure 11. Waveforms with a part selected
You can save or copy the waveform as an image (png format) using the right click menu in the waveforms area.
10
RaySafe X2 View User Manual – Export measurements
EXPORT MEASUREMENTS
EXPORT TO EXCEL
Figure 12. Excel export panel
EXPORT TO EXCEL AS YOU MEASURE
Follow the steps below to export each new measurement to Excel:
1. Click Connect in the Excel area.
2. Select Excel settings (workbook, sheet, start cell).
3. Verify that the box Automatically export to Excel is checked.
Tip! Click View – Compact view in the menu, or press Alt+C, to make the X2 View window narrow to see more
of the Excel window when exporting as you measure.
EXPORT MEASUREMENTS TO EXCEL AFTERWARDS
Use the Excel Export button to export measurement afterwards:
1. Click Connect in the Excel area.
11
RaySafe X2 View User Manual – Export measurements
2. Select Excel settings (workbook, sheet, start cell).
3. In the drop down list, select what to export: Selected, All, Starred or the Waveforms of the selected
measurement.
4. Press the Export button.
EXPORT WAVEFORMS TO EXCEL
Use the Excel Export button to export waveforms:
1. Click Connect in the Excel area.
2. Select Excel settings (workbook, sheet, start cell).
3. In the drop down list, select Waveforms.
4. Press the Export button.
12
RaySafe X2 View User Manual – Export measurements
EXPORT WAVEFORM IMAGE
Right click in the waveform area and select Save as image to save the waveform in png format or select Copy
to put it as an image in the clipboard, for pasting into a document.
Figure 13. Waveform, with a certain part zoomed in, copied in png format
SAVE FILE
Click File – Save in the menu, or press Ctrl+S, to save a file with all measurements, notes and stars.
Click File – Save As in the menu, or press Ctrl+Shift+S, to save a file with a new name.
The file is saved in X2 View format (.x2v).
13
RaySafe X2 View User Manual – Manage the RaySafe X2 system
MANAGE THE RAYSAFE X2 SYSTEM
CHANGE PROGRAM SETTINGS
Click File – Settings or press F4 to reach the program settings under the General tab.
Figure 14. Program settings window
The main difference between the standard and the RaySafe Xi View export format is the order of the columns.
Select RaySafe Xi View format for backward compatibility with your old Xi View Excel templates.
Change the desired settings and click Save.
14
RaySafe X2 View User Manual – Manage the RaySafe X2 system
CHANGE INSTRUMENT SETTINGS
You can only change settings for a connected sensor.
Click File – Settings or press F4 to reach the detector settings. For explanations of the different instrument
settings, see the information texts in the base unit.
Figure 15. Sensor settings window
Change the desired instrument settings and click Save.
15
RaySafe X2 View User Manual – Manage the RaySafe X2 system
UPDATE THE RAYSAFE X2 SYSTEM
X2 View will automatically connect to X2 Online when your computer is connected to the internet. The X2
Online field will show a notification icon if there are any updates available for you.
Figure 16. Update notification to the right
Click on the icon to go to the update window (below). Click Update to download and install the update or
Cancel to postpone the update.
Figure 17. Update window
16
RaySafe X2 View User Manual – Hints
HINTS
TROUBLESHOOTING
No instrument is shown in the RaySafe X2 status area, even if a base unit is connected.
Disconnect and reconnect the base unit to the computer, using the USB cable.
X2 Online does not appear in the RaySafe X2 status area.
Make sure that the computer running X2 View is connected to the internet.
SHORTCUTS
KEYBOARD SHORTCUT
ACTION
Up arrow
Show previous measurement
Down arrow
Show next measurement
Ctrl+N
Make a new file
Ctrl+O
Open an existing file
Ctrl+S
Save file
Ctrl+Shift+S
Save file with a new name (Save As)
Alt+C
Change to Compact view
Alt+D
Change to Default view
F1
View Help
F2
Open About window
F4
Open Settings window
F8
Open Import from base unit window
Ctrl+A
Mark all measurements
Ctrl+C
Copy all marked measurements to the clipboard
Delete
Delete the selected measurement.
Alt+X
Exit X2 View
17
RaySafe X2 View User Manual – Hints
MOUSE EVENT
ACTION
Mouse wheel up in waveforms area
Zoom in
Mouse wheel down in waveforms area
Zoom out
Double click in waveforms area
Reset zoom
Left click and drag in waveforms area
Pan
Shift+left click and drag in waveforms area
Mark a section
Ctrl+left click and drag in waveforms area
Select a region to zoom in to
Right click
Open a menu in the measurement or waveforms area
TECHNICAL SUPPORT
Please don’t hesitate to contact our support desk if you have any questions. Visit http://www.raysafe.com for
contact information.
18