1
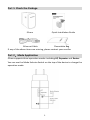
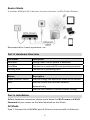
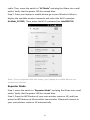
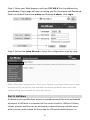
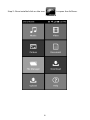
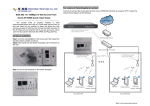
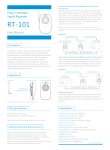
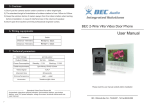
 Quick Installation Guide Wireless Share Router iShare
Part 1: Check the Package iShare Quick Installation Guide Ethernet Cable Flannelette Bag If any of the above items are missing, please contact your reseller. Part 2:Mode Application iShare supports three operation modes including AP, Repeater and Router. You can use the Mode Selector Switch on the top of the device to change the operation mode. 1
AP mode It extends your existing hardwired network to your wireless clients. Recommend for: hotel, small office, etc. Repeater Mode It extends the coverage of your root wireless router, boost the wireless signal strength. Recommend for: villa, big house, etc. 2
Router Mode It enables Multiple Wi‐Fi devices to share Internet via DSL/Cable Modem. Recommend for: home, apartment, etc. Part 3: Hardware Overview LED Status Description Solid Red During Power ON or system is defective. Solid Blue The device is powered ON and operating properly. Blinking Blue The device is processing WPS. Button Description Mode Selector Switch Used to change the operation mode of the device. WPS Used to secure your wireless network automatically. RST Used to reset router to factory default setting. Part 4: Installation Before hardware connection, please write down the Wi‐Fi name and Wi‐Fi Password of your router on the label attached on the iShare. AP Mode Step 1: Connect the LAN/WAN port of iShare to Internet with an Ethernet 3
cable. Then, move the switch to “AP Mode” and plug the iShare into a wall outlet. Verify that the power LED has turned blue. Step 2: From your laptop or mobile device go to your Wireless Utility to display the available wireless networks and select the Wi‐Fi name(ex: AirMobi_222222). Then, enter the Wi‐Fi password (ex: bdef222222). Note: Once completed the two steps, your laptop or mobile device can access the Internet. Repeater Mode Step 1: move the switch to “Repeater Mode” and plug the iShare into a wall outlet. Verify that the power LED has turned blue. Step 2: Press the WPS button of your root wireless router or AP, and then press the WPS button of iShare within two minutes. iShare will connect to your root wireless router or AP automatically. 4
Note: The Wi‐Fi name and Wi‐Fi password of iShare are same as your root wireless router or AP when the connection succeeds. Router Mode Step 1: Connect the LAN/WAN port of iShare to DSL Modem with an Ethernet cable. Then, move the switch to “Router Mode” and plug the iShare into a wall outlet. Verify that the power LED has turned blue. Step 2: From your laptop or mobile device go to your Wireless Utility to display the available wireless networks and select the Wi‐Fi name(ex: AirMobi_222222). Then, enter the Wi‐Fi password (ex: bdef222222). 5
Step 3: Open your Web browser and type 192.168.0.1 in the address bar, press Enter. A login page will pop up asking you for Username and Password. Enter the default Username admin and Password admin, click Login. Step 4: Follow the Setup Wizard to finish the configuration step‐by‐step. Note: After the configuration, from your laptop or mobile device go to your wireless utility to display the available wireless networks and select the network that you created for Internet access. Part 5: AirShare AirShare serves up effortless access to stored personal files and multimedia whenever a USB disk is connected to the router’s built‐in USB port. Music, videos, photos and files can be streamed or shared among multiple users with the easy touch‐based AirShare App for iOS and Android devices, or 6
users with a notebook. Using the function of AirShare, you need to insert your USB disk to iShare and please make sure your Smart Phone, Tablet and PC have been connected to the iShare. Access AirShare via PC Step 1: Open My Computer and type ftp://192.168.0.1 in the address bar, press Enter. And then you can access all files on the USB stick. Access AirShare via Smart Phone or Tablet Step 1: Search the app on the App store or Google Play, and you also can scan the QR code to download and install the AirShare App to your iPhone, iPad or Android devices. 7
Step 2: Once installed click on the icon to open the AirShare. 8
Technical Support For more information or troubleshooting help, please download the User Manual from our website. Additional support is also available on our website: www.cctairmobi.com The website contains the latest user documentations and software updates for AirMobi products. Support E‐mail Address: [email protected] Copyright©2013 Shenzhen Huaxunark Technology Co., Ltd. All rights reserved.
9