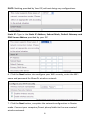
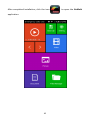
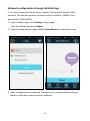
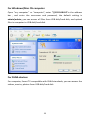
1
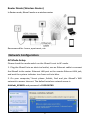
Quick Installation Guide
Wireless Share Router
iShare2
V1.1
Package contents
iShare2
x1
Ethernet Cable x 1
Quick Installation Guide x 1
Flannelette Bag x 1
Note: If any of items is missing or damaged, please contact your retailer.
Hardware
No.
1
Interface
Description
Mode Switch
AP/Repeater/Router
Solid Red: System booting
Solid blue: power ON and works well
2
System Indicator
3
USB
USB drive connection or 5V/1A adapter
4
RST
Long-press for 3-5S to restore factory defaults
5
LAN/WAN
10/100Mbps Ethernet port
6
WPS
Used to secure your wireless network
automatically
Blue flash: WPS processing or configuration
on App comes into effect
1
Working Mode
AP Mode (Access Point)
In AP mode, iShare2 creates your own WiFi hotspot by connecting to a wired
Internet connection.
Recommend for: hotel, small office, etc.
Repeater Mode (Wireless Repeater)
In Repeater mode, iShare2 extends the coverage of your existing wireless
router.
Recommend for: villa, big house, etc.
2
Router Mode (Wireless Router)
In Router mode, iShare2 works as a wireless router.
Recommend for: home, apartment, etc.
Network Configuration
AP Mode Setup
Please check the mode switch on the iShare2 is set to AP mode.
1. Plug the iShare2 into an electrical outlet, use an Ethernet cable to connect
the iShare2 to the router Ethernet LAN port or the remote Ethernet LAN jack,
and wait the system indicator turn from red into blue.
2. On your computer/ Smart phone /tablet, find and join iShare2’s WiFi
network to access Internet. The default wireless network name is
AirMobi_XXXXXX and password is 0123456789.
3
Repeater Mode Setup
Please check the mode switch on the iShare2 is set to Repeater mode.
Option A: Setup with WPS (Wi-Fi Protected Setup)
Press the WPS button on your existing wireless router, within two minutes,
press the WPS button on iShare2, iShare2 will be connected to your existing
wireless router automatically.
When the connection is complete, the iShare2 will use the same wireless
network name (SSID) and password as your existing wireless router.
Option B: Setup with web UI setup
1. Follow the step 1, 2, 3 in Router Mode Setup.
2. Log in to setup wizard page, follow Setup Wizard to complete setup.
4
3. Click Next button into internet connection configuration in Repeater
mode.
Click Search button to select a wireless network to extend, and type the
network password.
When the connection is complete, the default setting is Synchronism SSID.
The iShare2 will use the same wireless network name (SSID) and password as your
existing wireless router.
If the Synchronism SSID not checked, click the Next button into configure your
WiFi security, enter the WiFi name and password for iShare2’s wireless
network.
4. Click the Next button, complete the network configuration in Repeater
mode. Connect your computer/Smart phone/tablet to the new created
wireless network.
5
Router Mode Setup
Please check the mode switch on the iShare2 is set to Router mode.
1. Plug the iShare2 into an electrical outlet, check the device connection
follow the diagram in Working Mode, and wait the system indicator turn
from red into blue.
2. On your computer/ Smart phone /tablet, find and join iShare2’s WiFi
network. The default wireless network name is AirMobi_XXXXXX and
password is 0123456789.
3. Open a web browser and enter “192.168.8.8” in the address bar, enter
the username and password, the default setting is admin/admin.
6
4. Log in to setup wizard page, follow Setup Wizard to complete setup.
5. Click Next button into Internet connection configuration in Router mode.
In Router mode, there are three Internet connections available: Static IP,
DHCP, and PPPoE.
Select the right Internet connection, the configuration data can be get
from your ISP.
PPPoE: Used for ADSL services, type in the username and password provided by
your ISP.
7
DHCP: Nothing provided by Your ISP, without doing any configurations.
Static IP: Type in the Static IP Address, Subnet Mask, Default Gateway and
DNS Server Address provided by your ISP.
6. Click the Next button into configure your WiFi security, enter the WiFi
name and password for iShare2’s wireless network.
7. Click the Next button, complete the network configuration in Router
mode. Connect your computer/Smart phone/tablet to the new created
wireless network.
8
AirMobi Application
App installation
For iOS devices:
Search AirMobi in App Store, or scan the QR code, download and install the
Apps.
For Android devices:
Search AirMobi in Google Play store,or scan the QR code, download and
install the Apps.
9
After completed installation, click the icon
application.
10
to open the AirMobi
Network configuration through AirMobi App
1. On your computer/Smart phone /tablet, find and join iShare2’s WiFi
network. The default wireless network name is AirMobi_XXXXXX, and
password is 0123456789.
2. Open AirMobi App, click Setting to login page.
Type the default password admin.
3. Log into Setup Wizard page, follow Setup Wizard to complete setup.
4. After configuration completed, Connect your computer/Smart phone/
tablet to the new created wireless network.
11
Wireless Data Share
1. Plug the iShare2 into an electrical outlet, insert USB disk/hard disk into
USB port, and wait the system indicator turn from red into blue.
2. On your computer/ Smart phone /tablet, find and join iShare2’s WiFi
network.
For Android/iOS mobile devices
You can use AirMobi App to view and download the music, videos, photos
and documents from USB disk/hard disk.
In Files manager page, you can delete or download the files from USB
disk/hard disk.
In Backup page, you can upload files in mobile devices to USB disk/hard disk.
12
For Windows/Mac OS computer
Open “my computer” or “computer”, enter “\\192.168.8.8”in the address
bar , and enter the username and password, the default setting is
admin/admin, you can access all files from USB disk/hard disk, and upload
files in computer to USB disk/hard disk.
For DLNA devices
For computer, Smart TV compatible with DLNA standards, you can access the
videos, musics, photos from USB disk/hard disk.
13
Technical Support
For more information or troubleshooting help, please download the User Manual
from our website.
Additional support is also available on our website: www.cctairmobi.com
The website contains the latest user documentations and software updates for
AirMobi products.
Support E-mail Address: [email protected]
Copyright© 2013 Shenzhen Huaxunark Technology Co., Ltd. All rights reserved.
1