1
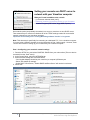
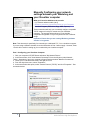
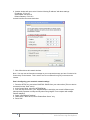
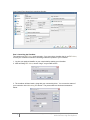
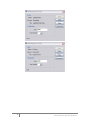
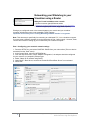
High End Systems, Inc.
Networking your
Wholehog to your
Visualizer computer
[A guide to establishing a network connection with Wholehog 3, Hog iPC,
Roadhog Full Boar and Hog3PC]
This document is intended as an addition to the Visualizer Connectivity
Application Instructions, which can be found online and in the Wholehog
User Manual
Page 2
Instructions for connecting via your console’s
internal DHCP Server
Page 5
Instructions for manually configuring your
network settings between console and Visualizer
Page 9
Instructions for Networking your console to
your Visualizer via a Router
Cat West, High End Systems
Updated 2/9/2009
Setting your console as a DHCP server to
network with your Visualizer computer
What you'll need in addition to the console:
- (1) Crossover ethernet cable (cat-5)
- Wholehog Visualizer Connectivity Drivers on your Computer
- Visualizer Program (ESP Vision, Wyg, MSD, Capture)
One network option (and probably the easiest) is to set your console to act as a DHCP server.
That means that your console can distribute all of the TCP/IP settings needed for a successful
network connection to your visualizer computer.
Important: Ensure that you are running Wholehog software Version 3.0 or greater.
Note: This document is specifically for connecting to a dedicated ESP Vision visualizer computer.
If you are using a different visualizer, then the instructions in Part 3 will not apply. However, Parts
1 and 2 will be useful in setting up your console with your visualizer computer.
Part 1- Configuring your console's network settings
1. Press the SETUP key, and select CONTROL PANEL from your main toolbar (This can also be
accessed from the “Start” menu).
2. In the Control Panel, select the NETWORK tab
3. Ensure that the settings are at as listed below
- Your HogNet Adaptor should list your console’s (or computer’s) Ethernet port
- Select "Use default IP settings"
- Under DHCP / Boot Server, "Enable DHCP and Boot Server" will need to be selected
4. Press "OK"
2
Connecting a Wholehog console with your Visualizer computer
2009 Cat West, High End Systems
Part 2- Configuring your Visualizer Computer
1. Click your computer's START Button and select "My Network Places."
2. In the new window, click "View Network Connections" from the left pane (under Network
Tasks). Alternatively, open your computer's Control Panel and select "Network Connections"
3. Locate your "Local Area Connection" and right-click on it.
4. From the drop-down menu, select "Properties."
5. In the new window that opens, select "Internet Protocol (TCP/IP)" and click "Properties." See
screenshot below.
6. Another window will open, select "Obtain an IP Address Automatically" and also "Obtain DNS
address automatically." It should look like the screenshot below.
3
Connecting a Wholehog console with your Visualizer computer
2009 Cat West, High End Systems
7. Click OK and close all network windows.
Note: You may see an information message on your computer that says you have "Limited or No
Connectivity" to the internet. This is not an error- the Wholehog 3 will not give you access to the
internet.
Part 3- Launching the Visualizer
This section uses ESP Vision as the example. If you are not using ESP Vision, consult your
Visualizer's manual for launching instructions.
1. Log into your patched showfile on your console before starting your Visualizer.
2. After launching ESP Vision, choose "Hog 3" as your DMX source.
3. The visualizer will then launch, along with your connectivity driver. You can see the status of
your connection in the Wholehog DP window. The process will look like these screenshots
below:
4
Connecting a Wholehog console with your Visualizer computer
2009 Cat West, High End Systems
Manually Configuring your network
settings between your Wholehog and
your Visualizer computer
What you'll need in addition to the console:
- (1) Crossover ethernet cable (cat-5)
- Wholehog Visualizer Connectivity Drivers on your Computer
- Visualizer Program (ESP Vision, Wyg, MSD, Capture)
These instructions will help you to manually configure compatible
TCP/IP ranges on both your console and your Visualizer
computer. The example below shows you one possible
compatible configuration- but you may choose to use a different
range.
Important: Ensure that you are running Wholehog software
Version 3.0 or greater.
.
Note: This document is specifically for connecting to a dedicated ESP Vision visualizer computer.
If you are using a different visualizer, then the instructions in Part 3 will not apply. However, Parts
1 and 2 will be useful in setting up your console with your visualizer computer.
Part 1- Configuring your Visualizer Computer
1. Click your computer's START Button and select "My Network Places."
2. In the new window, click "View Network Connections" from the left pane (under Network
Tasks). Alternatively, open your computer's Control Panel and select "Network Connections"
3. Locate your "Local Area Connection" and right-click on it.
4. From the drop-down menu, select "Properties."
5. In the new window that opens, select "Internet Protocol (TCP/IP)" and click "Properties." See
screenshot below.
5
Connecting a Wholehog console with your Visualizer computer
2009 Cat West, High End Systems
6. Another window will open, select "Use the following IP address" with these settings:
IP Address: 172.31.0.2
Subnet Mask: 255.255.0.0
Default Gateway: 172.31.0.2
It should look like the screenshot below.
7. Click OK and close all network windows.
Note: You may see an information message on your computer that says you have "Limited or No
Connectivity" to the internet. This is not an error- the console will not give you access to the
internet.
Part 2- Configuring your console's network settings
1. Press the SETUP key, and select CONTROL PANEL from your main toolbar (This can also be
accessed from the “Start” menu).
2. In the Control Panel, select the NETWORK tab
3. From the drop down menu, your “HogNet Adaptor" should list your console’s Ethernet port.
(this especially important to setup correctly when using Hog3PC on a computer with multiple
network adaptors)
4. Select "Use Default IP settings"
5. Under DHCP / Boot Server, select “Enable Boot Server” only
6. Press "OK."
6
Connecting a Wholehog console with your Visualizer computer
2009 Cat West, High End Systems
Your Control Panel should look something like this:
Part 3- Launching the Visualizer
This section uses ESP Vision as the example. If you are using a visualizer that is not ESP Vision,
consult your Visualizer's manual for launching instructions specific to your visualizer.
1. Log into your patched showfile on your console before starting your Visualizer.
2. After launching ESP Vision, choose "Hog 3" as your DMX source.
3. The visualizer will then launch, along with your connectivity driver. You can see the status of
your connection in the Wholehog DP window. The process will look like these screenshots
below:
7
Connecting a Wholehog console with your Visualizer computer
2009 Cat West, High End Systems
8
Connecting a Wholehog console with your Visualizer computer
2009 Cat West, High End Systems
Networking your Wholehog to your
Visualizer using a Router
What you'll need in addition to the console:
- (2) Non-crossover (patch) Ethernet cables
- Wholehog Visualizer Connectivity Drivers on your Computer
- Visualizer Program (ESP Vision, Wyg, MSD, Capture)
Placing a pre-configured router in the network between your console and your visualizer
computer will allow the router to set compatible TCP/IP settings.
Important: Ensure that you are running Wholehog software Version 3.0 or greater.
Note: This document is specifically for connecting to a dedicated ESP Vision visualizer computer.
If you are using a different visualizer, then the instructions in Part 3 will not apply. However, Parts
1 and 2 will be useful in setting up your console with your visualizer computer.
Part 1- Configuring your console's network settings
1. Press the SETUP key, and select CONTROL PANEL from your main toolbar (This can also be
accessed from the “Start” menu).
2. In the Control Panel, select the NETWORK tab
3. From the drop down menu, under "Adaptor Configuration," the adaptor should be configured
for your console's (or computer’s) Ethernet port.
4. Select "Obtain an IP address using DHCP"
5. Under DHCP / Boot Server, ensure that “Enable DHCP and Boot Server” is not selected.
6. Press "OK."
9
Connecting a Wholehog console with your Visualizer computer
2009 Cat West, High End Systems
Part 2- Configuring your Visualizer Computer
1. Click your computer's START Button and select "My Network Places."
2. In the new window, click "View Network Connections" from the left pane (under Network
Tasks). Alternatively, open your computer's Control Panel and select "Network Connections"
3. Locate your "Local Area Connection" and right-click on it.
4. From the drop-down menu, select "Properties."
5. In the new window that opens, select "Internet Protocol (TCP/IP)" and click "Properties." See
screenshot below.
6. Another window will open, select "Obtain an IP Address Automatically" and also "Obtain DNS
address automatically." It should look like the screenshot below.
10
Connecting a Wholehog console with your Visualizer computer
2009 Cat West, High End Systems
7. Click OK and close all network windows.
Note: You may see an information message on your computer that says you have "Limited or No
Connectivity" to the internet. This is not an error- the Wholehog 3 will not give you access to the
internet.
Part 3- Launching the Visualizer
This section uses ESP Vision as the example. If you are not using ESP Vision, consult your
Visualizer's manual for launching instructions.
1. Log into your patched showfile on your console before starting your Visualizer.
2. After launching ESP Vision, choose "Hog 3" as your DMX source.
3. The visualizer will then launch, along with your connectivity driver. You can see the status of
your connection in the Wholehog DP window. The process will look like these screenshots
below:
11
Connecting a Wholehog console with your Visualizer computer
2009 Cat West, High End Systems
Note 1: The original Roadhog does not have networking capabilities as the Full Boar does. In
order to communicate with a Visualizer, you will need a DMX-to-USB device. Consult your
visualizer manufacturer for more information regarding this.
Note 2: When connecting a Full Boar console to a visualizer computer, please use the “Hog-Net”
Ethernet port.
Note 3: If you want to run Hog3PC and your Visualizer on the same computer, no networking will
be necessary. Keep in mind that HES/FPS does not recommend running both Hog3PC and ESP
Vision (or other visualizer) on the same computer. These programs can be processor heavy, so
HES/FPS cannot guarantee the stability of either system if both are run simultaneously on the
same computer.
12
Connecting a Wholehog console with your Visualizer computer
2009 Cat West, High End Systems