1
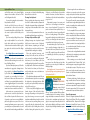
Is It Time To Replace
Your Laptop’s Battery?
—page 2
Using Apple Diagnostics
To Troubleshoot
Your Mac— pg. 3
More About iCloud
and Dropbox—
pages 4 and 6
For many, the month of August brings vacations and when traveling the popularity
of mobile devices like readers, tablets, and
smartphones, etc., seems even more pervasive. For Apple users, using our iPhones and
iPads has become so routine, we don’t even
think of them until we have a problem.
Many times the problems we run into are
M
6:45 P
, 2015: MUG
O
LIVE to
online
,
x
o
C
.
A
David
pbox—
o
r
D
d
an
iCloud
Ne x t M
Key articles.....
A message from the prez—
t 11th
A ug u s
related to our information not being in
“sync.” The problems only get worse as we
add new devices and services. Keeping our
emails, pictures, videos, and music straight
across multiple devices quickly becomes
frustrating when it doesn’t work the way
we think it should. In some cases, the problems may be of our own making. With all
of the new devices and services, maybe we
Illustration above is montage of photo components from PC Classes online.com, merged in Photoshop by your MUGSHOT editor
just don’t understand completely the way
things work. If you use iCloud or Dropbox
to organize and manage your information,
this month’s program will be especially
useful.
Burt and Phil have arranged for David
A. Cox, of PC Classes online.com, to make a
virtual presentation on iCloud and Dropbox
at our next meeting on 11 August. David’s
eeting
,
YouTube classes are highly recommended
and we are pleased to have him take the
time to share his knowledge and experience with us. I hope all of you can make it
to this meeting.
Apple has released a 6th Generation
iPod, the iPod Touch. It has been about
three years since this product was updated.
Some industry analysts thought that Apple
would drop the iPod from its product line,
but not so. Featuring the new A8 chip, a
4” Retina screen, significantly improved
performance, Apple is looking for it to be
the “Apple Music” player of choice. Time
will tell. I had an iPod Touch a few years ago
and I admit I really liked it for both listening
to music and audio books; unfortunately, I
dropped it and broke the screen. And yes, I
kind of miss it. But now that there is a new
updated one, running the latest version of
iOS—you guessed it—I have ordered one!
Changing the subject: last month there
was a daytime break-in at the Senior Center.
While it was of some concern to us, we
were pleased with the way we were notified of the break-in and the actions taken
by staff at the Senior Center. Fortunately for
us, we now understand that the police have
two suspects in custody.
Well, that is enough for this month;
don’t forget our upcoming meetings, both
regular programs and workshops. Burt
and Phil have worked hard to put together
some very interesting presenters and topics. Hope to see you all there at our next
meeting and although there won’t be a
workshop in August, they will start up again
in September. Don’t forget to bring a friend
or other guest.
—Bobby Adams
Best viewed in Adobe Reader
August 2015 | MUGSHOT Newsletter |
1
Is it Time to Replace Your Laptop’s Battery?
— by Phil Davis
I
[1]
f you are like me, you rarely think about
your laptop’s battery. Normally, it just
works. In fact, I challenge you to tell me
the last time you gave some attention to this
vital component of your laptop.
Several weeks ago I had to face this question and accept the fact that batteries are not
infallible and that they usually have a shorter
life span than a laptop.
How Do You Know If You Have A Problem?
One way is if your trackpad stops accepting taps.
When this happens it’s usually a sign that the
battery, located below the trackpad, has started
swelling. This is bad and potentially dangerous.
So if this happens you need to unplug the computer and trudge to your favorite repair shop (or
think about replacing it yourself). Another sign
is if you notice that your battery won’t hold a
charge for long. Since this happens gradually
you may not notice the problem immediately.
It just insidiously creeps up.
The second one is the problem that got my
attention. I was using my 13” MacBook Pro untethered from it’s AC umbilical cord and I happened to notice the state of charge indicator
in the menu bar—it was dropping, almost in
real time. I had only been using the computer
for a few minutes and the charge had already
dropped to 60%. A few minutes later it was below 50%! I mumbled a few choice words and
started to watch the meter. While I watched
— 49%, 46%, 42% — and dropping fast.
Wow — maybe I have a battery problem.
Thank you Captain Obvious.
To verify the problem I turned to a program
appropriately called Battery Health. Battery Health is a free app available on the Mac
App Store and should be a “must install” on all
laptops. This little gem sits in your menu and
gives you a wealth of information about your
battery.
For example: I learned that my battery which,
when new, was rated at 54 Wh, now had a capacity 36 Wh, 68% of the original. Battery Health
also gave a warning to “check battery” which
was a bit redundant, but reinforced my suspicions. I learned that the battery was now 5.7
years old and nearing retirement age.
Being reluctant to bite the bullet (or in this
case buy the battery), I decided to try recalibrating the battery. After draining and recharging it I cranked my computer up while watching the state-of-charge meter. Things started
off great with the charge at 100% (of course this
was only 68% of the original capacity). Looking
good. I kept Battery Health running while doing productive work (surfing the web) on my
desktop Mac Mini. One hour later — down to
51%. Yikes! Two hours later — 15%. Since recalibration was useless I had to decide whether to
get a new battery or a new computer. Since I
had recently put a new SSD in this beast I wanted to keep it running as long as possible so a
new battery was the obvious choice. Also, this
choice was a lot cheaper.
Finding a Battery
My first step was to use the model number
of my computer to determine which battery I
needed. In my case I needed an A1331 which
also fits several other older 13” MacBook Pros.
Some resources that you can use to help you
find your model include Apple Support, iFixit,
and the free MacTracker app.
If I wanted to take my computer to an
Apple store (or mail it to Apple) they would replace my battery for $129. But they would not
sell me a battery so that I could do the replacement myself. I needed to buy a battery from
a third-party vendor. There are “OEM” batteries on Amazon and eBay, but when I read the
fine print, I found that most of these batteries
are OEM-equivalent, and not from Apple. And
most of them, while about half the OEM price,
get mixed reviews.
After checking iFixit to confirm that this
was do-it-yourself territory and easy, I was off
to the web to search for a battery with a good
price and good reviews.
The Outcome
I first ordered a 65 Wh high performance battery from Other World Computing for $99. I’ve
had good success with OWC products in the
past and I liked the higher capacity battery
which should give more running time.
The battery from OWC included two small
special-purpose screwdrivers that I used to
remove the screws from the back of the computer and the screws holding the battery in
place. I then disconnected the battery using
a gadget called a spudger [2]. I slid the battery
in … or rather tried to slide the battery in. No
go! The battery has three small indentations
on one side that lets it slide under the screw
holes for the case. Despite OWC’s compatibility
claims, the indentations on their battery were
in the wrong place. Bummer.
So, returning the OWC battery, I continued
my search and found a battery on Amazon from
a company called Key Power. This battery got
good reviews, was also 65 Wh, had an 18-month
warranty, and cost $64. And, according to the
picture on the website, the indents were in the
right place. Two days later the new battery arrived and, after going through the now familiar
replacement drill, cranked my computer up. Success. The whole installation took less than five
minutes. The hardest part was keeping track of
the tiny screws. The new 65 Wh battery should
not only give better performance, but should
last the rest of My MacBook Pro’s life.
The instructions from Key Power say to
drain the new battery to about 7% by run-
ning the computer without AC power, then
recharging it completely. Then repeat this
discharge/charge cycle a couple more times.
Manufacturers recommend doing this periodically to get the best performance out of
your battery, so battery recalibration will now
go on my maintenance reminder list.
I’m now a happy camper. And so is my
computer. a
Specs After Installing New Battery—
1. Sometimes editors slash copy, other times they use InDesign’s magic to condense fonts, tighten spacing between letters, tighten line spacing, etc. as in this article. It’s like using a trusty ol’ shoehorn to make it all fit!
August 2015 | MUGSHOT Newsletter
2. If you don’t have a “spudger” use your fingernail, or a piece of thin stiff plastic. Don’t use anything metallic to avoid shorting out the battery.
|
2
Using Apple Diagnostics to Troubleshoot Your Mac’s Hardware —
Apple has provided testing software for
its Mac lineup over the years. However,
over time the test suite has undergone
changes, been updated, and advanced
from being included on a special CD, to
being able to perform the tests over the
Internet.
In 2013, Apple changed the testing system once again. Abandoning the older
Apple Hardware Test (AHT), and AHT over
the Internet, Apple moved on to Apple
Diagnostics, to help users find out what
might be wrong with their Macs.
Although the name has changed to Apple
Diagnostics (AD), the purpose of the app has
not. AD can be used to find problems with
your Mac’s hardware, including bad RAM, issues with your power supply, battery, or power adapter, failed sensors, graphics problems,
issues with the logic board or CPU, wired and
wireless Ethernet problems, internal drives,
bad fans, camera, USB, and Bluetooth.
Apple Diagnostics is included on every
2013 or later Mac. It’s installed on the original startup drive, and invoked using a special
keyboard shortcut when booting up the
Mac.
AD is also available as a special boot environment that is downloaded over the Internet from Apple’s servers. Known as Apple Diagnostics over the Internet, this special version can be used if you have replaced or reformatted the original startup drive, and thus
erased the AD version that was included at
the time of purchase. The two forms of AD
are for all purposes identical, although AD
over the Internet involves a few extra steps to
launch and use.
Using Apple Diagnostics
AD is for Mac models from 2013 and later; if
your Mac is an earlier model, you should follow the instructions in:
Use the Apple Hardware Test (AHT) to Find
Problems With Your Mac’s Hardware
—or—
Use the Apple Hardware Test Over the Internet to Diagnose Problems With Your Mac
AD on your Mac, that’s the preferred version of the test to run. It doesn’t require an
Internet connection, although if you have
one, you’ll be able to access Apple’s help
system, which includes diagnostics notes
based on AD error codes that may be generated.
1. Start by disconnecting any external devices connected to your Mac. This includes printers, external hard drives, scanners, iPhones,
iPods, and iPads. In essence, all peripherals
except the keyboard, monitor, wired Ethernet
(if that is your primary connection to your
network), and mouse should be disconnected from your Mac.
2. If you’re using a Wi-Fi connection to the
Internet, be sure to write down the access information, specifically, the name of the wireless network and the password you use to
access it.
3. Shut down your Mac. If you’re unable to
shut down using the normal shutdown command under the Apple menu, you can press
and hold the power button until your Mac
turns off.
Once your Mac is turned off, you’re ready
to start Apple Diagnostics, or Apple Diagnostics over the Internet. The difference between
the two is the keyboard command you use at
startup, and the need for an Internet connection to run AD over the Internet. If you have
3. Continue to hold down the key(s) until you
see your Mac’s gray screen change to
Apple Diagnostics.
By Tom Nelson, writing on AboutTech (edited)
Let’s Start the Test
1. Press your Mac’s power button.
2. Immediately hold down the D key (AD) or option+D keys (AD over the Internet).
4. If you use a wireless connection, you’ll be asked to connect to your Wi-Fi network, using the info you wrote down earlier.
5. Apple Diagnostics will begin with your screen displaying a Checking Your Mac message, along with a progress bar.
6. Apple Diagnostics takes 2 to 5 minutes to complete.
7. Once complete, AD will show a brief
description of any issues uncovered, along
with an error code.
8. Write down any error codes that are
generated; you can then compare them with the error code table (see link at right).
Finishing Up
If your Mac generated errors during the AD
test, you can send the codes to Apple, which
will result in an Apple support page being
displayed, showing options for repairing or
servicing your Mac.
1. To continue to the Apple support site, click
the Get Started link.
2. Your Mac will restart using OS X Recovery, and Safari will open to the Apple Service
& Support web page.
3. Click the Agree to Send link to send the AD
error codes to Apple (no other data is sent).
4. The Apple Service & Support web site will
show additional information about the
error codes, and the options you can take to resolve the problems.
5. If you would rather just shut down or
restart your Mac, simply press S (Shut Down) or R (Restart). If you would like to rerun the test, press the command+R keys.
To have a PDF copy of what those error
codes mean, click this link!
It’s possible that the AD test won’t find
any issues, even though you’re having problems you believe are related to your Mac’s
hardware. The AD test is not a complete and
comprehensive test, although it will find most
of the common issues associated with hardware. If you still have problems, don’t rule
out such common causes as failing drives or
even software issues. a
August 2015 | MUGSHOT Newsletter |
3
Setting Up an iCloud Account on Your Mac— By Tom Nelson, Macs Expert on about.com
Apple’s iCloud provides a host of cloud-based
services you can use on your Mac, including
Mail & Notes, Contacts, Calendars, Bookmarks, Photo Stream, Documents & Data,
Back to My Mac, Find My Mac, and more. Each
service lets you store data on the iCloud servers, and keep your Mac and all of your devices,
including Windows and iOS devices, in sync.
What You Need to Use the iCloud Service
iCloud on the Mac requires OS X 10.7.2 or later.
Once you have the proper version of OS X installed, you’ll need to turn iCloud on. If you
updated to OS X 10.7.2 or later after the launch
of the iCloud service, the iCloud preferences
pane will open automatically the first time
you boot your Mac after updating the OS. If
you updated to OS X 10.7.2 or later before the
iCloud service launched, you’ll need to access
the iCloud preferences pane manually.
We’ll assume you’re going to start this
process by accessing the iCloud preferences
pane manually.
Turn on iCloud
1. Click the System Preferences icon in the Dock, or select the System Preferences 7. Click the Sign-In button.
photos, reminders, notes, Safari book
marks, keychain and bookmarks on its servers, so you can access this data from any iOS, Mac, or Windows device. Place a
check mark next to this option if you wish to upload this data.
9. iCloud Drive allows you to store any files you like in the cloud. Apple provides a limited amount of free space, and then charges for additional space.
10. Find My Mac, one of the features of iCloud, uses geolocation services to pinpoint where your Mac is currently located. You can also send your Mac a message, remotely lock your Mac, or even erase the data on its hard drive. Place a check mark next to this option if you wish to use the Find My Mac service.
11. Click Next.
12. If you chose to use Find My Mac, you will receive a warning asking you to allow Find My Mac to use your Mac’s location data. Click Allow.
8. You can choose to have iCloud upload and store your contacts, calendars, iCloud will now be activated, and will display
a list of the iCloud services you can use. a
item in the Apple menu.
2.
In the System Preferences window, click the iCloud icon, which is located under the Internet & Wireless group (the third row of icons).
3.
The iCloud preferences pane should display the iCloud login, asking for your Apple ID and password. If, instead, the iCloud preferences pane displays a list of available iCloud services, then you (or someone else who uses your com-
puter) have already turned iCloud on.
4.
If iCloud was enabled using someone else’s Apple ID, check with that individual
before you log out of iCloud. If iCloud has already pushed data to your computer, he or she may want to back up that data before you disconnect from the service.
5. Enter the Apple ID you wish to use for the iCloud service.
6. Enter your Apple ID password.
Setting Up Dropbox for the Mac— By Tom Nelson, Macs Expert on about.com
ßYou can use the typical setup, which will create the
Dropbox folder in your home directory, and sync that
folder with all of the folders in the Dropbox cloud service.
Dropbox is one of the most popular
cloud-based storage systems. While
we will be looking primarily at the Mac
version, Dropbox is also available for
Windows, Linux, and most mobile plat-
forms, including iOS devices.
Once you set up a Dropbox account,
and download and install the application, it will appear on your Mac as a special Dropbox folder. Anything you place
inside the folder is automatically copied
to the cloud-based storage system, and
is synced with any other devices you
use that are also running Dropbox.
This means you can be working on a document on your Mac, head off to work, and go
back to work on the document, knowing it is
exactly the same version as the one you were
just fiddling with at home.
Dropbox isn’t the only cloud-based storage and syncing service for the Mac, but it’s
currently one of the most popular. It does
have some pretty stiff competition, though,
including Microsoft’s SkyDrive, Google’s
Google Drive, Box.net, and SugarSync.
You may notice a glaring omission from
that list: Apple’s iCloud. In its first release,
iCloud lacks a general-purpose, cloud-based
storage system, such as iDisk, which was
included with MobileMe, the precursor to
iCloud. If you currently use iDisk, you may
want to consider Dropbox, or one of its competitors, as a replacement, at least until Apple
again provides a similar service of its own.
Dropbox is available in four basic pricing
plans; the first three let you expand the
amount of storage you have by referring others to the service. For example, the basic free
version of Dropbox will give you 500 MB per
referral, to a maximum of 18 GB of free storage.
Installing Dropbox
1. You can grab the installer by downloading
it from the Dropbox web site.
2. Once the download is complete, look for
the installer in your Downloads folder. The file
name is Dropbox version#.dmg. (At the time
of this writing, the file name was Dropbox
1.4.0.dmg.) Launch the installer by doubleclicking its icon.
3. From the installer window that opens,
drag the Dropbox icon to your Applications
folder.
—Continued on page 6
August 2015 | MUGSHOT Newsletter |
4
THIS AND THAT
Better Answers to Security
Questions— from macmost.com
One of the weak spots of online security is
the security question. These are questions
like What was the name of your first pet? or
Which high school did you attend? Using real
or even fake answers to these questions will
make it easier for your account to be hacked.
However, there is a way to make this weak
spot more secure.— Link 1
How to See the Exact Location
Where a Photo was Taken with
a Mac— from OSXDaily.com
The digital cameras
included with iPhone,
Android, and many others,
have an option to geotag
pictures using the devices
GPS hardware, effectively
pinpointing the exact location a photo was taken and bundling that
geographic location data into the metadata
of a picture. This means that you can easily
view the location a picture was taken, and
retrieve the GPS coordinates. —Link 2
Disk Utility: Add, Delete, and
Resize Existing Volumes—
from Tom Nelson, about.com
Disk Utility, included with the Mac OS, can do
some amazing things. Not only can it format
your drives and perform basic repairs, it can
also dynamically re-partition your drives
without losing data.
Do you have a partition that’s just a bit
too small? You can use Disk Utility to expand
it by stealing unused space from an adjacent
HOT L I NKS
can find
with just a
few clicks
under
your computer’s
Apple
menu.
partition, all without erasing any data. It’s an
easy task, although it can take a little bit of
time to perform, depending on the partition
sizes. Link 3—
How to Minimize Emails in Mail
App on iPhone— from OSXDaily.com
If you spend a fair amount of time emailing
from the iPhone, you’ve almost certainly
come across a situation where you’ll be
writing out an email, but need to get data
or information from another email in your
Mail inbox. That used to be a challenge, but
modern versions of the Mail app in iOS ...
read more... Link 4—
Resolving the “Unable to
Download Item. Please Try
Again Later” Error Message on
iPhone— from OSXDaily.com
A somewhat strange error message can
occur at random on iOS, typically for iPhone
users, that states “Unable to Download
Item. Please try again later” with a “Done”
and “Retry” button options. The thing that
makes this error message strange is that it
appears at random and not after the user has
attempted to download or update anything
to the iOS device.— Link 5
Tech Tip: Accessing Your Mac’s
User Manual— Who says it doesn’t
have a manual? On an internet connected
Mac, just go to Apple menu, click on “About
This Mac” and select “Support” to chose
either a User manual covering the OS or navigate to the manual for your computer model,
and more. A wealth of infomation that you
MacFamilyTree
7.5—
Version 7.5 of the
multi award
winning genealogy
application has launched that
lets you to explore your own family history.
With MacFamilyTree 7.5, you can now create,
share and print family books including all
important data contained in your family tree
and supplemented with informative and
graphically impressive charts, statistics, and
reports. A mobile version is also available.
See the website, or buy the App — Link 6
Image Backup For Traveling
Photographers—by photog. Steve Perry
Steve shows you his method for backing
up photos when he’s on trips, including his
“secret” method for keeping his images on
his person at all times! I think you’ll like this
one, check out the video!— Link 7
Safari Status Bar— from macmost.com
Want to see where a link really leads before
clicking? In Safari, choose View, Show Status
Bar. Then you’ll see a thin bar at the very bottom of your Safari window. When you move
your cursor over a link, you’ll see the URL
appear there so you know before you click.
Starting Up In Safe Mode Can
Fix Things That Ail Your Mac—
from Tom Nelson, about.com
Is it safe boot or safe mode? If you’re
interested in getting your Mac running after
a problem occurs, you don’t really care what
it’s called, as long as it works.
Apple has offered a Safe Boot option
ever since Jaguar (OS X 10.2.x). Safe Boot
allows your Mac to start up with the minimal
number of system extensions, preferences,
and fonts it needs to run.
Safe Boot can get your Mac running
again when you’re having problems caused
by corrupt apps or data, software installation
issues, or damaged fonts or preference files.
In all cases, the problem you may experience
is either a Mac that fails to completely boot
and freezes at some point along the way to
the desktop, or a Mac that boots successfully,
but then freezes or crashes when you
undertake specific tasks or use specific
applications— see Link 8
How to Straighten Photos on
iPhone, iPad & iPod Touch—
from OSXDaily.com
Picture that isn’t lined up quite straight? iOS
offers a nice simple way to quickly straighten
any photo by tilting the image by a small degree. Whether an image is completely askew
or just slightly tilted, you can can quickly correct the image and straighten it right within
the Photos app— see Link 9 a
August 2015 | MUGSHOT Newsletter |
5
Setup Dropbox—continued from page 4
4. Launch Dropbox, now located in the Applications folder, by double-clicking its icon.
5. The Dropbox setup window will open and
ask if you have a Dropbox account. I’m going
to assume you don’t, so select “I don’t have
a Dropbox account” and then click the Continue button.
6. Enter the requested account information, and the name of the computer you will
be running this specific copy of Dropbox on.
Click Continue.
7. Select a Dropbox service. I’m going to assume you want to start with the free version,
so select the Free 2 GB version, and click Continue.
8. You can use the typical setup, which will
create the Dropbox folder in your home directory, and sync that folder with all of the folders in the Dropbox cloud service. You can also
select the Advanced setup, which lets you select the location for the Dropbox folder, and
the folders you want to sync to. But because
you can change these settings at any time, I
recommend selecting the Typical installation
option for now, and then clicking Install.
9. The Dropbox installer provides a quick
summary of how Dropbox works, including a
tour. You can use the Continue button to take
the tour, or click Skip Tour to finish the installation. If this is the first time you have used
Dropbox, or any syncing service, I suggest
taking a moment to go through the tour. Click
Continue.
10. Once the tour is over, click the Finish button to exit the installer.
11. Dropbox may ask you to supply the password for your home account on your Mac; this
is necessary for Dropbox to update the folder
it creates in your home account. Supply the
password, and click OK.
Your Dropbox folder is now working.
You’ll find a Dropbox item in your Mac’s menu
bar, and if you look inside the Dropbox folder
you’ll find a Getting Started PDF that will guide
you through the basics of using Dropbox.
One last thing. While you can always access your data from the Dropbox web site, it’s
easier in the long run to install Dropbox on all
the Macs, PCs, and mobile devices you use. a
Sunset Over Silver Springs Shores—
OMUG member Agnes Smith had eyes to the West and captured this outstanding sunset
with her tripod mounted Sony A-77 M2 DSLR with a Tamron 18-270mm zoom lens @ 35mm setting. She spot metered to carefully choose her
exposure (1/13 sec. @ f20, ISO 100). She used her MacBook Pro running Aperture to crop and adjust color temperature and other image tweaks.
Agnes Smith
Cleaning Your Keyboard and
Mouse— By Tom Nelson of about.com
The day you unpacked and started working
with your new Mac was special; it marked the
day when your Mac’s keyboard and mouse
were working at their best. From that day
forward, little bits of grime, dust, and dirt
have been building up on these often-used
peripherals. The buildup of gunk will slowly
cause your mouse to feel less responsive, and
may even cause your keyboard to miss a key
click or two now and then.
Luckily, it’s fairly easy to restore a keyboard
and mouse to like-new condition. All that’s
needed is a bit of cleaning and attention.
Cleaning Suggestions
Start by turning off your Mac and unplugging
your mouse and keyboard. If your keyboard
or mouse is battery powered, remove the
batteries as well.
Have the following items on hand:
— Microfiber cloth
— Can of pressurized air
— Clean water (It doesn’t need to be puri
fied, distilled, or anything else special;
just clean.)
— Cotton swabs or similar cleaning products
— Toothpicks or similar items
Cleaning Your Mac’s Mouse
Wipe the mouse body with the microfiber
cloth. This should be enough to remove any
oils, such as fingerprints. For stubborn spots,
dip the cloth in the clean water and rub the
mouse gently. Don’t apply water directly
to the mouse because it may drip into the
mouse’s inner workings, where sensitive electronics reside.
If you have an Apple Mighty Mouse, the
—Continued on page 7
August 2015 | MUGSHOT Newsletter |
6
Keyboard/Mouse Clean—Cont’d from pg. 6
scroll ball also needs to be cleaned. Slightly
dampen the microfiber cloth and roll the
scroll ball against the cloth.
You can also try using the cotton swabs to
help clean the scroll ball.
Once the scroll ball is clean, use the can of
pressurized air to blow out dust and dirt
from inside the well the scroll ball sits in. This
also serves to dry the scroll ball after you’ve
cleaned it.
If you have an Apple Magic Mouse, cleaning is vastly simplified. You can clean the
touch surface with a wet or dry microfiber
cloth, and run the microfiber cloth along the
two guide rails on the bottom of the Magic
Mouse.
If your Magic Mouse seems to have tracking errors, that is, the mouse pointer stalls or
jumps about, use the can of pressurized air to
clean around the tracking sensor on the bottom of the Magic Mouse.
If you have a third-party mouse, follow the
manufacturer’s suggested cleaning instructions, or take a look at How to Clean a Mouse
by Tim Fisher, About’s Guide to PC Support.
In general, use a microfiber cloth to clean
the exterior of the mouse. If the mouse has a
scroll wheel, you may find that it routinely becomes clogged with gunk. Use cotton swabs
to clean the scroll wheel and the can of pressurized air to clean around the scroll wheel.
In the worst cases, you may need to open
up the mouse to access the optical sensor in
the scroll wheel system. Not all mice are easily opened up, and some are very difficult to
put back together once opened. I don’t recommend performing mouse surgery unless
you already have a replacement mouse available, and don’t mind ending up with leftover
mouse parts, or looking for that little spring
that sailed across the room.
Cleaning Your Keyboard
Clean your keyboard surface using a microfiber cloth. For stubborn surfaces, dampen the
cloth with clean water. Wrap a toothpick with
a single layer of the microfiber cloth to clean
between the keys.
Use the can of pressurized air to blow out
any additional debris from around the keys.
Cleaning a Keyboard After a Spill
Spilling a beverage onto a keyboard is probably the most common cause of keyboard
death. However, depending on the liquid,
and how fast you react, it is possible to save a
keyboard that has undergone a spillage.
Clear and semi-clear beverages, such
as water, black coffee, and tea, are the easiest to recover from, with water offering the
best chances, of course. When a spill occurs,
quickly unplug the keyboard from your Mac,
or quickly turn it off and remove its batteries.
Don’t wait to shut down your Mac; disconnect the keyboard or remove its batteries as
quickly as possible.
If the liquid was plain water, wait 24 hours
to allow the water to dry before reconnecting
the keyboard or replacing its batteries. With
any luck, your keyboard will power back up
and you’ll be ready to go.
Coffee or tea spills are slightly more problematic, because of the acid levels in these
beverages. Depending on the keyboard design, these beverages can cause very small
signal wires within the keyboard to be etched
over time and stop working. Many sources
suggest flooding the keyboard with clean
water, in the hope of diluting the acid levels,
and then letting the keyboard dry out for
24 hours, to see if it still works. I’ve tried this
method a few times, but it has failed more
often than not. On the other hand, what have
you got to lose?
Carbonated beverages, beer, wine, and
other hot or cold beverages are death sentences to most keyboards. Of course, it depends on how much was spilled. A drop or
two can usually be cleaned up quickly, with
little or no lasting damage. If the spill was
larger, and the liquid got inside the keyboard,
well, you can always try the water submersion method, but don’t get your hopes up.
No matter what type of spill occurs, the
key to possibly salvaging a keyboard is to
disconnect it from any electrical source (batteries, USB) as quickly as possible and allow it
to completely dry out before you try using it
again.
I can’t tell you how many keyboards we
have around our office that work just fine,
except for one or two keys, all of which were
killed by spillage.
On a brighter note, I’ve never heard of a
keyboard spillage causing damage beyond
the keyboard itself. a
iPhone Photo
Scanner–Memories
IdeaSolutions has announced
Memories, an app for high
quality photo scanning on
iPhone. The team analyzed all the problems
normally related to the scanning of photos
using a mobile phone camera and concluded
that, in order to neutralize any shadow and
glare, it is necessary to frame the photo holding the device tilted about 45 degrees: in this
way the oblique flash light eliminates any ambient noise.
Memories guides the user with numerous
real time on-screen tips and adds a green
overlay on the photo to indicate proper framing or a yellow overlay while framing is wrong.
The app will correct the perspective with a
border detection algorithm applies filters to
produce top quality photos without need for
manual crop or adjusting.
Each compatible iPhone model has it’s
unique settings for post processing images
and to compensate the differences between
each sensor and flash. This app is simple and
easy to use and allows users to scan up to 10
photos in a minute. Users simply put the photo on a white sheet and follow the on-screen
tips to capture perfect photos.
Memories has an algorithm that automatically detects the orientation (portrait or landscape) and the Aspect Ratio.
After scanning, users can have fun with
the powerful Adobe® Creative Cloud® tools,
which integrates many photographic filters
to make photos unique. The photos can easily be saved in the standard camera roll or
shared on Social Networks thanks to the multiple selection feature.
Memories is the state of art for photo scanning on mobile devices. There is no other App
on the market that can guarantee a result anywhere near comparable. The app is free and offers an in-app purchase ($1.99) to remove the
watermarks on exported or shared photos.
Device Requirements:
iPhone 4S or higher. Optimized for iPhone 5,
iPhone 6, and iPhone 6 Plus. Also compatible
with iPad and iPod. • Requires iOS 8 or higher.
Memories – Instant Photo Scanner 1.0 is free
and available worldwide exclusively through
the App Store’s Photo & Video category. a
August 2015 | MUGSHOT Newsletter |
7
OMUG Meeting Information—
The Ocala Mac User Group meets the
2nd Tuesday of the month at 6:45 PM:
Marion Senior Services—
Multi Purpose Center
1101 SW 20th Court, Ocala, FL 34471
A workshop session is also held on the
4th Tuesday of the month at 6:45 PM.
OMUG Board of Directors—
President– Bobby Adams
[email protected] • 274.0177
Vice President– Marilyn Kennedy
[email protected] • 854.1021
Secretary–Lorraine Wieskamp
[email protected] • 351-3533
Treasurer– Don Boyd
[email protected] • 203-4059
Director– Tom Lee
[email protected]
Director– Philip Davis
[email protected] • 369-8432
Director– Burt Stephens
[email protected] • 873-6177
Director– Al Sypher
[email protected] • 237-9501
Past President– N.C. Sizemore
[email protected] • 291-8778
Apple Users Helping Apple
Users—
OMUG’s Help Team will try to help you
with your computer, iPad, iPhone and
software problems. Please go to the
website’s help-team for a list of help topics
and phone/email contacts for the
following member volunteers:
Bob Adams
Richard Bambridge
Don Boyd
Philip Davis (email ONLY)
Marilyn Kennedy
Dr. Roberto Putzeys
Tim Rankin
Al Sypher
Brian Voge
Lorraine Wieskamp
OMUG Assignments—
Fifty-Fifty Raffle– Tom Lee
Membership– Don Boyd
MUGSHOT Newsletter– Al Sypher
Program Coordinator– Burt Stephens
Online Services Coordinator and Apple
Ambassador– Philip Davis
Sunshine Ambassador– Don Morrison
Next Workshop—
None scheduled for August
Apple User Group
Oh... and one last thing—
A New Road… Many years ago, a king built a great road. Before it opened to the public, he
decided to have a contest to see who could travel the road the best. The winner would receive a box
of gold. • Hundreds of people traveled the road, and as they arrived at the end, they complained to
the king about a large pile of rocks and debris that nearly blocked the entire road and hindered their
travel. • At the end of the day, a lone traveler crossed the finish line. He was tired and dirty, but he
addressed the king with great respect and handed him a small chest of gold.
He said, “I stopped along the way to clear a pile of rocks and debris that was blocking the road, and
I found this chest of gold. Please return it to its rightful owner.” The king smiled and replied,
“You are the rightful owner. By taking the time to clear the road for others, you won my contest!”
The moral: He who travels the road best is he who makes the road better for those who will follow.
Thanks to Jody Phillips of Phillips Printing for “A New Road”
OMUG MEETING MINUTES July 14th, 2015
Announcements: President Bobby Adams welcomed 28 members, and one guest/new member.
Don Boyd reported a total membership of 97, but as there are 18 members who have not renewed
their membership as yet, our actual number is 79.
Treasurer’s Report: Don reported a balance of $1,928.63. Expenses: $30.00 Monthly Donation to
MSS; $119.99 Router Raffle Gift. Deposits: $136.00 : $100.00 New members; $36.00 Raffle.
Secretary’s Report: Minutes of the June meeting were approved as published.
Program: Phil Davis gave a very informative overview of the Photos app. He explained the changes
from iPhoto to Photo; covered creating libraries; organizing photos; editing – easier than it was in
iPhoto; sharing photos. Phil supplied answers to several questions received such as “Can you batch
edit?” “Is RAW supported?” “Does it remove duplicates?” and more.— link to Phil’s notes.
Tech Tips: Bobby took center stage and gave a technical briefing with emphasis on MAC Command
Line Interface with Terminal. He provided background, illustrated how Terminal works and discussed
some of the advantages to using it, and noted “that sometimes you can’t do everything in a GUI”.
See link…
Bob Halloran reminded members of the Senior Learners, Inc., which regularly holds short courses at
the CF. These courses are open to anyone for a very nominal fee. Several of our OMUG members
have given courses and will do so during the Fall semester. Bob will be doing one in the fall semester
on everything you ever wanted to know about chocolate! To find out more information, or to register
just go on line to seniorlearners.org.
Al Sypher showed an example of a relatively new type of photo print, a metal print. The medium has
advantages over traditional prints in that it is uses dye-sublimation inks infused directly into specially
coated aluminum sheets, using high temperature and pressure. Images take on a bright, vibrant
quality, ready to hang— no framing is needed. Several national sources supply this type of print.
Raffle Results: l 50/50 $30 – Bobby Adams l Choice of Take Control E-Book selection –
Adele Bongiovanni & Tom Lee l Head Phones – Marilyn Kennedy.
Thanks once again to all those members who brought along refreshments, and to everyone who helped
to tidy up the meeting room.
Next meeting: Tuesday August 11 at 6:45 PM. Program: Online Live to OMUG as a virtual meeting
with David A Cox presenting All About iCloud and Dropbox.
Respectively submitted, Lorraine Wieskamp, Secretary
Disclaimer—
The Apple logo is the property of Apple, Inc. All tradenames, trademarks, and registered trademarks used herein are the property of their respective owners or companies. Content presented herein attributed to specific sources remains the property of the named sources. The information
presented in this newsletter is for the personal enlightenment of OMUG members and friends, does not constitute an endorsement, and shall not
to be used for commercial purposes. Reproduction of any material herein is expressly prohibited unless prior written permission is given by OMUG.
August 2015 | MUGSHOT Newsletter |
8