1
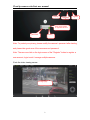
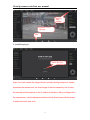
Cloud ip camera web client user manual
IP Camera
(HD Cloud Camera)
WEB Client User Manual
Note: To protect your privacy, please modify the camera’s password after landing
and Please keep the user name and password.
Manual Version:
Version
Time
Description
V1.0
May 30, 2013
/
V1.1
Sept 05, 2013
Strengthen the function of video program and client
background alarm notification
V1.2
Nov27,2013
Increase the account and single equipment management
password and RESET indication function
Cloud ip camera web client user manual
Contents
1.Introduction .................................................................................................................... 1
2.Install ............................................................................................................................... 1
2.1 Camera install and landing .............................................................................. 1
2.2 Wireless Installation Considerations............................................................... 4
3.Home............................................................................................................................... 6
3.1 Camera status .................................................................................................... 6
3.2 Account settings ................................................................................................ 7
3.3 Image settings and PTZ control ...................................................................... 8
3.4 Interface buttons ................................................................................................ 9
3.5 Playback............................................................................................................. 9
4.Information ................................................................................................................... 11
4.1 Alarm View Image Save as ............................................................................ 11
5. Management ............................................................................................................... 13
5.1 About ................................................................................................................. 13
5.2 Nickname .......................................................................................................... 13
5.3 Admin Password .............................................................................................. 14
5.4 Guest Password .............................................................................................. 15
5.5 Network ............................................................................................................. 16
5.6 OSD ................................................................................................................... 19
5.7 SD card: ............................................................................................................ 20
5.8 Camera alarm arming settings: .................................................................... 21
5.9 Sdheduled recording: ...................................................................................... 23
5.10 Date / Time: .................................................................................................... 23
5.11 System: ........................................................................................................... 24
5.12 Other:............................................................................................................... 26
6. Troubleshooting ......................................................................................................... 27
7. Wireless Infrastructure .............................................................................................. 35
8. Wireless Security ....................................................................................................... 40
Cloud ip camera web client user manual
1.Introduction
Thanks for your purchase of cloud camera. Cloud IP camera has a variety of
functions, dedicated to the office and home solutions. Unlike traditional IP
CAMERA, cloud camera easy to install, access to P2P technology, configurationfree, plug and play (no need to do port mapping settings, DNS, IP address
setting); through WIFI/3G remote monitoring, can be real-time control anywhere
under the network home, company or shop. Cloud IP Camera remote monitoring
smoothly, 720P HD. Cloud IP camera also has motion detection function, make it
complete, cost-effective for home and public places security solutions
2.Install
2.1 Camera install and landing
Step 1: Configure the network connection
Please refer to "Quick Installation Guide " to configure the network connection
Step two: Login
1: Open your browser ,http://www.mipcm.com/ , to enter the login screen, enter
the camera's ID number and password (each IPCAM have a unique ID number
and password).
1
Cloud ip camera web client user manual
languag
e
Download
e
register
Enter the ID number
or registered account
password
landing
Note: To protect your privacy, please modify the camera’s password after landing,
and please take good care of the username and password.
Note: The user can click on the login screen of the "Register" button to register a
user account, login to add / manage multiple cameras.
2:Into the video viewing screen.
ID login page
2
Cloud ip camera web client user manual
Select the
image
resolution
registered account
login page
play
3: Install the plug-in:
Install video plug
Note: If you have watch the image blurred, probably during transport or human
encounter the camera lens, the focal length of the lens caused by out of focus,
the user can put the camera on the 3 meters of reference, with your fingers turn
the camera lens, turn the adjustment back and forth a few times until the image
to watch the most clear as to.
3
Cloud ip camera web client user manual
2.2 Wireless Installation Considerations
Wireless Camera allows you in the wireless network coverage area to use
wireless connection to access the network. However, the wireless signals must
pass through walls, ceilings and other objects, thickness and location of limiting
its scope. Typical ranges vary, depending on your room or office types of
materials and RF (radio frequency) noise. Follow these basic guidelines is the
key to maximizing wireless range:
1. The routers and other network devices (such as your IP camera)
between the walls, ceilings minimize quantity- each wall or ceiling can
weaken road adapter 3-90 feet (1-30 meters) of the wireless transmission
range .
2. Please note that the straight-line distance between the devices. A 1.5 feet
thick (.5 meters) of the wall at a 45-degree angle appears to be almost 3
feet (1 meter) thick. In the 2-degree angle, the thickness of the wall will
reach 42 feet (14 meters). Put the machine straight through a wall or ceiling
(instead of at an angle) for better reception.
3. Building Materials make a difference. Metal door or aluminum studs may
weaken the wireless signal. The access points, wireless routers and other
networking devices where the signal passes through drywall or not open
doorways. Materials and objects such as glass, steel, metal, band insulator,
4
Cloud ip camera web client user manual
water (fish tanks), mirrors, file cabinets, brick, and concrete will degrade
your wireless signal.
4. Keep your product away from the electronic devices that generate RF noise
and appliances at least 3-6 feet or 1-2 meters from the outside position.
5. If you are using 2.4GHz cordless phones or other radio transmitting source
devices (such as microwave ovens), your wireless connection may degrade
dramatically or drop completely. Make sure your 2.4GHz phone base is as far
away from wireless devices. Even if the phone is not in use, the base will still
transmit signals.
5
Cloud ip camera web client user manual
3.Home
Registered users login, add the user to manage multiple cloud cameras.
2. add ID and
password
1. add online
cameras
3.1 Camera status
1.Here, you can see the online status of each camera. Online status for the
following categorie
• A green check indicates that your camera is online
and ready.
• Yellow means the camera online, but the
camera software upgrade or password has
been changed. You need to enter the new
password to access the camera again.
6
Cloud ip camera web client user manual
• Red indicates the camera is offline and is currently
not accessible remotely.
If the camera is off, try the following approach:
• Make sure the camera's network connection is normal.
• Try restarting your network router.
• Check the camera's cable connections, to ensure they are secure connection.
• Make sure the camera STATE2, the green light flashes flashing (every 3
seconds blinking 3).
If you still can not access your camera, restart the camera or long press the
RESET 5 seconds to restore the factory settings.
2.
3.
: Management the added cameras and add online cameras.
: Display and hide the status bar icons.
3.2 Account settings
7
Cloud ip camera web client user manual
1. Set video size: The user can choose the resolution of the images.
2. Password: The user can modify the administrator account(The visitors login
the account by administrator password can modify the information of the
account).
3. Guest Password: The user can modify the vistors account(The visitors login
the account by guest password can only watch and rotating screen, can't
modify the information of the account).
4. Exit: Exit Video Interface.
3.3 Image settings and PTZ control
1. Brightness / Contrast / Saturation / Sharpness: video images can adjust the
parameters of the corresponding
(Such as the right to adjust these parameters will result in poor image quality
display.
Not recommended for users of these parameters can be adjusted).
8
Cloud ip camera web client user manual
4.
: Click "Reset", you can right brightness / contrast / saturation / sharpness
Parameters to the factory default state.
5.
6.
: IPCAM can control PTZ up / down / left / right rotation.
: Display and hide the status bar icons.
3.4 Interface buttons
1.
2.
Video Play / Stop button: Click buttons to play the video image / stop.
Temporary manual recording button (the recorded file to micro SD
memory card): Click the buttons on the audio / video recording, recording icon
indicates
.NOTE: This video button function applies only to temporary
manual recording, when the user exits the monitor screen or click this record
button again, the recording will stop and saved to the micro SD card.
3. Snapshot button: Click the button for playing video capture pictures.Click the
inverted triangle button
, Optional camera image resolution (1280 *
720,640 * 360,320 * 180,160 * 90).
4.
Voice intercom: Click buttons, camera and computer microphone /
speakers are turned on, the two sides can conduct voice intercom, double-cross
between each other's voices can be heard.
3.5 Playback
SD card playback the recorded video file.
9
Cloud ip camera web client user manual
camera
list
video file
query
Play/Stop
1. Select the camera in the camera list.
2. In the image on the right , according to the time we can find more video files
and file details.
3. Inquiry, the progress will show the query to the length by color video file by
dragging with the mouse directly to optionally specify video playback
10
Cloud ip camera web client user manual
4.Information
4.1 Alarm View Image Save as
alarm
information
Open the
image
11
Cloud ip camera web client user manual
stored in PC
12
Cloud ip camera web client user manual
5. Management
This section of the camera configuration settings.
5.1 About
Basic information about the camera is displayed.
Model: The camera model.
Software Version: Camera current software version number.
Plug-in version: watch current video cameras plugin version number.
Device ID: camera ID.
5.2 Nickname
Modify the current camera name.
13
Cloud ip camera web client user manual
Nickname: The name of the camera, the user can modify the name of the
camera.
5.3 Admin Password
14
Cloud ip camera web client user manual
Admin Password: To modify the current camera, camcorder to enter the current
login password(When they leave the factory the default password is admin).
New Password: The user can Enter the current camera landing new admin
password.
(To protect your privacy, please modify the default password after landing and
Please keep the user name and password.)
Confirm new Password: Re-enter the current camera modified login password.
Click "Apply" to save your changes.
5.4 Guest Password
Admin Password: Enter the administrator password of the current camera.
Guest
Password: Visitors to the input current camera password(When they
leave the factory the default password is admin).
15
Cloud ip camera web client user manual
Confirm new Password: Re-enter the current camera modified login password.
Click "Apply" to save your changes.
5.5 Network
NIC: respectively, Ethernet (wired) and wireless networks.
1.
Ethernet:
Effective when connected to a wired network.
Start Status: Displays the current Ethernet
situation, enable / disable.
Mac Address: Displays the current Ethernet Mac
address.
Automatically obtain an IP address (cameras
16
Cloud ip camera web client user manual
default): When selected, the camera
automatically get to the router connected to it is automatically assigned to
Its associated IP address / gateway / subnet mask information.
Use the following IP Address: When checked, the user manually assign a
Static IP address / gateway / subnet mask to the camera.
Dns server address automatically exercised: When checked, the camera
Automatic access to the router connected to it is automatically assigned to
It's DNS information.
Use the following dns server address: When selected, the user
DNS manually assigned to the camera (users generally do not set)
2.
Wireless Network: (wireless network configuration)
Select the wireless network card
after.
Wireless Mode: Hot / Terminal
Choose
WI-FI
A.Hot spots: As is searching for
devices, network cameras
The default mode is a wireless
hotspot, wireless devices can be
Wireless search to the camera,
point to point connection.
17
Cloud ip camera web client user manual
B.Termination: As is searching for devices, enabling network
Camera with WIFI router.
Note: After setting a good WIFI
click Apply, WIFI
Choose
Client
Surface does not immediately
refresh the page information, the
user wants to quit
"Network", and then enter, you can see no
Line connection status display:
After a successful connection, IP
choose
router
Address and gateway information
will get to.
Meanwhile STATE1 green light in
front of network cameras
Lights
flashing
every
three
seconds three times.
18
Cloud ip camera web client user manual
5.6 OSD
Image screen display menu settings.
Display text: When checked, the upper left corner of the screen displays the
name of the camera. The user can modify the display name of the camera (Can
not have Chinese and symbols, only English and Allah Bai figures).
Display date: checked, upper left corner of the screen will display the date.
Date format: The user can select Year / Month / Day or Month / Day / Year two
date formats.
Display time: When checked, the screen will display the time left.
Time format: User selectable 24-hour or 12-hour clock.
19
Cloud ip camera web client user manual
Display week: When checked, the screen will display weeks left.
Click Apply to save your changes
5.7 SD card:
Display Camera SD card status.
Format: The Micro SD (T-FLASH) card is formatted, the existing micro SD card
contents will be cleared.
Unmount: If "Playback" video see video file or view the alarm information can not,
it can be repaired on the micro SD card. (Note: The repair function may cause
some of the micro SD card contents being lost)
Uninstall: put micro SD card from the camera release
Click Apply to save your changes.
20
Cloud ip camera web client user manual
5.8 Camera alarm arming settings:
Adjust the
sensitivity
Apply
I / O alarm input: corresponding alarm input port to connect an external alarm
sensor (such as door sensor, infrared, smoke alarm detector, etc.) must be a
normally open alarm probes. When alarm occurs, the probe switch is closed,
network cameras generate alarm triggers, and functions according to user-set
alarm;
I / O Alarm output: Alarm output port corresponding external alarm devices (such
as alarm loudspeakers, sound and light alarm equipment, etc.) must be a
normally open type, when an event has occurred, the user sets the Alarm I / O
port output , camera alarm output switch is closed, trigger external alarm devices
work;
21
Cloud ip camera web client user manual
Motion detection sensitivity: Set the sensitivity of motion detection, the greater
the value the higher the sensitivity, the relative probability of false alarms
generated by the larger, generally use the default values, the user may also need
to set up their own sensitivity.
Choose motion
Take photo
I/O on/off
Pre - recorded
time
Alarm on
22
Apply
Cloud ip camera web client user manual
5.9 Sdheduled recording:
In this option you can choose the 7× 24 hour video or sdheduled recording.
5.10 Date / Time:
23
Cloud ip camera web client user manual
Time Server: Users can manually enter in the online search to fill the local
country time zone server address (the system default time server address is
China time server address).
Sync
data&time
automatically:
Open,
the
camcorder
will
automatically
synchronize the time displayed on the address bar time server address
corresponding time.
Time zone: Users can choose the time zone of the camera.
Date: In the "time server automatically" turned off, users can manually modify the
camcorder displays the date.
Time: In the "time server automatically" turned off, users can manually modify the
camera is displayed.
Click Apply to save your changes.
5.11 System:
24
Cloud ip camera web client user manual
Online Upgrade: If you have the latest software, here are tips <Update> click
update, the camera will be online software upgrade, the upgrade is successful,
will be prompted to reboot the camera.
Restore the factory settings: The user
can click the "Restore" button, will pop up
on the right
Diagram tips. When the "Save network
device" checked, the point is determined,
in addition to
Network setup parameters retained, the other parameters are restored to the
factory settings back;
When the "Save Network Device" is not checked, the point is determined, all
camera parameters
Few are restored to factory settings back, equivalent to press the RESET button
for 5 seconds the camera.
Reboot: Click the reset button after the restart of the camera.
Note: when press the RESET button about 5 seconds, the STATE2 lights will be
kept flashing, the successful reduction.
25
Cloud ip camera web client user manual
5.12 Other:
Audio:
Speaker: Set the size of the camera's speaker sound, use the mouse to drag the
slider to set, the greater the value, the greater the sound from the speaker.
Mac: Sets the camera microphone sensitivity, drag the slider with the mouse
settings, the greater the value, the more sensitive the microphone receiving
sound external environment more, the computer listens to the voice of the larger
end, the corresponding listening to ambient noise is greater.
Flip: Check to take effect.For machine upside down by loading.
Power Frequency: 50Hz and 60Hz with two frequencies selected, the user
machine installation area under power frequency to choose.
Click Apply to save your changes.
26
Cloud ip camera web client user manual
6. Troubleshooting
This chapter provides installation and operation of the IP CAMERA problems
that may occur during provide solutions.
If you encounter problems, please read the following description. (The following
examples in Windows ® Vista ™ and XP as the basis for explanation, if you are
using a different operating system, your computer screen similar to the following
examples.)
1). What is Remote Access? How do I enable?
Via remote access, you can use a web browser to connect to the Internet from a
PC to access the camera. So even if you are not at home, you can also watch
the camera images and to manage the camera's settings.
To enable remote access, simply follow the Quick Install Wizard can operate.
If you do not connect the camera, make sure the following items:
....STATE2 on the camera flashing green LED is green (flashing every three
seconds under 3).
....Internet connection is working properly
... The router's LAN & WAN connection is working properly.
... Router has UPnP enabled and DHCP server.
... Routers can get public IP.
27
Cloud ip camera web client user manual
... Router has been upgraded to the latest firmware version.
... You can try the machine up and running, based on long press machine base
RESET button hole 6 seconds to restore the machine
Factory tune settings.
... You have already tried by unplugging the power supply and then reconnect
the way to restart the router
Checking the above items, you can login again.
2). Why is the camera's network connection unreliable?
Network cable may be a problem. To determine whether the cable is working,
you can PING the address of a known device on the network. If the cable is
properly connected and your network connection is working, you should receive
similar (bytes = 32 time = 2 ms) that reply.
Another possibility is that the network camera uses network devices such as
hubs or switches, there is a problem. Make sure that all devices are connected to
the power good and working properly.
3). Why remote landing camera, showing the camera is not online?
This may be caused by the firewall protection (such as MAC address filtering,
MAC address with the IP address binding), and your system administrator to
check network firewall. Firewall may need to make some configuration changes
28
Cloud ip camera web client user manual
to your local LAN from external access network cameras. For more information,
refer to the camera is installed behind a router relevant sections.
Ensure STATE1 (wireless status indication) or STATE2 (wired status indication)
is a green light flash 3 times every 3 seconds.
The default router setting might be the problem. Necessary to ensure that the
router's DHCP server is enabled.
If multi-level router, the connection between the router through the WAN port to
connect (such as a router out of the network from the LAN port to connect to
two routing WAN port), if you still can not solve, try the machine up and running
based on long press machine base RESET button hole 6 seconds, adjust the
machine to restore the factory settings or to the machine on again to restart.
4). Why is the image there are some vertical white lines?
There may be a CMOS sensor being exposed to strong light (such as direct
exposure to sunlight or halogen light) and a result of overloading. CMOS sensor
is located on the rear of the lens, its role is to measure the optical signal and
converts it to a digital format, so that the computer will format the numbers
presented to the user in the form of images. If the CMOS sensor is a long time
in bright light, the network camera can not be transferred to a dark area
immediately to avoid damage to CMOS sensors. .
5). Camera image appears blurred, how to solve?
29
Cloud ip camera web client user manual
If the network camera in very dark place to work, the video image may become
blurred.It may be the camera lens does not focus on the good, please put the
camera at an object 3 meters, turn the lens slowly by hand repeatedly adjusted
until the image is the sharpest. Another is to use a computer in a browser to
view the 640X360 image (on the computer, in fact, the image has been
enlarged 640X360).
6). Image quality is poor, how can we improve the image quality?
Network Camera image display is not configured correctly. Through the Web
Management Web configuration video interface, you can adjust the parameters
to improve image quality (eg: brightness, contrast, color saturation).
7). Why no images on a Web browser?
ActiveX may not be enabled. If you are using Internet Explorer to view an image,
make sure that the Internet Options menu to enable the ActiveX. You may also
need to modify the browser's security settings to allow ActiveX plugin installed.
If you are using Internet Explorer versions earlier than 7.0, you need to upgrade
your Web browser so that you can watch the network camera to send video.
30
Cloud ip camera web client user manual
8). Troubleshooting, LED status indication:
Indicator
LED
Status Description
Troubleshooting
status
POWER
(power
indicator)
Red light
Power
supply
is
normal
If light is not lit, check the power
supply is damaged or the camera
Normally on
hardware failure, requiring repair.
Wifi was disabled by
1.Press RESET for 5 seconds to
the user or wifi
restore the factory settings.
hardware failure
2.Make camera with wired Ethernet
connection, after landing, in the
OFF
"Manage" -> "Network" ,make WIFI
enabled;
3. Camera hardware failure, requiring
repair.
WIFI router is trying
1. Verify WIFI router is good;
to connect
2.Try
camera
placed
from
somewhere near WIFI router and
Red light
STATE1/STA1
the
then reconnect the power.
Normally on
3. Restart WIFI routers and cameras;
(Wireless WIFI
4. Camera hardware failure, requiring
Indicator)
repair.
Is connected to the
1.Please make sure your router's
Red
router, is trying to
DHCP server is enabled.
Flashing 2
obtain an IP address
2. Try to restart the router.
through DHCP
3. Manually assign a WIFI router to
times
the same gateway IP address.
Red light
flashing 3
times
Ip address has been
1.Confirm the router is good.
obtained or the user
2. Camera hardware failure, requiring
to configure a static ip
repair.
address, is trying to
communicate with the
gateway
31
Cloud ip camera web client user manual
And
gateway
communication
Green
is
1. User can check whether the
network can access the Internet.
normal, is trying to
2.Check
whether
there
are
two
communicate with the
routers connected (first level router
internet
network cable will need to receive a
second-class router's WAN port on
light
the job).
Normally on
3. Try the camera placed from
somewhere near WIFI router and
then reconnect the power.
4. Check the router is turned on the
firewall to do MAC address filtering.
Green
flashing 2
Internet traffic is
1.Restart the machine or the machine
normal, is trying to
on again to restart.
communicate with the
2.Try running the camera, based
cloud server
on the press camera base
RESET button hole 6 seconds,
times
set the camera to restore the
factory tune.
Normal
Normal
Green
communication with
light
the cloud server, you
flashes 3
times
can access the
camera via cloud
services
Red \
green
lights flash
alternately
Wifi for adhoc mode
References << Cloud Camera Quick
(wifi did not configure
Installation Guide. >>
the router / router
connection failed /
DHCP fails to enter
this mode), you can
wifi terminal (mobile
phone / pad /
notebook computers)
32
Cloud ip camera web client user manual
connected to the
wireless network, and
then access the
camera through
192.168.188.254.
OFF
Ethernet is disabled
1. Users press RESET 5 seconds to
by the user or the
restore the factory settings.
network cable is not
2. Check \ replace the camera and
connected
connect the network cable between
or
Ethernet
card
hardware failure
the router.
3. Camera hardware failure, requiring
repair.
Network
connected,
Red light
cable
is
1. Please make sure your routers
the
IP
DHCP server is enabled.
address is obtained
2. Try to restart the router.
3. Manually assign a letter to the
STATE2/STA2
Ethernet IP address of the router the
(RJ45 wired
same gateway.
network
Ip address has been
1. Confirm whether the router is good.
instructions)
obtained or the user
2. Camera hardware failure, requiring
Flashing
to configure a static ip
repair.
red
address, is trying to
communicate with the
gateway
And
gateway
communication
Green
light
is
1. The user to check whether the
network can access the Internet.
normal, is trying to
2. Check whether there are two
communicate with the
routers connected (first level router
internet
network cable will need to receive a
second-class router's WAN port on
the job).
33
Cloud ip camera web client user manual
3. Check the router is turned on the
firewall to do MAC address filtering.
Green
flashing 2
Internet traffic is
1.Restart the machine or the machine
normal, is trying to
on again to restart.
communicate with the
2.Try running the machine,
cloud server
based on the press machine
base RESET button hole 6
Next
seconds, set the machine to
restore the factory tune.
Normal
正常 Normal
Green
communication with
light
the cloud server, you
flashes 3
Next
can access the
camera via cloud
services
DHCP fails, use a
References << >> Cloud Camera
temporary ip address
Quick Installation Guide.
192.168.187.254,
Red \
green
lights flash
alternately
Users can access the
same computer and
webcam LAN, set
different segments ip
(192.168.187.xxx),
and then access the
camera through
192.168.187.254
34
Cloud ip camera web client user manual
7. Wireless Infrastructure
IP CAMERA wireless products are based on industry standards for your home,
business or public access wireless networks to provide easy and compatible
high-speed wireless connection. IP CAMERA strictly follow the IEEE standard,
all wireless family of products will allow you to securely access the data you
need. You will be able to enjoy the freedom that wireless networking delivers.
Wireless LAN (WLAN) is a wireless signal instead of wires to transmit and
receive data in a computer network unit. WLAN are used increasingly in both
home and office environments, such as airports, coffee shops and universities,
public places. Innovative ways to utilize WLAN technology are helping people to
work and communicate more effectively. Without a cable connection and other
fixed infrastructure, and better mobility has for many users with more
convenience.
In many environments, the mobile network devices to link to a conventional
Ethernet LAN in order to use a wired LAN servers, printers or an Internet
connection. Wireless Router is a device used to provide this link.
What is wireless?
Wireless or
WiFi
technology is without using wires to connect your
computer to the network in a way. WiFi uses radio frequency to connect
35
Cloud ip camera web client user manual
wirelessly, so you can be in your home or office network from anywhere in
the freedom to connect computers.
Why buy IPC1 wireless devices?
IPC1 is a leading global real remote monitoring using smartphones for both
smooth video network camera products, and access to real P2P technology.
IPC1 products at reasonable prices, and has excellent performance.
Wi-Fi is how to work?
Wi-Fi and cordless phones work similar, through radio signals to transmit
data from point A to point B. But wireless technology you how to access
the network has some limitations. You must be within range of a wireless
network, you can connect to your computer. Wireless network is divided
into two different types of wireless local area network (WLAN) and
wireless personal area network (WPAN).
Wireless LAN (WLAN)
In a wireless local area network, the access point (AP) as the computer
to the network device. The access point has a small antenna, can
transmit data back and forth over radio signals. As shown by an indoor
access point, the signal can travel up to 300 feet away. In the outdoor
access point the signal can reach as far as 30 miles, can be used, such
36
Cloud ip camera web client user manual
as factory floors, industrial locations, college and high school campuses,
airports, golf courses, as well as many outdoor occasions.
What people suitable for wireless network?
Wireless network technology in recent years more and more popular,
almost everyone is using it, whether for home, office and business.
Household
• To everyone at home broadband access
• browse the web, check email, instant messaging, etc.
• No connection cables around the room
• Simple and easy to operate
SOHO (Small Office and Home Office)
• you are at home as in the office will be placed in your hands everything
• Remote access from home, your office e
• with multiple computers to share an Internet connection and a printer
• No dedicated office space
Wireless networks used in any place?
Not limited to the home and office, wireless technology is extended to every
corner. People like the freedom of mobility, so the wireless network is
becoming increasingly popular, more and more public places started to
37
Cloud ip camera web client user manual
provide wireless access to attract people. The wireless connection in public
places is usually called "hotspots."
By using your laptop on a wireless network card, you can in distant places
such as: airports, hotels, coffee shops, libraries, restaurants and
conference center using wireless networks.
Wireless networks are easy to install, and if this is your first installation, you
need to work hard to understand where to start begins. That's why we want
to provide some of the installation steps and tips to help you complete the
wireless network installation process.
Prompted
When you install a wireless network, please note the following:
Your router or access point at the center
Sure you place the router / access point on the network's central location to
get the best results. Try to place the router / access point placed in the
highest point of the room, so the signal can be distributed to your room. If
your home is a two-story building, you need to install a repeater to boost
the signal to extend coverage.
38
Cloud ip camera web client user manual
Eliminate interference
Place home appliances such as cordless telephones, microwaves, and
televisions away from the router / access point as far away. This will greatly
reduce the electrical work at the same frequency interference caused.
Safe
Prevent your next door neighbors or intruders connect to your wireless network.
By turning on the router WPA or WEP security features to protect your wireless
network. Please refer to the product manual for more information on this feature
set.
39
Cloud ip camera web client user manual
8. Wireless Security
This section introduces you to the different levels of security to protect your data
from intruders. .
IPCAM provides the following security types:
•
WPA-PSK (pre-shared key)
•
WEP (Wired Equivalent Privacy)
What is WEP?
WEP is Wired Equivalent Privacy. It is based on the IEEE 802.11 standard
and uses the RC4 encryption algorithm. WEP on your wireless network
through data encryption to provide security so that it can protect from one
wireless device to another wireless device secure transmission.
To access a WEP network, you must know the key. Key is when you create a
string. When using WEP, you must specify the level of encryption. Type of
encryption determines the key length.128-bit encryption requires a longer key
than 64.Key from the input HEX (16 hex -0-9, AF) or ASCII (American Standard
Code for Information Interchange - alphanumeric characters) format string
definition. ASCII format allows you to enter a string of easy to remember. ASCII
string is transmitted on the network when using converted into HEX. Four keys
can be defined, which you can easily change the primary key.
40
Cloud ip camera web client user manual
What is WPA?
WPA, or Wi-Fi Protected Access is a Wi-Fi standard, designed to improve WEP
(Wired Equivalent Privacy) security features.
There are two major improvements over WEP:
Through the Temporal Key Integrity Protocol (TKIP) to improve data
encryption. TKIP scrambles the keys using a hash algorithm, by adding
an integrity-checking feature, ensures that the keys have not been
tampered with.WPA2 is based on 802.11i, using the Advanced
Encryption Standard (AES) instead of TKIP.
Through the Extensible Authentication Protocol (EAP) for user
authentication, usually missing in WEP.WEP computer-based hardware
MAC address to restrict access to wireless networks, relatively easy to be
sniffed out and stolen. EAP is built on a more secure public key encryption
system to ensure that only authorized network users can access the
network.
WPA-PSK/WPA2-PSK uses a passphrase or key to authenticate your wireless
connection. Key is an alpha-numeric password between 8 and 63 characters
long. Password can include symbols And spaces. This key must be your wireless
router or access point, enter the same key.
41
Cloud ip camera web client user manual
Complete the Quick Setup Guide IP CAMERA After installation, you can use the
assigned IP address of the camera. Because you and one or more shared
network PC via a router, so assigned to the network camera's IP address is a
local IP address .At this point you can see the camera's local network, configure
the router to allow remote viewing of the camera from the network before you
can view it from the network
42