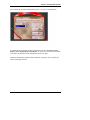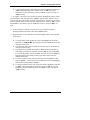
1
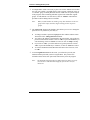
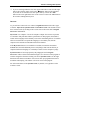
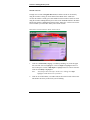
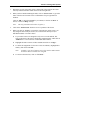
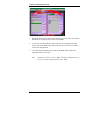
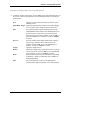
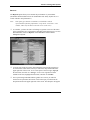
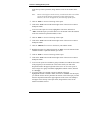
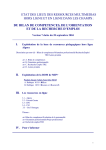
English Discoveries
Version 2.1
Teacher’s Management
System
English
Table of Contents
Table of Contents
OVERVIEW ...................................... 4
CLASS LIST..................................... 6
LESSONS ....................................... 9
TEACHER LESSONS .......................................................................................... 10
PREPARING A TEACHER LESSON: BASIC INSTRUCTIONS ................................. 10
PREPARING A TEACHER LESSON: ADVANCED INSTRUCTIONS ......................... 13
REPORTS ...................................... 15
COMPREHENSIVE
SITE REPORT
........................ 17
APPENDIX A: ADDING USERS IN A CLASS AND TESTING THE PROGRAM
.. 19
3
Teacher’s Management System
OVERVIEW
Note: The Teacher’s Management System is available only with
the multi-user installation of English Discoveries Version 2.0 .
Important: Do not make changes ( Add, Delete, Edit, Add-to, etc.) to
the Teacher’s Management System whilst students are using the
program.
The Teacher’s Management System is a special feature of the multi-user version of
English Discoveries Version 2.0. The Teacher’s Management System allows you to
monitor and direct your students’ work on the program.
If your institution has installed the “multi-user” version of English Discoveries, a
separate icon called “Teacher’s Management” will appear alongside the icons for
each module in the English Discoveries group on your screen. To utilize the
Teacher’s Management System, double-click on this icon.
) A default password to enter the system has been set. It is “m.”
♦
♦
Type in the password.
Click on “OK” or press the ENTER key to enter the password, or click on
“Cancel” to cancel.
Note: When you type in the password, an asterisk appears on the screen in
place of the letter.
) We recommend that you change this password to something agreed on by all the
teachers in your institution who will be using the system.
♦ To change the password, click on “Change Password.”
♦ Enter the old password in the top window and the new password in the
bottom window.
♦ Click on “OK” or press the ENTER key to enter the password, or click on
“Cancel” to cancel.
♦ Following the instructions, re-enter the new password.
♦ Click on “OK” or press the ENTER key to continue, or click on “Cancel”
to cancel.
Note: When you type in the password, an asterisk appears on the screen for each
letter.
4
Teacher’s Management System
After entering the Teacher’s Management System, you will see its Main Menu.
The Main Menu presents the following management options: Class List, Lessons
Reports, and a Comprehensive Site Report. To select one, first choose the module
you require and then click on the management option you desire.
Within the management options, buttons with black writing are active, and buttons
with red writing are inactive.
5
Teacher’s Management System
CLASS LIST
As its name suggests, this function of the Teacher’s Management System allows you
to enter the names of all your classes that are using the program, and list the students
in each one.
) Enter the names of your classes using the table on the left side of the screen.
♦
♦
♦
♦
6
To enter the name of a class (using the table on the left side of the screen),
type in the name for that class in the small window on the left side (e.g.,
“Class 1,” “Red” or any other suitable identifier).
To actually register this new class name in the computer, click on “Add.”
Click on “New” if you want to clear the window for typing.
To delete a class name from your list of classes, click on it to highlight it,
and then click on “Delete.” You may delete more than one class at a time.
Simply highlight the classes you wish to delete, and then click on “Delete.”
Teacher’s Management System
♦
To change a class name, click on the class name to highlight it and click on
“Edit.” Change the name in the window. Click on “OK” or press the
ENTER key to enter the change, click on “Cancel” to cancel, or click on
“Help” for help.
) To register your classes for more than one module, highlight the class or classes
you would like to add, and click on the “Add To” button. In the “Add To” screen,
click on each one of the modules to which you would like to add the class or classes.
You may add the classes to more than one module at a time. Click on “OK” or press
the ENTER key to continue, click on “Cancel” to cancel, or click on “Help” for
help.
) If you would like a printout of a class list, or several class lists together,
including students’ passwords, click on the “Print” button.
) Enter the names of your students for each class using the table on the right side
of the screen.
♦
♦
♦
♦
♦
To list the names of the students in a class, first highlight the class name,
then click on “Students Æ.” This will take you to the Students table on the
right side of the screen.
To begin a list, either click on “New” or move the cursor to the window in
which you will be typing.
Type the name of a student, then click on “Add.” Enter the password for
each student you add to the class list. Click on “OK” or press the ENTER
key to enter the change, click on “Cancel” to cancel, or click on “Help” for
help. Repeat this process until you have typed in the names of all the
students in that class.
To delete a student’s name from your class list, click to highlight it, then
click on “Delete.” You can delete several students at once, by highlighting
on their names and clicking on “Delete.”
To change a student’s name, click on the class name to highlight it and click
on “Edit.” Change the name in the window. Click on “OK” or press the
ENTER key to enter the change, click on “Cancel” to cancel, or click on
“Help” for help.
7
Teacher’s Management System
) You might find it useful or necessary to place one or more students in more than
one class. For example, you might want to create a special “advanced” group, or
a “remedial” group, in which particular learners would focus on specific aspects
of the program, while continuing with their regular work within their original
groups. To add students to several classes, click on “Add To” and follow the
procedure used for adding classes to modules.
Note:
When you add students to another group, their databases in the new
group will be empty until they begin working in their respective
groups.
) The “Passwords” button in the Students’ table allows you to view or change the
password of every student in your class(es).
♦
♦
♦
♦
To change a student’s password, highlight the line with the student’s name.
Then click on the “Change Password” button.
You will see the student’s old password in the top window. Type in the new
password in the bottom window. Click on “OK” or press the ENTER key to
enter the change, click on “Cancel” to cancel, or click on “Help” for help.
If you click on “OK,” you will be asked to retype the password. Click on
“OK” or press the ENTER key to continue, or click on “Cancel” to cancel.
To exit the Student Passwords Window and return to the Class List, click
on “OK.”
) To enter English Discoveries the first time, you will need to provide your
students with the passwords you have assigned them. They will need to
remember and use these same passwords each time they enter the program.
Note:
8
The maximum length possible for student and class names is twenty
(20) characters. The maximum length for passwords is ten (10)
characters.
Teacher’s Management System
) If you are working within the Class List option and wish to return from the right
table to the left table, simply click on the “Å
ÅClasses” button in the right table.
If you wish to exit from the Class List option entirely, click on the “Exit”
button in the lower right-hand corner of the screen to return to the Main Menu of
the Teacher’s Management System.
LESSONS
As you will have learnt in the User Manual, English Discoveries offers three types
of lessons: My Lesson, System Lessons and Teacher Lessons. The student accesses
these various lessons by clicking on the Lessons icon on the lower shelf of English
Discoveries’ Main Menu.
My Lesson is an “adaptive” lesson: the computer “adapts” the activities it presents
to a student to that particular student’s performance. In this program, the student’s
results on the Language and Vocabulary tests are the determining factors. If a student
achieves less than 60% on a particular Language or Vocabulary test, then the
computer will construct an individualized lesson for him/her.
If the My Lesson feature is not available to a student, it means that the student
EITHER does not need additional practice in anything at that time OR has not yet
completed sufficient Language or Vocabulary activities for the computer to judge.
System Lessons are lessons prepared by the pedagogical staff of English
Discoveries. These lessons lead students through a set of activities in the program in
an order designed to maximize learning. The list of System Lessons is on the right
hand side of the main Lesson Menu. You can use these pre-programmed lessons to
streamline and simplify your students’ self-access work on the program.
For full content details of the System Lessons, by module, see Appendix 8 in the
Teachers’ Guide.
9
Teacher’s Management System
TEACHER LESSONS
In single-user versions of English Discoveries, Teacher Lessons can be made by
using the Teacher’s Utility pen on the main Lesson Menu. In the “multi-user”
version, this Teacher’s Utility pen is unavailable because Teacher Lessons are made
using the Teacher’s Management System. Click on the “Lessons” button in the Main
Menu of the Teacher’s Management System in the “multi-user” version to access the
screen in which you will work to make your Teacher Lessons.
PREPARING A TEACHER LESSON: BASIC INSTRUCTIONS
1.
Click on a skill Section (Language, Vocabulary, Reading, etc.) from the upper
left side of the screen to highlight it. Click on a Topic to highlight it and see a
list of sub-topics. Click on a Sub-Topic to highlight it and see a list of activities.
Click on an Activity to highlight it.
Note:
2.
10
Not all topics have sub-topics. In this case, clicking on a Topic
highlights it and shows a list of activities.
Click on one of the buttons (1-8) under Tasks at the lower left side of the screen.
This defines an activity in the lesson you are building.
Teacher’s Management System
3.
Repeat the previous steps until you have defined all of the tasks for the lesson.
You may build lessons that contain between one and eight tasks.
4.
When you have finished defining the tasks, click on “Save Lesson.” Type in the
name of the lesson. The name can be a combination of up to eight letters or
numbers.
Click on “OK” or press the ENTER key to continue, or click on “Cancel” to
cancel, or click on “Help” for help.
Note:
The only punctuation allowed is a hyphen (-).
5.
Click on the “Print Lesson” button to receive a printout of the lesson.
6.
When you click on “Assign,” you enter the Assign Screen. In this screen, you
may assign the last lesson you created, or several lessons already saved, to
individual students or to entire classes.
♦
If you wish a lesson to be assigned to only one or several students, first
click on the name of the class to which these students belong. Then click on
“Students Æ” to access the list of individual student names.
♦
Highlight the name or names of those students and click on “Assign.”
♦
To delete the assignment of a lesson to a class or student(s), highlight their
name(s), then click on “Undo.”
Note:
♦
A number sign (#) will appear next to class and/or student names
to indicate that a lesson has been assigned.
To return to the class lists, click on “ÅClasses.”
11
Teacher’s Management System
7.
Repeat the above steps to build as many lessons as you wish. There is no limit to
the number of lessons you can create for each module.
8.
To see a list of all the students or classes that have been assigned a particular
lesson, click on the “List” button at the bottom of the screen. Click on “OK” to
return to the Assign Screen.
9.
To exit the Lesson-building Screen, click on the “Exit” button in the lower
right-hand corner of the screen.
Note:
12
To build a new lesson, click on “File” in the upper left-hand corner of
the screen. A menu will drop down. Choose “New.”
Teacher’s Management System
PREPARING A TEACHER LESSON: ADVANCED INSTRUCTIONS
) To manage Teacher Lesson files, click on “File” in the upper left-hand corner of
the screen. A menu will drop down. You can manage the files by selecting one
of the options:
Opens a new lesson file and returns you to the Lessonbuilding Screen.
Open/Mult. Assign Opens an existing lesson to enable you to make changes
to it, or enables you to assign several lessons at once.
Saves the lesson that is open. (Works the same as the
Save
“Save Lesson” button in the Lesson-building Screen.) If
the open lesson is a new lesson, you need to type the
name of the lesson file in the window. Click on “OK” or
press the ENTER key to continue, or click on “Cancel”
to cancel.
Saves an existing lesson under another name (rename a
Save As...
lesson). Type in the new name of the lesson in the
window. Click on “OK” or press the ENTER key to
continue, or click on “Cancel” to cancel.
Opens the Assign Screen.
Assign...
Deletes an existing lesson. Click on the lesson or lessons
Delete...
you want to delete. Click on “OK” or press the ENTER
key to continue, or click on “Cancel” to cancel.
Prints the lesson plan. For more information on printing
Print...
in Windows, consult your Windows User’s Manual or
Print Manager Help.
Exits to the previous screen or to the Main Menu.
Exit
Clicking on this button repeatedly will exit the program.
New
13
Teacher’s Management System
) It is possible to modify existing lessons by clearing tasks.
♦
♦
♦
♦
To modify an existing lesson, open the lesson by clicking on “File” and
then “Open.”
Click on the name of the lesson you want to open. Click on “OK” or press
the ENTER key to continue, or click on “Cancel” to cancel, or click on
“Help” for help.
Click on “Edit," on the menu bar. The command “Clear task...” will drop
down. Click on it.
Enter the number of the task you want to remove from the lesson, and click
on “OK." Click on “OK” or press the ENTER key to continue, or click on
“Cancel” to cancel, or click on “Help” for help.
) It is also possible to perform several of these options by double-clicking on
different places on the screen.
♦
♦
♦
Open a lesson file, or assign multiple lessons, double-click on the word
“Tasks” on the Assign Screen
Edit a lesson and delete a task, double-click on the specific task you wish to
delete;
Save a lesson file, double-click on the lesson name bar at the top of the
screen.
Note:
14
If you click on “Exit“ before you have saved a lesson, the computer
will prompt you by asking “Do you want to save this lesson?” You
then have the option of clicking on “Yes,” “No,” or “Cancel.”
Click on “Yes” to save the lesson by name.
Click on “No” to exit the Lesson-building Screen without saving the
lesson and return to the Main Menu.
Click on “Cancel” to return to the Lesson-building Screen.
Teacher’s Management System
REPORTS
The Reports option allows you to monitor the performance of your students.
(Remember that the student can use the “Student Records” utility anytime to see a
record of his/her own performance.)
Note:
This option gives him/her a cumulative, red and blue-colored
representation of his/her performance, except in the “Local Test” score
window, where only the most recent Test score can be seen.)
) As a teacher, you have the choice of looking at a general overview of the entire
class’s performance or at each student’s individual work and progress. To access
this information, click on “Reports” in the Main Menu of the Teacher’s
Management System.
) To access test reports for a class, first indicate the section of the program you
are interested in. Click on the section you want in the drop-down menu in the
upper right side of the screen. To see a test report of class averages, highlight
the class name, and click on “Average.” To see a list of grades for all the
students in the class, highlight the class name, and click on “Grades.”
) For a report listing individual student’s grades for a section, you will also
need to select a particular sub-section. Click on the topic you want from the
drop-down menu in the upper right side of the screen. The subtopics will appear
15
Teacher’s Management System
across the top of the report table, along with the scores for the students in the
class.
Note:
Due to a lack of space on the screen, you will not be able to see all the
scores for all the items in a particular section of the program.
However, all scores will appear on your hard copy of the report.
) Click on “Print” to receive a hard copy of the report.
) Click on the “Exit” button in the bottom right corner of the screen to return to
the Reports Menu.
) To access a time report for a class, highlight the class name, and click on
“Time.” With this report you will be able to see the amount of time the students
in the class worked in a particular module, to date.
) Click on “Print” to receive a hard copy of this report.
) Click on the “Exit” button in the bottom right corner of the screen to return to
the Reports Menu.
) Click on “Students Æ” to move to the lists of your students’ names.
) Highlight the name of a student, then click on “Time” to see the amount of time
a student worked in a particular module, per session.
) Click on “Print” to receive a hard copy of this report.
) Click on the “Exit” button in the bottom right corner of the screen to return to
the Reports Menu.
) To access test reports for a student or group of students, first indicate the section
)
16
of the program you are interested in. Click on the section you want in the
drop-down menu in the upper right side of the screen. To see a test report of
class averages for a group of students, highlight the students’ names, and click
on “Average.”
To see the grades for a student or group of students in the class,
highlight the student or students’ names, and click on “Grades.” For this report,
you will also need to select a particular sub-section. Click on the topic you want
from the drop-down menu in the upper right side of the screen. The subtopics
will appear across the top of the report table, along with the scores for the
student or students selected.
Teacher’s Management System
) Click on “Print” to receive a hard copy of the students’ reports and exercises
and tests.
) Click on the “Exit” button to return to the Reports Menu. If you wish to return
to the list of classes, just click on “ÅClasses.”
COMPREHENSIVE
SITE REPORT
The Comprehensive Site Report enables you to generate an accumulative report for
the whole school (all modules, classes, students, and activities) with the option to set
a date span with a mouse click.
To generate a comprehensive site report:
1.
Click on the Comprehensive Site Report icon in the main menu; the following
screen appears:
17
Teacher’s Management System
2.
Check the All Dates box to generate a report for the entire period, or check
Enter dates and set a time range for the comprehensive report.
You must use the European format of dd/mm/yyyy when selecting time range
for the report.
3.
4.
5.
Click OK.
A Save dialog box appears on the screen. The file is saved in the default format
year/month/day as a text file. You can change the name and path of the file.
Click OK.
The file is saved. This may take time according to the number of students in the
database. A Global School Report icon is generated in the start menu. Each time
you click on this icon, the most recently generated report can be viewed.
You can now open the report in a spreadsheet and perform calculations as desired.
18
Teacher’s Management System
APPENDIX A:
ADDING USERS
IN A CLASS AND TESTING THE PROGRAM
1.
English Discoveries does not have a generic guest login. At times it may be
desirable to allow people to log into the program without registering them by
name (training, vistors, etc.). These instructions will assist you in creating visitor
accounts and a useful logon presentation for users.
2.
Launch the Teacher’s Management program. Enter the default password, which
is the letter “m”. You may change the password if you wish.
English Discoveries is not a single unified program. Each module is a program in its
own right
3.
Whenever you work in the TMS, you are working in a particular module. By
default, the TMS will have chosen the lowest level module that you have
installed. Check the drop down list, labeled module to familiarize yourself with
this part of the program.
4.
Click on Classes. Students can only be registered in the system as part of a class.
5.
You will now create a class named CLASS?. Click in the blank for classes,
press the space bar twice, then type CLASS?. The reason for this will be
obvious to you when you logon to a module.
Click ADD to enter this class.
Click new, press the space bar once, then type Guest. Click ADD.
6.
Highlight the Guest class by clicking on it, then click on the Students button.
You will now move to the right side of the screen, to enter students in the class
Guest.
7.
Enter the first student by clicking in the blank and pressing the space bar once,
then type COMPUTER. Click ADD and when asked for the password, type
xxxxxxxx. Click enter.
19
Teacher’s Management System
8.
If the student computers are not numbered, number them with the labels starting
with 01. Make sure the students can easily see the labels.
9.
Click new and enter 01 or whatever the lowest number computer is. When asked
to add a password, use the same number you used to identify the computer.
Once you have entered all of the computers numbers, click on the Classes button
to return to the class side of the screen.
10. Select the class named CLASS?, then click the ADD TO button to add this class
to the other modules. Click on the first module in the list, press the shift key
down, then click on the last module on the list. Click and the class will be added
to the other modules. Repeat the process for the class named Guest.
The program now exports these records to the other modules. When it is finished,
click on the Quit door to exit the TMS.
11. You are now ready to use a module and test the installation. Click on any of the
module icons. When the logon screen appears, click on the drop down list for
CLASS and choose Guest. Now click on the drop down list with Computer and
choose your station number. Enter the password and proceed.
For a moment you may think that the program has aborted, when you see the
Windows desktop. This will soon pass and the program will launch.
12. Please encourage teachers, when entering student names in classes ,to enter a
pretend student Name? They should press the space bar once, then type Name.
The Password should be xxxxxxxx. This step will assist students to navigate the
drop down list and will reduce the possibility for erroneous logon attempts.
FORMAVISION
LLeess nnoouuvveelllleess tteecchhnnoollooggiieess éédduuccaattiivveess ((N
NTTEE))
8877--8899 R
Ruuee ddeess R
Roossiieerrss,, LLee M
Moonntt V
Vaalléérriieenn,,
9922550000 R
Ruueeiill M
Maallm
maaiissoonn..
20
Teacher’s Management System
TTeell:: ((3333)) 11--4477 0088 1122 1122 FFaaxx ((3333)) 11-- 4477 0088 0011
5588 IInntteerrnneett :: hhttttpp::////w
ww
ww
w..ffoorrm
maavviissiioonn..ccoom
m
21