1
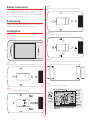
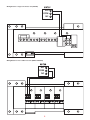
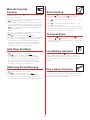
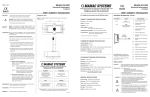
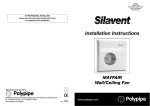
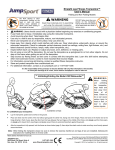
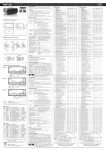
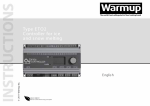
PRTIUM1
NOVEMBER 2009
EFFECTIVE: 1ST NOVEMBER 2009
Touch Screen Programmable Room Thermostat
Installation and User Manual
Safety Instruction
Step 4:
Cover the relay case and screw it properly with screwdriver
Installation and mounting of electrical appliances must be
carried out only by skilled electricians. It is imperative to observe
the generally applicable safety measures, such as:
Before starting work on the appliance, switch off power supply
and secure against switching on.
Positioning
The room thermostat should be positioned away from direct
sunlight or heat producing appliances. It is recommended that
the thermostat is installed 1·2 metres above floor level.
Installation
Step 5:
Step 1:
Mount and fix rear case with screws in wall
Open front and rear case with screwdriver, then take off
the front case
Step 6:
Put 2 x 1·5v AA batteries into battery box observing polarity
Step 2:
Open relay case with screwdriver and take off the relay case
Step 7:
Cover front and rear case correctly
Step 3:
Connect all wires properly (See page 2)
NC
COM
NO
1
Wiring details for single zone master unit (PB1ZM)
NO
COM
NC
Wiring details for 4 zone and 6 zone slave (PB4ZS and PB6ZS)
NO
COM
NC
2
3
Daily Programme
a) Press and hold key for 3 seconds to flash the day (1-7)
b) Press + or – key to set the day which you want to programme
c) After setting the day/days, press
key to flash time 0:00
and the corresponding bar dot for programme is flashing
d) Press
key to enter into energy saving mode; press key to
enter into comfort (sun) mode; press key to enter into night
(moon) mode
e) Press + or – key to adjust time. Repeat step d) and e) if you
want to change the programmed level temperature
f) When you finish setting one day programme,
press to flash day
g) Set the rest days’ programme of a week as above operation
from step b) to step f), after finishing all settings, press OK to
confirm and exit, or exit automatically in 1 minute (after 15
seconds the display will switch off).
Time Setting
a) Press the
key to flash the following in order:
Year, Month, Day, Hour, Minute.
Use the + or – key to adjust each
b) Press OK when complete to confirm exit
Note: The internal calendar will calculate the correct day of the
week (1=Monday etc.)
Note: The time with change automatically to adjust BST and
GMT on the correct date.
Temperature Setting
5/2 Programme
There are 3 temperature settings available:
Comfort used when room is permanently occupied e.g. 21°C
Economy used when room is temporarily occupied e.g. 18°C
Night used when the room is unoccupied e.g. 15°C
a) Press the key to flash the following in order:
Comfort, Economy, Night. Use the + or – key to adjust each
b) Press OK when complete to confirm exit.
a) Press and hold
key for 3 seconds to flash date
b) Press + or – key to select days from 1 to 5 (these days are
flashing)
c) Set the programme for Monday-Friday and Saturday-Sunday
by using the same way as Daily Programme A operation
Weekly Programme
a) Press and hold
key for 3 seconds to flash date
b) Press the + or – key to select days from 1 to 5 (these days
are flashing)
c) Set the programme by using the same method as Daily
Programme operation.
Mode Setting
a) Press the key to select the following:
Automatic (programme mode). The display will also show the
current temperature at that time e.g.
or
Continuous operating at comfort temperature
Continuous operating at economy temperature
Continuous operating at night temperature
Continuous operating at frost protection setting (+7°C)
Copy Function
a) Press and hold key for 3 seconds to flash day and enter into
COPY mode when you are in automatic mode
The day
and COPY are flashing
b) Press the + or – key to choose the programme of target day
which you want to copy from
c) Press the key again to stop flashing COPY (the programme
is memorised
d) Press + or – key to choose the day which you want to copy
the programme to
e) Press the key again, the programme has been downloaded
f) In the same way to copy and download programme to the
rest days, after finishing all programmes, press OK to confirm
and exit, or exit automatically in 1 minute (after 15 seconds
the display will switch off).
Quick Set Up
To enable quick set up of the Thermostat, there is a preinstalled programme. Simply enter the year, date and time.
Then switch to Auto.
The programme for each day will be as follows:
6.00 a.m. - 8.00 a.m.
Comfort setting
Set at 21°C
8.00 a.m. - 6.00 p.m.
Economy setting
Set at 18°C
6.00 p.m. - 11.00 a.m. Comfort setting
Set at 21°C
11.00 a.m. - 8.00 a.m.
Night setting
Set at 15°C
To change any of the temperatures for these times see
Temperature Setting Instructions. To enter different heating
times for each day proceed to Programme Setting Instructions.
Programme Setting
There are three different kinds of programme during the
automatic mode. That is: Daily programme (different
programme for each day of a week), 5/2 programme (the
same programme for Monday (1) - Friday (2) and the same
programme for Saturday (6) - Sunday (7)), Weekly programme
(the same programme for each day of a week).
4
Manual Override
Function
Alarm Setting
During the automatic mode
you can have the
override function
Temporary override (Party)
a) Press + or – key to adjust override temperature: the symbol
indicator will appear on the display
b) After setting the temperature, press OK key to confirm and
exit, or exit automatically in 1 minute (after 15 seconds the
display will switch off). The manual setting temperature and
will be kept until entering next setting programme or
when pressing OK key
Hold hours
a) Press + or – key to adjust override temperature: the symbol
indicator will appear on the display
b) Press
key once to display 1H and
indicator
c) Press + or – key to set holding time from 1 hour to 24 hours
d) Press OK key to confirm and exit, or exit automatically in
1 minute (after 15 seconds the display will switch off).
The number of hours and the override temperature are
flashing alternately on the top right side of the display.
Press OK to exit from the override function.
a) Press and hold
key for 3 seconds to display AL
b) Then press
key once to display
on the top left.
Press + or – key to select the days (1-5, 6-7, 1-7)
c) Press
key once to flash hour. Press + or – key to set hours
of alarm clock
d) Press
key once again to flash minute. Press + or – key
to set minutes of alarm clock
e) Press OK to confirm. After finishing the setting time, buzzer
ring BI-BI for 30 seconds to the programmed time. Press OK
key to turn off the alarm clock in the midway.
To Cancel Alarm
a) Press and hold
key for 3 seconds to display
b) Then press
and
will disappear, press OK key to confirm
and cancel alarm or exit automatically (after 15 seconds the
display will switch off).
Hold Days (Holiday)
Low Battery Indicator
a) Press + or – key to adjust override temperature: the symbol
indicator will appear on the display
b) Press
key twice to display 1d and
indicator
c) Press OK key to confirm and exit, or exit automatically
in 1 minute (after 15 seconds the display will switch off).
The number of hours and the override temperature are
flashing alternatively on the top right side of the display.
Press OK for exit from the override function.
When low battery occurs the symbol will appear on the
display. Change the batteries in a few minutes and the
programme, temperatures and date setting will remain in
memory, you only need to reset the time clock (hours and
minutes)
Hold Long Period Running
Key Lockout Function
a) Press + or – key to adjust override temperature: the symbol
indicator will appear on the display
b) Press
key three times and will display
c) Press OK key to confirm and exit, or exit automatically
in 1 minute (after 15 seconds the display will switch off).
The temperature will be kept until manually pressing OK key.
Hold OK key for 3 seconds to display OK only, all keys will be
locked out. To unlock the keys, hold the OK key for 3 seconds
to restore the display of the keys. Use this function when for
example you need to clean the display.
5
Technical Data
Dimension H x L x W (mm)
87 x 135 x 32
Operating voltage 2 batteries
1.5v LR6/AA
Temperature control range
+5°C / +35°C
Temperature display range
+5°C / +37°C
Switching capacity
(changeover contact)
at ohmic loads
at inductive loads cos w = 0.6
max 6a 240v 50hz
max 2a 240v 50hz
Switching output
Floating
Function modes
Heat / Cool
Anti-frost
+7°C
Ambient temperature
–5°C / +45°C
Programming
Daily, Weekly and 5/2
Class of protection
II
Index of protection
IP20
Displayed temperature update
10s
Reading accuracy
+/–1°C at 20°C
Reading resolution
+/–0.1°C
Swing
0.2°C
Comply with EMC and LV directives
LVD: EN60730-1, EN60730-2-7, EN 60730-2-9
EMC: EN 55014-1, EN 55014-2, EN 61000-3-2, EN61000-3-3
Subject to technical modifications
6
Touch Screen Programmable
Room Thermostat
Polypipe Building Products
Broomhouse Lane
Edlington
Doncaster DN12 1ES
Tel: 01709 770 000
Fax: 01709 770 001
www.ufch.com
2410 London Road
Mount Vernon
Glasgow G32 8XZ
Tel: 0141 778 8822
Fax: 0141 778 2703
Dromore Road
Lurgan, Craigavon
Co. Armagh BT66 7HL
Tel: 028 38 881270
Fax: 028 38 882344
www.polypipe.com