1
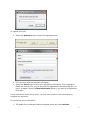
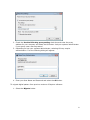
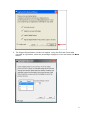
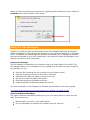
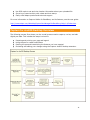
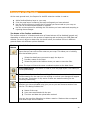
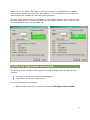
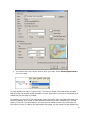
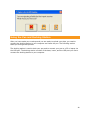
2010
Capturx for ArcGIS
Desktop®
User Guide
1
Contents
Welcome to Capturx for ArcGIS Desktop ...................................................................................... 3
How This Guide is Organized......................................................................................................... 3
Charging and Using Your Pen ........................................................................................................ 4
Registering and Activating Your Software and Pen ....................................................................... 4
Using the Pen Managers ............................................................................................................... 10
Capturx for ArcGIS Desktop Overview ....................................................................................... 11
Overview of the Toolbar ............................................................................................................... 12
How to Open a Map and a Legend ............................................................................................... 13
Selecting Pattern to Meet Your Needs .......................................................................................... 15
Printing the Page Layout and Legend ........................................................................................... 17
How to Use the Pen to Create Features ........................................................................................ 21
Uploading Data from the Pen to ArcMap ..................................................................................... 23
Reviewing the Changes You Have Made ..................................................................................... 25
Using the Pen and Docking Station .............................................................................................. 28
Troubleshooting and Maintenance ................................................................................................ 30
Care and Maintenance of the Pen ................................................................................................. 30
2
Welcome to Capturx for ArcGIS Desktop
Thank you for your purchase. Now you can put the power of digital pen technology to work.
Capturx for ArcGIS Desktop is a powerful, easy-to-use, digital data collection solution that
enables you to keep using paper maps. Our extension is the ideal way to create, import,
edit, share, and act on paper-based data in and between geographic information systems
(GIS).
With Capturx for ArcGIS Desktop and Pen Manager and Capturx Mobile software you will be
able to:
Print maps with various feature layers on ordinary paper. You can select a feature
from the printed legend and then draw it on the map. When the digital pen docks
with the PC, the data, including the classification of those features, automatically
gets updated within the geodatabase.
Use the Pen Manager for Windows, Capturx Mobile, Windows Mobile, and other
handsets to manage and upload your data. The Pen Manager enables you to
manage the features and options available on your pen and to send the file
containing the ink via email
This guide describes the process for using Capturx for ArcGIS Desktop and Pen Manager
software and to provide a comprehensive explanation of their features.
How This Guide is Organized
The topics and information in this user manual include:
How to charge and use your pen
Registering and activating your software and pen
Using the Pen Managers
Capturx for ArcGIS overview
Using the Capturx for ArcGIS toolbar and buttons
Opening a map and selecting a legend
Printing your map and legend
How to use Capturx for ArcGIS Desktop to create data
Uploading data from the pen to ArcMap
Troubleshooting and maintenance
These sections and topics will help you learn to use Capturx for ArcGIS Desktop.
3
Charging and Using Your Pen
The pen looks and feels just like an ordinary ballpoint pen and you use it in the same way.
There are no keys to press. You activate the pen simply by removing the cap and deactivate
it by replacing the cap. The pen needs to be charged before you can use it to capture data.
To charge the pen:
1. You may need to place the ink cartridge in the pen. To place the cartridge in the pen,
take one of the ink cartridges and gently slide it into the hole at the tip until it is
completely seated and does not fall out.
2. Attach the docking station to a PC or laptop via the USB port.
3. Fully insert the pen in the docking station.
4. The gold connection points on the pen and docking station need to be aligned and
the pen needs to be firmly placed in the docking station.
5. After you connect the USB port to your computer and dock your pen, you will initially
need to keep the pen in the docking station for four hours for it to fully charge.
Note: To prevent your battery from running low, do not leave the cap off the pen for
extended periods of time. You will need your pen cap so keep it in a place you will
remember.
For information on how to use the pen and docking station to upload data, see Using the
Pen and Docking Station.
Registering and Activating Your Software and Pen
After installing Capturx for ArcGIS Desktop, you will be prompted to complete the following
steps for registering your software and activating your digital pen(s). The steps include:
Registering your software
Activating the pen
Registering the digital pen(s)
Importing the digital pattern for printing from your digital pen
Moving digital pattern from previous versions of Capturx software to the current
version of Capturx for ArcGIS Desktop
Registering and Activating Your Software
You register and activate your Capturx software by filling out a registration form and you
activate the software by docking the pen. When you first open Capturx for ArcGIS Desktop,
you will see the following activation screen:
4
The green arrow shows you the step you are on in the activation process. To register your
software with Adapx, select the Next button. This will open the Register Software form.
To complete the registration process:
1. Fill in the form with the required information.
2. Select the Save Button to save your registration information. Select the Remind Me
Later button if you want to complete the form later.
To complete the software activation, dock the pen and select the Next button.
5
Registering and Activating Your Pen
The first time a pen is docked, you will see the Capturx Pen Startup Wizard. The green
arrow shows you the step you are on in the activation process. The check mark denotes the
parts of the process that have been completed and the warning sign denotes a procedure
that failed.
All new pens shipped with Capturx for ArcGIS have been activated. If you are using a pen
that was purchased with different software, you many need to manually activate. The
manual activation enables the digital pattern for use.
1. Select the Use Offline Key button.
2. The Manual Pen Activation window will appear. Enter the key you received from
Adapx sales.
3. Enter the key and select the OK button.
6
To register your pen:
1. Select the Activate button to open the registration form.
2. Fill in the form with the required information.
3. Select the Save Button to save your registration information. Their registration
details are saved to file, so you can print the registration information and fax it or
mail it to Adapx. Select the Remind Me Later button if you want to complete the
form later.
If your connection uses a proxy server, you may have to enter proxy information to
complete the activation.
To provide the proxy information:
1. The Adapx Proxy Settings window will appear when you select Activate
7
2. Check the Use the Following proxy setting check box and enter the proxy
address for your company and select the OK button. Ask your systems administrator
if your proxy uses a secure protocol.
3. Depending on how your systems administrator, selecting OK may require
authentication. If so the following dialog will appear:
4. Enter your User Name and Password and select the OK button
To migrate digital pattern from previous versions of Capturx software:
1. Select the Migrate button.
8
2. The Migrate Digital Pattern window will appear. Using the Size and Count table
provided as a guideline, select the percentage of pages to move and select the Move
button.
9
When you have completed the procedures for registering and activating your pen, select the
Complete button at the bottom of the wizard.
Using the Pen Managers
Capturx for ArcGIS provides you with access to two Pen Managers (Windows and Capturx
Mobile for BlackBerry) that can be used to send your ink to an email address or to a Capturx
server. In addition, the Pen Manager for Windows also enables you to manage the features
and options available on your pen. Listed below is an overview of these Pen Managers, their
features, and links to their user guides.
Capturx Pen Manager
The Pen Manager is installed on your computer when you install Capturx for ArcGIS. This
Pen Manager allows you to manage the ink you upload when you dock your pen. Using this
Pen Manager you can:
Send the file containing the ink via email or to the Capturx server
View the remaining time left on the battery of the pen
Download and delete the pages currently on the pen
Set how you want the pages to download
Enter and save personal details to the pen
Enable or disable the Bluetooth feature on the pen
For more information on Pen Manager for Windows and its features, see the user guide:
http://www.adapx.com/capturxpenmanager/Capturx_Pen_Manager_UserGuide_2.6.pdf
Capturx Mobile for BlackBerry
The Capturx Mobile for BlackBerry allows you to use your mobile device to send your pen
data. This allows you to:
Bluetooth pair your pen to your mobile device
Use your BlackBerry to send the file containing the ink via email
10
Use GPS mode to set and view location information about your uploaded file
See a log of recent activity with a date and time stamp
Easily email Adapx product and technical support
For more information on Capturx Mobile for BlackBerry and its features, see the user guide:
http://www.adapx.com/WebHelp/CapturxPenManagerForBlackBerry/Help/1.0/Index.htm
Capturx for ArcGIS Desktop Overview
The following process flow shows you the overall process used to capture, review, and edit
digital pen data. This includes the steps involved in:
Preparing and printing your map and legend
Using the pen to create ArcGIS data
Docking the pen and transmitting the features you have created
Reviewing and editing your changes using the Capturx ArcGIS Desktop extension
11
Overview of the Toolbar
At the most general level, the Capturx for ArcGIS extension toolbar is used to:
Add a Redline/Markup layer to your map
Print the page layout containing the map and legend you have selected
Use the import options to import the ink strokes you have made on your map so
they can be reviewed and accepted or rejected
Use the review options for selecting the ink strokes you have made and accepting or
rejecting these changes
The States of the Toolbar and Buttons
The toolbar consists of 12 buttons and some of these buttons will be disabled (grayed out)
depending on where you are in the process of capturing and reviewing your field data and
whether you are in layout or data view. As shown below, the toolbar can be in different
general states with different options disabled:
Toolbar
Button
How it is Used
Add Redline/Markup Layer: This button is used to add an Redline/Markup
layer that you can use to write notes on your map. This takes you to a dialog
box that enables you to:
Select the data frame you want to apply the layer to
Provide a name for the layer
Select the path to the location where you want to store the files.
Note: The layer will have the same coordinate system as the data frame.
Print Page Layout: This button is used to print the page layout. This takes you
to the print dialog.
Import Next Session for Current Map: This button is used download the
current session for the map you are working on so that your changes will appear
on the map. This button is only active if there are sessions waiting for the
currently loaded map.
Open the Session Dialog Box: This button will show you a current list of
sessions you have uploaded using your pen so you can choose a session from
the list. This dialog includes the:
Name of the map
User name associated with the pen
The time and date the upload was received
You can also use this dialog box to delete a session. Sessions that correspond
with other maps will be inactive.
12
Select All Capturx Features: This button is used to select all of the features
(except Redline/Markup strokes) you have made on your map.
Clear All Selected Features: This button is used to deselect any of the
features you have made on your map
Select the First Change: This button is used to select the first feature you
have made on your map
Select the Previous Change: This button is used to select the previous
feature you have made on your map
Select the Next Change: As you move through the changes you have made,
this button is used to select the next feature you have made on your map.
Select the Last Change: This button is used to select the last feature you
have made on your map.
Reject All Changes: This button is used to reject all of the feature you have
made on your map
Accept All Changes: This button is used to accept all of the features you have
made on your map.
How to Open a Map and a Legend
A legend, when printed with Capturx for ArcGIS, becomes a digital palette for creating
features. This section describes the process for opening a map and creating and placing the
legend you will use to add features to your map. This includes:
How to open the map you want to use with Capturx for ArcGIS Desktop
How to use the ArcMap Legend Wizard to select the layers you want to include in
your legend.
To create a map and legend:
1. Open ArcMap.
2. Select the map you want to use.
13
3. Once you have a map with data layers added, From the View Menu, select Layout
View.
4. From the Insert Menu, select Legend.
5. Use the Legend Wizard to select the layers you want to include in your Legend.
14
6. Select Next in each dialog box after closing the style sessions.
7. Select Finish on last dialog
8. The items you have selected will appear in the legend. Note: You can also right-click
on the legend once it has been added to your layout and choose Properties to
modify it later.
9. Use your mouse to drag it to the desired location on the map and to re-size it.
Selecting Pattern to Meet Your Needs
When you print with Capturx, a digital dot pattern (sometimes called a digital watermark) is
printed on the paper along with your map layout. Before you print, you need to know how
this pattern is used when you print your map and how to select the pattern size that best
meets your needs. This section describes:
How the pattern is used to print your digital map
How to use the Printing dialog box to learn how much pattern you have available and
how to get more pattern when you are running low
How the Pattern is Used to Print Your Digital Map
Digital pattern is required to print the digital map you will use. Pattern is available in 3 sizes
(A0, A2, and A4), and each size has an exact number of pages available for printing. These
pages are referred to as a "shelf" of pattern.
15
What you plan to print
Option to
choose
I will ONLY print LETTER size maps (8-1/2” x 11”)
from this computer
Select A4
I will print LETTER (8-1/2” x 11”) and TABLOID
(11” x 17”) size maps
Select A2
I will connect this PC to a PLOTTER (you will still be
able to print smaller sizes)
Select A0
A larger size pattern can be used to print a smaller size page layout. For example, onesquare-yard “A0” can be used to print a letter-size 8.5” x 11” page layout. However, there
are fewer pages in a refill of a larger size pattern, so it is more cost efficient to use the
smallest size pattern you can. If you have more than one shelf of pattern, Capturx will
automatically choose the smallest sized pattern possible in order to conserve pattern pages.
If you have downloaded pattern that is too large for the size you would like to print (“A0”
being used to print a letter-size 8.5” x 11” page layout) you can still print, but you will see a
warning notice in red text at the lower left of the print dialog noting that you could use
smaller pattern. If you do not have a additional pattern credit available, you can purchase
one by contacting [email protected].
Monitoring and Using Pattern in ArcGIS Desktop
Capturx for ArcGIS provides you with a Pattern Refill dialog box and a Desktop printing
dialog that you use to download pattern and to monitor the amount of pattern you have
16
When you‟re in the Pattern Refill dialog, you have the option to download any size pattern
that you don‟t already have more than 1000 pages of. If you already have more than 1000
pattern pages, the checkbox for that size will be grayed out.
The bars on the pattern control are full/green at 1000 pattern pages or more. If there is less
than 800 pages left you can find out exactly how many pages you have by hovering on that
bar, otherwise the hover text just reads „full‟
Printing the Page Layout and Legend
The following section describes the process for printing the page layout and legend. This
includes:
The steps for printing the page layout and legend
A description of the map "Layout View"
To print the page layout and legend:
1. Within ArcMap, select printer options by selecting File>Page and Print Setup.
17
2. This will open the Page and Print Setup window. When using this window:
Set your printer to use the size of paper desired as the “default tray”, since
the “source” (paper tray) setting in this Page and Print Setup window is not
currently supported
The “Scale Map Elements proportionally to changes in Page Size” option is
helpful to keep your page elements (map, legend) within the area of the page
that will actually be printed.
Select the Use Printer Paper Settings radio button
The image in the lower right corner of the dialog will show a visual
representation of how your map will fit on the paper size and orientation you
choose. If the image falls outside the page margin, you will need to choose a
different setting.
18
3. You need to be in the Layout View to print your map. Select View>Layout View to
print your map.
This will display the map in “Layout View”. This view provides rulers and printer margins
that will help you see the actual orientation of your page layout (portrait or landscape) and
determine how the page is printed.
By showing you the size of the page layout these rulers also show you what size paper you
should be setting your printer to use (make sure that the printer‟s “default tray” is using
paper of that size.) As noted above, you must set the default printer tray to the size you
like before printing or loading the appropriate size paper you are using into the default tray.
19
As noted below, in the Page Layout, you might want to keep anything you want to write on,
such as a map frame or a legend icon, at least 7 mm away from the printer margins.
1. Select the Print button on the Capturx toolbar to print current layout.
Note: If the legend has layers that are from data sources that we cannot modify, or that are
not fully compatible, a “Layer Support Information” form will pop up before printing. This
form lists the unsupported layers and unsupported symbology. If you see this form, you can
cancel printing, or continue on to print.
Even though these layers are not supported, you will still be able to print and markup the
map. New features will not be created on these unsupported layers but all markups will be
added to the Redline/Markup layer.
20
How to Use the Pen to Create Features
The following section describes how the pen and legend are used to add features on your
map so you can update the desired layer with new information. This includes an overview of
the two distinct functional states used by Capturx for ArcGIS to create data.
Digital Pen Functional States
To allow you to easily add new information to your map, the digital pen used with Capturx
for ArcGIS provides two functional states to create markups
The Redline/Markup state is turned on by default and the line color can be changed
by touching the legend item in the Capturx Markup layer
The Feature Creation state is enabled by touching any feature symbol on the legend
of the printed map
The following sections illustrate the two functional states and how these are used to add
features to the map. The following figure shows the layers for these options and how they
are shown on the map legend.
Legend in Layout View
The Redline/Markup mode
21
You are in Redline/Markup mode (shown above) as soon as you take your cap off the pen,
and the pen will stay in Redline/Markup mode until you make another selection from the
legend.
Feature Creation mode
As described in the section How to Open a Map and Select a Legend, you can also add
additional layers to your map, and these can be used with the pen and legend to add
features to your map. However, these function differently than the Redline/Markup options.
When using the additional legend items:
You need to check the legend for each separate entry you make on the map
Once you mark the map with the pen, Capturx returns to the Redline/Markup mode
For example, after you mark the location of the Staging Point on the map, the pen returns
to Redline/Markup mode so you can add notes or sketch next to the Staging Point feature
you just added. If you want to add additional Staging Points to the map, you need to check
the Staging Point symbol icon on the legend each time before you add the Staging Point
feature to the map.
Using the Pen and Map to Create Features
The following section summarizes the process for creating features on your map using the
two modes.
By default, when you take the cap off the pen you are automatically in
Redline/Markup mode. The Redline/Markup legend consists of three colored lines you
can use to draw free hand lines, sketch, or add notes to the map. You can select a
line color at any time by checking the icon on the legend for the color markup you
wish to produce.
You can select a different markup line color at any time and this selected line color
will now "stick", and all future markups will use that new color until another color is
selected.
To create a GIS feature, touch the legend symbol for that feature. The next pen
stroke on the map page indicates where these features should be added on the map.
Once the pen is lifted from the paper, the mode returns to Redline/Markup.
You may select a different feature type by checking the appropriate symbol on the
legend at any time, after which the next stroke will create that feature.
Using the example given above, to add a Staging Point, you would check that icon in the
legend and mark the location on the map with a single dot of the pen. Then, when you lift
the pen off the paper, the mode returns to the Redline/Markup and you can make a note on
the map that a Staging Point is located here. You may want to write "SP" or draw a symbol
that reminds you of what you added.
You would switch to an another feature (Fire Truck) by checking that icon in the legend and
then touching the pen to the map to add the fire truck, and then write the acronym „FT‟ next
to the location of the fire truck to remind you it was added to your map.
22
Note: For the pen to recognize the legend symbol, you need to limit the size of your mark
to the size of the legend icon for that feature. Even a single "dot" by firmly tapping the pen
tip to the legend symbol will suffice. This will prevent your ink strokes from accidently
running into the adjacent feature symbol and "selecting" that feature for the map. Also note
that the digital pen does not work well at the edges of the map. Allow a 7 mm margin to
ensure that your ink strokes are captured correctly.
Uploading Data from the Pen to ArcMap
This section describes how to upload the ink using the docking station and Pen Manager for
Windows.
After you have made your markups and you are ready to upload your data, you need to
connect the docking station to your computer and insert the pen or you will need to use
Bluetooth to pair your pen to a mobile device. The following section takes you through that
process.
The docking station is used to dock your pen and to connect your pen to a PC or laptop via
the USB port. The docking station consists of the base, insert, and the USB port you use to
connect the docking station to your computer.
23
To upload the digital ink using the Pen Manager for Windows:
1. Attach the docking station to a PC or laptop via the USB port.
2. Fully insert the pen in the docking station. The gold connection points on the pen and
docking station need to be aligned and the pen needs to be firmly placed in the
docking station.
3. After you connect the USB port to your computer and dock your pen, a semitransparent Status Window will also show you the progress of the download.
To upload the digital ink using Bluetooth with Capturx Mobile for BlackBerry:
1. Pair your digital pen with a supported mobile device
2. Open the configuration options on the Capturx Mobile application
3. Enter the email address where you want to send data
24
4. Choose Direct Email as the upload method
5. After collecting data, tick the send data to phone
a. The pen will buzz twice telling you that the connection has been made
b. The pen will buzz three times after the data has been sent to the phone
For more information on Pen Manager for Capturx Mobile and its features, see the user
guide:
http://www.adapx.com/WebHelp/CapturxPenManagerForCapturx
Mobile/Help/1.0/Index.htm
See the Using the Pen Managers section for a description of how the Windows Pen Manager
is used to monitor and download the ink and to manage the features and options available
on your pen.
Reviewing the Changes You Have Made
After you have uploaded your changes, you can review them. The following section
describes how you review the changes you have made to your map. This includes:
An overview of deleting and modifying features during the review session
Using the Session Selection window to choose the particular session you want to
review
A description of the reviewing options available with the Capturx toolbar and the
process for accepting or rejecting the features you have added.
Deleting and Modifying Features during the Review Session
When making changes to your geodatabase, ArcGIS Desktop only “edits” one data source at
a time. Unlike standard ArcMap editing, Capturx opens an edit session for all databases
(workspaces) at the same time and the active workspace will be determined by the „first‟
layer you added data to with the digital pen.
When reviewing and editing Capturx features you need to be aware of which feature is in
the “target” list in the ArcMap editor toolbar. If the feature you are reviewing is under the
ArcMap“target” feature layer you will be able to edit, delete and modify the geometry or
vertices of the features as you normally would. However, if the feature you are reviewing
belongs to a feature layer outside the ArcMap “target” layer, you can still edit the features,
but you are limited to editing them through their attribute table. Editing the geometry and
vertices of these features outside the “target” layer must be done outside the current
Capturx edit/review session.
Importing Your Review Session
After you have docked your pen and imported your sessions, you can use the buttons
highlighted below to select, accept or reject the changes you have made to your map. The
first toolbar shows you the options available in the layout view and the second shows you
the options available in the data view.
25
To review changes on the map:
A. Select the Import Next Session button
on the Capturx toolbar to download
the next session available on the current map so that your changes will appear on
the map.
Or
B. Select Open Session Dialog Box button
on the Capturx toolbar and it will
show you a current list of sessions you have uploaded. This includes the:
Name of the map
User name associated with the pen and can be defined in the Pen Manager for
Windows
Time and date the upload was received
1. Select the Import button to upload the desired session or double-click on the item.
The Import button is only enabled for sessions associated with the current map – to
load a session for another map, use the "Open Session Dialog Box" button. The
correct map will automatically open. If the target .mxd file cannot be found, you will
have the option to browse for it.
2. The features you have made will be shown on the map.
26
3. Use the Capturx toolbar to select all pending changes or to step through your
features one at a time. The feature you select will be highlighted on the map.
4. Use the Accept all button to accept all changes (reviewed or not) made to the
geodatabase. Use the Reject all button to reject all changes (reviewed or not) made
to the geodatabase.
5. When you select the Reject All button the following window appear asking you to
cancel the rejection, remove the session you have just imported, or to revert the
session so you can re-import it again at a later time.
27
Using the Pen and Docking Station
After you have made your markups and you are ready to upload your data, you need to
connect the docking station to your computer and insert the pen. The following section
takes you through that process.
The docking station is used to dock your pen and to connect your pen to a PC or laptop via
the USB port. The docking station consists of the base, insert, and the USB port you use to
connect the docking station to your computer.
28
To upload the digital ink using the pen:
1. Attach the docking station to a PC or laptop via the USB port.
2. Fully insert the pen in the docking station. The gold connection points on the pen and
docking station need to be aligned and the pen needs to be firmly placed in the
docking station.
3. After you connect the USB port to your computer and dock your pen, a Status
Window will also show you the progress of the download.
29
Troubleshooting and Maintenance
Below is a listing of common errors that can occur with the pen and Capturx ArcGIS and
recommendations on how to resolve each of the issues.
Missing Markup Layer in the Table of Contents When Importing the Ink
1. When you create a markup layer and name it other than the default “Capturx
Markup.shp” name, such as “John Doe Capturx Markup.shp”
2. The user removes the Capturx Markup layer “John Doe Capturx Markup.shp” from
the table of contents.
3. The user then attempts to import a new ink session.
4. Capturx will inform the user the markup layer can‟t be found and ask the user to
create a new layer. The user then has the choice:
a. Create a new Capturx Markup Layer and choose where to save it
The user will be informed that all Markup ink will be defaulted to “Redline
Markup”, the other colors (green/blue markup) will turn into redline markup
b. Or the user can manually find the “John Doe Capturx Markup.shp” Capturx Markup
Layer by entering its location path and name into the window in step (a).
If the pen does not turn on when you take off the cap, make sure the pen is fully charged.
Insert the pen into the USB cradle to recharge the battery.
The pen does not charge when connected to the docking station.
1. Make sure the computer is turned on.
2. Make sure the docking station is connected to the computers USB port - verify that
the USB cable is tightly inserted into the dock bottom plug
3. Make sure the pen is fully seated
4. Try using another USB port on the computer.
Contacting Adapx Technical Support
You can also contact the Technical Support department directly by email or by phone:
[email protected]
866-208-9673
Care and Maintenance of the Pen
Your pen is a product of superior design and craftsmanship and should be treated with care.
The suggestions below will help you protect your warranty coverage.
1. Although the pen is designed to work on all-weather environments, try to keep the
device dry. Precipitation, humidity, and all types of liquids or moisture can contain
minerals that can corrode electronic circuits.
30
2. Do not use or store the device in dusty, dirty areas. Its electronic components can be
damaged. Always keep the cap on when you are not using the pen.
3. If possible, try not to store the device in hot areas, as with any electronic
components and equipment. High temperatures can shorten the life of electronic
devices, damage batteries, and warp or melt certain plastics.
4. Do not store the device in freezing areas. When the device returns to its normal
temperature, moisture can form inside the device and damage electronic circuit
boards.
5. Do not drop, knock, or shake the device. Rough handling can break internal circuit
boards and fine mechanics.
6. Do not use harsh chemicals, cleaning solvents, or strong detergents to clean the
device.
7. All of the above suggestions apply equally to your battery, charger, or any
enhancement. If any device is not working properly, take it to the nearest authorized
service facility for service.
Changing the Ink Cartridge
You can change the ink cartridge by using the ink cartridge removal hole. This section takes
you through the removal steps. The ink is under pressure, so be careful when changing the
cartridge that you don‟t break the tip.
To change the ink cartridge:
1. Remove the cap and place the ink cartridge in the hole provided on the shirt clip.
2. Gently pull to extract the cartridge.
3. Insert the new cartridge and press to fully seat.
For more information on the pen and docking station, see the following topics:
Charging and Using Your Pen
Using the Pen and Docking Station
1/07/10
31