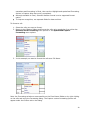
1
2010
Capturx Forms for
Excel®
User Guide
1
Contents
Welcome to Capturx Forms for Excel ............................................................................................ 4
Capturx Forms for Excel Overview ................................................................................................ 5
How Capturx Printing Works ......................................................................................................... 5
The Capturx Digital Pen ................................................................................................................. 6
Charging and Using Your Pen ........................................................................................................ 7
Registering and Activating Your Pen and Software ....................................................................... 7
When Purchasing and Obtaining New Pattern for Printing .......................................................... 12
Getting Familiar with the Capturx Toolbar .................................................................................. 14
Using the Pen and Docking Station .............................................................................................. 19
Using the Pen Manager ................................................................................................................. 21
Creating an Effective Form ........................................................................................................... 28
Merging Cells to Create a Writing Area ....................................................................................... 31
Adding Borders to Your Form ...................................................................................................... 32
Selecting a Format for the Cells.................................................................................................... 32
Ignoring Selections to Prevent Handwriting Input ....................................................................... 39
Adding and Using the Eraser ........................................................................................................ 40
Sorting Worksheets on the Form .................................................................................................. 41
Designing and Completing Your Form Overview ........................................................................ 42
Making the Paper Form Digital .................................................................................................... 42
Ensuring the Form Formatting is Complete.................................................................................. 43
Naming a Worksheet..................................................................................................................... 44
Printing the Excel Form ................................................................................................................ 45
Using the Import Ink Options ....................................................................................................... 47
2
Using Review Options .................................................................................................................. 48
Using the Review Pane ................................................................................................................. 50
Viewing the Sheet Status Information .......................................................................................... 52
Using and Viewing the Help and Support Options....................................................................... 52
Appendix A: Using Custom Expressions ..................................................................................... 53
Appendix B: How to Monitor Digital Pattern............................................................................... 56
Appendix C: Collecting and Sharing Data Across Teams ............................................................ 57
3
Welcome to Capturx Forms for Excel
Thank you for purchasing Capturx Forms for Excel. Capturx is an add-in to Microsoft ®
Excel ® that extends paper based workflows to Microsoft Office ® 2007.
Capturx Forms for Excel Features
Capturx Forms for Excel enables teams to design forms in Excel, print them on ordinary
paper, and have the handwritten data automatically digitized and formatted back into the
original Excel fields.
Teams get the ease-of-use and independence of simply working with Excel and paper, while
also getting structured data they can use within Excel or provide to IT for easy integration
into databases or other backend systems. Teams get the simplicity of working with pen and
paper and all the advantages of immediate access to structured digital data.
With Capturx you will be able to:
Easily design forms in Excel. Capturx provides teams with the power and flexibility to
create new forms or use existing forms with a familiar software application –
Microsoft Office Excel. No new tools to buy or scripting languages to learn.
Easily collect data on paper. Forms are printed on ordinary paper with a special
watermark that enables them to be used with a digital pen. Teams can fill out paper
forms in any environment without extra equipment or training. The pen leaves
behind a written paper record while also instantly digitizing the information for use
with Excel.
Immediate access to rich data in Excel. Capturx automatically uploads the data and
inserts it into the right formatted cells within Excel. Teams can view, share, and
store the original ink strokes or the converted digital data for each form. Capturx
also provides aggregated data tables which can be used for analysis within Excel or
integrated into other databases or back end applications.
Capturx Forms for Excel System Requirements
Since Capturx improves recognition by extending and using the Office dictionary, you must
have Word 2007 installed AND uninstall Word 2003. Capturx only leverages the dictionary,
so you do not need to have Word running in order to use Capturx. The Capturx Forms for
Excel System requirements include:
Microsoft Office Excel 2007, Word 2007, and Office 2007 SP2
This guide is intended to describe the process for using Capturx Forms for Excel and provide
a comprehensive explanation of its features.
4
Capturx Forms for Excel Overview
The topics and information in this user manual include:
How to get started, including charging the digital pen
How to register the software and activate the digital pen
How Capturx printing and the digital pen work
An overview of the Capturx Forms for Excel user interface
How to prepare a Capturx form to be used with a digital pen
How to use the Digital Pen Manager for managing your digital pen and data
Appendices that describe how use custom expressions, how to monitor digital
pattern, and how to collect and share data across teams
These sections and topics will help you learn to use Capturx software that enables you to
use digital pen and paper technology. See Getting Familiar with the Capturx Toolbar for
information on the Capturx Forms for Excel user interface.
How Capturx Printing Works
Capturx Forms for Excel includes Capturx technology, which turns ordinary pieces of paper
into extensions of your computer desktop applications through a special digital watermark
or dot pattern which gets printed on each page and enables them to be read by digital pens.
The dot pattern is unique for each page and appears as a light background on printed
pages. The digital pen has a sensor which reads the dot pattern as it writes, tracking its
location on that unique sheet as you write.
The dot pattern is printed with high precision using black ink, which is the only color
"visible" to the digital pen. The information in the file, which is visible to humans, is printed
using your printer's yellow, magenta, and cyan inks. Any visible lines that look black are
actually combinations of these colors.
An initial Capturx Forms for Excel purchase includes a large amount of unique digital dot
pattern: enough to print thousands of pages. Dot pattern is like printer toner: it gets used
up as you print. Additional dot pattern is available for purchase and download from Adapx.
You can obtain additional pattern for Capturx Forms for Excel by contacting:
[email protected]
Digital-pen-enabled print outs must be made with a 4-color postscript printer. A broad
range of printers have been tested for use with Capturx technology including: HP, Okidata,
Oce, Ricoh, and Canon.
To learn more about specific printers, please visit:
http://www.adapx.com/printers/Sample_List
5
See Charging and Using Your Pen for information on the digital pen and how it is used.
See Appendix B: How to Monitor Digital Pattern for information on how to choose and obtain
the amount of pattern that best meets your needs.
The Capturx Digital Pen
The DP20 Digital Pen is a powerful computing device that converts any handwritten paperbased information into electronic data that can be modified, manipulated, or shared in
leading applications you already use.
The digital pen looks and feels like a regular ballpoint pen, but it contains an integrated
digital sensor and an advanced image microprocessor. As you write, the digital pen scans
your writing in conjunction with the Capturx watermark printed by the Capturx Forms for
Excel software along with the visual information in your form or map. The digital pen scans
all handwriting and stores it until it is uploaded into a Microsoft Windows®-based computer.
The Capturx pen can also be used with Fisher pressurized ink pen cartridges, filled
with Rite in the Rain® proprietary ink, enabling teams to write in any position and in
any condition.
The digital pen stays charged for five to seven days of typical use with built in
Lithium-ion rechargeable battery. Charging time approximately 2.5 hours (150 min),
from 0% to 100% via cradle and USB adapter. The digital pen can endure a standby
time (without cap) of 10 hours.
The digital pen can be used for 2 hours (120 minutes) continuously, and holds up to
50 pages of letter sized paper.
Model # AMP-1221. Weight 1.06 oz. Dimensions 6.02x.75x.6 inches without cap;
6.18x.83x.71 inches with cap.
Data Communication: USB 1.1 standard (also supports USB 2.0 standard), the pen
has a Bluetooth® radio, but Bluetooth data connections are currently NOT
supported.
For use: 32 to 104 degrees Fahrenheit at relative humidity levels of 10-85%
For storage: -4 to 113 degrees Fahrenheit at relative humidity levels of 10-90%
Ruggedness tested on 'standard' 4 foot drop while capped.
Pen can be used in inclement weather and rain, but it is not submersible.
6
Charging and Using Your Pen
The pen looks and feels just like an ordinary ballpoint pen and you use it in the same way.
There are no keys to press. You activate the pen simply by removing the cap and deactivate
it by replacing the cap. The pen needs to be charged before you can use it to capture data.
To charge the pen:
1. You may need to place the ink cartridge in the pen. To place the cartridge in the pen,
take one of the ink cartridges and gently slide it into the hole at the tip until it is
completely seated and does not fall out. It’s normal for the cartridge to feel slightly
loose.
2. Attach the docking station to a PC or laptop via the USB port.
3. Fully insert the pen in the docking station.
4. The gold connection points on the pen and docking station need to be aligned and
the pen needs to be firmly placed in the docking station.
5. After you connect the USB port to your computer and dock your pen, you will initially
need to keep the pen in the docking station for four hours for it to fully charge.
Note: To prevent your battery from running low, do not leave the cap off the pen for
extended periods of time. You will need your pen cap so keep it in a place you will
remember.
See How Capturx Printing Works for information on how the digital pen and paper work
together to capture your data. For information on how to use the pen and docking station to
upload data, see Using the Pen and Docking Station.
Registering and Activating Your Pen and Software
To begin using Capturx for Excel you will need to complete the following steps for
registering your software and activating your digital pen(s). The steps include:
Registering your software
Activate the pen
Registering the digital pen(s)
Importing the digital pattern for printing from your digital pen
If you have an existing software product using the uses Capturx technology, then
you may be given an option to move digital pattern from that product to Capturx
Forms for Excel
Registering and Activating Your Software
Your software is registered using a form that appears upon first use. You activate the
software by docking the pen.
7
To access Capturx Forms for Excel, open Excel and look for the “Capturx” tab on the Excel
ribbon. The first time you select the “Capturx” tab, you will see the following activation
screen:
The green arrow shows you the step you are on in the activation process. To register your
software with Adapx, select the Next button. This will open the Register Software form.
To complete the registration process:
1. Fill in the form with the required information.
2. Select the Save Button to save your registration information. Select the Remind Me
Later button if you want to complete the form later.
8
To complete the software activation, dock the pen and select the Next button.
Registering and Activating Your Pen
The first time your digital pen is docked, you will see the Capturx Pen Startup Wizard. The
green arrow shows you the step you are on in the activation process. The check mark
denotes the parts of the process that have been completed and the warning sign denotes a
procedure that failed.
All new pens that are purchased for use with Capturx Forms for Excel are pre-activated.
1. Select the Use Offline Key button.
2. The Manual Pen Activation window will appear. Enter the key you received as part of
your purchase.
3. Enter the key and select the OK button.
To register your pen:
9
1. Select the Activate button to open the registration form
2. Fill in the form with the required information.
3. Select the Save Button to save your registration information. Select the Remind Me
Later button if you want to complete the form later.
If your internet connection uses a proxy server, you may have to enter proxy information to
complete the activation.
To provide the proxy information:
1. The Adapx Proxy Settings window will appear when you select Activate
2. Check the Use the Following proxy setting check box and enter the proxy address for
your company and select the OK button. Ask your systems administrator if your
proxy uses a secure protocol.
10
3. Depending on how your systems administrator, selecting OK may require
authentication. If so the following dialog will appear
4. Enter your User Name and Password and select the OK button
To migrate digital pattern from previous versions of Capturx software:
1. Select the Migrate button.
1. The Migrate Digital Pattern window will appear. Using the Size and Count table
provided as a guideline, select the percentage of pages to move and select the Move
button
11
When you have completed the procedures for registering and activating your pen, select the
Complete button at the bottom of the wizard.
When Purchasing and Obtaining New Pattern for Printing
The following section outlines the process used to choose the appropriate paper size and to
obtain the digital pattern you will need to print your form. You order digital pattern through
the Adapx sales department at:
[email protected]
12
206.428.0800 or 1.877.232.7903
To learn more about dot pattern, please see the How Capturx Printing Works topic.
Selecting the Optimal Dot Pattern
You can optimize your use of pattern by selecting the pattern size that best fits the
paper size that you will print from this PC
You will see a choice of different sizes: A4, A2 or A0. Before selecting, see the chart
below.
What you plan to print
Option to choose
I will ONLY print LETTER size sheets (81/2” x 11”) from this computer
Select A4
I want the option to print LETTER (8-1/2” x
11”) and TABLOID (11” x 17”) size sheets
Select A2
I want the option to print large sizes using
a plotter (you will still be able to print
smaller sizes)
Select A0
Downloading Digital Pattern
You access the Pattern Refill dialog, either via the Get More digital Pattern button on the
Capturx Printing tool or by selecting the Install Pattern button on the Pen Manager.
13
Note: If you do not have any additional pattern available, you will need to contact Adapx to
order additional pattern. When making the request you will be required to provide the
license number.
Getting Familiar with the Capturx Toolbar
Capturx Forms for Excel is an add-in into Excel. To access the Capturx toolbar select the
Capturx tab:
14
The Capturx toolbar (ribbon), also known as a ribbon in Microsoft parlance, is grouped by
function. There are 6 groups on the toolbar that contain buttons that are displayed under
different conditions. This topic is divided into two sections:
A table that describes which functions are available under different conditions
A table that describes all of the options available on the complete ribbon
When Specific Sections and Options are Available
In order to make the toolbar easier to use and to show you the specific options you will
need, some of the features are hidden or exposed depending on where you are at in the
process of using Capturx Forms for Excel.
For example, when a digital pen connects to Capturx Forms for Excel and uploads
handwritten data, the data payload is displayed in the “Import Ink” function group. If you
don't have ink waiting to be imported, you will not see the Workbook (1) and Pen Data pulldown menu (2) or the Import Pen Data button (3) in the Import Ink section of the ribbon.
Complete List of Sections and Options Available on the Ribbon
Capturx
Section
Capturx Template
You start to prepare your form by selecting the Enable Form button. This
appears on the far left of the toolbar. This button prepares your form to be
printed and for use with a digital pen. Selecting the button allows you to
select the desired option. The Template option creates a template so you
can print and use multiple copies of the same form. The Direct option
creates a single copy of the same form.
15
Designing
Designing the Form
The next section is the Design Form section. With Capturx Forms for Excel
data to be entered into any formatted cell using a digital pen on a paper
print. The Capturx technology will convert the handwriting to match the
formatting of the cell.
Capturx works with standard Excel formatting – enabling you to leverage
existing worksheets and knowledge of Excel. Capturx also supports some
specialized formats to improve digital conversion of certain types of
information, such as names or addresses.
You can get a digital image of a sketch or signature for any cell, by leaving
that cell’s formatting as "General,” which is the default for Excel or by
selecting "handwritten ink". Text or numbers handwritten in cells formatted
as "General" or "handwritten ink" will not be converted into formatted digital
equivalents.
If you want to format a cell, but you don't want that cell accidentally
overwritten with the digital pen (e.g., a header on a table that is formatted
as text), you can easily have Capturx ignore that cell’s format (see below).
The Design Form Section provides the following menus and options:
The Standard menu enables you to select from one of Excel’s
standard formats for the writing areas you have created on the form.
The Specialized menu provides an additional list of new formats that
you are likely to have on your form.
The Wordlist menu enables you to use a wordlist for specific form
fields to improve text recognition of key words within the form.
Selecting Ignore Selection prevents cells with previous formatting
from being overwritten with converted data from the digital pen. This
is convenient when cells need formatting (such as dates at the top of
table) and it is important that ink written on the page does not
change the value of those cells. You can still see ink written on those
cells – but the cell values won’t change.
Select Add Eraser to Form to place an eraser tool in the current cell
of the worksheet. The eraser allows you to "start over" on a
particular cell that you want to change.
Select Sort Worksheet to sort your worksheets in alphabetical order.
16
See Selecting a Format for the Cells for information on the Formatting
section and how to use these options.
Print
Sheet
Printing the Sheet
After you have formatted the form, you are use the Print with Capturx
option to print your sheet. Note: You need to use this button when you print
so the sheet will contain the digital pattern. See Printing the Excel Form for
information on this option and how it is used.
Import
Ink
Importing the Ink
Once the pen is docked, the Import Pen Data button will appear. You can
import the most recent data entry or import all data at once.
This section also enables you to:
Select the Workbook file you have printed
View Pen Data information listing the author, time, and date for the
last time the pen was docked
Select Import Pen Data to import the ink from the selected
Worksheet
Review
Section
Reviewing the Changes Made to the Form
You will be able to review both the ink and the translation conversion using
the Capturx Review Pane and the Show Ink button.
The Review Section enables you to:
17
Use the Ink button to temporarily replace all converted values and
show the original ink marks you wrote on the page.
Review the information collected with your digital pen in the field by
selecting Review Pane. This pane will reveal the ink and the
interpretations of Capturx handwriting recognition based on the
format you have selected for each cell. The pane will appear on the
right hand side of your screen
Select the Summarize button for Capturx Forms for Excel to generate
a summary of the data that was collected on all your forms. The
summary data can be exported as a .csv or other format for use in
back-end systems. Go to sheet 1 to select the Summarize button
See Using the Review Options for more information about the review options
and how they are used.
Sheet
Status
Section
Sheet Status Section
The next section is the Sheet Status Section. This section displays the
information about when the worksheet was last printed and when the ink
was last reviewed.
See Viewing Status Sheet Information for more information about the Sheet
Status and the information it provides.
Help
Section
Help Section
The Help section enables you to:
View the online help
Check for recent updates. This option will take you to a Software
Updates dialog that allows you to view recent updates and to select
how often you want to check for updates
View and use sample Excel forms to practice using Capturx for
Microsoft Excel
View Capturx for Microsoft Excel version and copyright information
View a tutorial that describes Capturx for Microsoft Excel and its
features
18
Using the Pen and Docking Station
After you have made your form entries and you are ready to upload your data, you need to
connect the docking station to your computer and insert the pen. The following section
takes you through that process.
The docking station is used to dock your pen and to connect your pen to a PC or laptop via
the USB port. The docking station consists of the base, insert, and the USB slave port you
use to connect the docking station to your computer.
19
To upload the digital ink using the pen
1. Attach the docking station to a PC or laptop via the USB port.
2. Fully insert the pen in the docking station. The gold connection points on the pen and
docking station need to be aligned and the pen needs to be firmly placed in the
docking station.
3. After you connect the USB port to your computer and dock your pen, a Status
Window will also show you the progress of the download.
20
Using the Pen Manager
The Capturx Pen Manager is used to manage settings for the pen and processing ink records
saved on the pen. Features and options include:
Viewing the docked and/or locked status of the pen
Entering and saving contact details to the pen
Assigning a password to the pen
Setting a Customer Reference Pen for accessing additional services
Viewing the remaining time left on the battery of the pen
Downloading and deleting the pages currently on the pen
Setting how you want the pages to download
Activating Capturx enterprise applications for the pen
Enabling or disabling the Bluetooth feature on the pen
Registering the pen
Entering an email or server address for sending ink records
Using the Pattern Migrator to move pattern from one account to another
You can view the activity of the Pen Manager and access it by double-clicking on the icon in
your system tray.
Four states of the icon are used to show you status:
Displays this
icon
One or more pens are docked
Animated icon
One or more pens have
that flashes
unprocessed ink in their
between the
memory
two states
Animated icon
that flashes
between the
four states
Pen is processing ink records
- either downloading ink
records from the pen or
importing from an XID file to
the personal computer
Displays this
icon
One or more pens are locked
Displays this
icon
No pens docked
Hovering over the system tray icon with your mouse pointer will provide you with the
battery charge information and the memory status of the pen.
21
The Capturx Pen Manager is divided into tabs for each pen that has been docked, a docking
status indicator, and other main sections and options. Each of these is identified by the
number in the diagram and chapters below with descriptions:
Tabs Separating Each Pen (1)
Pen Docking Status (2)
Personal Data Stored on the Pen (3)
Customer Reference Pen
Pen Status (4)
Pen Docking Status (5)
Pen Activation and Enable Bluetooth (6)
Install Pattern (7)
Save/Register Pen (8)
Enter Email or Server Address (9)
22
Tabs Separating Each Pen (1)
Tabs are used to separate the Pen Manager options for each individual pen. Selecting the
tab will show you the options for the tab (pen) you have selected. The “Close” button is
used to close the particular tab you have open.
Pen Docking Status (2)
This section is used to assign a password and to enter personal data to the pen. If you
registered your pen during the original activation process, the information you entered will
appear in the "personal data" section. If not, you can enter personal data by filling in the
desired fields. By assigning a password, you prevent someone else from using the pen to
download data or from viewing the personal information you have entered. Once you assign
23
a password, you will be asked to enter it before you can download data from the pen. The
password options include:
Delete Button: Use this button to delete the password on your pen
Change Button: Use this button to change the password you have previously
assigned to the pen
Keep your password in a safe place.
The Customer Reference Pen is used to designate the pen serial number that is sent to
Adapx to identify the account used for acquiring additional pattern. You may be asked to
supply this serial number when ordering products. Capturx will select the first pen that you
dock as your CRP. After docking other pens, you may select them as your CRP.
Note: If your password is lost you cannot retrieve it and you will need to contact Adapx.
Pen Status (4)
This section allows you to view the following information:
Battery Status: Percent charged, writing time, and idle time left on the pen
Data on Pen: Percentage of free space left on the pen, pages remaining, and the
number of current pages on the pen ready to download. You can also delete and
download the current pages on the pen by selecting the desired button.
Based on average data per page, an estimate of how many pages you have left to
use on the pen
Pen Docking Status (5)
This section allows you to select a download option. Download options enable you to see
instructions for how you want to download your pen data. For example, if you select "Auto
download” the data will be auto downloaded. The download options include:
Automatically download – Data is auto downloaded as soon as the system detects a
connected pen.
Prompt for download – When the system detects a connected pen, you are prompted
for permission to download the data. For example:
Manual Download – With the pen connected, the system will wait for you to initiate
download using the Download button on the Pen Status section of the Pen Manager
Pen Activation and Enable Bluetooth (6)
24
To begin using Capturx products, other than Capturx for Microsoft OneNote, you must have
an activated pen. (Typically, your pen will come fully activated from Adapx.) Although
activating the pen is part of the initial registration and activation process, you may want to
activate additional pens or to activate your pen if you did not do it during the initial
registration. You have the choice to activate using an offline key or via the internet. Activate
offline by manually entering your software activation key.
The Enable Bluetooth option allows you to use the check box to enable the Bluetooth feature
on the pen hardware. Your Bluetooth PIN will also be displayed, so that you can use it to
pair your pen with a supported mobile handset (for use with Capturx Pen Manager on that
handset). When using Bluetooth, see how Capturx works with Mobile device at:
http://www.adapx.com/mobile
Install Pattern (7)
Although you may have received pattern when you installed your pen, you may need
additional pattern if you dock a new pen or run out of pattern. The Install Pattern button is
activated when you have pattern on the pen.
Save/Register Pen (8)
Selecting the Save/Register button will save the changes you made to the pen register and
update the pen’s registration information sent to Adapx with the information shown in
section 3.
Enter Email or Server Address (9)
You can also send ink records to an email recipient or to a Capturx-enabled Server by
entering the mail recipient address or URL in the “Connection” field at the bottom of the Pen
Manager and selecting Enable.
Ink Records routed to Capturx-enabled Server
1. Enter a URL for a Capturx-enabled Server in the Connection field
2. Select Enable
3. Records written on forms printed from the Capturx-enabled Server will be processed
4. All other ink records on the pen will then be processed on the local machine
Ink Records routed to other Capturx installations via email
1. Enter an email address formatted as [email protected] in the Connection field
and select Enable.
2. Dock the pen once the data is collected.
3. Capturx will create an email using your default email client with the sender being
whatever address is entered into the Connection field. The ink records will be
contained in an .XID file (Adapx Ink Document) attached to the email.
When routing from a pen containing ink records from both Capturx for OneNote and other
Capturx applications, two XID files will be created once the pen is docked – all data stored
on the pen will be saved as one of two XID file(s).
a. One XID file containing ink records for Capturx for Microsoft Office OneNote
b. One XID file for the other Capturx applications
25
Each .XID file will be named with the following:
a. Name of the Pen Author
b. Date and time of the file upload
c. Whether or not the ink records are for OneNote or not (“Non-OneNote”).
Opening XID files:
In order for the email recipient to open the XID file
Recipient must have Capturx Pen Manager 2.5 installed and the corresponding Capturx
application for each document that the ink record was written upon
1. Capturx for OneNote:
a. Double click on the OneNote.XID file named with the appropriate date/time,
author
b. OneNote ink record is processed and uploaded into a Microsoft Office OneNote
Notebook.
2. Capturx Forms for Excel, Capturx for ArcGIS: and other Capturx applications, except
OneNote.
a. Open the saved file from which the document was printed
b. Download and open the XID file named with the appropriate date/time,
author and Non-OneNote.XID file.
For either kind of XID, successful processing of Ink Records will be reported by the Capturx
Pen Manager after processing.
26
Unsuccessful processing of Ink Records will result in a “Failure” message. Failures are
generally explained by the following conditions and can be solved with the accompanying
actions:
Condition
Action
Ink record was
created with an
Unactivated Pen
Please activate the pen on this machine before attempting to import
the ink.
Capturx is unable to
find the correct file
Copy and open the original document on this computer, or import
this XID on the computer where the document was printed
Ink record has
already been
imported
This ink record has already been imported. This can happen if you
accidentally try to import the same file more than once.
Unable to import ink
record
Unexpected error during import. Try rebooting the computer if this
does not work contact Adapx customer support http://www.adapx.com/Support/Contact-Technical-Support.html
Ink record belongs to This ink record belongs to an application that has been uninstalled.
an application that
To import this ink, please re-install the application or import it on a
has been uninstalled computer that has the application installed.
This utility is installed with the Capturx Pen Manager. If needed you will be able to obtain
additional pattern which is used create the printed digital watermark when printing Capturx
enabled documents. You can also use this tool to move pattern from one Windows account
to another.
or more information see: C:\Program Files\Adapx\Pattern Migrator\Help\Using Capturx
Pattern Migrator.htm
If you encounter any issues, contact Adapx Technical Support:
http://www.adapx.com/Support/Contact-Technical-Support.html
27
Creating an Effective Form
The Capturx Forms for Excel Overview topic outlines the general steps for using Capturx
Forms for Excel. This section describes general strategies that will help you use Capturx
Forms for Excel effectively and help you avoid formatting and recognition errors. These
strategies apply to both using an existing form and to creating a new form.
Make the Form Easy to Use - Cell Size
You can make your form easier to use and improve the recognition by making the cells large
enough to accommodate the user's handwriting. You can make the cells taller or wider by
using the tools Excel provides, and you can also use the merge cells features to make larger
cells. See the Merging Cells to Create a Writing Area topic for information about how to
merge cells
Select the Formatting that Meets Your Needs
After you have made the cells large enough to create the writing areas on the form, you
need to select the appropriate format for each cell you want to write in. Formatting helps
limit the recognition to a selected type or category. For example, if you select "City" as a
format option, the software will interpret the results based on this category, and when you
enter data into a cell, the data is handled differently depending on the type of formatting
you have assigned to the cell.
You can, therefore, help the recognition process by selecting the format that most closely
matches your desired input. However, if you leave the formatting as "General" you will
simply see your ink strokes reproduced on the form.
If you explicitly want handwriting to stay as ink and appear in a dark color, such as for
signatures, we encourage you to format the “handwritten ink” format in the specialized
formatting tool found in the Capturx Forms ribbon. This is a good options for signatures,
sketches, or freehand text that does not need to be converted to digital text. See the
Selecting a Format for the Cells topic for information about the format options and how they
are used.
Make it Clear Where the User Should Write on the Form
You can also make your form easier to use by making it clear where the user is expected to
write on the form. You can help achieve this by putting borders around the cells where you
want them to write and by putting the field or cell name close to the data entry field. To
avoid confusion, we recommend that you don't place borders around other cells where you
don't want the user to write. In addition, if you are expecting certain formatting (like first
name or postal code), make it clear on the form what type of input you are expecting.
Complete Your Form Design Before Capturx-Enabling Your Form
Design your form making all necessary changes to alignment and spacing for each
page/sheet. Once your form design is complete, Capturx enable your form and begin
formatting the cells. If changes are needed to the design of your form after they have been
formatted, ensure the "ignore selection" button is not selected for the formatted cells before
changing the cells. Once your changes are made, select the "highlight" button to review
formatting.
28
Layout and Boxes
Check your lay-out by selecting print preview. This will give you a dotted line outline of the
printed page you can use. It is important to make the writing space large enough for
handwriting in general, especially for longer values. To enlarge the writing space, simply
merge cells or expand the dimensions and font sizes of the specific cells. Communicate to
users where you want them to write by using an outline around the cell. You will help to
avoid confusion during data entry, by outlining around these specific cells and not all of the
cells.
Using an Image in Your Form
You can copy and paste images in your form, such as diagrams for inspections. If you want
to collect structured data in the image make sure the underlying cells are enabled for that
type of formatted data. Also make sure that the user knows where to fill in the data to get
the correct information in the correct cells. You can do this by underlining the cell, making a
border on the cell, and by making your image transparent so that the underlying cell
borders can be seen when printed. If you want basic freehand ink collected, keep all the
background cells formatted as "General".
Custom Word Lists
You can improve data recognition by limiting entries to certain items that you define, by
creating a word list of valid entries for your form. See the wordlist section under Selecting a
Format for the Cells
Create Name Ranges for your Summary Sheet
To get a data table from all of your worksheets, use "Name Ranges" to define the cell field
names when you design forms on your template. For information on name ranges, see the
wordlist section under Selecting a Format for the Cells. You can also do this right before you
create a summary table after you’ve uploaded some form records. The field name will
appear at the top of the column in your "Summary Sheet". To create a name, simply select
the field, right click, and give the appropriate name.
Capture a Signature and Keep It as Ink
Simply outline the desired cell – or make the cell area bigger by merging cells or by
expanding the cell height and width. By keeping the formatting as "General," your ink
strokes won’t be converted to digital data. The information will remain as digital ink on the
form, and it won’t appear in converted data or on summary data tables.
Checkboxes
When marking a check box, ensure your check mark is centered, don't mark too close to the
cell borders, and don't extended your mark past the cell. Use checkboxes to turn on or off a
value that indicates an opposite/unambiguous choice. Create check boxes in their own cell
with labels for check boxes in adjacent cells. In the following cases using "X" symbol instead
of the "√" symbol for checkboxes is preferred:
When "checked" the check, will reference the current state of the check box.
When the check box is selected, the cell returns a TRUE value.
When the check box is cleared or unselected, the cell returns a FALSE value.
Note: When the check box cell is empty Capturx interprets the check box state as FALSE.
29
Designing Forms for Searching
If you want to convert and easily search shorthand codes written in forms, we recommend
creating special cells for shorthand codes. You can use word lists that include all of the
abbreviations to ensure that special abbreviations are recognized
Best Practices for Form Design
To create a list: Enter your list item in the text entry field at the top of the dialog and click
the Add button. You can add your item by selecting it on the list and click Delete to
remove it from the list. You should provide a name for the list for future reference in Excel
(as a Named Range). If your list has already been created in Excel, you can refer to it by
name (using the Named Range entry). You can also refer to it by providing a Sheet,
Column, Start and End Row, or by entering the Formula that specifies the list.
As you select your list using one of these three methods, the list will be imported into the
window on the left of the dialog for your review. However, if you want to revise the list in
the future, you will need to navigate to the worksheet and update the list from that specific
worksheet.
Best Practices for Writing on Forms
When using the pen to write on the form, you also need to keep the following practices and
strategies in mind:
Avoid crossing adjacent "t"s with a single horizontal stoke such as in "Seattle"
Exaggerate your punctuation marks so they are recognized more easily
When placing a period and decimal points on the page, make the points thick
If you write a number that starts with a decimal point, start with a "0" then make a
decimal point with a thick point
When writing a date, use the day, month, year number abbreviation convention
If you use slants to separate dates, then exaggerate the slants to avoid them looking
like the number "1"
Make large thick "dots" when writing email and internet addresses
When writing text on the Excel form you need to write in the same direction and
orientation as the printed form for your ink to be recognized.
Although the image can be printed up to the edge of the pattern, the digital pen does
not work well at the edges of the page. Allow a 12.7 millimeter margin from the edge
of the page to ensure that your ink is captured correctly.
If you enter double-quotes (") in a cell to mean "same entry as the cell above",
Capturx will try to translate the ink, so we recommend that you don't use doublequotes to mean "same entry as the cell above".
Custom Expressions
Capturx provides many built-in formats, but if these do not meet your needs, you can
customize a desired format. Use "Custom Expressions" to provide a concise and flexible
means for identifying strings of text of interest, such as particular characters, words, or
patterns of characters. See the Capturx Forms User Guide Appendix topic Using Custom
Expressions for more information.
Note: Using Custom Expressions is an advanced technique; some programming knowledge
may be required.
30
Merging Cells to Create a Writing Area
The first step in creating a digital form you can write on is to merge cells to create the areas
on the form you can write on. This section explains how to merge cells within all versions of
Microsoft Excel. Merging cells is often used when a title is to be centered over a particular
section of a spreadsheet.
Merging cells is important when designing forms because, in part, Capturx relies on cell
boundaries to determine what to do with the results of translated ink you have downloaded.
In the example below, we have set up a Name entry field. Let’s assume that the name
Brenda Williams was written on the form. Since the name is written on two separate cells,
Capturx will try to associate the Brenda ink with Cell B2 and Williams with C2. However,
since this is rarely the intended behavior, the forms designer should merge these cells.
To merge a group of cells:
1. Highlight or select a range of cells.
2. Right-click on the highlighted cells and select Format Cells.
3. Click the Alignment tab and place a check mark in the check box labeled Merge
cells.
To merge a group of cells and center the text, you can also use the Merge and Center
button on the Excel tool bar.
1. Highlight or select a range of cells.
2. Click the Merge and Center button on the Alignment tool bar or pull-down that
same menu to align the merged cells differently (e.g., left).
Merging the name field above produces
31
Note: when designing forms, you will discover that it is easier to begin with many, thinner
columns. This allows for a lot of customized placement on the page, and these thinner
columns also make merging that much more important.
Adding Borders to Your Form
The use of borders encourages people filling out forms to write within the specified lines.
To add borders to your form:
1. Choose the merged cell B:2 (C:2 no longer exists; it has been merged away).
2. Select the Border tool on Excel’s Home Ribbon and select Outside Borders. This
border provides the cell with an outline that will encourage users to keep their
writing within that border.
Selecting a Format for the Cells
After you have merged the cells to create the writing area on the form, format each cell you
want to write on appropriately. When you enter data into a cell in Excel using the pen, the
data is handled differently depending on what type of formatting you have assigned to the
cell. For best results of ink data converted into Excel data, cells should select other then
"general" formatting so that the handwriting is converted into the desired format. This
section explains the process for formatting the cells you have merged.
Before you begin formatting, you need be aware of the following:
You need to add the single quote (') marks around any worksheet name that
contains characters other than standard letters and numbers such as spaces, curly
braces, etc.
If the individual characters within the cells have different font styles applied to them
(apart from the style of the cell itself or the row or column), once you apply a Format
on a Capturx-enabled sheet to that cell, the font styles are eliminated
Changing the size of the rows in a table after you have formatted selected columns
will cause the ink will appear between the rows
Do not merge cells that you want to format with the check box option
After you use the Capturx design tools to highlight cells or to format multi-cells, the
Excel undo operation cannot be used to revert to prior states of your document. We
recommend that during the design phase you complete the physical layout
32
operations and formatting in Excel, then use the Highlight and specialized Formatting
actions in Capturx after that work is completed.
Although available in Excel, Scientific Number format is not a supported format
option.
To improve recognition, use separate fields for date and time
To format a cell:
1. Select the cells you want to format.
2. Return to the Capturx Ribbon and format the cells using a selection from either the
Standard Excel Formatting menu options or the Specialized Capturx
Formatting menu options.
3. In this example, we want to format the cells as a Full Name.
Note: the Formatting selections are accessible on the Excel Home Ribbon or by right-clicking
on the cells and using the Formatting dialog. The Capturx custom formatting options will
appear under the Custom tab in the dialog.
33
Specialized Formats
Capturx Forms for Excel adds a number of Specialized Formats that can be used to optimize
the handwriting recognition experience. The list is provided in the previous figure.
Adding new terms to the dictionary
The handwriting recognition software uses a dictionary to help match handwriting to proper
words. By using words, the handwriting software can still perform well when individual
letters within a word can be difficult to discern. You can add new words and terms to
augment the standard dictionary so they can be recognized by the handwriting dictionary
when using text strings such as comment fields. This section shows you how to add new
words to the dictionary within a existing workbook or to an external workbook. The section
below refers to "external workbooks". If you are not familiar with external workbooks and
how they are used in Excel, consult your Excel documentation. Adding new words requires:
Creating a list and defining a name.
Using Capturx technology to specify the custom terms you want to add
Note: When adding new terms to the dictionary, you need remember the following:
Text Plus Custom Terms created in a single worksheet can be used in the same
worksheet multiple times, but new terms cannot be added for the entire workbook.
Named ranges are not case sensitive and they can contain both upper and lower
case letters. They cannot resemble any actual cell addresses such as "B3". All named
ranges must begin with a letter, an underscore "_" or a backslash "\".
Named ranges can include numbers but cannot include any spaces. You cannot use
any symbols except for an underscore and a full stop (period). You can include a
backslash and a question mark as long as they are not the first characters. Named
ranges can be just single letters with the exception of the letters R and C.
External workbooks must be open during upload of pen data for Capturx to include
the custom terms in the form. If the external source is closed, import to this form
will abort and you will receive an error message. You can manually open up the
linked workbook and import again by click Import button on the Capturx ribbon.
From the list of terms shown, select the term you want to add to the dictionary and
select OK.
To activate the custom terms for a specific fields:
1. Select a new worksheet and enter the words or terms you want to add in separate
cells. Use your mouse to select the cells
2. Right clicking on the cells you have selected and select the Name a Range option.
34
3. Type a one-word name for the list, e.g. Radionuclide.
4. The term you selected will appear in the name field.
7. Select OK.
To activate the custom terms for specific fields:
1. Select the worksheet for the Capturx form you are working on.
2. Use the Capturx toolbar by clicking on the Capturx tab.
3. Select the Specialized pull-down option in the Form Design section of the toolbar
and select Text Plus Custom Terms.
35
4. From the list of terms shown, select the term you want to add to the dictionary and
select OK.
5. Follow the same process for adding custom terms from an external workbook. As
noted earlier, external workbooks must be open during upload of pen data for
Capturx to include the custom terms in the form. From the list of terms shown,
select the term you want to add to the dictionary and select OK.
See Using the Review Pane for information on how you review the words you have entered
with the pen and accept or reject the entries you have made.
Using the Excel Data Validation Feature
When data is reviewed using Capturx Forms for Excel, validation rules will not activate as
they normally would when typing values into cells. To discover whether a validation rule you
have written may have failed turn on Validation Circles. To turn on validation circles:
1. On the Data tab, in the Data Tools group, click the arrow next to Data Validation.
36
2. Click Circle Invalid Data.
Creating Custom Expressions
Custom Expressions provide options for advanced formatting with Capturx Forms for Excel.
This allows the forms designer to express complex formats such as serial numbers,
employee ID numbers, etc. Custom expressions are difficult to write and to do correctly. We
recommend alternative formats be used unless the forms designer has experience writing
custom expressions and functions. Although difficult to use, these custom expressions are
the best way to guarantee highly accurate translation of your ink for complex alphanumeric
expressions. See Appendix B: Using Custom Expressions for detailed information on custom
expressions and how they are used.
Capturx for Excel provides the following alternatives to using custom expressions:
The Text formatting option may be adequate for your form depending upon the mix
of symbols in the valid entries.
If the values in your entry are all known, then a List format may be your best and
easiest method to implement. Last, a forms builder can choose to use Custom
Expressions to develop a complex regular expression that describes all possible
values.
For each of these alternatives (and in selecting any formats), there is a trade-off between
how precise and accurate the format is and how easy it is to use. For example, choosing
Text format is easy (there is no additional preparation), but the accuracy of the handwriting
recognition is likely to suffer.
Creating a Wordlist
Use a wordlist for specific form fields to improve text recognition of key words within the
form. Capturx can easily select from a list one of the possible choices in a cell. This topic
shows you how to create and select a wordlist.
Note:When adding new terms to the dictionary, you need remember the following:
37
As in the example below, you need to use a single column when naming the range
you want to use.
See the "When adding new terms to the dictionary" note above for a list of conditions
for naming a range.
When using external workbooks to reference wordlists, the workbooks will need to be
open and the original location of the workbook must remain unchanged or you will
need choose the wordlist again from the new location.
To create and select a wordlist:
1. First create a wordlist in a worksheet using a single column. Select the cells that
contain the items you want to include in your wordlist.
2. Right click on the cells you have selected and select the Name a Range option and
enter the desired name in the Name field
3. Type a one-word name for the list, e.g. Fruits. Note: for names with two or more
words no spacing is allowed.
4. Select the OK key. You can also name a range of selecting the Formulas tab and
selecting the Define Name option and entering the desired name in the Name field.
38
4. Select the Capturx tab at the top.
6. Select the Wordlist pull-down option from the Design Form section and select the
name of the wordlist you created.
Ignoring Selections to Prevent Handwriting Input
In some cases, you may also want to have Capturx Forms for Excel ignore certain cells to
prevent unintended handwriting on those forms from accidentally changing fixed elements
of your form. This could include form elements which are formatted with dates, for example,
or areas where you want to create comments or instructions. This topic shows you the
process for specifying certain selections of cells to be ignored.
Here is an example of a scenario appropriate for Ignoring Selections. Imagine a table with
dates at the headings and I want my team to write information in the cells below the date
headings. I may wish to keep the date format for the headings which look good in my form.
If I do not use IGNORE SELECTION for those cells, then those cells become available for
handwriting input.
Before excluding areas on a form, please keep the following in mind:
If you copy and paste cells from an enabled sheet that contains excluded cells into
the same or a different worksheet, the exclude formatting will not be pasted into the
new cells.
If you create a copy of a worksheet that has excluded cells, those cells will not be
included in the new copy of the worksheet
To exclude areas on the form:
1. Select the cells you want to exclude.
2. Select the Ignore Selection.
39
Adding and Using the Eraser
An Eraser can be added to your form and placed anywhere on the form. The purpose of the
Eraser is to allow the user in the field to reset a cell’s value or "start over” in a particular
entry. Once printed, you can use the digital pen to check on the Eraser after making a
mistake in some cell. The next time that you write on a printed worksheet, if you write in a
formatted cell, Capturx will only translate the ink written after the Eraser was checked.
Before you use the eraser, you need to keep in mind the following:
Do not place the eraser over a cell that has been Capturx enabled
If you print out a worksheet that spans multiple pages or has a collection of multiple
sheets, you can only use the eraser on the specific page it was printed on.
If you accidently check the eraser icon or decide, after checking the icon, that you
don't want to make a change, you can place the ink in a non-formatted area
To add an eraser to your form:
1. Select the cell where you would like to place an Erase.
2. Click on the Eraser button in the Capturx Design Form ribbon.
This will place the Eraser icon on your form in the cell that you selected.
To use the eraser make a correction:
1. On the page you have printed, check the Eraser icon with your pen.
40
2. Write the desired text in the cell you want to replace. When you dock the pen and
download the ink, the new text will appear in the cell.
To delete the Eraser, select the Eraser icon with your mouse and select the Delete key.
For best results, please ensure that the eraser tool is used in the following sequence. (You
may even want to add this text to your form as a reminder):
1. Cross out the old value of a cell with the digital pen
2. Put a check in the eraser icon using your digital pen
3. Enter a new value within the original cell boundaries
If you follow the INCORRECT sequence, such as the one below, then your new value will be
obscured by your crossing out of the prior value.
1. Put a check in the eraser icon using your digital pen
2. Cross out the old value of a cell with the digital pen
3. Enter a new value within the original cell boundaries
Sorting Worksheets on the Form
You may also want to sort all of your worksheets in an alphabetical order. Before you use
Sort Worksheets option, you need to keep in mind the following:
If the name of the workbook starts with a number, a letter should be placed in front
of the number so the worksheets are sorted correctly
To sort worksheets on the form:
1. Select the workbook you want to sort.
2. Select Sort Worksheets.
41
Designing and Completing Your Form Overview
This section describes the process for activating and completing your form. This includes:
How to make the paper form digital so it can be used with the pen
How to ensure that the form is complete so that the desired cells can be used with
the pen
Before you start to design and complete your Excel form, you need to keep in mind the
following:
Worksheets are locked when in either Ink Only or Highlight mode (these two are
exclusive operations and you can only perform one at a time). However, you can
make changes to your forms, such as sorting, that reshuffle the location of
information and reformat the cells without informing Capturx. However, these
operations should be avoided on the Capturx forms to prevent loss of information
used for reviewing the original ink submission.
Since you modify the spreadsheet during printing and when you download the ink,
you need the workbook to be non-read-only. If you print or use a read-only
spreadsheet, you will be asked to save and shown a Save As dialog. Printing and
downloading the ink will then continue as usual on this new spreadsheet you have
saved.
The following information will help you become familiar with the features and how they are
used:
Making the Paper Form Digital
Ensuring the Form is Complete
Making the Paper Form Digital
After you have created the writing areas on form and selected the desired formatting for the
cells, you make your paper form digital.
When to use a Template or a Single Form
Using the Capturx button enables you to choose either a Template of Direct option. If you
choose template, each printed copy will ultimately create a new copy of the enabled sheet
when the pen is docked. This is the most common use. However, if you have a single form
and data from all printed copies should be entered into that form, then you can select the
Direct option. When you do so, you will want to take care when you import data from
different printed copies, since the ink will be translated for and the values updated in that
single worksheet.
To make your paper form digital:
42
1. Open the form you want to use.
2. Select the Enable Form button in the Capturx function group of the ribbon and
select the desired Template or Direct option.
Ensuring the Form Formatting is Complete
After making your paper form digital, you need to ensure that the form is complete and that
you did not miss a cell that needs to be formatted. Highlighting enables you to make sure
that none of the input cells are missing and to double-check that they are formatted
according to your specifications. This ensures that when ink is imported, Capturx translates
it correctly.
Note: When using this feature, you need to keep the following in mind:
If a cell has not yet been formatted for digital ink input, it won't have a highlighted
background. By pulling down on the bottom part of the button, you can select which
color you would like to use for your highlight.
If the individual characters within the values of the cells have different font styles
applied to them (apart from the style of the cell itself or the row or column), once
you apply a Format on a digital-pen enabled sheet to that cell, the font styles applied
to the Value are eliminated.
After you use the Capturx design tools to highlight cells or to format multi-cells, the
Excel undo operation cannot be used to revert to prior states of your document. We
recommend that during the design phase you complete the physical layout
43
operations and formatting in Excel, then use the Highlight and specialized Formatting
actions in Capturx after that work is complete.
To ensure the form is complete and to review your formatting selections:
1. Open the form you want to review.
2. Select the Highlight button in the Design Form section of the ribbon.
The formatted cells will be highlighted and show the formatting you have selected for each
cell. Selecting the button again will turn hide the highlighted formatting.
Note: With the exception of Icon Sets, the highlighting cells feature will not work if you have
added conditional formatting to a cell by selecting the Conditional Formatting options from
the Home tab
Naming a Worksheet
To make it easier to design and complete your form, you can use the Naming a Worksheet
option. This option enables you to quickly and easily change the name of the worksheet to
the value is of a selected cell
To name a worksheet:
1. Select a cell in your form.
44
2. Click on the Name Worksheets button.
The name of the worksheet will change to the value is of the cell you selected.
Printing the Excel Form
This section describes the process for printing your Excel form with digital pattern. This
includes how you select an appropriate option to print the form and instructions for printing.
See When Purchasing and Obtaining New Pattern for Printing for a description of the process
for monitoring and using pattern, including a description of how to use the Capturx Pattern
Refill dialog box to get the pattern you need to print your page.
Please keep the following items in mind before printing your form:
Capturx Forms for Excel is an add-in that requires both the Excel 2007 application for
printing and uploading AND the use of .XLSX or .XLSM Excel file types. To work with
an existing .XLS file type, please open the file and save it to an .XLSX format before
enabling for Capturx.
If either the folder containing your Excel Workbook or the Workbook itself are
marked read-only, then Capturx will prompt you to "Save As" your workbook at each
Import or Print request.
To avoid potential issues with digital pattern becoming difficult to track by the digital
pen, Capturx Forms for Excel does not support duplex printing on both sides of a
single sheet of paper.
Printing the Form
Once a form has been designed and Capturx-enabled, it is ready for printing. Printing is
done by selecting the Print with Capturx button on the Capturx Forms ribbon. Printing with
Capturx technology is also accessible from the Excel 2007 Print menu under “Capturx Forms
Print.” If no worksheet has been Capturx-enabled, the button and the menu option in the
figures below will be disabled.
45
To print the Excel form:
1. Select the Capturx Forms Print Option from the Excel print menu.
After clicking on the print option, a custom print dialog will appear showing you the status
of the print job and the amount of pattern you have left.
2. Select the OK button to print the form.
46
Note: If you have a hidden workbook or if you see an unknown error when attempting to
"Print Entire Workbook" from the print dialog, then you should do the following:
1. Open the workbook you want to print.
2. Select the Capturx tab.
3. Select all the sheets in the workbook. (Select the first sheet by clicking on its tab
then hold down the Shift key and click on the last sheet you want to select. You
should notice that all the tabs between the two have also been highlighted. If the
sheets you need to select aren't consecutive, hold down the Control key and click on
the sheet tabs as you need. You can also select all the sheets in the workbook by
right-clicking on a sheet tab and selecting the Select All Sheets choice from the
pop-up menu.)
4. Select the Print with Capturx button.
5. Select OK.
Using the Import Ink Options
The Import Ink options allow you to:
Select the Workbook file you have printed
View Pen Data information
Select Import Pen Data to import the ink from the selected Worksheet
47
The following information will help you become familiar with the Review section of the
ribbon and the options it provides:
The Workbook drop-down shows you the current Workbook that is ready to
import.
The Pen Data option provides information listing author, time, and date based on
the most recent docking. This field shows the data once per target sheet,
regardless of number of times the pen has been docked using that particular
sheet.
The Import Pen Data button is used to import the ink from the selected
Worksheet.
Using Review Options
The Review options allow you to:
Create a batch print job
Select how you want the page and palette printed
View information about each print job in the print queue
Manage the print files you are using
48
The following information will help you become familiar with the Review section of the
ribbon and the options it provides:
The Show Ink button toggles between showing you the value for each cell and
showing you the ink originally written in that cell.
The Show/Hide Review Pane option opens and closes the Capturx Review Pane.
The Review Pane enables you to review the entries you have made with the pen
and to accept or reject the changes you have made.
The Summarize button is used to show you a summary of the data collected from
multiple worksheet of the form. You can view a summary of either all the
Capturx-enabled cells or other selected cells.
the Export Summary takes the summary you created using the Summarize option
and exports it to a brand new workbook.
49
Using the Review Pane
The Review pane enables you to review your input and accept or reject the changes you
have made.
If the Review pane is docked on either side of the worksheet to create more space, you will
see alternates as selectable elements, rather than in a drop-down list. If the pane is docked
on top or at the bottom of the worksheet, the recognition alternates will be contained in a
drop-down list.
Note: If you accept an edit to a cell value by clicking Approve and then change the focus
from that cell to another cell, when you return and click Revert, the original ink value
appears correctly in the Review Pane for the cell, but that cell itself will be empty.
To use the review pane:
1. Open the form you want to use.
2. Select the Show Review Pane button to open/hide the Review Pane.
The following table shows you the review pane and the features and options it provides:
50
Review Pane Options and
Features
1.
The top of the Review
Pane shows user and status
information including:
Current Cell Selected
Author and Pen
identification number
Date and time of the
last ink written in that
cell.
2.
Navigation buttons
used to navigate through
each cell. The navigation
buttons will navigate
through the cells in the
order the cells were
originally filled out. The
Approve and Revert buttons
are used to approve the
interpreted value or revert
to the original value of the
cell.
3.
The Original value will
be displayed just above the
Ink collected in that cell.
Ink collected prior to use of
an Eraser will be displayed
lighter than any ink drawn
after.
4.
The Cell Value field
shows you the most likely
interpretation of the ink
drawn by applying the cell’s
format.
5.
The Candidates field
shows a list of other
possible interpretations of
your text that you can
choose from.
6.
The Approve Pending
and Revert Pending buttons
are used to approve of or
reject all of the changes
you have made.
Review Pane
51
Viewing the Sheet Status Information
You can use the Sheet Status options to see when the currently loaded Excel workbook was
last printed and last reviewed.
After you have printed and/or reviewed the workbook, the Sheet Status section of the
ribbon will show you the date and time when these events occurred.
Using and Viewing the Help and Support Options
Selecting the Help button allows you to:
View the online help
Check for recent updates. This option will take you to a Software Updates dialog that
allows you to view recent updates and to select how often you want to check for
updates. You can check for updates in the help file and/or the application will check
for updates automatically when online and provide a window with links available for
you to click on and download an update.
View and use sample Excel forms to practice using Capturx for Excel
View Capturx for Excel version and copyright information
52
View a tutorial that describes Capturx for Excel and its features
Contacting Adapx Technical Support
You can also contact the Technical Support department directly by email or by phone:
[email protected]
866-208-9673
Appendix A: Using Custom Expressions
The most basic custom expressions consist of a single literal character, e.g.: the letter 'a'.
Such an expression would match the first occurrence of that single character in a string.
Indeed, most characters entered into the Capturx Custom Expressions dialog are treated as
the literal text that you write, matching the expression character for character. The
expression "Capturx", for example, will only match the letters C - a - p - t - u - r - x, in that
order, and the C must be capitalized.
Certain characters, however, have special meanings:
the
the
the
the
the
the
the
the
Brackets []
Backslash \
Dot .
Vertical Bar |
Question Mark ?
Asterisk *
Plus Sign +, and
Parentheses ()
If you want to use any of these characters as a literal in an expression, you need to precede
them with a Backslash (e.g., '\\' would match the literal Backslash). If you want to match
1+1=2, the correct expression is 1\+1=2. Otherwise, the Plus sign will take its special
meaning rather than its literal meaning.
These special characters allow the expression author to write complex matches for
formatted strings like serial numbers, model numbers, or virtually anything that can be
written without enumerating every possible sentence using literal characters.
53
The following sections provide direction as to how to use the special characters and
examples of their use in expressions.
Note: the advanced reader may want to search the Internet to learn more about the regular
expressions upon which the custom expressions are based.
Special Character
How This Special Character is Used
Square Brackets: [ ] for a list of characters
Square Brackets let you match a Set of any
one of several characters, each of them
alternatives. Suppose you want to match
the word 'gray', but also want to find it if it
was spelled "grey’. A set will allow you to
match either. The expression gr[ea]y is
interpreted as ”g, followed by r, followed by
either an e or an a, followed by y.”
Within a Set, a Dash can be used to specify
a range of characters. Instead of
[01234567890abcdefABCDEF] we can write
[0-9a-fA-F]. Elsewhere, it simply matches
the normal dash character.
The Dot: . for any character
The '.' (Dot) matches any single character
outside of a Set, but not inside of a Set. It
is very convenient when the expression you
are developing has a position that can
contain any character. However, it is often
better to use a Set to constrain the
expression rather than the Dot, because a
Set or negated Set can be more precise.
And, the more precise your expression, the
more accurately Capturx will be able to
translate the handwriting.
The Vertical Bar: | for alternatives
The Vertical Bar is the special character
equivalent of "or". It allows you to describe
expressions that contain alternates.
"Mike|Michael" will match either Mike or
Michael in the expression. You can add as
many alternatives as you want, e.g.:
cat|dog|mouse|fish.
Parentheses: () for grouping
Place parentheses around multiple
characters to group them together. You can
then apply a Question Mark, Plus or Star to
the group. Parenthesis can be used to limit
the scope of the alternatives. I could
shorten our previous expression that
matched Mike or Michael with creative use
of parentheses. The expression
Mi(ke|chael) matches the same thing.
54
The Question Mark: ? for optional
The '?' (Question Mark) means optional. It
is placed immediately after a character,
Set, or Group that is allowed, but not
required in an expression.
If you wanted to match the English or
American versions of the word 'flavor' you
could use the expression flavou?r, which is
interpreted as ”f, followed by l, followed by
a, followed by v, followed by o, followed by
an u, which is optional, followed by r.”
The Plus and Star: + and * for repetition
Like the Question Mark, the Asterisk and
Star is used to match the preceding
character, Group, or Set zero or more
times. The Plus can be used to describe an
expression where the preceding character,
Group, or Set must appear at least once.
Examples of How These Special Characters are Used
Social Security Number:
In the US, social security numbers are structured as follows: three digits, followed a group
of 2 digits, followed by a group of 3 digits. The digit groups can be delineated either by
space, hyphen, period, or nothing at all (8 digits).
'
Here’s the custom expression that describes US social security numbers:
[1-9][0-9][0-9][-. ]?[0-9][0-9][-. ]?[0-9][0-9][0-9][0-9]
Let’s analyze this expression a bit. It starts out with a digit in the range of 1 to 9 ([1-9]),
followed by 2 more digits, this time in the range of 0 to 9 ([0-9][0-9]). The next group ([-,
]?) is a bit more interesting. The characters inside the '[ ]' are alternatives if enumerated as
is the case here. The characters '-', '.', and ’ ’ (space) are alternatives (one can be chosen).
If the '-' is in this set, then it must be the first character (otherwise it is denoting a
character range, as in 0-9). The '[]' is followed by '?', which indicates that choosing one of
the characters listed inside the '[]' is optional (which will allow the user to write 8 digits
without inserting any separator in between the number groups).
Part number:
The second example is a timesheet charge code. Here’s the expression that describes the
timesheet charge code:
(FIN|ADMIN|DEV|TEST)\.[0-9][0-9][A-Z][a-c]
The first part ((FIN|ADMIN|DEV|TEST)) describe a selection of one of the four alternative
letter sequences. That is followed by the Dot ’r;.’, which needs to be preceded by '\'
otherwise it would allow the user to write any character in this position. Next, there are
three Sets for 2 digits and one upper-case letter. The final element ([a-c]) could also have
been expressed as (a|b|c).
55
Appendix B: How to Monitor Digital Pattern
A certain amount of pattern is required to print the sheet you will use, and these different
size patterns are used to print different size pages:
A larger size pattern can be used to print a smaller size page layout. For example, A0 can
be used to print a letter-size 8.5” x 11” page layout. However, there are fewer pages in a
refill of a larger size pattern, so it is more cost efficient to use the smallest size pattern you
can. See When Purchasing and Obtaining New Pattern for Printing for information on how to
choose the pattern you will need.
Monitoring Pattern
Capturx Forms for Excel provides you with a Pattern Refill dialog box and a Desktop printing
dialog that you use to download pattern and to monitor the amount of pattern you have.
When you’re in the Pattern Refill dialog, you have the option to download any size pattern
for which you don’t already have more than 1000 pages. If you already have more than
1000 pattern pages, the check box for that particular size will be grayed out.
The bars on the pattern control are full/green at 1000 pattern pages or more. If there is less
than 800 pages left, you can find out exactly how many pages you have by hovering on that
bar, otherwise the hover text just reads "full".
You may need to buy some more pattern refills at some point, although your initial purchase
provides you with access to 1 digital pattern shelf per pen Extension Connection license
purchase. You can purchase more from Adapx.
56
Appendix C: Collecting and Sharing Data Across Teams
Teams can work with Capturx Forms for Excel to aggregate data from multiple members.
Data can be aggregated by sharing files through email or by posting files on common
network locations. By posting forms on a central network location, such as Microsoft Office
SharePoint Server, teams can publish forms and data collect data using a central place.
Using Interchangeable Pens
Individual digital pens can be used with multiple Capturx applications, even during the same
session. In order to use the digital pen with any given application, the pen must be licensed
for that application. Once a pen is licensed for a specific application, such as Capturx Forms
for Excel, then it can be used with any copy of Capturx Forms for Excel.
The digital watermarks created and printed with each form, map or design are all unique.
The underlying Capturx technology keeps track of each printed file by application, file name
and print out. Of course, the file from which any given paper form was printed using
Capturx must be accessible by Excel when data is uploaded from the digital pen.
Digital Watermark Records Move with the Files
When forms print, Capturx software makes a record of the unique digital watermark and
embeds it with the original file. If that file is sent by email or posted on a network, the file
always contains a record of the digital watermarks that were created and printed from that
file.
A form can be printed through one PC with an installation of Capturx, moved to a different
PC that is also running Capturx, and the data written on the original form can be uploaded
into the original file through that second PC. For example, an administrator can:
1. Print forms using a main office PC and send them through the physical mail to field
offices.
2. The administrator could then post the original file from which the forms were printed
onto a network location accessible by the field offices.
3. The field teams can complete the paper forms and then upload data through a field
office PC directly into the original file through the network.
Collecting data into Separate Workbooks and combining worksheets into a master
workbook
You can use Capturx Forms for Excel to:
Create a master workbook for your form
Share the master workbook with colleagues to print forms and upload data
Copy all of the worksheets from the separate workbooks into a master workbook
Creating and Sharing the Form
You start with a master form workbook which has the original template enabled for Excel.
You can then share copies of your master workbook to team members through email or by
posting the workbook on a shared network location.
57
Each team member will save their copy of the workbook using a different, unique name.
They can then print forms from their copy of the workbook. They fill out the forms as they
ordinarily would and upload the data back into their copies of the Excel workbook. When
teams want to combine workbooks, the person with the master workbook collects the other
workbooks through email, a thumb drive or a shared network location.
Copying and Moving the Worksheets
The person with the master workbook can simply copy or move the desired worksheets from
the other workbooks into the master workbook. They simply select one or more worksheets
and use the Edit | Move or Copy Sheet command to add worksheets to the desired
workbook. You can also drag and drop selected worksheets from one workbook to another
by arranging the windows to display both the source and target workbooks.
If source and target workbooks contain worksheets with the same name, then Excel will add
a "(2)" to the end of the name of the new worksheet. "Sheet1" will become "Sheet1 (2)."
For ease of use, we recommend that you keep the master template form as the first sheet
in all your workbooks, and that you add new worksheets after the template. This will make
it easy to print new blank forms with Capturx and to create new summary tables.
Updating your forms in new workbooks
We strongly encourage you to move your template forms into new workbooks and then reenable those workbooks with Capturx. To do so, you will open your original workbook and
move the template to a new workbook, which you will then save under a different name.
To open your original worksheet in Excel:
1. Open your original workbook in Excel
2. Select worksheets in the workbook for your form templates (also copy list
worksheets if used)
3. You can also move all existing completed forms
4. Right click on the worksheet tabs located at the bottom of the workbook
To move the worksheets:
1. For each selected worksheet tab choose Move or Copy
58
You will be presented with a dialog and drop down box titled “To Book”
1. Select (new book) – this will create a new workbook for your worksheet(s)
2. Be sure to check the check ox at the bottom which states Create a copy.
3. Click OK
After you’ve added worksheets to your master, the ”create summary” feature will still work
to create a data table of all the worksheets present at that time in your workbook. Each of
the worksheets must, however, have the same layout and formatting of the original
template.
Note: If you try to copy a sheet with ingested ink within the same document or to a
different document, the Show Ink button will not be active in the copied sheet and the
Review Pane will not be active. Therefore, if you want to see the active Review Pane and to
create summary of the moved worksheet, you will need to move the sheet from one
workbook to another workbook.
59
Using a Single Workbook on a Network to Print Forms and Collect Data
Using a Workbook on a Network
Teams can also post a single workbook on a network share which can be used for local
printing and uploading data. This enables data to be collected into a single location with
team members taking turns printing and uploading data directly into the master workbook.
Each local person computer can open that file directly from the network location for printing
and data uploading. Each of those person computers will need to have Capturx software
installed and have access to the master workbook.
Using Revision and Version Control
We recommend using document management software that supports version control or
revision control of shared files, such as Microsoft Office SharePoint Server. Most document
and project management and collaboration software supports version control where teams
can check-in and check-out files to avoid accidental data overwriting and loss. Version
control is important because every time a team member prints a form or uploads data, the
master workbook is updated.
When a new form prints, Capturx generates a unique digital watermark. A record of this
watermark gets stored in the original Excel workbook, which enables the data later written
on that form to be matched and uploaded into the original workbook. Of course, every time
data is uploaded into the master workbook, the workbook changes again.
If multiple team members have the same file open and are making changes at the same
time, then teams can accidentally overwrite each other’s data. Version control can help
guarantee that only one person is working with the file at a time, either to print or upload
data. To illustrate the steps, we’ll use an example with SharePoint:
1. Publish the master workbook to SharePoint and enable version control. When a team
member wishes to print a form, they simply check out the workbook and make a
print from their local PC using Capturx Forms for Excel. When finished, they save the
document and check it back into SharePoint. The master workbook will keep a
record of the digital watermark.
2. To upload data, they check the workbook out of SharePoint again and open it. They
connect the digital pen, upload the data and make any edits. They then save the file
and check it back into SharePoint. Each new form record will be created as a new
worksheet within that workbook. As more team members repeat the process, more
data from each team member will be aggregated into the master workbook.
Since the Capturx digital watermark is stored on the master workbook on the server, team
members do not have to upload data into the PC from which the form was originally printed.
They can use their Capturx pen with any PC that has Capturx Forms for Excel installed and
has the ability to open and write to the original file.
60